Chapter 21. Test Readability
To design is to communicate clearly by whatever means you can control or master.
—Milton Glaser
Introduction
Teams that adopt TDD usually see an early boost in productivity because the tests let them add features with confidence and catch errors immediately. For some teams, the pace then slows down as the tests themselves become a maintenance burden. For TDD to be sustainable, the tests must do more than verify the behavior of the code; they must also express that behavior clearly—they must be readable. This matters for the same reason that code readability matters: every time the developers have to stop and puzzle through a test to figure out what it means, they have less time left to spend on creating new features, and the team velocity drops.
We take as much care about writing our test code as about production code, but with differences in style since the two types of code serve different purposes. Test code should describe what the production code does. That means that it tends to be concrete about the values it uses as examples of what results to expect, but abstract about how the code works. Production code, on the other hand, tends to be abstract about the values it operates on but concrete about how it gets the job done. Similarly, when writing production code, we have to consider how we will compose our objects to make up a working system, and manage their dependencies carefully. Test code, on the other hand, is at the end of the dependency chain, so it’s more important for it to express the intention of its target code than to plug into a web of other objects. We want our test code to read like a declarative description of what is being tested.
In this chapter, we’ll describe some practices that we’ve found helpful to keep our tests readable and expressive.
Test Names Describe Features
The name of the test should be the first clue for a developer to understand what is being tested and how the target object is supposed to behave.
Not every team we’ve worked with follows this principle. Some naive developers use names that don’t mean anything at all:
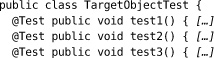
We don’t see many of these nowadays; the world has moved on. A common approach is to name a test after the method it’s exercising:
perhaps with multiple tests for different paths through the same method.
At best, such names duplicate the information a developer could get just by looking at the target class; they break the “Don’t Repeat Yourself” principle [Hunt99]. We don’t need to know that TargetObject has a choose() method—we need to know what the object does in different situations, what the method is for.
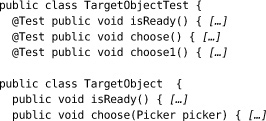
A better alternative is to name tests in terms of the features that the target object provides. We use a TestDox convention (invented by Chris Stevenson) where each test name reads like a sentence, with the target class as the implicit subject. For example,
• A List holds items in the order they were added.
• A List can hold multiple references to the same item.
• A List throws an exception when removing an item it doesn’t hold.
We can translate these directly to method names:

These names can be as long as we like because they’re only called through reflection—we never have to type them in to call them.
The point of the convention is to encourage the developer to think in terms of what the target object does, not what it is. It’s also very compatible with our incremental approach of adding a feature at a time to an existing codebase. It gives us a consistent style of naming all the way from user stories, through tasks and acceptance tests, to unit tests—as you saw in Part III.
As a matter of style, the test name should say something about the expected result, the action on the object, and the motivation for the scenario. For example, if we were testing a ConnectionMonitor class, then
pollsTheServersMonitoringPort()
doesn’t tell us enough: why does it poll, what happens when it gets a result? On the other hand,
notifiesListenersThatServerIsUnavailableWhenCannotConnectToItsMonitoringPort()
explains both the scenario and the expected behavior. We’ll show later how this style of naming maps onto our standard test structures.
Test Name First or Last?
![]()
We’ve noticed that some developers start with a placeholder name, fill out the body of the test, and then decide what to call it. Others (such as Steve) like to decide the test name first, to clarify their intentions, before writing any test code. Both approaches work as long as the developer follows through and makes sure that the test is, in the end, consistent and expressive.
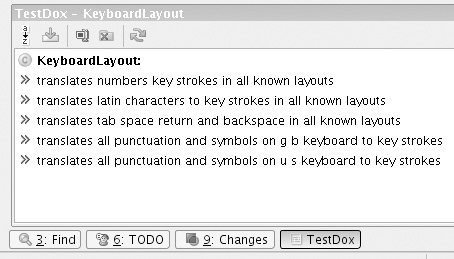
The TestDox format fulfills the early promise of TDD—that the tests should act as documentation for the code. There are tools and IDE plug-ins that unpack the “camel case” method names and link them to the class under test, such as the TestDox plug-in for the IntelliJ IDE; Figure 21.1 shows the automatic documentation for a KeyboardLayout class.
Figure 21.1 The TestDox IntelliJ plug-in
Regularly Read Documentation Generated from Tests
![]()
We find that such generated documentation gives us a fresh perspective on the test names, highlighting the problems we’re too close to the code to see. For example, when generating the screenshot for Figure 21.1, Nat noticed that the name of the first test is unclear—it should be “translates numbers to key strokes in all known layouts.”
We make an effort to at least skim-read the documentation regularly during development.
Canonical Test Structure
We find that if we write our tests in a standard form, they’re easier to understand. We can skim-read to find expectations and assertions quickly and see how they relate to the code under test. If we’re finding it difficult to write a test in a standard form, that’s often a hint that the code is too complicated or that we haven’t quite clarified our ideas.
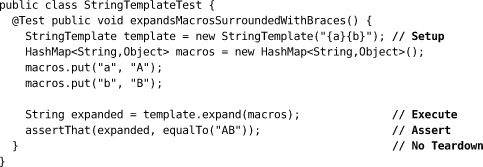
The most common form for a test is:
1. Setup: prepare the context of the test, the environment in which the target code will run;
2. Execute: call the target code, triggering the tested behavior;
3. Verify: check for a visible effect that we expect from the behavior; and,
4. Teardown: clean up any leftover state that might corrupt other tests.
There are other versions of this form, such as “Arrange, Act, Assert,” which collapse some of the stages.
For example:
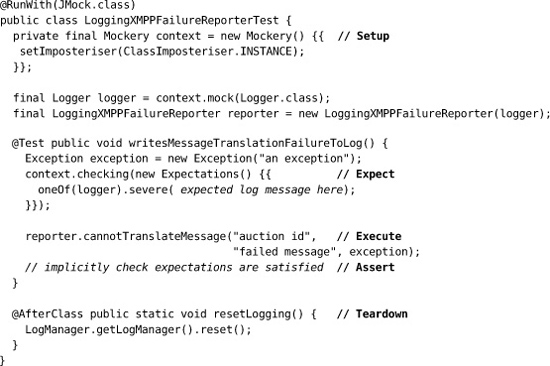
Tests that set expectations on mock objects use a variant of this structure where some of the assertions are declared before the execute stage and are implicitly checked afterwards—for example, in LoggingXMPPFailureReporterTest from Chapter 19:
Write Tests Backwards
![]()
Although we stick to a canonical format for test code, we don’t necessarily write tests from top to bottom. What we often do is: write the test name, which helps us decide what we want to achieve; write the call to the target code, which is the entry point for the feature; write the expectations and assertions, so we know what effects the feature should have; and, write the setup and teardown to define the context for the test. Of course, there may be some blurring of these steps to help the compiler, but this sequence reflects how we tend to think through a new unit test. Then we run it and watch it fail.
Streamline the Test Code
All code should emphasize “what” it does over “how,” including test code; the more implementation detail is included in a test method, the harder it is for the reader to understand what’s important. We try to move everything out of the test method that doesn’t contribute to the description, in domain terms, of the feature being exercised. Sometimes that involves restructuring the code, sometimes just ignoring the syntax noise.
Use Structure to Explain
As you’ll have seen throughout Part III, we make a point of following “Small Methods to Express Intent” (page 226), even to the extent of writing a tiny method like translatorFor() just to reduce the Java syntax noise. This fits nicely into the Hamcrest approach, where the assertThat() and jMock expectation syntaxes are designed to allow developers to compose small features into a (more or less) readable description of an assertion. For example,
assertThat(instruments, hasItem(instrumentWithPrice(greaterThan(81))));
checks whether the collection instruments has at least one Instrument with a strikePrice property greater than 81. The assertion line expresses our intent, the helper method creates a matcher that checks the value:
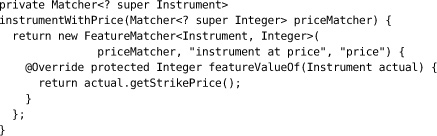
This may create more program text in the end, but we’re prioritizing expressiveness over minimizing the source lines.
Use Structure to Share
We also extract common features into methods that can be shared between tests for setting up values, tearing down state, making assertions, and occasionally triggering the event. For example, in Chapter 19, we exploited jMock’s facility for setting multiple expectation blocks to write a expectSniperToFailWhenItIs() method that wraps up repeated behavior behind a descriptive name.
The only caution with factoring out test structure is that, as we said in the introduction to this chapter, we have to be careful not to make a test so abstract that we cannot see what it does any more. Our highest concern is making the test describe what the target code does, so we refactor enough to be able to see its flow, but we don’t always refactor as hard as we would for production code.
Accentuate the Positive
We only catch exceptions in a test if we want to assert something about them. We sometimes see tests like this:
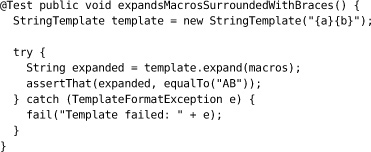
If this test is intended to pass, then converting the exception actually drops information from the stack trace. The simplest thing to do is to let the exception propagate for the test runtime to catch. We can add arbitrary exceptions to the test method signature because it’s only called by reflection. This removes at least half the lines of the test, and we can compact it further to be:

which tells us just what is supposed to happen and ignores everything else.
Delegate to Subordinate Objects
Sometimes helper methods aren’t enough and we need helper objects to support the tests. We saw this in the test rig we built in Chapter 11. We developed the ApplicationRunner, AuctionSniperDriver, and FakeAuctionServer classes so we could write tests in terms of auctions and Snipers, not in terms of Swing and messaging.
A more common technique is to write test data builders to build up complex data structures with just the appropriate values for a test; see Chapter 22 for more detail. Again, the point is to include in the test just the values that are relevant, so that the reader can understand the intent; everything else can be defaulted.
There are two approaches to writing subordinate objects. In Chapter 11 we started by writing the test we wanted to see and then filling in the supporting objects: start from a statement of the problem and see where it goes. The alternative is to write the code directly in the tests, and then refactor out any clusters of behavior. This is the origin of the WindowLicker framework, which started out as helper code in JUnit tests for interacting with the Swing event dispatcher and eventually grew into a separate project.
Assertions and Expectations
The assertions and expectations of a test should communicate precisely what matters in the behavior of the target code. We regularly see code where tests assert too much detail, which makes them difficult to read and brittle when things change; we discuss what this might mean in “Too Many Expectations” (page 242).
For the expectations and assertions we write, we try to keep them as narrowly defined as possible. For example, in the “instrument with price” assertion above, we check only the strike price and ignore the rest of the values as irrelevant in that test. In other cases, we’re not interested in all of the arguments to a method, so we ignore them in the expectation. In Chapter 19, we define an expectation that says that we care about the Sniper identifier and message, but that any RuntimeException object will do for the third argument:
![]()
If you learned about pre- and postconditions in college, this is when that training will come in useful.
Finally, a word of caution on assertFalse(). The combination of the failure message and negation makes it easy to read this as meaning that the two dates should not be different:
assertFalse("end date", first.endDate().equals(second.endDate()));
We could use assertTrue() and add a “!” to the result but, again, the single character is easy to miss. That’s why we prefer to use matchers to make the code more explicit:
assertThat("end date", first.endDate(), not(equalTo(second.endDate())));
which also has the advantage of showing the actual date received in the failure report:
![]()
Literals and Variables
One last point. As we wrote in the introduction to this chapter, test code tends to be more concrete than production code, which means it has more literal values. Literal values without explanation can be difficult to understand because the programmer has to interpret whether a particular value is significant (e.g. just outside the allowed range) or just an arbitrary placeholder to trace behavior (e.g. should be doubled and passed on to a peer). A literal value does not describe its role, although there are some techniques for doing so that we will show in Chapter 23
One solution is to allocate literal values to variables and constants with names that describe their function. For example, in Chapter 12 we declared
public static final Chat UNUSED_CHAT = null;
to show that we were using null to represent an argument that was unused in the target code. We weren’t expecting the code to receive null in production, but it turns out that we don’t care and it makes testing easier. Similarly, a team might develop conventions for naming common values, such as:
public final static INVALID_ID = 666;
We name variables to show the roles these values or objects play in the test and their relationships to the target object.