
Automated Security Review and Attack Tools
Introduction
Collecting and tying together your own set of security scanning tools can be time consuming. Even if you do spend the time, they might not work together as well as you’d like or offer all of the features you need. Integrated tools are available—some commercial, some free—that can provide the features you need.
The automated tools fall into two categories. The first category will attempt to identify vulnerabilities on a system based on a list of known vulnerabilities, sometimes called checks or signatures, without actually exploiting them. This category has been around the longest, and many of the security software vendors offer such a product. They are usually called a vulnerability assessment tool or a remote vulnerability scanner. The second category is tools that will attempt to exploit security holes, and in some cases, use the newly compromised victim to further penetrate into a network. This category is newer, and in fact, tools have only been announced and are not yet available to the public. The first category is primarily intended for security administrators to evaluate their network for vulnerabilities. The second category is intended for use primarily by penetration testers.
These automated tools can be a great help, especially when many hosts must be evaluated for weaknesses. Of course, the tools are not all-powerful, and will ultimately require a knowledgeable human to interpret the results. Like any set of signatures, these tools can report both false positives and false negatives. If you are attempting to perform a penetration test, the false negatives can be especially troublesome. A knowledgeable penetration tester operating and interpreting one of these automated tools may accomplish a great deal.
In this chapter, we examine some of the tools that are available, both commercial and free. We also discuss where the tools are headed in the near future.
Learning about Automated Tools
Automated scanning tools vary in how they function. Some tools have the ability to scan hosts externally without credentials, whereas others must scan hosts from inside the corporate network with the necessary credentials (usually administrator or root). Additionally, some tools are quite intrusive, as they attempt to exploit the actual vulnerabilities it scans for; others are unobtrusive and attempt to identify vulnerable hosts by checking for various signs of patches being installed (for example, specific files installed by a vendor patch). The jury is still out on which tools perform the best—see the sidebar “Automated Tools: Product Reviews” for a list of various product reviews.
Automated Tools: Product Reviews
The following links are various reviews on a lot of the automated tools available today. Many of these reviews share the opinion that the unobtrusive tools do not test the effectiveness of a patch but only its existence. This certainly has been true in some cases where a vendor patch has not properly addressed an issue and testing for the mere existence of the patch would still leave the system vulnerable. You can find product reviews at the following Web sites:
![]() A comparative review of most of the commonly used scanners www.nwc.com/1201/1201f1b1.html
A comparative review of most of the commonly used scanners www.nwc.com/1201/1201f1b1.html
![]() A comprehensive review of multiple scanners www.westcoast.com/securecomputing/2001_07/testc/prod2.html
A comprehensive review of multiple scanners www.westcoast.com/securecomputing/2001_07/testc/prod2.html
![]() A comparative review of some of the more popular commercial scanners www.infosecuritymag.com/articles/january01/features1.shtml
A comparative review of some of the more popular commercial scanners www.infosecuritymag.com/articles/january01/features1.shtml
![]() A “Best Buy” review from Info Security www.westcoast.com/asiapacific/articles/2000_07/testc/testc.html
A “Best Buy” review from Info Security www.westcoast.com/asiapacific/articles/2000_07/testc/testc.html
![]() Network Associates (NAI) CyberCop Scanner 5.5 www.secadministrator.com/Articles/Index.cfm?ArticleID=9203
Network Associates (NAI) CyberCop Scanner 5.5 www.secadministrator.com/Articles/Index.cfm?ArticleID=9203
![]() Axent (now Symantec) NetRecon 3.0 www.secadministrator.com/Articles/Index.cfm?ArticleID=9204
Axent (now Symantec) NetRecon 3.0 www.secadministrator.com/Articles/Index.cfm?ArticleID=9204
![]() ISS Internet Scanner 6.1 www.secadministrator.com/Articles/Index.cfm?ArticleID=9205
ISS Internet Scanner 6.1 www.secadministrator.com/Articles/Index.cfm?ArticleID=9205
![]() BindView HackerShield (now BV-Control for Internet Security) www.secadministrator.com/Articles/Index.cfm?ArticleID=9206
BindView HackerShield (now BV-Control for Internet Security) www.secadministrator.com/Articles/Index.cfm?ArticleID=9206
![]() Webtrends (now NetIQ) Scanner 3.0 www.secadministrator.com/Articles/Index.cfm?ArticleID=9207
Webtrends (now NetIQ) Scanner 3.0 www.secadministrator.com/Articles/Index.cfm?ArticleID=9207
Scanning tools use a number of checks or scan signatures to test each host. Most scanners, both commercial and freeware, support a scripting language that is easy to use and understand. Even someone with minor programming skills can understand how a check works and exactly what it is looking for. The following is an example of how one of the freeware scanners, Nessus, scans for hosts that are vulnerable to the Internet Information Server (IIS) Directory Traversal Vulnerability (CVE ID 2000-0884).
The full Nessus plug-in is available at http://cvs.nessus.org/cgi-bin/cvsweb.cgi/nessus-plugins/scripts/iis_dir_traversal.nasl.
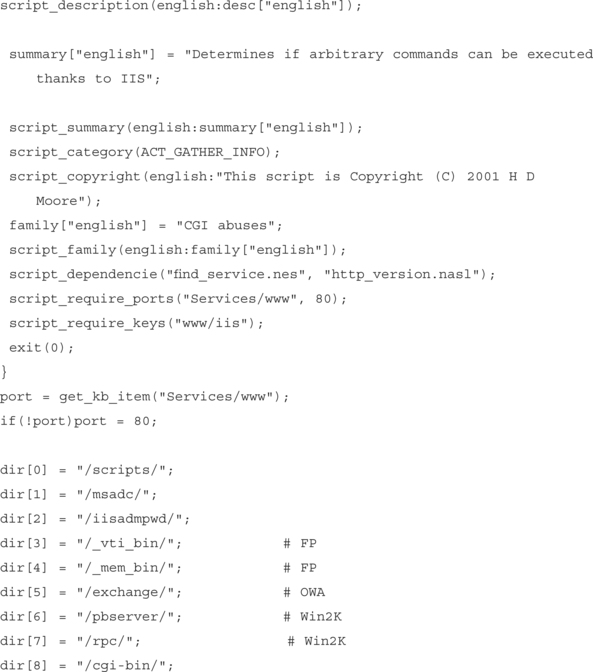


As you can see, the check written by HD Moore for Nessus will actively attempt to exploit the vulnerability and report back if the host is found to be vulnerable. Conversely, an automated product can also check for the same vulnerability by doing a simple check for the following Registry key:
HKLM, SOFTWAREMicrosoftWindows NTCurrentVersionHotfix\%HOTFIX_NUMBER%
While this method is definitely simpler and probably easier to code, it has a few drawbacks. First, the scanning software would require administrative access to the system in order to check the Registry key and, second, this will only confirm that in this case the Hotfix was installed and not confirm if it was installed properly or if the system is actually not vulnerable. Often, installing a feature on Windows NT will cause it to read files from the original installation CD, essentially reverting to an insecure state. The key will still exist, but the box will be unpatched at that point.
The traditional tools available today will stop at this point and simply report back to the operator the results of a scan. Some of the newer tools, currently under development, will take things one step further. Using the same vulnerability example, IIS Directory Traversal (CVE ID 2000-0884), we explain how some of the current “under development” penetration testing tools could approach this specific vulnerability.
First, the tools would use a script very much like the Nessus plug-in to identify if the system is vulnerable. Once vulnerability is confirmed, the tools will then use the vulnerability to obtain further information on both the host being scanned and the network it is attached to. The information obtained could be used in conjunction with other vulnerabilities or even with simple commands to further penetrate the system and the network it is attached to.
Many consulting organizations that perform penetration testing already have tools that perform these tasks, but currently none are available as either a commercial product or a freeware one.
Exploring the Commercial Tools
Multiple commercial tools are available on the market today. Purchasing one of these tools can be a daunting and confusing task. As with most products, each vendor’s marketing team will tell you that their product is the best and that they have the most checks. The problem when purchasing such a tool is that not all the vendors count their checks in the same way. Mitre, a U.S. federally funded research and development organization (www.mitre.org) has partially addressed this problem by creating the Common Vulnerabilities and Exposures (CVE) dictionary, which is a standardized naming convention for vulnerabilities and information security exposures. The goal of CVE was to make it easier for both security vendors and the end users to map vulnerability information across the multiple tools. Currently, a number of commercial and freeware products have mapped or are in the process of mapping their databases to CVE numbers. That being said, it is important when evaluating these tools for your own use that you take the marketing numbers with a grain of salt and actually install and run each product before deciding on a purchase. See Table 17.1 for a table of products and their vulnerability count.
Table 17.1
Vulnerability Scanners by Number
| Product | Vulnerability Count |
| ISS Internet Scanner | 976 |
| NAI CyberCop Scanner | 830 |
| BV Control for Internet Security | 900 |
| Harris STAT Scanner | 1,200 |
| Symantec NetRecon | 600 |
| eEye Retina | 820 |
As you can see, when based purely on the numbers, each scanner appears to be dramatically different. An ideal solution to this confusion would be if each vendor mapped and counted their checks based on what CVE entry it scans for. This is no small task, and in the case of most vendors, would require not only rethinking how they count checks, but also how various checks are written. As vendors find new ways to show that their product is superior, the checks game will cease to exist and true comparative issues like false positive rate, scan engine performance, usability, and reporting features will become the key indicators as to which product is superior.
Here’s a quick review some of the criteria that you should consider when purchasing a commercial scanning product:
You need to understand that most commercially vulnerability scanners are not created equal, and each has its own strengths and weaknesses. It is common to find security administrators using more than one commercial tool, because no one product is a complete fit for every network. When deciding on a vulnerability scanner, you need to take the time to thoroughly evaluate each product for your specific needs and environment. Almost all product vendors will offer you a free demonstration copy of their software—take them up on this offer. The worst-case scenario is that you will find yourself being phoned by their sales people to assist you in making a decision. If the salesperson cannot answer your questions sufficiently, ask to speak to one of the product engineers. My experience with vendors has usually been good as they are happy to help and answer any of your questions, but be wary of the marketingspeak. Make your own decision as to what product will fit your needs.
False positive rates are probably the most annoying issue you will have with vulnerability scanners. A false positive is when the scanner reports that an issue exists when it really does not. A high rate of these will cause you to stop trusting the scanner and start verifying, usually manually, each find. Obviously, this isn’t productive and would make you wonder why you purchased an expensive scanner in the first place. False negatives—when the scanner does not detect an issue that does in fact exist—are even more disturbing. Luckily, these are less common and easier for a vendor to fix, but have been known to exist. This alone is probably the best reason to use more than one scanner, and of course, constant monitoring of your systems.
If you are responsible for a large network, scanner performance is probably important to you. A lot of factors affect the performance of the product. Two of the more obvious factors are the scanner engine itself and how the vendor has decided to check for the existence of a vulnerability. Today, most products are multithreaded applications that allow for a bit of user tuning. The bottom line when comparing scanner performance is that when you are scanning multiple machines, you can only do so much to tune performance. Some vendors have addressed this problem by offering distributed scanning solutions that use multiple scan engines on multiple machines to scan the network then report back to a central reporting console. In theory, this sounds like an acceptable solution, but it opens the floor to other issues, such as network bandwidth, and, of course, the potential security issues if the traffic isn’t handled securely.
Reporting is a feature that is slowly becoming standardized among all the scanning products on the market. Whether the product uses its own custom reporting solution or has Crystal Report functionality built in, most of them allow the user to customize the report output.
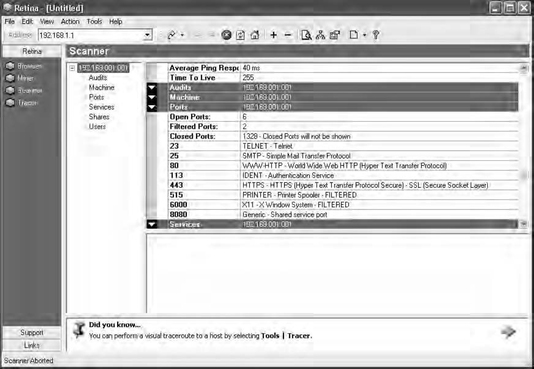
Figure 17.1 shows the interface for one common commercial scanner, ISS Internet Scanner, and Figure 17.2 shows the interface for another, Retina by eEye. As you can see, the interfaces do have their subtle differences, but both are intuitive and easy to use. You will not find a large difference between the usability of each of the established commercial products, but as you will see later in this chapter, you do have to be aware of and understand their limitations.

We don’t write a lot about each commercial product—the links in the “Automated Tools: Product Reviews” sidebar all lead to specific product reviews—but we do list of some of the common ones and give a short blurb about each product based on our own experiences with them.
CyberCop Scanner
CyberCop Scanner has been around for quite some time. It started out as Ballista Scanner by Secure Networks, which was purchased a number of years ago by Network Associates. NAI improved upon the scanner and its features enough to make it a popular choice. One of the largest drawbacks with the product is its high false positive rate and various performance issues. It is a nice tool to have if you have the knowledge and time to weed through the massive amounts of reporting to find the real issues that need addressing.
Internet Security Systems (ISS) Internet Scanner
Internet Scanner is considered to be the market leader in scanning products. ISS was one of the first organizations to market a vulnerability scanner. As you will learn as you evaluate different commercial products for yourself, accuracy (or rather the lack of accuracy) seems to plague all commercial tools, including Internet Scanner. Given that ISS was one of the first to market, they have had the most time to improve upon their product. Like CyberCop, a common complaint of ISS users is the need to comb through large reports and pull out useless information while keeping the good information.
BindView’s BV-Control for Internet Security
The next commercial scanner on the list is BV-Control for Internet Security, formerly named HackerShield. I have a hard time seeing fault in this product, but I am a biased former employee of BindView’s RAZOR Security Research Team. That being said, this product’s largest fault is its reporting. On the screen, the reports look wonderful but once dumped to the printer, all kinds of formatting errors make the hard copies look almost unreadable. Currently, BindView probably puts the most research into vulnerabilities, so the accuracy of the scanner might be a little better.
eEye Retina
eEye Retina is one of the newer scanning products on the market. Boasting features like its Common Hacking Attack Methods to find and identify new, previously unreported vulnerabilities, Retina is a solid product that does have room for improvement in areas such as performance and reporting. Overall, I like this product and the potential that the team at eEye brings it.
Exploring the Free Tools
Everybody likes getting something for free. The general rule however, has always been “you get what you pay for.” I would argue that in the case of vulnerability scanners, the general rule is actually the exception. One caveat though, you need to understand the limitations and expectation of freeware and open source software.
These are not packages that have large development teams who get paid for their work; they are packages that are developed by intelligent people in their spare time. Support is typically sparse, and operating most of these tools is not as easy as clicking on an icon. That being said, the freeware and open-source tools have their place and most of them do the job as advertised.
This section takes a look at some of the popular tools (Nessus, SAINT, SARA, ShadowScan, Nmap, whisker, and VLAD), what they do, and how effective they are. Of course, your experience with each tool may differ from ours, but we try to present all of the issues—good and bad.
Nessus
The first tool is Nessus. Nessus is the most popular and probably the most effective free tool. Nessus is a vulnerability scanner much like the commercial tools discussed in the preceding section. In fact, for a free scanning tool, it is just as good as or in same cases even better than most of the commercial products.
Nessus consists of both a client piece and a server. The server portion of Nessus runs on a UNIX environment; client pieces are available for both the various UNIX and Win32 environments. Figure 17.3 depicts the client portion of Nessus performing a scan. Nessus may be one of those free tools that are supported by an ad hoc group of people, but it offers accuracy in its checks that rival, if not exceed, those of the commercial products. Typically, you will find it best to use more than one scanning tool to obtain the most accurate and thorough results, and no matter what commercial tool you choose, your second scanner should be Nessus. You can find Nessus at www.nessus.org.
Security Administrators Integrated Network Tool (SAINT)
SAINT is an updated version of one of the first vulnerability scanners, Security Administrator Tool for Analyzing Networks (SATAN). SATAN was released back in 1995 and checked for only ten security related problems. SAINT Corporation (formerly World Wide Digital Security, Inc.) updated and improved upon SATAN, renamed their version to SAINT, and released it for free to the general public along with a number of supporting commercial applications. SAINT, like Nesuss and most of the commercial products, offers the capability to customize or create your own security checks. Reporting, however, is not included with the freeware SAINT, but it is sold as an add-on. I do have to admit that I have only taken a couple brief looks at this tool as it seems to not offer any significant advantages over the tools I normally use. You can find SAINT at www.saintcorporation.com.
Security Administrators Research Assistant (SARA)
Another freeware tool based on the original SATAN is SARA, which is very similar to SAINT except that it does include a reporting engine that generates HTML and other formatted reports. One of the weaknesses that both SAINT and SARA share is that they do not offer a granular approach to identifying vulnerabilities. Both of these products take a more generic information-gathering approach, leaving most of the vulnerability analysis work to be done by the operator. A potential benefit of SARA, however, is its ability to interface with other security tools, enabling the user to use SARA to tie together each tool in his toolkit. You can find SARA at www-arc.com/sara/index.shtml.
ShadowScan
ShadowScan is a vulnerability detection and exploitation tool that has a GUI that looks suspiciously close to Internet Security Systems Internet Scanner. According to its Web site (www.rsh.kiev.ua/newse.htm), the ShadowScan checks database contains 1,130 different checks, more than most of the commercial products. As much as I hate stereotypes, the design of the Web page makes me think that this tool is directed to more of the script kiddie population than it is the security professional. I have ShadowScan listed under the free tool sections although the latest version of the tool is now only a 15-day trial and has a $100 ($4,999 if you want source code) price tag associated with it. In my test lab, the tool definitely performed as advertised, but the theme of the Web site combined with the lack of source code makes me a bit nervous about the product and its true intentions. One day I will spend the lab time required to comfortably check out this program for any nefarious intentions, but without the source code to audit, it would be difficult to be 100 percent sure. The security business, especially the security scanning product business is about trust. Call me paranoid, but using my credit card to send funds to an organization that has no verifiable contact information and just happens to be in the former Soviet Union is not on my list of safe investments.
Nmap and NmapNT
Nmap and NmapNT are not considered to be full-featured vulnerability scanners but are useful freeware tools that every security professional must have in her toolkit. Nmap (www.insecure.org) runs on various *NIX systems and was created by Fyodor. Not only is it your basic port scanner, but it also incorporates other useful options, such as the capability to perform multiple types of port scans and to use decoys to attempt to hide your scanning activity. Nmap has the capability to identify, most of the time, remote operating systems and scan hosts that don’t respond to ICMP PING requests. NmapNT (www.eeye.com/html/Research/Tools/nmapnt.html) is the version of Nmap that eEye ported over to run on the Windows NT and Windows 2000 platform. If all you need is a sweep of your network identifying systems and what services are bound to ports, Nmap is the tool for you.
Whisker
Whisker, created by Rain Forest Puppy (RFP), is a simple Common Gateway Interface (CGI) vulnerability scanner written in Perl. Since its first revision, whisker has split into two separate projects, whisker, which is the scanner that we all know and love and libwhisker, a Perl module that is used by whisker. Whisker is not a traditional CGI scanner; traditional CGI scanners do not have a heck of a lot of intelligence built into them. They simply point themselves at a host and fill that host’s log files with a number of known CGI issues, regardless of the existence of the /cgi-bin/ directory and regardless of the Web server running. The problem with this is that it does not make sense to blindly scan a machine, not only do you waste a lot of time and bandwidth, but you will also, more times than not, end up missing a number of issues. Whisker attempts to solve this problem by first having some intelligence built in, like a way to determine the operating system and revision of remote Web server being scanned, and the capability to modify or script other options into your scans. Whisker also offers the capability to attempt to use some of the classic intrusion detection systems (IDSs) evasion techniques. Granted, whisker is only a CGI scanner and will not check for other vulnerabilities, such as weak versions of Sendmail and BIND, but it does excel at what it is meant to do and is a welcome addition to any toolkit. You can find whisker at www.wiretrip.net/rfp/p/doc.asp/i5/d21.htm.
VLAD the Scanner
VLAD the Scanner is another freeware tool of some use that, like whisker, is written mostly in Perl. Created by BindView’s RAZOR team to scan for the SANS top ten security vulnerabilities, VLAD is a small but very efficient scanning tool. Of course, VLAD does not check for everything that BindView’s commercial product (BV-Control for Internet Security) does, but it does give you the capability to quickly scan for the issues listed on the SANS top ten list. VLAD is a tad dated as SANS has updated their list to be a top twenty, but the weak password and CGI checks in VLAD are still very useful. You can find VLAD at http://razor.bindview.com/tools/vlad/index.shtml.
Other Resources
A large number of other freeware tools are probably out there, but this section has listed the most popular ones. A couple resources for finding and downloading some of these tools is PacketStorm Security (www.packetstormsecurity.org) and Technotronic (www.technotronic.com). When downloading freeware tools, you need to be careful that you fully understand what the tools do, and if possible, obtain source code for your own auditing to ensure that it is doing what it advertises to do.
Using Automated Tools for Penetration Testing
Despite some of their drawbacks, automated tools are a welcome addition when performing penetration testing. Most organizations that do penetration testing rely on automated tools, whether they are commercially purchased, freeware, or developed in-house. Imagine a scenario where you have been asked to perform a penetration test on five systems remotely. You have two choices: You can do every test manually, or you can rely on some of the automated tools to help you out. Imagine how inefficient it would be to manually use Telnet to check all five systems for open ports. Obviously, you would have to be a bit warped to think that performing the simple—but very long—task of the initial portscan done in most penetration tests is worth doing manually. The following sections will outline how both commercial tools and free tools can help with the penetration testing process.
Testing with the Commercial Tools
Let’s look at the original scenario where you have to perform a penetration test on five systems with the IP addresses 192.168.0.1 through 192.168.0.5. This is all of the information you have been provided, no operating system information and no listening services information. How can a commercial automated tool help you make this process as efficient as possible? First, you need to purchases a license for the selected tool. Whether you choose ISS Internet Scanner, Network Associates CyberCop, or eEye Retina, the process from here is very similar.
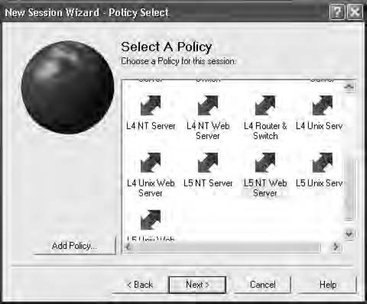
Simply launch the tool, give it the necessary information, then enter in the IP address range you wish to scan. Some commercial tools give you the ability to preselect the type of scan you wish to perform, as shown in Figure 17.4, which is the scan policy selection screen from ISS Internet Scanner.
From this point, you need to simply wait until the scan completes then analyze the results and create a report. The next steps from here vary. Unfortunately, a large population of consultants and consulting organizations think that the next logical step from here is to hand over the report and attach an invoice.
What should be done, instead of simply handing over the report, is that you should analyze the report results and, where necessary, manually verify the results. The commercial tool is great to determine a baseline in which you should now base some real work. For example, say that the commercial tool claimed to find all five hosts vulnerable to the Windows NT Internet Information Server showcode.asp vulnerability. A wise move would be to manually test each system to verify that they are truly vulnerable. First, you need to first verify that each system is actually a Windows NT system running Internet Information Server. You can accomplish this in a couple of different ways (probably more); the first is by using the Telnet command as follows:
telnet www.example.com 80
Date: Mon, 04 Feb 2002 21:41:17 GMT
As you can see, the information returned identified the system as a Microsoft IIS 4.0. Another way that you can identify the operating system running on the host is to simply go to Netcraft at http://uptime.netcraft.com/up/graph/ and enter the IP address or URL of the site in question. Figure 17.5 shows the output from Netcraft. As you can see, Netcraft identifies the remote operating system and provides potentially valuable uptime information.

Pretend that you decided to use the Telnet method on all five hosts. On the last host tested, you receive the following information:
telnet www.example.com 80
Date: Mon, 04 Feb 2002 21:48:31 GMT
Server: Apache/1.3.19 (Unix) mod_ssl/2.8.4 OpenSSL/0.9.6b
Last-Modified: Tue, 29 Jan 2002 15:13:47 GMT
The final system seems to be Apache running on a UNIX variant. Now you know that the IIS vulnerability is incorrect on the fifth host, and you do not need to test it further, and that this host might perhaps be vulnerable to an Apache or UNIX vulnerability and should be further investigated later. This is also a large clue that perhaps the other four systems, although they certainly seem to be running Windows NT with Microsoft IIS 5.0 Server, should be further tested to ensure that the vulnerability actually exists.
To accomplish this test, you need to have knowledge of the vulnerability. Unfortunately, the commercial tools do not help much here—some of them will give pointers on the Internet where you can go and read about the vulnerabilities. Fortunately, the Internet has multiple resources that catalog vulnerability information, complete with how to “test” for such a vulnerability. One such resource is www.securityfocus.com. By doing a search at securityfocus.com for “showcode.asp”, you can find the URL www.securityfocus.com/bid/167, which provides you with all the information you need. Using your Web browser, you can types in the following URL: www.example.com/msadc/Samples/SELECTOR/showcode.asp?source=/msadc/Samples/../../../../../boot.ini
In the browser window, you should now see the contents of the BOOT.INI file located in the root of all Windows NT installations. If the file is not displayed, you should attempt the same exploit using other known, readable files. Once the vulnerability has been adequately tested, you can determine if the hosts are truly vulnerable by your ability to view readable files. Screenshots of these readable files also make great report additions to further drive the point home.
As you can see, using the commercial scanning tools help make testing hosts for vulnerability much more efficient. Imagine attempting to test these hosts without an automated tool; the current CVE database is at 1,604 entries (as of January 13, 2002), which makes trying to manually test for every applicable vulnerability a daunting task. With the assistance of an automated tool, you simply need to verify the results and retest any systems that return enough anomalies to cause you to not trust the scanner. These anomalies, and the prospect of having to completely manually test a host, are what cause many consultants to use more than one scanning product—typically they will use a commercial tool and a freeware tool.
Testing the Free Tools
Like the preceding scenario with commercial tools, you can also use free tools in the same manner. Free tools are probably more accurate because they require a little more user input and interaction. Let’s describe two separate scenarios with the same five hosts. The first scenario will describe a situation where you need to rely on multiple free tools and your own knowledge to test the systems. Before getting into the example, we want to make one thing clear: We know that there are multiple ways to do what we are describing, there are probably even more efficient ways than we are describing. We simply using some common examples to help illustrate a point.
First, you can uses Nmap to scan the five hosts and determine what ports are open by using the following syntax:
nmap –sS –v –v –0 –P0 –oN results.out 192.168.0.1-5
Using Nmap: It’s All in the Syntax
To get a list of all the parameters that you can use with Nmap, simply type nmap –h at the command prompt. Here is a quick description of the syntax:
![]() -sS TCP Syn scan or half scan. This will prevent most sites from logging your scan attempt because you are not completing the handshaking process and therefore not truly connecting to the host.
-sS TCP Syn scan or half scan. This will prevent most sites from logging your scan attempt because you are not completing the handshaking process and therefore not truly connecting to the host.
![]() -v Verbose mode. Using this syntax twice increases the information displayed on the screen.
-v Verbose mode. Using this syntax twice increases the information displayed on the screen.
![]() -O Remote host operating system detection. Nmap will attempt to identify the remote operating system.
-O Remote host operating system detection. Nmap will attempt to identify the remote operating system.
![]() -P0 Do not attempt to ping the host before scanning. This will allow you to use Nmap to scan hosts that are not responding to Internet Control Message Protocol (ICMP) ping requests.
-P0 Do not attempt to ping the host before scanning. This will allow you to use Nmap to scan hosts that are not responding to Internet Control Message Protocol (ICMP) ping requests.
![]() -oN results.out This causes Nmap to log the results of the scan to results.out. Of course, you can name the output file to anything you want because it is created in readable cleartext.
-oN results.out This causes Nmap to log the results of the scan to results.out. Of course, you can name the output file to anything you want because it is created in readable cleartext.
![]() 192.168.0.1-5 This tells Nmap to scan the Internet Protocol (IP) address range 192.168.0.1-5. Of course, you can simply scan one host or an entire network if required.
192.168.0.1-5 This tells Nmap to scan the Internet Protocol (IP) address range 192.168.0.1-5. Of course, you can simply scan one host or an entire network if required.
Nmap will then scan all five systems and return information that should look something like this:
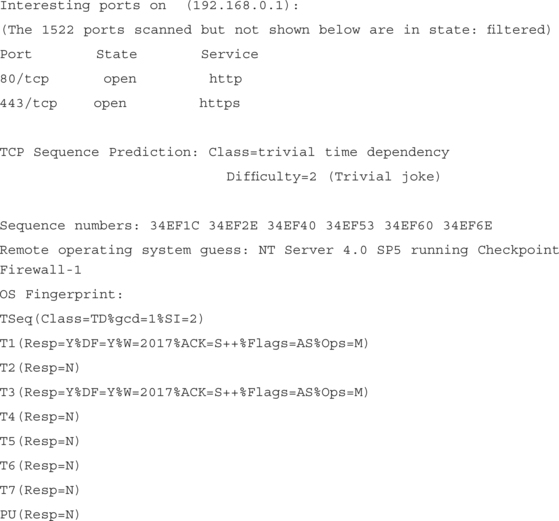
According to the output of this scan, the host at 192.168.0.1 is running NT Server 4.0 and has a Web server installed that is listening on ports 80 (http) and 443 (https). It would probably be a good idea to now confirm that the Web server running is IIS by either using Netcraft or Telnet as explained in “Testing with the Commercial Tools.” Once you confirm, you have a number of options at your disposal. The first being to manually go through and test each related IIS vulnerability, which, of course, might be a bit too time consuming. The second would be to use either Whisker or VLAD, to quickly check for some of the more common IIS vulnerabilities, and as you learned from using the commercial tool on this host, the showcode.asp vulnerability.
Obviously, the Nmap method shown, while probably more precise, does leave room for error and room for missing vulnerabilities. Typically, you would use this method to go after the “low-hanging fruit,” or common vulnerabilities. Also, instead of using VLAD or Whisker to test the Web server, it would be a simple task to create a Perl script that quickly scans a Web server for most of the common IIS vulnerabilities, such as double decode, unicode, and any of the sample pages exploits, such as showcode.asp.
A second option to test these five systems is to use one of the freeware security scanners, such as SAINT, SARA, or Nessus. In my opinion, SAINT and SARA do not provide an in-depth enough scan to be effective in this case, so by default, use Nessus, which is probably the best freeware scanner available.
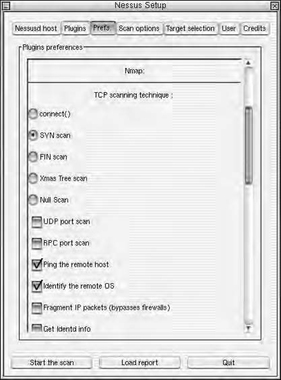
Nessus works in a manner very similar to the commercial scanning products. Once connected to the Nessus server, you can log in and select what options you want to scan for, as shown in Figure 17.6. Additionally, you can also set what type of portscan you would like Nessus to perform, as shown in Figure 17.7. As you can see in both of these screen shots Nessus removes the need to first run Nmap then run a custom script as all of the options you need are built right in.

Like the commercial scanners, however, Nessus can be prone to the occasional false positive or incorrectly identified host. So, as with the commercial tools, performing some sort of sanity checking on the reports and verifying information as required would be wise.
Knowing When Tools Are Not Enough
Vulnerability scanning tools definitely changed the face of penetration testing and definitely have their place in the penetration testing process. But they are not a silver bullet solution that will solve all of your security problems. Indulge me if you will, I want to share an experience that happened to me back when I was an internal security person for a large outsourcing organization. One of our newer clients, which had a large distributed network consisting of multiple operating systems and platforms, decided to bring in a third-party consultant to perform a penetration test on the network. This was back in 1998, when the mystique of hacker culture was capturing a lot of attention and penetration testing was starting to become a popular request.
Our client selected a penetration testing company based in the San Francisco area and gave them the necessary information to test their external facing systems. After a few days had passed, the outside penetration tester sent, via courier, the final report to our client. Attached to the report of course, was also their invoice, which was in the range of $10,000. Unfortunately, as the outsourcer, I did not get to work with or see the initial report from this consultant, but I did get to see the report when the CIO of our client called me into his office to explain to him why this external penetration tester found over fifty different vulnerabilities on their Web servers. I was shocked, of course, I thought I had done my job, keeping the server admin people abreast of all the latest vulnerabilities and patches, even performing small penetration tests myself but never managing to find anything wrong. I asked to see the report, and as the CIO was handing it to me, I immediately noticed the logo of one of the commercial vulnerability scanner vendor. Upon further investigation, I noticed that the high-paid consultant simply pointed his commercial product (which was easily paid for with the fees he charged) at the systems, printed the reports and sent it out with the invoice. It was clear to me that this so called penetration tester did not do any validation of the report results. To make a long story short, in order to convince the client’s CIO that the results of this report were incorrect, we ended up flying the third-party penetration tester in to our offices to meet with us and our client. As we went through the report, it was clear that the consultant didn’t understand the content—let alone read it—before sending it out. It turned out that of the 400+ pages of the report provided to my client, only 10 pages were actually applicable.
I am sure that many of you have similar stories of the snake oil salesman coming in armed with a few commercial, or even in some cases, freeware tools and charging big bucks for little or no value-added service. You need to realize that although all of the tools in this chapter can assist with the penetration testing process, a bit of knowledge is still required to get the most out of them. When selecting an organization to provide penetration testing services, ask them what percentage they rely on commercial tools, freeware tools, and their own proprietary scripts. If you see a high reliance on commercial tools, you might want to consider looking elsewhere. If you are providing penetration testing services, you need to be sure that you have more than one tool in your bag of tricks, along with a number of other scripts and general vulnerability knowledge.
The New Face of Vulnerability Testing
During July 2001, at The Black Hat Briefings in Las Vegas, NV, Ivan Acre, and Máximiliano Cáceres of CORE-SDI, presented their work in the area of penetration testing and automated penetration testing. Their theory is that the current methodologies used to perform penetration testing are not as effective or optimal as they could be. Additionally, the typical automated scanning tool will scan a host, identify vulnerabilities, and not actually break into the host being scanned or attempt to look at any other hosts that might be connected in some way.
CORE-SDI has done a considerable amount of work in developing new tools to help automate the entire penetration testing process from the initial information gathering phase to the actual exploitation of the hosts. Some of the key benefits of this approach would be a tool that encompasses the entire penetration test under one common framework, to define and enforce a standardized methodology, to improve on the security of the penetration tests, and finally, to accurately speed up monotonous and time-consuming tasks.
I personally feel that CORE-SDI has the potential to revolutionize the penetration testing field and raise the bar on vulnerability scanning. Quite some time has passed since the presentation at Black Hat, but rumor has it that CORE is close to releasing beta versions of their tool. As someone who performs a lot of penetration tests every year, I look forward to seeing what CORE-SDI has to offer because it should not only improve on the quality of work presented by penetration testers but also increase the value of a penetration test to organizations while making it more cost effective.
Summary
By tying together both commercial and freeware vulnerability scanning applications, the process of performing a penetration test can be dramatically improved. The tools do have their limitations and by all means do not make the operator an expert, and you should be cautious of so-called penetration testers who rely only on automated tools.
Some of the key elements to successfully using automated tools to perform penetration testing are an understanding of what the automated tool does and what its limitations are, an in-depth knowledge of vulnerabilities and the conditions that make them exploitable, the ability to recognize when the automated tools have made a mistake, and the ability to confirm if a system is vulnerable.
During a typical penetration test, the client will make a number of requests, one of them might be to perform the tests as quietly as possible and even perhaps avoid their intrusion detection systems. Vulnerability scanners should not be used in such a case because they are typically extremely noisy on the network and leave a lot of fingerprints in the logfiles.
Testing for vulnerabilities, whether the test is automated or not, is not an exact science, and there are usually multiple ways to check for the same vulnerability. This combined with the fact that some vendors misrepresent various vulnerabilities in order to pad their “check count” makes purchasing a vulnerability scanner confusing, and unfortunately, the products are not cheap so you need to choose carefully. That being said, the future of automated vulnerability scanners and automated penetration testing tools looks bright because there is only room for more improvement and innovation.
Solutions Fast Track
Using Automated Tools for Penetration Testing
![]() Current automated tools do not actually penetrate the host being scanned but check only for the existence of a possible vulnerability.
Current automated tools do not actually penetrate the host being scanned but check only for the existence of a possible vulnerability.
![]() Beware of false positives and be scared of false negatives.
Beware of false positives and be scared of false negatives.
![]() Typically, a combination of more than one tool, either commercial or not, is recommended to get complete coverage.
Typically, a combination of more than one tool, either commercial or not, is recommended to get complete coverage.
Frequently Asked Questions
The following Frequently Asked Questions, answered by the authors of this book, are designed to both measure your understanding of the concepts presented in this chapter and to assist you with real-life implementation of these concepts. To have your questions about this chapter answered by the author, browse to www.syngress.com/solutions and click on the “Ask the Author” form.
Q: What is a good resource that lists all of the commercial and freeware security scanning tools?
A: A good, but a little out of date, site is Talisker’s Network Intrusion page at www.networkintrusion.co.uk. Additionally, Security Focus (www.securityfocus.com) also keeps a large list of the various tools.
Q: What is your favorite commercial vulnerability scanner?
A: It depends on the environment and the engagement I am on. I have used and still use most of the commercial products, but IIS Internet Scanner and eEye Retina are probably the two I use most.
Q: Aren’t commercial vulnerability scanners a crutch for security professionals that don’t actually have any skills or understanding of the real security issues?
A: Unfortunately, an influx of people and organizations think that all it takes to be a security consultant is an automated tool. Before hiring any security consultant, review the person’s credentials and question him thoroughly.
Q: What remote-access tools are available to leverage a compromised host for further access during a penetration test?
A: Currently, no publicly available tools will do this other than eEye Retina, which claims to use information found during its initial scans to compromise other hosts that have been specified in the IP range for scanning. The new tool that is being developed by CORE-SDI will also have the capability to do this and appears to be quite promising.