
As we now understand, proving a correct identity is authentication, and allowing a specific action by authenticated users is authorization. In this section, we will present a brief about OAuth—an industry-standard protocol for authorization – along with a few authorization schemes. When we mention the OAuth IETF OAuth Working Group (https://tools.ietf.org/wg/oauth/) in this section, it's OAuth 2.0, which focuses on client-developer simplicity (a RESTful principle) while providing specific authorization flows for various application use cases such as desktop applications, web applications, mobile phones, and even IoT-enabled living room devices.
Before we move on to OAuth 2.0 schemes, let's understand why you would choose OAuth-based authorization over traditional cookie-based authorization with the following list:
- Cookie-based authorization is mostly stateful, that is, the server has to keep a record of active user sessions. To manage active sessions, the server would need multiple database calls to maintain the state. Also, a few other server-side overheads make it difficult to decouple the authorization process from the application server (to be stateless).
- Cookie-based authentication and authorization involve domains, as applications may interact with multiple domains, and so the underlying server needs a few additional configurations, resulting in maintenance and security overheads.
- Integration of third-party clients such as Google+ and Facebook. Authorization for the application with cookie-based authorization is not a feasible solution in many cases.
- Cookie-based authorization is considered a maintenance nightmare (in some cases, such as native mobile apps) and so is not a preferred choice for many applications, especially when relying on mobile-based authentication.
OAuth addresses these concerns by allowing arbitrary clients (for example, a first-party iOS application or a third-party web application) to access user's (resource owner's) resources on resource servers via authorization servers with secure, reliable, and effective methods:

The preceding diagram depicts OAuth authorization stakeholders and their roles.
Now, let's look at a few OAuth 2.0-based authorization schemes and the situations or business cases you would choose those specific schemes for, with the following table:
|
Schemes / Flow |
Client type |
Brief description |
|
Implicit |
Single-page application (SPA) such as Google Fonts. |
Application requests access tokens from the gateway and the user grants permission |
|
Client-credentials |
Machine-to-machine non-interactive programs such as services, daemons, and so on |
The application passes the client credentials and gets the access token from the gateway server |
|
Authorization code |
Less trusted apps (third-party apps requesting access to your application) |
The application sends a temporary authorization code it receives from the gateway and gets it validated (by the same gateway) |
|
Resource owner password credentials |
Highly trusted apps (first-party apps) |
The client will ask the user for their authorization credentials (usually a username and password), then the client sends a few parameters (grant_type, client_id, client_secret) to the authorization server |
As part of this chapter, we have provided OAuth 2.0 example code that implements the Resource Owner password credentials flow and is available on GitHub for anyone to download and execute.
The following diagram depicts the typical sequence of a resource owner password credential OAuth scheme, before we move to the section that explains how to run that example code:

The following steps and a few screenshots of the Postman tool will be useful if you want to run and test that example code on your system:
- Download the code from GitHub (you may want to refer to the Technical requirement section Chapter 3, Essential RESTful API Patterns).
- Open the Terminal and cd to downloaded_loc/Hands-On-RESTful-API-Design-Patterns-and-Best-PracticesChapter06oauth2-sample.
- Run mvn clean install and wait for the BUILD SUCCESS message.
- Run the application by running the java -jar target oauth2-sample-0.0.1-SNAPSHOT.jar command.
- Open the local Postman tool and test the URLs (in the Chapter06 folder of Postman collections).
- you will see the following screenshots when you run the different scenarios.
- Try error conditions and other scenarios as well (by providing incorrect credentials, user credentials instead of admin credential, and so on).
- Run the sample with the java -jar command:

- Wait for the local server to start and be ready to accept requests:

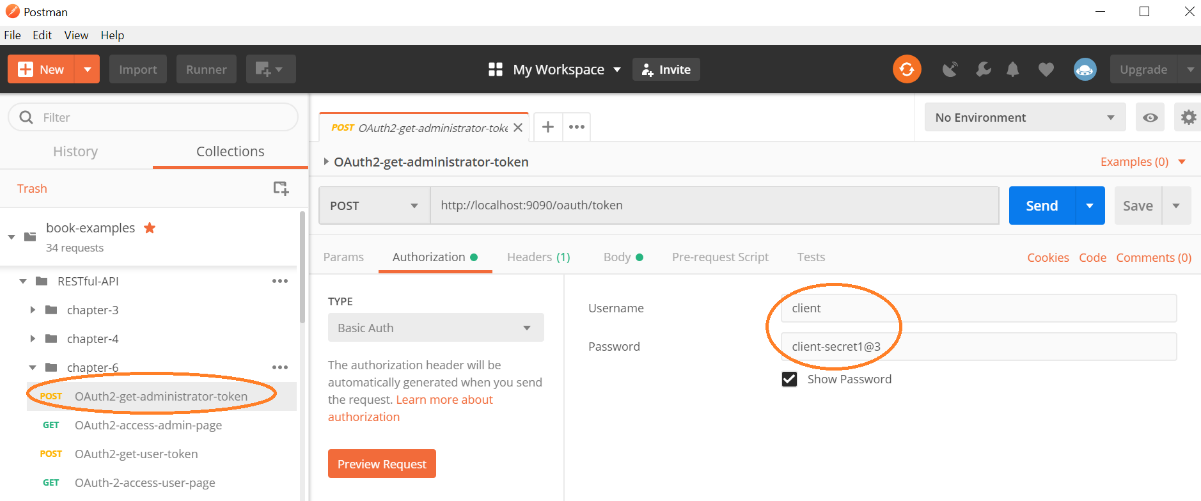
- Open the Postman tool, run the collections in the Chapter06 folder, and observe the client credentials (required for the Authorization server):
- Now enter user credentials for the Authorization server to provide the necessary token:

- Get the access-token from the Authorization server so that we can use it to access the necessary resources in the next step:

- Use the access token that we got in the last step and access the admin (resource) API. Notice the response body:

- Repeat the same steps for user resources with the necessary user credentials (notice the user name in the input):

So, you can execute different scenarios (not provided as part of this chapter) such as error messages and different HTTP error codes (403, 302, and so on) with the sample code.