
So...you want to build a home recording studio? Well, join the club.
Due to the recent advances in technology in the field of electronics, building a home recording studio is now more of a reality than it was 15 years ago. For example, 15 years ago, setting up a home studio to record 24 tracks at once would have been unthinkable for most people. The cost of the gear alone would have made it almost impossible to do, unless someone had some serious money to burn for a hobby. Today, though, the unthinkable has become the affordable.
Just look at current gear costs for a moment. For an investment of about 6,000 U.S. dollars, you can have a 24-track board designed by Malcolm Toft of Toft Audio Designs, which has the same technology used on the Trident Boards he designed back in the ‘70s and ‘80s. Better yet, it’s constructed directly under Malcolm’s watchful eye. That price is amazing when you think about the fact that today you can spend upward of $27,000 for a used 32- track Trident Console. Heck, even the 80B input modules cost $950 a pop used—if you could find them.
Plus, you can have top-of-the-line tube gear produced by companies like Manley in Chino, California, or Sebatron in Australia. EveAnna Manley and Sebatron themselves are personally leading the way to innovative designs, since they directly oversee the construction of the gear they’re selling you.
Then you have thousands of options for affordable solid state gear, including effects boxes, compressors, limiters, pre-amps, amplifiers, and so on. Companies like Joemeek, Tascam, PreSonus, M-Audio, and more are all giving you a wide variety of options for your recording needs.
All of this creates an affordable cost for starting your own home recording studio.
Most of you reading this book probably have a fair idea of how to use this gear—after all, you’re musicians. However, what you lack is the knowledge it takes to build a room in which you can use this gear effectively.
Don’t get me wrong—you can set up in any old room of your house (or apartment) and play around with your gear. Maybe you can even make some halfway-decent-sounding demo CDs if you run back and forth 10 or 12 times to your car so that you get the levels corrected. But without a decent room, you’ll never be able to sit down and really make anything you’ll be truly proud of and excited to have other people hear.
The gear is only part of the equation when it comes to recording and mixing; the other parts are the rooms you do it all in. In this chapter, you will see a world-class recording studio I had the pleasure of “gently guiding” from a hole in the ground to final finishes. It was designed by acoustical genius Tony Bongiovi. It was the first recording studio I ever worked on, and it was the beginning of my love and appreciation for everything special that it takes to make a recording studio.
I am also going to show you a couple of studios I designed, so you can get a feel for options that exist.
Designing and constructing a recording studio is not like any other construction you might do. If you begin with a blank piece of paper and an empty piece of land, designing and constructing a home is easy. You decide the type of home you want, the total square footage you can afford, and then you make it all fit.
If you have to shift a wall 6″ to fit some furniture in—no problem. If a bedroom ends up being 10x10—no problem. You only have to worry about the house being functional, but never have to concern yourself with how it will sound. Yes, I said “sound,” because sound is a function of room size. You’ll learn more about this in the next chapter.
With a recording studio, not only do you need to concern yourself with its function, but you also have to concern yourself with its sound. That same 10x10 bedroom that isn’t a problem for sleeping or reading is a problem for recording. And if it had 10’ ceilings, it would be even worse.
Next, you have to be concerned about what function you will be performing in the room—because function drives design. For example, if you are going to have a dedicated control room, then you want the room to be perfectly symmetrical. Whereas, for a dedicated tracking room, asymmetrical would be ideal. With a combination tracking/control room, settle for symmetry; otherwise, the control room part of the equation won’t work.
Take a look at the figures that follow. These very different rooms in Studio “A” have different needs and therefore different finishes, shapes, and sizes.
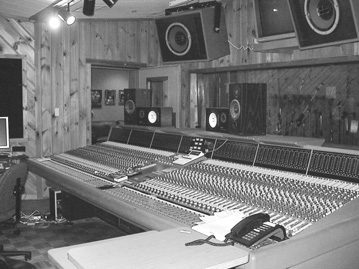
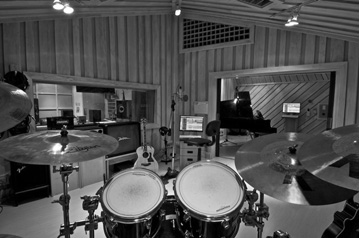
Power Station is one of the premier names in the recording industry. In the main tracking room of the facility (see Figure 1.1), you can record anything you choose, whether it’s a full band or just a vocal. At ground level, it (the sound in the room) is fairly dead—mics at that level capture just the instruments. The higher you place the mic in the room, the more lively it gets. By the time you reach the “coffin” you see at the top of Figure 1.1, it sounds as if you are recording in a nightclub. A combination of close micing and room mics for ambiance make for great recording from this room.

All of these needs (and effects) were considered by Tony as he worked his way through the design of this studio in his mind, but they were never perfectly executed until this particular studio was constructed, which is why this studio did not require “tuning” upon completion.
Notice how the board spacing tightens up (the space between boards gets smaller) as you climb higher into the room. This creates a greater ratio of board surface to airspace between the boards (and whatever is behind the boards). The more square feet of exposed board (per square foot of wall surface) you have, the more the mid and higher frequencies are reflected.
Also, as the room rises, notice how it closes down until it finally reaches the smaller volume of the coffin. This design effectively creates a gradually greater reverberant field as you rise into the room. That’s why mics placed in the coffin capture that exciting, vibrant feeling, as if you recorded live in some nightclub.
I can’t tell you any more about this than I have. The items discussed here are all visible on the surface, and anyone who is an expert in acoustics would be able to see and understand them. But there is much more behind the boards that comprise this work as well—from the designed construction of the walls to their geometry in relation to the geometry of the finished surface. All of this works together hand-in-hand to create a room like this.
In the percussion/rhythm room (shown in Figure 1.2), you see just the opposite. The board spacing is wide and very open between the boards. This lowers the ratio of mid/high frequencies reflected back into the space. Cymbals will have a faster decay in this room, while the low-frequency thump of the bass drum will be accentuated. Bass guitar recorded in this room is clear and concise once again, with all of this carefully controlled by what you see, as well as what you don’t see. By the way, modal issues aren’t a problem in this space because of the way it opens into the main room. There is an isolation assembly for this room, but it uses glass partitions that allow just enough isolation not to cause problems in the main room, while not creating modal issues in this room. As you will see, that’s quite a juggling act.
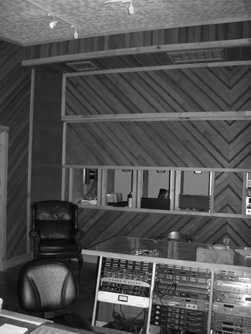
The string room (see Figure 1.3) is designed to record a grand piano, full string section, or a single violin. This design begins with slightly tighter board spacing at floor level, becoming increasingly tighter as you go higher in the room. It’s a relatively small space with a tall vaulted ceiling. Oh, one thing to remember as you work your way through your studio, don’t be afraid to get creative. In the original Studio “A,” there was no chance for what happened here, so it did not exist in the original. But in this studio, the wall you see on the left side of the picture was adjacent to the building’s exterior, with just enough room for an air-lock entrance. It’s a great place for vans to back up and enter directly into the room. But there were no doors in the original, so we put some in and made them almost invisible. If you look carefully, you can see the edges of a pair of 3’ doors by the corner of the two walls, with the surface finish applied over them.
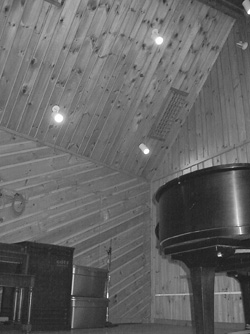
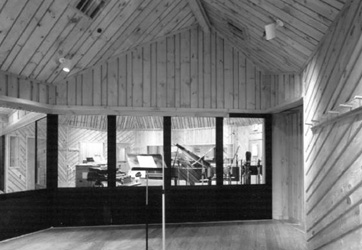
Figure 1.4 gives you a different view of this room (looking into the main room), with the isolation panels in the closed position. There are three sets of these movable partitions that separate this room from both the main and rhythm rooms and the rhythm room from the main room.
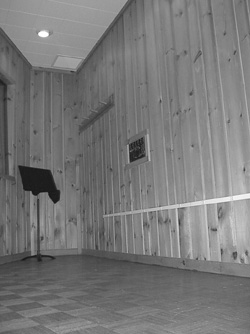
In the iso-booth, you can see some very different construction, as shown in Figure 1.5. Acoustic ceilings come into play. It still has wood-finished walls and floors, but in this room, you want the sound to be slightly more dead than in the other rooms. You don’t want a very reverberant room, but rather, you want to capture more of the vocals or instruments. Adding acoustically absorbent materials to the ceiling helps a lot with this cause. These rooms are not made for low-frequency instruments like bass guitars, which would cause serious modal issues in a space this size. Note how the walls in this room are not parallel, which helps to avoid issues with flutter echo and comb filtering. You’ll learn more about that in Chapter 2.
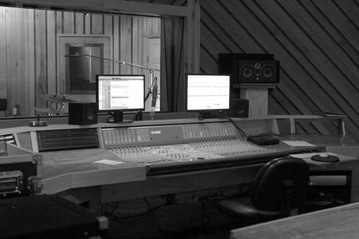
Finally, you can see the control room, as shown in Figure 1.6, and note that once again the design is very different from any of the other spaces in the studio. This room is symmetrical, whereas the tracking rooms are not. Symmetry in a control room is critical to proper stereo imaging. As you saw in the iso- booth, the control room has a soft absorbent ceiling for acoustic control. Note how the ceiling is splayed from a low point over the board to high points at the front and back of the room. Again, this helps to alleviate problems with comb filtering and flutter echo at the engineer’s location.
This room is designed to approach the acoustics found in a typical living room, but without the acoustic anomalies that would exist there normally. If you look at the rear wall of this room (see Figure 1.7), you’ll see that this is also laid out in a symmetrical manner, with plenty of soft fabrics (and what’s behind them) to help tame early reflections and modal issues within the space. Plenty of space is provided for rack gear and patch bays on this wall. Front to back, left to right—perfect symmetry equates to perfect stereo imaging.
Looking through this world-class pro studio gives you a feel for what is involved in studio design and construction, but unless you have some serious money to invest, you aren’t going to go to this extreme in your home studio.
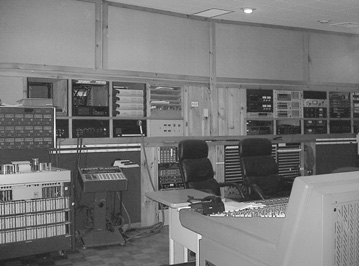
Hit Productions is an award-wining Audio Visual (AV) firm. Studio H was their first venture into the world of real-life audio recording. In the control room of this studio (which was constructed in the Philippines), you can see a design completely different from Power Station. Whereas Power Station has a compression ceiling (the ceiling is lower over the board and higher in the back and front of the room), this ceiling is sloped from a low point in the front to a high point in the back of the room. This is also not a wood-finished room. The owner wanted a more modern look with some fabric finishes. Note the ceiling cloud hung below the actual ceiling (see Figure 1.8).
In the back of the control room (Figure 1.9), you have the entrance door on the right and a storage room on the left (which also houses the studio computers). In between those doors and along the ceiling above them is the front finish for the room treatments handling the low frequencies. Given enough area in the footprint and careful planning, room treatments do not need to be an afterthought.
The treatment space behind those finishes is about 6’ in depth. Chapter 9, “Room Treatments,” will include details outlining how you can effectively use a space like that in your construction.
The owner (due to space considerations) opted for a string room (which can double for an iso-booth) in lieu of a typical iso-booth (see Figure 1.10). Although relatively small in area, it has fairly high ceilings that are installed to create a rather dramatic barrel roll effect—you can see this clearly on the upper-right side of the room in Figure 1.10.

The finish in this room is all wood, which helped achieve very bright high- and mid-frequency responses, while maintaining good low-frequency control. That baby grand piano you see in there sounds sweet—a string section that recorded in there fell in love with the room.
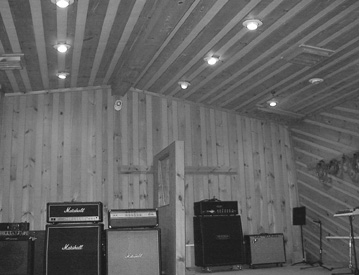
Notice that the tracking room in this studio (Figure 1.11) is much smaller in its footprint than the one at Power Station, because the building housing this studio had nowhere near the necessary clearance to achieve the ceiling heights you see in Power Station’s tracking room. However, we were able to work to a high point of 17’ on one side of the room, which gave us everything we needed to make a room with first-rate sound. Again, tracking rooms are best when they are asymmetrical, which is what you see here.
I have a couple of comments regarding this studio. The outside of the studio itself is exposed to common spaces, corridors to be exact. This studio is housed on the third (top) floor of a commercial building in the heart of Manila (Makati City to be exact), and to make things more difficult, it has a tin roof, which is a challenge from an isolation point of view. We will examine (in Chapter 10, “Putting It All Together”) how you can deal with conditions like this.
All of the air-handler units and duct work for the air supply were installed between the studio ceiling and the tin roof, but the return air was only installed outside of the rooms (above the hall ceiling), which involved another isolation challenge (see Chapter 7, “HVAC Design Concepts,” for more complete details).
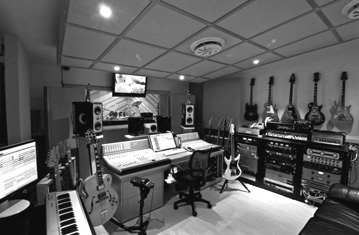
Dark Pine Studios is a smaller production studio that is fast making a name for itself in the recording industry. In the control room of this studio (which was constructed in North Carolina), you see another control room design that differs from Power Station (see Figure 1.12). Again, where Power Station has a compression ceiling, this ceiling is sloped from a low point in the front of the room to a high point in the back of the room. Similar in some respects to Power Station, it is a wood-finished room because the owner wanted the warmer feeling that wood gives.
In Figure 1.13, you can see the back wall of the control room. Note that it is similar to Power Station in that it has gear racks built into the wall.
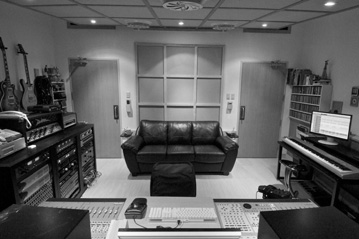
Behind this space you can find a lounge and a computer room. Because the owner was not planning on using these spaces while recording, we got creative and designed the back wall of the control room with little to no isolation. This effectively created a room that was much deeper than it seems at first glance, which allowed us to use this space as a deep bass trap.
You can also see (at the top of the wall) a soffit containing the return air outlet, as well as a couple of supply registers. In between these spaces (within the soffit), we developed deep bass traps. Both of the vertical corners have bass traps as well. You can see one of those on the left side of the picture. We will discuss methods of constructing these types of room treatments in Chapter 9.
Also note the lack of a ceiling cloud in this room—all that was needed acoustically in this case were simple 12x12 acoustic ceiling tiles.
You can see that the tracking room in this studio (Figure 1.14) is also much smaller in its footprint than Power Station. The building housing this studio had nowhere near the clearance necessary to achieve the ceiling heights you see in Power Station’s tracking room. However, we were able to work to a high point of 12′6″ on one side of the room, which gave us everything we needed to create a room with first-rate sound. The asymmetrical design of this room is completely different than either Power Station’s “A” room or Hit Production’s “H” room, yet they all have a warmth and clarity that make them a pleasure to record in. Note the small iso-booth in the back of this room.

As I mentioned earlier, you probably won’t be investing as much money or labor in your home studio as you see in the pro studios above. The idea here is to show you that there are a lot of different approaches you can take with design while accomplishing the same thing—a room that has a great sound.
Now, let’s take a quick look at some of the challenges facing you in your quest.
You can’t forget the issue of sound isolation, which is possibly one of the most important aspects to consider when designing a home studio, and even high-end residential construction is generally not good enough to satisfy those needs.
In any house I design, we generally put sound-batt insulation in every sleeping area and bathroom. We also use resilient channel with sound-batt insulation for the master bedroom. This will generally make it so that you can’t listen to conversations taking place in those rooms, which represents a decent level of sound isolation for a home.
But that doesn’t even begin to produce the isolation required for a recording studio.
It’s one thing to ask a teenager to turn down his stereo because it’s too loud. It’s another thing altogether to have to turn down a band that you’re recording because the baby can’t sleep. Or to have someone drop a dish on the floor above you and have the resultant sound destroy an otherwise perfect take in a recording session.
No—standard isolation techniques simply will not suffice in a studio environment.
If you live in a condo, an apartment building, or some other environment where your ability to modify the existing structure is severely limited, you’re probably thinking that buying this book was a waste of money because you won’t be able to do what you need to create your studio. Actually, this may or may not be true. You may not be able to soundproof your room, but there are plenty of treatments you can use to improve its sound that are nondestructive in nature. You can either build or purchase room treatments and install them in your space to deal with modal and non-modal issues (more about them in the next chapter). Then, perhaps, you can develop a schedule with your neighbors, such as times when they won’t be around, where you can work with your band to record. Maybe you can record with headphones on and everyone DI (direct in), including electronic drums (ouch —as a drummer not my first choice, but it would beat the heck out of not playing at all) in order to record. Then you could mix down afterward, at a lower volume and at times when no one else is going to be bothered.
If this is the case, then you probably want to go directly to the second chapter, from there to the eighth chapter, and finish with Chapters 9 and 10. Those are chapters you need for treating the room itself—the rest of the book pertains to sound isolation construction techniques along with electrical and HVAC details.
If not, then keep reading.
This book is going to show you how to get it done. How to determine the best use of that space you have, how to isolate yourself from the remaining space in your home (and the outside world at the same time), and how to treat it so that not only does your music sound right, but the room does as well.
Actually, there are other books on the market that you can buy that will show you all of this, but there is a difference between this book and those books. Acoustics (whether it be for sound isolation, room modes, or room treatments) is all about math. It is not necessarily intuitive, and that (for a lot of people) is a problem.
Not everyone gets along with higher math—for some people, it’s like speaking Latin. When they see equations on a page, they start having flashbacks to high school trig classes—with teachers they didn’t especially like—and frustrations they don’t want to revisit. Their sight begins to get blurry, their heart starts beating faster, they get faint, and they long for a drug to calm them down.
Well, don’t worry, because with this book you don’t have to deal with math at all. You’ll get straightforward, easy explanations about how to make it from point “A” to point “B.” I’ll break down some of the math into its simplest forms for you, and I’ll also provide you with the tools (in the form of a series of spreadsheets available from the author on request), to help you get the job done.
Simply email me at [email protected], or stop into any of the forums I visit to ask for a copy of my tool kits.
Another thing that will set this book apart from others is that the people who wrote those other books are not necessarily experts in construction itself, although they may be some of the best and brightest in the world of recording studios and acoustics. With this book, I bring you over 35 years of construction experience, so ideas that don’t really work won’t be in here. Also, I’ll give you some construction techniques that aren’t found on paper anywhere else, but have proven themselves to be useful for me over the years.
There’s no magic with any of this, regardless of what you might have heard about egg crates. There are, however, some formulas for success that (if you follow them very closely) will give you a home recording studio you can be proud of—one that will give back to you what you expect for your investment in time and money.
One thing I do want to make very clear to you is this: If you don’t get it— read it again and again—and then once more until you do get it. Do not stumble blindly forward thinking that you can slip a sheet of drywall in a location where this book says you don’t want it. Don’t think that leaving a sheet of drywall in a location where the book recommends that you “take it out,” is not going to make much of a difference. If you’re going to bake a cake, then leaving out key ingredients is not going to get you there, and adding ingredients willy-nilly isn’t going to get it done either. Follow the recipe or don’t bother with the baking.
I’ve had people come to me with the same complaint over and over again— for example, they’ve spent time reviewing their work and looking at pictures, just to find out that what they installed as resilient channel wasn’t resilient channel at all, but was hat channel. After spending thousands of dollars for materials and labor, the answer is to rip it all down and start over. Had they paid attention in the first place, none of this would be necessary, but they didn’t and now it’s going to cost them.
One important point—please don’t trust your contractors to know the difference between isolating and non-isolating materials, because the vast majority of them don’t. In one of the cases with hat sections being substituted for resilient channel, the substitution was done by a contractor hired for the project, whose contract specifically stated RC-2, and who argued with the homeowner afterward that there “really wasn’t any difference.” Well, I have a surprise for him—there really is.
A hat channel is simply designed as a framing member, generally used to frame suspended ceilings in commercial work. It is a cold, rolled steel member without any isolating slots cut into its legs. RC-2 is specifically designed and tested to create isolation between a structural assembly and the wall surface, which is usually drywall. The isolating slots cut into its legs make all the difference. It’s just that simple. That’s one of the reason why you will find illustrations in this book detailing the proper members and the proper manner in which to install those products—to get the results you’re paying for.
Another point I want to make is this: If you don’t find a recommendation for a particular product in this book, then it’s probably because it’s not the most cost-effective way to go.
There are a lot of isolation products on the market that will “get the job done,” but when you set them down side by side with standard construction and do a square foot analysis on the isolation received versus using standard construction with drywall (as one example), there is no way that they can compare.
It isn’t that their claims of isolation value are false—they aren’t—it’s just that they are so expensive that they cannot compete with standard materials. Remember that the basics are mass, mass, and more mass, and some of the cheapest mass you can buy is standard ⅝″ fire-code drywall.
The last thing I want to touch on is the topic of quality control.
In the construction industry, we typically have a project manager who buys out the project and makes the administrative decisions required to bring a project to successful completion. We also have a project superintendent who manages the day-to-day scheduling and on-site supervision necessary to verify that the work has been completed and is installed correctly.
The project superintendent is the on-site quality control inspector. It is his responsibility to make certain that everything is done according to plans and specifications through each step of the project. In the case of your home studio, you are probably going to be taking on that role.
If you want to do all of the work yourself, make it easier by taking it one step at a time and referring back to the book as you move along. But, if you hire contractors to do the work for you, it will be much harder for you to follow the progression of the work between your daily job and the performance of their contracts. Work can easily get buried before you ever have a chance to see it, and this is a recipe for disaster if your contractor decides to “cut a few corners.”
Remember that what is outlined in this book does not reflect standard construction practices for 99 percent of the work that these contractors will ever perform, so they might get the attitude that it is “overkill” and not really required in order for them to get the job done “right.” However, what’s outlined in this book is what’s really required to attain the extra degree of isolation necessary for a studio environment.
Basically, it’s up to you to do one of two things to protect yourself. The first possibility is to find someone who knows construction, for example, a trusted friend. Spend some time going over the requirements in this book with them, making certain that they understand exactly what needs to be done. Then have them do inspections for you along the way to ensure that the contractor is doing the work properly.
The other possibility is for you to specify in your contract with the subcontractor some work limits that will allow you to perform the proper inspections.
For example, if the contractor could install two layers of drywall in one day, he might decide that the caulking of the first layer is overkill and not bother to do it at all. You would never know this unless you began destructive testing of the work, such as removing the caulk and backer rod from the second layer to see the first layer. You could specify (in your contract documents) that the second (third, fourth, etc.) layer of drywall could not be installed prior to inspection of the completed previous layer.
If the contractor had someone to call for inspections (meaning you), he could schedule this inspection so that his work would move along seamlessly. However, if he has to wait for you to inspect at the end of each day, he will probably charge you a premium for this. Pay the premium; otherwise, you might get only part of what you are paying for.
The same goes for treatments behind the wall, prior to the subsequent sheet. Although you can count on your building inspector to ensure that the electrical wiring is done correctly, the inspector will only insist on adherence to the code and nothing beyond that. Thus, you could pay for certain things and not have them in the end. In certain areas around the world, you might not even have building officials overseeing the work that is taking place.
So, if you are going to contract out part (or all) of the work on your studio, make absolutely certain that you outline all of the steps where inspections will be required. Insert clauses requiring removal of materials (at no cost to you) to allow for inspections of any work that is covered up prior to your inspection (and acceptance) of the work in place.
Trust me when I tell you that you will pay extra to do work as outlined in this book, that is, compared to standard construction techniques, but if you follow the techniques outlined here, you will achieve your goals for creating a home studio you can be proud of.