

92 IBM Enterprise Workload Manager
For the mortgage rate application, consider the end-to-end response time and the time the
transactions normally spend in the database query. Since the web application server is not
instrumented, the performance objectives defined in the domain policy represent only the
portion of time the transactions spend in DB2 UDB. The application is not quite real-time. The
the portion of the time spent in DB2 for the query is estimated to be about 20 seconds, so the
response time objective is set for 1 minute.
For the mortgage rate application, EWLM can manage and monitor the uninstrumented web
application server regions. A service class is defined for the non-instrumented Web
application server region with a velocity goal. The administrator defines a general service
class name. Velocity is specified as a category Fastest, Fast, Moderate, Slow, or Slowest.
The administrator would also like to manage the processes running the web browsers in the
banks. The browsers, Internet Explorer and Netscape Navigator are processes, and are also
assigned a velocity goal.
For work not otherwise categorized, EWLM provides a service class in every domain policy
called EWLM Service Class. It is assigned a discretionary goal, which specifies that work is to
be completed when resources are available. You can assign a discretionary goal type to a
service class representing low priority work that does not require a particular performance
goal. EWLM processes discretionary work using resources not required to meet the goals of
other service classes.
Based on the service classes, the following workloads are defined for reporting purposes:
? WAS Applications: WebSphere Application Server EJB application that processes the
bank statements
? DB2 Applications: The mortgage advisor transactions originating from the non-ARM
instrumented application running in DB2 UDB
? Non-Instrumented Applications: The Web application server process and the Web
browser processes
? Web Site Applications: The funds transfer, account query, mortgage rate advisor, and
brokerage buyer transactions, and the static Web serving work.
? EWLM provides a workload, EWLM Workload, which is assigned to the EWLM Service
Class.
4.2.3 Building a domain policy
Once you have a clear idea of how to classify your workload and how to assign performance
goals to each type, you are ready to build the domain policy. We describe the fundamentals in
this section but provide you with an example of our own policy building in “The ITSO EWLM
scenario” on page 119. This includes the planning, assessing and designing phase. We
Brokerage Buyers Highest 80% complete in 1 seconds
Stock Quotes Medium 80% complete in 10 seconds
Static Web Serving Low 80% complete in 20 seconds
Mortgage Rate Medium 1 minute avg response time
Non instrumented Web Appl High Fast Velocity
Web Browsers Medium Moderate Velocity
Service class Importance Performance goal
Chapter 4. Administering EWLM 93
recommend that you go through both “Administering EWLM” on page 77 and “The ITSO
EWLM scenario” on page 119 before starting to create your own domain policy.
There are several ways to build your policy. You can:
? Use the wizard, which will guide you through the entire process of building a new domain
policy.
? Create a New Domain Policy with the wizard, then click Finish immediately, rather then
Next. This will save an empty domain policy where at a later time, using the edit function,
you can add the remaining definitions.
? Create a new policy from a sample one and alter it the specific needs of your installation.
This is the easy and recommended way if the sample policy is very close to what you
expect from your installation.
? Use the Import function from a previous exported policy. The export function creates an
xml document that you can save in any directory. To import the policy back, select Domain
policies in the Set up menu and click the Import function. In the pop-up window returned,
input the name and location of the exported xml policy file and click Import. This imports
the domain policy back in the current database.
Using a sample policy
If the Sample Banking Domain Policy resembles your installation definition, a good start is to
make a copy of the policy and alter or add definitions to tailor it to your specific needs. Use
the following steps to do this:
1. At the Control Center, select Set up
→ Domain policies. Select the Sample Banking
Domain Policy and Based on from the pull-down menu. Click Go.
2. Enter the name of the new domain policy at the prompt. We entered ITSO_Redbook. A new
policy ITSO_Redbook, with exactly the same definitions as the Sample Banking policy, is
created.
3. This domain policy has a single service policy associated: Banking 2004 Service Policy. If
the name of the service policy does not apply to your installation, you can rename it. To do
this, edit your new policy by doing the following:
a. Click Service policies.
b. Select the Banking 2004 Service Policy.
c. Select the Edit function from the pull-down menu and click Go.
d. Change the name of the policy to a name that is consistent with your installation
standards, for example, ITSO_Redbook_NormPol1.
4. Edit definitions or add new definitions to the policy as needed.
5. When you have finished defining your service policy, use EWLM to verify that it is
formatted properly, contains valid syntax, and whether or not the managed servers will
activate it successfully. To automatically check the policy, begin by selecting Set up
→
Domain Policies. Select Sample Banking Domain Policy, and Verify from the action
pull-down menu. Click Go.
The EWLM Control Center verifies the domain policy on all servers defined in the domain.
6. You are now ready to deploy the domain policy ITSO_Redbook. To do this, begin by
selecting Set up
→ Domain policies. Select ITSO_Redbook, and Deploy from the
action pull-down menu. Click Go.
7. EWLM displays the Deploy Domain Policy page. In the Service Policy to Activate field,
select ITSO_Redbook_NormPol1.

94 IBM Enterprise Workload Manager
8. EWLM displays the Deploy Domain Policy and Activate Service Policy Status page. When
you get to this point, you have defined, verified, and deployed a domain policy, and
activated a service policy for your installation.
Deploying a domain policy can take quite a few minutes. Be prepared to wait until all servers
have come up as active. Alternatively, after you make changes to your policy, you may find
that it is easier to deploy it again rather than just activating the service policy. The result
should be the same, but it is an alternative to try when you feel the activation takes too long.
Using the wizard
This section guides you through the navigation of the Control Center panels that are used to
set up a new policy. We recommend that you get familiar with the navigation by reading
through this section prior to your first attempt at building your own policy.
The domain policy is the anchor level defined within the domain. Therefore, the domain policy
is the first item that should be defined. To perform this task, log in to the Control Center as
administrator, then click Set up
→ Domain policies. You should see the Domain Policies
screen shown in Figure 4-8.
Figure 4-8 Initiating a new Domain Policy
The Domain Policies screen lists all the policies currently defined to EWLM. Once the
remaining steps here are complete, the result will be an additional name on this list. To define
a new policy, click New. The Domain policy wizard welcome screen shown in Figure 4-9 is
presented.
click
Chapter 4. Administering EWLM 95
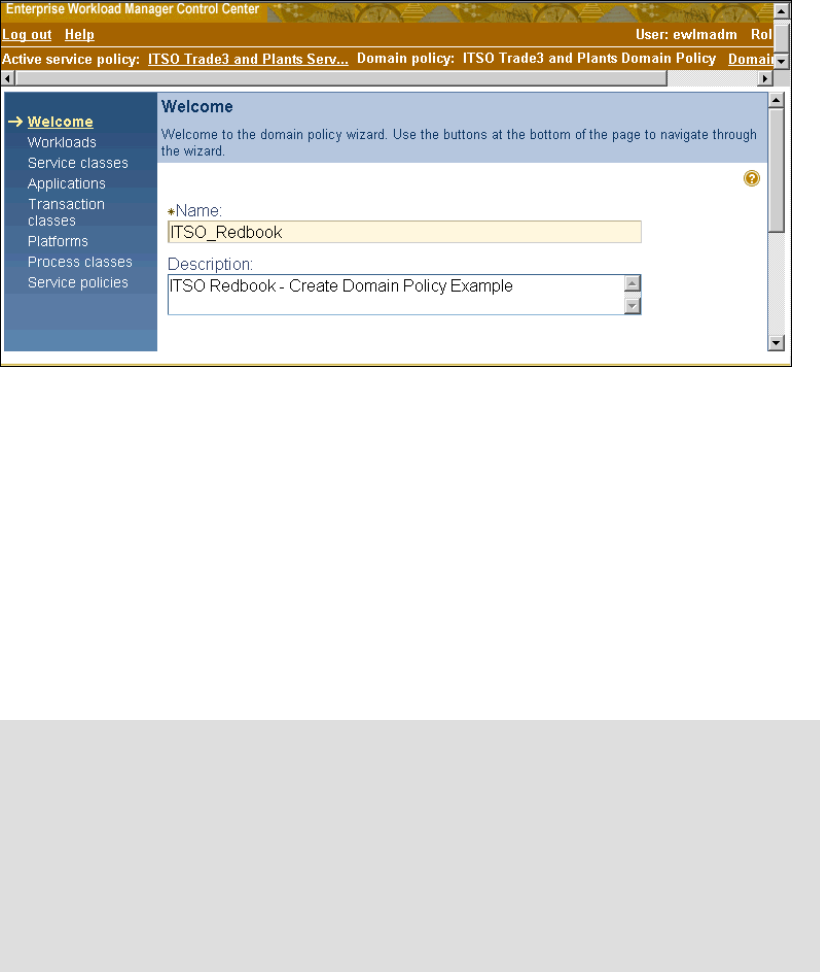
Figure 4-9 Domain policy wizard welcome screen
The left side of the domain policy wizard screen lists all the resources that might be defined in
the policy. The wizard keeps track as you progress through this list. Use the welcome panel
to enter the name and description of the domain policy you want to create. In this example,
we simply assigned the name ITSO_Redbook to the domain policy being created. Click Next
(not shown in the figure) at the bottom of the screen to continue.
Any time you click Next, the wizard proceeds to the next resource to be defined until it
completes the list in the left panel. For this discussion, we go through the steps to produce
just the workload definition, then we skip to the end of the wizard without going through all the
other resource panels.
Figure 4-10 shows the first screen used to define our first resource, the workload.
Defining a workload means assigning a group of service classes to it for the purpose of
reporting. When a workload is defined, it is created and maintained at the domain policy level.
To create a workload definition, click the New button shown in Figure 4-10; the panel in
Figure 4-11 is presented.
Tip: Creation of the workload is optional, and in fact, it may seem a bit strange to create
the workload first. From a logical point of view the service policy seems to be the first step
in your domain policy, but since the elements are related to each other in various ways it is
suggested that you follow the order shown by the wizard.
For your production environment we recommend you do proper planning before starting to
build your policy. This includes preparing a list of service classes, mapping transaction and
process classes to service classes, as well as preparing a list of platforms, applications,
and workload. Once these elements are defined, the order you type them into your
configuration is not important.

96 IBM Enterprise Workload Manager
Figure 4-10 Workload Definition
Figure 4-11 Define new workload panel
In Figure 4-11, the New Workload screen, enter the name and description to assign to this
grouping of service classes. In our example, the name given to this workload was
ITSO_Redbook_NormWL. When one or more service classes are created, they will be associated
to a workload name to create the link between them. When done, click OK to continue.
click
..................Content has been hidden....................
You can't read the all page of ebook, please click here login for view all page.