

Automation and scripting
This chapter provides information about scripting and automation tasks that can occur in an IBM Spectrum Virtualize environment that uses Ansible.
This chapter includes the following topics:
12.1 REST API on IBM Spectrum Virtualize
The IBM Spectrum Virtualize Representational State Transfer (REST) application programming interface (API) consists of command targets that are used to retrieve system information and to create, modify, and delete system resources. These command targets allow command parameters to pass through unedited to the IBM Spectrum Virtualize command-line interface (CLI), which handles parsing parameter specifications for validity and error reporting. Hypertext Transfer Protocol Secure (HTTPS) is used to communicate with the REST API server.
The easiest way to interact with the storage system by using the REST API is the curl utility (for more information, see this website) to make an HTTPS command request with a valid configuration node URL destination. Open TCP port 7443 and include the API version in combination with the keyword rest followed by the IBM Spectrum Virtualize target command that you want to run.
Each curl command uses the following format:
curl –k –X POST –H <header_1> –H <header_2> ... -d <JSON input> https://SVC_ip_address:7443/rest/<api_version>/target
Where the following definitions apply:
•POST is the only HTTPS method that the Spectrum Virtualize REST API supports.
•Headers <header_1> and <header_2> are individually specified HTTP headers (for example, Content-Type and X-Auth-Username).
•The use of the -d parameter followed by the input in Java script Object Notation (JSON); for example, ‘{“raid_level”: “raid5”}’ to provide required more configuration information.
•<SVC_ip_address> is the IP address of the IBM SAN Volume Controller to which you are sending requests.
•<target> is the target object of commands, which includes any object IDs, names, and parameters.
•<api_version> specifies which version of the API should get used. The latest API version is v1.
|
Note: Compatibility with an earlier version is implemented by auto redirection of nonversioned requests to v0. It is recommended to use versioned endpoints for guaranteed behavior.
|
Consider the following examples:
•https://SVC_ip_address:7443/rest/target uses API v0.
•https://SVC_ip_address:7443/v0/rest/target uses API v0.
•https://SVC_ip_address:7443/v1/rest/target uses API v1.
Authentication
Aside from data encryption, the HTTPS server requires authentication of a valid username and password for each API session. Two authentication header fields must be specified for your credentials: X-Auth-Username and X-Auth-Password.
Initial authentication requires that you POST the authentication target (/auth) with the username and password. The REST API server returns a hexadecimal token. A single session lasts a maximum of two active hours or 30 inactive minutes, whichever occurs first.
|
Note: The chsecurity command configures the amount of time (in minutes) before a token expires. The allowed range is 10 - 120 minutes. The default value is 60 minutes.
|
When your session ends because of inactivity (or if you reach the maximum time that is allotted), error code 403 indicates the loss of authorization. Use the /auth command target to re-authenticate by using the username and password.
The following example shows the correct procedure for authenticating. You authenticate by first producing an authentication token and then, use that token in all future commands until the session ends.
For example, the following command passes the authentication command to IBM SAN Volume Controller node IP address 192.168.10.20 at port 7443 by using API version v1:
curl –k –X POST –H ‘Content-Type: application/json’ –H ‘X-Auth-Username: myuser’ –H ‘X-Auth-Password: mypassw0rd’ https://192.168.10.20:7443/rest/v1/auth
|
Note: Make sure that you format the request correctly by using spaces after each colon in each header; otherwise, the command fails.
|
This request yields an authentication token, which can be used for all subsequent commands, as shown in the following example:
{"token": "38823f60c758dca26f3eaac0ffee42aadc4664964905a6f058ae2ec92e0f0b63"}
The X-Auth-Token header in combination with the authentication token replaces the username and password for all further actions. The token is good for one session, but the session times out after two hours of activity or 30 minutes of inactivity. Repeat the authentication for creating another token.
Example commands
In this section, we discuss some of example commands.
Using the authentication token
Most actions can be taken only after authentication. The following example of displaying the system information demonstrates the use of the previously generated token in place of the authentication headers that are used in the authentication process:
curl –k –X POST –H ‘Content-Type: application/json’ –H ‘X-Auth-Token:
38823f60c758dca26f3eaac0ffee42aadc4664964905a6f058ae2ec92e0f0b63’ https://192.168.10.20:7443/rest/v1/lssystem
|
Note: If you use curl, you do not receive the HTTPS error code that is displayed if you do not specify the -f option.
|
Specifying more parameters
Although querying any information does not require that any other parameters are required within the REST call, this mandatory requirement exists for any action that intends to modify an object or create an object; for example, host, hostcluster, array, or VDisk.
The following example demonstrates the use of the -d parameter to specify the parameters and associated values that are required for creating a mirrored volume:
curl –k –X POST –H ‘Content-Type: application/json’ –H ‘X-Auth-Token:
38823f60c758dca26f3eaac0ffee42aadc4664964905a6f058ae2ec92e0f0b63’
–d ’{"name":"myVDisk1", "copies":"2", "mdiskgrp":"mdiskgrp0:mdiskgrp1", "size":"200", "vtype":"striped", "unit":"gb", "rsize":"5%" }’ https://192.168.10.20:7443/rest/v1/mkvdisk
This REST call is equivalent to running the following mkvdisk command (it produces the same output):
mkvdisk -name myVDisk1 -copies 2 -mdiskgrp mdiskgrp0:mdiskgrp1 -size 200 -vtype striped -unit gb -rsize 5%
The parameters and values that can or must be specified when a REST target is used, such as mkvdisk or mkhost, are identical to those within the CLI.
|
Note: Parameters (keys) and values must be specified in JSON notation.
|
JSON is a lightweight data-interchange text format that is language-independent, but uses conventions that are familiar to programmers of the C-family of languages, including C, C++, C#, Java, JavaScript, Perl, and Python.
JSON data is written as key/value pairs. A key/value pair consists of a field key, followed by a colon, followed by a value, whereby key and value must be placed in double quotes.
One or more key/value pairs build an object, which begins with a left brace ( { ) and ends with a right brace ( } ), as shown in Example 12-1).
Example 12-1 JSON notation for creating a thin provisioned mirrored VDisk
{
"name": "myVDisk1",
"copies": "2",
"mdiskgrp": "mdiskgrp0:mdiskgrp1",
"size": "200",
"vtype": "striped",
"unit": "gb",
"rsize": "5%"
}
For more information about JSON, see this website.
Rate limiting
Rate limiting (see Example 12-1) helps with security and the prevention of an attack, such as a denial of service in which unlimited work is sent to the system. The rate limiting is implemented at millisecond granularity and creates a return code (429 - too many requests) when a violation occurs.
Table 12-1 REST API rate limits
|
Limit
|
Type
|
Value
|
|
Maximum active connections per cluster
|
REST API
|
4
|
|
Maximum requests per second to the /auth endpoint
|
REST API
|
3 per second
|
|
Maximum requests per second to the /non-auth endpoint
|
REST API
|
10 per second
|
|
Number of simultaneous CLIs in progress
|
System
|
1
|
REST API Explorer
REST API documentation is available at this IBM Documentation web page. Support also can be found directly on the system within the REST API Explorer.
The REST API Explorer is based on the Swagger UI and runs within a browser. It offers an easy way to familiarize yourself with the API and to test the commands that it contains.
To access the REST API Explorer, enter the following URL in a browser:
https://<SVC_ip_address | FQDN>:7443/rest/explorer
Figure 12-1 shows the grouping of available actions within the RET API Explorer.

Figure 12-1 REST API Explorer actions
The use of the REST API Explorer also requires the generation of a token, which can be used for all further actions. Figure 12-2 shows how to create an authentication token for within the IBM SAN Volume Controller Info and IBM SAN Volume Controller Task actions.
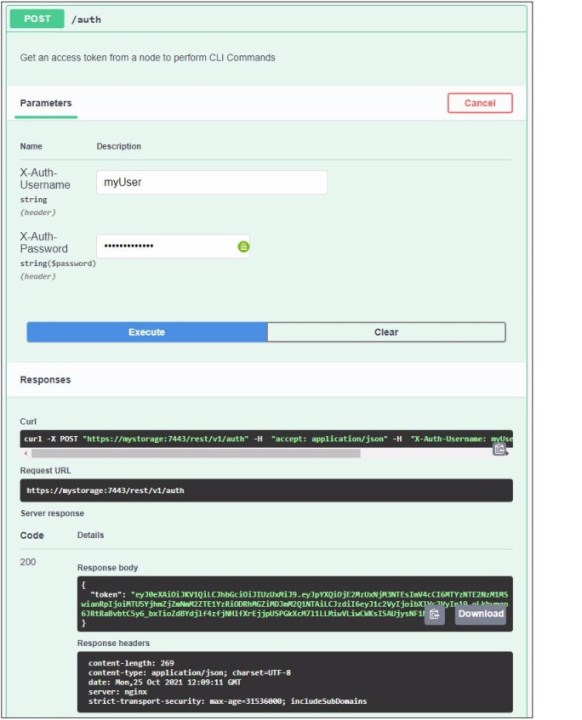
Figure 12-2 REST API Explorer authentication
Figure 12-2 also shows the following outputs after successful authentication:
•The curl command that is required to carry out the action
•Request URL, which was addressed during the execution of the action
•Server response in from of the Response body and the response header
The token is displayed in JSON notation in the response body.
By using the generated authentication token, more actions can be completed in the REST API Explorer.
Figure 12-3 shows the mkvdisk task in the REST API Explorer. All accepted parameters are listed in the request body. These parameters can then be adapted or deleted according to the requirements for creating the VDisk.

Figure 12-3 REST API Explorer /mkvdisk
Figure 12-4 shows an example for the Request body to create a mirrored VDisk and the output within the Response body.

Figure 12-4 REST API Explorer /mkvdisk output
REST API HTTP messages
When an issue exists with the information that you provided, an error message appears.
Different types of error messages can appear, depending on the issue. The only error messages that are described in this document are HTTP errors. Other error messages are explained in other product documentation, which is available at this IBM Documentation web page.
The following HTTP error codes are returned to the user by the REST API in response to a problem with the request:
•400: bad request
The command did not specify a required parameter or gave a parameter value that did not pass the REST API checks.
•401: unauthorized
The command requires a successful authentication.
•403: forbidden
The user did not send a valid authentication token to interact with the specified URL.
•404: not found
The command attempted to issue a request to a URL that does not exist.
•405: method not allowed
The command attempted to use an HTTP method that is invalid for the specified URL.
•409: conflict
The sent request conflicts with the current state of the system.
•429: too many requests
Too many requests violate the rate limiting.
•500: something went wrong on the server
A Spectrum Virtualize command error was forwarded from the REST API.
•502: bad gateway
The API received an invalid response from the upstream system.
For more information about the use of the REST API, see this IBM Documentation web page.
For more information about other examples, see the following web pages:
Audit logging
Commands that are started by the REST API are auditable, such as actions that are started by the CLI or GUI. The Origin field within the output of the catauditlog CLI command shows the source interface of the executed command.
12.2 Scripting
This section describes some methods that can be used to access the IBM Spectrum Virtualize Controller family by using scripts. These methods can be used for configuration, reporting, and administration tasks.
IBM Spectrum Virtualize Controller family supports the following methods or protocols for running configuration tasks and monitoring, in addition to the traditional web-based graphical user interface (GUI):
•Secure Shell (SSH)
•SMI-S
•HTTPS and REST API on IBM Spectrum Virtualize
•HTTPS and REST API on IBM Spectrum Control
12.2.1 Scripting principles
The following practices are recommended for scripting:
•Always use secure protocols, such as SSH and HTTPS.
•Use SSH-keys for authentication if possible and protect the SSH-keys.
•Use dedicated users for monitoring and configuring and administering purposes.
•Assign only the required permissions according to the purpose of the configured user.
•Implement error handling in the scripts.
12.2.2 Secure Shell
SSH is a network protocol that enables secure communication and operation over an insecure network.
All members of the IBM Spectrum Virtualize storage products feature a CLI, which is accessible by using the SSH protocol.
|
Note: The SSH protocol authenticates users by using passwords or SSH keys (that i, asymmetric cryptography methods). For security reasons, it is recommended to use and protect the configured SSH keys.
|
The system supports up to 32 interactive SSH sessions on the management IP address simultaneously.
|
Note: After an SSH interactive session times out, the session is automatically closed. The session timeout limit is set to 15 minutes by default. The limit value can be changed by using the chsecurity command. For more information, see this IBM Documentation web page.
|
To connect to the system, the SSH client requires a user login name and an SSH password (or if you require command-line access without entering a password, the key pair). Authenticate to the system by using a management username and password.
When you use an SSH client to access a system, you must use your username and password. The system uses the password (and if not a password, the SSH key pair) to authorize the user who is accessing the system.
General tips
Consider the following general tips when SSH is used:
•Use of svcinfo and svctask
Some small differences exist between the CLIs of the different products; for example, lsnodecanister is used on IBM FlashSystem Controllers, and lsnode is used on IBM Spectrum Virtualize controllers.
•Use of -delim parameter on ls-commands
Parsing the output of a ls-command becomes much easier because it inserts a single, selectable character between each field instead of several spaces. The colon (:) is a good choice for a delimiter for all output that does not contain any IPv6 addresses.
•Use of -nohdr on ls-commands
The use of the -nohdr parameter suppresses the output of the header so that the required code for skipping the first line of the output is bypassed.
Using SSH in bash/ksh
The use of an SSH client within a shell is a common way of running a specified command, but, not a login shell on a remote system. Instead of opening an interactive session, SSH runs a command on the remote system, forwards the output to the local computer, and then, exits the session.
Running commands remotely by way of SSH provides a way to write and use advanced scripts to collect data from an IBM Spectrum Virtualize system. It also continues processing that data on a local computer in combination with other available tools and utilities.
Running commands remotely by way of SSH allows SSH to be used in a shell and piping the output to any external program for parsing, filtering, and data processing.
Example 12-2 shows how to use SSH to run a command (svcinfo lssystem) on the IBM Spectrum Virtualize system (mystorage) with the privileges of myuser and piping the output to filter only for lines containing unmap.
Example 12-2 Using ssh and grabbing selected information
ssh myuser@mystorage ‘svcinfo lssystem | grep unmap’
Using SSH in Windows command line
For the use of the SSH in combination with the Windows operating system, the PuTTY Plink utility or the optional available OpenSSH client feature (which integrates into the standard command line) must be installed.
PuTTY Plink (see Example 12-3) enables authentication by using SSH keys by using or configuring the PuTTY authentication agent (Pageant).
Example 12-3 Using PuTTY PLink
cd C:Program FilesPuTTY
plink.exe myuser@mystorage ‘svcinfo lssystem | findstr unmap’
To enable the Windows OpenSSH client for authentication by using SSH keys, the keys must be placed within the following directory structure C:User<username>.ssh.
Using SSH with Python
Python requires the use of another external module to connect to IBM Spectrum Virtualize by using the SSH protocol.
The paramiko open source module is popular and can be installed by using pip.
Example 12-4 shows the simple use of paramiko within a Python script by connecting to myStorage by using the myUser user and running the commands to display the configured host and controller objects.
Example 12-4 Using paramiko within Python
#!/usr/bin/python
import paramiko
mystorage = 'myStorage'
myuser = 'myUser'
ssh = paramiko.SSHClient()
ssh.set_missing_host_key_policy(paramiko.AutoAddPolicy())
ssh.connect(hostname=mystorage, username=myuser)
command1 = 'lshost -delim :'
command2 = 'lscontroller -delim :'
stdin, stdout, stderr = ssh.exec_command(command1)
data = stdout.read()
errors = stderr.read()
if data:
print(data)
if errors:
print(errors)
print "-----------------------------------------------------------------------------
";
stdin, stdout, stderr = ssh.exec_command(command2)
data = stdout.read()
errors = stderr.read()
if data:
print(data)
if errors:
print(errors)
ssh.close()
The set_missing_host_key_policy(paramiko.AutoAddPolicy()) method defines how to proceed if the remote system SSH fingerprint is not known locally.
The connect(hostname=target, username=user) method connects with the storage system. If keys-based authentication is configured correctly, keys are checked automatically and a session with SSH server is established.
Several options are available with client.connect(). For example, certificates can be specified by using pkey or key_filename arguments, and set the user password with password argument if better authentication methods cannot be used.
The following example shows how to specify user and password when creating a connection. This type is the most insecure because the password is saved in plain text in the script. Therefore, this approach is not recommended:
client.connect(hostname=’myStorage’, username=’myUser’, password=’myPassword’)
|
Note: If you do not want to manage session handling and paramiko methods, you can use the IBM Spectrum Virtualize Python Client (pysvc), which is available for download at this GitHub web page.
|
Using SSH with Perl
Perl requires the usage of an extra external module to connect to IBM Spectrum Virtualize by using the SSH protocol.
Net::OpenSSH is a Secure Shell client package that is implemented on the OpenSSH binary client, which is installed by using CPAN.
Example 12-5 shows the use of Net::OpenSSH within a Perl script by connecting to myStorage by using the user myUser and running the commands to display the configured host and controller objects.
Example 12-5 Using Net::OpenSSH within Perl
#!/usr/bin/perl
use strict;
use Net::OpenSSH;
my $host = "myStorage";
my $user = "myUser";
my $command1 = "lshost -delim :";
my $command2 = "lscontroller -delim :";
my $ssh = Net::OpenSSH->new("$user@$host", forward_agent => 1);
$ssh->error and die "SSH connection failed: " . $ssh->error;
print "Connected to $host
";
my @vDisk = $ssh->capture($command1) or die "Unable to run command";
my @controller = $ssh->capture($command2) or die "Unable to run command";
print @vDisk;
print "-----------------------------------------------------------------------------------
";
print @controller;
$ssh->disconnect();
The forwared_agent=>1 option defines the use of the ssh-agent authentication agent for the SSH key-based authentication.
12.2.3 SMI-S
The Storage Management Initiative Specification (SMI-S) is a common standard that was developed and maintained by the Storage Network Industry Association (SNIA). SMI-S also was ratified as an ISO standard.
The main objective of SMI-S is the management of heterogeneous storage systems across different vendors.
Because SMI-S was available before the REST API was introduced, several products, such as IBM Spectrum Protect Snapshot, still use this interface.
SMI-S consists of the following three main components:
•Common Information Model (CIM)
The CIM is an open standard that defines how managed elements are represented as a set of objects and their relationships in an IT environment.
•Web-Based Enterprise Management standards (WBEM)
WBEM is a set of standards that enable computers and other network devices to be managed by using a standard web browser.
•Service Location Protocol (SLP)
The SLP is a service discovery protocol that allows computers and other devices to find services in a LAN without prior configuration.
Python requires the use of an extra external module pywbem to connect to IBM Spectrum Virtualize by using the SMI-S interface.
The script that is shown in Example 12-6 shows the basic use of pywbem.
Example 12-6 Basic use of pywbem
#!/usr/bin/python
import pywbem
import getpass
mystorage = 'myStorage'
url = 'https://' + mystorage
username = 'myUser'
password = getpass.getpass()
wbemc = pywbem.WBEMConnection(url, (username, password), 'root/ibm', no_verification=True)
cluster = wbemc.EnumerateInstances('IBMTSSVC_Cluster')
print(cluster[0].items())
In this example, WBEMConnection() establishes HTTPS connection with WBEM services of IBM Spectrum Virtualize controller. Here, target storage system URL is specified by the URL argument. The username and password and the CIM namespace (root/ibm) to query also are provided in the next lines.
|
Note: The getpass module is not necessary to work with SMI-S because its purpose is to securely read passwords from standard input with the terminal echo function switched off to hide what is entered.
|
The no_verification=True argument disables SSL certificate verification. That is, it forces the script to trust any certificate that is provided by the WBEM server.
After the connection is successfully established, instances of a specific CIM class can be enumerated by using the EnumerateInstances() method, which returns a complex data structure (a list of CIMInstance() classes). As shown in Example 12-6 on page 580, it is done over the IBMTSSVC_Cluster class, which represents system-level information that is comparable with the results of running the lssystem command.
Different CIM classes are available for comprehensive management of the IBM SAN Volume Controller system, including the following examples:
•IBMTSSVC_Cluster: System level information
•IBMTSSVC_Node: Information about nodes
•BMTSSVC_ConcreteStoragePool: MDisk groups
•IBMTSSVC_BackendVolume: MDisks
•IBMTSSVC_StorageVolume: VDisk information
This section gives a brief overview of these CIM classes to illustrate SMI-S capabilities, but it does not provide full list of these classes or their descriptions. For more information about IBM SAN Volume Controller WBEM/CIM classes, their purposes, and relationship diagrams, see IBM Spectrum Virtualize: Interfacing Using the RESTful API.
The last line of the script parses and prints the data. But it is not the only way to complete the job. Python is a flexible language and it performs work in different ways. Several approaches of processing the data that is acquired by EnumerateInstances() for several CIM classes are listed in Example 12-7.
Example 12-7 Parsing EnumerateInstances() output for classes cluster, nodes, and storage pools
print('Cluster information')
cluster = wbemc.EnumerateInstances('IBMTSSVC_Cluster')
print(cluster[0]['ElementName'])
for c_prop in cluster[0]:
print(' {prop}: "{val}"'.format(prop=c_prop, val=cluster[0].properties[c_prop].value))
print('Nodes information')
nodes = wbemc.EnumerateInstances('IBMTSSVC_Node')
for node in nodes:
print(node['ElementName'])
for n_prop in node:
print(' {prop}: "{val}"'.format(prop=n_prop, val=node[n_prop]))
print('Pools information')
pools = wbemc.EnumerateInstances('IBMTSSVC_ConcreteStoragePool')
print('PoolID', 'NumberOfBackendVolumes', 'ExtentSize', 'UsedCapacity',
'RealCapacity', 'VirtualCapacity', 'TotalManagedSpace', sep=',')
for pool in pools:
print(
pool['ElementName'], pool['NumberOfBackendVolumes'], pool['ExtentSize'],
pool['UsedCapacity'], pool['RealCapacity'], pool['VirtualCapacity'],
pool['TotalManagedSpace'], sep=','
)
Using similar, yet different approaches, Cluster information and Nodes information sections of the example parse data in key/value pairs to show all acquired data. However, the Pools information part filters data to print selected fields only. It wastefully ignores all other fields.
For some classes, such as IBMTSSVC_StorageVolume, full enumeration of all the instances can be slow and can generate several megabytes of unnecessary data. This data must be prepared by the storage system, passed over the network, and then, parsed by the script. Fortunately, it is possible to significantly reduce such data flows by requesting limited amount of necessary information only.
As shown in Example 12-8, by using the ExecQuery() method, the WBEM server can be requested in a convenient query language, which is similar to SQL.
Example 12-8 Querying only required data using the ExecQuery() method
print('Vdisks:')
vdisks = wbemc.ExecQuery(
'DMTF:CQL',
"SELECT VolumeId, VolumeName, NumberOfBlocks FROM IBMTSSVC_StorageVolume"
" WHERE VolumeName LIKE 'vdisk.'"
)
for vd in vdisks:
print(vd['VolumeId'], vd['VolumeName'], vd['NumberOfBlocks'], sep=',')
Two dialects (CIM Query Language [DMTF:CQL] and WBEM Query Language [WQL]) are recognized by PyWBEM and both can be used with IBM Spectrum Virtualize. However, we use the DMTF:CQL syntax in the examples in this chapter. The DMTF specification (DSP0202) for CQL can be found in CIM Query Language Specification.
One of the advantages of SMI-S on IBM SAN Volume Controller is its capability to collect performance data of various storage system components by using “Statistic” family CIM classes, as shown in the following examples:
•IBMTSSVC_BackendVolumeStatistics
•IBMTSSVC_FCPortStatistics
•IBMTSSVC_NodeStatistics
•IBMTSSVC_StorageVolumeStatistics
A detailed, with commentaries, example of performance data collecting, and processing script is shown in Example 12-9. It works with IBMTSSVC_StorageVolumeStatistics to retrieve VDisks statistics, as shown in Example 12-9.
Example 12-9 Accessing performance metrics by using the PyWBEM module
import pywbem
import getpass
import time
mystorage = 'myStorage'
myuser = 'myUser'
mypassword = getpass.getpass()
url = 'https://' + mystorage
ofs = ',' # Output field separator
header = ['InstanceID', 'ReadIOs', 'WriteIOs', 'TotalIOs',
'KBytesRead', 'KBytesWritten', 'KBytesTransferred']
frequency = 5 # Performance collection interval in minutes
def vdisks_perf(wbem_connection, hdr):
"""Get performance statistics for vdisks"""
# Form "select" request string
request = "SELECT " + ','.join(hdr) + " FROM IBMTSSVC_StorageVolumeStatistics"
result = []
# Request WBEM
vd_stats = wbem_connection.ExecQuery('DMTF:CQL', request)
# parse reply and form a table
for vds in vd_stats:
# Handle 'InstanceID' in a specific way
vde = [int(vds.properties[hdr[0]].value.split()[1])]
# Collect the rest of numeric performance fields
for fld in header[1:]:
vde.append(int(vds.properties[fld].value))
result.append(vde)
return result
def count_perf(new, old, interval):
"""Calculate performance delta divided by interval to get per second values"""
result = []
for r in range(0, len(new)):
row = [new[r][0]] # InstanceID
for c in range(1, len(new[0])):
row.append(round(float(new[r][c] - old[r][c]) / interval, 2))
result.append(row)
return result
def print_perf(stats, hdr):
"""Printout performance data matrix"""
# Print header
print(ofs.join(str(fld) for fld in hdr))
# Print performance table
for ln in stats:
print('{}{}{}'.format(ln[0], ofs, ofs.join(str(fld) for fld in ln[1:])))
# Connect with WBEM/CIM services
wbemc = pywbem.WBEMConnection(url, (myuser, mypassword), 'root/ibm', no_verification=True)
# Infinite performance processing loop
new_perf = vdisks_perf(wbemc, header)
while True:
old_perf = new_perf
new_perf = vdisks_perf(wbemc, header)
delta_perf = count_perf(new_perf, old_perf, frequency * 60)
print_perf(delta_perf, header)
time.sleep(frequency * 60)
12.2.4 HTTPS and REST API on IBM Spectrum Virtualize
In this section, we discuss various ways in which the REST API can be used by using Curl, Python, and Perl.
We do not provide a recommendation for which programming language is to be used regarding the REST API.
Although Curl offers to test individual REST API calls quickly, Python and Perl are suitable for more complex tasks in which several REST API calls are to be run depending on each other.
Curl
Table 12-2 shows the curl command options.
Table 12-2 Options of the curl command
|
Command option
|
Description
|
Notes
|
|
curl
|
This is the executable that is sending the request to the server.
|
|
|
-k
|
By default, every SSL connection curl makes is verified to be secure. This option allows curl to proceed and operate, even for server connections otherwise considered insecure.
|
If you are using a signed SSL certificate, you do not need this option.
|
|
-H ‘Key:Value’
|
Send the information in the quote as a header.
Key is the name of the header - describing what specific header is being sent.
Value is the value for the key.
|
|
|
X-Auth-Username
|
The username that you use to log in.
|
Only used for initial authentication.
|
|
X-Auth-Password
|
The password that you use to log in.
|
Only used for initial authentication.
|
|
X-Auth-Token
|
The authentication token that is used to authenticate the REST calls after authentication is complete.
|
Only used for running commands, not for the authentication.
|
|
Content-Type:application/json
|
Tells the server to send the result back in JSON format.
|
|
|
https://{{cluster IP or DNS name}}:7443/rest/v1/auth
|
The URI that you send an authentication request to.
|
|
|
https://{{cluster IP or DNS name}}:7443/v1/{{cli command}}
|
The URI to which you send a CLI command.
|
|
|
-d ‘{{DATA}}’
|
The -d flag is used to send the CLI options, encoded in JSON.
|
|
Creating an authentication token
Example 12-10 shows how to authenticate at the REST API endpoint. The successful authentication creates an authentication token for further use with the REST API.
Example 12-10 Creating a JSON Web Token (JWT)
curl -k -X POST -H 'Content-Type:application/json' -H 'X-Auth-Username: MyUser' -H 'X-Auth-Password: MyPassword' https://myStorage:7443/rest/v1/auth
{"token": "4d8916c21058db218d623df51c33f5f01cefeafc988ed7af78c1c51b4a104212"}
Query for all configured MDisks
Example 12-11 shows how to use the REST API to get a list of all MDisks by using the formerly generated authentication token.
Example 12-11 Get all M0Disks
curl -k -X POST -H 'Content-Type:application/json' -H 'X-Auth-Token: 4d8916c21058db218d623df51c33f5f01cefeafc988ed7af78c1c51b4a104212' https://myStorage:7443/rest/v1/lsmdisk
[{ "id": "0", "name": "mdisk0", "status": "online", "mode": "array", "mdisk_grp_id": "0", "mdisk_grp_name": "Pool0", "capacity": "21.7TB", "ctrl_LUN_#": "", "controller_name"
: "", "UID": "", "tier": "tier1_flash", "encrypt": "no", "site_id": "", "site_name": "", "distributed": "yes", "dedupe": "no", "over_provisioned": "no", "supports_unmap": "ye
s" }]
Because this output is difficult to read, add “| python -m json.tool” to get a better readable output (see Example 12-12).
Example 12-12 Piping the output to python for getting better readable JSON output
curl -k -X POST -H 'Content-Type:application/json' -H 'X-Auth-Token: 4d8916c21058db218d623df51c33f5f01cefeafc988ed7af78c1c51b4a104212' https://10.1.1.10:7443/rest/v1/lsmdisk | python -m json.tool
[
{
"UID": "",
"capacity": "21.7TB",
"controller_name": "",
"ctrl_LUN_#": "",
"dedupe": "no",
"distributed": "yes",
"encrypt": "no",
"id": "0",
"mdisk_grp_id": "0",
"mdisk_grp_name": "Pool0",
"mode": "array",
"name": "mdisk0",
"over_provisioned": "no",
"site_id": "",
"site_name": "",
"status": "online",
"supports_unmap": "yes",
"tier": "tier1_flash"
}
]
Python
The script that is shown in Example 12-13 shows an example of the authentication and creation of an access token for further use in the context of querying all available MDisks.
The output of the script provides the following information about each MDisk:
•Name
•Name of the providing controller
•Name of the MDisk group
•Capacity
•Status
The script uses the getpass module to prompt for the password and prevent the storage of the credentials in clear text within the script.
Example 12-13 Using the REST API by using Python
#!/usr/bin/python
import json
import requests
import getpass
myStorage = 'myStorage'
myUser = 'myUser'
myPassword = getpass.getpass()
### disable SSL verification
ssl_verify = False
### ignore warning for SSL not being used
from requests.packages.urllib3.exceptions import InsecureRequestWarning
requests.packages.urllib3.disable_warnings(InsecureRequestWarning)
### get session token
tokenRequest = requests.post('https://' + myStorage + ':7443/rest/v1/auth',
headers={
'Content-type': 'application/json',
'X-Auth-Username': myUser,
'X-Auth-Password': myPassword
},
params="", data="", verify=ssl_verify)
### convert to JSON
_token = json.loads(tokenRequest.text)
token = _token['token']
### get mdisks
mdiskRequest = requests.post('https://' + myStorage + ':7443/rest/v1/lsmdisk',
headers={
'Content-type': 'application/json',
'X-Auth-token': token
},
params="", data="", verify=ssl_verify)
_mdisks = json.loads(mdiskRequest.text)
print( '{:32.32s} {:20.20s} {:32.32s} {:8.8s} {:10.10s}'
.format("name","controller_name","mdisk_grp_name","capacity","status") )
for mdisk in _mdisks:
print( '{:32.32s} {:20.20s} {:32.32s} {:8.8s} {:10.10s}'
.format(mdisk['name'],mdisk['controller_name'],mdisk['mdisk_grp_name'],mdisk['capacity'],mdisk['status']) )
The use of the verify=False option allows insecure SSL connections. By default, every SSL connection is verified to be secure. This option allows the request to get proceed; otherwise, the connection is considered insecure. If you use a signed SSL certificate, you do not need this option.
Perl
The script that is shown in Example 12-14 shows an example of the authentication and creation of an access token for further use in the context of querying all available MDisks.
The output of the script provides the following information about each MDisk:
•Name
•Name of the providing controller
•Name of the MDisk group
•Capacity
•Status
The script uses the IO::Prompter module to prompt for the password and prevent the storage of the credentials in clear text within the script.
Example 12-14 Using the REST API by using Perl
#!/usr/bin/perl
use strict;
use JSON;
use REST::Client;
use IO::Prompter;
my $myStorage = 'myStorage';
my $myUser = 'myUser';
my $myPassword = prompt 'Please enter your password:', -echo=>"*";
my $restURL = 'https://' . $myStorage . ':7443/rest/v1/';
### get the session token
my $tokenRequest = REST::Client->new();
$tokenRequest->addHeader('Content-type', 'application/json');
$tokenRequest->addHeader('X-Auth-Username' , $myUser);
$tokenRequest->addHeader('X-Auth-Password', $myPassword);
$tokenRequest->getUseragent()->ssl_opts('verify_hostname' => 0);
$tokenRequest->POST($restURL . '/auth');
my $token = decode_json($tokenRequest->responseContent())->{'token'};
### get the list of mdisks
my $mdiskRequest = REST::Client->new();
$mdiskRequest->addHeader('Content-type', 'application/json');
$mdiskRequest->addHeader('X-Auth-Token', $token);
$mdiskRequest->getUseragent()->ssl_opts('verify_hostname' => 0);
$mdiskRequest->POST($restURL . '/lsmdisk');
my $mdiskList = $mdiskRequest->responseContent();
my @mdiskListJSON = @{decode_json($mdiskList)};
for my $key (@mdiskListJSON) {
printf "%32s %20s %32s %8s %10s
",
$key->{'name'},
$key->{'controller_name'},
$key->{'mdisk_grp_name'},
$key->{'capacity'},
$key->{'status'};
}
The use of the getUseragent()->ssl_opts('verify_hostname' => 0) method allows insecure SSL connections. By default, every SSL connection is verified to be secure. This option allows the request to proceed; otherwise, the connection is considered insecure. If you use a signed SSL certificate, you do not need this option.
12.2.5 HTTPS and REST API on IBM Spectrum Control
You can use the Representational State Transfer (REST) API for IBM Spectrum Control to access information about resources and to generate custom capacity, configuration, and performance reports.
The main advantage of this method is that it allows to get information about the entire SAN and storage infrastructure that is managed by the IBM Spectrum Control server (see Example 12-15).
Example 12-15 Using the IBM Spectrum Control REST API by using Python
#!/usr/bin/python
import requests
import getpass
username = 'myUser'
password = getpass.getpass()
url = 'https://spectrumcontrol-server:9569/srm/'
sesssion = requests.Session()
sesssion.verify = False
response = session.post(url + 'j_security_check',
data={'j_username': username, 'j_password': password})
response.raise_for_status()
response = session.get(url + 'REST/api/v1/' + 'StorageSystems')
response.raise_for_status()
print(response.json())
12.3 Automation with Red Hat Ansible
Automation is a priority for maintaining today’s busy storage environments. Automation software allows the creation of repeatable sets of instructions. It also reduces the need for human interaction with computer systems.
Red Hat Ansible and other third-party automation tools are becoming increasingly used across the enterprise IT environments. It is not unexpected that their use in storage environments will become more popular.
12.3.1 Red Hat Ansible
The IBM SAN Spectrum Virtualize Controller family includes integration with Red Hat Ansible Automation Platform. This integration allows IT to create an Ansible playbook that automates repetitive tasks across an organization in a consistent way, which helps improve outcomes and reduces errors.
Ansible is an agentless automation management tool that uses the SSH protocol. As of this writing, Ansible can be run from any machine with Python 2 (version 2.7) or Python 3 (versions 3.5 and higher) installed. Supported platforms for Ansible include Red Hat, SUSE, Debian, CentOS, macOS, and any of the Berkeley Software Distribution (BSD) versions.
|
Note: Windows is not supported for the Ansible control node.
|
12.3.2 Red Hat Ansible Editions
The following Red Hat Ansible Editions are available:
•Ansible Core
Ansible Core is the command-line tool that is installed from community repositories or the official Red Hat repositories for Ansible.
•Ansible Tower
Ansible Tower is the GUI tool that is used to run Ansible tasks. Tower requires a license that is based on the number of systems Ansible Tower is to manage. Ansible Tower is available as Standard or Premium Edition, whereby the difference is the 24x7 support that is included in the Premium Edition.
12.3.3 Requirements
Ansible server (Control Node) features the following requirements:
•Python 2 (version 2.7) or Python 3 (versions 3.5 and higher)
|
Note: Some plug-ins that run on the control node include other requirements. These requirements are listed in the plug-in documentation.
|
•Host requirements:
– Although you do not need a daemon on your managed nodes, you need a way for Ansible to communicate with them.
– For most managed nodes, Ansible makes a connection over SSH and transfers modules by using SFTP. If SSH works but SFTP is not available on some of your managed nodes, you can switch to SCP in ansible.cfg.
– For any machine or device that can run Python, you also need Python 2 (version 2.6 or later) or Python 3 (version 3.5 or later).
|
Note: Some modules feature more requirements that must be met on the ‘target’ machine (the managed node). These requirements are listed in the module documentation.
|
12.3.4 Essential terminology in an Ansible environment
Ansible environment features the following essential terminology:
•Ansible Galaxy: A hub for finding and sharing Ansible content.
•Ansible server: The machine with Ansible installed, which runs all tasks and playbooks.
•Playbook: A framework where Ansible automation tasks are defined (written in YAML).
•Task: A section that contains a single procedure you want to be run.
•Tag: A name that you can assign to a task.
•Play: The execution of a playbook.
•Hosts: The devices that you manage with Ansible.
•Modules: A command or set of commands that are made for execution on the client side.
•Handler: A task that is called only if a notifier is present.
•Notifier: A section that is assigned to a task that calls a handler if the output is changed.
•Inventory: A file that contains Ansible client/server data.
•Fact: Information that is retrieved from the client from global variables by using the gather-facts operation.
•Roles: A structured way of grouping tasks, handlers, variables, and other properties.
•Container: Ansible Container uses Ansible roles to build images, initialize projects, and add services to projects.
12.3.5 Automating IBM Storage with Ansible
IBM data storage provides simple storage solutions that address modern data requirements and provides a solution to your hybrid multicloud strategy.
With the speed, scale, and complexity of hybrid multicloud and even traditional on-premises environments, automation became a priority.
IBM FlashSystem family for hybrid multicloud includes integration with Red Hat Ansible Automation Platform. It allows IT to create an Ansible playbook that automates the tasks that are repeated across an organization in a consistent way, which helps improve outcomes and reduces risk.
It also standardizes how IT and application owners interact together and features the following benefits:
•With Red Hat Ansible Automation Platform and IBM Storage, customers can easily automate tasks, such as configuration management, provisioning, workflow orchestration, application deployment, and life-cycle management.
•By using Red Hat Ansible Automation Platform and IBM Storage, customers can reduce system inconsistencies with the automation modules.
•Red Hat Ansible Automation Platform can also be used to configure end-to-end infrastructure in an orchestrated fashion.
•Ansible provides a single pane of glass visibility to multi cluster, multicloud environments, which allows lines of business to use playbooks to accomplish their goals without needing to understand the details of how the work is being done.
IBM is a Red Hat-certified support module vendor that provides simple management for the following commands that are used in the IBM Spectrum Virtualize Ansible Collection:
•Collect facts: Collect basic information, including hosts, host groups, snapshots, consistency groups, and volumes
•Manage hosts: Create, delete, or modify hosts
•Manage volumes: Create, delete, or extend the capacity of volumes
•Manage MDisk: Create or delete a managed disk
•Manage pool: Create or delete a pool (managed disk group)
•Manage volume map: Create or delete a volume map
•Manage consistency group snapshot: Create or delete consistency group snapshots
•Manage snapshot: Create or delete snapshots
•Manage volume clones: Create or delete volume clones
This collection provides a series of Ansible modules and plug-ins for interacting with the IBM Spectrum Virtualize family storage products. The modules in the IBM Spectrum Virtualize Ansible collection use the REST API to connect to the IBM Spectrum Virtualize storage system. These products include:
•IBM SAN Volume Controller
•IBM FlashSystem family members that are built with IBM Spectrum Virtualize (FlashSystem 5000, 5100, 5200, 7200, 9100, 9200, 9200R, and V9000
•IBM Storwize family
•IBM Spectrum Virtualize for Public Cloud
For more information, see Automate and Orchestrate Your IBM FlashSystem Hybrid Cloud with Red Hat Ansible, REDP-5598.
For IBM Spectrum Virtualize modules, Ansible version 2.9 or higher is required. For more information about IBM Spectrum Virtualize modules, see this web page.
12.3.6 Getting started
The Ansible Collection (ibm.spectrum_virtualize) provides a series of Ansible modules and plug-ins for interacting with the IBM Spectrum Virtualize family storage products,.
As of this writing, the Ansible collection for IBM Spectrum Virtualize is available in version 1.6.0.
All information in this section are based on this version.
Prerequisites for using the modules
Paramiko must be installed to use ibm_svctask_command and ibm_svcinfo_command modules.
Paramiko is a Python (2.7, 3.4+) implementation of the SSHv2 protocol, and provides client and server functions.
Although Paramiko is a Python C extension for low-level cryptography, it is a pure Python interface around SSH networking concepts.
Current limitations
The modules in the IBM Spectrum Virtualize Ansible collection use the REST API to connect to the IBM Spectrum Virtualize storage system.
This collection has the following limitations:
•Using the REST API to list more than 2000 objects might create a loss of service from the API side because it automatically restarts because of memory constraints.
•The Ansible collection can run on all IBM Spectrum Virtualize storage versions that are 8.1.3, except versions 8.3.1.3 and 8.3.1.4.
•It is not possible to access the REST API by using a cluster IPv6 address.
Prerequisites
Ensure that the following prerequisites are met:
•Ansible and is installed and configured on a controller node
•Ansible Galaxy Collection ibm.spectrum_virtualize is installed on the same controller node.
•Network access is available from the controller node to Spectrum Virtualize Management IP.
•A user with the necessary is available permissions to create or delete objects on IBM Spectrum Virtualize.
•IBM Spectrum Virtualize operates at version 8.1.3 or higher.
Installing or upgrading Ansible Galaxy Collection ibm.spectrum_virtualize
To install the IBM Spectrum Virtualize collection that is hosted in Galaxy, use the following command:
ansible-galaxy collection install ibm.spectrum_virtualize
To upgrade to the latest version of the IBM Spectrum Virtualize collection, use the following command:
ansible-galaxy collection install ibm.spectrum_virtualize --force
Functions provided by IBM Spectrum Virtualize Ansible modules
The ibm.spectrum_virtualize collection provides the following modules:
•ibm_svc_auth: Generates an authentication token for a user on the IBM Spectrum Virtualize family storage system.
•ibm_svc_host: Manages hosts that are on IBM Spectrum Virtualize system.
•ibm_svc_hostcluster: Manages the host cluster that is on IBM Spectrum Virtualize system.
•ibm_svc_info: Collects information about the IBM Spectrum Virtualize system.
•ibm_svc_manage_consistgrp_flashcopy: Manages the FlashCopy consistency groups that are on IBM Spectrum Virtualize system.
•ibm_svc_manage_cv: Manages the change volume in remote copy replication that is on the IBM Spectrum Virtualize system.
•ibm_svc_manage_flashcopy: Manages the FlashCopy mappings that are on IBM Spectrum Virtualize system.
•ibm_svc_manage_mirrored_volume: Manages the mirrored volumes that are on the IBM Spectrum Virtualize system.
•ibm_svc_manage_migration: Manages the volume migration between clusters that are on the IBM Spectrum Virtualize system.
•ibm_svc_manage_replication: Manages the remote copy replication that is on the IBM Spectrum Virtualize system.
•ibm_svc_manage_replicationgroup: Manages the remote copy consistency group on IBM Spectrum Virtualize system.
•ibm_svc_manage_volume: Manages the standard volumes on IBM Spectrum Virtualize system.
•ibm_svc_manage_volumegroup: Manages the volume groups that are on IBM Spectrum Virtualize system.
•ibm_svc_mdisk: Manages the MDisks for IBM Spectrum Virtualize system.
•ibm_svc_mdiskgrp: Manages pools for IBM Spectrum Virtualize system.
•ibm_svc_start_stop_flashcopy: Starts or stops the FlashCopy mapping and consistency groups that are on IBM Spectrum Virtualize system.
•ibm_svc_start_stop_replication: Starts or stops the remote copy relationship or group on IBM Spectrum Virtualize system.
•ibm_svc_vol_map: Manages the volume mapping for IBM Spectrum Virtualize system.
•ibm_svcinfo_command: Runs the svcinfo CLI command on the IBM Spectrum Virtualize system over an SSH session.
•ibm_svctask_command: Runs the svctask CLI commands on the IBM Spectrum Virtualize system over and SSH session.
|
Note: Beginning with version 1.6.0, the ibm_svc_vdisk module is considered a deprecated feature. A new module (ibm_svc_manage_volume) was introduced to manage standard volumes.
|
Getting help for IBM Spectrum Virtualize Ansible modules
To get the online documentation for a specific module that is displayed, use the following command:
ansible-doc <collection-name>.<module-name>
The output of the help includes all permissible options and some examples of how to use the module (see Example 12-16).
Example 12-16 Example displaying online help
ansible-doc ibm.spectrum_virtualize.ibm_svc_manage_volume
> IBM_SVC_MANAGE_VOLUME
Ansible interface to manage 'mkvolume', 'rmvolume', and 'chvdisk' volume commands.
* This module is maintained by The Ansible Community
OPTIONS (= is mandatory):
- buffersize
Specifies the pool capacity that the volume will reserve as a buffer for thin-provissioned and compressed volumes.
Parameter 'thin' or 'compressed' must be specified to use this parameter.
The default buffer size is 2%.
`thin' or `compressed' is required when using `buffersize'.
Valid when `state=present', to create a volume.
[Default: (null)]
type: str
= clustername
The hostname or management IP of the Spectrum Virtualize storage system.
type: str
:
:
:
12.3.7 Securing credentials in Ansible
While working with Ansible, you can create several playbooks, inventory files, variable files, and so on. Some of the files might contain sensitive data, such as access credentials. To protect this kind of data, Ansible provides the Ansible Vault, which helps to prevent this data from being exposed. Sensitive data and passwords are kept in an encrypted file rather than in plain text files.
12.3.8 Creating an Ansible playbook
The playbook automates in a consistent manner the tasks that are repeated across an organization, which improves outcomes and reduces risk. It also standardizes how IT and application owners interact.
In this section, we discuss creating an Ansible playbook. The creation of the playbook is based on the use case that is used here.
For a new VMware ESX cluster, consisting of two new servers, two VDisks are to be created and mapped to the hostcluster object.
|
Note: Idempotence is a property that might be included in a mathematics or computer science operation. It roughly means that an operation can be carried out multiple times without changing the result.
The IBM Spectrum Virtualize Ansible modules provide idempotency in Ansible playbooks.
The IBM Spectrum Virtualize Ansible modules check whether the object to be created exists in the defined state and does not attempt to create it again.
|
Table 12-3 lists the variable parameters and their values for the example playbook.
Table 12-3 Variable parameters and their values for the example playbook
|
Attribute
|
Value
|
|
Name of new host cluster
|
ESX-Cluster-1
|
|
Name of new host 1
|
ESX-Host-1
|
|
WWPNs of new host 1
|
100000109C400798, 1000001AB0440446
|
|
Name of new host 2
|
ESX-Host-2
|
|
WWPNs of new host 2
|
100000109B600424, 1000001BC0660146
|
|
Name of VDisk 1
|
Datastore1
|
|
Name of VDisk 2
|
Datastore2
|
Step 1: Authentication
Example 12-17 shows the required YAML notation for the part of the playbook to authenticate at the IBM Spectrum Virtualize REST API to obtain a token for further use. To avoid storing the password in clear text within the playbook, the password was encrypted in a vault.
Example 12-17 YAML notation for obtaining an authentication token
vars:
clustername: <Cluster management ip | hostname>
domain: <FQDN>
username: myuser
password: !vault |
$ANSIBLE_VAULT;1.1;AES256
62653531313434393266646438306537396264306433653638343439643136333238383139616561
6530373430636265316639626234376336306630343333640a326332626564656233323336333239
39633132656631353030386430663736363631656438343364346235653534316333333233333531
3166343263626538360a633664616264326133643339336333363638323232373962393839356637
6138
tasks:
- name: Obtain an authentication token
register: result
ibm_svc_auth:
clustername: "{{ clustername }}"
domain: "{{ domain }}"
username: "{{ username }}"
password: "{{ password }}"
For more informations about how to work with Ansible vaults, see this Ansible Documentation web page.
Step 2: Creating the host cluster object
Example 12-18 shows the required YAML notation for the part of the playbook to create an empty host cluster object.
Example 12-18 YAML notation for creating an empty host cluster
- name: Define a new host cluster
ibm_svc_hostcluster:
clustername: "{{ clustername }}"
domain: "{{ domain }}"
token: "{{ result.token }}"
log_path: "{{ log_path }}"
name: <hostcluster_name>
state: present
Step 3: Creating an FC host
Example 12-19 shows the required YAML notation for the part of the playbook to create an FC host object.
Example 12-19 YAML notation for creating a new FC host object
- name: Define a new FC host
ibm_svc_host:
clustername: "{{ clustername }}"
domain: "{{ domain }}"
token: "{{ result.token }}"
log_path: "{{ log_path }}"
name: "{{ hostname }}"
state: present
fcwwpn: "{{ fcwwpn(s) }}"
iogrp: 0:1:2:3
protocol: scsi
type: generic
hostcluster: "{{ hostcluster_name }}"
hostcluster: "{{ hostcluster_name }}"
Step 4: Creating a thin-provisioned volume
Example 12-20 shows the required YAML notation for the part of the playbook to create a thin-provisioned volume.
Example 12-20 YAML notation to create a thin-provisioned volume
- name: Create a thin-provisioned volume
ibm_svc_manage_volume:
clustername: "{{ clustername }}"
domain: "{{ domain }}"
token: "{{ result.token }}"
log_path: "{{ log_path }}"
name: "volume_name"
state: "present"
pool: "<pool_name>"
size: "<size>"
unit: "<size_unit>"
thin: true
buffersize: 10%
Step 5: Mapping the new volume to the host cluster object
Example 12-21 shows the required YAML notation for the part of the playbook to map the new volume to the hostcluster.
Example 12-21 YAML notation to map a volume to the hostcluster
- name: Map a volume to a hostcluster
ibm_svc_vol_map:
clustername: "{{ clustername }}"
domain: "{{ domain }}"
token: "{{ result.token }}"
log_path: "{{ log_path }}"
volname: <volume_name>
hostcluster: <hostcluste_-name>
state: present
If a SCSI-Id must be specified, use the scsi: <scsi-id> parameter.
Putting it all together
Example 12-22 shows the combined required tasks for the use of the IBM Spectrum Virtualize collection to create hostcluster volumes (this use case is used in this chapter) to be used as a playbook by Ansible. All customized lines of the playbook are highlighted in bold in the example.
Example 12-22 Complete playbook for specified use-case
- name: Using Spectrum Virtualize collection to create hostcluster - hosts - volumes
hosts: localhost
collections:
- ibm.spectrum_virtualize
gather_facts: no
connection: local
# definition of global variables
vars:
clustername: mySVC
domain: mydomain.com
username: myuser
password: !vault |
$ANSIBLE_VAULT;1.1;AES256
62653531313434393266646438306537396264306433653638343439643136333238383139616561
6530373430636265316639626234376336306630343333640a326332626564656233323336333239
39633132656631353030386430663736363631656438343364346235653534316333333233333531
3166343263626538360a633664616264326133643339336333363638323232373962393839356637
6138
log_path: /tmp/redbook-example.log
# define variables for running the playbook
# hostcluster
hostcluster_name: ESX-Cluster-1
# host 1
host1_name: ESX-Host-1
host1_fcwwpn: 100000109C400798{{":"}}1000001AB0440446
# host 2
host2_name: ESX-Host-2
host2_fcwwpn: 100000109B600424{{":"}}1000001BC0660146
# pools to use for volume mirror
pool1_name: pool1
pool2_name: pool2
# volume 1
volume1_name: Datastore1
volume1_size: '10'
volume1_size_unit: tb
# volume 2
volume2_name: Datastore2
volume2_size: '10'
volume2_size_unit: tb
tasks:
# creating an authentication token for further usage within the playbook
- name: Obtain an authentication token
register: result
ibm_svc_auth:
clustername: "{{ clustername }}"
domain: "{{ domain }}"
username: "{{ username }}"
password: "{{ password }}"
log_path: "{{ log_path }}"
# create the hostcluster object
- name: Create the hostcluster
ibm_svc_hostcluster:
clustername: "{{ clustername }}"
domain: "{{ domain }}"
token: "{{ result.token }}"
log_path: "{{ log_path }}"
name: "{{ hostcluster_name }}"
state: present
# create first host object
- name: Define first FC host
ibm_svc_host:
clustername: "{{ clustername }}"
domain: "{{ domain }}"
token: "{{ result.token }}"
log_path: "{{ log_path }}"
name: "{{ host1_name }}"
state: present
fcwwpn: "{{ host1_fcwwpn }}"
iogrp: 0:1:2:3
protocol: scsi
type: generic
hostcluster: "{{ hostcluster_name }}"
# create second host object
- name: Define second FC host
ibm_svc_host:
clustername: "{{ clustername }}"
domain: "{{ domain }}"
token: "{{ result.token}}"
log_path: "{{ log_path }}"
name: "{{ host2_name }}"
state: present
fcwwpn: "{{ host2_fcwwpn }}"
iogrp: 0:1:2:3
protocol: scsi
type: generic
hostcluster: "{{ hostcluster_name }}"
# create first mirrored thin-provisioned volume
- name: Create first thin-provisioned volume
ibm_svc_manage_volume:
clustername: "{{ clustername }}"
domain: "{{ domain }}"
token: "{{ result.token }}"
log_path: "{{ log_path }}"
name: "{{ volume1_name }}"
state: "present"
pool: "{{ pool1_name }}:{{ pool2_name }}"
size: "{{ volume1_size }}"
unit: "{{ volume1_size_unit }}"
thin: true
buffersize: 10%
# create second mirrored thin-provisioned volume
- name: Create second thin-provisioned volume
ibm_svc_manage_volume:
clustername: "{{ clustername }}"
domain: "{{ domain }}"
token: "{{ result.token }}"
log_path: "{{ log_path }}"
name: "{{ volume2_name }}"
state: "present"
pool: "{{ pool1_name }}:{{ pool2_name }}"
size: "{{ volume2_size }}"
unit: "{{ volume2_size_unit }}"
thin: true
buffersize: 10%
# mapping of first volume to the hostcluster
- name: Map first volume to the hostcluster
ibm_svc_vol_map:
clustername: "{{ clustername }}"
domain: "{{ domain }}"
token: "{{ result.token }}"
log_path: "{{ log_path }}"
volname: "{{ volume1_name }}"
hostcluster: "{{ hostcluster_name }}"
state: present
# mapping of second volume to the hostcluster
- name: Map second volume to the hostcluster
ibm_svc_vol_map:
clustername: "{{ clustername }}"
domain: "{{ domain }}"
token: "{{ result.token }}"
log_path: "{{ log_path }}"
volname: "{{ volume2_name }}"
hostcluster: "{{ hostcluster_name }}"
state: present
12.3.9 More automation
The use case that is described in this chapter can be extended by completing the following steps:
1. Create the required FC zoning.
2. Scan the HBA for the newly created volumes.
3. Create a VMFS data store on the discovered volumes.
4. Create one or more virtual machines (VMs).
For more information about the Brocade FOS FC collection on Ansible Galaxy, see this Ansible web page.
For more information about the community.vmware Ansible Collection on Ansible Galaxy, see this Ansible web page.
..................Content has been hidden....................
You can't read the all page of ebook, please click here login for view all page.