
Chapter 8
Printers
Objectives
Upon completion of this chapter, you will be able to answer the following questions:
What are the characteristics and capabilities of printers?
What are printer connectors and ports?
What are the parts and characteristics of inkjet printers?
What are the parts and characteristics of laser printers?
How do laser printers operate?
What are the characteristics of thermal printers and impact printers?
What are the characteristics of virtual printers?
What are the parts and characteristics of 3D printers?
How do you install and update the device driver, firmware, and RAM for a printer?
How do you configure settings on a printer?
How do you optimize printing performance?
How do you configure printer sharing?
How do you configure printer sharing using a print server?
What are vendor guidelines and the importance of appropriate operational environments for printers?
How do you perform preventive maintenance on an inkjet printer?
How do you perform preventive maintenance on a laser printer?
How do you perform preventive maintenance on a thermal printer?
How do you perform preventive maintenance on an impact printer?
How do you perform preventive maintenance on a 3D printer?
What are the six steps of troubleshooting printers?
What are common problems and solutions for printers?
Key Terms
This chapter uses the following key terms. You can find the definitions in the glossary at the end of the book.
automatic document feeder (ADF) page 412
Enhanced Capabilities Port (ECP) page 415
Enhanced Parallel Port (EPP) page 415
mean time between failures (MTBF) page 411
near letter quality (NLQ) page 436
pages per minute (PPM) page 410
Introduction (8.0)
Printers produce paper copies of electronic files. Government regulations and business policies often require that physical records be kept. This makes paper copies of digital documents as important today as they were when the paperless revolution began several years ago. This chapter provides essential information about printers. You will learn how printers operate, what to consider when purchasing a printer, and how to connect printers to an individual computer or to a network. You will also learn the operation of various types of printers and how to install them and maintain them, as well as how to troubleshoot common problems that arise. At the end of the chapter you will learn the importance of a preventive maintenance program for printers and apply the six steps in the troubleshooting process as they pertain to printers.
It is important to not only learn about the different types of printers and their components but also to build hands-on skills. In this chapter you will complete a lab performing preventive maintenance on an inkjet printer and a laser printer. You will also work labs on installing and sharing a printer in Windows.
Common Printer Features (8.1)
Printers come in various models and types, and they are chosen to meet the different needs and necessities of an organization. Choosing printers requires an understanding of its individual features. Choosing the right model saves time, is cost effective, and efficiently uses company resources. Different purchase choices will be made for high-volume document printing than for printing of digital pictures to create brochures.
Characteristics and Capabilities (8.1.1)
No matter what model, price range, and type of printer you purchase, you need to consider how the printer is going to be used. Printing speeds, monochrome or color, cost and availability of cartridges, driver compatibility, power consumption, network type, and the total cost of ownership are some of the many factors that need to be considered when purchasing, repairing, and maintaining printers.
Characteristics of Printers (8.1.1.1)
Computer technicians are often required to select, purchase, and install printers for the users. Technicians need to know how to configure, troubleshoot, and repair the most common types of printers. Most printers available today are either laser printers using imaging drums or inkjet printers using electrostatic spray technology. Dot matrix printers using impact technology are used in applications that require carbon copies. Thermal printers are commonly found in retail, typically used to print receipts. 3D printers are used in design and manufacturing. Figure 8-1 shows examples of these five types of printers.
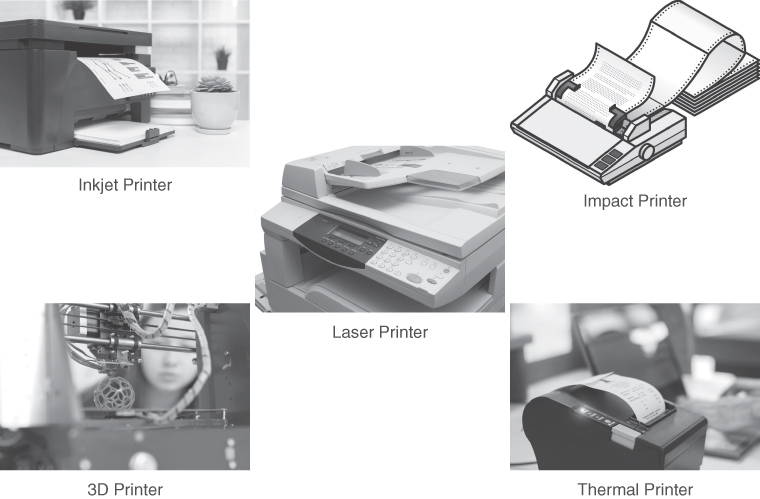
Figure 8-1 Characteristics of Printers
Printer Speed, Quality, and Color (8.1.1.2)
Printer speed is a factor to consider when selecting a printer. The speed of a printer is measured in pages per minute (PPM). Printer speed varies between makes and models. Speed is also affected by the complexity of the image and the quality desired by the user. The quality of printing is measured in dots per inch (dpi). The larger the dpi number, the better the image resolution. When the resolution is higher, text and images are clearer. To produce the best high-resolution images, use high-quality ink or toner and high-quality paper.
The color printing process uses the primary colors cyan, magenta, and yellow (CMY). For inkjet printing, the color black serves as the base or key color. Thus, the acronym CMYK refers to the inkjet color printing process. Figure 8-2 shows a CMYK color wheel.

Figure 8-2 CMYK Color Wheel
Reliability and Total Cost of Ownership (8.1.1.3)
A printer should be reliable. Because so many types of printers are on the market, it is important to research the specifications of several printers before selecting one. Here are some manufacturer options to consider:
Warranty: Identify what is covered in the warranty.
Scheduled servicing: Servicing is based on expected usage. Usage information is in the documentation or on the manufacturer’s website.
Mean time between failures (MTBF): A printer should work without failing for an average length of time. Information about the MTBF is provided in the documentation or on the manufacturer’s website.
When buying a printer, there is more than just the initial cost of the printer to consider. The total cost of ownership (TCO) includes a number of factors:
Initial purchase price
Cost of consumable supplies, such as paper and ink (see Figure 8-3)

Figure 8-3 Reliability and Total Cost of Ownership
Pages per month
Price per page
Maintenance costs
Warranty costs
When calculating the TCO, consider the amount of printing required and the expected lifetime of the printer.
Automatic Document Feeder (8.1.1.4)
An automatic document feeder (ADF) can be found on some laser and inkjet printers that also have the capabilities of copy machines. The ADF is a slot where an existing document can be placed, as shown in Figure 8-4. The machine is then set to make copies of this document.
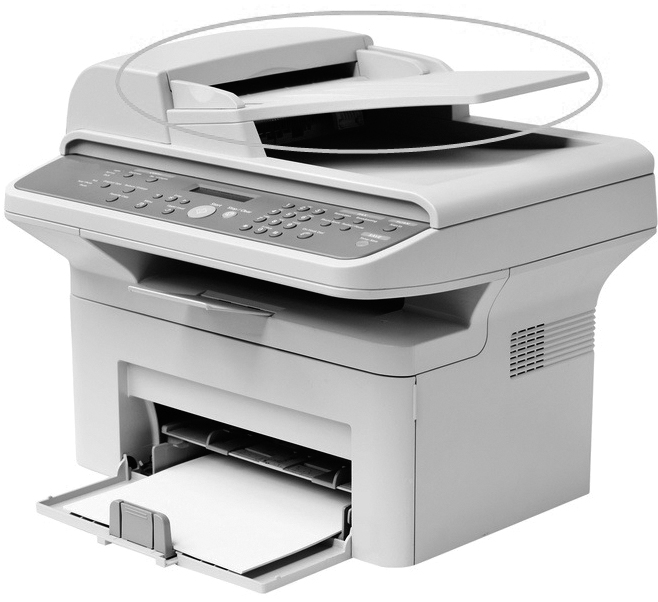
Figure 8-4 ADF
When the print process is started, the ADF pulls one page of the document onto the glass surface of the platen, where it is scanned and copies are made. The page on the platen is then automatically removed, and the next page in the original document is pulled onto the platen. This process continues until the entire original document in the feeder has been pulled through. Some machines can make multiple copies. Usually these machines can also collate these copies.
Depending on the capabilities of the machine, the original document may be placed face up in the feeder or face down. The machine may have a limit as to how many pages can be put in the ADF at a time.
8.1.1.5 Check Your Understanding - Printer Capabilities and Characteristics

Refer to the online course to complete this activity.
Printer Connections (8.1.2)
Printers have many types of connection choices, which gives a technician a great deal of flexibility in choosing the type of printer and printer installation. For example, a printer can be connected to an individual PC for a single user or as a network printer to extend usage to many devices or even give remote access through the Internet.
Printer Connection Types (8.1.2.1)
A printer must have a compatible interface with the computer. Typically, a printer connects to a home computer using a USB or wireless interface. However, a printer may also connect directly to a network, using a network cable or a wireless interface, as shown in Figure 8-5.
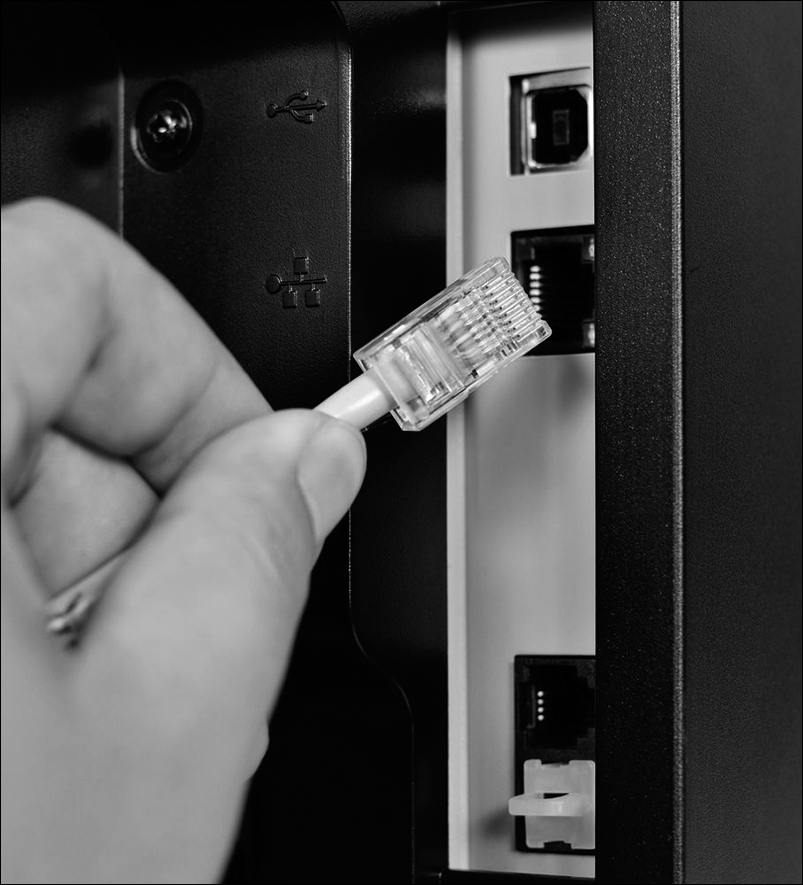
Figure 8-5 Printer Connection Types
Serial Connectors
A serial connection can be used for dot matrix printers because the printers do not require high-speed data transfer. A serial connection, shown in Figure 8-6, for a printer is often referred to as COM. Serial ports are generally found on legacy computer systems.
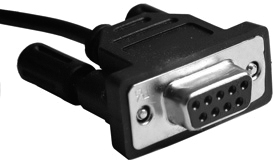
Figure 8-6 Serial
Parallel Connectors
With a parallel connection, the data transfer path is wider than a serial data transfer path, allowing data to move more quickly to or from the printer.
IEEE 1284 is the standard for parallel printer ports. Enhanced Parallel Port (EPP) and Enhanced Capabilities Port (ECP) are two modes of operation within the IEEE 1284 standard that allow bidirectional communication. A parallel connection for a printer is often referred to as LPT. Parallel ports, shown in Figure 8-7, are generally found on legacy computer systems.

Figure 8-7 Parallel
USB Connectors
USB, shown in Figure 8-8, is a common interface for printers and other devices. When a USB device is added to a computer system that supports Plug and Play, the device is automatically detected and starts the driver installation process.

Figure 8-8 USB
FireWire Connectors
FireWire, also known as i.LINK or IEEE 1394, is a high-speed communication bus that is platform independent. FireWire, shown in Figure 8-9, connects digital devices such as printers, scanners, cameras, and hard drives.
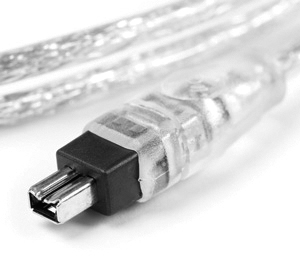
Figure 8-9 FireWire
Ethernet Connectors
With an Ethernet connection, connecting a printer to the network requires cabling that is compatible with both the network and the network port installed in the printer. Most network printers use an RJ-45 interface to connect to a network, as shown in Figure 8-10.
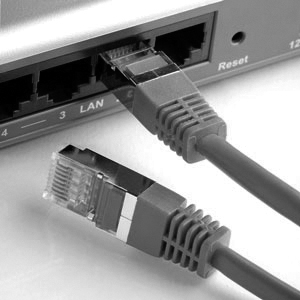
Figure 8-10 Ethernet
Wireless Connections
Many printers come with built-in wireless capability, which enables them to be connected to a Wi-Fi network, as shown in Figure 8-11. Some printers come equipped with the ability to connect to devices through Bluetooth pairing.

Figure 8-11 Wireless
8.1.2.2 Check Your Understanding - Printer Connections
Refer to the online course to complete this activity.
Printer Type Comparison (8.2)
This section describes the characteristics of two main printer categories: impact and non-impact. There are several types of printers in each of these categories. Not all printers can provide all the functions you may want, so understanding the features and characteristics of different printer types is necessary to make the best choice for the intended printer use. The intended use of the printer is also important in the purchasing decision. Considerations include whether a printer will be used for business or home use, whether it will be networked or local, and whether it is a special use printer.
Inkjet Printers (8.2.1)
Inkjet printers are a type of non-impact printer that creates output by spraying ink onto the material being printed on. This type of printer is commonly used for low-volume printing and is a strong choice for home users and small businesses.
Inkjet Printer Characteristics (8.2.1.1)
Inkjet printers are easy to use and usually less expensive than laser printers. Figure 8-12 shows an all-in-one device that contains an inkjet printer.

Figure 8-12 Inkjet Printer
Some advantages of an inkjet printer are the initial low cost, high resolution, and short warmup time. Some disadvantages of an inkjet printer are that the nozzles are prone to clogging, ink cartridges can be expensive, and the ink is wet for a few seconds after printing.
Inkjet Printer Parts (8.2.1.2)
The sections that follow illustrate and describe the main components of an inkjet printer.
Ink Cartridges/Paper
Paper and ink cartridges, shown in Figure 8-13, are the primary consumable items in an inkjet printer. Ink cartridges are designed for specific makes and models of inkjet printers. Most inkjet printers use plain paper for printing. Some can also print images on high-quality photo paper. Consult your printer’s manual for the correct type of ink cartridges and paper to use.

Figure 8-13 Ink Cartridges
If inkjet printer quality degrades, check the printer calibration by using the printer software.
Print Head
Inkjet printers use ink cartridges that spray ink onto a page through tiny holes. The tiny holes are called nozzles and are located in the print head, shown in Figure 8-14.

Figure 8-14 Print Head
There are two types of inkjet nozzles:
Thermal: A pulse of electrical current is applied to heating chambers around the nozzles. The heat creates a bubble of steam in the chamber. The steam forces ink out through the nozzle and onto the paper.
Piezoelectric: Piezoelectric crystals are located in the ink reservoir at the back of each nozzle. A charge is applied to the crystals, causing them to vibrate. This vibration of the crystals controls the flow of ink onto the paper.
Roller
Rollers, shown in Figure 8-15, pull paper in from the feeder.

Figure 8-15 Rollers
Feeder
The feeder, shown in Figure 8-16, may hold blank paper in a tray or cassette. Some inkjet printers are also copiers. In addition, an inkjet printer may have an automatic document feeder (ADF). The ADF holds documents, which are fed page by page onto the scanner bed for copying.
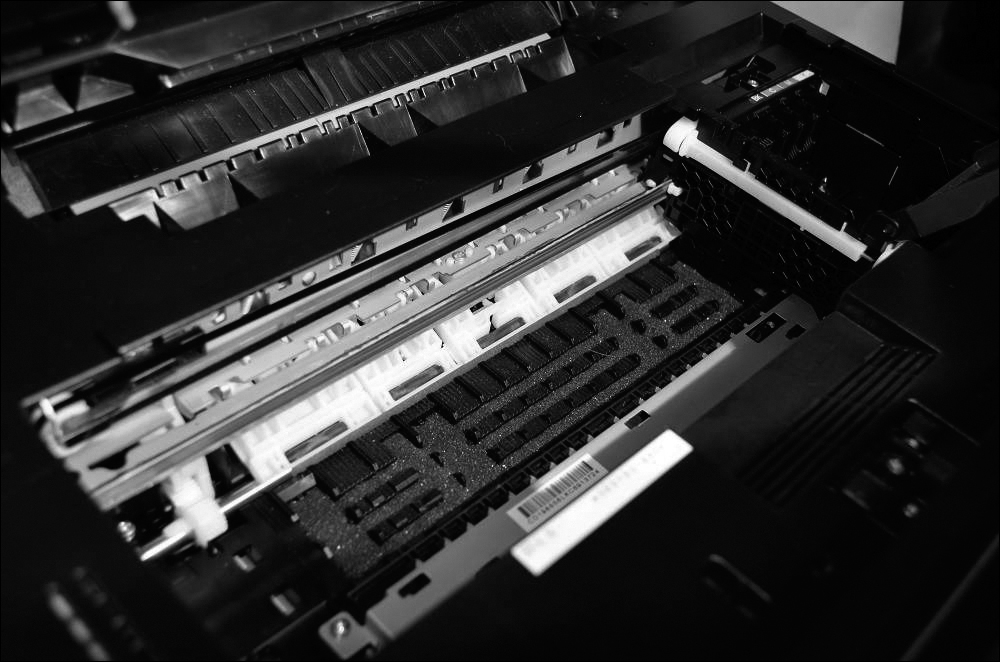
Figure 8-16 Feeder
Duplexing Assembly
Some inkjet printers can print on both sides of a page. This requires a duplexing assembly, shown in Figure 8-17, which turns a printed page over and feeds it back through the printer to be printed on the other side.
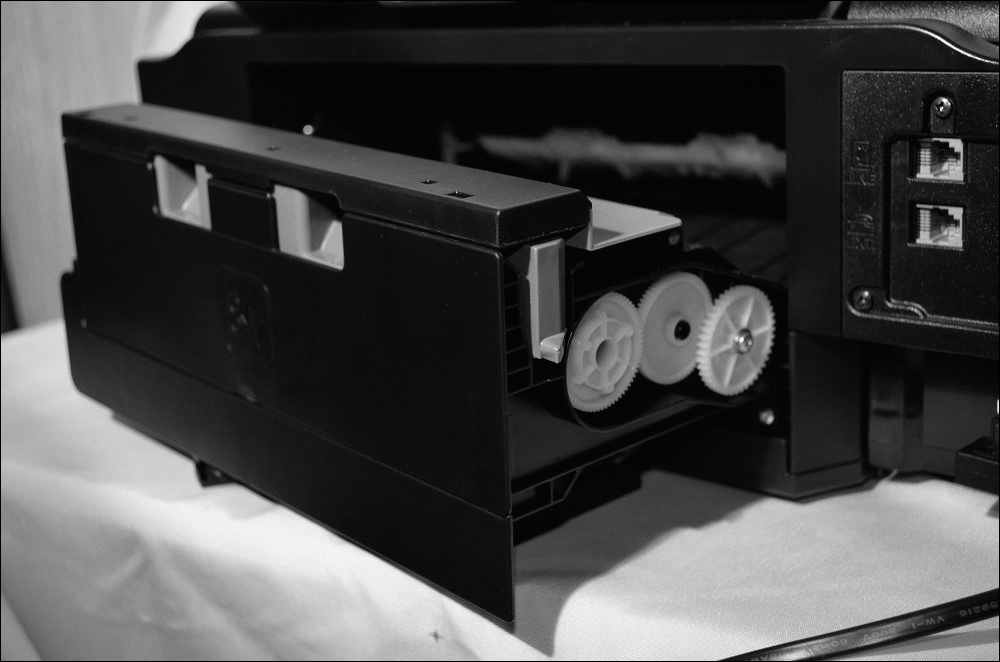
Figure 8-17 Duplexing Assembly
Carriage/Belt
The print head and ink cartridges are located on the carriage, which is attached to a belt and motor, as shown in Figure 8-18. The belt moves the carriage back and forth across the paper as the ink is sprayed on it.
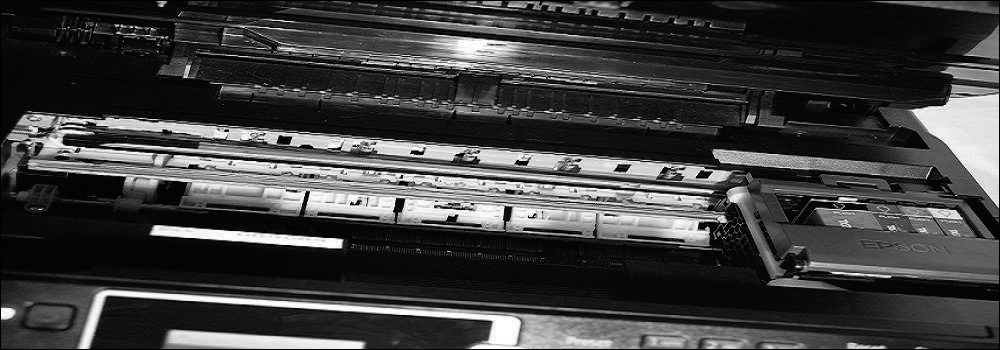
Figure 8-18 Carriage/Belt
8.2.1.3 Check Your Understanding - Inkjet Printers
Refer to the online course to complete this activity.
Laser Printers (8.2.2)
Laser printers are non-impact printers that create the output by using toner and lasers. Laser printers usually have an expensive upfront cost but offer a lower total cost of ownership.
Laser Printer Characteristics (8.2.2.1)
A laser printer, shown in Figure 8-19, is a high-quality, fast printer that uses a laser beam to create an image.

Figure 8-19 Laser Printer
Some advantages of a laser printer are low cost per page, high number of pages printed per minute, high capacity, and dry printed pages. Some disadvantages of a laser printer are high cost of startup and potentially expensive toner cartridges.
Laser Printer Parts (8.2.2.2)
The sections that follow illustrate and describe the main components of a laser printer.
Imaging Drum
The central part of the laser printer is its imaging drum, shown in Figure 8-20. The drum is a metal cylinder that is coated with a light-sensitive insulating material. When a beam of laser light strikes the drum, it becomes a conductor at the point where the light hits it.
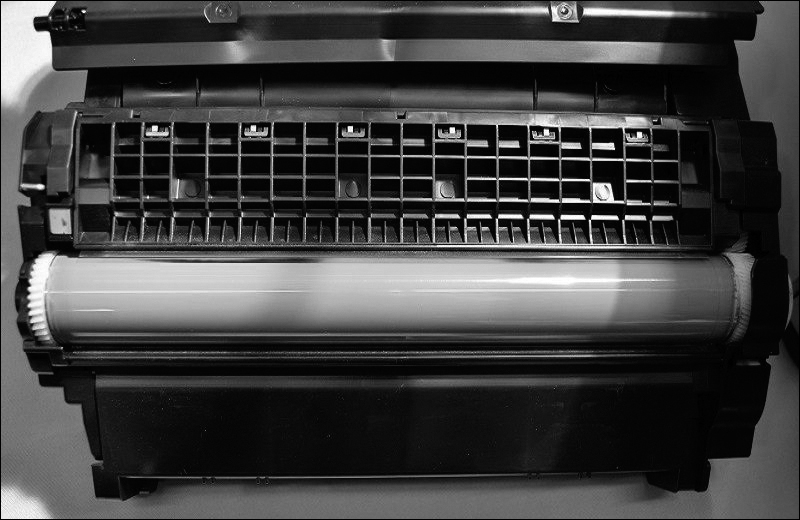
Figure 8-20 Imaging Drum
Toner Cartridge/Paper
As the drum rotates, the laser beam draws an electrostatic image on the drum. This undeveloped image is passed by a supply of toner. The toner is a negatively charged combination of plastic and metal particles. The electrostatic charge attracts toner to the image. The drum turns and brings the exposed image in contact with the paper, which attracts the toner from the drum.
The toner cartridge (see Figure 8-21) and paper are the primary consumable items in a laser printer. Other parts may also be contained in the toner cartridge. Check your printer’s manual for more information.

Figure 8-21 Toner Cartridge
Fuser Assembly
The paper is passed through a fuser assembly, shown in Figure 8-22, that is made up of hot rollers, which melt the toner into the paper.
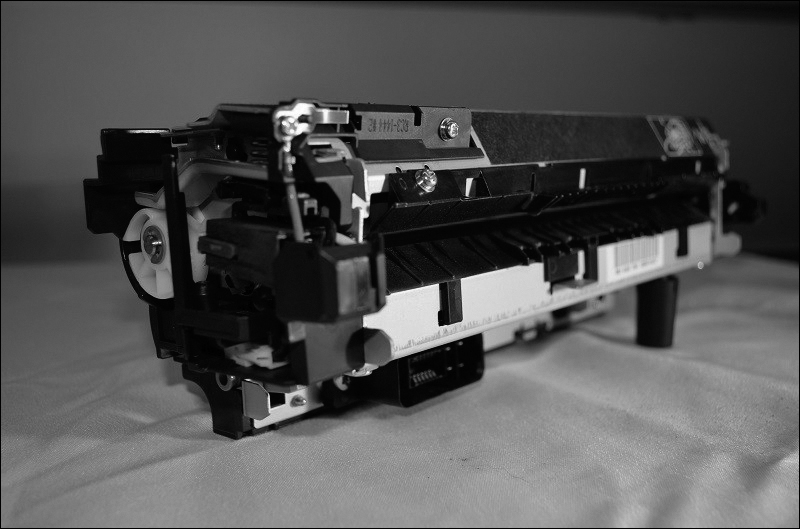
Figure 8-22 Fuser Assembly
Transfer Roller
The transfer roller, shown in Figure 8-23, assists in transferring the toner from the imaging drum to the paper.

Figure 8-23 Transfer Roller
Pickup Rollers
Pickup rollers, shown in Figure 8-24, may be located in multiple areas of a printer. They move the sheet of paper out of the tray or cassette and through the printer during the printing process.

Figure 8-24 Pickup Rollers
Duplexing Assembly
The duplexing assembly, shown in Figure 8-25, turns a page that is already printed on one side so that it can be printed on the other side.

Figure 8-25 Duplexing Assembly
8.2.2.3 Check Your Understanding - Laser Printers
Refer to the online course to complete this activity.
Laser Printing Process (8.2.3)
A laser printer uses a laser to imprint an image onto a copier drum, and that image is then transferred onto paper. It sounds simple but is rather complex. Many moving parts and components inside a laser printer must work together to produce the final product. Each component has an important part to play. The key components of the printer include the toner cartridge, imaging drum, transfer roller, fuser, laser, and mirrors.
Laser printers are very efficient and cost-effective to use when you need to quickly print in large quantities.
How Laser Printing Works (8.2.3.1)
The laser printer process involves seven steps to print information onto a single sheet of paper.
Processing (see Figure 8-26): The data from the source must be converted into a printable form. The printer converts data from common languages, such as Adobe PostScript (PS) or HP Printer Command Language (PCL), to a bitmap image stored in the printer’s memory. Some laser printers have built-in Graphical Device Interface (GDI) support. Windows applications use GDI to display printed images on a monitor, so there is no need to convert the output to another format, such as PS or PCL.

Figure 8-26 Step 1: Processing
Charging (see Figure 8-27): The image on the drum is removed, and the drum is conditioned for the new image. A wire, grid, or roller receives a charge of approximately –600 volts DC uniformly across the surface of the drum. The charged wire or grid is called the primary corona. The roller is called a conditioning roller.
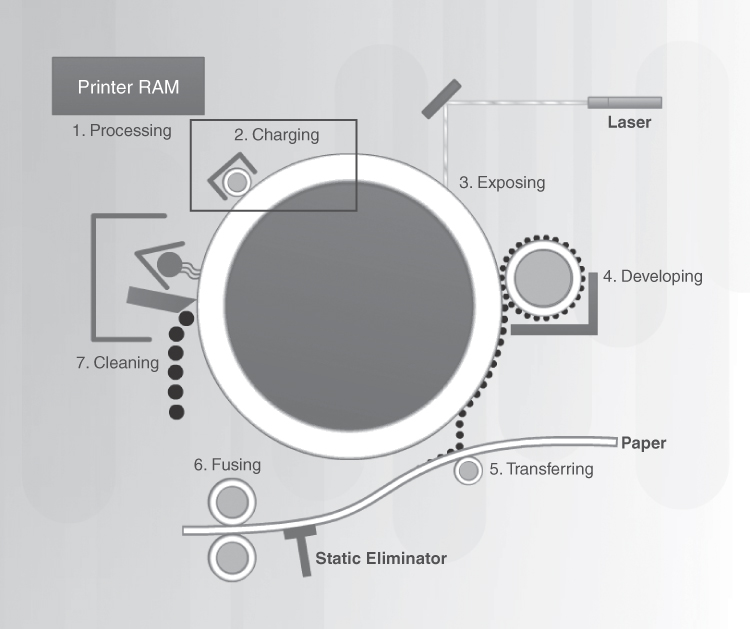
Figure 8-27 Step 2: Charging
Exposing (see Figure 8-28): To write the image, the photosensitive drum is exposed with the laser beam. Every portion of the drum that is scanned with the light has the surface charge reduced to about –100 volts DC. This electrical charge has a lower negative charge than the rest of the drum. As the drum turns, an invisible image is created on the drum.
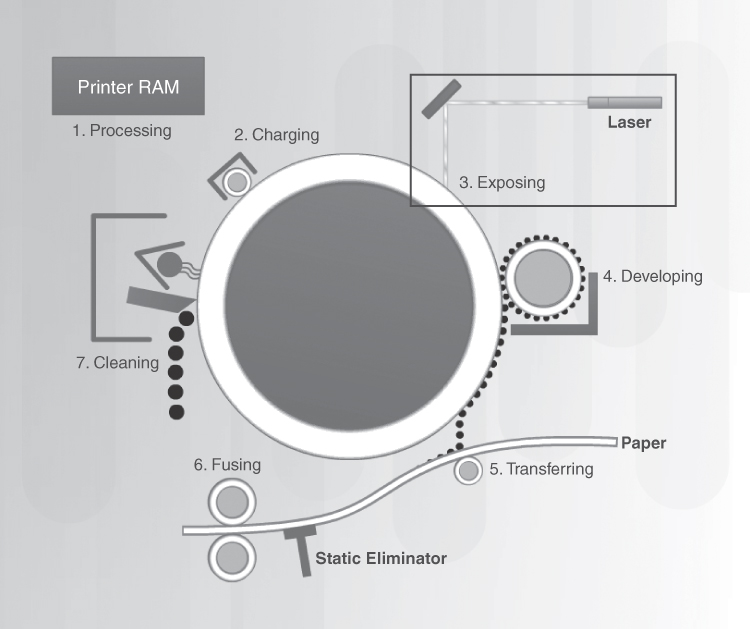
Figure 8-28 Step 3: Exposing
Developing (see Figure 8-29): The toner is applied to the image on the drum. A control blade holds the toner at a microscopic distance from the drum. The toner then moves from the control blade to the more positively charged image on the drum.
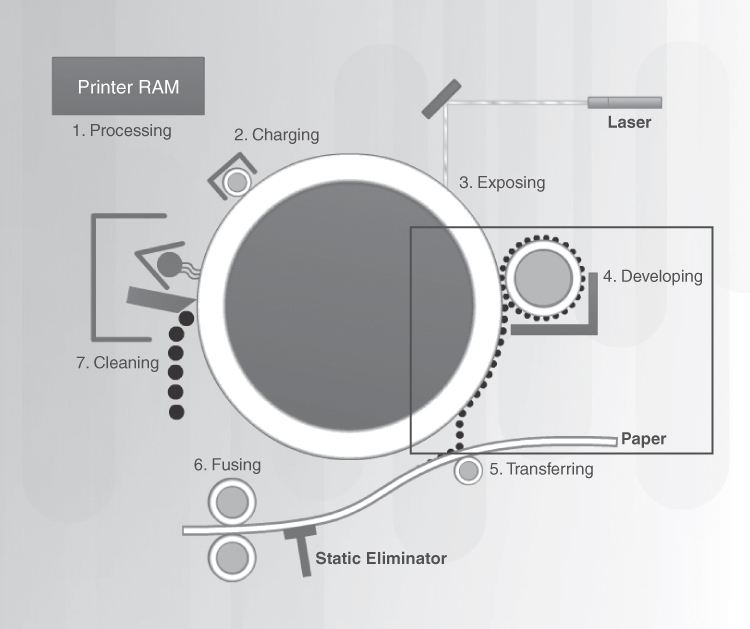
Figure 8-29 Step 4: Developing
Transferring (see Figure 8-30): The toner, attached to the image, is transferred to the paper. The corona wire places a positive charge on the paper. Because the drum was charged negatively, the toner on the drum is now attracted to the paper. The image is now on the paper and is held in place by the positive charge. Because color printers have three cartridges of toner, a colored image must go through multiple transfers to be complete. To ensure precise images, some color printers write multiple times onto a transfer belt that transfers the complete image to paper.

Figure 8-30 Step 5: Transferring
Fusing (see Figure 8-31): The toner is permanently fused to the paper. The printing paper is rolled between a heated roller and a pressure roller. As the paper moves through the rollers, the loose toner is melted and fused with the fibers in the paper. The paper is then moved to the output tray as a printed page. Laser printers with duplex assemblies can print on both sides of a sheet of paper.

Figure 8-31 Step 6: Fusing
Cleaning (see Figure 8-32): When an image has been deposited on the paper and the drum has separated from the paper, the remaining toner must be removed from the drum. A printer might have a blade that scrapes the excess toner. Some printers use AC voltage on a wire to remove the charge from the drum surface and allow the excess toner to fall away from the drum. The excess toner is stored in a used toner container that is either emptied or discarded.

Figure 8-32 Step 7: Cleaning
8.2.3.2 Check Your Understanding - The Laser Printing Process
Refer to the online course to complete this activity.
Thermal Printers and Impact Printers (8.2.4)
Typically businesses choose between two main types of receipt printers with their POS systems: thermal printers and dot matrix printers.
Impact printers are more reliable than thermal printers but are noisier and slower than thermal printers. Location for the usage of these printers can be particularly important. Because the paper that resides inside thermal printers is, by necessity, sensitive to heat, the performance of these printers suffers when exposed to the high temperatures and humidity levels; therefore, in an environment that is hot and humid, an impact printer is the better option. Knowing what the usage of a printer will be is critical in deciding on the type of printer.
Thermal Printer Characteristics (8.2.4.1)
Many retail cash registers and some older fax machines contain thermal printers, shown in Figure 8-33). Thermal paper is chemically treated and has a waxy quality. Thermal paper becomes black when heated. After a roll of thermal paper is loaded, the feed assembly moves the paper through the printer. Electrical current is sent to the heating element in the print head to generate heat. The heated areas of the print head make the image on the paper.

Figure 8-33 Cash Receipt Thermal Printer
Some advantages of thermal printers are that they last a long time because there are few moving parts, their operation is quiet, and there is no cost for ink or toner. However, thermal paper is expensive, it must be stored at room temperature, and it can degrade over time. Thermal printer images are poor quality, and color printing is not available.
Impact Printer Characteristics (8.2.4.2)
Impact printers have print heads that strike an inked ribbon, causing characters to be imprinted on the paper. Dot matrix and daisy wheel are examples of impact printers.
An advantage of impact printers is that the ribbon is less expensive than inkjet cartridges or laser printer toner cartridges. In addition, these printers can use continuous feed or normal sheets of paper and can print carbon copies. Disadvantages include the fact that they are noisy, the graphics are low resolution, and they have limited color printing capabilities.
A dot matrix printer (see Figure 8-34) has a print head containing pins that are surrounded by electromagnets. When energized, the pins push forward onto the ink ribbon, creating a character on the paper. The number of pins on a print head, 9 or 24, determines the quality of the print. The highest quality of print that is produced by a dot matrix printer is referred to as near letter quality (NLQ).

Figure 8-34 Impact Printer
Most dot matrix printers use continuous-feed paper, also known as tractor feed. The paper has perforations between sheets, and perforated strips on the side are used to feed the paper and to prevent skewing or shifting. Sheet feeders that print one page at a time are available for some higher-quality printers. A large roller, called the platen, applies pressure to keep the paper from slipping. If a multiple-copy paper is used, you can adjust the platen gap to the thickness of the paper.
8.2.4.3 Check Your Understanding - Thermal Printers and Impact Printers
Refer to the online course to complete this activity.
Virtual Printers (8.2.5)
A virtual printer is not actually a printer; rather, it is software on the computer with an interface similar to a print driver that is coded to send the output to other applications rather than to a physical device. A virtual printer sends its output to a file, such as a PDF. It can help save resources by carrying out tasks that would otherwise involve actual printing but without wasting paper and ink.
Virtual Printer Characteristics (8.2.5.1)
Virtual printing does not involve sending a print job to a printer within your local network. Instead, the print software either sends the job to a file or transmits the information to a remote destination in the cloud for printing.
Typical methods for sending a print job to a file include the following:
Print to file: Originally, print to file saved the data in a file with the .prn extension. The .prn file then could be quickly printed at any time without opening the original document. Print to file can now save in other formats, as shown in Figure 8-35.

Figure 8-35 Printing to a File
Print to PDF: Adobe’s Portable Document Format (PDF) was released as an open standard in 2008.
Print to XPS: Introduced by Microsoft in Windows Vista, the XML Paper Specification (XPS) format was meant to be an alternative to PDF.
Print to image: To prevent others from easily copying the content in a document, you can choose to print to an image file format, such as JPG or TIFF.
Cloud Printing (8.2.5.2)
Cloud printing is sending a print job to a remote printer, as shown in Figure 8-36. The printer could be at any location within your organization’s network. Some printing companies provide software that you can install and use to send print jobs to their closest location for processing.
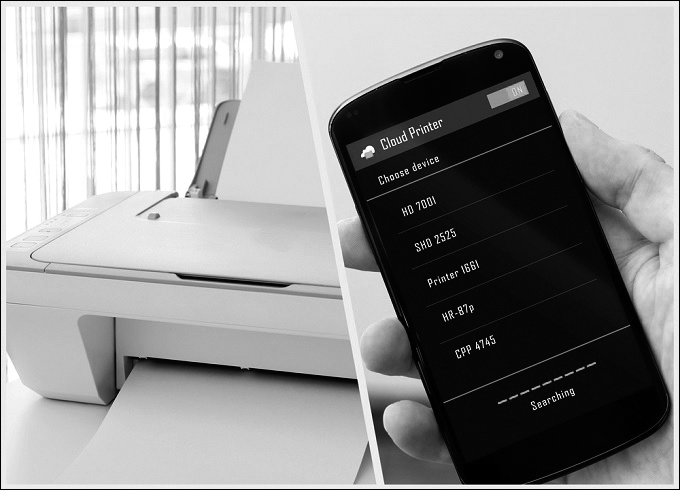
Figure 8-36 Cloud Printing
Another cloud printing example is Google Cloud Print, which allows you to connect your printer to the Web. After it is connected, you can send print jobs to your printer from anywhere that has Internet access.
8.2.5.3 Check Your Understanding - Virtual Printers
Refer to the online course to complete this activity.
3D Printers (8.2.6)
3D printing is the process of making three-dimensional solid objects from digital files by putting down layer after layer of material, usually plastic, until the object is completed. It is being used in a variety of industries for many different applications, from dentures to dinosaur bones.
3D Printer Characteristics (8.2.6.1)
3D printers, shown in Figure 8-37, are used to create three-dimensional objects. These objects are first designed using a computer. A variety of media are now available to create these objects. For beginners, plastic filament is the most commonly used 3D printer medium. The plastic filament is added in layers to create the object that was programmed on the computer.
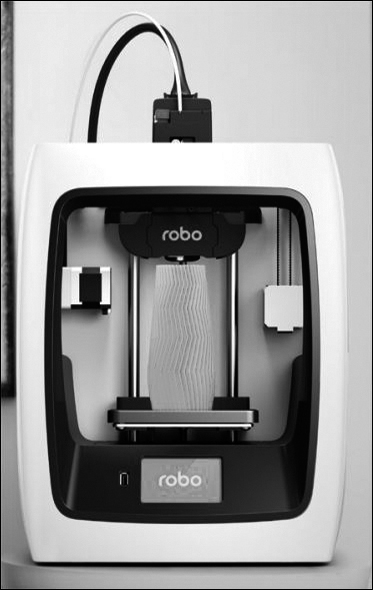
Figure 8-37 3D Printer
Traditionally, machines cut or drilled pieces out of raw material (such as stone, metal, or wood) to create an object. This is known as subtractive manufacturing. 3D printers add the material used to create objects in layers or even small bits; therefore, they are known as additive manufacturing machines.
3D Printer Parts (8.2.6.2)
The main parts of 3D printers are as follows:
Filament: This is the material used in 3D printers to create objects. Common types of filament are plastic-based: ABS, PLA, and PVA (see Figure 8-38). There are even filaments made of nylon, metal, or wood. Check your 3D printer’s manual to determine which type(s) of filament to use.
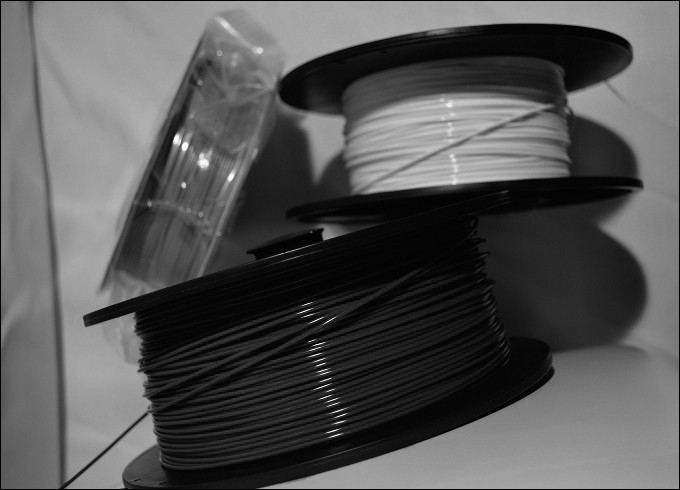
Figure 8-38 Filament
Feeder: The feeder (see Figure 8-39) takes filament from a feed tube that is placed into the extruder. The feeder pulls it down to be heated and then sends it through the hotend nozzle.
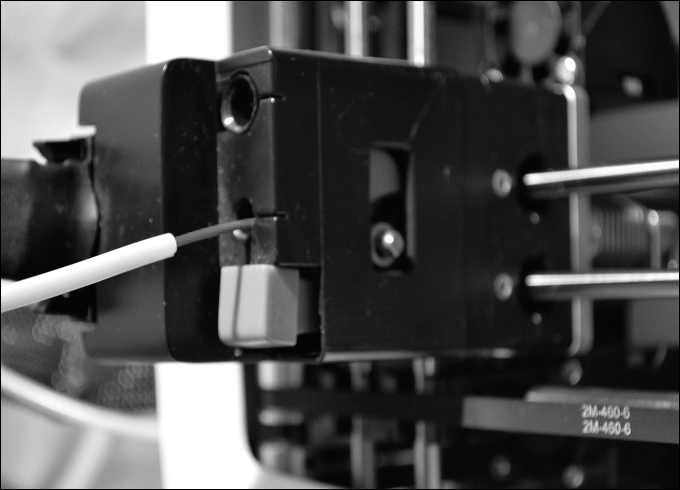
Figure 8-39 Feeder
Hotend nozzle: When the filament is heated to the correct temperature, it is extruded from the hotend nozzle, shown in Figure 8-40.
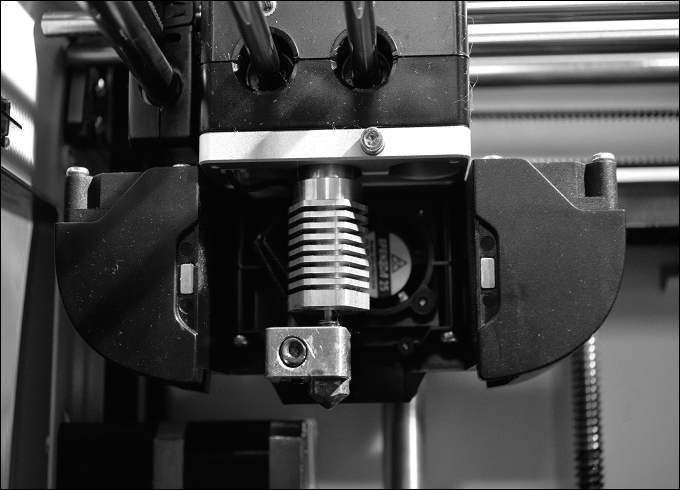
Figure 8-40 Hotend Nozzle
Axis: An axis is one of several bars on which the hotend nozzle travels to dispense filament, as shown in Figure 8-41. An axis is either vertical or horizontal so that the hotend nozzle can be located within a specified location in a 3D environment to “print” the object.
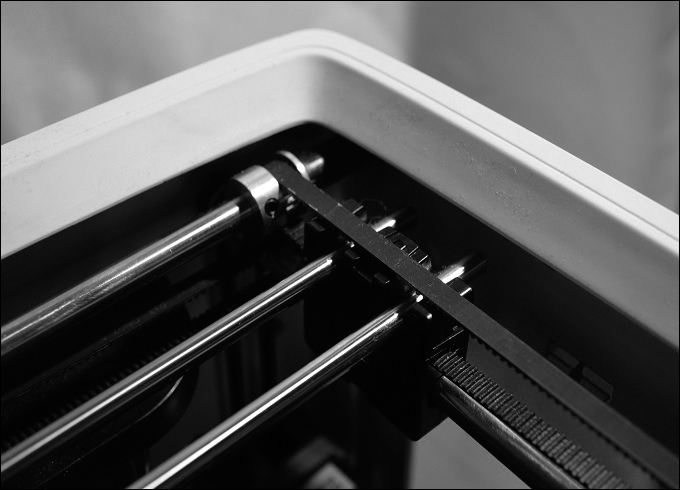
Figure 8-41 Axis
Print bed: The print bed, shown in Figure 8-42, is the platform onto which the heated filament forms the object.

Figure 8-42 Print Bed
8.2.6.3 Check Your Understanding - 3D Printers
Refer to the online course to complete this activity.
Installing and Configuring Printers (8.3)
Installing and configuring a printer can be straightforward and is easiest when done by following the manufacturer’s directions. Preparing the hardware for installation is the starting point, and the rest is up to how the operating system works with the print driver.
Installing and Updating a Printer (8.3.1)
In this section, you will learn about installing and upgrading a printer and how to set up the different features that printers offer.
Installing a Printer (8.3.1.1)
When you purchase a printer, the installation and configuration information is usually found on the manufacturer’s website. Before you install a printer, remove all packing material. Remove anything that prevents moving parts from shifting during shipping. Keep the original packing material in case you need to return the printer to the manufacturer for warranty service.
Note
Before connecting the printer to the computer, read the installation instructions. In some cases, the printer driver needs to be installed before the printer is connected.
If the printer has a USB, FireWire, or parallel port, connect the corresponding cable to the printer port. Connect the other end of the data cable to the corresponding port on the back of the computer. If you are installing a network printer, connect the network cable to the network port.
After the data cable has been properly connected, attach the power cable to the printer. Connect the other end of the power cable to an available electrical outlet. When you turn on the power to the device, the computer determines the correct device driver to install.
Test Printer Functions (8.3.1.2)
The installation of any device is not complete until you have successfully tested all its functions. Depending on the printer you have, functions might include the following (see Figure 8-43):
Printing double-sided documents
Using different paper trays for different paper sizes
Changing the settings of a color printer so that it prints in black and white or grayscale
Printing in draft mode
Using an optical character recognition (OCR) application
Printing a collated document
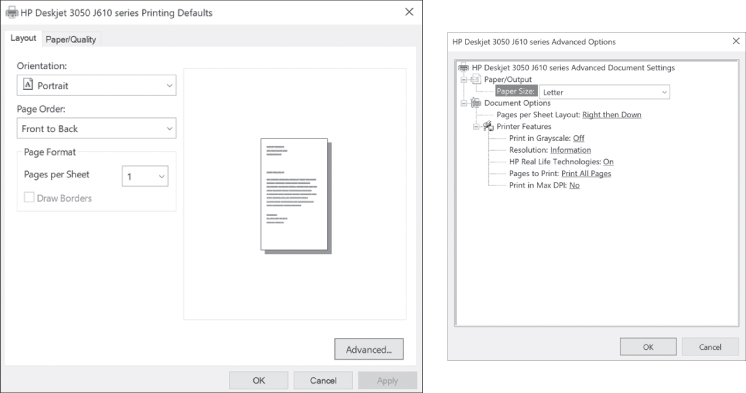
Figure 8-43 Collated Printing
Note
Collated printing is ideal when you need to print several copies of a multiple-page document. The Collate setting prints each set, in turn. Some printers can even staple each printed set.
Functions for an all-in-one printer include the following:
Faxing to another known working fax
Creating a copy of a document
Scanning a document
Printing a document
8.3.1.3 Lab - Install a Printer in Windows
![]()
In this lab, you will install a printer. You will find, download, and update the driver and the software for the printer.
Configuring Options and Default Settings (8.3.2)
Each printer may have different configurations and default options.
Common Configuration Settings (8.3.2.1)
Check the printer documentation for specific information about its configuration and default settings. Table 8-1 shows some common configuration options available for printers.
Table 8-1 Common Configuration Settings
Configuration Option |
Details |
Paper type |
Standard, draft, gloss, or photo |
Print quality |
Draft, normal, or photo |
Color printing |
Multiple colors of ink are used |
Black-and-white printing |
Only black ink is used |
Grayscale printing |
Images printed using only black ink in different proportions to produce shades of gray |
Paper size |
Standard paper sizes, envelopes, and business cards |
Paper orientation |
Landscape or portrait |
Print layout |
Normal, banner, booklet, or poster |
Duplex |
Two-sided printing |
Collate |
Print sets of a document with multiple pages arranged in order |
Common printer options that the user can configure include media control and printer output.
Media Control Options
These are some media control options specific to paper:
Input paper tray selection
Output path selection
Media size and orientation
Paper weight selection
Printer Output Options
These are two printer output options that manage how the ink or toner goes on the media:
Color management
Print speed
8.3.2.2 Check Your Understanding - Configuration Options
Refer to the online course to complete this activity.
Optimizing Printer Performance (8.3.3)
Output relies on many factors, such as settings that are configurable through software that comes with the printer, the paper used, and whether the printer is kept clean.
Software Optimization (8.3.3.1)
With printers, most optimization is completed through the software that comes with the drivers.
The following tools optimize performance:
Print spool settings: Cancel or pause current print jobs in the printer queue.
Color calibration: Adjust settings to match the colors on the screen to the colors on the printed sheet.
Paper orientation: Select landscape or portrait image layout, as shown in Figure 8-44.
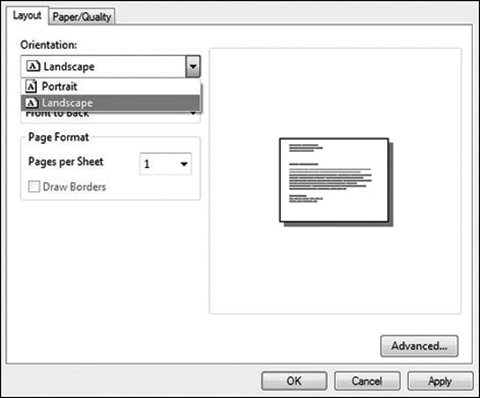
Figure 8-44 Changing the Paper Orientation to Landscape
Printers are calibrated using the printer driver software. Calibration makes sure that the print heads are aligned and that they can print on different kinds of media, such as cardstock, photographic paper, and optical discs. Some inkjet print heads are fitted to the ink cartridge, and you might have to recalibrate the printer each time you change a cartridge.
Hardware Optimization (8.3.3.2)
Some printers can be upgraded to print faster and to accommodate more print jobs by adding hardware. The hardware may include additional paper trays, sheet feeders, network cards, and expansion memory.
The procedure to upgrade firmware is similar to the procedure to install printer drivers. Firmware updates do not take place automatically, so you can visit the home page of the printer manufacturer to check the availability of new firmware.
All printers have RAM, such as the chips shown in Figure 8-45. Printers usually arrive from the factory with enough memory to handle jobs that involve text. However, print jobs involving graphics, and especially photographs, run more efficiently if the printer memory is adequate to store the entire job before it starts. Upgrading the printer memory increases the printing speed and enhances complex print job performance.
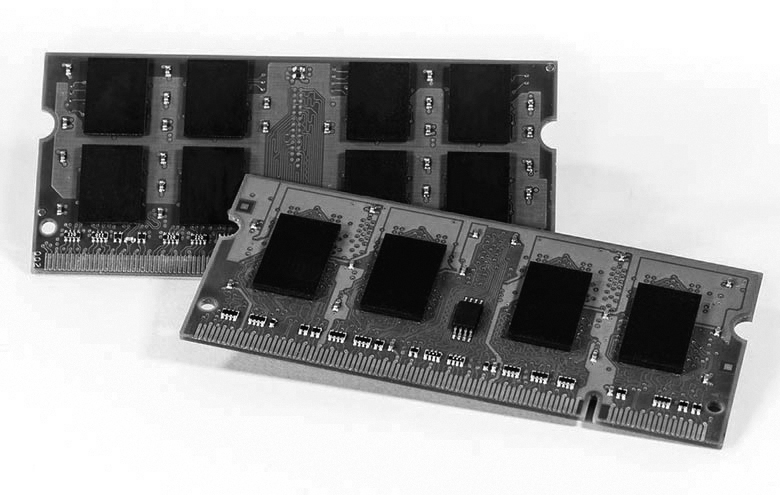
Figure 8-45 Hardware Optimization
Print job buffering involves capturing a print job in the internal printer memory. Buffering is a common feature in laser printers and plotters, as well as in advanced inkjet and dot matrix printers.
Low memory errors can indicate that the printer is out of memory or has a memory overload. In such a case, you may need more memory.
8.3.3.3 Check Your Understanding - Printer Optimization
Refer to the online course to complete this activity.
Sharing Printers (8.4)
Sharing printers has many advantages for businesses. Sharing printers can provide savings in printer maintenance and purchases, it can provide options for placement and selections for printers used, computers running on multiple platforms can access the same network printers and send print jobs to the printers using drivers designed for each platform, plus many other advantages. This section discusses installation and use of shared printers.
Operating System Settings for Sharing Printers (8.4.1)
Shared printers can reduce resources needed in a business. You can enable multiple PCs to share a single printer by following the operating systems steps for connecting the printer to the network and then configuring the PCs to connect and share the networked printer.
Configuring Printer Sharing (8.4.1.1)
Windows allows computer users to share their printers with other users on the network.
Users who cannot connect to a shared printer might not have the required drivers installed. They might also be using different operating systems than the computer that is hosting the shared printer. Windows can automatically download the correct drivers to these users. Accessing Printer properties will take the user to the Additional Drivers button to select operating systems that the other users are using. Clicking this button and selecting their OS and then closing the dialog box and clicking OK, Windows asks to obtain those additional drivers and downloads them. If other users are also using the same Windows operating system, they will not need to click the Additional Drivers button.
Figure 8-46 and Figure 8-47 show how to begin the process of printer sharing in Windows 10.

Figure 8-46 Changing Advanced Sharing Settings
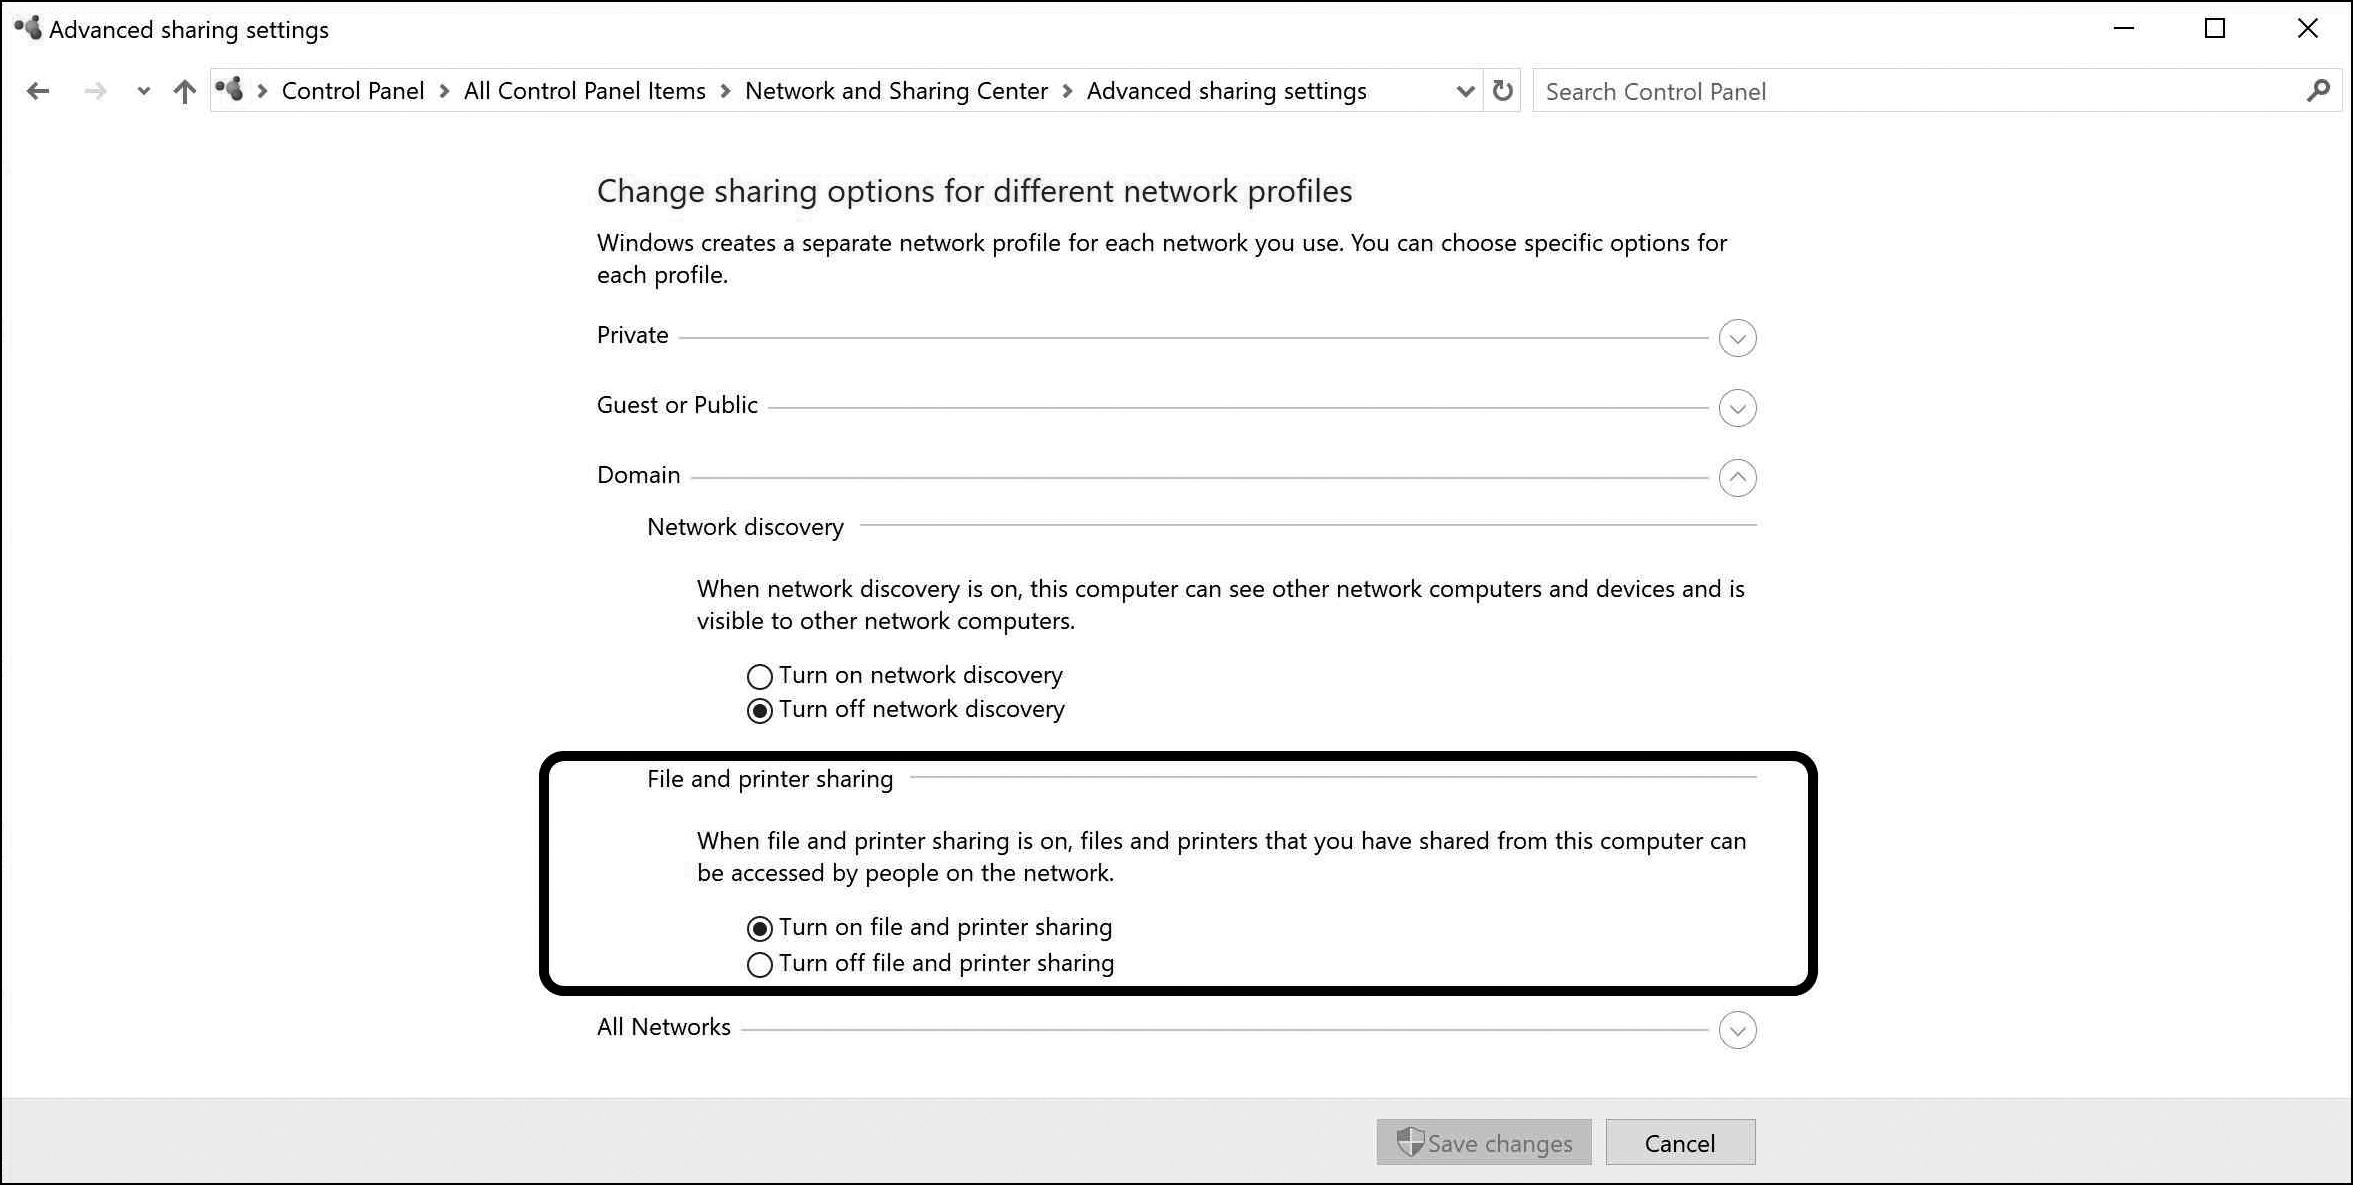
Figure 8-47 File and Printer Sharing
There are potential data privacy and security issues to consider when sharing printers:
Hard drive caching: Cached print files pose privacy and security risks because someone with access to the device could recover files and then access confidential or personal information.
User authentication: To prevent unauthorized use of a network or cloud-based printer, permissions and user authentication methods can be used to control access to the printer.
Data privacy: Print jobs sent over a network could be intercepted and read, copied, or modified.
Wireless Printer Connections (8.4.1.2)
Wireless printers enable hosts to connect and print wirelessly using Bluetooth or a Wi-Fi connection. For wireless printers to use Bluetooth, both the printer and the host device must have Bluetooth capabilities, and they must be paired. If necessary, you can add a Bluetooth adapter to a computer, usually in a USB port. Wireless Bluetooth printers also allow for printing from mobile devices.
Wireless printers that use Wi-Fi connect directly to a wireless router or an access point. Setup is completed by connecting the printer to the computer with the supplied software or by using the printer display panel to connect to the wireless router. The printer’s wireless adapter supports an 802.11 standard. The devices connecting to the printer must also support the same standard.
In wireless infrastructure mode, the printer is configured to connect to an access point. Client connections to the printer go through the access point. In wireless ad hoc mode, client devices connect directly to the printer, as shown in Figure 8-48.
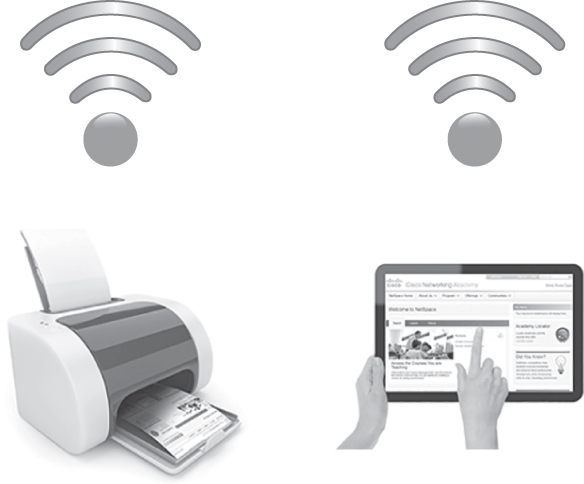
Figure 8-48 Sharing a Printer Wirelessly
8.4.1.3 Lab - Share a Printer in Windows
![]()
In this lab, you will share a printer, configure the printer on a networked computer, and print a test page from the remote computer.
Print Servers (8.4.2)
A print server manages files in a user’s printing queue and makes the status available to the user. It provides print resources to all connected print clients. It can manage printing requests for both your computer and the printing device.
Purposes of Print Servers (8.4.2.1)
A printer that does not have built-in network interfaces may require a separate print server to enable network connectivity. Print servers let multiple computer users, regardless of device or operating system, access a single printer (see Figure 8-49). A print server has three functions:
Providing client access to print resources
Administering print jobs by storing them in a queue until the print device is ready for them and then feeding or spooling the print information to the printer
Providing feedback to users about the state of the printer
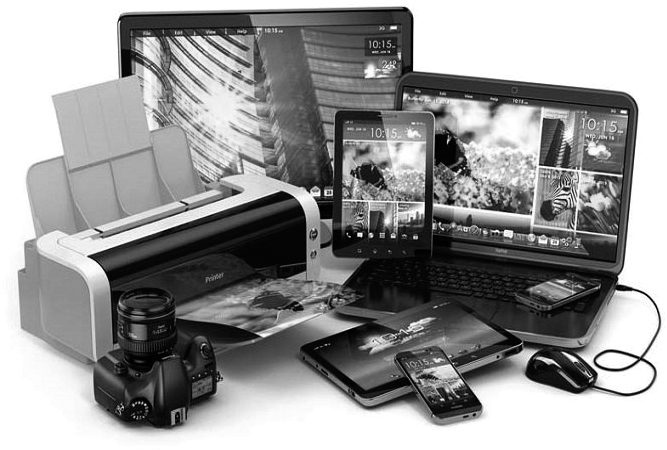
Figure 8-49 Serving Many Devices with a Print Server
Sharing a printer from a computer also has disadvantages. The computer sharing the printer uses its own resources to manage the print jobs coming to the printer. If the computer user on the desktop is working at the same time as a user on the network is printing, the desktop computer user might notice a performance slowdown. In addition, the printer is not available if the user reboots or powers off the computer that shares the printer.
Software Print Servers (8.4.2.2)
In some instances, the computer sharing a printer is running an operating system that is not Windows, such as macOS. In such a case, you can use print server software. One example is Apple’s free Bonjour Printer Server, which is a built-in service in macOS. It is automatically installed on a Windows computer if you install the Apple Safari browser. You can also download Bonjour Print Services for Windows, as shown in Figure 8-50, for free from the Apple website.
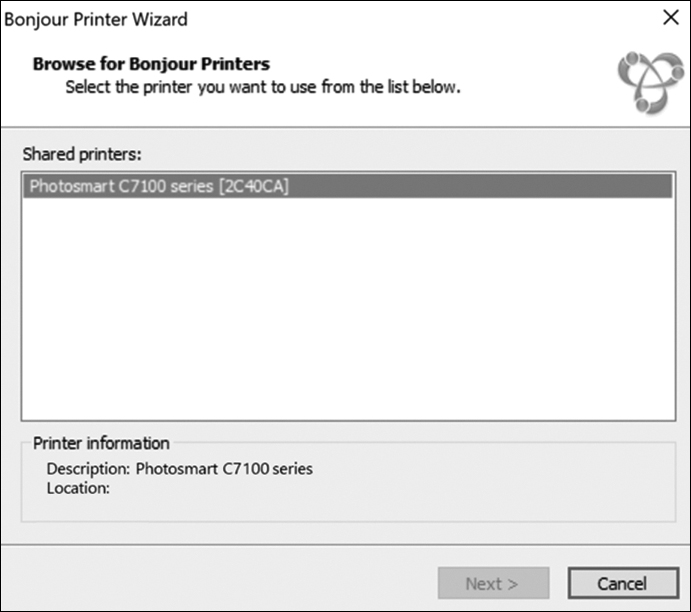
Figure 8-50 Bonjour Print Services
When it is downloaded and installed, Bonjour Print Services operates in the background, automatically detecting any compatible printers connected to the network.
Hardware Print Servers (8.4.2.3)
A hardware print server is a simple device with a network card and memory. It connects to the network and communicates with the printer to enable print sharing. The print server in the Figure 8-51 is connected to the printer by a USB cable. A hardware print server may be integrated with another device, such as a wireless router. In this case, the printer would connect directly to the wireless router, most likely through a USB cable.

Figure 8-51 Hardware Print Servers
Apple’s AirPort Extreme is a hardware print server. Through the AirPrint service, AirPort Extreme can share a printer with any device on the network.
A hardware print server can manage network printing through either wired or wireless connections. An advantage of using a hardware print server is that the server accepts incoming print jobs from devices, thereby freeing the computers for other tasks. A hardware print server is always available to users, unlike a printer shared from a user’s computer.
Dedicated Print Servers (8.4.2.4)
For larger networking environments with multiple LANs and many users, a dedicated print server is needed to manage printing services (see Figure 8-52).
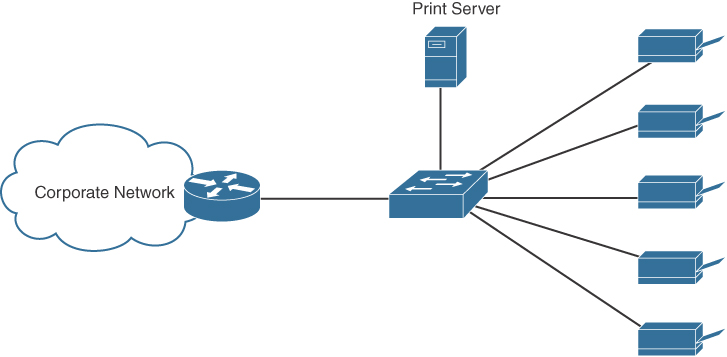
Figure 8-52 Dedicated Print Server
A dedicated print server is more powerful than a hardware print server. It handles client print jobs in the most efficient manner and can manage more than one printer at a time. A dedicated print server must have the following resources to meet the requests of print clients:
Powerful processor: Because the dedicated print server uses its processor to manage and route printing information, it must be fast enough to handle all incoming requests.
Adequate storage space: A dedicated print server captures print jobs from clients, places them in a print queue, and sends them to the printer in a timely manner. This process requires the computer to have enough storage space to hold these jobs until they are completed.
Adequate memory: The processor and RAM handle sending print jobs to a printer. If there is not enough memory to handle an entire print job, the document is stored on the drive in the print server and printed from there. This is generally is slower than printing directly from memory.
8.4.2.5 Check Your Understanding - Print Servers
Refer to the online course to complete this activity.
Maintaining and Troubleshooting Printers (8.5)
A printer is one of the most commonly used peripheral devices. There are many different types of printers and ways to connect them to a device or network, but doing maintenance is an important task no matter what type of printer. Troubleshooting specifics may vary, but it is a certainty that a technician will be required to troubleshoot printer issues, so it is important for a technician to understand the methodology and steps.
Printer Preventive Maintenance (8.5.1)
Performing preventive maintenance is a proactive way to decrease printer problems and increase the life span of the hardware. Using manufacturers’ guidelines, a preventive maintenance plan should be established and implemented. This section examines preventive maintenance guidelines and best practices.
Vendor Guidelines (8.5.1.1)
A good preventive maintenance program helps ensure good-quality prints and uninterrupted operation. The printer documentation contains information on how to maintain and clean the equipment.
Read the information manuals that come with every new piece of equipment. Follow the recommended maintenance instructions. Use the supplies listed by the manufacturer. Less expensive supplies can save money but may produce poor results, damage the equipment, or void the warranty.
Most manufacturers sell maintenance kits for their printers (see Figure 8-53). If you do not know how to maintain printing equipment, consult with a manufacturer-certified technician. When servicing toner kits and cartridges, wear air filter masks to avoid breathing in harmful particles.

Figure 8-53 Maintenance Kit
What Do You Already Know? - Printer Operating Environment (8.5.1.2)
Printers are affected by temperature, humidity, and electrical interference. In fact, laser printers tend to create a great deal of heat and must be operated in a well-ventilated area, or they will overheat.
Paper is also affected by its environment. Although paper can withstand warm and cool temperatures, it is easily affected by humidity. Paper can absorb moisture from the air, which can cause pieces to stick together and sometimes jam during printing.
Toner is also affected by its environment, especially humidity. High humidity can prevent the toner from attaching to the paper correctly. It is therefore best to keep toner cartridges in their original wrappers and store them in a cool, dust-free environment, until you are ready to use them.
Dust is an environmental problem for all printers. Dusty conditions in and around a printer’s location, as well as dust from the printer paper, must be removed regularly. Use compressed air to blow dust away from the interior of a printer.
Inkjet Printer Preventive Maintenance (8.5.2)
Using a consistent preventive maintenance program can improve the performance and safety of the equipment in a home or an organization. Ensuring safety, properly locating a device, using the correct supplies, and keeping a printer clean can all help prolong the life of a printer.
8.5.2.1 Video Demonstration - Inkjet Printer Preventive Maintenance

Refer to the online course to view this video.
Always consult the manual before performing maintenance tasks. The manual gives instructions that are specific to your inkjet printer.
The type and quality of paper and ink used can affect the life of a printer. The printer manufacturer might recommend a type of paper to use for best results. Some types of paper, especially photo paper, transparencies, and multilayered carbon paper, have a right and wrong side. Load the paper according to the manufacturer’s instructions.
The manufacturer recommends the brand and type of ink to use. If the wrong type of ink is installed, the printer might not work, or the print quality might deteriorate. Avoid refilling ink cartridges because the ink can leak.
When an inkjet printer produces blank pages, the ink cartridges might be empty. Some inkjet printers may not print any pages if one of the ink cartridges is empty. You can set the printer software to draft quality to reduce the amount of ink that the printer uses. These settings also reduce the print quality and the time it takes to print a document.
Over time, the parts collect dust, dirt, and other debris. If not cleaned regularly, a printer may not work well or could stop working completely. On inkjet printers, clean the paper-handling machinery with a damp cloth.
8.5.2.2 Lab - Perform Preventive Maintenance on an Inkjet Printer
![]()
In this lab, you will perform preventive maintenance on an inkjet printer.
Laser Printer Preventive Maintenance (8.5.3)
Preventive maintenance keeps a laser printer working at its greatest potential and at optimal quality.
8.5.3.1 Video Demonstration - Laser Printer Preventive Maintenance
Refer to the online course to view this video.
Laser printers do not usually require much maintenance unless they are in a dusty area or are very old. When cleaning a laser printer, use only a vacuum cleaner with high-efficiency particulate air (HEPA) filtration. HEPA filtration catches microscopic particles within the filters.
Always consult the manual before performing maintenance tasks. The manual gives instructions that are specific to your laser printer. For some maintenance tasks done on a laser printer, you need to disconnect the printer from its power source. Consult your manual for specific information. If you do not know how to maintain printing equipment, consult a manufacturer-certified technician. Use caution when handling printer parts as some can become very hot and burn you.
Most manufacturers sell maintenance kits for their printers. For laser printers, such a kit might contain replacement parts that often break or wear out, such as a fuser assembly, transfer rollers, and pickup rollers.
When you install new parts or replace ink or toner cartridges, visually inspect all internal components, remove bits of paper and dust, clean spilled ink or toner, and look for worn gears, cracked plastic, or broken parts.
Laser printers do not produce blank pages. Instead, they begin to print poor-quality prints. Some printers have LCD message screens or LED lights that warn users when toner supplies are low. Some types of prints use more toner than others. For example, a photograph uses more toner than a letter. You can set the printer software to toner save or draft quality to reduce the amount of toner that the printer uses. These settings also reduce the quality of laser prints.
When maintenance is completed, reset the counters to allow the next maintenance to be completed at the correct time. On many types of printers, the page count is viewed through the LCD display or a counter located inside the main cover.
8.5.3.2 Lab - Perform Preventive Maintenance on a Laser Printer
![]()
In this lab, you will perform preventive maintenance on a laser printer.
Thermal Printer Preventive Maintenance (8.5.4)
Many factors can impact the performance of a thermal printer, such as heat, dust, wear on the printheads, and more. Properly maintaining a printer is critical to ensuring that the printer continues to generate high-quality images and text.
Preventive Maintenance on a Thermal Printer (8.5.4.1)
Always consult the thermal printer’s manual before performing maintenance tasks. The manual gives instructions that are specific to your thermal printer on how to replace the paper roll. Figure 8-54 shows a thermal printer’s paper being replaced.
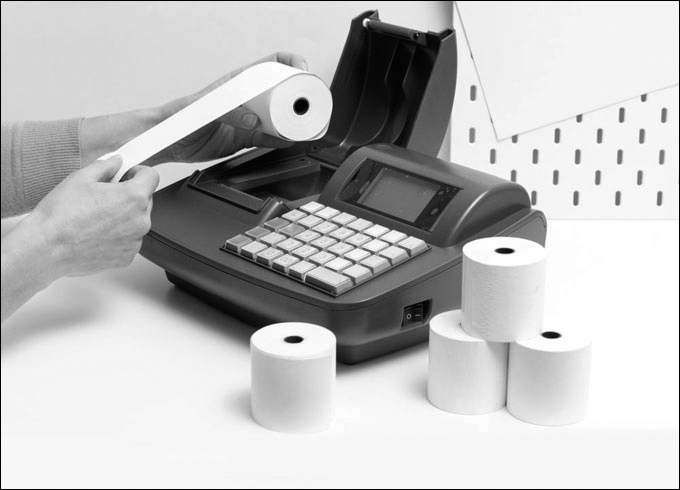
Figure 8-54 Replacing the Paper
Thermal printers use heat to create an image on special paper. To extend the life of the printer, dampen a cotton swab with isopropyl alcohol and use it to clean the heating element. Do this on a regular basis. The heating element is located near the slot where the printed paper emerges, as shown in Figure 8-55. While the printer is open, use compressed air or a lint-free cloth to remove any debris.

Figure 8-55 Heating Element
8.5.4.2 Check Your Understanding - Thermal Printer Preventive Maintenance
Refer to the online course to complete this activity.
Impact Printer Preventive Maintenance (8.5.5)
Regularly performing preventive maintenance is the best way to reduce printer problems. Impact printers have many moving parts, and doing scheduled checks of parts for cleanliness, lubrication, wear, and so on can add to the longevity of the device.
Preventive Maintenance of an Impact Printer (8.5.5.1)
Always consult the manual before performing maintenance tasks on an impact printer. The manual gives instructions that are specific to your impact printer. For safety reasons, it is always important to pay attention to the components that the manual indicates may be hot as they can cause you physical harm.
An impact printer is similar to a typewriter in that the print head strikes an inked ribbon to transfer ink to the paper. When an impact printer produces faded or light characters, the ribbon (see Figure 8-56) is worn out and needs to be replaced. Consult your manual for instructions on how to replace the ribbon.

Figure 8-56 Impact Printer Ribbon
If a consistent flaw is produced in all characters, the print head (see Figure 8-57) is stuck or broken and needs to be cleaned or possibly replaced. Search for procedures on dot matrix printhead cleaning to learn about this.
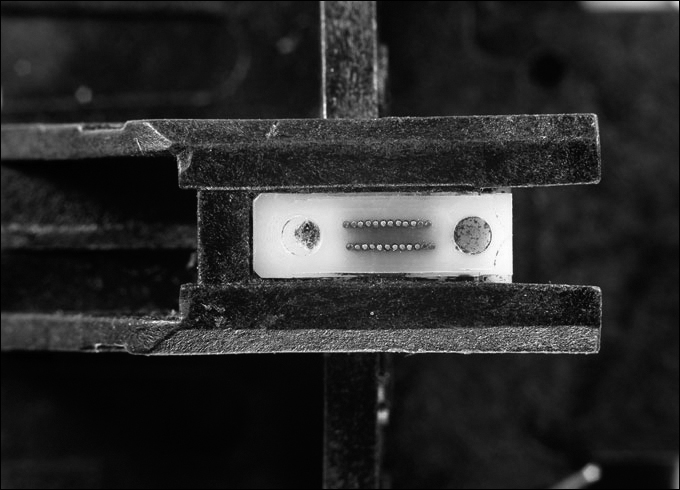
Figure 8-57 Print Head
8.5.5.2 Check Your Understanding - Impact Printer Preventive Maintenance
Refer to the online course to complete this activity.
3D Printer Preventive Maintenance (8.5.6)
Costly repairs can stem from neglect. Preventive maintenance helps avoid issues or failures that result from neglect. 3D printers are highly mechanical devices with moving parts that need attention.
8.5.6.1 Video Demonstration - 3D Printer Preventive Maintenance
Refer to the online course to view this video.
Always consult the manual before performing maintenance tasks. The manual gives instructions that are specific to your 3D printer.
8.5.6.2 Video Demonstration - 3D Printer Printing a Component
Refer to the online course to view this video.
Applying the Troubleshooting Process to Printers (8.5.7)
Knowing the troubleshooting steps to take when you have encountered a printing problem is critical to getting the printer problems diagnosed. This section outlines a systematic troubleshooting approach and offers specifics on how to address issues that are particular to printers.
The Six Steps of the Troubleshooting Process (8.5.7.1)
The six steps of the troubleshooting process are as follows:
Step 1. Identify the problem.
Step 2. Establish a theory of probable cause.
Step 3. Test the theory to determine the cause.
Step 4. Establish a plan of action to resolve the problem and implement the solution.
Step 5. Verify full system functionality and, if applicable, implement preventive measures.
Step 6. Document findings, actions, and outcomes.
Identify the Problem (8.5.7.2)
Printer problems can result from a combination of hardware, software, and connectivity issues. A technician must be able to determine if a problem exists with the device, a cable connection, or the computer to which the printer is connected. Computer technicians must be able to analyze the problem and determine the cause of the error to repair the printer issues.
The first step in the troubleshooting process is to identify the problem. Table 8-2 shows a list of open-ended and closed-ended questions to ask the customer.
Table 8-2 Step 1: Identify the Problem
Open-Ended Questions |
Closed-Ended Questions |
|
|
Establish a Theory of Probable Cause (8.5.7.3)
After you have talked to the customer, you can establish a theory of probable causes. Table 8-3 lists some common probable causes for printer problems. If necessary, conduct internal and external research based on the symptoms of the problem.
Table 8-3 Step 2: Establish a Theory of Probable Cause
Common causes of printer problems |
|
Test the Theory to Determine Cause (8.5.7.4)
After you have developed some theories about what is wrong, test them to determine the cause of the problem. Once a theory is confirmed, you can determine the steps to resolve the problem. Table 8-4 lists some quick procedures that can help you determine the exact cause of a problem or even correct the problem. If a quick procedure does correct the problem, you can verify full system functionality. If a quick procedure does not correct the problem, you may need to research the problem further to establish the exact cause.
Table 8-4 Step 3: Test the Theory to Determine the Cause
Common steps to determine cause |
|
Establish a Plan of Action to Resolve the Problem and Implement the Solution (8.5.7.5)
After you have determined the exact cause of a problem, establish a plan of action to resolve the problem and implement the solution. Table 8-5 shows some sources you can use to gather additional information to resolve an issue.
Table 8-5 Step 4: Establish a Plan of Action to Resolve the Problem and Implement the Solution
If no solution is achieved in the previous step, further research is needed to implement the solution, using these sources |
|
Verify Full System Functionality and, if Applicable, Implement Preventive Measures (8.5.7.6)
After you have corrected the problem, verify full functionality and, if applicable, implement preventive measures. Table 8-6 lists the steps to verify the solution.
Table 8-6 Step 5: Verify Full Functionality and, if Applicable, Implement Preventive Measures
Verify full functionality |
|
Document Findings, Actions, and Outcomes (8.5.7.7)
In the final step of the troubleshooting process, document your findings, actions, and outcomes. Table 8-7 lists the tasks required to document a problem and its solution.
Table 8-7 Step 6: Document Findings, Actions, and Outcomes
Document your findings, actions, and outcomes |
|
Problems and Solutions (8.5.8)
Specific troubleshooting solutions vary depending on the printer, but when you understand some common issues, you can search and find fixes. Printer problems can stem from many sources, including the printer hardware, printer drivers, print server, or, in the case of a network printer, the network. Recognizing the source of a problem and identifying a solution are the topics of this section.
Identify Printer Problems and Solutions (8.5.8.1)
Printer problems can be attributed to hardware, software, networks, or some combination of the three. You will resolve some types of problems more often than others.
Common Problems and Solutions for Printers (8.5.8.2)
Table 8-8 documents some common printing problems and possible solutions.
Table 8-8 Common Problems and Solutions for Printers
Identify the Problem |
Probable Causes |
Possible Solutions |
An application document does not print. |
There is a document error in the print queue. |
Manage the print jobs by canceling the document from the print queue and printing again. |
Printer cannot be added or there is a print spooler error. |
The printer service is stopped or not working properly. |
Start the print spooler and, if necessary, reboot the computer. |
Printer jobs are sent to the print queue but are not printed. |
The printer has been installed on the wrong port. |
Use printer properties and settings to configure the printer port. |
Print queue is functioning properly, but the printer does not print. |
There is a bad cable connection. |
Check for bent pins on the printer cable and check the printer cable connections to the printer and computer. |
The printer is in standby. |
Manually resume the printer from standby or power cycle the printer. |
|
The printer has an error such as being out of paper, being out of toner, or having a paper jam. |
Check the printer status and correct any errors. |
|
Printer is printing unknown characters or does not print a test page. |
Wrong or outdated printer driver is installed. |
Uninstall the current print driver and install the correct print driver. |
Printer prints unknown characters or does not print anything. |
Printer may be plugged into a UPS. |
Plug the printer directly into the wall outlet or surge protector. |
Incorrect print driver installed. |
Uninstall incorrect print driver and install correct driver. |
|
Printer cables are loose. |
Secure printer cables. |
|
No paper in printer. |
Add paper to the printer. |
|
Paper jams when printing. |
Printer is dirty. |
Clean the printer. |
The wrong paper type is being used. |
Replace paper with the manufacturer’s recommended paper type. |
|
Humidity causes the paper to stick together. |
Insert new paper in the paper tray. |
|
The print jobs are faded. |
The toner cartridge is low or the toner cartridge is defective. |
Replace the toner cartridge. |
The paper is incompatible with the printer. |
Replace the paper. |
|
The toner is not fusing to the paper. |
The toner cartridge is empty or defective. |
Replace the toner cartridge. |
The paper is incompatible with the printer. |
Replace the paper. |
|
The paper is creased after printing. |
The paper is defective. |
Remove the paper from printer, check for defects, and replace. |
The paper is loaded incorrectly. |
Remove, align, and replace the paper. |
|
The paper is not being fed into the printer. |
The paper is wrinkled. |
Remove the wrinkled paper from print tray. |
Check rollers for damage or need of replacement. |
||
Printer set to print to a different paper size than currently loaded. |
Change paper size in print settings. |
|
User receives a “Document failed to print” message. |
A cable is loose or disconnected. |
Check and reconnect the parallel, USB, or power cable. |
A printer is no longer shared. |
Configure the printer for sharing. |
|
User receives an “Access Denied” message when trying to install a printer. |
User does not have administrative or power user privileges. |
Log out and log in as an administrator or power user. |
Printer is printing incorrect colors. |
Print cartridge is empty or defective. Incorrect cartridge installed. |
Replace the printer cartridge. |
Print heads need to be cleaned and calibrated. |
Clean and calibrate the printer using the supplied software. |
|
The printer is printing blank pages. |
The printer is out of ink or toner. |
Replace the ink or toner cartridge. |
The print head is clogged. |
Replace the ink cartridge. |
|
The corona wire has failed. |
Replace the corona wire. |
|
The high-voltage power supply has failed. |
Replace the high-voltage power supply. |
|
The printer display has no image. |
The printer is not turned on. |
Turn on the printer. |
The contrast of the screen is set too low. |
Increase the screen contrast. |
|
The display is broken. |
Replace the display. |
Advanced Problems and Solutions for Printers (8.5.8.3)
Table 8-9 documents some advanced printing problems and possible solutions.
Table 8-9 Advanced Problems and Solutions for Printers
Identify the Problem |
Probable Causes |
Possible Solutions |
Printer prints unknown characters. |
An incorrect print driver is installed. |
Uninstall the incorrect print driver and install the correct driver. |
The printer cables are loose. |
Secure the printer cables. |
|
Printer will not print large or complex images. |
The printer does not have enough memory. |
Add more memory to the printer. |
Laser printer prints vertical lines or streaks on every page. |
The drum is damaged. |
Replace the drum or replace the toner cartridge when it contains the drum. |
Toner is not evenly distributed in the cartridge. |
Remove and shake the toner cartridge. |
|
Printed pages show ghost images. |
The drum is scratched or dirty. |
Replace the drum or replace the toner cartridge when it contains the drum. |
The drum wiper blade is worn. |
Replace the drum or replace the toner cartridge when it contains the drum. |
|
The toner is not fusing to the paper. |
The fuser is defective. |
Replace the fuser. |
Paper is creased after printing. |
The pickup rollers are obstructed, damaged, or dirty. |
Clean or replace the pickup rollers. |
Paper is not being fed into the printer. |
The pickup rollers are obstructed, damaged, or dirty. |
Clean or replace the pickup rollers. |
Each time a network printer is restarted, users receive a “Document failed to print” message. |
The printer’s IP configuration is set for DHCP. |
Assign a static IP address to the printer. |
A device on the network has the same IP address as the network printer. |
Assign a different static IP address to the printer. |
|
There are multiple failed jobs in the printer logs. |
The printer is off. |
Turn on the printer. |
The printer is out of paper. |
Add paper to the printer. |
|
The printer is out of toner or ink. |
Replace the toner or ink cartridge(s). |
|
The print job is corrupt. |
Restart or delete the print job. |
Summary (8.6)
In this chapter, you learned how printers operate, what to consider when purchasing a printer, and how to connect printers to an individual computer or to a network. There are many different types and sizes of printers, each with different capabilities, speeds, and uses. Printers can be connected directly to computers or shared across a network. The chapter also introduced the different types of cables and interfaces available to connect a printer.
Some printers have low output and are adequate for home use, whereas other printers have high output and are designed for commercial use. Printers can have different speeds and print qualities. Older printers use parallel cables and ports. Newer printers typically use USB or FireWire cables and connectors. With newer printers, the computer automatically installs the necessary drivers. If the device drivers are not automatically installed by the computer, download them from the manufacturer’s website or use the supplied CD.
You learned about important characteristics and components of the various printer types. The primary components of an inkjet printer are the ink cartridges, the print head, roller, and feeder. A laser printer is a high-quality, fast printer that uses a laser beam to create an image. The central parts of a laser printer are the imaging drum, toner cartridge, fuser assembly, and rollers. Thermal printers use a special thermal paper that becomes black where heated. Impact printers have print heads that strike an inked ribbon, causing characters to be imprinted on the paper. Dot matrix and daisy wheel are examples of impact printers. 3D printers are used to create three-dimensional objects. These objects are first designed using a computer. A variety of media are now available to create these objects.
You also learned about virtual printing and cloud printing. Virtual printing does not send a print job to a physical printing device; rather, the print software sends the job to a file or transmits the information to a remote destination in the cloud for printing. Common virtual printing options are print to file, print to PDF, print to XPS, and print to image. Cloud printing involves sending a print job to a remote printer that could be at any location connected to the internet.
You completed a lab installing a printer in Windows. In the lab, you installed a print driver, downloaded and installed an updated print driver, and, if all was configured correctly, were able to print a test page. After you set up the printer, you had a lab in which you shared the device in Windows with other users on the network.
At the end of the chapter, you learned the importance of following a preventive maintenance program for printers. A good preventive maintenance program extends the life of a printer and keeps it performing well. Always follow safety procedures when working with printers. Many parts inside printers contain high voltage or become very hot with use. In two labs you performed preventive maintenance on inkjet and laser printers.
Finally, you learned the six steps in the troubleshooting process as they pertain to printers.
Practice
The following activities provide practice with the topics introduced in this chapter. The labs are available in the companion IT Essentials v7 Labs & Study Guide (ISBN 9780135612033).
Labs
![]()
8.3.1.3 Lab - Install a Printer in Windows
8.4.1.3 Lab - Share a Printer in Windows
8.5.2.2 Lab - Perform Preventive Maintenance on an Inkjet Printer
8.5.3.2 Lab - Perform Preventive Maintenance on a Laser Printer
Check Your Understanding Questions
Complete all the review questions listed here to test your understanding of the topics and concepts in this chapter. The appendix “Answers to ‘Check Your Understanding’ Questions” lists the answers.
1. Which type of document typically takes the longest time to print?
a high-quality page of text
a digital color photograph
a draft photo–quality printout
draft text
2. Which of the following are potential disadvantages of replacing printer consumables with parts or components that are not recommended by the manufacturer? (Choose two.)
Nonrecommended parts might be more readily available.
The printer may need to be cleaned more often.
Print quality might be poor.
The manufacturer warranty might be voided.
Nonrecommended parts might be less expensive.
3. A small company is deciding whether a laser printer should be purchased to replace an inkjet printer. What are two disadvantages of a laser printer? (Choose two.)
It only prints black-and-white documents.
Toner cartridges are expensive.
The startup cost is high.
It cannot print in high resolution.
It uses expensive piezoelectric crystals to generate print images.
4. A technician wants to share a printer on the network, but according to the company policy, no PC should have a directly connected printer. Which device would the technician need?
a USB hub
a LAN switch
a hardware print server
a docking station
5. What term is used to describe dual-sided printing?
spooling
duplex printing
IR printing
buffering
6. While troubleshooting a printer problem, a technician discovers that the printer has been connected to the wrong computer port. Which printer problem would this mistake cause?
Blank pages are printed by the printer.
When a document is printed, there are unknown characters on the page.
The print spooler displays an error.
The print queue is functioning, but print jobs are not printed.
7. Which method is recommended for cleaning the print heads in an inkjet printer?
Use compressed air.
Wipe the print heads with isopropyl alcohol.
Wipe the print heads with a damp cloth.
Use the printer software utility.
8. A small business has connected several printers to the Web using Google Cloud Print. Mobile workers can therefore print job orders while they are on the road. This is an example of using what type of printer?
thermal
virtual
laser
inkjet
9. How could a user share a locally connected printer with other users on the same network?
Enable print sharing.
Install a USB hub.
Install shared PCL drivers.
Remove the PS drivers.
10. What is the first action that should be taken when performing preventive maintenance on a printer?
Disconnect the printer from the network.
Clean the print heads using the printer software utility.
Remove the paper from the printer paper tray.
Disconnect the printer from the power source.
11. What are two disadvantages of sharing a directly connected printer from a computer? (Choose two.)
Only one computer at a time can use the printer.
Other computers do not need to be cabled directly to the printer.
The computer sharing the printer uses its own resources to manage all the print jobs coming to the printer.
The computer directly connected to the printer always needs to be powered on, even if not in use.
All the computers using the printer need to use the same operating system.
12. Which statement describes the print buffering process?
Large documents are stored temporarily in internal printer memory while waiting for the printer to be available.
A document is being prepared by the application to be printed.
A document is being printed on the printer.
A PC is encoding a photograph into a language that the printer understands.
13. Dots per inch is used as a measure for which characteristic of a printer?
speed
quality of printing
cost of ownership
reliability
14. What software enables users to set and change printer options?
drivers
firmware
configuration software
word processing applications
15. What are two closed-ended questions that a technician could ask a user when trying to identify the problem with a printer? (Choose two.)
What error messages were displayed when the problem occurred?
What were you doing when the problem occurred?
Is the printer powered on?
What recent software or hardware changes have been made to your computer?
Can you print a test page on the printer?
16. Which method is recommended for cleaning the print heads in an inkjet printer?
Use the printer software utility.
Use compressed air.
Wipe the print heads with a damp cloth.
Wipe the print heads with isopropyl alcohol.