
Chapter 13
Security
Objectives
Upon completion of this chapter, you will be able to answer the following questions:
What are different types of malware?
What are measures that protect against malicious software?
What are different types of network attacks?
What are different social engineering attacks?
What is a security policy?
What are physical security measures?
What are measures that protect data?
How do you secure a workstation?
How do you configure security by using the Windows Local Security Policy tool?
How do you manage users and groups?
How do you configure security by using Windows Firewall?
How do you configure a browser for secure access?
How do you configure security maintenance in Windows?
How do you configure wireless devices for secure communication?
What are the six steps of the troubleshooting process for security?
What are common problems and solutions for security?
Key Terms
This chapter uses the following key terms. You can find the definitions in the glossary at the end of the book.
acceptable use policy page 835
Advanced Encryption Standard (AES) page 888
asymmetric encryption page 888
authentication method page 891
data loss prevention (DLP) page 842
denial of service (DoS) page 826
denial of service (DoS) Trojan page 818
distributed DoS (DDoS) page 826
electromagnetic degaussing device page 848
Email Security Appliance (ESA) page 830
Encrypting File System (EFS) page 844
identification and authentication policy page 835
incident handling policy page 835
intrusion prevention system (IPS) page 829
MAC address filtering page 871
man-in-the-middle (MITM) page 826
Message Digest 5 (MD5) page 887
multifactor authentication page 877
network maintenance policy page 835
one-time password (OTP) page 877
Port Address Translation (PAT) page 871
Secure Hash Algorithm (SHA) page 887
security software disabling Trojan page 818
something for something page 833
stateful packet inspection (SPI) page 895
Triple Data Encryption Algorithm (3DES) page 888
Trusted Platform Module (TPM) page 845
Universal Plug and Play (UPnP) page 898
Web Security Appliance (WSA) page 830
Wi-Fi Protected Access (WPA) page 891
Introduction (13.0)
This chapter reviews the types of attacks that threaten the security of computers and the data contained on them. An IT technician is responsible for the security of data and computer equipment in an organization. To successfully protect computers and the network, a technician must understand the threats to physical equipment, such as servers, switches, and wiring, and threats to data, such as authorized access, theft, and loss.
In this chapter, you will learn about the many types of threats to computers and networks, the greatest and most common of which is malware. You will learn about common types of computer malware, such as viruses, Trojan horses, adware, ransomware, rootkits, spyware, and worms, as well as techniques to protect against them. You will also learn about TCP/IP attacks such as denial of service, spoofing, SYN flood, and man-in-the-middle attacks. Cybercriminals often use social engineering techniques to deceive and trick unsuspecting individuals to reveal confidential information or account login credentials. You will learn about the many forms of social engineering attacks, such as phishing, pretexting, baiting, and Dumpster diving, and how to protect against them.
You will also learn about the importance of having a security policy, which is a set of security objectives that ensure the security of a network, the data, and the computers in an organization. A good security policy specifies the persons authorized to access network resources, the minimum requirements for passwords, acceptable uses for network resources, how remote users can access the network, and how security incidents will be handled. You will learn about host-based firewalls such as Windows Defender and how you can configure such a firewall to allow or deny access to specific programs or ports. You will explore the Windows Defender Firewall in a lab and configure advanced firewall settings. You will also learn about wireless security and configure wireless security in a Packet Tracer activity.
Finally, you will learn the six steps in the troubleshooting process as they are applied to security.
13.1 Security Threats (13.1)
This chapter reviews the types of attacks that threaten the security of computers and the data contained on them. A technician is responsible for the security of data and computer equipment in an organization. You will learn how to work with customers to ensure that the best possible protection is in place.
Malware (13.1.1)
This section discusses the various types of malicious software, for which malware has become the comprehensive term. Malware can damage and destroy computer systems and data stored on them.
Malware (13.1.1.1)
Many types of threats are created to disrupt computers and networks. The greatest and most common threat for computers and the data contained on them is malware. Malware is software developed by cybercriminals to perform malicious acts. In fact, the word malware is an abbreviation for malicious software.
Malware is typically installed on a computer without the user’s knowledge. Once a host is infected, the malware could
Change the computer configuration.
Delete files or corrupt hard drives.
Collect information stored on the computer without the user’s consent.
Open extra windows on the computer or redirect the browser.
How does malware get on your computer? Cybercriminals use a variety of methods to infect hosts, and a user’s system is at risk of being infected for reasons such as these:
Visiting an infected website
Having outdated antivirus software
Having a web browser that is not patched for a new vulnerability
Downloading a “free” program
Opening unsolicited email
Exchanging files on file sharing sites
Becoming infected by another infected host
Inserting a USB stick found in a public area
Depending on their goals, cybercriminals use different types of malware. The choice of malware depends on the target and what the criminals are after.
Noncompliant and legacy systems are especially vulnerable to software exploitations. A noncompliant system is a system that has not been updated with operating system or application patches or that is missing antivirus and firewall security software. Legacy systems are systems for which the vendor no longer provides support or fixes for vulnerabilities.
What Do You Already Know? - Malware (13.1.1.2)
Malware can come from many different sources. You must know the differences between the seven main types of malware: spyware, adware, rootkit, ransomware, virus, worm, and Trojan horse. Read each scenario and select the malware type in each.
Scenarios
Scenario 1: You just downloaded and installed a free game, and suddenly a new “search” toolbar has appeared in your browser.
Scenario 2: You have booted your computer, and it is displaying a page that states your files are encrypted and that you must send bitcoin to decrypt your hard drive.
Scenario 3: A cybercriminal has installed a very hard-to-detect malware on your computer to gain system-level privileges and can now control it remotely.
Scenario 4: Whenever you access a secure site on your computer, a program is secretly capturing the login credentials and sending them to a cybercriminal.
Scenario 5: After visiting a free gaming site, your computer displays a pop-up window saying it discovered several viruses, and to fix it you must download and run the free antivirus software. When you download the software and scan your computer with it, it reports that all viruses have been removed. However, the free antivirus software has installed a backdoor application to give a cybercriminal access to your host.
Scenario 6: You open an email attachment, and suddenly your computer shuts down. You try to reboot it, but it keeps shutting down.
Scenario 7: The corporate network is suddenly very noticeably slow and unresponsive.
Answers
Scenario 1 Answer: Adware. This malware can display unsolicited advertising using pop-up web browser windows or new toolbars, or it can unexpectedly redirect from a web page to a different website.
Scenario 2 Answer: Ransomware. This malware encrypts files on the target and then demands that a ransom be paid for the decryption key needed to decrypt the files.
Scenario 3 Answer: Rootkit. Cybercriminals use this malware to gain Administrator account–level access to a computer and control it remotely.
Scenario 4 Answer: Spyware. This malware monitors user activity and sends information to cybercriminals. Keyloggers do the same thing.
Scenario 5 Answer: Trojan horse. This malware is packaged with legitimate software and is activated when a user installs the legitimate application.
Scenario 6 Answer: Virus. This malware requires human action to spread and infect other hosts. Viruses actively try to make copies of themselves and spread.
Scenario 7 Answer: Worm. This malware exploits network applications to consume bandwidth, crash the device, or install other malware.
Viruses and Trojan Horses (13.1.1.3)
The most common type of computer malware is a virus. Viruses require human action to propagate and infect other computers. For example, a virus can infect a computer when a victim opens an email attachment, opens a file on a USB drive, or downloads a file.
The virus hides by attaching itself to computer code, software, or documents on the computer. When opened, the virus executes and infects the computer. These are examples of what can happen when a virus has infected a host:
Alter, corrupt, or delete files or erase entire computer drives
Cause computer booting issues and corrupt applications
Capture and send sensitive information to attackers
Access and use email accounts to spread themselves
Lay dormant until summoned by the attacker
Modern viruses are developed for specific nefarious reasons. Table 13-1 lists some of the main types of viruses.
Table 13-1 Types of Viruses
Types of Viruses |
Description |
Attacks the boot sector, file partition table, or file system |
|
Attacks the device firmware |
|
Uses the Microsoft Office macro feature maliciously |
|
Inserts itself in another executable program |
|
Attacks the OS interpreter, which is used to execute scripts |
Cybercriminals also use Trojan horses to compromise hosts. A Trojan horse is a program that looks useful but carries malicious code. Trojan horses are often provided with free online programs such as computer games. Unsuspecting users download and install the game, and they also install the Trojan malware.
There are several types of Trojan horses, as described in Table 13-2.
Table 13-2 Types of Trojan Horses
Type of Trojan Horse |
Description |
Enables unauthorized remote access |
|
Provides the attacker with sensitive data, such as passwords |
|
Corrupts or deletes files |
|
Uses the victim’s computer as the source device to launch attacks and perform other illegal activities |
|
Enables unauthorized file transfer services on end devices |
|
Stops antivirus programs or firewalls from functioning |
|
Slows or halts network activity |
|
Actively attempts to steal confidential information, such as credit card numbers, by recording keystrokes entered into web forms |
Viruses and Trojan horses are only two types of malware that cybercriminals use. Many other types of malware have been designed for specific purposes.
To fix some issues caused by viruses, it may be necessary to boot the computer using the Windows product disk and then use the Windows Recovery Console to run commands from a “clean” command environment. The Recovery Console is able to perform functions such as repairing the boot file and writing a new Master Boot Record or Volume Boot Record.
Types of Malware (13.1.1.4)
There are many different types of malware, as described in the list that follows:
-
Adware is usually distributed by downloading online software.
Adware can display unsolicited advertising using pop-up web browser windows and new toolbars, or it can unexpectedly redirect from a web page to a different website.
Pop-up windows may be difficult to control as new windows can pop up faster than the user can close them.
-
Ransomware typically denies a user access to his or her files by encrypting the files and then displaying a message demanding a ransom for the decryption key.
Users without up-to-date backups must pay the ransom to decrypt their files.
Payment is usually made using wire transfer or cryptocurrencies (such as bitcoin).
-
Cybercriminals use rootkits to gain Administrator account–level access to a computer.
A rootkit is very difficult to detect because it can alter firewalls, antivirus protection, system files, and even OS commands to conceal its presence.
A rootkit can provide a backdoor to cybercriminals, giving them access to the PC and allowing them to upload files and install new software to be used in a DDoS attack.
Special rootkit removal tools must be used to remove a rootkit, or the system may need to be completely reinstalled.
-
Spyware is similar to adware but is used to gather information about the user and send it to cybercriminals without the user’s consent.
Spyware can be a low threat (for example, gathering browsing data), or it can be a high threat (for example, capturing personal and financial information).
-
A worm is a self-replicating program that propagates automatically without user actions by exploiting vulnerabilities in legitimate software.
A worm uses the network to search for other victims with the same vulnerability.
The intent of a worm is usually to slow or disrupt network operations.
13.1.1.5 Check Your Understanding - Malware

Refer to the online course to complete this activity.
Preventing Malware (13.1.2)
It is essential for computer systems and networks to be protected against breaches. A technician needs to understand malware, the preventive measures to take, and the technologies available to mitigate attacks.
Anti-Malware Programs (13.1.2.1)
Malware is designed to invade privacy, steal information, damage the operating system, or allow hackers to take control of a computer. It is important to protect computers and mobile devices using reputable antivirus software.
This is the seven-step best practice procedure for malware removal:
Step 1. Identify and research malware symptoms.
Step 2. Quarantine the infected systems.
Step 3. Disable system restore (in Windows).
Step 4. Remediate infected systems.
Step 5. Schedule scans and run updates.
Step 6. Enable system restore and create restore points (in Windows).
Step 7. Educate the end user.
Antivirus programs are commonly referred to as anti-malware programs because many of them can also detect and block Trojans, rootkits, ransomware, spyware, keyloggers, and adware programs, as shown in Figure 13-1.

Figure 13-1 Anti-Malware
Anti-malware programs are the best line of defense against malware because they continuously look for known patterns against a database of known malware signatures. They can also use heuristic malware identification techniques, which can detect specific behavior associated with some types of malware.
An anti-malware program starts when a computer boots, and it checks the system resources, drives, and memory for malware. It then runs continuously in the background, scanning for malware signatures. When a virus is detected, the anti-malware software displays a warning similar to the one shown in Figure 13-1. It may automatically quarantine or delete the malware, depending on software settings.
Anti-malware programs are available for Windows, Linux, and macOS from many reputable security organizations, such as McAfee, Symantec (Norton), Kaspersky, Trend Micro, and Bitdefender.
Note
Using two or more anti-malware solutions simultaneously can negatively impact computer performance.
The most common method of malware delivery is through email. Email filters are a line of defense against email threats, such as spam, viruses, and other malware because they filter email messages before they reach the user’s inbox. Anti-malware software can scan file attachments before they are opened.
Email filtering is available on most email applications, or it can be installed at the organization’s email gateway. In addition to detecting and filtering out spam messages, email filters also allow the user to create blacklists of known spammer domains and to whitelist known trusted or safe domains.
Malware can also be delivered through applications that are installed. Installation of software from untrusted sources can lead to the spread of malware such as Trojans. To mitigate this risk, vendors implement various methods to restrict the ability of users to install untrusted software. Windows uses the concept of Administrator and Standard User accounts, along with User Account Control (UAC) and system policies to help prevent installation of untrusted software.
Be cautious of malicious rogue antivirus products that may appear while browsing the Internet. Such a product is likely to display an ad or a pop-up that looks like an actual Windows warning window, as shown in Figure 13-2. Such ads usually state that the computer is infected and must be cleaned. Clicking anywhere inside the window may begin the download and installation of the malware.

Figure 13-2 Rogue Antivirus
Do not click a warning window that is suspect. Close the tab or the browser to see if the warning window goes away. If the tab or browser does not close, press Alt+F4 to close the window or use the Task Manager to end the program. If the warning window does not go away, scan the computer using a known good antivirus or adware protection program to ensure that the computer is not infected.
Visit https://zvelo.com/introduction-to-rogue-antivirus/ to read about rogue antivirus malware.
In Linux, users are prompted if they attempt to install untrusted software. The software is signed with a cryptographic private key, and the public key for the repository is needed to install the software.
Mobile OS vendors use the walled garden model to prevent installation of untrusted software. Under this model, apps are distributed from an approved store, such as the Apple App Store or the Microsoft Windows Store.
Signature File Updates (13.1.2.2)
New malware is always being developed; therefore, anti-malware software must be updated regularly. The update process is often enabled by default. However, a technician should know how to manually update anti-malware software signatures.
To update a signature file manually, follow these suggested steps:
Step 1. Create a restore point in case the file you load is corrupt. Setting a restore point allows you to go back to the way things were.
Step 2. Open the anti-malware program. If the program is set to execute or obtain updates automatically, you might need to turn off the automatic feature to perform these steps manually.
Step 3. Click the Update button.
Step 4. After the program is updated, use it to scan the computer and then check the report for viruses or other problems.
Step 5. Set the anti-malware program to automatically update its signature file and scan the computer on a regular basis.
Always download signature files from the manufacturer’s website to make sure the updates are authentic and not corrupted by malware. This can put a great demand on the manufacturer’s website, especially when new malware is released. To avoid creating too much traffic at a single website, some manufacturers distribute their signature files for download to multiple download sites. These download sites are called mirrors.
Caution
When downloading signature files from a mirror, ensure that the mirror site is a legitimate site. Always link to the mirror site from the manufacturer’s website.
13.1.2.3 Video Explanation - Protecting Against Malware

Refer to the online course to view this video.
Remediating Infected Systems (13.1.2.4)
When a malware protection program detects that a computer is infected, it removes or quarantines the threat. However, the computer is most likely still at risk.
When malware is discovered on your home computer, you should update your anti-malware software and perform full scans of all your media. An anti-malware program can be set to run on system start before loading Windows. This allows the program to access all areas of the disk without being affected by the operating system or any malware.
When malware is discovered on a business computer, you should remove the computer from the network to prevent other computers from becoming infected. Unplug all network cables from the computer and disable all wireless connections. Next, follow the incident response policy that is in place. This may include notifying IT personnel, saving log files to removable media, or turning off the computer.
Removing malware may require that the computer be rebooted into Safe mode to prevent most drivers from loading. Some malware may require that a special tool from the anti-malware vendor be used. Be sure that you download such tools from legitimate sites.
For really stubborn malware, it may be necessary to contact a specialist to ensure that the computer has been completely cleaned. Otherwise, the computer may need to be reformatted and the operating system reinstalled, and you may need to recover your data from the most recent backups.
The OS system restore service may include infected files in a restore point. Therefore, once a computer has been cleaned of any malware, the system restore files should be deleted, as shown in Figure 13-3.

Figure 13-3 Deleting Restore Points
After remediation, you may need to fix some issues caused by viruses; it may be necessary to boot the computer using the Windows product disk and then use the Windows Recovery Console to run commands from a “clean” command environment. The Recovery Console can perform functions such as repairing the boot file and writing a new Master Boot Record or Volume Boot Record.
13.1.2.5 Video Explanation - Remediating an Infected System
Refer to the online course to view this video.
13.1.2.6 Check Your Understanding - Preventing Malware
Refer to the online course to complete this activity.
Network Attacks (13.1.3)
Network attacks take many forms and have many different phases. The common theme among them is that a network attack is an assault on network infrastructures, with the intent to compromise or disrupt the network system and gain unauthorized access to data and systems.
Networks Are Targets (13.1.3.1)
To control communication on the Internet, networks use the TCP/IP protocol suite. Because the TCP/IP protocol suite is the de facto protocol suite, it is widely targeted and has some known vulnerabilities, making networks that use it major targets for attackers.
Attackers look for TCP/IP vulnerabilities. Exploits are used to attack a network and make it or devices unresponsive or to help attackers gain access to internal resources. Many protocols in the TCP/IP suite transmit information in plaintext, which makes them susceptible to various attacks.
Attackers typically do some reconnaissance of target networks. Reconnaissance, also referred to as footprinting, is the phase of an attack in which the attacker attempts to learn as much about the target network as possible. To accomplish this, an attacker may follow these steps:
Step 1. Perform an information query of a target: The attacker looks for network information about a target by using various tools, including Google search, the organization’s website, whois, and more.
Step 2. Initiate a ping sweep of the target network: The attacker initiates a ping sweep of the discovered target’s public network address to determine which IP addresses are active.
Step 3. Initiate a port scan of active IP addresses: The attacker determines which services are available on the active ports by using tools such as Nmap and SuperScan.
Step 4. Run vulnerability scanners: The attacker runs vulnerability scanners such as Nipper or Secuna PSI to discover the type and version of the application and operating system running on the target host.
Step 5. Run exploitation tools: The attacker attempts to discover vulnerable services that can be exploited, using tools such as Metasploit and Core Impact.
Types of TCP/IP Attacks (13.1.3.2)
There are many different types of TCP/IP attacks, including the following:
-
In a DoS attack, the attacker completely overwhelms a target device with false requests to deny service to legitimate users.
An attacker could cut or unplug a network cable to a critical network device to cause a network outage.
DoS attacks may be caused for malicious reasons or used in conjunction with other attacks.
-
A DDoS attack is an amplified DoS attack that involves many infected hosts called zombies overwhelming a target.
Attackers control zombies by using a handler computer.
A botnet is an army of compromised hosts that remains dormant until instructed by the handler.
Botnets can be also be used for spam and phishing attacks.
-
In a DNS poisoning attack, the attacker has successfully infected a host to accept false DNS records pointing to malicious servers.
Traffic is diverted to these malicious servers to capture confidential information.
An attacker can then retrieve the data from that location.
-
In a TCP/IP MITM attack, an attacker intercepts communications between two hosts.
If successful, the attacker could capture packets and view their content, manipulate packets, and more.
MITM attacks can be created using an ARP poisoning spoofing attack.
-
A replay attack is a type of spoofing attack in which the attacker has captured an authenticated packet, altered the packet’s contents, and sent the packet to its original destination.
The goal is to have the target host accept the altered packet as authentic.
-
In a TCP/IP spoofing attack, the attacker forges IP addresses.
For example, an attacker might spoof the IP address of a trusted host to gain access to resources.
-
A SYN flood attack is a type of DoS attack that exploits the TCP three-way handshake.
The attacker sends continuous false SYN requests to the target.
The target is eventually overwhelmed and unable to establish valid SYN requests, creating a DoS attack.
13.1.3.3 Check Your Understanding - Identify the TCP/IP Attack
Refer to the online course to complete this activity.
Zero-Day (13.1.3.4)
The following two terms are commonly used to describe when a threat is detected:
Zero-day: Sometimes also referred to as zero-day attack, zero-day threat, or zero-day exploit, this is the day that an unknown vulnerability is discovered by the vendor. The term is a reference to the amount of time that a vendor has had to address the vulnerability.
Zero-hour: This is the moment when an exploit is discovered.
A network remains vulnerable between the zero-day and the time it takes a vendor to develop a solution.
In the example in Figure 13-4, a software vendor has learned of a new vulnerability. The software can be exploited until a patch that addresses the vulnerability is made available. Notice that in the example, it took several days and a few software patch updates to mitigate the threat.
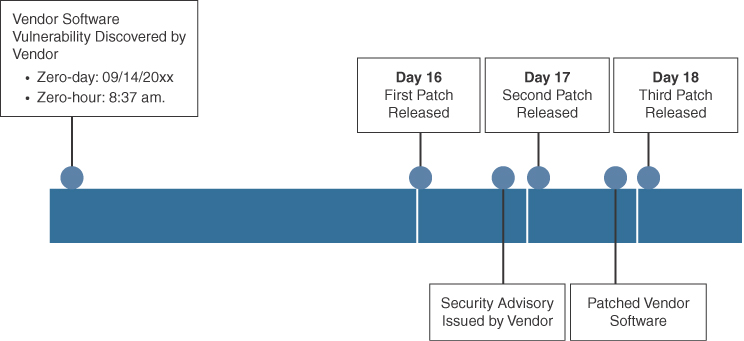
Figure 13-4 Mitigating a Zero-Day Attack
The next section addresses how networks can be protected against threats and zero-day attacks.
Protecting Against Network Attacks (13.1.3.5)
Many network attacks are fast moving; therefore, network security professionals must adopt a sophisticated view of the network architecture. There is no one solution to protect against all TCP/IP or zero-day attacks.
One solution is to use a defense-in-depth approach, also known as a layered approach, to security. This requires a combination of networking devices and services working together in tandem.
Consider the network in Figure 13-5.
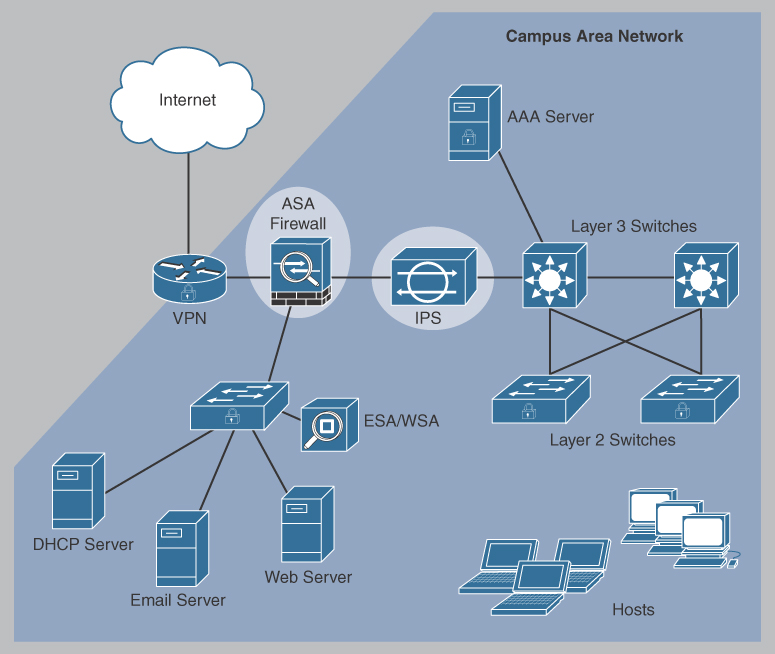
Figure 13-5 Protecting Against Network Attacks
As shown in Figure 13-5, several security devices and services can be implemented to protect users and assets against TCP/IP threats:
VPN: A router can be used to provide secure VPN services with corporate sites and remote access support for remote users, using secure encrypted tunnels.
ASA firewall: This dedicated device provides stateful firewall services. It ensures that internal traffic can go out and come back but external traffic cannot initiate connections to inside hosts.
An intrusion prevention system (IPS): An IPS monitors incoming and outgoing traffic, looking for malware, network attack signatures, and more. If it recognizes a threat, it can immediately stop it.
AAA server: This server contains a secure database of who is authorized to access and manage network devices. Network devices authenticate administrative users using this database.
Email Security Appliance (ESA) and Web Security Appliance (WSA): The ESA filters spam and suspicious emails. The WSA filters known and suspicious Internet malware sites.
All network devices, including the router and switches, can also be hardened to prevent attackers from tampering with the devices.
Social Engineering Attacks (13.1.4)
Social engineering is malicious activity achieved through human interactions. It is an art to be able to gain trust and use powers of persuasion to manipulate people to unknowingly give up information that can lead to a security breach. That is exactly how social engineering attacks happen. Exploiting the human consciousness rather than using technical techniques is often a successful method of circumventing security barriers.
Social Engineering (13.1.4.1)
To secure networks and hosts, organizations often deploy network security solutions and anti-malware solutions for their hosts. They also need to address the weakest link: the users.
Social engineering is likely the single most serious threat to a well-configured and well-secured network. Cybercriminals use social engineering techniques to deceive and trick unsuspecting targets to reveal confidential information or violate security to gain information. Social engineering is an access attack that attempts to manipulate individuals into performing actions or divulging confidential information.
Social engineers prey on people’s weaknesses and often rely on human nature and people’s willingness to be helpful.
Note
Social engineering is often used in conjunction with other network attacks.
What Do You Already Know? - Social Engineering Techniques (13.1.4.2)
There are many types of social engineering techniques: impersonation, baiting, pretexting, Dumpster diving, phishing, spam, shoulder surfing, tailgating, spear phishing, and something for something. Read the following scenarios and select the social engineering technique in each one.
Scenarios
Scenario 1: When you find a USB drive in a parking lot and insert it into your laptop, you unknowingly install malware on your computer.
Scenario 2: An attacker retrieves hard copies of recently outdated device configuration files from a trash bin.
Scenario 3: A person claiming to be from your heating and ventilation contractor asks you if you could let him into a secure area.
Scenario 4: You receive an email from your bank, stating that your account has been compromised and that you should click an enclosed link to rectify the problem. When you click, you install malware on your device.
Scenario 5: Your bank calls to say your account may be compromised and asks you to confirm your identity by providing personal and financial data.
Scenario 6: You notice a fellow employee purposely looking over your supervisor’s shoulder while she is entering her login credentials.
Scenario 7: You received a survey in an email that asks you to provide personal identifiable information in exchange for a cool free t-shirt.
Scenario 8: An attacker sends malicious emails containing harmful links, malware, and deceptive content to a large number of random individuals.
Scenario 9: An attacker has created a targeted phishing attack tailored specifically for the chief executive officer of a large organization.
Scenario 10: A person you have never seen before has quickly followed you into a secure building entrance, saying that he forgot his security badge.
Answers
Scenario 1 Answer: Baiting. With this social engineering technique, an attacker leaves a malware-infected flash drive in a public location (such as a corporate restroom), hoping a victim will find the drive and insert it into a corporate laptop, where it can install the malware.
Scenario 2 Answer: Dumpster diving. With this social engineering technique, an attacker rummages through trash bins to discover confidential documents or old media.
Scenario 3 Answer: Impersonation. With this social engineering technique, an attacker pretends to be someone he or she is not (such as a new employee, a fellow employee, or a vendor or partner company employee) to gain the trust of a victim.
Scenario 4 Answer: Phishing. With this social engineering technique, an attacker sends fraudulent email that purports to be from a legitimate, trusted source to trick the recipient into installing malware or sharing personal or financial information.
Scenario 5 Answer: Pretexting. With this social engineering technique, an attacker pretends to need personal or financial information in order to confirm the identity of the person he or she is talking to.
Scenario 6 Answer: Shoulder surfing. With this social engineering technique, an attacker inconspicuously looks over someone’s shoulder to steal his or her passwords.
Scenario 7 Answer: Something for something. This social engineering technique, also called quid pro quo, involves an attacker requesting personal information from a victim in exchange for something such as a gift.
Scenario 8 Answer: Spam. With this social engineering technique, an attacker sends unsolicited junk mail to thousands or millions of recipients in an attempt to trick them to click on an infected link or download an infected file.
Scenario 9 Answer: Spear phishing. This social engineering technique is a phishing attack targeting specific individuals (such as executives) or organizations.
Scenario 10 Answer: Tailgating. An attacker uses this social engineering technique, also called piggybacking, to gain access to a secure area.
Social Engineering Techniques (13.1.4.3)
There are many different ways to use social engineering techniques. Some social engineering techniques are used in person, and others involve the telephone or Internet. For example, a hacker could call an authorized employee with an urgent problem that requires immediate network access. The hacker could appeal to the employee’s vanity, invoke authority by using name-dropping techniques, or appeal to the employee’s greed.
These are the most common social engineering techniques:
Pretexting: An attacker pretends to need personal or financial data in order to confirm the identity of the recipient.
Phishing: An attacker sends fraudulent email, disguised as being from a legitimate, trusted source to trick the recipient into installing malware on his or her device or sharing personal or financial information (such as a bank account number and a PIN).
Spear phishing: An attacker creates a targeted phishing attack tailored specifically for an individual or organization.
Spam: Also known as junk mail, this is unsolicited email that often contains harmful links, malware, or deceptive content.
Something for something: With this type of attack, sometimes called quid pro quo, an attacker requests personal information from a party in exchange for something such as a free gift.
Baiting: An attacker leaves a malware-infected flash drive in a public location (such as a corporate restroom). A victim finds the drive and inserts it into his laptop, unintentionally installing the malware.
Impersonation: With this type of attack, an attacker pretends to be someone he or she is not (such as a new employee, a fellow employee, or a vendor or partner company employee) to gain the trust of a victim.
Tailgating: This is an in-person type of attack in which an attacker quickly follows an authorized person into a secure location to gain access to that area.
Shoulder surfing: This is an in-person type of attack in which an attacker inconspicuously looks over someone’s shoulder and tries to steal their passwords or other information.
Dumpster diving: This is an in-person type of attack in which an attacker rummages through trash bins, looking for confidential documents.
Protecting Against Social Engineering (13.1.4.4)
Enterprises must train and educate their users about the risks of social engineering and develop strategies to validate identities over the phone, via email, or in person.
These are recommended practices that should be followed by all users:
Never give your username and password credentials to anyone.
Never leave your username and password credentials where they can easily be found.
Never open emails from untrusted sources.
Never release work-related information on social media sites.
Never reuse work-related passwords.
Always lock or sign out of your computer when unattended.
Always report suspicious individuals.
Always destroy confidential information according to the organization policy.
13.1.4.5 Check Your Understanding - Personal and Corporate Social Engineering Techniques
Refer to the online course to complete this activity.
Security Procedures (13.2)
Security procedures, which are built on the security policy of an organization, are the detailed instructions and steps to follow to implement and enforce security rules, as specified in the security policy.
Security Policy (13.2.1)
A security policy is like a blueprint for a company’s security plan. It is a plan that outlines the security objectives, goals, and rules established by high-level management. The document is meant to establish the security approach and attitude of an organization.
What Is a Security Policy? (13.2.1.1)
A security policy is a set of security objectives that ensure the security of a network, the data, and the computers in an organization. The security policy is a constantly evolving document based on changes in technology, business, and employee requirements.
A security policy is usually created by a committee consisting of management and IT staff. The committee creates and manages a security policy document that identifies the following:
Which assets require protection
What the possible threats are
What to do in the event of a security breach
What training will be in place to educate the end users
A security policy should consist of the following:
Identification and authentication policy
Password policy
Acceptable use policy
Remote access policy
Network maintenance policy
Incident handling policy
In addition, a security policy should include other items related specifically to the operation of a particular organization. It is up to the IT staff to implement security policy specifications in the network. For example, to implement recommendations on a Windows host, IT staff could use the Local Security Policy feature.
Security Policy Category (13.2.1.2)
The typical items included in a security policy are as follows:
Identification and authentication policy: Specifies authorized persons who can have access to network resources and outlines verification procedures.
Password policy: Ensures that passwords meet minimum requirements and are changed regularly.
Acceptable use policy: Identifies network resources and usages that are acceptable to the organization. It may also identify ramifications if this policy is violated.
Remote access policy: Identifies how remote users can access a network and what is accessible via remote connectivity.
Network maintenance policy: Specifies network device operating systems and end-user application update procedures.
Incident handling policy: Describes how security incidents are handled.
Securing Devices and Data (13.2.1.3)
The goal of the security policy is to ensure a safe network environment and to protect assets. An organization’s assets include data, employees, and physical devices such as computers and network equipment.
The security policy should identify hardware and equipment that can be used to prevent theft, vandalism, and data loss.
Protecting Physical Equipment (13.2.2)
This section examines an often-overlooked aspect of information systems security: physical security. Physical security—including security of personnel, buildings, and equipment—is a vital part of any security plan and foundational to the strength of all security efforts.
Physical Security (13.2.2.1)
Physical security is as important as data security. For example, if a computer is taken from an organization, the data is also stolen or, worse, lost.
Physical security involves securing:
Access to an organization’s premises
Access to restricted areas
The computing and network infrastructure
The level of physical security implemented depends on the organization as some have higher physical security requirements than others.
For example, consider how data centers, airports, and military installations are secured. These organizations use perimeter security including fences, gates, and checkpoints with security guards posted. Entrance to a building’s premises and restricted areas is secured using one or more locking mechanism. Building doors typically use self-closing and self-locking mechanisms. The type of locking mechanism required varies based on the level of security required. A visitor accessing a secure building may have to pass through a security checkpoint staffed by security guards. The guards may scan a visitor and his or her belongings and may have the visitor sign an entry control roster when entering the building and sign out when leaving.
Higher-security organizations have all employees wear identification badges with photographs. A badge could be a smart card containing the user information and security clearance to access restricted areas. For additional security requirements, RFID badges can also be used with proximity badge readers to monitor the location of an individual.
Types of Secure Locks (13.2.2.2)
There are many different types of secure locks.
Conventional lock: This type of lock is unlocked by entering the required key into the door handle mechanism (see Figure 13-6).

Figure 13-6 Conventional Lock
Deadbolt lock: This type of lock is unlocked by entering the required key into a lock separate from the door handle mechanism (see Figure 13-7).

Figure 13-7 Deadbolt Lock
Electronic lock: This type of lock is unlocked by entering a combination code or PIN into the keypad (see Figure 13-8).

Figure 13-8 Electronic Lock
Token-based lock: This type of lock is unlocked by swiping a secure card or by using a proximity reader to detect a smart card or wireless key fob (see Figure 13-9).

Figure 13-9 Token-Based Lock
Biometric lock: This type of lock is unlocked using a biometric scanner such as a thumbprint reader (see Figure 13-10). Other biometric scanners include voice print and retina scanners.

Figure 13-10 Biometric Lock
Multifactor lock: This type of lock uses a combination of mechanisms. For example, a user must enter a PIN and then scan her thumb (see Figure 13-11).

Figure 13-11 Multifactor Lock
Mantraps (13.2.2.3)
In high-security environments, mantraps are often used to limit access to restricted areas and to prevent tailgating. A mantrap is a small room with two doors, one of which must be closed before the other can be opened.
Typically, a person enters the mantrap by unlocking one door. Once inside the mantrap, the first door closes, and then the user must unlock the second door to enter the restricted area.
Figure 3-12 illustrates how a mantrap is used to secure access to a restricted area.

Figure 13-12 Mantrap
Securing Computers and Network Hardware (13.2.2.4)
Organizations must protect their computing and network infrastructure, including cabling, telecommunication equipment, and network devices.
There are several methods of physically protecting computer and networking equipment:
Use webcams with motion-detection and surveillance software.
Install physical alarms triggered by motion-detection sensors.
Label and install RFID sensors on equipment.
Use locking cabinets or security cages around equipment.
Fit equipment with security screws.
Keep telecommunication rooms locked.
Use cable locks with equipment.
Network equipment should be installed only in secured areas. In addition, all cabling should be enclosed within conduits or routed inside walls to prevent unauthorized access or tampering. Conduit is a casing that protects the infrastructure media from damage and unauthorized access.
To restrict access to physical switch ports and switch hardware to authorized personnel, an organization can use a secure server room and lock hardware cabinets. To prevent the attachment of rogue or unauthorized client devices, switch ports should be disabled through the switch management software.
Factors that determine the most effective security equipment to use to secure equipment and data include:
How the equipment is used
Where the computer equipment is located
What type of user access to data is required
For instance, a computer in a busy public place, such as a library, requires extra protection from theft and vandalism. In a busy call center, a server might need to be secured in a locked equipment room. Server locks can provide physical chassis security by preventing access to power switches, removable drives, and USB ports. Where it is necessary to use a laptop computer in a public place, a security dongle and key fob ensure that the computer locks if the user and laptop are separated. Another tool for physical security is a USB lock, which is locked into place in a USB port and requires a key for removal.
Security policies can be applied to mobile devices in a corporate network through mobile device management software. MDM software can manage corporate-owned devices and personal devices in a bring-your-own-device (BYOD) situation. The software logs use of devices on the network and determines whether a device should be allowed to connect (in a process known as onboarding), based on administrative policies.
13.2.2.5 Check Your Understanding - Locking Mechanisms
Refer to the online course to complete this activity.
Protecting Data (13.2.3)
One of the most important goals of information security is to protect data. It is critical that the data being stored, processed, and transported be safeguarded. Programs can be reinstalled if damaged, but user data is unique and not easily replaced.
Data - Your Greatest Asset (13.2.3.1)
Data is likely to be an organization’s most valuable asset. Organizational data can include research and development data, sales data, financial data, human resources and legal data, employee data, contractor data, and customer data.
Data can be lost or damaged due to theft, equipment failure, or a disaster. Data loss and data exfiltration are terms used to describe data being intentionally or unintentionally lost, stolen, or leaked to the outside world.
Data loss can negatively affect an organization in multiple ways:
Brand damage and loss of reputation
Loss of competitive advantage
Loss of customers
Loss of revenue
Legal action resulting in fines and civil penalties
Significant cost and effort to notify affected parties
Significant cost and effort to recover from the breach
Losing data, regardless of circumstances, can be detrimental or even catastrophic to an organization.
Data can be protected from data loss using data backups, file and folder encryption, and file and folder permissions.
Data loss prevention (DLP) means preventing data loss or leakage. DLP software uses a dictionary database or an algorithm to identify confidential data and block the transfer of that data to removable media or email if it does not conform to predefined policy.
Data Backups (13.2.3.2)
Backing up data is one of the most effective ways of protecting against data loss. A data backup stores a copy of the information on a computer to removable backup media that can be kept in a safe place. If the computer hardware fails, the data can be restored from the backup to functional hardware.
Data backups should be performed on a regular basis, as identified in the security policy. Data backups are usually stored offsite to protect the backup media in case anything happens to the main facility. Windows hosts have a backup and restore utility. This is useful for users to back up their data to another drive or to a cloud-based storage provider. macOS includes the Time Machine utility to perform backup and restore functions.
A number of considerations related to data backup are important:
Frequency: Perform backups on a regular basis, as identified in the security policy. Full backups can be time-consuming, so you might want to perform monthly or weekly full backups with frequent partial backups of changed files.
Storage: Transport backups to an approved offsite storage location on a daily, weekly, or monthly rotation, as required by the security policy.
Security: Protect backups by using strong passwords that are required to restore data.
Validation: Always validate backups to ensure the integrity of the data and validate the file restoration procedures.
File and Folder Permissions (13.2.3.3)
Permissions are rules you configure to limit folder or file access for an individual or for a group of users. The following permissions are available for files and folders in a Windows environment:
Full Control: This permission enables the user to see the content of a file or folder, change and delete existing files and folders, create new files and folders, and run programs in a folder.
Modify: This permission enables the user to change and delete existing files and folders but does not allow the user to create new files or folders.
Read and Execute: This permission enables the user to see the contents of existing files or folders and run programs in a folder.
Read: This permission enables the user to see the contents of a folder and open files and folders.
Write: This permission enables the user to create new files and folders and make changes to existing files and folders.
To configure file- or folder-level permissions in all versions of Windows, right-click the file or folder and select Properties > Security > Edit.
Users should have their permissions limited to only the resources they need in a computer or on a network. For example, they should not be able to access all files on a server if they only need access to a single folder. It may be easier to provide users access to the entire drive, but it is more secure to limit access to only the folder the user needs to perform the job. This is known as the principle of least privilege. Limiting access to resources also prevents malicious programs from accessing those resources if the user’s computer becomes infected.
Folder redirection allows a user with administrative privileges to redirect the path of a local folder to a folder on a network share. This makes the folder’s data available to the user when he or she logs into any computer on the network where the network share is located. With user data redirected from local to network storage, administrators can back up the user data when the network data folders are backed up.
File and network share permissions can be granted to individuals or through membership in a group. These share permissions are different from file- and folder-level NTFS permissions. If an individual or a group is denied permissions to a network share, this denial overrides any other permissions given. For example, if you deny someone permission to a network share, the user cannot access that share, even if the user is the administrator or part of the Administrators group. The local security policy must outline which resources and the type of access allowed for each user and group.
When the permissions of a folder are changed, you are given the option to apply the same permissions to all subfolders. This is known as permission propagation. Permission propagation allows you to apply permissions to many files and folders quickly. After parent folder permissions have been set, folders and files that are created inside the parent folder inherit the permissions of the parent folder.
Also, the location of the data and the action performed on the data determine how the permissions are propagated:
When data is moved to the same volume, it keeps the original permissions.
When data is copied to the same volume, it inherits new permissions.
When data is moved to a different volume, it inherits new permissions.
When data is copied to a different volume, it inherits new permissions.
File and Folder Encryption (13.2.3.4)
Encryption is often used to protect data. With encryption, data is transformed using a complicated algorithm that makes the data unreadable. A special key must be used to return the unreadable information back into readable data. Software programs are used to encrypt files, folders, and even entire drives.
Encrypting File System (EFS) is a Windows feature that can encrypt data. EFS is directly linked to a specific user account. Only the user who encrypted the data can access it after it has been encrypted using EFS. To encrypt data using EFS in all Windows versions, follow these steps:
Step 1. Select one or more files or folders.
Step 2. Right-click the selected data and select Properties.
Step 3. Click Advanced.
Step 4. Select the Encrypt Contents to Secure Data checkbox and click OK. Windows displays an informational message stating that it is applying attributes.
Files and folders that have been encrypted with EFS are displayed in green, as shown in Figure 13-13.

Figure 13-13 Encrypting a File System
Windows BitLocker and BitLocker To Go (13.2.3.5)
You can choose to encrypt an entire hard drive by using BitLocker. To use BitLocker, at least two volumes must be present on a hard disk. A system volume is left unencrypted and must be at least 100 MB. This volume holds the files that Windows needs in order to boot.
Note
BitLocker is built into the Windows Enterprise editions, Windows 7 Ultimate, Windows 8 Pro, and Windows 10 Professional.
Before you can use BitLocker, Trusted Platform Module (TPM) must be enabled in BIOS. TPM is a specialized chip installed on the motherboard. It stores information specific to the host computer, such as encryption keys, digital certificates, and passwords. Applications such as BitLocker that use encryption can make use of the TPM chip. These are the steps to enable TPM on a Lenovo laptop:
Step 1. Start the computer and enter the BIOS configuration.
Step 2. Look for the TPM option in the BIOS configuration screens. Consult the manual for your motherboard to locate the correct screen.
Step 3. Choose Enable or Activate for the chip security.
Step 4. Save the changes to the BIOS configuration.
Step 5. Reboot the computer.
To turn on BitLocker full disk encryption in all versions of Windows, follow these steps:
Step 1. Click Control Panel > BitLocker Drive Encryption.
Step 2. On the BitLocker Drive Encryption page, click Turn On BitLocker on the operating system volume. (If TPM is not initialized, follow the instructions provided by the wizard to initialize TPM.)
Step 3. On the Save the Recovery Password page, choose whether to save the password to a USB drive or to a network drive or another location or to print the password. After saving the recovery password, click Next.
Step 4. On the Encrypt the Selected Disk Volume page, select the Run BitLocker System Check check box and click Continue.
Step 5. Click Restart Now.
When these steps are complete, the Encryption in Progress status bar is displayed. After the computer reboots, you can verify that BitLocker is active, as shown in Figure 13-14.
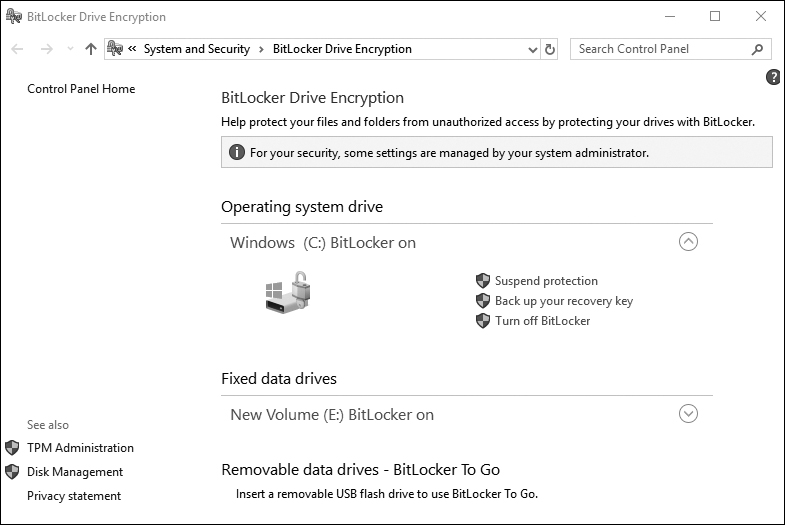
Figure 13-14 Verifying That BitLocker Is Active
You can click TPM Administration to view the TPM details, as shown in Figure 13-15.
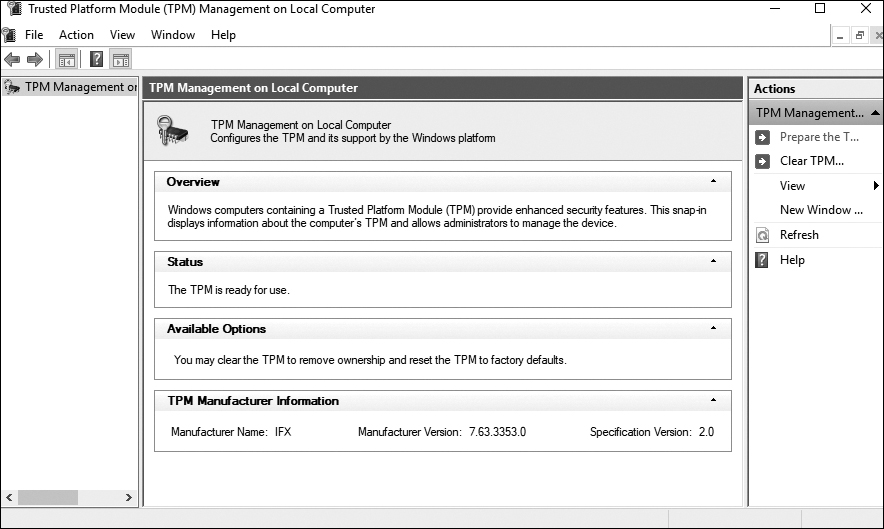
Figure 13-15 Viewing TPM Details
BitLocker To Go makes BitLocker encryption available on removable drives. BitLocker To Go does not use a TPM chip but still provides encryption for the data and requires a password.
13.2.3.6 Video Demonstration - BitLocker and BitLocker To Go
Refer to the online course to view this video.
13.2.3.7 Lab - BitLocker and BitLocker To Go
![]()
In this lab, you will enable BitLocker encryption on a removable data drive and on the computer system drive.
Data Destruction (13.2.4)
Data destruction or data disposal is a critical part of any security plan. For data that is no longer needed, it is necessary to have a proper disposal strategy to make sure data that you do not want accessed and used for unauthorized purposes is erased and unrecoverable.
Data Wiping Magnetic Media (13.2.4.1)
Protecting data involves removing files from storage devices when they are no longer needed. Simply deleting files or reformatting the drive may not be enough to ensure data privacy. For example, deleting files from a magnetic hard disk drive does not remove them completely. The operating system removes the file reference in the file allocation table, but the actual data remains on the drive. This deleted data is overwritten only when the hard drive stores new data in the same location.
Software tools can be used to recover folders, files, and even entire partitions. This can be handy in the case of an accidental erasure, but it can be disastrous in the hands of a malicious user.
Storage media should be fully erased using one or more of the following:
Data wiping software: This software, also known as secure erase, is specifically designed to overwrite existing data multiple times, rendering the data unreadable.
Degaussing wand: A wand with very powerful magnets can be held over exposed hard drive platters to disrupt or eliminate the magnetic field on a hard drive. Hard drive platters must be exposed to the wand for approximately 2 minutes.
Electromagnetic degaussing device: This type of device, which is useful for erasing multiple drives, consists of a magnet with an electrical current applied to it to create a very strong magnetic field that disrupts or eliminates the magnetic field on a hard drive. This method is very expensive but fast, erasing a drive in seconds.
Note
Data wiping and degaussing techniques are irreversible, and the data can never be recovered.
Data Wiping Other Media (13.2.4.2)
SSDs are composed of flash memory instead of magnetic platters. Common techniques used for erasing data, such as degaussing, are not effective with flash memory. Perform a secure erase to fully ensure that data cannot be recovered from an SSD or a hybrid SSD.
Other storage media and documents (such as, optical discs, eMMC, and USB sticks) must also be destroyed. Use a shredding machine or an incinerator that is designed to destroy documents and each type of media. When you need to keep sensitive documents, such as those containing classified information or passwords, be sure to keep them locked in a secure location.
When thinking about what devices must be wiped or destroyed, remember that devices besides computers and mobile devices store data. A printer or a multifunction device may also contain a hard drive that caches printed or scanned documents. This caching feature can be turned off in some instances, or the device might need to be wiped on a regular basis to ensure data privacy. It is a good security practice to set up user authentication on the device, if possible, to prevent an unauthorized person from changing any settings that concern privacy.
Hard Drive Recycling and Destruction (13.2.4.3)
Companies with sensitive data should establish and follow clear policies for storage media disposal. There are two choices available when a storage medium is no longer needed:
Recycling: Hard drives that have been wiped can be reused in other computers. A drive can be reformatted, and a new operating system can be installed.
Destruction: Destroying a hard drive fully ensures that data cannot be recovered from it. Specifically designed devices such as hard drive crushers, hard drive shredders, and incinerators can be used for large volumes of drives. Otherwise, physically damaging the drive with a hammer is effective.
Two types of formatting can be performed:
Low-level formatting: The surface of the disk is marked with sector markers identifying tracks where the data will be physically stored on the disk. This type of formatting is most often performed at the factory after the hard drive is assembled.
Standard formatting: This process, also called high-level formatting, involves creating a boot sector and a file system. Standard formatting can be performed only after low-level formatting has been completed.
A company might choose to have an outside contractor destroy its storage media. Such contractors are typically bonded and follow strict government regulations. They might also offer certificates of destruction to provide evidence that the media has been completely destroyed.
13.2.4.4 Check Your Understanding - Data Protection
Refer to the online course to complete this activity.
Securing Windows Workstations (13.3)
Securing workstations should be a significant part of an organization’s security strategy. Many organizations store sensitive information that can be used as an access point to the rest of the network system.
Securing a Workstation (13.3.1)
To secure a workstation, you need to consider all facets of its exposure. Physical security, securing user access, and user rights and permissions are a few of the aspects that are discussed in this section.
Securing a Computer (13.3.1.1)
Computers and workstations should be secured against theft. Companies often secure computers in locked rooms.
To prevent unauthorized users from stealing or accessing local computers and network resources, lock your workstation, laptop, or server when you are not present. It is important to use physical security as well as password security. If you must leave a computer in an open public area, use a cable lock to deter theft.
Data displayed on your computer screen should be protected, especially when you’re using a laptop in a public location such as an airport, a coffeehouse, or a customer site. Use a privacy screen to protect the information displayed on your laptop from prying eyes. A privacy screen is a clear plastic panel attached to the computer screen that permits only the user directly in front of the screen to see the information displayed.
You also need to protect access to your computer. Three levels of password protection can be used on a computer:
BIOS: Prevents the operating system from booting and changing BIOS settings.
Login: Prevents unauthorized access to the local computer.
Network: Prevents access to network resources by unauthorized personnel.
Securing BIOS (13.3.1.2)
A Windows, Linux, or Mac login password can be bypassed. A malicious user could boot your computer from a CD or flash drive with a different operating system. After it is booted, the malicious user could access or erase your files.
Setting a BIOS or UEFI password can prevent someone from booting the computer. It also prevents someone from altering the configured settings. In Figure 13-16, for example, a user would have to enter the configured BIOS password to access the BIOS configuration.

Figure 13-16 BIOS Authentication
All users on a computer share the same BIOS password. UEFI passwords can be set on a per-user basis, but an authentication server is required.
Caution
A BIOS or UEFI password is relatively difficult to reset, so be sure you remember it.
Securing Windows Login (13.3.1.3)
The most common type of password protection is a computer login, where you enter a password and sometimes a username, as shown in Figure 13-17.
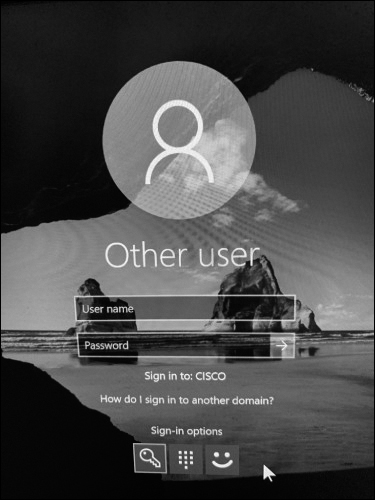
Figure 13-17 Windows 10 Login
Depending on your computer system, Windows 10 might also support other sign-in options. Specifically, Windows 10 supports the following sign-in options:
Windows Hello: With this feature, Window can use facial recognition or your fingerprint to access Windows.
PIN: You may be able to enter a preconfigured PIN to access Windows.
Picture password: You might be able to choose a picture and gestures to use with the picture to create a unique password.
Dynamic lock: This feature causes Windows lock when a specific paired device such as a cell phone goes out of range of the PC.
Figure 13-18 shows a sample PIN authentication screen instead of the password login option. In this example, a user could change the sign-in option to either password, fingerprint, or facial recognition.
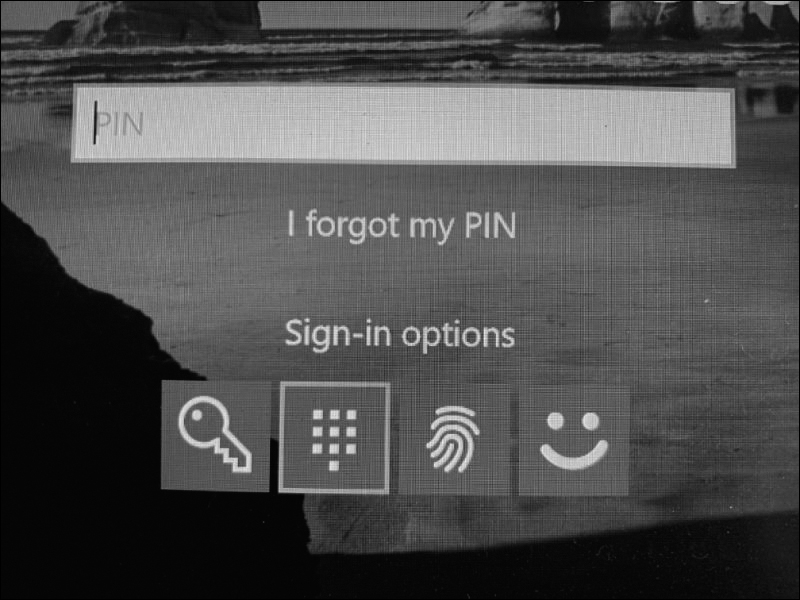
Figure 13-18 Windows 10 PIN Sign-in
If a user chooses to authenticate using her fingerprint, she would scan her finger as shown in Figure 13-19.

Figure 13-19 Laptop Fingerprint Reader
To change sign-in options on a Windows 10 computer, use Start > Settings > Accounts > Sign-in. In the window that appears (see Figure 13-20), you can also change your password, set a PIN, enable picture password, or select to use dynamic lock.

Figure 13-20 Windows 10 Sign-in Options
Local Password Management (13.3.1.4)
Password management for standalone Windows computers can be set locally using the Windows User Accounts tool (see Figure 13-21). To create, remove, or modify a password in Windows, use Control Panel > User Accounts.

Figure 13-21 User Accounts Tool
It is important to make sure that computers are secure when users are away. A security policy should contain a rule about requiring a computer to lock when the screen saver starts. This ensures that a short time after a user stops using the computer, the screen saver starts, and the computer cannot be used until the user logs in.
In all versions of Windows, use Control Panel > Personalization > Screen Saver to open the dialog shown in Figure 13-22. Choose a screen saver and a wait time and then select the On Resume, Display Logon Screen option.

Figure 13-22 Setting the Screen Saver Lock
Usernames and Passwords (13.3.1.5)
A system administrator usually defines a naming convention for usernames when creating network logins. A common example of a username is the first letter of the person’s first name and then the entire last name. Keep the naming convention simple so that people do not have a hard time remembering it. Usernames, like passwords, are important information that should not be revealed.
Password guidelines are an important component of a security policy. Any user who must log onto a computer or connect to a network resource should be required to have a password. Passwords help prevent theft of data and malicious acts. Passwords also help confirm that the logging of events is valid by ensuring that the user is the correct person.
The guidelines for creating strong passwords are as follows:
Minimum length: Use passwords of eight characters or more.
Complexity: Include letters, numbers, and symbols. Avoid passwords based on easily identifiable pieces of information. Deliberately misspell a password.
Variety: Use a different password for each site or computer that you use. Never use the same password twice.
Expiration: Change passwords on a regular basis. The shorter the time period a password is used, the more secure the password will be.
13.3.1.6 Check your Understanding - Secure a Workstation
Refer to the online course to complete this activity.
Windows Local Security Policy (13.3.2)
The Windows Local Security Policy tool enables administration of many system, user, and security settings, such as password policy, audit policy, and user permissions on a local computer. Local Security Policy allows you to control and maintain security policies that are standardized with the organization’s policy.
The Windows Local Security Policy (13.3.2.1)
In most networks that use Windows computers, Active Directory is configured with domains on a Windows server. Windows computers are members of a domain. The administrator configures a domain security policy that applies to all computers that join the domain. Account policies are automatically set when a user logs into Windows.
For standalone computers that are not part of an Active Directory domain, the Windows Local Security Policy tool can be used to enforce security settings.
To access the Local Security Policy tool in Windows 7 and Vista, use Start > Control Panel > Administrative Tools > Local Security Policy. In Windows 8, 8.1, and Windows 10, use Search > secpol.msc and then click secpol. The Local Security Policy tool opens, as shown in Figure 13-23.

Figure 13-23 The Windows Local Security Policy Tool
Note
In all versions of Windows, you can run the command secpol.msc to open the Local Security Policy tool.
Account Policies Security Settings (13.3.2.2)
A security policy should include the password policy. The Windows Local Security Policy tool can be used to set and implement the password policy. When assigning passwords, the level of password control should match the level of protection required.
Note
Use strong passwords whenever possible.
To enforce password requirements, use Account Policies > Password Policy, as shown in Figure 13-24.
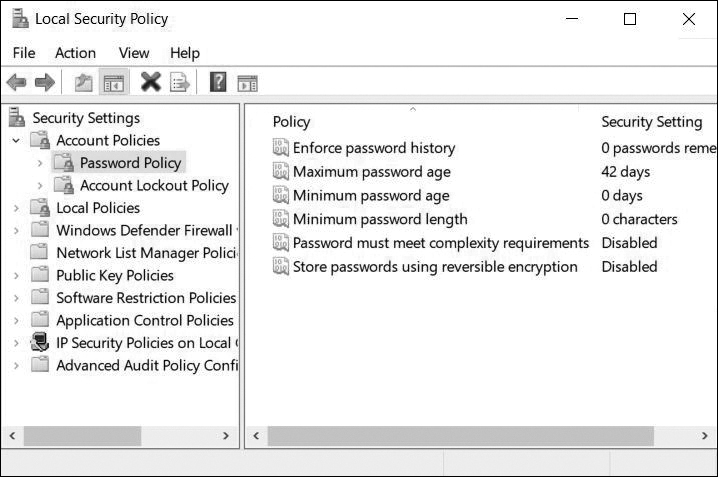
Figure 13-24 Enforcing Password History
Guidelines for the password policy settings in Figure 13-24 are as follows:
Enforce Password History: The user may reuse a password after 24 unique passwords have been saved.
Maximum Password Age: The user must change the password after 90 days.
Minimum Password Age: The user must wait 1 day before changing a password again. This helps reinforce password history by preventing a user from entering a different password 24 times in order to use a previous password again.
Minimum Password Length: The password must be at least 8 characters.
Password Must Meet Complexity Requirements: The password must not contain the user’s account name or parts of the user’s full name that exceed two consecutive characters. The password must contain three of the following four categories: uppercase letters, lowercase letters, numbers, and symbols.
Store Passwords Using Reversible Encryption: Storing passwords using reversible encryption is essentially the same as storing plaintext versions of the passwords. For this reason, this policy should never be enabled unless application requirements outweigh the need to protect password information.
To prevent brute-force attacks, use Account Policies > Account Lockout Policy, as shown in Figure 13-25.
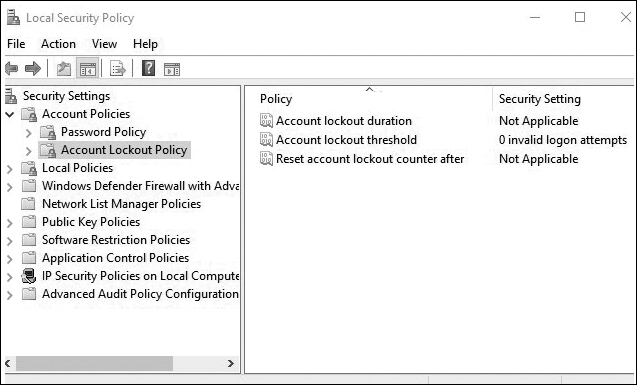
Figure 13-25 Configuring Account Lockout Policies
The account lockout policy settings in Figure 13-25 can be described as follows:
Account Lockout Duration: If the user exceeds the account lockout threshold (that is, five attempts), the account is locked out for 30 minutes.
Account Lockout Threshold: The user can enter the wrong username and/or password five times.
Reset Account Lockout Counter After: After 30 minutes, the number of attempts is reset to zero, and the user can attempt to log in again.
The account lockout policy shown in Figure 13-25 protects against brute-force attacks, in which the attackers use software that attempts to break a password by trying every possible combination of characters. This account lockout policy also protects against dictionary attacks. A dictionary attack is a type of brute-force attack that tries using every word in a dictionary in hopes of gaining access. An attacker may also use a rainbow table, which is a refinement of a dictionary attack that involves a precomputed lookup table of all probable plaintext passwords and their matching hashes. The hash value of a stored password can be looked up in the table to discover the corresponding plaintext.
Local Policies Security Settings (13.3.2.3)
The Local Policies section in the Local Security Policy tool is used to configure audit policies, user rights policies, and security policies.
It is useful to log successful and unsuccessful login attempts. Use Local Policies > Audit Policy, as shown in Figure 13-26, to enable auditing. In this example, audit account logon events auditing is being enabled for all logon events.
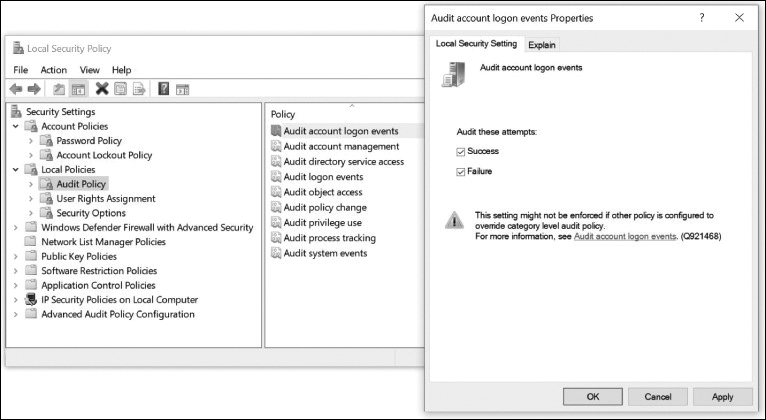
Figure 13-26 Local Policies Security Settings
The User Rights Assignment and Security Options sections of the Local Security Policy tool provide a wide variety of security options that are beyond the scope of this course, but you will explore some settings in a lab (13.3.2.5).
Exporting the Local Security Policy (13.3.2.4)
An administrator might need to implement an extensive local policy for user rights and security options. This policy would most likely need to be replicated on each system. To help simplify this process, the local security policy can be exported and copied to other Windows hosts.
The steps to replicate a local security policy on other computers are as follows:
Step 1. Use the Action > Export Policy feature, as shown in Figure 13-27, to export the policy of a secure host.

Figure 13-27 Exporting a Local Security Policy
Step 2. Save the policy to external media with a name such as workstation.inf.
Step 3. Import the local security policy file to other standalone computers.
13.3.2.5 Lab - Configure Windows Local Security Policy
![]()
In this lab, you will configure a Windows local security policy. You will modify password requirements, enable auditing, configure some user rights, and set some security options. You will then use Event Manager to view logged information.
13.3.2.6 Check Your Understanding - Local Security Policy
Refer to the online course to complete this activity.
Managing Users and Groups (13.3.3)
Managing who has access to a computer and their access levels is an important part of security. When managing users and groups, you can limit or allow users and groups to perform certain actions by assigning rights and permissions.
Maintaining Accounts (13.3.3.1)
Employees in an organization often require different levels of access to data. For example, a manager and an accountant might be the only employees in an organization with access to the payroll files.
Employees can be grouped by job requirements and given access to files according to group permissions. This process helps manage employee access to the network. Temporary accounts can be set up for employees who need short-term access. Close management of network access can help limit areas of vulnerability that might allow a virus or malicious software to enter the network.
There are several tasks associated with managing users and groups.
Terminating employee access: When an employee leaves an organization, immediately disable the account or change the login credentials on the account.
Guest access:
Temporary employees and guests may need limited access to the network, using a guest account.
Special guest accounts with additional privileges can be created and disabled as required.
Tracking login times:
Employees may only be allowed to log in during specific hours, such as 7 a.m. to 6 p.m.
Logins would be blocked during other times of the day. This is known as logon time restrictions. The authenticating server periodically checks whether a user has privileges to continue using the network. If the user does not, an automatic logout procedure is activated.
Logging failed login attempts:
Configure a threshold for the number of times a user is allowed to attempt to log in.
By default, in Windows the number of failed login attempts is set to zero, which means a user will never be locked out until this setting is changed.
Configuring the idle timeout and screen lock:
Configure an idle timer that will automatically log the user out and lock the screen after a specified period of time.
The user must log back in to unlock the screen.
Changing default admin user credentials:
Rename default accounts, such as the default admin user account, so that attackers cannot use the known account names to access the computer.
Windows disables the default admin user account by default and replaces it with a named account that is created during the operating system setup process.
Some devices ship with a default password such as admin or password. These passwords should be changed during initial device setup.
Managing User Account Tools and User Account Tasks (13.3.3.2)
Regular maintenance tasks for administrators include creating and removing users from the network, changing account passwords, and changing user permissions. You must have administrator privileges to manage users.
To accomplish these tasks, you can use either User Account Control (UAC) or Local Users and Groups Manager. To access UAC, choose User Account Control (UAC) - Control Panel > User Accounts > Manage Another Account. You can use UAC to add, remove, or change attributes of individual users. When logged in as an administrator, use UAC to configure settings to prevent malicious code from gaining administrative privileges.
To access Local Users and Group Manager, choose Local Users and Groups Manager - Control Panel > Administrative Tools > Computer Management > Local Users and Groups. You can use Local Users and Groups Manager to create and manage users and groups that are stored locally on a computer.
User account tasks include creating an account, resetting the account password, disabling or activating an account, deleting an account, renaming an account, assigning a login script to an account, and assigning a home folder to an account.
Local Users and Groups Manager (13.3.3.3)
You can use the Local Users and Groups Manager tool to limit the ability of users and groups to perform certain actions by assigning rights and permissions:
Rights: A right authorizes a user to perform certain actions on a computer. Examples include backing up files and folders and shutting down a computer.
Permissions: A permission is a rule that is associated with an object (usually a file, folder, or printer). It regulates which users can have access to the object and in what manner.
To configure all the users and groups on a computer using the Local Users and Groups Manager tool, type lusrmgr.msc in the search box or the Run utility.
The Local Users and Groups > Users window displays the current user accounts on the computer. It includes the built-in administrator and built-in guest accounts, as shown in Figure 13-28.

Figure 13-28 Local Users and Groups Manager Window
The Administrator account in Figure 13-28 has the following characteristics:
Has full control of the computer and is a member of the Administrators group
Can assign user rights and access control permissions
Can be renamed or disabled but never deleted or removed from the Administrators group
Is disabled by default
The Guest account in Figure 13-28 has the following characteristics:
Is used by users who do not have assigned accounts on the computer
Is a member of the default Guests group, which allows a user to log on to a computer
By default, does not require a password
Is disabled by default
Double-clicking a user or right-clicking and choosing Properties opens the user properties window, as shown in Figure 13-29. This window allows you to change the user options that were defined when the user was created. It also allows you to lock an account and assign a user to a group by using the Member Of tab or control which folders the user has access to by using the Profile tab.

Figure 13-29 User Properties
To add a user, click Action > New User to open the New User window, as shown in Figure 13-30. In this window, you can assign a username, a full name, a description, and account options.
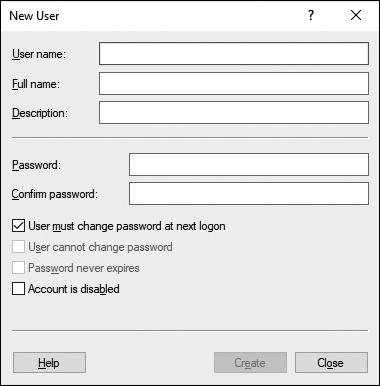
Figure 13-30 Creating a New User
Note
Some versions of Windows also include the built-in Power User account, which possesses most of the power of an administrator but, for security reasons, lacks some of the privileges of an administrator.
Managing Groups (13.3.3.4)
Users can be assigned to groups for easier management. Tasks used to manage local groups include the following:
Creating a local group
Adding members to a group
Identifying members in the local group
Deleting a group
Creating a local user account
The Local Users and Groups Manager tool is used to manage local groups on a Windows computer. Use the icon view in Control Panel > Administrative Tools > Computer Management > Local Users and Groups to open the Local Users and Groups Manager tool.
In the Local Users and Groups window, click Groups to list all the local groups on the computer, as shown in Figure 13-31.
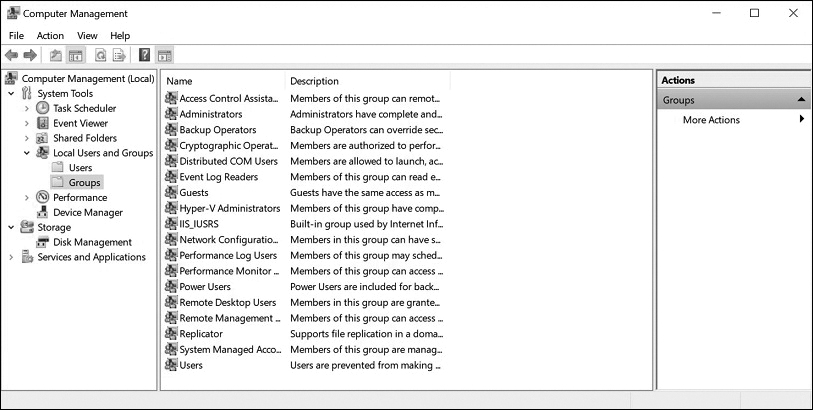
Figure 13-31 Built-in Local Groups
There are many built-in groups available, as shown in Figure 13-31. However, the three most commonly used groups are as follows:
Administrators: Group members who have full control of the computer and can assign user rights and access control permissions. The Administrator account is a default member of this group. Use caution when you add users to this group.
Guests: A member of this group has a temporary profile created at logon, and when the member logs off, the profile is deleted. The Guest account (which is disabled by default) is a default member of this group.
Users: Members of this group can perform common tasks, such as running applications, using local and network printers, and locking the computer. Members cannot share directories or create local printers.
It is important to note that running your computer as a member of the Administrators group makes the system vulnerable to Trojan horses and other security risks. It is recommended that you add your domain user account only to the Users group (and not to the Administrators group) to perform routine tasks, including running programs and visiting Internet sites. When it becomes necessary to perform administrative tasks on the local computer, use Run as Administrator to start a program using administrative credentials.
Double-click a group to view its properties. Figure 13-32, for example, shows the properties of the Guest group.
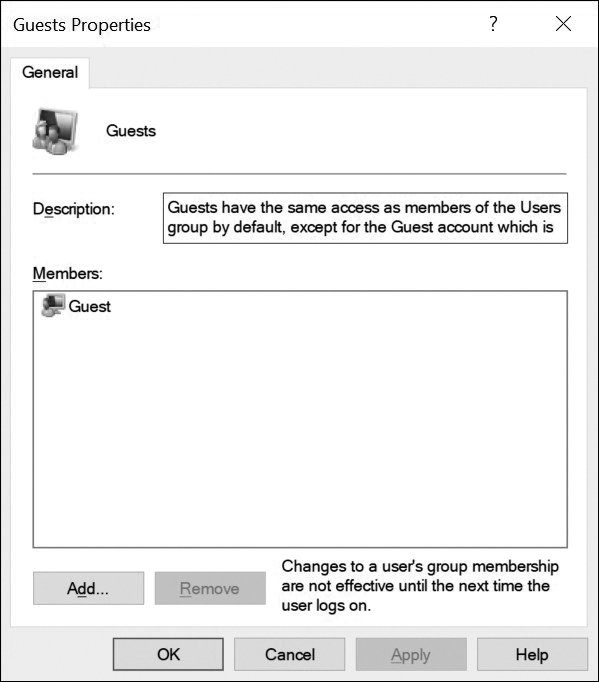
Figure 13-32 Built-in Local Guest Group Properties
To create a new group, click Action > New Group to open the New Group window, as shown in Figure 13-33. In this window you can create new groups and assign users to them.
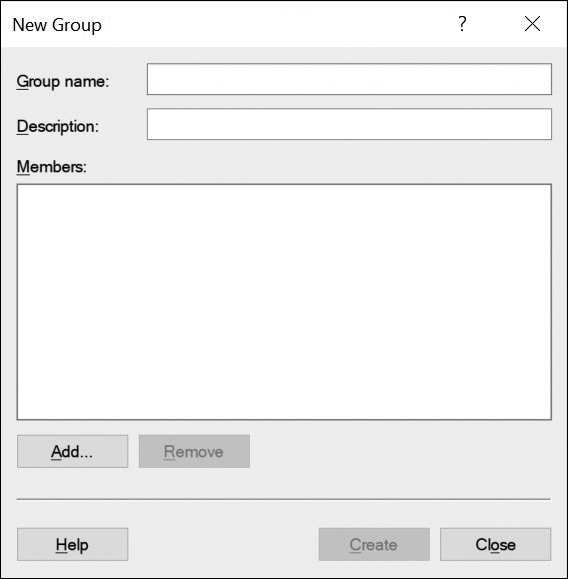
Figure 13-33 Creating a New Group
Active Directory Users and Computers (13.3.3.5)
Whereas local accounts are stored in the Local Security Accounts database of a local machine, domain accounts are stored in Active Directory on a Windows server domain controller (DC) and are accessible from any computer joined to the domain. Only domain administrators can create domain accounts on a domain controller.
Active Directory is a database of all computers, users, and services in an Active Directory domain. The Active Directory Users and Computers console on Windows server, shown in Figure 13-34, is used to manage Active Directory users, groups, and Organizational Units (OUs). Organizational Units provide a way to subdivide a domain into smaller administrative units. By using Active Directory Users and Computers, an administrator can create more OUs in which to place accounts or add accounts to existing OUs.

Figure 13-34 Active Directory Users and Computers
To create a new user account, right-click the container or OU that will contain the account and choose New User. Enter the user’s information, such as name, last name, and logon name; click Next; and then set an initial password for the user. By default, the option to force the user to reset his or her password on first sign-in is selected. If a user locks himself out of his account with too many password attempts, the administrator can open Active Directory Users and Computers, right-click on the user object, select Properties, and check Unlock Account.
To delete a user account, simply right-click the user object and select Delete. Note, however, that once an account is deleted, it may not be retrievable. Another option is to disable an account rather than to delete it. Once an account is disabled, the user is denied access to the network until the administrator reenables the account.
Creating a new group account in Active Directory is similar to creating a new user. Open Active Directory Users and Computers, select the container that will house the group and Action > New > Group. Fill in the group details and click OK.
13.3.3.6 Lab - Configure Users and Groups in Windows
![]()
In this lab, you will create users and groups and delete users by using the Local Users and Groups Manager tool. You will also assign group and user permissions to the folders.
13.3.3.7 Check your Understanding - User Account Tools and User Account Tasks
Refer to the online course to complete this activity.
Windows Firewall (13.3.4)
A firewall selectively denies traffic to a computer or network segment. Firewalls generally work by opening and closing the ports used by various applications. By opening only the required ports on a firewall, you are implementing a restrictive security policy. Any packet not explicitly permitted is denied. In contrast, a permissive security policy permits access through all ports except for those explicitly denied.
Firewalls (13.3.4.1)
A firewall protects computers and networks by preventing undesirable traffic from entering internal networks. For instance, the topology at the top of Figure 13-35 illustrates how a firewall enables traffic from an internal network host to exit the network and return to the inside network. The topology illustrated at the bottom of Figure 13-35 shows how traffic initiated by the outside network (that is, the Internet) is denied access to the internal network.

Figure 13-35 Firewall Controls Network Access
A firewall could allow outside users controlled access to specific services. For instance, servers accessible to outside users are usually located on a special network referred to as the demilitarized zone (DMZ), as shown in Figure 13-36.

Figure 13-36 Access to the DMZ
The DMZ enables a network administrator to apply specific policies for hosts connected to that network, such as web, FTP, and email services (such as SMTP and IMAP) to external users. The firewall permits access to only those server services and denies all other outside requests, such as traffic to the server from external addresses, inbound ICMP echo request traffic, inbound Microsoft Active Directory queries, or inbound traffic to Microsoft SQL Server inquiries.
Firewall services can be provided as follows:
Host-based firewall: This type of firewall is implemented with software such as Windows Defender Firewall.
Small office home office (SOHO): This network-based solution uses a home or small office wireless router. These devices not only provide routing and WI-FI services but also NAT, DHCP, and firewall services.
Small to medium-sized organization: This network-based solution uses a dedicated device such as a Cisco Adaptive Security Appliance (ASA) or a firewall enabled on a Cisco Integrated Services Router (ISR). These devices use access control lists (ACLs) and advanced features to filter packets based on header information, including source and destination IP addresses, protocol, source and destination TCP/UDP ports, and more.
Routers may also provide many of the following settings:
Port Address Translation (PAT): PAT is a version of NAT that overloads the router-assigned public IP address. PAT enables internal hosts with private IP addresses to use the public address of the router to traverse the Internet. Return traffic to the router is retranslated to the internal private IP address.
Port forwarding: Port forwarding, also called destination NAT (DNAT), adds an Internet-accessible host on a small router. Internet traffic is forwarded to a specific host/port number.
Disabling ports: You can selectively enable or disable access to specific TCP/UDP ports.
MAC address filtering: You can add known MAC addresses to a whitelist and then permit only whitelisted MAC addresses to connect.
Whitelists/blacklists: A blacklist is used to block malicious or disreputable sites based on domain name and IP address. A whitelist can be used to identify permitted sites.
Parental control: With parental control, also called content filtering, you can filter traffic based on unacceptable keywords or by website rating.
The focus of this section is on the host-based firewall solution using Windows Firewall.
Software Firewalls (13.3.4.2)
A software firewall is a program that provides firewall services on a computer to allow or deny traffic to the computer. The software firewall applies a set of rules to data transmissions through inspection and filtering of data packets.
Windows Firewall is an example of a software firewall that helps prevent cybercriminals and malware from gaining access to your computer. It is installed by default when the Windows OS is installed.
Note
In Windows 10, Windows Firewall was renamed Windows Defender Firewall. In this section, Windows Firewall includes Windows Defender Firewall.
Windows Firewall settings are configured using the Windows Firewall window. To change Windows Firewall settings, you must have administrator privileges to open the Windows Firewall window.
To open the Windows Firewall window, use Control Panel > Windows Firewall. Figure 13-37 shows the Windows 10 Windows Defender Firewall window.
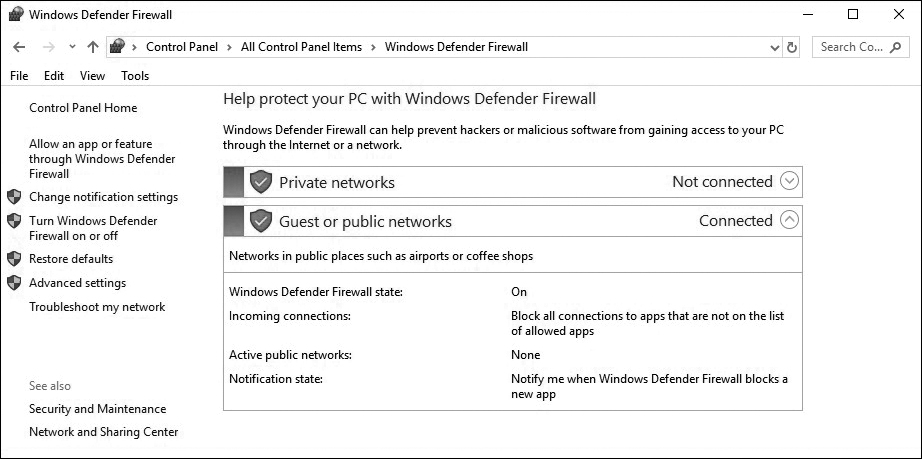
Figure 13-37 Windows Defender Firewall
Windows Firewall (13.3.4.3)
Software firewall features are applied to a network connection. A software firewall has a standard set of inbound and outbound rules that are enabled depending on the location of the connected network.
In the example in Figure 13-38, firewall rules are enabled for a private network, a guest or public network, and a corporate domain network. The window displays the settings for the private network as it is the currently connected network. To display the settings for the domain or guest networks, click on the drop-down arrow beside the Not Connected label.

Figure 13-38 Firewall Rules Enabled for a Private Network
From this Windows Firewall window, you can enable or disable Windows Firewall, change notification settings, allow apps through the firewall, configure advanced settings, or restore firewall defaults.
To disable or reenable Windows Firewall or change notifications for a network, click on either Change Notifications Settings or Turn Windows Defender Firewall On or Off to open the Customize Settings window, shown in Figure 13-39.
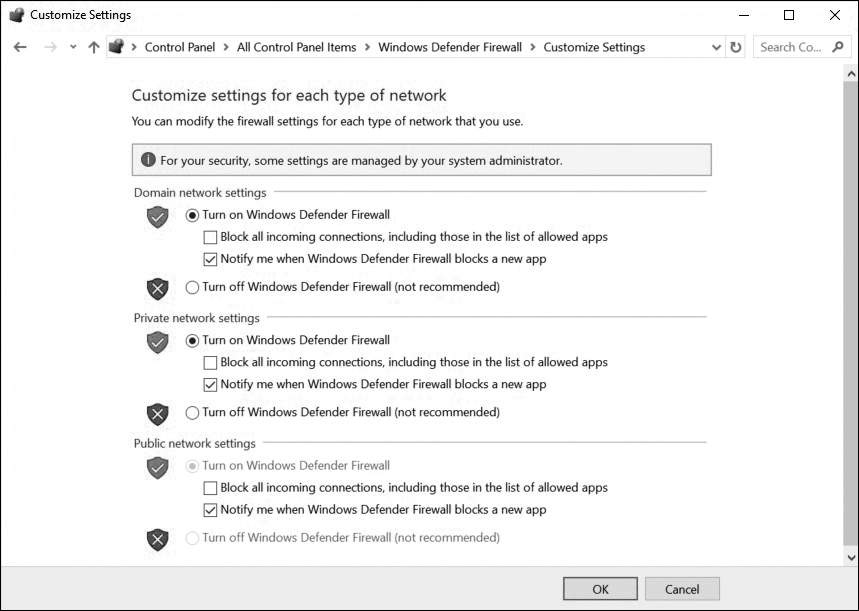
Figure 13-39 Customize Settings Window
If you wish to use a different software firewall, you need to disable Windows Firewall.
To disable Windows Defender Firewall in Windows 10, follow these steps:
Step 1. Open Control Panel > Windows Defender Firewall > Turn Windows Defender Firewall On or Off.
Step 2. Click on Turn Off Windows Defender Firewall (not recommended) for the desired network.
Step 3. Click OK.
To disable Windows Firewall in Windows 7 and 8, follow these steps:
Step 1. Open Control Panel > Windows Firewall > Turn Windows Firewall On or Off.
Step 2. Click on Turn Off Windows Firewall (not recommended) for the desired network.
Step 3. Click OK.
Note
Windows Firewall is enabled by default. Do not disable Windows Firewall on a Windows host unless other firewall software is enabled.
Configuring Exceptions in Windows Firewall (13.3.4.4)
You can allow or deny access to specific programs or ports from the Windows Firewall window. To configure exceptions and allow or block applications or ports, click on Allow an App or Feature Through the Windows Firewall to open the Allowed Apps window, shown in Figure 13-40.

Figure 13-40 Configuring Exceptions
From this window, you can add, change, or remove the allowed programs and ports on the different networks. The steps required to do so are as follows:
To add programs through the Windows Defender Firewall in Windows 10, follow these steps:
Step 1. Open Control Panel > Windows Defender Firewall > Allow an App or Feature Through the Windows Firewall.
Step 2. Check the boxes for listed applications or use Allow Another Program if a program is not listed.
Step 3. Click OK.
To add programs through the Windows Firewall in Windows 7 and 8, follow these steps:
Step 1. Open Control Panel > Windows Firewall > Allow an App or Feature Through the Windows Firewall.
Step 2. Select Change Settings > Allow Another App.
Step 3. Click OK.
Windows Firewall with Advanced Security (13.3.4.5)
A Windows tool that provides even greater access control with Windows Firewall policies is Windows Firewall with Advanced Security (which is called Windows Defender Firewall with Advanced Security in Windows 10, as shown in Figure 13-41). To open it, in the Windows Firewall window, click on Advanced Settings.

Figure 13-41 Windows Firewall with Advanced Security Window
Note
Alternatively, you can enter wf.msc in the search box and press Enter.
Windows Defender Firewall with Advanced Security provides these features:
Inbound and outbound rules: You can configure inbound rules that are applied to incoming Internet traffic and outbound rules that are applied to traffic leaving your computer going to the network. These rules can specify ports, protocols, programs, services, users, or computers.
Connection security rules: Connection security rules secure traffic between two computers. Both computers must have the same rules defined and enabled.
Monitoring: You can display the firewall inbound or outbound active rules or any active connection security rules.
13.3.4.6 Lab - Configure Windows Firewall
![]()
In this lab, you will explore Windows Firewall and configure some advanced settings.
13.3.4.7 Check your Understanding - Windows Firewall
Refer to the online course to complete this activity.
Web Security (13.3.5)
Attackers can use various web tools to install malicious programs on a computer. Web security attempts to mitigate threats that come from the Internet, which is largely an insecure means for data exchange. Web security requires being aware, proactive, and defensive against security vulnerabilities. This section explains some common web vulnerabilities and ways to mitigate the threats they pose.
Web Security (13.3.5.1)
Web browsers are not only used for web browsing; they are also now used to run other applications, including Microsoft 365 and Google Docs, and as interfaces for remote access SSL users. To help support these additional features, browsers use plug-ins to support other content. However, some plug-ins can introduce security problems.
Browsers are targets and should be secured. Some features to secure web browsers include the following:
InPrivate browsing
Pop-up blocker
SmartScreen filter
ActiveX filtering
When browsing, many websites and services require the use of authentication for access. Recently, it has become common to require multifactor authentication instead of using a traditional username and password. Multifactor authentication involves using a combination of technologies, such as a password, a smart card, and biometrics, to authenticate a user. For example, two-factor authentication combines something a user has, such as a smart card, with something the user knows, like a password or PIN. Three-factor authentication combines all three: something the user knows, something the user has, and some type of biometric component, such as a thumb or eye retina scan.
Recently, the use of authenticator applications for multifactor authentication has become popular. A service might require both a password and a registered phone number or email address. To access the service, an authenticator application sends a code called a one-time password (OTP) to the registered phone or email address. The user must supply her account username and password as well as the OTP code to authenticate.
Once a user is authenticated, the system may grant a software token to the application or device that was used to authenticate. The software token allows the user to perform actions on the system without the need to repeatedly authenticate. If the token system is not secure, a third party may be able to capture it and act as the user. This is known as a replay attack. To prevent replay attacks, a token should be time limited or should be usable only once.
InPrivate Browsing (13.3.5.2)
Web browsers retain information about the web pages visited, the searches performed, and identifiable information such as usernames and passwords. Although this information retention is convenient on a personal computer, it is a concern on public computers such as a computer in a library, a hotel business center, or an Internet cafe. The information retained by web browsers can be recovered and exploited to steal your identity or your money or to change your passwords on important accounts.
To improve security when using a public computer, always:
Clear your browsing history: You can clear your browsing history, cookies, files, and more. Figure 13-42 lists the steps used to clear the browsing history in Microsoft Edge. Notice that you also have the option to always clear the browsing data when the browser is closed.
Use the InPrivate mode: All web browsers provide the ability to browse the web anonymously, without retaining information. When you use InPrivate mode, the browser temporarily stores files and cookies and deletes them when the InPrivate session is ended.
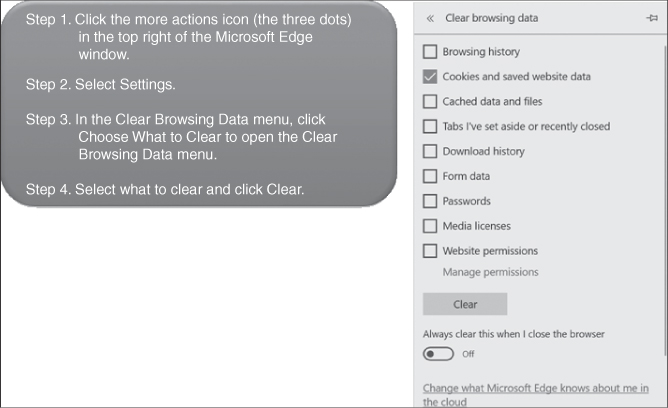
Figure 13-42 Clearing the Browsing History in Microsoft Edge
Figure 13-43 lists the steps to open an InPrivate window in Microsoft Edge. Notice that the new window is identified with an InPrivate label in the top-left corner of the browser.

Figure 13-43 Opening an InPrivate Window in Microsoft Edge
For Internet Explorer 11, use Tools > InPrivate Browsing, as shown in Figure 13-44.
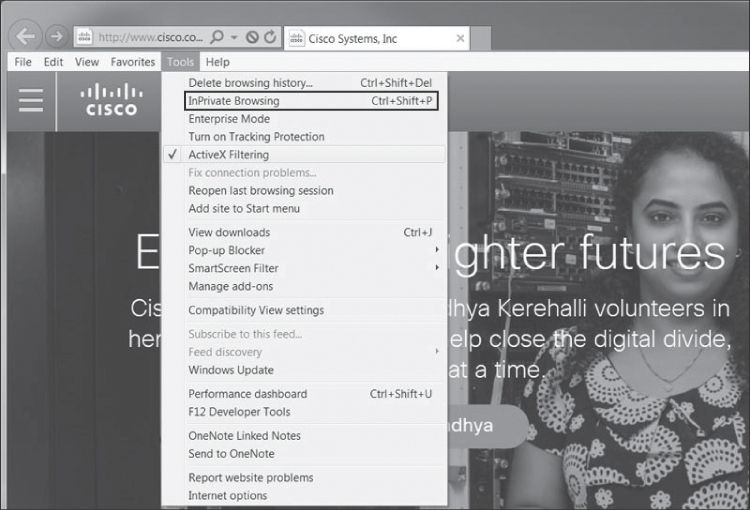
Figure 13-44 Starting InPrivate Browsing from Internet Explorer 11
Note
As an alternative, you can press Ctrl+Shift+P to open an InPrivate window.
Pop-up Blocker (13.3.5.3)
A pop-up is a web browser window that opens on top of another web browser window. Some pop-ups are initiated while browsing, as with a link on a page that opens a pop-up to deliver additional information or a close-up of a picture. Other pop-ups are initiated by a website or advertiser and are often unwanted or annoying, especially when multiple pop-ups are opened at the same time on a web page.
Most web browsers offer the ability to block pop-up windows. A user can then limit or block most of the pop-ups that occur while browsing the web.
Figure 13-45 lists the steps to enable the Internet Edge pop-up blocker feature.

Figure 13-45 Blocking Pop-ups in Microsoft Edge
To enable the Internet Explorer 11 pop-up blocker feature, use Tools > Pop-up Blocker > Turn On Pop-up Blocker.
SmartScreen Filter (13.3.5.4)
Some web browsers offer additional web filtering capabilities. For instance, Internet Explorer 11 provides the SmartScreen Filter feature, which detects phishing websites, analyzes websites for suspicious items, and checks downloads against a list that contains sites and files that are known to be malicious.
Figure 13-46 lists the steps to enable SmartScreen Filter in Microsoft Edge.
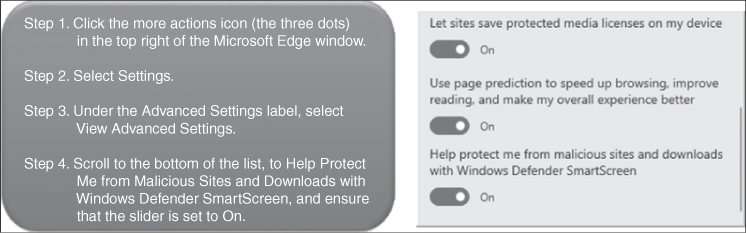
Figure 13-46 Enabling SmartScreen Filter in Microsoft Edge
In Internet Explorer 11, use Tools > Smartscreen Filter > Turn On Smartscreen Filter, as shown in Figure 13-47.

Figure 13-47 Enabling the SmartScreen Filter Feature
ActiveX Filtering (13.3.5.5)
Some web browsers require you to install ActiveX controls. The problem is that ActiveX controls can be used for malicious reasons.
ActiveX filtering allows for web browsing without running ActiveX controls. After an ActiveX control has been installed for a website, the control runs on other websites as well. This may degrade performance or introduce security risks. When ActiveX filtering is enabled, you can choose which websites are allowed to run ActiveX controls. Sites that are not approved cannot run these controls, and the browser does not show notifications for you to install or enable them.
To enable ActiveX filtering in Internet Explorer 11, use Tools > ActiveX Filtering. The example in Figure 13-48 shows that ActiveX filtering is enabled. Clicking Tools > ActiveX Filtering again disables ActiveX.

Figure 13-48 Enabling the ActiveX Filtering Feature
To view a website that contains ActiveX content when ActiveX filtering is enabled, click the blue ActiveX Filtering icon in the address bar and click Turn Off ActiveX Filtering.
After viewing the content, you can turn on ActiveX filtering for the website again by following the same steps.
Note
Microsoft Edge does not support ActiveX filtering.
13.3.5.6 Check Your Understanding - Web Security
Refer to the online course to complete this activity.
Security Maintenance (13.3.6)
Maintaining proactive security practices is essential to keeping your devices and network running smoothly and properly. Security maintenance is an ongoing process that requires planning and scheduling.
Restrictive Settings (13.3.6.1)
Devices often come with security features that are not enabled or have security features left set to their defaults. For example, many home users leave their wireless routers with default passwords and open wireless authentication because they think it is easier.
Some devices are shipped with permissive settings, enabling access through all ports except those that are explicitly denied. The problem is that the default permissive settings leave many devices exposed to attackers.
Permissive settings are easier to implement, less secure, and easier to hack than more restrictive settings.
Many devices now ship with restrictive settings that must be configured to enable access. Any packet not explicitly permitted is denied.
Restrictive settings are harder to implement, more secure, and more difficult to hack than permissive settings.
It is your responsibility to secure devices and configure restrictive settings whenever possible.
Disable Auto-Play (13.3.6.2)
Older Windows hosts used AutoRun to simplify the user experience. When a new medium (for example, a flash drive, a CD, or a DVD) was inserted into the computer, AutoRun would automatically look for a special file called autorun.inf and execute it. Malicious users have taken advantage of this feature to quickly infect hosts.
Newer Windows hosts now use a feature called AutoPlay that is similar to AutoRun. With AutoPlay, you can determine which media will run automatically. AutoPlay provides additional controls and can prompt the user to choose an action based on the content of the new media.
Use Control Panel > AutoPlay to open the AutoPlay window, shown in Figure 13-49, where you can configure the actions associated with specific media.

Figure 13-49 Configuring AutoPlay Settings
Keep in mind that you are just a click away from unknowingly running malware through the AutoPlay dialog. Therefore, the most secure solution is to turn off AutoPlay. Figure 13-50 lists the steps to disable AutoPlay.
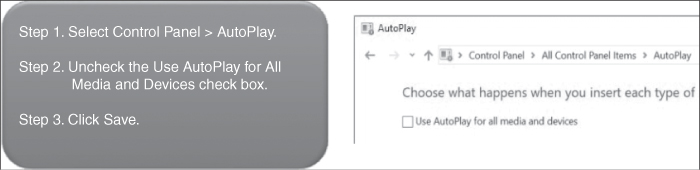
Figure 13-50 Disabling AutoPlay
Operating System Service Packs and Security Patches (13.3.6.3)
Patches are code updates that manufacturers provide to prevent a newly discovered virus or worm from making a successful attack. From time to time, manufacturers combine patches and upgrades into a comprehensive update application called a service pack.
It is critical to apply security patches and OS updates whenever possible. Many devastating virus attacks could have been much less severe if more users had downloaded and installed the latest service pack.
Windows routinely checks the Windows Update website for high-priority updates that can help protect a computer from the latest security threats. These updates include security updates, critical updates, and service packs. Depending on the setting you choose, Windows automatically downloads and installs any high-priority updates that your computer needs or notifies you as these updates become available (see Figure 13-51).

Figure 13-51 Windows Update
13.3.6.4 Check your Understanding - Security Maintenance
Refer to the online course to complete this activity.
Wireless Security (13.4)
Because wireless networks are easy to implement and more available and less expensive than ever before, deployment in both home and business environments is growing. Technicians therefore need to understand how to secure wireless networks to prevent unauthorized and malicious access.
Configure Wireless Security (13.4.1)
Wireless network deployment brings new and different security risks to the network infrastructure, and certain security issues particular to wireless communication need special attention.
What Do You Already Know? - Wireless Security (13.4.1.1)
It is vital to protect a network and connected devices. This is true not only for wired networks but also for wireless networks. You need to understand the following terms related to wireless security: SSID, WPA, UPnP, firmware, and firewall.
Read the scenarios and select the term that is most appropriate for each one.
Scenarios
Scenario 1: In a local restaurant, you notice a sign that says “Free Wi-Fi.” On your phone, you see a network called ForOurGuests.
Scenario 2: You notice a wireless network named StaffOnly with a lock symbol on it. When you try to connect, a password prompt appears.
Scenario 3: A cybercriminal has requested port forwarding targeting your internal network printer.
Scenario 4: An email from your wireless router manufacturer warns of a vulnerability and recommends that you update the device.
Scenario 5: After learning about remote vulnerabilities, you decide to install a device that carefully monitors and filters network traffic.
Answers
Scenario 1 Answer: SSID. The name of a wireless network can be configured to be broadcast for all devices to see.
Scenario 2 Answer: WPA. Access to wireless networks can be restricted and encrypted with passwords.
Scenario 3 Answer: UPnP. Made for convenience, this protocol opens ports without authentication.
Scenario 4 Answer: Firmware. You can download this file directly from the manufacturer to update your wireless router.
Scenario 5 Answer: Firewall. Threats to your network can come from internal and external sources. It is recommended that all devices filter network traffic.
Common Communication Encryption Types (13.4.1.2)
Communication between two computers may need to be secure communication. There are two major requirements for secure communication: The received information must not have been altered by someone who has intercepted the message and anyone who can intercept the message must be unable to read it. The following technologies can be used to accomplish these requirements:
Hash encoding
Symmetric encryption
Asymmetric encryption
Hash Encoding
Hash encoding, or hashing, ensures the integrity of a message. This means that the message is not corrupt, and it has not been tampered with during transmission. Hashing uses a mathematical function to create a numeric value, called a message digest, that is unique to the data. If even one character is changed, the function output will not be the same. The function can be used only one way. An attacker who knows only the message digest cannot re-create the original message, as a changed message will have a completely different hash output. Figure 13-52 illustrates hash encoding. The most popular hashing algorithm is Secure Hash Algorithm (SHA), which is replacing the older Message Digest 5 (MD5) algorithm.
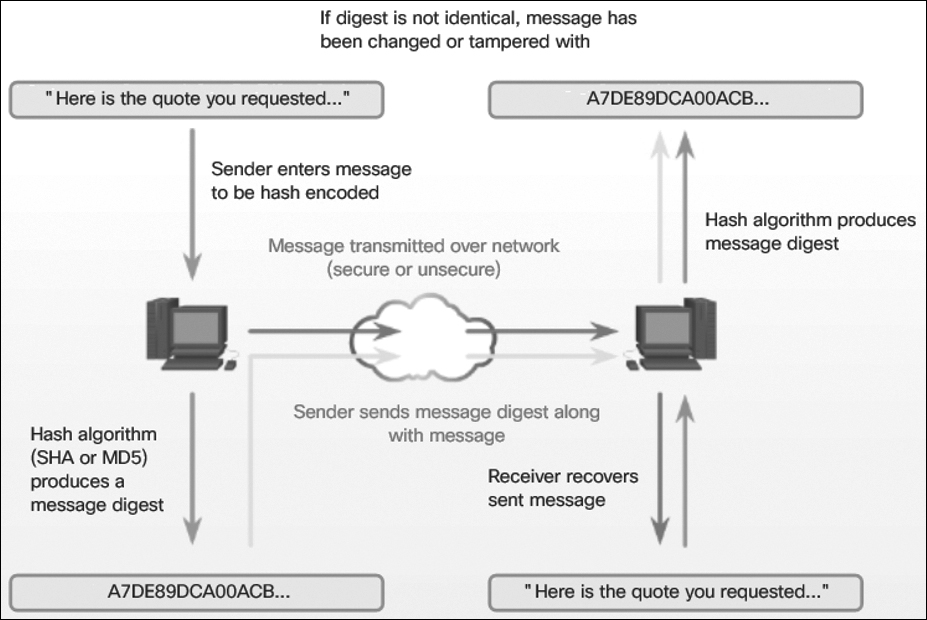
Figure 13-52 Hash Encoding
Symmetric Encryption
Symmetric encryption ensures the confidentiality of a message. If an encrypted message is intercepted, it cannot be understood. It can only be decrypted (that is, read) using the password (that is, key) that it was encrypted with. Symmetric encryption requires both sides of an encrypted conversation to use an encryption key to encode and decode the data. The sender and receiver must use identical keys. Figure 13-53 illustrates symmetric encryption. Advanced Encryption Standard (AES) and the older Triple Data Encryption Algorithm (3DES) are examples of symmetric encryption.

Figure 13-53 Symmetric Encryption
Asymmetric Encryption
Asymmetric encryption ensures confidentiality of a message by using two keys, a private key and a public key. The public key can be widely distributed, such as by being emailed in plaintext or posted on the Web. The private key is kept by an individual and must not be disclosed to any other party. These keys can be used in two ways:
Public key encryption is used when a single organization needs to receive encrypted text from a number of sources. The public key can be widely distributed and used to encrypt the messages. The intended recipient is the only party to have the private key, which is used to decrypt the messages. Asymmetric encryption using a public key is shown in Figure 13-54.

Figure 13-54 Asymmetric Encryption
In the case of digital signatures, a private key is required for encrypting a message, and a public key is needed to decode the message. This approach allows the receiver to be confident about the source of the message because only a message encrypted using the originator’s private key can be decrypted using the public key. RSA (Rivest-Shamir-Adleman) is the most popular example of asymmetric encryption.
Smart cards also use asymmetric encryption. A digital certificate is stored with a private key on a smart card hardware token. To perform authentication, the card provides the certificate to an authentication server, which checks that it is valid and trusted. The server then uses the public key in the certificate to issue an encrypted challenge to the user. The smart card decrypts the challenge with the private key and sends an appropriate response to the server.
Wi-Fi Configuration Best Practices (13.4.1.3)
Radio waves used to transmit data in wireless networks make it easy for attackers to monitor and collect data without physically connecting to a network. Attackers can gain access to an unprotected wireless network simply by being within range of it. A technician needs to configure access points and wireless NICs using an appropriate level of security.
A robust wireless network with sufficient coverage for users in all locations requires the proper placement of antenna and access points. If placing an access point in proximity to the provider’s cabling does not provide enough coverage, extenders and repeaters can be used to boost the wireless signal to locations where it is weak. A site survey can also be performed to identify signal dead zones.
Reducing the power output on an access point may help prevent war driving, but it may also result in insufficient wireless coverage for legitimate users. Increasing the power output of an access point can increase coverage, but it can also increase the chance of signal bouncing and interference. There may also be legal restrictions on wireless power levels. Because of these potential issues, it is usually best to set power levels to auto-negotiate.
When installing wireless services, apply wireless security techniques immediately to prevent unwanted access to the network. Wireless access points should be configured with basic security settings that are compatible with the existing network security. When you set up an access point on a Wi-Fi network, the management software prompts for a new administrator password. There may also be an option to change the default username of the administrator account, which is slightly more secure than using the default name configured. Also, on smaller networks, you can assign IP addresses statically instead of by using DHCP. This prevents any computer from connecting to the access point unless it is configured with the correct IP address.
Additional security services, such as parental controls or content filtering, may be available in a wireless router. Internet access times can be limited to certain hours or days, specific IP addresses can be blocked, and key words can be blocked. The location and depth of these features varies depending on the router manufacturer and model.
One way to provide basic security on Wi-Fi networks is to change the default service set ID (SSID) and to disable broadcast of the SSID, as shown in Figure 13-55. Access point vendors use a default SSID for each device model. A technician should change the default SSID to something users will recognize that will not get confused with other nearby networks. Most access points broadcast the SSID by default. A level of privacy can be gained by disabling the broadcast of the SSID, which prevents wireless network adapters form finding the network unless they are specifically configured with the name of the network SSID. Disabling the SSID broadcast provides very little security. Someone who knows the SSID of a network can simply enter it manually. A wireless network also broadcasts the SSID during a computer scan, and the SSID can easily be intercepted in transit.

Figure 13-55 Enabling SSID Broadcast
Authentication Methods (13.4.1.4)
There are two basic authentication methods in a wireless network:
Open: Any wireless device can connect to the wireless network. This method should be used only in situations where security is of no concern. With open authentication, no password is required, and any willing client can associate; open authentication is ideal for providing free Internet access.
Shared key: This method provides mechanisms to authenticate and encrypt data between a wireless client and an AP or a wireless router:
Wired Equivalent Privacy (WEP): WEP was the original 802.11 specification for securing WLANs; however, the encryption key never changes when exchanging packets, which makes WEP it easy to crack.
Wi-Fi Protected Access (WPA): The WPA standard uses WEP but secures the data with the much stronger Temporal Key Integrity Protocol (TKIP) encryption algorithm. TKIP changes the key for each packet, which makes it much more difficult to crack than WEP.
IEEE 802.11i/WPA2: This is now the industry standard for securing WLANs. The Wi-Fi Alliance version is called WPA2. 802.11i and WPA2 both use Advanced Encryption Standard (AES) for encryption. AES is currently considered the strongest encryption protocol. Since 2006, any device that bears the Wi-Fi Certified logo is WPA2 certified. Therefore, modern WLANs should always use the 802.11i/WPA2 standard.
Wireless Security Modes (13.4.1.5)
Wi-Fi Protected Setup (WPS) and WPA are different technologies. WPS allows a simplified process for connecting to devices on a wireless home network, and it completes the process of setting up passphrases automatically for the user. WPA can be used with a lot of different protocols, including WPA and WPA2. It is a security and access control technology. Using WPA or WPA2, the user creates and encrypts passwords. WPA2 is the safest option because it has increased security features over WPA. It also offers enterprise options.
WPA2
It is important to use a wireless encryption system to encode the information being sent over a wireless network to prevent unwanted capture and use of data. Most wireless access points support several different security modes. As discussed earlier in this chapter, you should always implement the strongest security mode (WPA2) when possible, as shown in Figure 13-56.
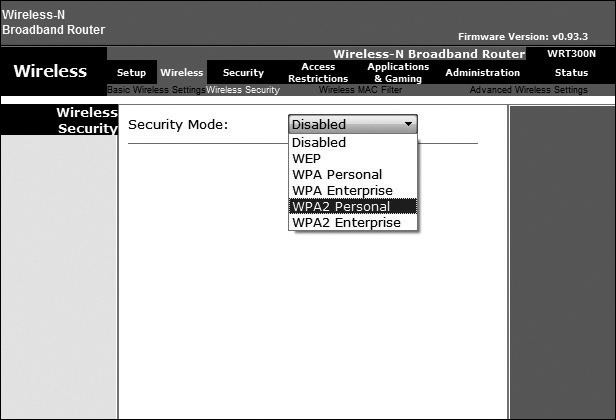
Figure 13-56 WPA2
WPS
Many routers offer WPS, as shown in Figure 13-57. With WPS, both the router and the wireless device have a button that can both be pressed to automatically configure Wi-Fi security between the devices. A software solution using a PIN is also common. It is important to know that WPS is not entirely secure as it is vulnerable to brute-force attack. WPS should be turned off as a security best practice.
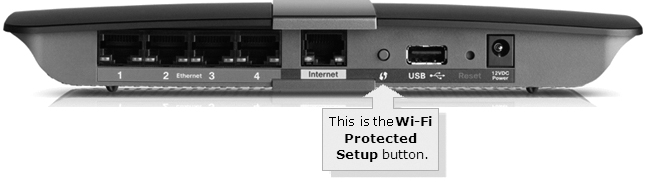
Figure 13-57 WPS
Firmware Updates (13.4.1.6)
Most wireless routers offer upgradable firmware, as shown in Figure 13-58. Firmware releases may contain fixes for common problems reported by customers as well as security vulnerabilities. You should periodically check the manufacturer’s website for updated firmware. After it is downloaded, you can use the GUI to upload the firmware to the wireless router, as shown in Figure 13-58. Before installing the upgrade, connect the router to a wired connection because users will be disconnected from the WLAN and the Internet until the upgrade finishes. The wireless router may need to reboot several times before normal network operations are restored.

Figure 13-58 Firmware Updates
Firewalls (13.4.1.7)
A hardware firewall is a physical filtering component that inspects data packets from the network before they reach computers and other devices on a network. A hardware firewall is a freestanding unit that does not use the resources of the computers it is protecting, so there is no impact on processing performance. The firewall can be configured to block multiple individual ports, a range of ports, or even traffic specific to an application. Most wireless routers also include an integrated hardware firewall, as shown in Figure 13-59.
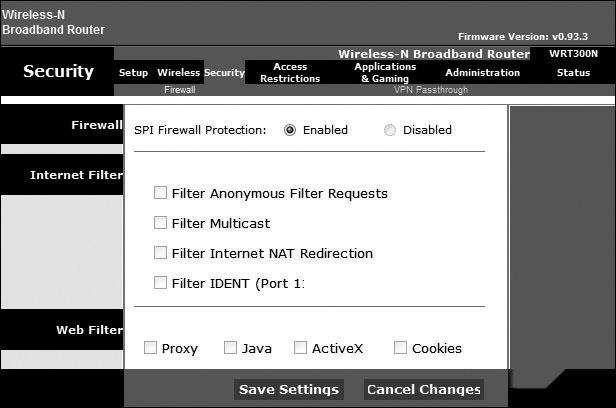
Figure 13-59 SPI Firewall Protection
A hardware firewall passes two different types of traffic into a network:
Responses to traffic that originates from inside the network
Traffic destined for a port that was intentionally left open
Hardware and software firewalls protect data and equipment on a network from unauthorized access. A firewall should be used in addition to security software. Table 13-3 compares hardware and software firewalls.
Table 13-3 Hardware and Software Firewall Comparison
Hardware Firewall |
Software Firewall |
Dedicated hardware component |
Available as third-party software; cost varies |
Initial cost for hardware and software updates can be high |
Free version included with Windows operating system |
Multiple computers can be protected |
Typically protects only the computer on which it is installed |
No impact on computer performance |
Uses computer resources and therefore may potentially have an impact on performance |
Table 13-4 describes the different firewall configurations.
Table 13-4 Firewall Configurations
Type |
Description |
Packet filter |
Packets cannot pass through the firewall unless they match the established rule set configured in the firewall. Traffic can be filtered based on different attributes, such as source IP address, source port, or destination IP address or port. Traffic can also be filtered based on destination services or protocols such as WWW or FTP. |
This is a firewall that keeps track of the state of network connections traveling through the firewall. Packets that are not part of a known connection are dropped. The SPI firewall is enabled in Figure 13-59. |
|
Application layer |
All packets traveling to or from an application are intercepted. All unwanted outside traffic is prevented from reaching protected devices. |
Proxy |
A firewall can be installed on a proxy server to inspect all traffic and allow or deny packets based on configured rules. A proxy server is a server that is a relay between a client and a destination server on the Internet. |
A DMZ, as shown in Figure 13-60, is a subnetwork that provides services to untrusted networks. Email, Web, and FTP servers are often placed into the DMZ so that the traffic using the server does not come inside the local network. This protects the internal network from attacks by this traffic but does not protect the servers in the DMZ in any way. It is common for a firewall or proxy to manage traffic to and from the DMZ.
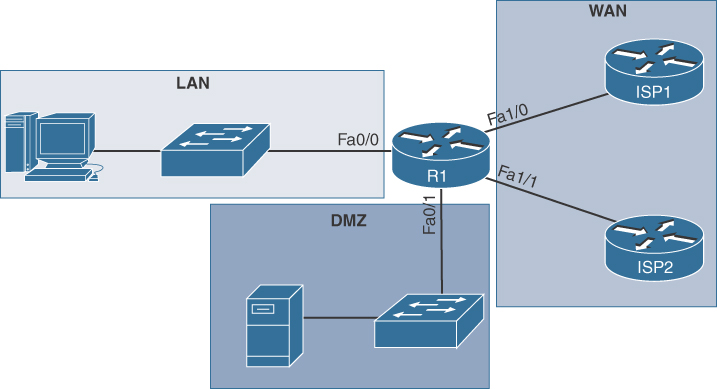
Figure 13-60 Demilitarized Zone
Port Forwarding and Port Triggering (13.4.1.8)
Hardware firewalls can be used to block ports to prevent unauthorized access into and out of a LAN. However, there are situations when specific ports must be opened so that certain programs and applications can communicate with devices on different networks. Port forwarding, shown in Figure 13-61, is a rule-based method of directing traffic between devices on separate networks.

Figure 13-61 Port Forwarding
When traffic reaches the router, the router determines whether the traffic should be forwarded to a certain device based on the port number found with the traffic. Port numbers are associated with specific services, such as FTP, HTTP, HTTPS, and POP3. The rules determine which traffic is sent on to the LAN. For example, a router might be configured to forward port 80, which is associated with HTTP. When the router receives a packet with the destination port 80, the router forwards the traffic to the server inside the network that serves web pages. For example, port forwarding could be enabled for port 80, which is associated with the web server at IP address 192.168.1.254.
Port triggering, shown in Figure 13-62, allows the router to temporarily forward data through inbound ports to a specific device. You can use port triggering to forward data to a computer only when a designated port range is used to make an outbound request. For example, a video game might use ports 27000 to 27100 for connecting with other players. These are the trigger ports. A chat client might use port 56 for connecting the same players so that they can interact with each other. In this instance, if there is gaming traffic on an outbound port within the triggered port range, inbound chat traffic on port 56 is forwarded to the computer that is being used to play the video game and chat with friends. When the game is over and the triggered ports are no longer in use, port 56 is no longer allowed to send traffic of any type to this computer.

Figure 13-62 Port Triggering
Universal Plug and Play (13.4.1.9)
Universal Plug and Play (UPnP) is a protocol that enables devices to dynamically forward traffic through network ports without the need for user intervention or configuration. Port forwarding, shown in Figure 13-63, is often used for streaming media, hosting games, or providing services from home and small business computers to the Internet.

Figure 13-63 Port Forwarding
Although UPnP is convenient, it is not secure. The UPnP protocol has no method for authenticating devices. Therefore, it considers every device trustworthy. In addition, the UPnP protocol has numerous security vulnerabilities. For example, malware can use UPnP to redirect traffic to different IP addresses outside your network, potentially sending sensitive information to a hacker.
Many websites host a variety of free browser-based vulnerability profiling tools. Search the Internet for “UPnP router test” and scan your router to determine if yours is subject to UPnP vulnerabilities.
Many home and small office wireless routers have UPnP enabled by default. Therefore, check this configuration, shown in Figure 13-64, and disable UPnP.
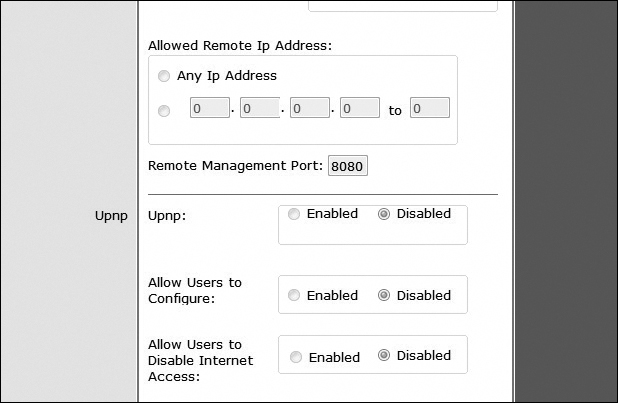
Figure 13-64 Disabling UPnP
13.4.1.10 Packet Tracer - Configure Wireless Security

In this Packet Tracer activity, you will configure a wireless router to use WPA2-Personal as a security method, rely on MAC filtering to increase security, and support single port forwarding.
Basic Troubleshooting Process for Security (13.5)
A technician must be able to effectively troubleshoot security problems. Using the troubleshooting process to identify and correct security problems helps technicians maintain a consistent approach to managing and mitigating threats to data and equipment.
Applying the Troubleshooting Process to Security (13.5.1)
The troubleshooting process is used to help resolve security issues.
The Six Steps of the Troubleshooting Process (13.5.1.1)
The six steps of the troubleshooting process are:
Step 1. Identify the problem.
Step 2. Establish a theory of probable cause.
Step 3. Test the theory to determine the cause.
Step 4. Establish a plan of action to resolve the problem and implement the solution.
Step 5. Verify full system functionality and, if applicable, implement preventive measures.
Step 6. Document findings, actions, and outcomes.
Identify the Problem (13.5.1.2)
Security-related issues can be as simple as preventing shoulder surfing or more complex, such as having to remove infected files from multiple networked computers. Use the troubleshooting steps listed in the preceding section as guidelines to help in diagnosing and repairing security-related problems.
Computer technicians must be able to analyze a security threat and determine the appropriate method to protect assets and repair damage. The first step in the troubleshooting process is to identify the problem. Table 13-5 shows a list of open-ended and closed-ended questions to ask the customer.
Table 13-5 Step 1: Identify the Problem
Open-Ended Questions |
Closed-Ended Questions |
|
|
Establish a Theory of Probable Cause (13.5.1.3)
After you have talked to the customer, you can begin to establish a theory of probable causes. You may need to conduct additional internal or external research, based on the customer’s description of the symptoms. Table 13-6 shows a list of some common probable causes of security problems.
Table 13-6 Step 2: Establish a Theory of Probable Cause
Common causes of security problems |
|
Test the Theory to Determine Cause (13.5.1.4)
After you have developed some theories about what is wrong, test your theories to determine the cause of the problem. Table 13-7 lists some quick procedures that can help you determine the exact cause of the problem or even correct the problem. If a quick procedure corrects the problem, you can verify full system functionality. If a quick procedure does not correct the problem, you might need to research the problem further to establish the exact cause.
Table 13-7 Step 3: Test the Theory to Determine Cause
Common steps to determine cause |
|
Establish a Plan of Action to Resolve the Problem and Implement the Solution (13.5.1.5)
After you have determined the exact cause of the problem, establish a plan of action to resolve the problem and implement the solution. Table 13-8 shows some sources you can use to gather additional information to resolve an issue.
Table 13-8 Step 4: Establish a Plan of Action to Resolve the Problem and Implement the Solution
If no solution is achieved in the previous step, further research is needed to implement the solution, using these sources |
|
Verify Full System Functionality and, if Applicable, Implement Preventive Measures (13.5.1.6)
After you have corrected the problem, you need to verify full functionality and, if applicable, implement preventive measures. Table 13-9 shows a list of the steps to verify the solution.
Table 13-9 Step 5: Verify Full System Functionality and, if Applicable, Implement Preventive Measures
Verify solution and full system functionality |
|
Document Findings, Actions, and Outcomes (13.5.1.7)
In the final step of the troubleshooting process, you must document your findings, actions, and outcomes. Table 13-10 shows a list of the tasks required to document the problem and the solution.
Table 13-10 Step 6: Document Findings, Actions, and Outcomes
Document your findings, actions, and outcomes |
|
Common Problems and Solutions for Security (13.5.2)
Knowing some of the common problems and solutions related to security can speed the troubleshooting process.
Common Problems and Solutions for Security (13.5.2.1)
Security problems can be attributed to a number of reasons. You will resolve some types of security problems more often than others. Table 13-11 identifies common problems and solutions for security.
Table 13-11 Common Problems and Solutions for Security
Symptoms |
Possible Causes |
Possible Solutions |
A security alert is displayed. |
Windows Firewall is disabled. |
Enable Windows Firewall. |
Virus definitions are out of date. |
Update virus definitions. |
|
Malware has been detected. |
Remove malware. |
|
A user is receiving hundreds or thousands of junk emails each day. |
The network is not providing detection or spam protection for the email server. |
Install/update antivirus software or email antispam software. |
An unauthorized wireless access point is discovered on the network. |
A user added a wireless access point to increase the wireless range of the company network. |
Disconnect and confiscate the unauthorized device. |
Enforce the security policy by taking actions against the person responsible for the security breach. |
||
An unknown printer repair person is observed looking under keyboards and on desktops. |
Visitors are not being monitored properly or user credentials have been stolen. |
Contact security or the police. |
Educate users to never to hide passwords near their work area. |
||
System files have been renamed, applications crash, files are disappearing, or file permissions have changed. |
The computer has a virus. |
Remove the virus by using antivirus software. |
Restore the computer from a backup. |
||
Users with flash drives are infecting computers on the network with viruses. |
Flash drives are not scanned by the antivirus software when a network computer accesses it. |
Set the antivirus software to scan removable media when data is accessed. |
Your email contacts report spam coming from you. |
Your email has been hijacked. |
Change your email password. |
Contact email service support and reset the account. |
||
Your wireless network is compromised even though 128-bit WEP encryption is used. |
WEP can be decrypted using commonly available hacking tools. |
Upgrade to WPA encryption. |
Use MAC address filtering for older wireless clients. |
||
Users are being redirected to malicious websites. |
Domain name resolution has been compromised or DNS spoofing is occurring. |
Flush the local DNS cache by using ipconfig /flushdns to clear malicious entries. |
Check the HOSTS file for spoofed entries. |
||
Check the priority order for name resolution services. |
||
Validate the DNS resolvers set as primary and secondary in the client’s IP address configuration. |
||
User receives access denied errors when attempting to open files. |
Malware has changed the permissions of files. |
Quarantine the infected system and investigate closely. |
Browser opens a page other than what the user is attempting to access. |
Spyware has been installed. |
Check the host file for malicious entries. Also verify that the DNS servers the client is using are correct. |
13.5.2.2 Lab - Document Customer Information in a Work Order
![]()
In this lab, you will document customer information in a work order.
Summary (13.6)
In this chapter, you learned that many types of threats are created to disrupt computers and networks; the greatest and most common threat is malware. Malware is software developed by cybercriminals to perform malicious acts. Malware is typically installed on a computer without user knowledge. You learned about common types of computer malware, such as viruses, Trojan horses, adware, ransomware, rootkits, spyware, and worms, and you also learned about mitigation techniques to protect against malware. You learned about types of TCP/IP attacks, such as denial of service, spoofing, SYN flood, and man-in-the-middle attacks.
Organizations often deploy network security solutions and the latest anti-malware solutions to secure their networks. However, these measures do not address what is likely the single most serious threat to a well-configured and well-secured network: social engineering. You learned that cybercriminals use social engineering techniques to deceive and trick unsuspecting individuals into revealing confidential information or account login credentials. Social engineering attacks take many forms, including phishing, pretexting, baiting, and Dumpster diving.
You learned about the importance of a security policy in defining security objectives that ensure the security of the network, the data, and the computers in an organization. You learned that the policy should specify the persons authorized to access network resources, the minimum requirements for passwords, acceptable uses for network resources, how remote users can access the network, and how security incidents will be handled. Part of the security policy addresses protecting physical equipment. You learned about different types of secure locks and mantraps that can limit access to restricted areas and prevent tailgating.
Data can be easily lost or damaged due to theft, equipment failure, or disasters. The risk of data loss can be mitigated by using data backups, file and folder permissions, and file and folder encryption. You completed a lab using BitLocker encryption to encrypt the data on a removable USB data drive and on the OS drive of a Windows PC.
You learned how to secure a Windows workstation by setting passwords on the BIOS to prevent the operating system from booting and changing BIOS settings, setting login passwords to prevent access to the local computer, and setting network passwords to prevent access to network resources. You also learned how to set local security policies in Windows.
You completed a lab configuring a Windows local security policy to modify password requirements, enable auditing, configure some user rights, and set security options. You also used Event Manager to view logged information in a lab.
You learned about the Windows Defender Firewall host-based firewall included with Windows 10 and how to configure Windows Defender Firewall to allow or deny access to specific programs or ports. You also learned about Windows Defender Firewall with Advanced Security, which provides even greater access control with Windows Firewall policies such as inbound and outbound rules, connection security rules, and monitoring. You explored Windows Firewall and configured advanced settings in a lab.
Wireless networks are particularly vulnerable to attack and must be properly secured. Radio waves used to transmit data in wireless networks make it easy for attackers to monitor and collect data without physically connecting to a network. One way to provide a level of security on Wi-Fi networks is to change the default SSID and to disable broadcast of the SSID. Further levels of security can be gained through authentication and encryption. You practiced configuring wireless security in a Packet Tracer activity.
Finally, you learned the six steps in the troubleshooting process as they are applied to security.
Practice
The following activities provide practice with the topics introduced in this chapter. The labs are available in the companion IT Essentials v7 Labs & Study Guide (ISBN 9780135612033). The Packet Tracer activity instructions are also in the Labs & Study Guide. The PKA files are found in the online course.
Labs
![]()
13.2.3.7 Lab - BitLocker and BitLocker To Go
13.3.2.5 Lab - Configure Windows Local Security Policy
13.3.3.6 Lab - Configure Users and Groups in Windows
13.3.4.6 Lab - Configure Windows Firewall
13.5.2.2 Lab - Document Customer Information in a Work Order
Packet Tracer Activity
13.4.1.10 Packet Tracer - Configure Wireless Security
Check Your Understanding Questions
Complete all the review questions listed here to test your understanding of the topics and concepts in this chapter. The appendix “Answers to ‘Check Your Understanding’ Questions” lists the answers.
1. Which type of security threat uses email that appears to be from a legitimate sender and asks the email recipient to visit a website to enter confidential information?
phishing
stealth virus
adware
worm
2. A technician has recently joined an organization and, during the first week on the job, discovers a security breach. What policy should the technician implement after the security breach has occurred?
acceptable use policy
identification and authentication policy
incident handling policy
remote access policy
3. A technician discovers that an employee has attached an unauthorized wireless router to the company network so that the employee can get Wi-Fi coverage while outside taking a break. The technician immediately reports this to a supervisor. Which of the following actions should the company should take in response to this situation? (Choose two.)
Create a guest account for the employee to use when outside the building.
Make sure the wireless router is not broadcasting an SSID.
Immediately remove the device from the network.
Add an authorized wireless access point to the network to extend coverage for the employee.
Consult the company security policy to decide on actions to take against the employee.
4. When a support technician is troubleshooting a security issue on a system, which action should the technician take just before documenting the findings and closing the ticket?
Ask what problem the customer is experiencing.
Boot the system in Safe mode.
Ensure that all applications are working.
Disconnect the system from the network.
5. A corporate executive has asked the IT department to provide a solution to ensure data security of removable drives that are being taken off the premises. Which security solution should be recommended?
TPM
VPN
BitLocker
BitLocker To Go
6. A corporate employee has recently taken the mandated security awareness training and wants to use the correct security term. Which issue can occur when browsing the Internet and is often initiated by the destination website?
autorun
pop-up
phishing
privacy screen
7. When configuring Windows security, which term is used to mean a rule associated with an object such as a folder or printer?
ActiveX
permission
right
firewall
8. Which characteristics of network traffic are being monitored if a network technician configures the company firewall to operate as a packet filter? (Choose two.)
packet speed
ports
MAC addresses
protocols
packet size
9. A technician in a small business is configuring the local security policy for a computer. Which configuration setting would the technician use to require the user to change the password after 90 days?
Enforce Password History
Password Must Meet Complexity Requirements
Maximum Password Age
Minimum Password Length
10. Which action could be used to determine whether a host is compromised and flooding traffic onto the network?
Examine Device Manager on the host for device conflicts.
Check the host’s hard drive for errors and file system issues.
Unseat and then reconnect the hard drive connectors on the host.
Disconnect the host from the network.
11. As data is being stored on a local hard disk, which method would secure the data from unauthorized access?
data encryption
two factor authentication
deletion of sensitive files
a duplicate hard drive copy
12. Which type of hard drive format is commonly performed at the factory where the drive is assembled?
standard
low-level
EFS
multifactor
13. Which of the following is an example of social engineering?
the infection of a computer by a virus carried by a Trojan
a computer displaying unauthorized pop-ups and adware
an unidentified person claiming to be a technician collecting user information from employees
an anonymous programmer directing a DDoS attack on a data center
14. A technician has recently changed jobs from supporting a small company to a large company, in the security group. Which of the following types of passwords could the larger company use to secure a workstation? (Choose two.)
synchronous
BIOS
multifactor
login
cryptic
15. When a user turns on her PC on Wednesday, the PC displays a message indicating that all of the user files have been locked. In order to get the files unencrypted, the user is supposed to send an email and include a specific ID in the email title. The message also includes ways to buy and submit bitcoin as payment for the file decryption. After inspecting the message, the technician suspects that a security breach occurred. What type of malware is this?
Trojan
ransomware
spyware
adware