
Chapter 12
Mobile, Linux, and macOS Operating Systems
Objectives
Upon completion of this chapter, you will be able to answer the following questions:
Compare the Android and iOS operating systems.
Describe the features of the Android touch interface.
Describe the features of the iOS touch interface.
Describe operating system features that are common among mobile devices.
Explain how to configure various types of passcode locks.
Describe cloud-enabled services for mobile devices.
Describe software security for mobile devices.
Describe tools and features of the Linux and Mac operating systems.
Describe Linux and macOS best practices.
Define basic CLI commands.
Explain the six steps of troubleshooting other operating systems.
Describe common problems and solutions for other operating systems.
Key Terms
This chapter uses the following key terms. You can find the definitions in the glossary at the end of the book.
Android Application Package (apk) page 734
Android main home screen page 735
Apple File System (APFS) page 768
Apple’s Software Development Kit (SDK) Xcode page 733
command line interface (CLI) page 773
Extended Hierarchical File System (HFS Plus) page 768
Global Positioning System (GPS) page 745
Indoor Positioning Systems (IPS) page 745
iOS Notification Center page 739
mobile operating system page 729
notification and system icons page 736
Preferred Roaming List (PRL) page 766
Primary Rate ISDN (PRI) page 766
restrictions on failed login attempts page 756
security credentials manager page 781
Introduction (12.0)
The use of mobile devices has grown very rapidly. IT technicians and professionals must be familiar with the operating systems (OSs) on these devices. Like desktops and laptops, mobile devices also use operating systems to interface with the hardware and to run software. The two most commonly used mobile operating systems are Android and iOS. There are also desktop operating systems other than Windows, the two most popular being Linux and macOS.
In this chapter, you will learn about the components, functions, and terminology related to mobile, Linux, and macOS operating systems. First, you will learn about the differences between the open source and customizable Android and the Apple-proprietary and closed source iOS mobile operating systems. You will also learn about common mobile device features such as screen orientation, screen calibration, Wi-Fi calling, virtual assistants, and GPS. You will work with both the Android and iOS operating systems as part of lab exercises.
The portable nature of mobile devices puts them at risk for theft and loss. You will learn about mobile security features such as screen lock, biometric authentication, remote lock, remote wipe, and patching and upgrading. You will also learn to configure mobile OSs to disable access if too many failed login attempts are made to prevent someone from trying to guess a passcode. Most mobile devices also have a remote lock and remote wipe feature that can be activated if the device is stolen. You will perform a lab exercise securing a mobile device using passcode locks.
Finally, you will learn the six steps in the troubleshooting process as they are applied to mobile, Linux, and macOS operating systems.
Mobile Operating Systems (12.1)
Mobile operating systems are OSs that are designed specifically to run on mobile devices such as smartphones, tablets, and wearables. Just like other operating systems, mobile operating systems manage hardware and software on devices; also as with other OSs, there is not interoperability among device vendor hardware.
Android vs. iOS (12.1.1)
The two most popular mobile operating system are Android and iOS. iOS runs only on Apple products.
Open Source vs. Closed Source (12.1.1.1)
Like desktops and laptops, mobile devices use an OS to run software, as shown in Figure 12-1. This chapter focuses on the two most commonly used mobile operating systems: Android, developed by Google, and iOS, developed by Apple.

Figure 12-1 Mobile Device Operating Systems
In order for users to be able to analyze and modify software, they must be able to see the source code. Source code is a sequence of instructions written in human-readable language, before it is turned into machine language (zeros and ones). The source code is an important component of free software as it allows users to analyze and eventually modify the code. When a developer chooses to provide the source code, the software is said to be open source. If the program’s source code is not published, the software is said to be closed source.
Android is an open source, Linux-based smartphone/tablet operating system developed by the Open Handset Alliance, primarily driven by Google. Released in 2008 on the HTC Dream, Android OS has been customized for use on a wide range of electronic devices. Because Android is open source and customizable, programmers can use it to operate devices such as laptops, smart TVs, and e-book readers. There have even been Android installations in devices such as cameras, navigation systems, and portable media players. Figure 12-2 shows Android running on a tablet.

Figure 12-2 Android GUI
iOS is a closed source Unix-based operating system for Apple’s iPhone smartphone and iPad tablet. Released in 2007 on the first iPhone, the Apple iOS source code was not released to the public. Copying, modifying, or redistributing iOS requires permission from Apple. Figure 12-3 shows iOS running on an iPhone.

Figure 12-3 iOS GUI
iOS is not the only closed source OS for mobile devices. Microsoft has also created versions of Windows for its mobile devices, including Windows CE, Windows Phone 7, and Windows Phone 8. With the development of Windows 10 Mobile, shown in Figure 12-4, Microsoft provides a very similar user interface and use of code on all Microsoft devices, including Windows 10 Mobile phones and Surface tablets.

Figure 12-4 Windows 10 Mobile
Applications and Content Sources (12.1.1.2)
Apps are programs that are executed on mobile devices. An app is written and compiled for a specific mobile operating system, such as Apple iOS, Android, or Windows. Mobile devices come with a number of different apps preinstalled to provide basic functionality, as shown in Figure 12-5. There are apps to make phone calls, send and receive email, listen to music, take pictures, and play videos or video games.

Figure 12-5 Applications
Apps are used on mobile devices the same way that programs are used on computers. Instead of being installed from an optical disc, apps are downloaded from a content source. Some apps can be downloaded for free, and others must be purchased.
Apps for Apple iOS mobile devices are available for free or purchase from the App Store, shown in Figure 12-6. Apple uses a walled garden model for its apps, which means the apps must be submitted to and approved by Apple before they are released to users. This helps prevent the spread of malware and malicious code. Third-party developers can create apps for iOS devices by using Apple’s Software Development Kit (SDK) Xcode and the Swift programming language. Note that Xcode can only be installed on computers running OS X.

Figure 12-6 iOS Apps
Android apps are available from both Google Play, shown in Figure 12-7, and third-party sites, such as Amazon’s App Store. Android Studio, a Java-based SDK, is available on Linux, Windows, and OS X. Android apps run in a sandbox and have only the privileges enabled by the user. A prompt appears if an app needs to obtain permissions. Permissions are granted via the app’s Settings page.

Figure 12-7 Android Apps
Third-party or custom programs are installed directly by using an Android Application Package (apk) file. This gives users the ability to directly install apps without going through the storefront interface, in a process known as sideloading.
12.1.1.3 Check Your Understanding - Compare Android and iOS

Refer to the online course to complete this activity.
Android Touch Interface (12.1.2)
Android supports a selection of touchscreens.
Home Screen Items (12.1.2.1)
Much like a desktop or laptop computer, a mobile device organizes icons and widgets on multiple screens for easy access, as shown in Figure 12-8.
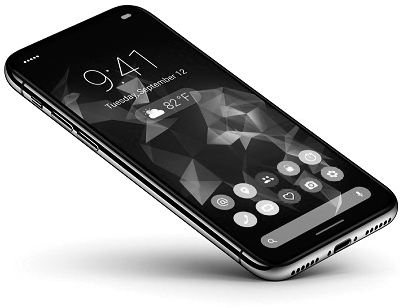
Figure 12-8 Icon and Widget Organization
One screen is designated as the home screen. Additional screens are accessed by sliding the home screen to the left or right. Each screen contains navigation icons, the main area where icons and widgets are accessed, and notification and system icons, as shown in Figure 12-9. The screen indicator displays which screen is currently active.
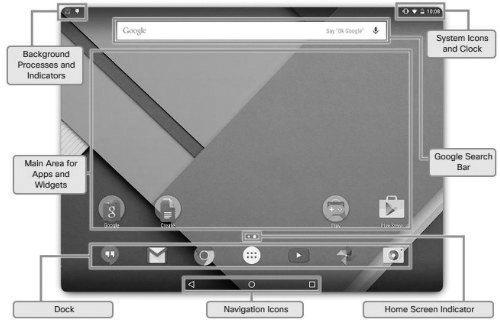
Figure 12-9 Android Main Home Screen
The Android OS has a system bar for navigating apps and screens, as shown in Figure 12-10. The system bar is always displayed at the bottom of every screen.

Figure 12-10 Navigation icons
The system bar contains the following buttons:
Back: Returns to the previous screen. If the onscreen keyboard is displayed, this button closes it. By continuing to tap the Back button, you can navigate through the previous screens until the home screen is displayed.
Home: Returns to the home screen.
Recent Apps: Opens thumbnail images of recently used apps. To open an app, touch its thumbnail. Swipe a thumbnail to remove it from the list.
Menu: If available, Menu shows additional options for the current screen.
Each Android device has an area that contains system icons, such as the clock, battery status, and radio signal status for Wi-Fi and provider networks. Figure 12-11 shows display status icons indicating communication activity for apps such as email, text messaging, and Facebook.

Figure 12-11 Notification and System Icons
To open the notification area on Android devices, swipe down from the top of the screen. You can do the following when notifications are open:
Respond to a notification by touching it.
Dismiss a notification by swiping it off the screen to either side.
Dismiss all notifications with the icon.
Toggle often-used settings.
Adjust the brightness of the screen.
Open the Settings menu with the quick settings icon.
12.1.2.2 Lab - Working with Android
![]()
In this lab, you will work with the Android operating system.
iOS Touch Interface (12.1.3)
The iOS interface is made up of elements such as sliders, switches, and buttons designed around a touchscreen. As with Android OS, there is no clicking to open an app or access a program: All you need to do is touch.
Home Screen Items (12.1.3.1)
The iOS interface works in much the same way as the Android interface. Screens are used to organize apps (see Figure 12-12), and apps are launched with a touch. There are some very important differences:
No navigation icons: A physical button may have to be pressed instead of touching navigation icons.
No widgets: Only apps and other content can be installed on iOS device screens.
No app shortcuts: Each app on a home screen is the actual app, not a shortcut.

Figure 12-12 iOS Interface
Unlike Android devices, iOS devices do not use navigation icons to perform functions. On iPhone versions prior to the iPhone X, a single physical button called the Home button, shown in Figure 12-13, performs many of the same functions as the Android navigation buttons.

Figure 12-13 Home Button
The Home button is at the bottom of the device and can perform many functions. The following are some common functions in iOS:
Wake the device: In versions prior to iPhone X, when the device’s screen is off, press the Home button once to turn it on. On iPhone X, you can wake the device using either facial recognition or by raising the phone and tapping the screen. (Raise to wake is also available on iPhone versions 6s and later.)
Return to the home screen: In versions prior to iPhone X, press the Home button while using an app to return to the last home screen that was used. On iPhone X, return to the home screen by swiping the screen up from the bottom.
Start Siri or voice control: In versions prior to iPhone X, press and hold the Home button to start Siri or voice control. Siri is special software that understands advanced voice controls. On iPhone X, launch Siri by pressing and holding the side button.
iOS devices have a notification area called Notification Center that displays all alerts in one location, as shown in Figure 12-14. To open the notification area on iOS devices, touch the top center of the screen and swipe down. Once in Notification Center, you can browse notifications and alerts, dismiss them, clear them, and adjust them as necessary.

Figure 12-14 iOS Notification Center
iOS devices allow the user to quickly access common settings and switches, shown in Figure 12-15, even if the device is locked. To access the commonly used settings menu, swipe up from the very bottom of any screen. From the commonly used settings screen, a user can:
Toggle commonly used settings such as Airplane mode, Wi-Fi, Bluetooth, Do Not Disturb mode, and screen rotation lock
Adjust screen brightness
Control the music player
Access AirDrop
Access the Flashlight, Clock, Calendar, and Camera apps

Figure 12-15 Commonly Used Settings
From any screen of an iOS device, touch the screen—any part of the screen except the very top or the very bottom—and drag down to reveal the Spotlight search field, shown in Figure 12-16. When the Spotlight search field is revealed, type what you’re looking for. iOS Spotlight shows suggestions from many sources, including apps on the device, the Internet, iTunes, the App Store, and nearby locations. Spotlight also automatically updates the results as you type.

Figure 12-16 iOS Spotlight
12.1.3.2 Lab - Working with iOS
![]()
In this lab, you will work with the iOS operating system.
Common Mobile Device Features (12.1.4)
Mobile devices offer a set of capabilities, services, and applications to the user, and although users have a choice of different vendors and models for the devices, there are common features among them. This section describes capabilities, services, and applications that are common to mobile devices and also describes others that are unique to different vendors’ devices.
Screen Orientation (12.1.4.1)
Most mobile devices can be used in either portrait or landscape mode, as shown in Figure 12-17. A sensor inside the device, called an accelerometer, detects how the device is being held and changes the screen orientation appropriately. Users can choose the viewing mode that is the most comfortable for them for different types of content or applications. Content is automatically rotated to the position of the device. This feature is useful, for example, when taking a photograph. When the device is turned to landscape mode, the Camera app also turns to landscape mode. Also, when a user is writing a text, turning the device to landscape mode automatically turns the app to landscape mode, making the keyboard larger and wider.
Figure 12-17 Screen Orientation
A device may also have a gyroscope to provide more accurate movement readings. A gyroscope allows a device to be used as a control mechanism for driving games where the phone or tablet itself functions as a steering wheel.
Android Screen Auto-Rotation Setting
When using an Android device, to enable auto rotation, open the notifications panel and turn on the auto-rotate function by tapping the screen rotation icon, indicated in Figure 12-18.
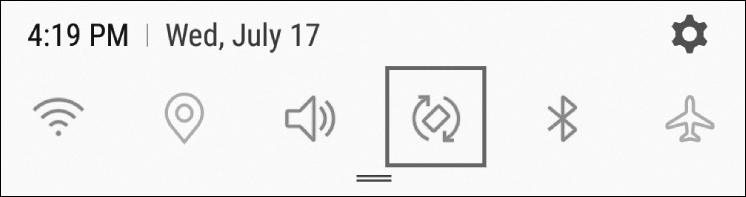
Figure 12-18 Android Screen Auto-Rotation Setting
iOS Screen Auto-Rotation Setting
When using an iOS device, to enable automatic rotation, swipe up from the bottom or down from the top (depending on your device) to open the Control Center. Then tap the screen rotation lock icon, shown in Figure 12-19, until it is turned off.
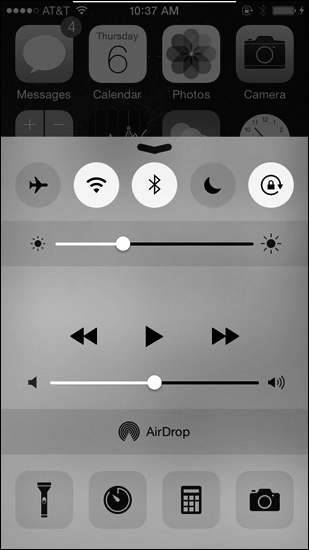
Figure 12-19 iOS Screen Auto-Rotation Setting
Screen Calibration (12.1.4.2)
When using a mobile device, you may need to adjust the brightness of the screen (see Figure 12-20). When bright sunlight makes the screen difficult to read, increase the brightness level. Inversely, very low brightness is helpful when reading a book on a mobile device at night. Some mobile devices can be configured to automatically adjust the brightness depending on the amount of surrounding light. The device must have a light sensor to use auto-brightness.

Figure 12-20 Screen Calibration
The LCD screen component for most mobile devices consumes the most battery power on the device. Lowering the brightness or using auto-brightness helps conserve battery power. Set the brightness to the lowest setting to get the most battery life from the device.
Android Brightness Menu
When using an Android device, to configure screen brightness, swipe down from the very top of the screen and use the path Display > Brightness, then slide the brightness to the desired level, as shown in Figure 12-21.
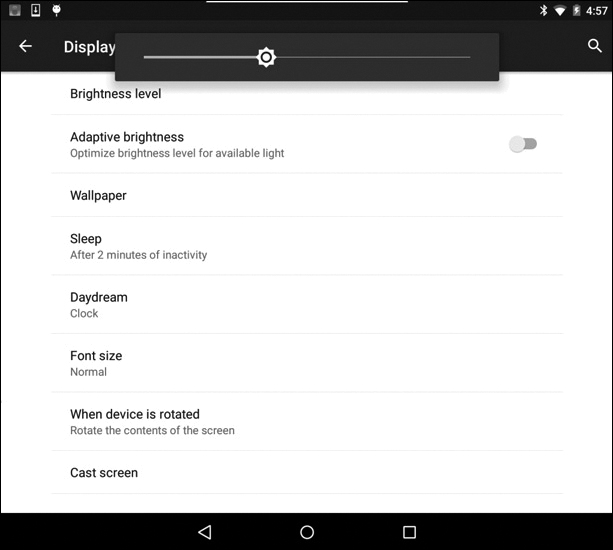
Figure 12-21 Android Brightness Menu
Alternatively, tap the Adaptive Brightness toggle to allow the device to determine the optimal screen brightness based on the amount of ambient light.
iOS Display & Brightness Menu
When using an iOS device, to configure screen brightness, swipe up from the very bottom of the screen and slide the brightness bar up or down to vary the brightness. Alternatively, to configure brightness in the Settings menu, tap Settings > Display & Brightness then slide the brightness to the desired level, as shown in Figure 12-22.
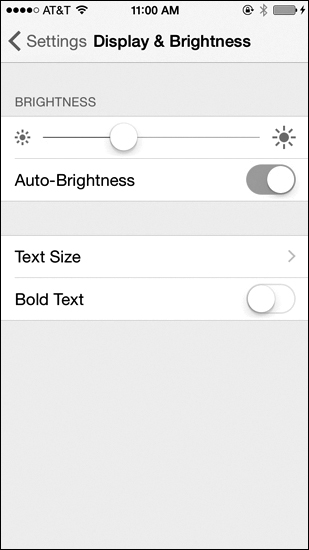
Figure 12-22 iOS Display & Brightness Menu
GPS (12.1.4.3)
Another common feature of mobile devices is the ability to work with the Global Positioning System (GPS). GPS is a navigation system, shown in Figure 12-23, that determines the time and geographical location of the device by using messages from satellites in space and a receiver on Earth. A GPS radio receiver uses at least four satellites to calculate position, based on the messages. GPS is very accurate and can be used under most weather conditions. However, dense foliage, tunnels, and tall buildings can interrupt satellite signals. GPS receivers must have line-of-sight to GPS satellites and do not work indoors. Indoor Positioning Systems (IPS) can determine location by triangulating the position of the device based on proximity to other radio signals, such as Wi-Fi access points.
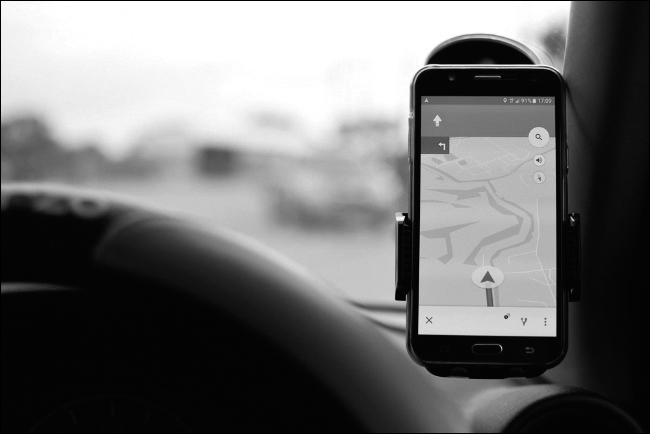
Figure 12-23 GPS
GPS services allow app vendors and websites to know the location of a device and offer location-specific services (such as local weather and advertising). This is called geotracking.
Android Location Services
To enable GPS on Android devices, tap Settings > Location, then tap on the toggle to turn on location services, as shown in Figure 12-24.

Figure 12-24 Android Location Services
iOS Location Services
To enable GPS on iOS devices, tap Settings > Privacy, then toggle Location Services on, as shown in Figure 12-25.

Figure 12-25 iOS Location Services
12.1.4.4 Lab - Mobile Device Features
![]()
In this lab, you will learn about mobile device features.
Wi-Fi Calling (12.1.4.5)
Instead of using the cellular carrier’s network, a modern smartphone can use the Internet to transport voice calls by taking advantage of a local Wi-Fi hotspot (see Figure 12-26). This is called Wi-Fi calling. Locations such as coffeeshops, workplaces, libraries, and homes usually have Wi-Fi networks connected to the Internet. A phone can transport voice calls through a local Wi-Fi hotspot. If there is no Wi-Fi hotspot within reach, the phone uses the cellular carrier’s network to transport voice calls.

Figure 12-26 Wi-Fi Calling
Wi-Fi calling is very useful in areas with poor cellular coverage because it uses a local Wi-Fi hotspot to fill the gaps. The Wi-Fi hotspot must be able to guarantee a throughput of at least 1 Mbps to the Internet for a good-quality call. When Wi-Fi calling is enabled and in use during a voice call, the phone displays “Wi-Fi” next to the carrier name.
Enabling Wi-Fi Calling on Android
To enable Wi-Fi calling on Android, tap Settings > More (under the Wireless & Networks section), tap on Wi-Fi Calling as shown in Figure 12-27 to expose the on/off toggle. Tap on the toggle to turn it on.
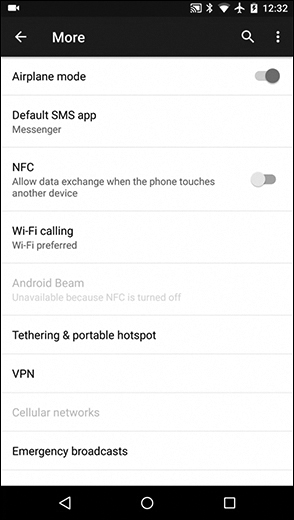
Figure 12-27 Enabling Wi-Fi Calling on Android
Enabling Wi-Fi Calling on iOS
To enable Wi-Fi calling on iOS, tap Settings > Phone > Wi-Fi Calling, then toggle on Allow Wi-Fi Calls, as shown in Figure 12-28.
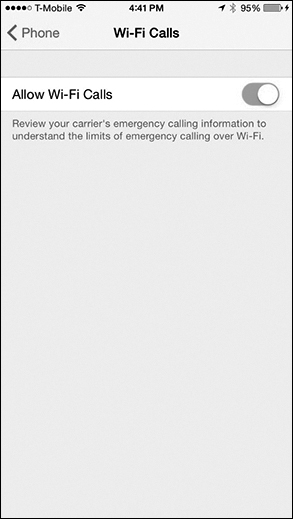
Figure 12-28 Enabling Wi-Fi Calling on iOS
Note
Not all cellular carriers allow Wi-Fi calling. If you cannot enable it on your phone, your carrier or mobile device probably does not support it.
NFC Payment (12.1.4.6)
Mobile payment refers to any payments made through a mobile phone. You can make mobile payments in several ways:
Premium SMS-based transactional payments: Consumers send an SMS message to a carrier’s special phone number containing a payment request. The seller is informed that the payment has been received and is cleared to release the goods. The charge is then added to the customer’s phone bill. Slow speed, poor reliability, and poor security are a few shortcomings of this method.
Direct mobile billing: By using a mobile billing option during checkout, a user identifies himself or herself (usually through two-factor authentication) and allows the charge to be added to the mobile service bill. This type of billing is very popular in Asia and has several benefits: security, convenience, and no need for bank cards or credit cards.
Mobile web payments: With this method, a consumer uses the Web or dedicated apps to complete a payment transaction. This method relies on Wireless Application Protocol (WAP) and usually requires the use of a credit card or a pre-registered online payment solution, such as PayPal.
Contactless NFC (Near Field Communication): This method is used mostly in physical store transactions. A consumer pays for goods or services by waving the phone near the payment system. Based on a unique ID, the payment is charged directly against a prepaid account, bank account, or credit card. NFC payments are also used in mass-transportation services, for public parking, and in many other consumer areas.
Virtual Private Network (12.1.4.7)
A virtual private network (VPN) is a private network that uses a public network (usually the Internet) to connect remote sites or users together (see Figure 12-29). Instead of using a dedicated leased line, a VPN uses “virtual” connections routed through the Internet from the company’s private network to the remote site or employee.

Figure 12-29 Virtual Private Network
Many companies create their own VPNs to accommodate the needs of remote employees and distant offices. With the proliferation of mobile devices, it was a natural move to add VPN clients to smartphones and tablets.
When a VPN is established from a client to a server, the client accesses the network behind the server as if it were connected directly to that network. Because VPN protocols also allow for data encryption, the communication between client and server is secure.
When the VPN information has been added to the device, the VPN connection must be started before traffic can be sent and received through it.
Configuring a VPN Connection on Android
To create a new VPN connection on Android, tap Settings > More (under the Wireless & Networks section) > VPN, tap on the + sign to add a VPN connection, and enter the VPN information (see Figure 12-30).

Figure 12-30 Configuring a VPN Connection on Android
Starting a VPN Connection on Android
To start a VPN connection on Android, tap Settings > General > VPN, select the desired VPN connection, enter the username and password, then tap CONNECT (see Figure 12-31).

Figure 12-31 Starting a VPN Connection on Android
Configuring a VPN Connection on iOS
To create a new VPN connection on iOS, tap Settings > General > VPN > Add VPN Configuration, then fill in the screen shown in Figure 12-32.

Figure 12-32 Configuring a VPN Connection on iOS
Starting a VPN Connection on iOS
To start a VPN connection on iOS, tap Settings and toggle VPN on, as shown in Figure 12-33.
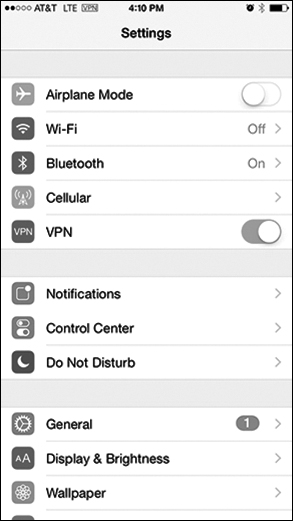
Figure 12-33 Starting a VPN Connection on iOS
Virtual Assistants (12.1.4.8)
A digital assistant, sometimes called a virtual assistant, is a program that can understand natural conversational language and perform tasks for the end user. Modern mobile devices are powerful computers, which makes them a perfect platform for digital assistants. Popular digital assistants include Google Now for Android, Siri for iOS, and Cortana for Windows Phone 8.1 and Windows 10 Mobile.
Digital assistants rely on artificial intelligence, machine learning, and voice recognition technology, as shown in Figure 12-34, to understand conversational-style voice commands. As the end user interacts with a digital assistant, sophisticated algorithms predict the user’s needs and fulfill requests. By pairing simple voice requests with other inputs, such as GPS location, digital assistants can perform tasks such as playing a specific song, performing a web search, taking a note, or sending an email.

Figure 12-34 Virtual Assistants
Google Now
To access Google Now on an Android device, simply say “Okay google,” and Google Now begins listening to requests, as shown in Figure 12-35.

Figure 12-35 Google Now
Siri
To access Siri on an iOS device, press and hold the Home button. Siri begins listening to requests, as shown in Figure 12-36. Alternatively, you can configure Siri to start listening to commands when it hears “Hey Siri.” To enable “Hey Siri,” tap Settings > Siri & Search and toggle Listen for “Hey Siri” on.
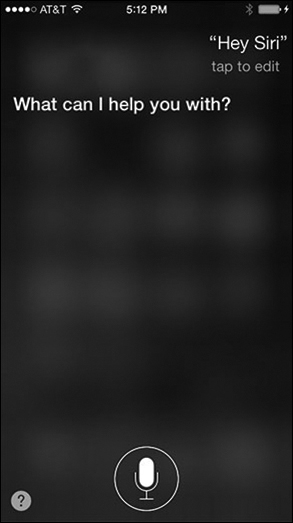
Figure 12-36 Siri
Methods for Securing Mobile Devices (12.2)
Securing mobile devices involves many issues, from physical security to encryption of data. It is easy to forget how vulnerable mobile devices can be, but their ease of use and network access make them targets of threats. There are many ways to secure a mobile device, and knowing them can help ensure that users are practicing good security rather than leaving themselves vulnerable due to poor security practices. Mobile device threats are increasing and can result in data loss, security breaches, and regulatory compliance violations.
Screen Locks and Biometric Authentication (12.2.1)
Setting screen locks and using biometric authentication are methods that can help protect against unauthorized access to a device. Such measures can prevent immediate access to a device for an intruder.
What Do You Already Know? - Locks (12.2.1.1)
It is imperative that a mobile device be protected by a screen lock. There are five types of screen locks: face, passcode, pattern, swipe, and fingerprint.
Read the scenario and select the lock that is used in each case.
Scenarios
Scenario 1: This screen lock requires that a four- or six-digit numeric code be entered to unlock the mobile device.
Scenario 2: This screen lock requires the user to simply swipe the device screen in a predefined direction to unlock the device.
Scenario 3: This screen lock requires the user to join four or more dots in a specific pattern to unlock the device.
Scenario 4: This biometric screen lock can unlock a device by scanning the user’s fingerprint.
Scenario 5: This biometric screen lock can unlock a device by scanning the user’s face.
Answers
Scenario 1 Answer: Passcode lock. This is the most common method of locking mobile devices. Passcode options can also include setting a custom numeric code or alphanumeric password.
Scenario 2 Answer: Swipe lock (also called Slide to Unlock on many Android devices). Although convenient, this less secure method should be used only if security is unimportant.
Scenario 3 Answer: Pattern lock. This type of lock is available on many Android devices. The screen unlocks when you draw the correct pattern with your finger.
Scenario 4 Answer: Fingerprint lock. This iOS and Android feature converts the user’s fingerprint scan into a unique hash. When a user touches the fingerprint sensor, the device recomputes the hash. The device unlocks if the hash values match.
Scenario 5 Answer: Face lock. This iOS and Android feature computes a hash using a picture of the user’s face.
12.2.1.2 Lab - Passcode Locks
![]()
In this lab, you will use passcode locks.
Restrictions on Failed Login Attempts (12.2.1.3)
When a passcode has been properly implemented, unlocking a mobile device requires entering the correct PIN, password, pattern, or another passcode type. In theory, a passcode, such as a PIN, could be guessed given enough time and perseverance. To prevent someone from trying to guess a passcode, mobile devices can be set to perform defined actions after a certain number of incorrect attempts have been made.
For Android devices, shown in Figure 12-37, the number of failed attempts before lockout depends on the device and version of Android OS. It is common for an Android device to lock when a passcode has failed from 4 to 12 times. After a device is locked, you can unlock it by entering the Gmail account information used to set up the device.

Figure 12-37 Restrictions on Failed Login Attempts
iOS Erase Data
For iOS devices, you can turn on the Erase Data option, as shown in Figure 12-38. If the passcode fails 10 times, the screen goes black, and all data on the device is deleted. To restore the iOS device and data, if you have backups, use either the Restore and Backup option in iTunes or the Manage Storage option in iCloud.
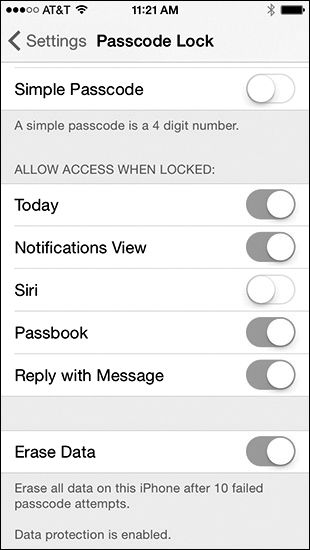
Figure 12-38 iOS Erase Data
iOS GUI
On iOS, to increase security, the passcode is used as part of the encryption key for the entire system. Because the passcode is not stored anywhere, no one (including Apple) can gain access to the user data on iOS devices without the passcode. The system depends on the user providing the passcode before the system can be unlocked and decrypted for use. A forgotten passcode renders user data unreachable, as shown in Figure 12-39, and the user must perform a full restore from a backup saved in iTunes or iCloud.
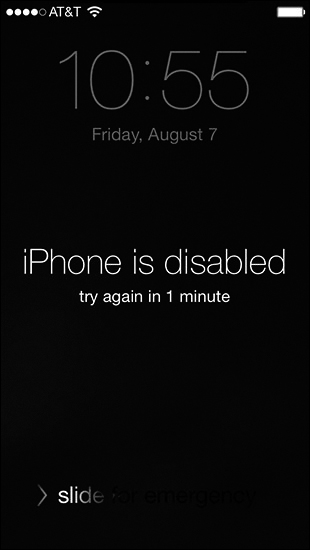
Figure 12-39 iOS GUI
12.2.1.4 Check your Understanding - Screen Locks and Biometric Authentication
Refer to the online course to complete this activity.
Cloud-Enabled Services for Mobile Devices (12.2.2)
Cloud-enabled services provide access to data and applications wherever and whenever you want or need them. This on-demand access to storage resources, applications, and services reduces some of the limitations of mobile devices.
Remote Backup (12.2.2.1)
Mobile device data can be lost due to device failure or the loss or theft of the device. Data must be backed up periodically to ensure that it can be recovered, if needed. With mobile devices, storage is often limited and not removable. To overcome these limitations, remote backups can be performed. With a remote backup, a device copies its data to cloud storage using a backup app. If data needs to be restored, run the backup app and access the website to retrieve the data.
Most mobile operating systems come with a user account linked to the vendor’s cloud service, such as iCloud for iOS, shown in Figure 12-40, Google Sync for Android, or OneDrive for Microsoft. The user can enable automatic backups to the cloud for data, apps, and settings. In addition, third-party backup providers, such as Dropbox, can be used. A mobile device can also be backed up to a PC. iOS supports backups on iTunes running on a PC. Another option is to configure mobile device management (MDM) software to automatically back up user devices.
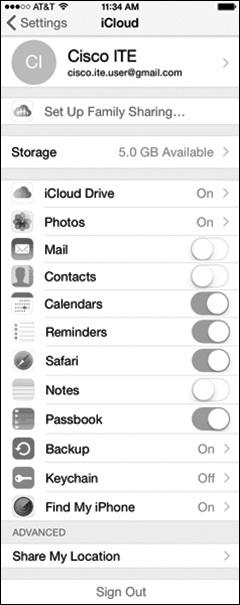
Figure 12-40 iCloud for iOS
Locator Applications (12.2.2.2)
If a mobile device is misplaced or stolen, it is possible to find it by using a locator application. A locator app should be installed and configured on each mobile device before it is lost. Both Android and iOS have apps for remotely locating a device.
Apple’s Find My iPhone and Android’s Device Manager allow a user to locate, ring, or lock a lost device or to erase data from the device. To manage a lost Android device, the user must visit the Android Device Manager Dashboard, hosted at https://www.google.com/android/devicemanager, and log in with the Google account used on the Android device. Android Device Manager is included and enabled by default on Android 5.x and can be found under Settings > Security > Device Administration.
iOS users can use the Find My iPhone app on different iOS devices to help locate lost devices (see Figure 12-41). After installing the app, the user can start it and follow the instructions to configure the software.

Figure 12-41 iOS Find My iPhone
Note
If Find My iPhone is unable to locate the lost device, the device might be turned off or disconnected. The device must be connected to a cellular or wireless network to receive commands from the app or to send location information to the user.
After the device is located, you might be able to perform additional functions, such as sending a message or playing a sound. These options are useful if you have misplaced your device. If the device is close by, playing a sound can help you find it. If the device is at another location, sending a message to display on the screen allows someone to contact you after finding the device.
Remote Lock and Remote Wipe (12.2.2.3)
If attempts to locate a mobile device have failed, other security features can be used to prevent data on the device from being compromised (see Figure 12-42). Usually, the same apps that perform remote location services have security features. Two of the most common remote security features are remote lock and remote wipe.
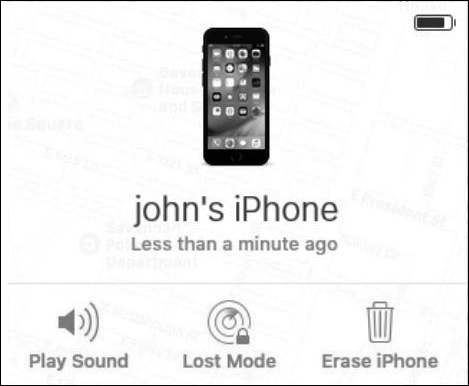
Figure 12-42 Remote Lock and Remote Wipe
Note
For these remote security measures to function, the device must be powered on and connected to a cellular or Wi-Fi network.
Remote Lock
The remote lock feature for iOS devices is called Lost Mode (see Figure 12-43). The Android Device Manager calls this feature Lock. Both of these features allow you to lock the device with a passcode, so others cannot gain access to the data in the device. For example, the user can display custom messages or prevent the phone from ringing to indicate incoming calls or text messages.
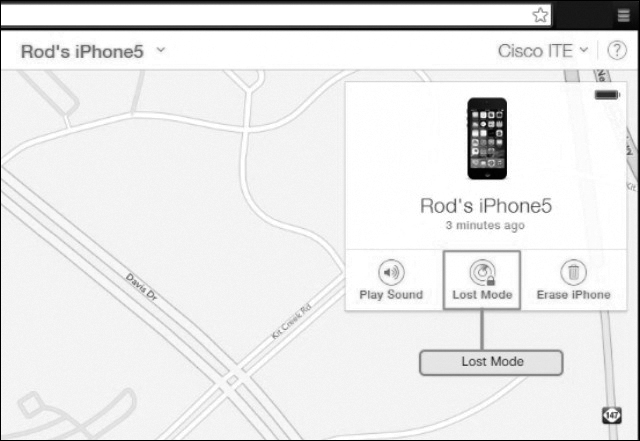
Figure 12-43 Remote Lock
Remote Wipe
The remote wipe feature for iOS devices is called Erase iPhone (see Figure 12-44). The Android Device Manager calls this feature Erase. Both Erase iPhone and Erase delete all data from the device and return it to a factory state. To restore data to the device, an Android user must set up the device using a Gmail account, and an iOS user must synchronize the device to iTunes.
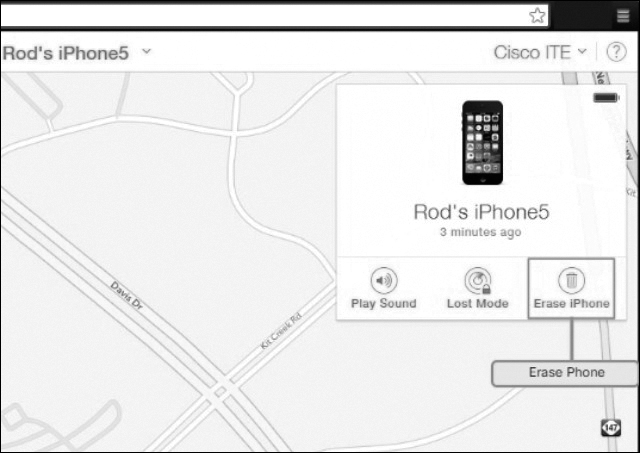
Figure 12-44 Remote Wipe
Most mobile device operating systems provide a full device encryption feature. Full device encryption can prevent anyone in possession of the device from circumventing the device’s access controls and reading the raw data stored in memory.
All user data on an iOS device is always encrypted, and the key is stored on the device. When Erase iPhone or Erase is used to “wipe” the device, the OS deletes the key, and the data becomes inaccessible. Data protection encryption is enabled automatically when a password lock is configured on the device.
On Android OS, encryption is enabled through Settings > Security. Android uses full-disk encryption with a passcode-derived key.
12.2.2.4 Check Your Understanding - Cloud-Enabled Services for Mobile Devices
Refer to the online course to complete this activity.
Software Security (12.2.3)
Applications need to be protected from internal design flaws and external threats. Application developers embed security measures inside applications to prevent hackers from compromising a program. Technicians need to take additional measures to keep applications, including operating systems, from being compromised.
Antivirus (12.2.3.1)
All computers are vulnerable to malicious software. Smartphones and other mobile devices are computers and are also vulnerable. Antivirus apps (see Figure 12-45) are available for both Android and iOS. Depending on the permissions granted to an antivirus app when it is installed on an Android device, the app might not be able to scan files automatically or run scheduled scans. File scans must be initiated manually. iOS does not allow automatic or scheduled scans. This safety feature prevents malicious programs from using unauthorized resources or contaminating other apps or the OS. Some antivirus apps also provide services such as locator services, remote lock, and remote wipe.
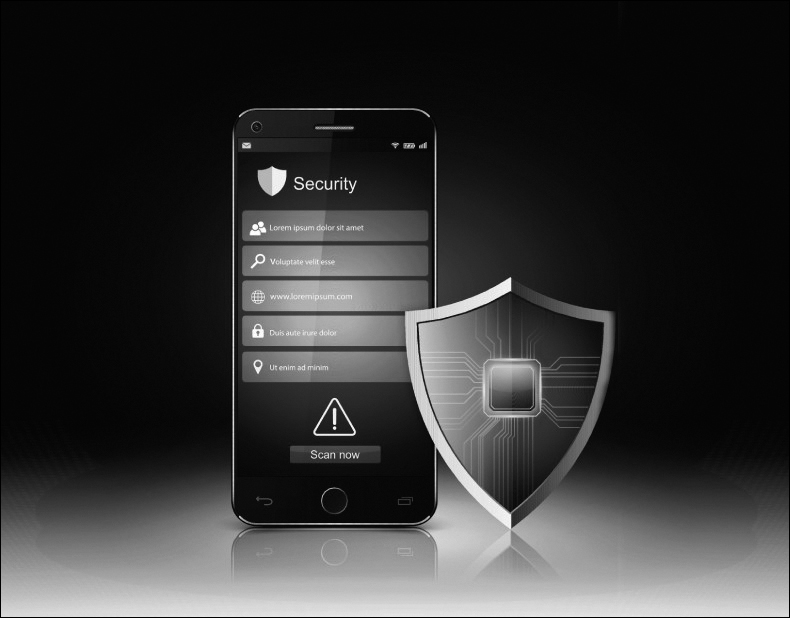
Figure 12-45 Antivirus
Mobile device apps run in a sandbox, which is a location of the OS that keeps code isolated from other resources and other code. It is difficult for malicious programs to infect a mobile device because apps are run inside the sandbox. An Android app asks for permission to access certain resources upon installation. A malicious app has access to any resources that were allowed permission during installation. This is another reason it is important to download apps only from trusted sources. A trusted app source is a source that is authenticated and authorized by a service provider. The service provider issues the developer a certificate to use to sign apps and identify them as trusted.
Due to the nature of a sandbox, malicious software does not usually damage mobile devices; it is far more likely for a mobile device to transfer a malicious program to another device, such as a laptop or desktop. For example, if a malicious program is downloaded from email, the Internet, or another device, the malicious program could be placed on a laptop the next time it is connected to the mobile device.
To prevent the malicious program from infecting additional devices, a firewall can be used. Firewall apps for mobile devices can monitor app activity and prevent connections to specific ports or IP addresses. Because a mobile device firewall must be able to control other apps, it works at a higher (root) permission level. A NoRoot Firewall works by creating a VPN and then controlling app access to the VPN.
Rooting and Jailbreaking (12.2.3.2)
Mobile operating systems are usually protected by a number of software restrictions. An unmodified copy of iOS, for example, executes only authorized code and allows very limited user access to its file system.
Rooting and jailbreaking are two methods for removing restrictions and protections added to mobile operating systems. They make it possible to circumvent the usual operation of the device operating system to gain superuser or root administrator permissions. Rooting is used on Android devices to gain privileged or root-level access for modifying code or installing software that is not intended for the device. Jailbreaking is typically used on iOS devices to remove manufacturer restrictions and make it possible to run arbitrary user code and grant users full access to the file system and full access to kernel modules (see Figure 12-46).

Figure 12-46 Rooting and Jailbreaking
Rooting or jailbreaking a mobile device usually voids the manufacturer’s warranty. It is not recommended that you modify a customer’s mobile device in this way. Nevertheless, a large group of users choose to remove the restrictions on their own devices. Rooting or jailbreaking a mobile device makes it possible to heavily customize the GUI, make modifications to the OS to improve the speed and responsiveness of the device, and install apps from secondary or unsupported sources.
Jailbreaking exploits vulnerabilities in iOS. When a usable vulnerability is found, a program is written. This program is the actual jailbreak software, and it is then distributed on the Internet. Apple discourages jailbreaking and actively works to eliminate vulnerabilities that make jailbreaking possible on iOS. In addition to the OS updates and bug fixes, new iOS releases usually include patches to eliminate known vulnerabilities that allow jailbreaking. When iOS vulnerabilities are fixed by updates, hackers are forced to start over.
Note
The jailbreak process is completely reversible. To remove the jailbreak and bring the device back to its factory state, connect it to iTunes and perform a Restore.
Patching and Updating Operating Systems (12.2.3.3)
As you can update the OS on a desktop or laptop, you can update or patch the OS on a mobile device. Updates add functionality or increase performance. Patches can fix security problems or issues with hardware and software.
Because there are many different Android mobile devices, updates and patches are not released as one package for all devices. Sometimes a new version of Android cannot be installed on older devices whose hardware does not meet the minimum specifications. These devices might receive patches to fix known issues but may not receive OS upgrades.
Android updates and patches are delivered using an automated process. When a carrier or manufacturer has an update for a device, a notification on the device indicates that an update is ready, as shown in Figure 12-47. Touch the update to begin the download and installation process.

Figure 12-47 System Update Notification on Android
iOS updates also use an automated process for delivery, and devices that do not meet the hardware requirements are excluded. To check for updates to iOS, connect the device to iTunes. A notice to download opens if updates are available. To manually check for updates, click the Check for Update button in the iTunes Summary pane.
Two other types of updates for mobile device radio firmware are important. These baseband updates consist of the Preferred Roaming List (PRL) and the Primary Rate ISDN (PRI). The PRL is configuration information that a cellular phone needs to communicate on networks other than its own so that a call can be made outside the carrier’s network. The PRI configures the data rates between the device and the cell tower. This ensures that the device is able to communicate with the tower at the correct rate.
12.2.3.4 Check Your Understanding - Mobile Security Features
Refer to the online course to complete this activity.
Linux and macOS Operating Systems (12.3)
Besides Microsoft Windows, Linux and macOS operating systems are most familiar to users.
Linux and macOS Tools and Features (12.3.1)
Each OS is developed with certain tools and features in mind for the system on which it will run and the people who will use it. This section addresses tools and features such as ease of use, visual aesthetics, security, performance, and compatibility with hardware and software.
Introduction to Linux and macOS Operating Systems (12.3.1.1)
Two file systems (see Figure 12-48) used on most Linux operating systems are ext3, which is a 64-bit file system with support for journaling, and ext4, which delivers significantly better performance than ext3. Linux can also support FAT and FAT32. In addition, Network File System (NFS) can be used to mount remote storage devices into the local file system.

Figure 12-48 File Systems
Most installations of Linux also support the creation of a swap partition to use as swap space. The OS uses the swap partition to supplement system RAM. If applications or data files use up all the available space in RAM, data is written to the swap space on a disk and is treated as if it were stored in RAM.
Apple Mac workstations have their own file system, Extended Hierarchical File System (HFS Plus). This file system supports many of the same features as NTFS in Windows but not native file/folder encryption. In macOS High Sierra and later, HFS Plus was updated to Apple File System (APFS), which supports native file encryption. HFS Plus has a maximum volume and file size of 8 EB.
Unix
Unix, shown in Figure 12-49, is a proprietary operating system written in the C programming language. macOS and iOS are based on the Berkeley Standard Distribution (BSD) version of Unix.

Figure 12-49 Unix
GNU/Linux is an open source, independently developed operating system that is compatible with Unix commands. Android and many OS distributions rely on the Linux kernel.
Linux
Linux operating systems are used in embedded systems, wearable devices, smartwatches, cell phones, netbooks, PCs, servers, and supercomputers. There are many different distributions (or distros) of Linux, including SUSE, Red Hat, CentOS, Fedora, Debian, Ubuntu (see Figure 12-50), and Mint. Each distro adds specific packages and interfaces to the generic Linux kernel and provides different support options. Most distributions provide a GUI interface.

Figure 12-50 Linux
In most cases, a distro is a complete Linux implementation that includes the kernel, shell, applications, and utilities. Each Linux distribution vendor packages software, distributes installation media, and provides support.
macOS
The operating system for Apple computers, macOS (see Figure 12-51), is developed from the Unix kernel, although macOS is a closed source operating system.
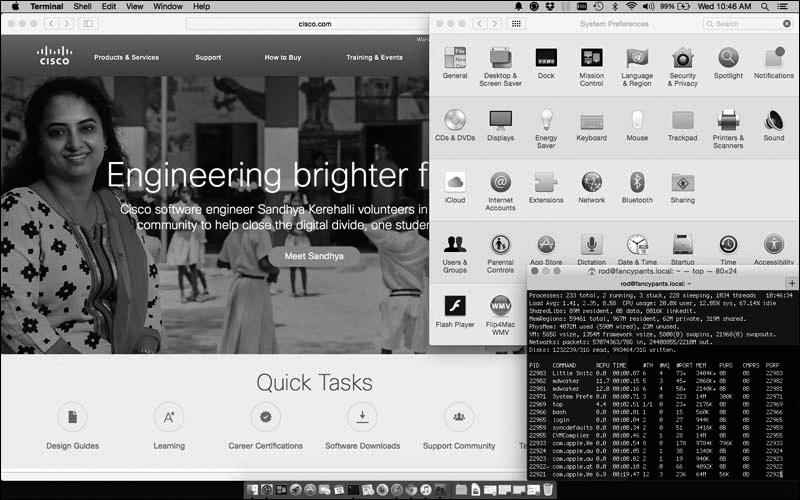
Figure 12-51 macOS
Since its release in 2001, macOS has undergone regular updates and revisions to keep pace with Apple Mac hardware updates. Updates and new OS versions are distributed for free through the App Store. Some older Mac computers may not be able to run the newest macOS versions. You can check support.apple.com/specs for the technical specifications of any macOS release.
macOS supports remote network installation called NetBoot, which is similar to Preboot Execution Environment (PXE).
Overview of Linux GUI (12.3.1.2)
Different Linux distributions ship with different software packages, but users decide what stays in their system by installing or removing packages. The graphical interface in Linux is composed of a number of subsystems that can also be removed or replaced by the user. While the details about these subsystems and their interactions are beyond the scope of this book, it is important to know that the Linux GUI as a whole can be easily replaced by the user. There are many Linux distributions, but this chapter focuses on Ubuntu Linux.
Ubuntu Linux uses Unity as its default GUI. One feature in the Linux GUI is the ability to have multiple desktops or workspaces, which allows the users to arrange the windows on a particular workspace.
Canonical has a website that simulates Unity’s user interface and also provides a tour through Unity’s main features. To experience Unity via Canonical’s website, visit http://tour.ubuntu.com/en.
As illustrated in Figure 12-52, there are five main components of the Ubuntu Unity desktop: launcher, dash search box, top menu bar, system notification menu, and lenses.

Figure 12-52 Ubuntu Unity Desktop
A dock, called the launcher, appears on the left side of the screen and serves as an application launcher and switcher. Right-click any application hosted on the launcher to access a short list of tasks the application can perform.
A multipurpose menu bar, called the dash search box, contains the currently running application, buttons to control the active window, and system controls and notifications.
A multipurpose menu bar, called the top menu bar, contains the currently running application, buttons to control the active window, and system controls and notifications.
Many important functions are located in the indicator menus at the top-right corner of the screen. This is called the system notification menu. Use the indicator menu to switch users, shut down the computer, control the volume level, or change network settings.
Lenses allow the user to fine-tune results.
Overview of macOS GUI (12.3.1.3)
Among the major differences between older versions of OS X and macOS is the addition of the Aqua GUI. Aqua was designed around the theme of water, with components resembling droplets and a deliberate use of reflection and translucency. The latest release of macOS at the time of writing is 10.1 Mojave. As illustrated in Figure 12-53, there are eight main components of the Apple Aqua desktop: Apple menu, application menu, menu bar, status menu, spotlight, desktop area, dock, and notification area.
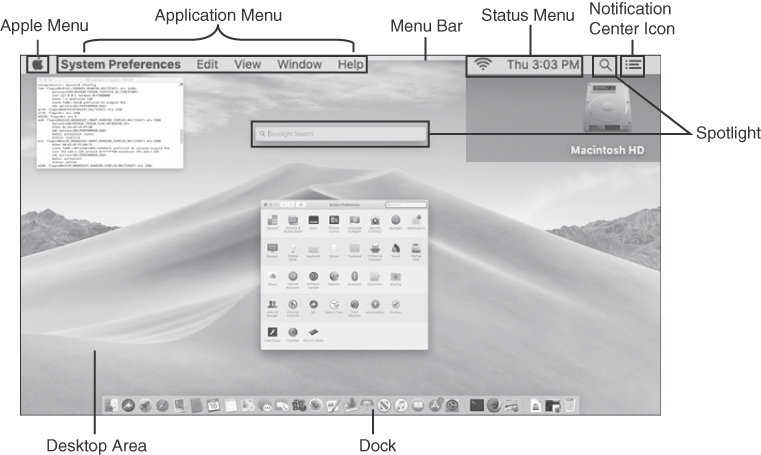
Figure 12-53 Apple Aqua Desktop
The Apple menu enables you to access system preferences, software updates, power controls, and more.
The application menu displays the name of the active application in bold and the menu of the active application.
The menu bar contains the Apple menu, currently active application menus, status menus and indicators, Spotlight, and Notification Center.
The status menu displays the date and time and status of the computer and some features, such as Bluetooth and wireless.
Spotlight is a file system search feature in macOS. It can be used to find almost anything in the macOS. To start a new search, click the magnifying glass in the menu bar or press Cmd+Spacebar to bring up the search box. To change the document type being searched, go to Preferences. To specifically exclude locations from a Spotlight search, click the Privacy button to specify folders or drives to be excluded.
The desktop area, which is where most work is performed, is customizable. App windows open over the desktop, which can become covered by open windows. Mission Control gives you a simple view of everything that is open on the desktop. You can also open and work in multiple desktop spaces.
The dock displays thumbnails of frequently used applications and the running applications that are minimized. One of the important functions included in the Dock is Force Quit. By right-clicking a running application in the Dock, the user can choose Force Quit to close an unresponsive application. You can right-click an icon to display a menu of other actions to take, such as open or close an app, open a recent document, and so on.
The notification center icon allows the user to see all notifications.
The Apple Magic Mouse and the Magic Trackpad of a MacBook both support gestures to control the user interface. Gestures are finger movements on a trackpad or mouse that enable a user to scroll, zoom, and navigate desktop, document, and application content. Available gestures can be viewed and changed under System Preferences > Trackpad.
With macOS, Mission Control is a quick way to see everything that is currently open on a Mac. Mission Control can be accessed by using a three- or four-finger swipe-up gesture, depending on the touchpad or mouse settings. Mission Control allows you to organize apps on multiple desktops. To navigate the file system, macOS includes Finder, which is very similar to the Windows File Explorer.
Most Apple laptops do not have optical drives. To install software from optical media, you can use Remote Disk, an app that lets the user access a CD/DVD drive on another Mac or Windows computer. To set up Remote Disk, go to System Preferences > Sharing and then check the DVD or CD Sharing checkbox.
macOS also allows screen sharing. Screen sharing is a feature that enables other people using Macs to view your screen or even take control of your computer. This is very useful when you need help or want to help someone else.
Overview of Linux and macOS CLI (12.3.1.4)
In both Linux and macOS, the user can communicate with the operating system by using the command line interface (CLI). To add flexibility, options and switches that can be used with commands are usually preceded by the dash (-) character. The options and switches supported by a command are entered by the user along with the command.
Most operating systems include a graphical interface. Although a command line interface is still present, the OS often boots into the GUI by default, hiding the command line interface from the user. One way to access the command line interface in a GUI-based operating system is through a terminal emulator application. These applications provide user access to the command line interface and are often named using some variation of the word terminal. The terminal is separated from the kernel by the shell, as shown in Figure 12-54.

Figure 12-54 Operating System Components
A program called a shell interprets the commands from the keyboard and passes them to the operating system. When a user logs into the system, the login program checks the username and password; if the credentials are correct, the login program starts the shell. From this point on, an authorized user can begin interacting with the OS through text-based commands.
Users interact with the kernel through a shell. Basically, the shell acts as an interface layer between the user and the kernel. The kernel is responsible for allocating CPU time and memory to processes. It also manages the file system and communications in response to system calls.
On Linux, popular terminal emulators are Terminator, eterm, xterm, konsole, and gnome-terminal. Figure 12-55 shows gnome-terminal.

Figure 12-55 The gnome-terminal Linux Terminal Emulator
macOS includes a terminal emulator called Terminal, and a number of third-party emulators are available as well. Figure 12-56 shows Terminal.

Figure 12-56 The Terminal macOS Terminal Emulator
Linux Backup and Recovery (12.3.1.5)
The process of backing up data involves creating a copy (or multiple copies) of data for safekeeping. When the backup process is complete, the copy is called a backup. The primary goal of making backups is to be able to restore or recover data in case of failure. Gaining access to an earlier version of the data is often seen as a secondary goal of the backup process.
While backups can be achieved with a simple copy command, many tools and techniques exist to make the process automatic and transparent to the user.
Linux does not have a built-in backup tool. However, there are many commercial and open source backup solutions for Linux, such as Amanda, Bacula, Fwbackups, and Déjà Dup. Déjà Dup, shown in Figure 12-57, is an easy and efficient tool for backing up data. Déjà Dup supports a number of features, including local, remote, or cloud backup locations; data encryption compression; incremental backups; periodic scheduled backups; and GNOME desktop integration. It can also be used to restore from a particular backup.

Figure 12-57 Linux Backup and Recovery
macOS Backup and Recovery (12.3.1.6)
macOS includes a backup tool called Time Machine. With Time Machine, users choose an external drive to be used as a backup destination device and connect it to the Mac using USB, FireWire, or Thunderbolt. Time Machine prepares the disk to receive backups and, when the disk is ready, it performs incremental backups periodically.
If the user has not specified a Time Machine destination disk, Time Machine asks if the newly connected external disk should be used as the destination backup disk. Time Machine stores some backups on your Mac, and if the Time Machine backup disk is not available, you may be able to restore a backup directly from your Mac. This type of backup is called a local snapshot.
To enable Time Machine, go to System Preferences > Time Machine, slide the switch to On, and select the disk where the backups are stored, as shown in Figure 12-58. Clicking the Options button allows the user to select or unselect the files, folders, or drives to back up. By default, Time Machine performs hourly backups for the past 24 hours, daily backups for a month, and weekly backups for all previous months. When the destination backup drive becomes full, Time Machine removes the oldest backup files to free up space.
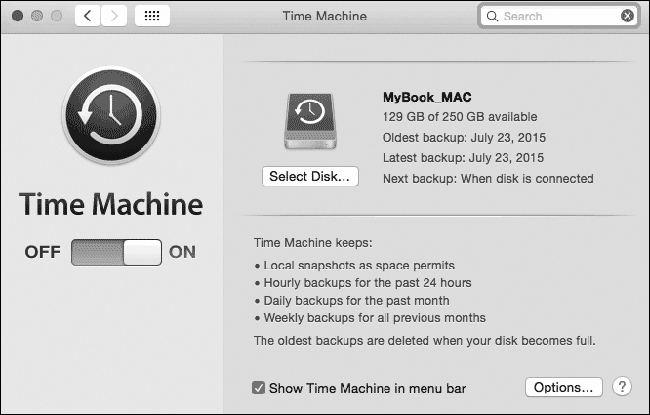
Figure 12-58 macOS Backup and Recovery
To restore data from Time Machine, make sure the destination backup disk is connected to the Mac and click Enter Time Machine in the Time Machine menu. A timeline on the right-hand side of the screen shows the available backups. Time Machine allows the user to restore the data to any previous version currently available in the destination backup disk.
Overview of Disk Utilities (12.3.1.7)
To help diagnose and solve disk-related problems, most modern operating systems include disk utility tools. Ubuntu Linux includes a disk utility called Disks. With Disks, users can perform the most common disk-related tasks, including partition management, mounting and unmounting, disk formatting, and query self-monitoring analysis and reporting technology (S.M.A.R.T.). macOS includes Disk Utility. In addition to supporting the main disk maintenance tasks, Disk Utility also supports Verify Disk Permissions and Repair Disk Permissions. Repair Disk Permissions is a common troubleshooting step in macOS. Disk Utility can also be used to back up disks to image files and perform an image recovery to disk from image files. These files contain the entire contents of a disk.
The following are a few common maintenance tasks that can be performed using disk utility software:
Partition management: When working with computer disks, partitions may need to be created, deleted, or resized.
Disk partition mounting or unmounting: On Unix-like systems, mounting a partition relates to the process of binding a partition of a disk or a disk image file (usually an .iso file) to a folder location.
Disk formatting: Before a partition can be used by the user or the system, it must be formatted.
Bad sector checking: When a disk sector is flagged as bad, it becomes harmless to the OS because it is no longer used to store data. The existence of many bad sectors could be an indicator of a failing disk. Disk utilities can salvage data stored in bad sectors by moving it to healthy disk sectors.
S.M.A.R.T. attribute querying: S.M.A.R.T. can detect and report attributes about a disk’s health. The goal of S.M.A.R.T. is to anticipate disk failure so that the user can move the data to a healthy disk before the failing disk becomes inaccessible.
12.3.1.8 Check Your Understanding - Linux and macOS Operating Systems
Refer to the online course to complete this activity.
Linux and macOS Best Practices (12.3.2)
Computer systems need periodic preventive maintenance to ensure the best performance. Maintenance tasks should be scheduled and performed frequently to prevent or detect problems early. To avoid missing maintenance tasks due to human error, computer systems can be programmed to perform tasks automatically.
Scheduled Tasks (12.3.2.1)
Two tasks that should be scheduled and performed automatically are backups, shown in Figure 12-59, and disk checks.
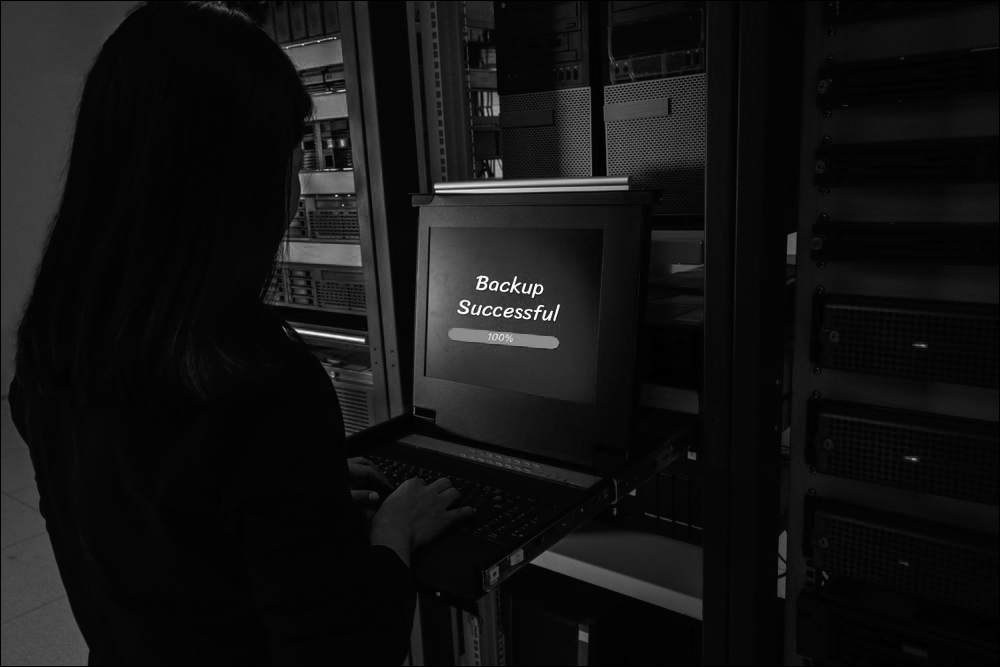
Figure 12-59 Scheduled Tasks
Backups and disk checks are usually time-consuming tasks. An additional benefit of scheduled maintenance tasks is that it allows the computer to perform these tasks when no users are using the system. The CLI utility known as cron can schedule these tasks during off-peak hours.
In Linux and macOS, the cron service is responsible for scheduled tasks. cron runs in the background and executes tasks at specific dates and times. It uses a schedule table called a cron table that can be edited with the crontab command.
cron Table Format
The cron table is a plaintext file that has six columns, formatted as shown in Figure 12-60. A task is usually represented by a command, a program, or a script. To schedule a task, the user adds a row to the cron table. The new row specifies the minute, hour, day of the month, and the day of the week when the task should be executed by the cron service. When the specified date and time arrives, the task is executed.

Figure 12-60 Cron Table Format
Cron Table Fields
The center column of the cron table shows the data types acceptable for the fields, as shown in Figure 12-61.
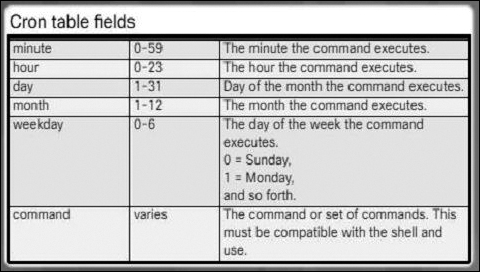
Figure 12-61 Cron Table Fields
Cron Table Example
The cron table shown in Figure 12-62 has two entries. The first entry tells the cron service to execute the myFirstTask script, located at /myDirectory/, on the first and fifteenth days of each month and also on Mondays, always at midnight (0h0m). The second entry shows that the cron service should execute mySecondTask script, also located at /myDirectory/, every Thursday at 2h37m in the morning.

Figure 12-62 Crontab Example
To create or edit the cron table, use the crontab -e command from a terminal.
To list the current cron table, use the crontab -l command.
To remove the current cron table, use the crontab -r command.
Operating System Updates (12.3.2.2)
Despite continued efforts to create a perfectly secure operating system, vulnerabilities still exist. When a vulnerability is found, it can be exploited with a virus or other malicious software.
Measures can be taken to help prevent malicious software from infecting a computer system. The most common of these measures are operating system updates, firmware updates, antivirus, and anti-malware. Also known as patches, OS updates are released periodically by OS companies to address any known vulnerabilities in their operating systems. While companies have update schedules, the release of unscheduled OS updates is common when a major vulnerability is found in OS code. Modern operating systems alert the user when updates are available for download and installation, but the user can check for updates at any time. Figure 12-63 shows an update alert window for Apple macOS.
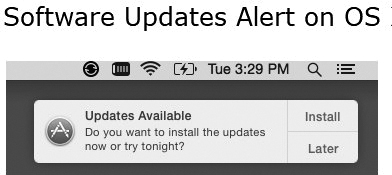
Figure 12-63 Software Updates Alert in macOS
Firmware Updates
Usually held in nonvolatile memory, such as ROM or Flash, firmware is a type of software designed to provide low-level functionality for a device. Check for firmware updates with the manufacturer and update the system if new versions are available.
Antivirus and Anti-malware
In general, antivirus and anti-malware rely on code signatures to operate. A signature, or signature file, is a file that contains a sample of the code used by viruses and malware. Based on signature files, antivirus and anti-malware software can scan the contents of a computer disk and compare the contents of the files stored on the disk with the samples stored in the signature file. If a match is found, the antivirus or anti-malware software alerts the user of the possible presence of malware.
New malware is created and released every day; therefore, the signature files of antivirus and anti-malware programs must be updated just as frequently.
Security (12.3.2.3)
Digital assets are very valuable, and the theft of these assets are a major threat to users and organizations. Proper security practices include methods of protecting credentials that allow access to these assets.
Security Credentials Manager
Usernames, passwords, digital certificates, and encryption keys are just a few of the security credentials associated with a user. Due to the increasing number of necessary security credentials, modern operating systems include a service to manage them. Applications and other services can request and utilize the credentials stored by the security credentials manager service.
Security Credentials Service on Ubuntu
GNOME Keyring, shown in Figure 12-64, is a security credentials manager for Ubuntu Linux. To access GNOME Keyring on Ubuntu Linux, select Dash then search for Key > Passwords and Keys.

Figure 12-64 Security Credentials Service on Ubuntu
Security Credentials Service on macOS
Keychain, shown in Figure 12-65, is a security credentials manager for macOS. To access Keychain on macOS, select Applications > Utilities > Keychain Access.

Figure 12-65 Security Credentials Service on macOS
12.3.2.4 Check Your Understanding - Linux and macOS Best Practices
Refer to the online course to complete this activity.
Basic CLI Commands (12.3.3)
The command line interface (CLI) is a user interface that is used to execute commands by typing text at a prompt instead of using a mouse to point and click on icons in a GUI shell. Having a basic understanding of CLI commands allows you to navigate the shell.
12.3.3.1 Syntax Checker - File and Directory Commands
Refer to the online course to complete this activity.
12.3.3.2 Check Your Understanding - File and Directory Commands
Refer to the online course to complete this activity.
The ls –l Command Output (12.3.3.3)
In the following section you will examine the ls –l command output, as demonstrated in Figure 12-66.
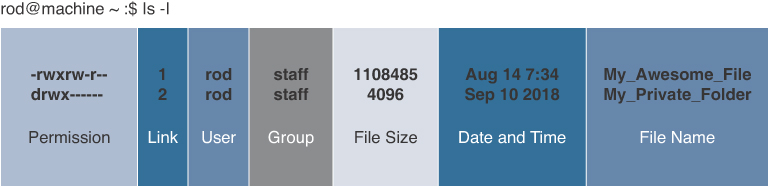
Figure 12-66 ls -l Command Output
Table 12-1 describes each of the components of this output.
Table 12-1 ls -l Command Output Components
Component |
Description |
Permission |
The permission defines how the user, the group, and others access the files and directories |
Link |
The number of links or the number of directories inside this directory (My_Private_Folder in this example) |
User |
The username of the owner of the file or the directory |
Group |
The name of the group that owns the file or the directory |
File Size |
The file size, in bytes |
Date and Time |
The date and time of the last modification |
File Name |
The file or directory name |
Basic Unix File and Directory Permissions (12.3.3.4)
To organize the system and reinforce boundaries within the system, Unix uses file permissions. File permissions are built into the file system structure and provide a mechanism to define permissions to every file and directory. Every file and directory on a Unix system carries permissions that define the actions that the owner, the group, and others can do with the file or directory.
The only user who can override file permissions in Unix is the root user. Having the power to override file permissions means the root user can write to any file. Because everything in Unix is treated as a file, the root user has full control over the Unix operating system. Root access is often required to perform maintenance and administrative tasks.
Note
Because Linux and OS X are based on Unix, both operating systems conform with Unix file permissions.
Review the different permission values shown in Figure 12-67. Note how file and directory access is affected by the permissions.

Figure 12-67 Basic Unix File and Directory Permissions
Table 12-2 provides a summary of the Unix file permissions.
Table 12-2 Unix File Permissions Summary
Permission |
Description |
777<br>-rwxrwxrwx |
There are no restrictions on permissions. Anybody may do anything: read, write, or execute the file. This is generally not a desirable setting. |
755<br>-rwxr-xr-x |
With this permission, only the file’s owner may read, write, and execute the file. All others may only read and execute the file. This setting is common for programs that are used by all users on the system. |
700<br>-rwx------ |
The file’s owner may read, write, and execute the file. Nobody else has any rights. This setting is useful for programs that only the owner may use and that must be kept private from others. |
666<br>-rw-rw-rw- |
All users may read and write the file, but no users can execute the file. |
644<br>-rw-r--r-- |
Only the file owner may read and write a file, and all others on the system may only read the file. This is a common setting for data files that all the users may read but that only the owner may change. |
600<br>-rw------- |
The owner may read and write a file. All others cannot read, write, or execute the file. This setting is used when the owner wants to keep the data file private. |
777<br>drwxrwxrwx |
There are no restrictions on permissions. Anybody may list, add, or delete content in the directory. Generally this is not a desirable setting. |
755<br>drwxr-xr-x |
The directory owner has full access. All others may list the directory but cannot create files or delete them. This setting is common for directories that can be shared with other users. |
700<br>drwx------ |
The directory owner may list, add, or delete content in the directory. All others have no access, so the directory owner may keep the directory private. |
Table 12-3 summarizes the Unix directory and file permissions.
Table 12-3 Directory and File Permissions Summary
Binary |
Octal |
Permission |
Description |
000 |
0 |
--- |
No access |
001 |
1 |
--x |
Execute only |
010 |
2 |
-w- |
Write only |
011 |
3 |
-wx |
Write and Execute |
100 |
4 |
r-- |
Read only |
101 |
5 |
r-x |
Read and Execute |
110 |
6 |
rw- |
Read and Write |
111 |
7 |
rwx |
Read, Write, and Execute |
12.3.3.5 Syntax Checker - File and Directory Permissions
Refer to the online course to complete this activity.
12.3.3.6 Check Your Understanding - File and Directory Permissions
Refer to the online course to complete this activity.
Linux Administrative Commands (12.3.3.7)
Administrators use the terminal, shown in Figure 12-68, to monitor and control users, processes, and IP addresses and to carry out other tasks. Certain commands can be executed by users without any special privileges while others require elevated privileges.
Figure 12-68 Linux Admin Commands
To get to the terminal in an Ubuntu distribution, click Activities in the upper-left corner and type terminal. How you open the terminal in other Linux distributions varies depending on the interface.
passwd
The passwd command, shown in Figure 12-69, allows users to change their own passwords at the terminal. To change a password, the user must know his or her current password. For security reasons, neither the password characters nor asterisks are displayed while the user types the password. The passwd command is often confused with the pwd command, which stands for print working directory.

Figure 12-69 passwd Command
ps
The ps command, shown in Figure 12-70, allows users to monitor their own processes. If the ps command is used without specifying options, it only shows the programs that are running in the current terminal. The second use of the ps command shown in Figure 12-70 includes the -e option, indicating everything. The output of the command is piped to the grep command to search for output lines that match the word gnome (pronounced “Gee-Nome”).
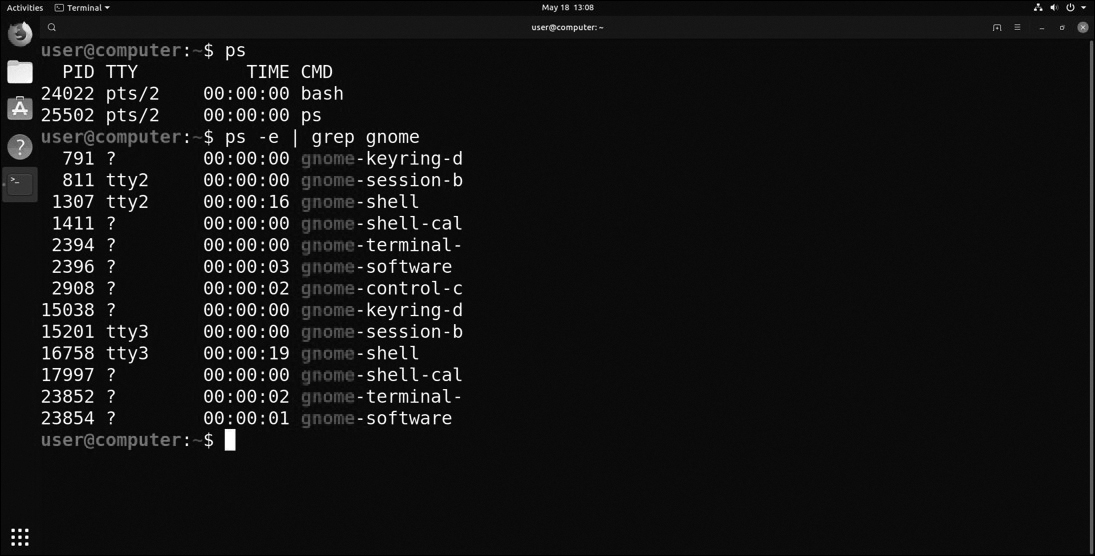
Figure 12-70 ps Command
kill
The kill command, shown in Figure 12-71, allows users to end the processes that they have started. In this example, Firefox was started in the background using the ampersand (&). The kill command was used to abruptly end the Firefox process. Use man kill to view useful options for the kill command.

Figure 12-71 kill Command
ifconfig
The ifconfig command, shown in Figure 12-72, is used in much the same way as the Windows ipconfig command. Although it is referenced in the CompTIA A+ objectives, this command has been deprecated, and the ip address command should be used instead.

Figure 12-72 ifconfig Command
iwconfig
The iwconfig command, shown in Figure 12-73, is one of many wireless commands that start with the letters iw. The iwconfig command allows users to set and view their wireless settings. In the example shown in Figure 12-73, no wireless connections are being used.
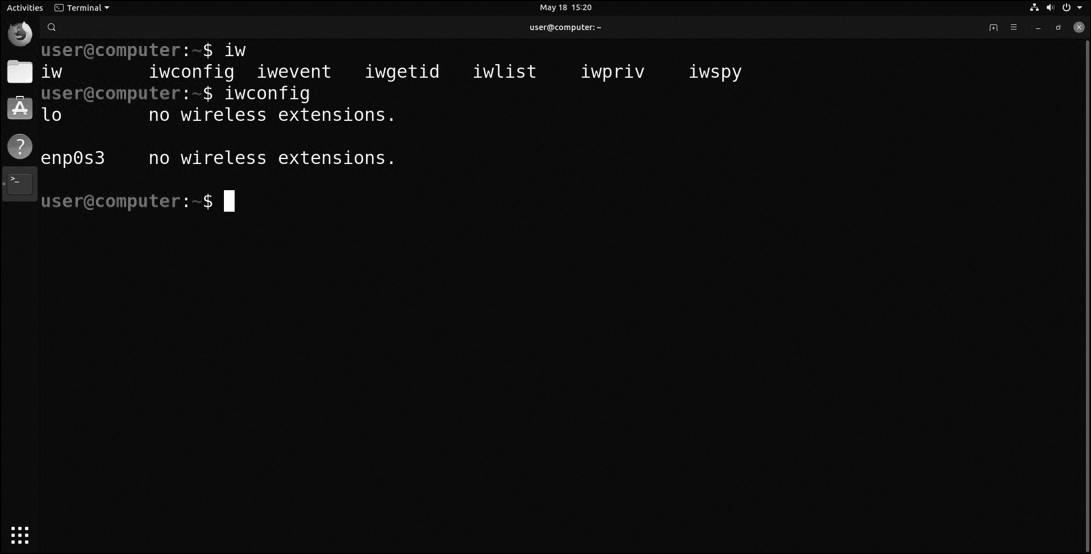
Figure 12-73 iwconfig Commands
chmod
The chmod command, shown in Figure 12-74, allows users to change the permissions of files that they own. In the example shown in Figure 12-74, a script is made executable using octal mode, and it is reverted using reference mode.
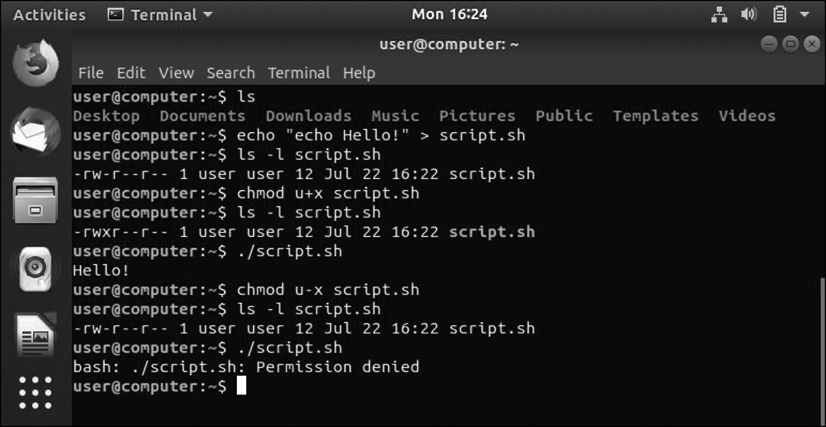
Figure 12-74 chmod Command
Linux Administrative Commands Requiring Root Access (12.3.3.8)
Some commands can be used without special privileges. Other commands require root access some of the time or all of the time, as shown in Figure 12-75. Typically, a user can manipulate the files within his or her own home directory, but changing files and settings throughout the server requires either sudo (superuser DO) or root access.

Figure 12-75 Commands Requiring Root Access
sudo
The sudo command, shown in Figure 12-76, grants a user root access without actually changing the user’s profile. The access is granted for a limited time but only if the user is listed in the /etc/sudoers file. In the example shown in Figure 12-76, sudo is needed to kill a process.
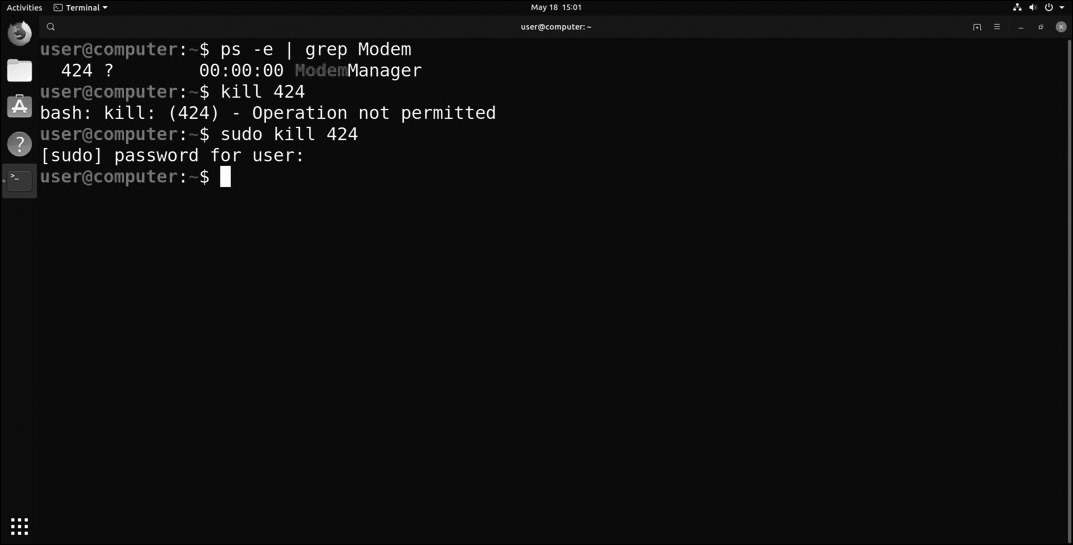
Figure 12-76 sudo
chown
The chown command, shown in Figure 12-77, allows a user to switch both the owner and the group of a file or files. After using the su or sudo command, users may see files that don’t belong to them in their home directories. Use the -R (recursive) option with the chown command to revert all files in a user’s home directory back to the user.

Figure 12-77 chown
apt-get
The apt-get command, shown in Figure 12-78, is used to install and manage software on Debian-based Linux distributions. There are many options available for this command, and you can examine them by simply typing apt. The apt-get command has been deprecated in favor of simply using apt.
Figure 12-78 apt
shutdown
The shutdown command, shown in Figure 12-79, is used to halt and reboot the operating system. It can also warn users of an impending shutdown and schedule a shutdown to occur in the future. In a multi-user system, regular users do not have the rights to shut down the system.
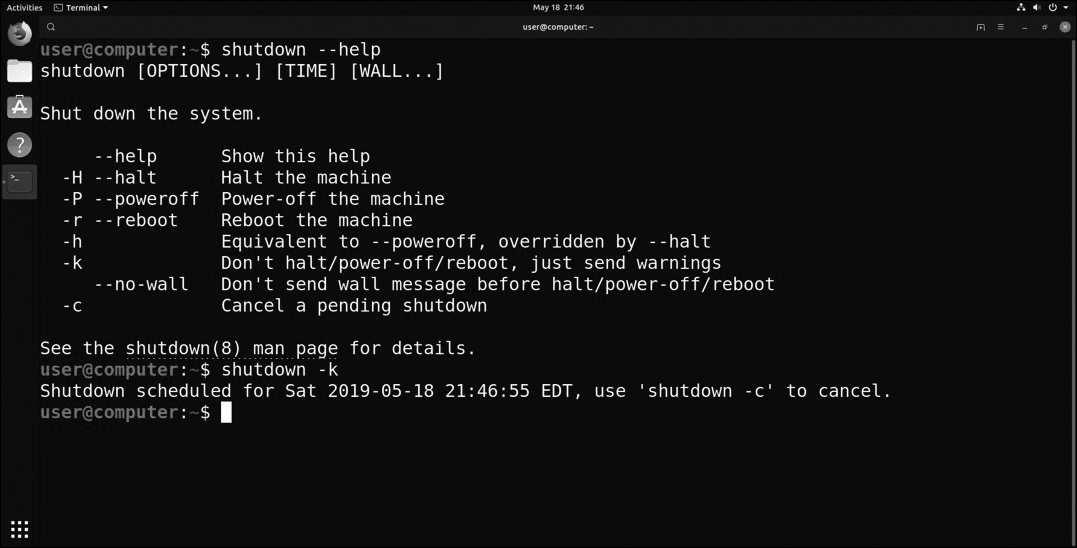
Figure 12-79 shutdown
dd
The dd (disk duplicate) command, shown in Figure 12-80, is used to copy files and partitions and to create temporary swap files. The dd command should be used with extreme caution.

Figure 12-80 dd
12.3.3.9 Check Your Understanding - Administrative Commands
Refer to the online course to complete this activity.
12.3.3.10 Syntax Checker - File Ownership and Permission
Refer to the online course to complete this activity.
Basic Troubleshooting Process for Mobile, Linux, and macOS Operating Systems (12.4)
All OSs are susceptible to errors, freezing up, and other unexpected behaviors. Knowing a basic troubleshooting methodology is critical in helping to correct common OS issues.
Applying the Troubleshooting Process to Mobile, Linux, and macOS Operating Systems (12.4.1)
Follow the steps outlined in this section to accurately identify, repair, and document problems.
The Six Steps of the Troubleshooting Process (12.4.1.1)
The six steps of the troubleshooting process are:
Step 1. Identify the problem.
Step 2. Establish a theory of probable cause.
Step 3. Test the theory to determine the cause.
Step 4. Establish a plan of action to resolve the problem and implement the solution.
Step 5. Verify full system functionality and, if applicable, implement preventive measures.
Step 6. Document findings, actions, and outcomes.
Identify the Problem (12.4.1.2)
When troubleshooting problems with a mobile device, find out if the device is under warranty. If it is, it can often be returned for repair or exchange. If the device is no longer under warranty, determine whether repairing the device would be cost-effective. To determine the best course of action, compare the cost of the repair with the cost of replacing the mobile device. Because mobile devices tend to change rapidly in design and functionality, repairing them is often more expensive than replacing them. For this reason, mobile devices are usually replaced.
Mobile device problems can result from a combination of hardware, software, and network issues. Mobile technicians must be able to analyze a problem and determine the cause of the error to repair the mobile device. This process is called troubleshooting.
The first step in the troubleshooting process is to identify the problem. Table 12-4 shows a list of open-ended and closed-ended questions to ask the customer for mobile device operating systems and on Linux and macOS.
Table 12-4 Step 1: Identify the Problem
Open-Ended Questions |
Closed-Ended Questions |
Mobile Device Operating Systems |
|
What is the problem you are experiencing? What is the version of the mobile OS that are you using? What is your service provider? What apps have you installed recently? |
Has this problem happened before? Has anyone else used the mobile device? Is your mobile device under warranty? Have you modified the operating system on the mobile device? Have you installed any apps from an unapproved source? Does the mobile device connect to the Internet? |
Linux or macOS |
|
What is the problem you are experiencing? What are the make and model of your computer? What version of Linux or macOS is your computer running? What programs or drivers have you installed recently? What OS updates have you installed recently? What system configurations have you changed recently? |
Has this problem happened before? Has anyone else used the computer? Is your computer under warranty? Does the computer connect to the Internet? |
Establish a Theory of Probable Cause (12.4.1.3)
After you have talked to the customer, you can establish a theory of probable cause. Table 12-5 shows a list of some common probable causes for problems with mobile device operating systems, Linux, and macOS.
Table 12-5 Step 2: Establish a Theory of Probable Cause
Common Causes of Linux or macOS Problems |
Common Causes of Mobile Device Operating System Problems |
|
|
Test the Theory to Determine the Cause (12.4.1.4)
After you have developed some theories about what is wrong, test your theories to determine the cause of the problem. When the theory is confirmed, you can determine the steps to resolve the problem. Table 12-6 shows a list of quick procedures that can determine the exact cause of the problem or even correct the problem. If a quick procedure corrects the problem, you can then verify full system functionality. If a quick procedure does not correct the problem, you might need to research the problem further to establish the exact cause.
Table 12-6 Step 3: Test the Theory to Determine the Cause
Common Steps to Determine the Cause of a Linux or macOS Problem |
Common Steps to Determine the Cause of a Mobile Device Operating System Problem |
|
|
Establish a Plan of Action to Resolve the Problem and Implement the Solution (12.4.1.5)
When you have determined the exact cause of a problem, establish a plan of action to resolve the problem and implement the solution. Table 12-7 shows some sources you can use to gather additional information to resolve an issue.
Table 12-7 Step 4: Establish a Plan of Action to Resolve the Problem and Implement the Solution
If no solution is achieved in the previous step, further research is needed to implement the solution, using these sources |
|
Verify Full System Functionality and, if Applicable, Implement Preventive Measures (12.4.1.6)
After you have corrected the problem, you verify full functionality and, if applicable, implement preventive measures. Table 12-8 shows a list of the steps to verify the solution.
Table 12-8 Step 5: Verify Full System Functionality and, if Applicable, Implement Preventive Measures
Verify Solution and Full System Functionality for Linux and macOS |
Verify Solution and Full System Functionality for Mobile Device Operating Systems |
|
|
Document Findings, Actions, and Outcomes (12.4.1.7)
In the final step of the troubleshooting process, you must document your findings, actions, and outcomes. Table 12-9 lists the tasks required to document the problem and the solution.
Table 12-9 Step 6: Document Findings, Actions, and Outcomes
Document your findings, actions, and outcomes |
|
Common Problems and Solutions for Other Operating Systems (12.4.2)
To identify and implement solutions to mobile device operating systems, you need to know and understand features of mobile device operating system. This section will help you identify common issues related to mobile devices and their operation.
Common Problems and Solutions for Mobile Operating Systems (12.4.2.1)
Table 12-10 outlines how you can use the first step of the troubleshooting process (identify the problem) to determine possible solutions to common problems for mobile operating systems.
Table 12-10 Common Problems and Solutions for Mobile Operating Systems
Identify the Problem |
Probable Causes |
Possible Solutions |
The mobile device will not connect to the Internet. |
Wi-Fi is turned off. |
Turn on Wi-Fi. |
Wi-Fi settings are incorrect. |
Reconfigure the Wi-Fi settings. |
|
Airplane mode is turned on. |
Turn off Airplane mode. |
|
An app fails to respond. |
The app does not work correctly. |
Force the app to close. |
The app failed to close. |
Restart the mobile device. |
|
Memory is low. |
Reinstall the app. |
|
Remove and reinsert the battery, if possible. |
||
Reset the mobile device. |
||
The mobile device is out of storage space. |
Remove unnecessary files. |
|
Uninstall unnecessary apps. |
||
The mobile device fails to respond. |
The operating system has encountered an error. |
Restart the mobile device. |
An app has caused the operating system to become unresponsive. |
Remove and reinsert the battery, if possible. |
|
An app has caused the operating system to become unresponsive. |
Reset the mobile device. |
|
The mobile device’s memory is low. |
Insert a memory card or replace the memory card with a larger one, if possible. |
|
The mobile device is out of storage space. |
Remove unnecessary files. |
|
Uninstall unnecessary apps. |
||
The mobile device cannot send or receive email. |
The mobile device is not connected to the Internet. |
Connect the device to a Wi-Fi or cellular data network. |
The email account settings are incorrect. |
Reconfigure the email account settings. |
|
The mobile device cannot install additional apps or save photos. |
The mobile device is out of storage space. |
Insert a memory card or replace the memory card with a larger one, if possible. |
Remove unnecessary files. |
||
Uninstall unnecessary apps. |
||
A mobile device cannot connect or pair with a Bluetooth device. |
Bluetooth is not enabled on the mobile device. |
Enable Bluetooth on the mobile device. |
The Bluetooth device is out of range of the mobile device. |
Move the Bluetooth device within range of the mobile device. |
|
The Bluetooth device is not turned on. |
Turn on the Bluetooth device. |
|
The PIN code is incorrect. |
Enter the correct PIN code. |
|
The mobile device’s display looks dim. |
Brightness is set too low in the display settings. |
Increase the brightness in the display settings. |
Auto-brightness does not work well in well-lit areas. |
Turn off auto-brightness. |
|
Auto-brightness is not calibrated correctly. |
Recalibrate the light sensor. |
|
The mobile device cannot broadcast to an external monitor. |
No wireless display-capable device is available. |
Install a wireless display-capable device or turn it on if there is one available. |
Miracast, Wi-Fi, AirPlay, or other wireless display technology is not enabled. |
Enable the wireless display capability. |
|
The mobile device is exhibiting slow performance. |
A GPS application is running. |
Turn off the GPS or close the GPS application. |
One or more power-intensive apps is running. |
Close all unnecessary apps. |
|
The mobile device’s memory is low. |
Restart the device. |
|
The mobile device is unable to decrypt email. |
The email client is not set up to decrypt email. |
Configure the email client to decrypt encrypted email. |
The decryption key is incorrect. |
Attain the decryption key from the sender of the encrypted email. |
|
The mobile device operating system has frozen. |
An app is not compatible with the device. |
Uninstall the incompatible app. |
Network connectivity is poor. |
Move to an area with better network coverage. |
|
The device has failing hardware. |
Replace any failing hardware. |
|
The mobile device has no sound coming from the speakers. |
The volume of the device is set too low in the audio settings or in an app. |
Turn up the volume in the audio settings or in the app. |
The volume is muted. |
Unmute the volume. |
|
The speaker has failed. |
Replace the speaker. |
|
The mobile device’s touchscreen has inaccurate response. |
The touchscreen is not calibrated in the display settings or in an app. |
Recalibrate the touchscreen in the display settings or in the app. |
The touchscreen is dirty. |
Clean the touchscreen. |
|
The touchscreen is shorting out due to damage or water. |
Replace the touchscreen. |
Common Problems and Solutions for Mobile OS Security (12.4.2.2)
Table 12-11 outlines how you can use the first step of the troubleshooting process (identify the problem) to determine possible solutions to common problems for mobile operating system security.
Table 12-11 Common Problems and Solutions for Mobile Operating System Security
Identify the Problem |
Probable Causes |
Possible Solutions |
A mobile device has a weak signal, or the signal has been dropped. |
There are not enough cell towers in the area. |
Move to a more populated area that has more cell towers. |
The area is between coverage areas of the carrier. |
Move to an area within the range of the carrier. |
|
The building that you are in is blocking the signal. |
Relocate to a different area in the building or outside. |
|
Your grip on the mobile device is blocking the signal. |
Change your grip on the device. |
|
The power of a mobile device is draining more quickly than normal. |
The device is roaming between cell towers or areas of coverage. |
Move to an area within the range of the carrier. |
The display is set to a high level of brightness. |
Set the display to a lower brightness level. |
|
An app is using too many resources. |
Close any unnecessary apps. |
|
Too many radios are in use. |
Turn off any unnecessary radios. |
|
Reboot the device. |
||
A mobile device has slow data speeds. |
The connected cell tower is too far away for high-speed data. |
Move closer to a cell tower. |
The mobile device is roaming. |
Move to an area within the range of the carrier. |
|
Data transmission has gone over the usage limit for a device. |
Raise the data limit of the device. |
|
The device is experiencing high resource utilization. |
Turn off data usage for the device. |
|
Close any unnecessary apps. |
||
Restart the device. |
||
A mobile device connects to a Wi-Fi network unintentionally. |
The device is set to automatically connect to unknown Wi-Fi networks. |
Set the device so that it will only connect to known Wi-Fi networks. |
A mobile device pairs to a Bluetooth device unintentionally. |
The device is set to automatically pair with unknown devices. |
Set the device to turn off Bluetooth pairing by default. |
Turn off Bluetooth. |
||
A mobile device has leaked personal files and data. |
The device has been lost or stolen. |
Remote lock or wipe the device. |
The device has been compromised by malware. |
Scan for and remove malware from the device. |
|
A mobile device’s account has been accessed by unauthorized personnel. |
Credentials are being stored by default. |
Set the device to not store credentials by default. |
No VPN is being used. |
Use a VPN connection. |
|
No passcode is set on the device. |
Set a passcode on the device. |
|
The passcode on the device has been discovered. |
Change the passcode to a stronger one. |
|
The device has been compromised by malware. |
Scan for and remove malware from the device. |
|
The provider database that stores the account credentials has been compromised. |
The provider needs to tighten security measures. |
|
An app has achieved unauthorized access to root. |
The device has been compromised by malware. |
Scan for and remove malware from the device. |
A mobile device is being tracked without permission. |
The GPS is on but is not in use by any apps. |
Turn off the GPS when not in use. |
An app allows connection to the GPS. |
Shut down or remove any unwanted apps that allow connection to the GPS. |
|
The device has been compromised by malware. |
Scan for and remove malware from the device. |
|
A mobile device camera or microphone is being accessed without permission. |
An app allows connection to the camera or microphone. |
Shut down or remove any unwanted apps that allow connection to the camera or microphone. |
The device has been compromised by malware. |
Scan for and remove malware from the device. |
Common Problems and Solutions for Linux and macOS Operating Systems (12.4.2.3)
Table 12-12 outlines how you can use the first step of the troubleshooting process (identify the problem) to determine possible solutions to common problems for Linux and macOS operating systems.
Table 12-12 Common Problems and Solutions for Linux and macOS Operating Systems
Identify the Problem |
Probable Causes |
Possible Solutions |
The automatic backup operation does not start. |
Time Machine is turned off in macOS. |
Turn on Time Machine in macOS. |
Déjà Dup is turned off in Linux. |
Turn on Déjà Dup in Linux. |
|
The directory appears to be empty. |
The directory is the mount point for another disk or partition. |
Remount the disk using the correct directory with Disk Utility for macOS. |
Remount the disk using the correct directory with Disks for Linux. |
||
The files were accidentally deleted. |
Restore the deleted files from backup by using Time Machine or Déjà Dup. |
|
The files are hidden. |
Use the Show Hidden Files option in the file browser. |
|
An application stops responding in macOS. |
The application has stopped working. |
Use Force Quit to kill the application. |
The application was using a resource that became unavailable. |
Use Force Quit to kill the application. |
|
Wi-Fi is not accessible using Ubuntu. |
The wireless NIC driver was not installed correctly. |
Install the Linux driver from the manufacturer’s website, if available. |
Install the Linux driver from the Ubuntu repositories, if available. |
||
Check the Linux distribution’s hardware compatibility list for the wireless card. |
||
macOS cannot read the remote optical disc using Remote Disc. |
The Mac already has an optical drive installed. |
Place the media in the local optical drive. |
The option to request permission to use the optical drive has been enabled. |
Accept the request for permission to use the drive. |
|
Linux fails to boot and you receive a “Missing GRUB” or “Missing LILO” message. |
GRUB or LILO has been corrupted. |
Run Linux from the installation media, open a terminal, and install the boot manager with the command sudo grub-install or sudo lilo-install. |
GRUB or LILO has been deleted. |
||
Linux or Mac OS freezes on startup and exhibits kernel panic where there is a stop screen. |
A driver has become corrupted. |
Update all device drivers from the manufacturer’s website. |
Hardware is failing. |
Replace any failing hardware. |
12.4.2.4 Lab - Troubleshoot Mobile Devices
![]()
In this lab, you will learn how to troubleshoot mobile devices.
Summary (12.5)
In this chapter, you learned that, like desktops and laptops, mobile devices use operating systems to interface with the hardware and to run software. The two most commonly used mobile operating systems are Android and iOS. You learned that Android is an open source operating system that is customizable, while iOS is closed source and cannot be modified or redistributed without permission from Apple. Both platforms use apps to provide functionality. You worked with both the Android and iOS operating systems as part of lab exercises.
Mobile devices are easily lost or stolen. Therefore, as an IT professional, you need to be familiar with mobile security features such as screen locks, biometric authentication, remote lock and remote wipe, and patching and upgrading. You learned that mobile devices can be unlocked using facial recognition, fingerprints, passcodes, and swipe patterns. You also learned that mobile OSs can be configured to disable access if too many failed login attempts are made to prevent someone from trying to guess a passcode. Another measure of security is provided by remote lock and remote wipe for devices that have been lost or stolen. These features allow the device to be remotely erased or locked to prevent data on the device from being compromised. You configured passcode locks on a mobile device in a lab.
You learned about the Linux and macOS operating systems and some of the differences between them. Linux supports the ext3, ext4, FAT, and NFS file systems, and macOS supports HFS and APFS. Also, macOS includes a backup tool called Time Machine, and Linux does not have a built-in backup tool. Another major difference between macOS and Linux is that the Linux GUI can be easily replaced by the user.
It is important to not only learn about other operating systems but to build hands-on skills. In this chapter, you worked through a lab to install Linux in a virtual machine and explore the GUI.
Finally, you learned the six steps in the troubleshooting process as they are applied to mobile, Linux, and macOS operating systems.
Practice
The following activities provide practice with the topics introduced in this chapter. The labs are available in the companion IT Essentials v7 Labs & Study Guide (ISBN 9780135612033).
Labs
![]()
12.1.2.2 Lab - Working with Android
12.1.3.2 Lab - Working with iOS
12.1.4.4 Lab - Mobile Device Features
12.2.1.2 Lab - Passcode Locks
Check Your Understanding Questions
Complete all the review questions listed here to test your understanding of the topics and concepts in this chapter. The appendix “Answers to ‘Check Your Understanding’ Questions” lists the answers.
1. Which feature of an Android or iOS mobile device helps prevent malicious programs from infecting the device?
The phone carrier prevents the mobile device app from accessing some smartphone features and programs.
The passcode restricts the mobile device app from accessing other programs.
Mobile device apps are run in a sandbox that isolates them from other resources.
The remote lock feature prevents malicious programs from infecting the device.
2. Which of the following are features of the Android operating system? (Choose two.)
Android is open source and allows anyone to contribute to its development and evolution.
Android has been implemented on devices such as cameras, smart TVs, and e-book readers.
All available Android applications have been tested and approved by Google to run on the open source operating system.
Each implementation of Android requires a royalty to be paid to Google.
Android applications can only be downloaded from Google Play.
3. Which of the following tasks can be done with an iOS device’s Home button? (Choose two.)
wake the device
respond to an alert
display the navigation icons
return to the home screen
open audio controls
place apps into folders
4. Which of the following are types of cloud-enabled services for mobile devices? (Choose two.)
locator apps
remote backup
passcode configuration
screen calibration
screen app locking
5. A company is creating a new website to be hosted on a Linux server. The system administrator creates the group webteam and assigns team members to it. The administrator then creates the directory webpages for storing files. Later that day, one of the team members reports being unable to create files in the webpages directory or subdirectories. The administrator uses the ls -l command to view the file permissions. The result displayed is drwxr-xr--. What should the administrator do to allow the team members to add and edit files?
Add the user to the webteam group.
Issue the command chmod 775 –R webteam.
Issue the command chmod 775 –R webpages.
Make the user the owner of the directory and subdirectories.
6. Which of the following terms describe unlocking Android and iOS mobile devices to allow users full access to the file system and full access to the kernel module? (Choose two.)
patching
rooting
remote wipe
sandboxing
jailbreaking
7. A person with an Android mobile device holds down the power button and the volume down button until the device turns off. The person then turns the device back on. What is this person doing to the device?
a normal power off
a factory reset
a full backup to iCloud
a standard reset of the device
an operating system update
8. True or false: Android and OS X are based on the Unix operating system.
True
False
9. Which of the following methods can be used to unlock a smartphone? (Choose three.)
NFC
passcode
encryption
swipe pattern
QR code scan
biometric information
10. A user taps the Recent Apps icon on an Android-based smartphone to see a list of recently used apps. What should the user do to remove an app from the list?
Swipe the app up.
Double-tap on the app.
Swipe the app down.
Swipe the app to either side.
11. A user has an iOS device. What will happen if the user forgets the passcode to unlock the device?
The user must call Apple to reset the passcode.
The user can visit the Apple website to initiate a passcode reset request.
The user must perform a full restore from a backup saved in iTunes or iCloud.
The user can use the Find My iPhone service on the website www.icloud.com to reset the passcode.
12. Which Linux CLI command removes files?
rm
man
ls
cd
mkdir
moves
13. Which of the following location-specific services can the GPS feature on a mobile device offer? (Choose two.)
playing local songs
delivering local advertising
displaying local weather information
planning a route between two locations
displaying a map of a destination city while driving
14. A system administrator is using the crontab command to edit an entry on a Linux server. What is the administrator doing?
editing a shell script to run when the server starts
installing the new BIOS update when it is available
scheduling a task to run at a specific time and date
deleting caches and cookies after the web browser closes
15. Which of the following preventive maintenance tasks should be scheduled to occur automatically? (Choose two.)
executing a backup
scanning the signature files
updating the operating system software
resetting devices by applying the factory reset feature
checking the disks for bad sectors