Chapter 10. InfoPath Form Web Part
In This Chapter
• Add an InfoPath Form Web Part to a SharePoint Web Part Page
• Create a Master/Detail Display Form For SharePoint Lists
• Use the Edit Form on the List Page
• Create a Custom List Page That Displays the List Item Form
This chapter explores the use of the InfoPath Form web part, which is available in SharePoint 2010. The InfoPath Form web part enables you to display an InfoPath form designed for SharePoint. Because it is a web part, you may use it to connect and send data between other web parts.
Combining this functionality with list forms and list web parts opens the door for producing and providing extensive functionality within SharePoint. Use the concepts in this chapter to further expand your portal environment.
Add an InfoPath Form Web Part to a SharePoint Web Part Page
To add and configure an InfoPath Form web part on a SharePoint web part page, follow these steps:
- Navigate to the SharePoint page and select Edit Page from the ribbon bar. (Or create a new web part page.)
- Click Add a Web Part in the zone where you want the InfoPath Form web part.
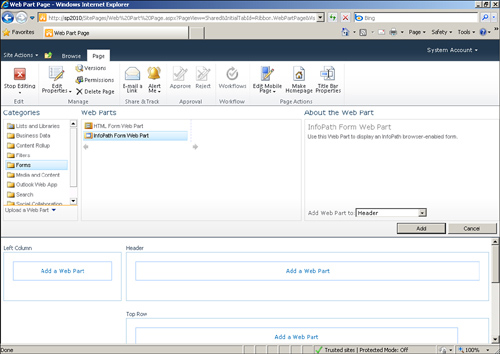
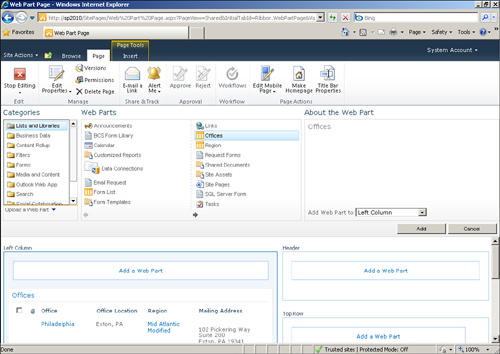
- Select the Forms category and select InfoPath Form Web Part, as shown in Figure 10.1. Click Add to add it to the selected zone.
Figure 10.1. Selecting InfoPath Form Web Part allows you to add it to your page.
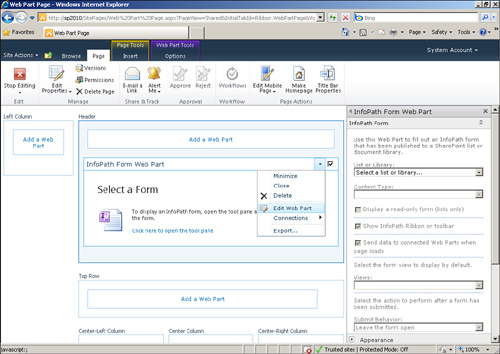
- From the web part item menu, select Edit Web Part, as shown in Figure 10.2, to open the tool pane.
Figure 10.2. Editing the web part opens the tool pane.
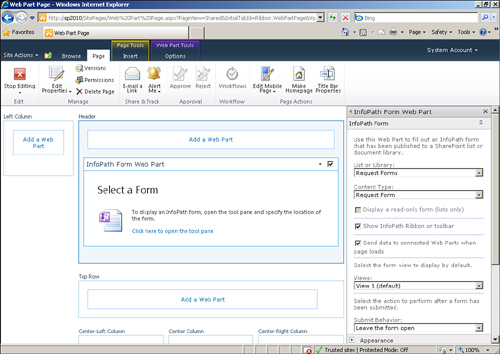
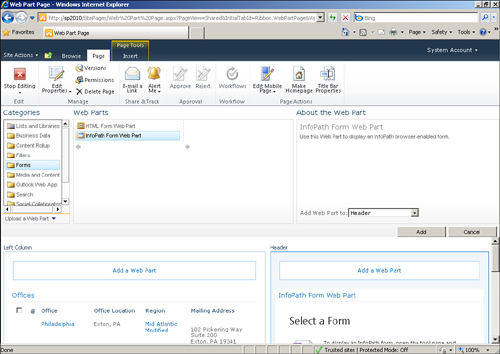
- In the web part tool pane, select the form library that contains the form you want to display. Make sure your form is selected in the Content Type drop-down, as shown in Figure 10.3.
Figure 10.3. Selecting the library and content type configures the form to be displayed.
- Click OK in the web part tool pane.
- Click Stop Editing on the ribbon bar to save the page.
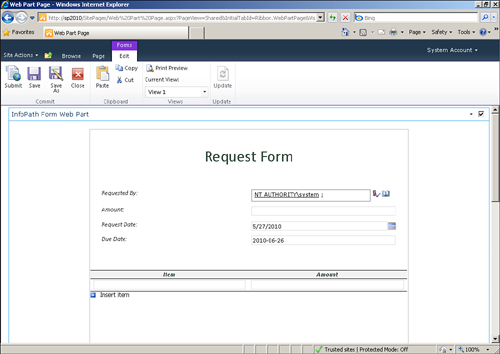
Browsing the page displays the InfoPath form on the page itself. Clicking the Edit tab in the ribbon bar displays the InfoPath commands to the user, as shown in Figure 10.4.
Figure 10.4. Clicking the Edit tab displays the InfoPath commands available for the form.
Tip
The same steps can be used for a wiki page. Simply select the Web Part button from the Insert ribbon bar menu for step 2.
Create a Master/Detail Display Form for SharePoint Lists
Revisiting the Office and Region lists from Chapter 9, “Using Data in SharePoint Forms,” each Office entry has a region selection that is a lookup to the Region list. Therefore, you can modify the display form for the Region list such that the corresponding offices are shown on the same page.
To accomplish this, navigate to the parent list and follow these steps:
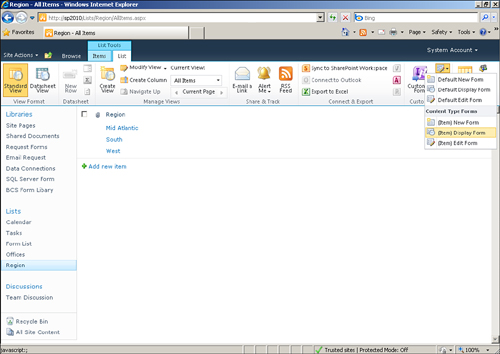
- From the List ribbon bar select the Modify Form Web Parts button and select (Item) Display Form, as shown in Figure 10.5, to edit the display form page. The display form is presented in edit mode.
Figure 10.5. Clicking Modify Form Web Parts allows you to edit the form pages.
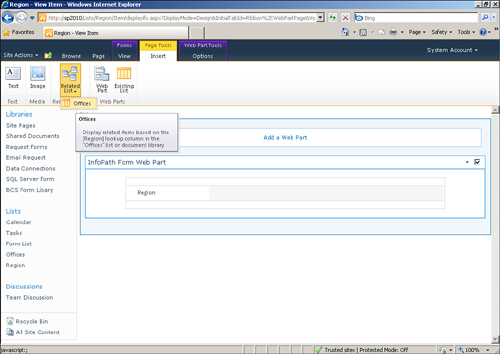
- From the Insert ribbon bar, select Related List and click the related list to insert the details onto the display form page, as shown in Figure 10.6.
Figure 10.6. Inserting a related list adds the details to the display form page.
- On the Page ribbon bar, click Stop Editing to save your changes.
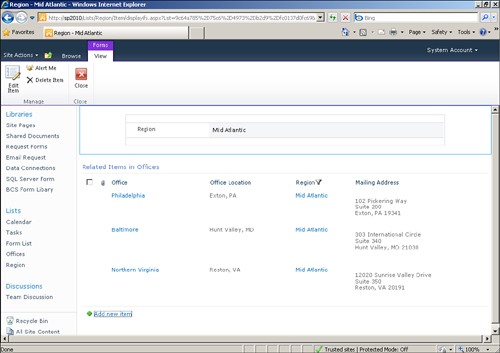
- Back in the Regions list, clicking a region opens the display form and shows the related offices, as shown in Figure 10.7.
Figure 10.7. Viewing a region item displays the related offices.
Tip
If you don’t want the lookup column to be displayed (because it shows the same entry for each item), you can create a new view in the related list that doesn’t show the lookup column and edit the related list web part to use that view.
Use the Edit Form on the List Page
The InfoPath Form web part can be leveraged to modify the standard list pages to customize the user experience with the list. To accomplish this implementation, follow these steps:
- Navigate to the list you want to modify.
- From the Site Actions menu, select Edit Page.
- Click Add Web Part on the page and select the InfoPath Form Web Part. Click Add.
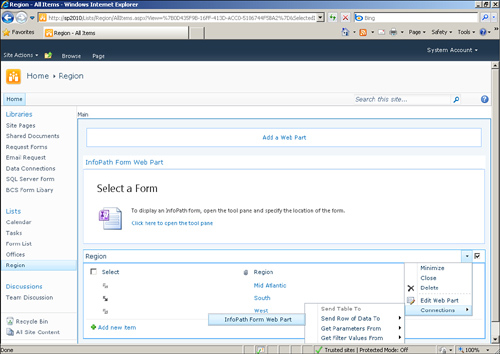
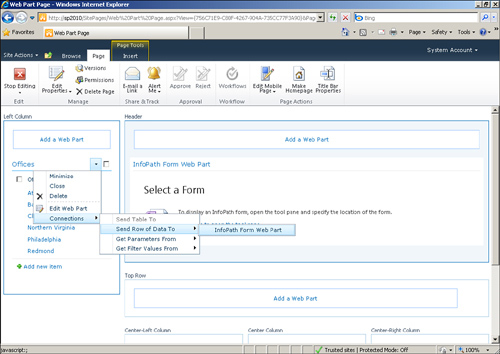
- From the list web part on the page, select Connections, Send Row of Data To, InfoPath Form Web Part, as shown in Figure 10.8, to create the connection between the two web parts.
Figure 10.8. Sending the row of data to the InfoPath Form web part creates a connection.
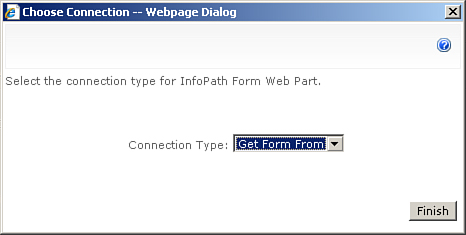
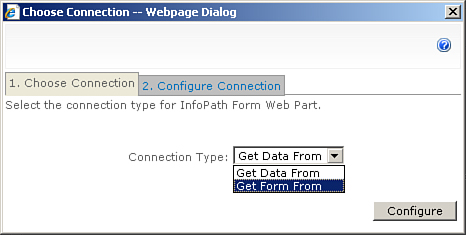
- In the Choose Connection dialog, select Get Form From, as shown in Figure 10.9. The InfoPath Form web part will receive the edit form from the list web part. Click Finish.
Figure 10.9. Selecting Get Form From allows the InfoPath Form web part to receive the form from the list web part.
- Move the InfoPath Form web part below the list web part by dragging it below the list web part, as shown in Figure 10.10.
Figure 10.10. Dragging the InfoPath Form web part moves it below the list web part.
- On the Page ribbon bar, click Stop Editing to save the changes.
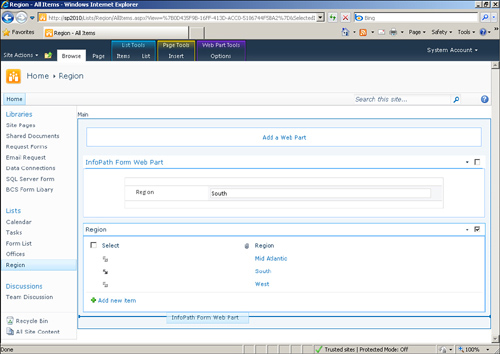
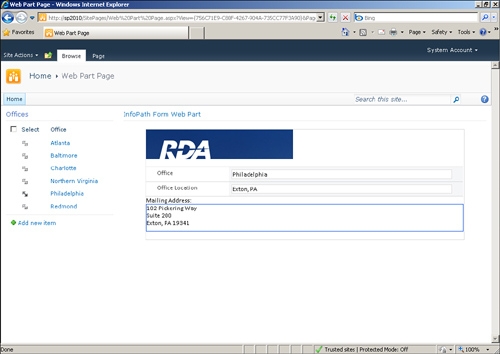
In browse mode, selecting a list item’s double-sided arrow icon displays the InfoPath edit form on the same page, as shown in Figure 10.11. Users may modify the entry right on the list page.
Figure 10.11. Selecting a list item displays the Edit Form for that item on the same page.
Note
Users who do not have permissions on the list items will not be able to submit any changes. The edit form will still show on the page and appear to be editable, but an error message will appear if the user attempts to save a modification.
Create a Custom List Page That Displays the List Item Form
Modifying the list page in the previous example is neat, but you might not want to do that on the actual list page. Instead, you may want to create a custom list page that performs similar functionality.
To create a custom list page, follow these steps:
- Create a new view for your list that only displays the main column (for example, Office).
- Create a new web part page in your SharePoint site using a template that has a left column.
- Click Add Web Part in the left column zone and select the list from the Library and Lists category, as shown in Figure 10.12, to add the list web part onto the page. Click Add.
Figure 10.12. Selecting the list web part adds the web part to the page.
- Click Add Web Part in the right or header column zone and select InfoPath Form Web Part, as shown in Figure 10.13, to add the InfoPath Form web part onto the page. Click Add.
Figure 10.13. Selecting InfoPath Form Web Parts adds the web part to the page.
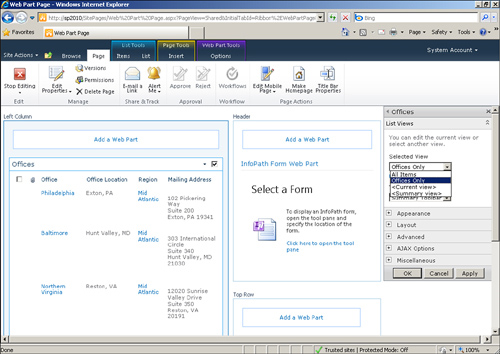
- Select Edit Web Part from the list web part item menu. The web part tool pane appears.
- In the web part tool pane, change the view to the main column view, as shown in Figure 10.14, such that only the main column is displayed in the list web part. Click OK.
Figure 10.14. Changing the view determines what is displayed in the list web part.
- From the list web part on the page, select Connections, Send Row of Data To, InfoPath Form Web Part, as shown in Figure 10.15, to create the connection between the two web parts.
Figure 10.15. Sending the row of data to the InfoPath Form web part creates a connection.
- In the Choose Connection dialog, select Get Form From, as shown in Figure 10.16. The InfoPath Form web part will receive the edit form from the list web part. Click Finish.
Figure 10.16. Selecting Get Form From allows the InfoPath Form web part to receive the form from the list web part.
- Click Stop Editing on the Page ribbon bar.
- Selecting an item from the list displays the list edit form in the InfoPath Form web part on the page, as shown in Figure 10.17.
Figure 10.17. Selecting a list item displays the details on the page.
Tip
Change the Chrome to None on the InfoPath Form web part to hide the web part title or change the title to something more meaningful (for example, Office Details).
Expose Form Fields as Web Part Connection Parameters
There are many opportunities to promote fields as parameters during publishing of the form or creating a “send data to web part” rule action. However, at any time, you may promote fields as web parameters using the form options:
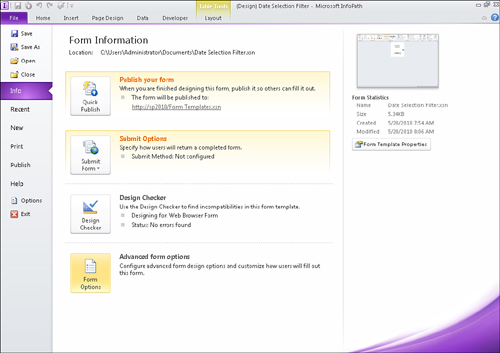
- From File, Info, click the Form Options button, as shown in Figure 10.18, to access the form settings.
Figure 10.18. Clicking Form Options allows you to access the form settings.
- Select the Property Promotion category in the Form Options dialog.
- Click Add in the bottom section and select a field from your form, as shown in Figure 10.19, to use the field as a web part parameter. Select the parameter type and click OK to create the web part parameter.
Figure 10.19. Selecting a field allows you to create the web part parameter.
- All the fields listed in the box will be available for web part usage, as shown in Figure 10.20. Click OK to save the changes.
Figure 10.20. Clicking OK allows all fields listed to be used as web part parameters.
Create a Form to Send Data to Web Parts
With the InfoPath Form web part, you may create forms that are used solely for input purposes and submit the entered data as parameters to other web parts on the page. A simple example of this is using a form to filter items displayed in a list.
First let’s create the form:
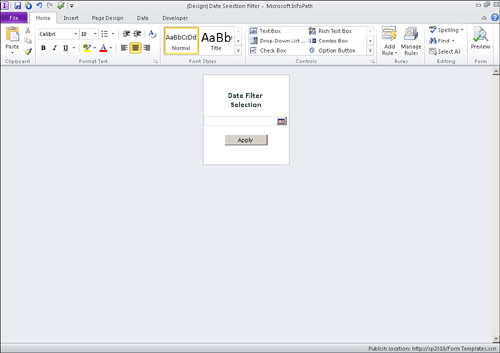
- Create a new form with a date picker control and a button. Name the date field DateSelection and change the button label to Apply. Because this is for a web part, resize the form as shown in Figure 10.21.
Figure 10.21. Resizing the form prepares it for web part usage.
- From File, Info, click the Form Options button.
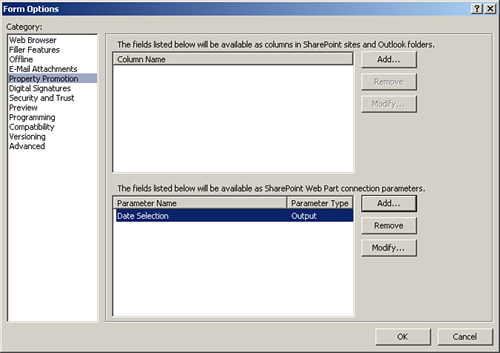
- Select the Property Promotion category in the Form Options dialog.
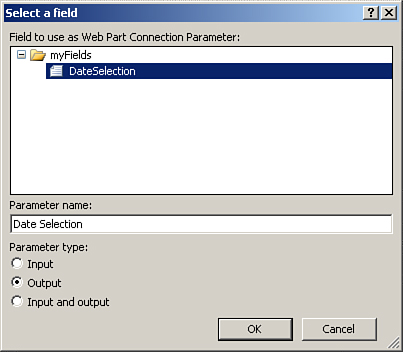
- Click Add in the bottom section and select the Date field from your form. Select Output as the parameter type and click OK to create the web part parameter.
- Click OK in the Form Options dialog.
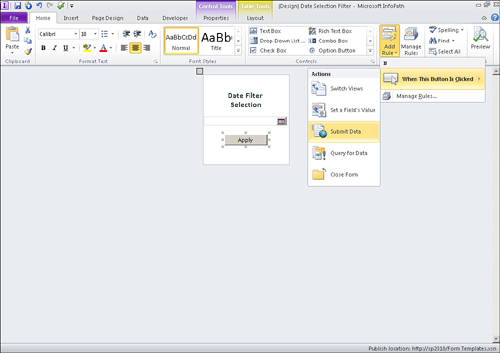
- Select the Apply button and on the ribbon bar select Add Rule, When This Button Is Clicked, Submit Data, as shown in Figure 10.22, to create a new button rule. The Rule Details dialog appears.
Figure 10.22. Clicking Add Rule creates a new button rule.
- In the Rule Details dialog, change the Action to Send Data to Web Part, as shown in Figure 10.23, such that the rule sends the parameters to a connected web part.
Figure 10.23. Changing the action allows the button to send data to a connected web part.

- Optionally, click the Property Promotion button to ensure the Date Selection field is being promoted as a SharePoint web part parameter.
- Click OK.
- Publish the form to a SharePoint library or as a content type. If using a content type, add it to an existing form library.
Now let’s create the page:
- Create a new web part page in your SharePoint site. Use a template that has a left column.
- Add an InfoPath Form web part to the Left Column zone and configure it to use the form you created in the previous steps.
- Add a List View web part to the Body zone of the page by selecting a form library.
- From the InfoPath Form Web Part item menu, select Connections, Send Data To, List Name, as shown in Figure 10.24, to create a web part connection between the web parts. The Choose Connection dialog appears.
Figure 10.24. Sending data to the list web part creates a web part connection.

- We are using the connection as a filter, so in the Choose Connection dialog, click the Configure button.
- Select the Date column from the list web part in the Consumer Field Name, as shown in Figure 10.25, to send the Date Selection as a filter to that field.
Figure 10.25. Selecting the consumer field determines the column that is to be filtered.
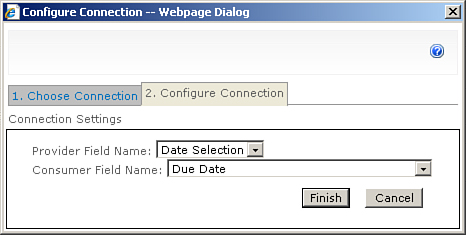
- Click Finish.
- On the Page ribbon bar, click the Stop Editing button.
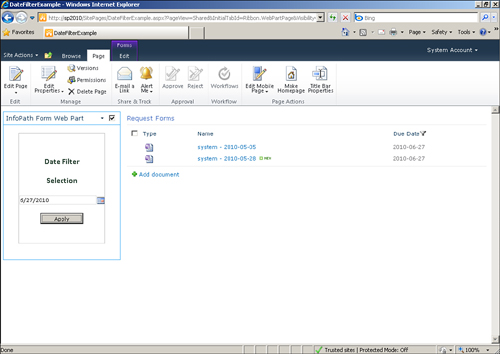
- Enter a date into the form and click Apply. The list shows only (filters) the items with a due date of the entered date, as shown in Figure 10.26.
Figure 10.26. Entering a date and clicking Apply filters the list.