Chapter 16. Leveraging Visual Studio 2010 with InfoPath
This chapter explores several ways to use Visual Studio 2010 with InfoPath. Visual Studio 2010 can be leveraged to create workflows for an InfoPath form as well as to create application-level add-ins.
The creation of Visual Studio workflows and the customization of Office products are broad subjects within themselves, and plenty of resources discuss these topics in great detail. The scenarios in this chapter provide a primer for using Visual Studio 2010 with InfoPath.
Access Your Form Within a Visual Studio Workflow
You may access the form contents within a workflow by creating an object of the form. To create an object, you need to define a class that defines the structure of your form. Luckily, utilities are available to automatically generate this class for you.
First you need the source files of your InfoPath form. There are two ways to accomplish this. One way is to export the source files from InfoPath, and the other is to just extract them from your form template file.
To export the source files of your form, follow these steps:
- Open your form in design mode using InfoPath Designer 2010.
- Click File, Publish.
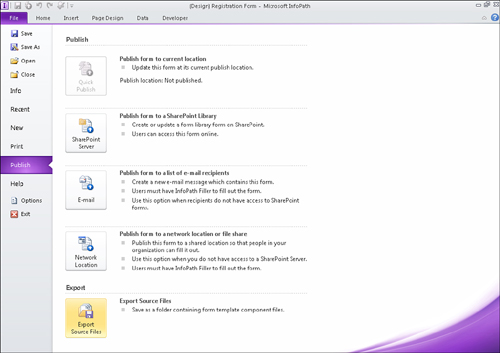
- Click the Export Source Files button, as shown in Figure 16.1. The Browse for Folder dialog appears.
Figure 16.1. Clicking Export Source Files exports your form’s source files to a folder.
- Select a folder location and click OK. The source files are saved to the folder selected.
- Close InfoPath Designer.
Tip
When creating a new folder to save the source files, it is a good idea to include Source Files in the name so you know what it contains (for example, Registration Form Source Files).
To extract the source files right from the form template, follow these steps:
- Navigate to your form template in Windows Explorer.
- Rename the form replacing .xsn with .cab.
- Open the .cab file. The source files are there!
- Select all of the source files.
- Right-click and select Extract. The Select a Destination dialog appears.
- Navigate to the folder where you want to save the files and click Extract. The source files are extracted to the location.
- Rename the form back to .xsn.
The file that you are most interested in is the myschema.xsd file. This contains the XML definition of your form. Using the Visual Studio xsd.exe utility, you can easily generate a class file using myschema.xsd. To do this, follow these steps:
- Open a Visual Studio command prompt. (This can be found under Start, Microsoft Visual Studio 2010, Visual Studio Tools.)
- Navigate to the location of your form source files.
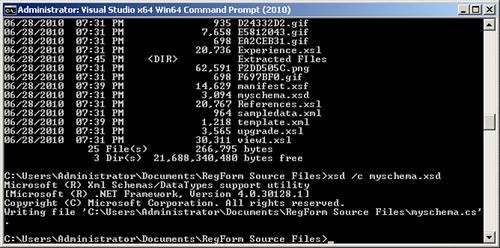
- Type xsd /c myschema.xsd and press Enter, as shown in Figure 16.2.
Figure 16.2. Using the xsd utility generates the class file.
- Back in Windows Explorer, rename the .cs file that was generated to your form name (for example, RegistrationForm.cs).
- Optionally, copy the .cs file into your workflow project folder.
- Add the .cs file to your workflow project, as shown in Figure 16.3.
Figure 16.3. Adding the form .cs file to your project allows you to leverage the form class.
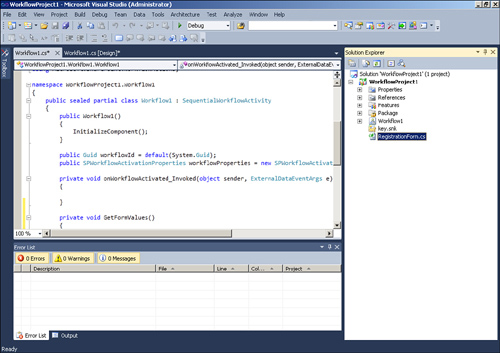
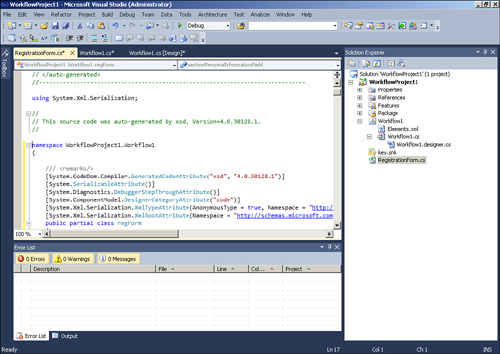
- Copy the namespace from your workflow class file and paste it into your form class file, as shown in Figure 16.4. Your form classes must be in the same namespace to be accessed within the workflow code.
Figure 16.4. Placing the form classes into the workflow namespace allows you to access the objects within the workflow code.
Now the class is part of the workflow project. The next steps and code pertain to the workflow class:
- Open the workflow class file.
- Add the proper using statements as listed in Listing 16.1 at the top of the class. Because access to the form is done through XML serialization, these references need to be made.
- Create a
GetFormValuesmethod, as shown in Listing 16.2.Note
This example assumes that you did not modify the main data source name from myFields to something else, although it is a good idea to rename the main data source to the form name or similar.
Listing 16.1. Using Statements
using System.Xml;
using System.Xml.Serialization;Listing 16.2. GetFormValues
private void GetFormValues()
{
XmlSerializer serializer = new XmlSerializer(typeof(myFields));
XmlTextReader reader = new XmlTextReader(new System.IO.StringReader
(workflowProperties.InitiationData));
myFields registrationForm = (myFields)serializer.Deserialize(reader);
} - Call the
GetFormValues()method from theonWorkflowActivated_Invokedmethod or anywhere else needed in your workflow code.
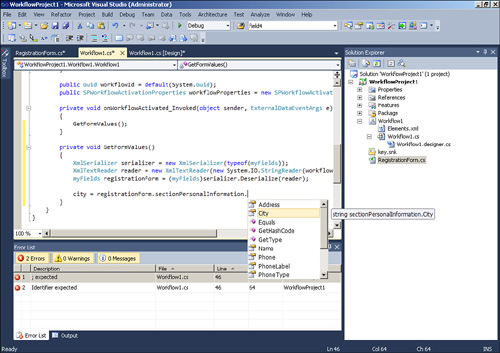
You may now access the form as an object and set class variables to the values the user entered, as shown in Figure 16.5.
Figure 16.5. Serializing the object allows you to access the entered values.
Create an InfoPath 2010 Add-In
You may use Visual Studio 2010 to create an InfoPath 2010 add-in that can be used within InfoPath. The add-in is an application-level add-in that customizes the InfoPath Designer experience. Two common uses of an InfoPath add-in are to customize the ribbon and generate a custom task pane.
To create an InfoPath 2010 add-in, follow these steps:
- Launch Visual Studio 2010.
- Click File, New, Project. The New Project dialog appears.
- Navigate to Office, 2010 from the left-side Installed Templates navigation.
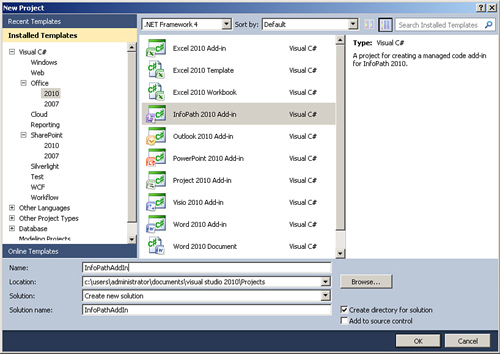
- Select the InfoPath 2010 Add-In project template, as shown in Figure 16.6.
Figure 16.6. Selecting the project template generates an InfoPath 2010 add-in project.
- Click OK.
- Add user controls or classes as appropriate; see the next section for an example.
- Build the add-in project. The add-in is generated.
- Open InfoPath Designer 2010.
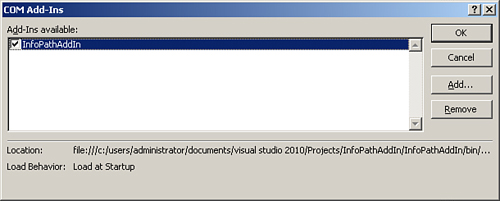
- Click the COM Add-Ins button on the Developer ribbon. The add-in is available and installed, as shown in Figure 16.7
Figure 16.7. Clicking COM Add-Ins shows the available and installed application add-ins.
Create a Custom Task Pane
To create a new task pane, follow the steps for creating a new InfoPath 2010 add-in. Then perform these steps:
- Add a user control to your project.
- Add windows controls to your user control as needed. In this example, a user control named CustomTaskPaneControl is used.
- Add any code to handle options or selections.
- In the ThisAddIn class, add private variables to handle the user control and custom task pane, as shown in Listing 16.3.
- In the startup method of the ThisAddIn class, add code to instantiate the user control as a custom task pane, as shown in Listing 16.4.
Listing 16.3. Private Declarations
private CustomTaskPaneControl customTaskPaneControl;
private Microsoft.Office.Tools.CustomTaskPane customTaskPane;Listing 16.4. Custom Task Pane Instantiation
customTaskPaneControl = new CustomTaskPaneControl();
customTaskPane = this.CustomTaskPanes.Add(customTaskPaneControl, "Custom
Task Pane");
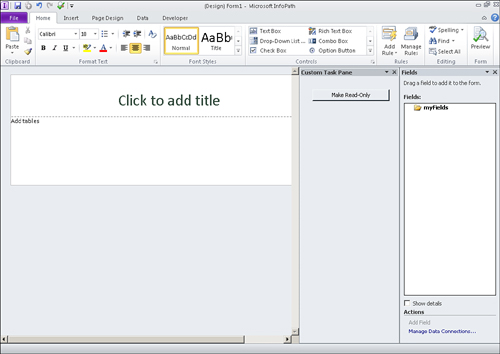
customTaskPane.Visible = true; - Build the project, and then launch InfoPath Designer 2010. The custom task pane appears as shown in Figure 16.8.
Figure 16.8. Building a custom task pane add-in displays the user control in InfoPath.