
Space Explorer
The Space Explorer graphical utility is used to create, modify, delete, and manage the dbspaces and chunks that comprise the database. It has the capability of adding or dropping dbspaces, creating mirrored dbspaces, and adding or deleting storage to existing dbspaces. One of the things that it does not do is create temporary dbspaces. You can create a dbspace to be used for temporary space in this GUI, but it will not be a proper, nonlogging tempspace. To create it properly, you need to create the space using the onspaces utility. You can then add chunks to it through the GUI.

When you first enter the utility, you can choose your server either from the drop-down list box underneath the menu or by clicking on the appropriate icon in the left-hand frame. Once you've chosen the server, you can then click on any of the dbspaces listed.
This will open a screen that shows you the number of chunks in that dbspace and the size of each one. By using the menu, you can change the view from large icons to medium-sized icons to a text list, in standard Windows 95 fashion.

Space Explorer, like the Command Center application, uses the srv_agent socket defined in the setup icon of Command Center. If the server agent is not running on the server, Space Explorer cannot see that server,
The first button on the toolbar creates a new dbspace and gives you the opportunity to either mirror or not mirror the space. Unlike UNIX, the space for a new chunk does not have to be predefined before adding it. You can simply give it a name, a primary storage location, a size, and any mirroring information. The GUI will check for enough disk space, create the file housing the chunk, and initialize it for you. By the way, this process is immensely faster than under UNIX. Creating a 2-gigabyte dbspace under UNIX may take 5 or 10 minutes. On NT, it is done in a matter of seconds.
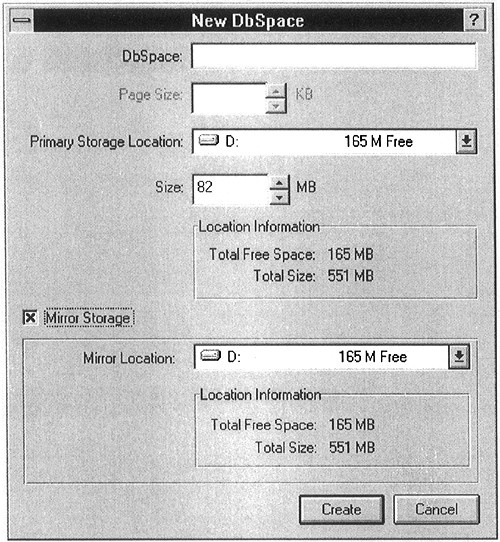
When the user clicks on one of the drop-down list boxes for either primary or mirror storage locations, only those disks which have an NTFS filesystem will be listed. This is a cause of frequent confusion when the user knows he has multiple disk drives and can see only one or two.
The second button creates a blobspace for the storage of blob data. Blobspaces are specialized dbspaces that can hold binary or other nontraditional data. Blob usage is a somewhat specialized area and will not be covered in this book.

The third button allows the user to add storage to an existing dbspace. There is a maximum size for any chunk of 2 gigabytes. Informix cannot address any file directly that is larger than 2 gigabytes. This size limit also includes any file offsets that the user may specify in creating the chunks. The total of offset + chunksize needs to be less than 2 gigabytes. Note also that the GUI does not handle file offsets. If you need to specify an offset for the chunk, you'll need to use the character-based onspaces utility and create the chunks manually.
In the initial dbspace creation, the user has the option of specifying mirroring. If the user decides later to mirror the chunk, it can be done with the GUI, but there is no toolbar button for it. It's done by choosing Space from the menu and then choosing Enable Mirroring. The following screen comes up and allows the user to specify the name, location, and size of the mirror dbspace.
