
HTTPS with Apache Tomcat
As we know, SSL connections provide a secure pipe over an insecure network, incorporating server authentication, data integrity, confidentiality, and optionally, client authentication. In fact, SSL was developed to address the security concerns regarding use of the Internet for conducting e-commerce transactions.
URLs starting with https:// imply HTTP connection over SSL. Under the hood, though, both client and server must support HTTPS for this to work. Tomcat supports HTTPS, but by default, this support is disabled. You need to do some planning and edit the configuration file server.xml to setup Tomcat to accept HTTPS connections and serve Web pages corresponding to https URLs.
In the rest of this section, we go through the steps in enabling our Tomcat installation for serving https URLs and accessing these URLs with a Web browser.
Recall from Chapter 6, Securing the Wire, that SSL setup requires the server to have a X.509 certificate and the corresponding private key so that the server can authenticate itself to the clients. Also, the server can be set up to require certificate-based client authentication by demanding a X.509 certificate and prove the possession of the corresponding private key. SSL setup for Apache Tomcat follows the same pattern.
Setup for Server Authentication
Let us begin by setting up Tomcat for SSL-based server authentication. It is important to keep in mind that although Tomcat can be configured for both SSL-based server and client authentication, a vast majority of SSL enabled sites do server authentication only and rely on a password-based authentication mechanism for the client authentication. The rationale for certificate-based server authentication is that the user can be reasonably sure that the website accessed by a particular URL is indeed being served by the legitimate owner of the domain name indicated in the URL.
Setup for server authentication involves two main steps:
1. | Acquire a CA signed server certificate. This step consists of a number of substeps: generate a self-signed certificate with a common name same as the fully qualified domain name of the site, create a CSR (Certificate Signing Request) from this; arrange with a CA to get a CA signed X.509 certificate based on the CSR; and import it into the keystore. |
2. | Edit the confserver.xml file, un-commenting the configuration element for HTTPS Connector and setting the appropriate attributes so that Tomcat can access the private key and the certificate. |
We have already gone through the process of generating a key pair using J2SE utility keytool and issuing a X.509 with JSTK utility certtool in Chapter 4, PKI with Java. For the current setup, the only thing to keep in mind is that you should specify the complete name of the server used in a URL (such as localhost or www.pankaj-k.net or 192.168.1.101) as the CN of the distinguished name while generating the key pair with keytool. Also, recall the discussion around validity of certificates: a certificate obtained through certtool is okay for development purposes but not for authenticating a server on the Internet. For that you should obtain the certificate from a reputable CA. A reputable CA arranges to include its public key in the major Web browsers, but the same is not true for the public key of certtool-based CA. However, if you can arrange so that your users take the public key of the CA from you then certtool-based CA will work fine.
At this point, it is worth mentioning that you don't need a CA signed certificate if all you are doing is just experimenting on your own machine—you could simply use a self-signed certificate. For our illustration here, though, we setup a certtool-based CA and sign the certificates. This will be closer to the production situation. Who knows, you may even decide to be your own CA and use certtool to sign certificates.
Without getting into the details, let us recap the main steps in getting a CA signed X.509 server certificate. These steps assume that you have a fresh installation of the JSTK software and you are working from its home directory.
Now we have a CA signed certificate in our server.ks keystore. Copy this file to the home directory of Apache Tomcat. Strictly speaking, having the server keystore in Tomcat's home directory is not a must. You can have this keystore in any directory but then you must specify the full pathname of the keystore file in the Tomcat configuration file server.xml.
We are ready to edit the configuration file server.xml. Identify the portion with the following text:
<!--
<Connector className="org.apache.coyote.tomcat4.CoyoteConnector"
   port="8443" minProcessors="5" maxProcessors="75"
   enableLookups="true"
  acceptCount="100" debug="0" scheme="https" secure="true"
   useURIValidationHack="false" disableUploadTimeout="true">
     <Factory
       className="org.apache.coyote.tomcat4.CoyoteServerSocketFactory"
       clientAuth="false" protocol="TLS" />
</Connector>
-->
You can see that this entry defines a Connector for HTTPS at port 8443 and is currently commented out. Uncomment and modify this entry as shown below.
<Connector className="org.apache.coyote.tomcat4.CoyoteConnector"
   port="8443" minProcessors="5" maxProcessors="75"
   enableLookups="true"
  acceptCount="100" debug="0" scheme="https" secure="true"
   useURIValidationHack="false" disableUploadTimeout="true">
     <Factory
       className="org.apache.coyote.tomcat4.CoyoteServerSocketFactory"
       clientAuth="false" protocol="TLS"
       keystoreFile="server.ks"
							keystorePass="srvrpass"/>
</Connector>
We have set the attributes keystoreFile and keystorePass of element Factory to the filename of the keystore and its password. You will have to specify the full pathname of the keystore file if it was kept in a directory other than the Tomcat home directory.
Another thing that you may have noticed is that the keystore password is specified in clear-text in the configuration file. As we know, this is not very secure and is a limitation of Tomcat. Ideally, it should be possible to enter the password manually at startup time.
Notice that we didn't specify the keystore type. This is so because our keystore is of the default type JKS. If it were of type JCEKS or PKCS12, we would have to set the Factory element attribute keystoreType to the value JCEKS or PKCS12.
If you want Tomcat to listen on standard https port 443 then you should change the current value of 8443 to 443. Keep in mind that the absence of an explicit port number in an https URL implies 443.
Browsers typically come with a number of CA certificates pre-installed. You can see these CA certificates in IE6.0 by selecting Tools --> Internet Options --> Content --> Certificates. With Netscape 7.0, select Edit --> Preferences --> Privacy & Security --> Certificates --> Manage Certificates.
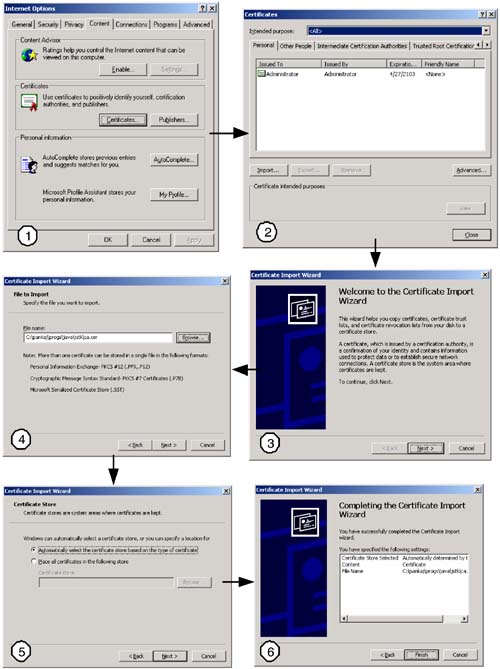
If you have used the certtool to sign the server certificate, then install the CA certificate in the browser. For IE6.0, the sequence of operations is shown in Figure 9-5. As you can see, the Certificate Import Wizard guides the user to select the certificate file and specify the appropriate certificate store. Screen #4 shows ca.cer, the certificate exported from CA keystore in Step 2, to be the certificate for import into the browser certificate store. After clicking the Finish button in screen #6, you should see the imported certificate in the Trusted Root Certificates list (screen #2).
Figure 9-5. Importing a trusted certificate in MS-IE 6.0.
To test successful setup, restart Tomcat and point your browser to the URL https://localhost:8443. This should get the default home page of Tomcat. The returned page is almost identical to the one obtained by going to the URL http://localhost:8080, with the only difference that you now have a small padlock symbol at the lower right corner of the browser. Click on this symbol. You can see the details of the certificate furnished by the server.
If you don't get this page, something has gone wrong and you need to get into a debugging session. Here are a few tips on debugging an HTTPS connection with Tomcat.
Try to access URL https://localhost:8443 with JSTK utility ssltool. Assuming that you are at the JSTK home directory, you can run following commands:
C:jstk>set JSTK_OPTS=-Djavax.net.ssl.trustStore=cadirca.ks
							-Djavax.net.ssl.trustStoreType=jceks
C:jstk>binssltool client -action read-url -url https://localhost:8443
The first command sets the environment variable JSTK_OPTS so that appropriate system properties are set. These system properties make sure that the truststore of ssltool is same as the keystore of the certtool-based CA.
If the above ssltool invocation works, i.e., you are able to see the HTML file returned by the server for the specified URL, then you know that the Tomcat setup works for Java clients. The problem is perhaps with the browser. If the above test fails, you can enable SSL related debug messages for the ssltool by setting system property javax.net.debug to ssl and look at the debug messages to identify the cause of the problem.
The same technique can also be used to enable SSL-related debug messages at the Tomcat Server. You do this by setting the environment variable CATALINA_OPTS. From the Tomcat home directory, issue these commands:
C:apache...jdk14>set CATALINA_OPTS=-Djavax.net.debug=ssl
C:apache...jdk14>binstartup
This will display a lot of messages on the screen and hopefully, will help you identify the problem.
Setup for Client Authentication
Though less frequently used, certificate-based client authentication provides a very secure way to authenticate users. Carry out the following steps to generate a signed client certificate and set up Tomcat so that it requires certificate-based client authentication.
Step 1. |
Modify configuration file server.xml.
Go back to the Connector element and the Factory subelement that we uncommented for HTTPS connections. You would find the attribute clientAuth of Factory element to be set as "false". Change this value to "true": <Factory className="org.apache.coyote.tomcat4.CoyoteServerSocketFactory" clientAuth="true" protocol="TLS" keystoreFile="server.ks" keystorePass="srvrpass"/> |
Step 2. |
Generate the client certificates.
The process of getting a client certificate is very similar to the one used for getting a server certificate, specifying the name and other details of the user. Carry out the steps, supplying the user information to form the distinguished name. Let us assume that we generated two user certificates, one with the common name "Pankaj Kumar" and another with "Veena Prakash" and these certificates are stored in JKS keystore client.ks, protected by keystore password “clntpass", under key entries with aliases "pankaj" and "veena", respectively. |
Step 3. |
Specify Tomcat's truststore.
To be able to accept a client certificate, Tomcat must have the certificate of the signing CA in its truststore. As we know, the default truststore for J2SE v1.4 installation is keystore file cacerts in directory %JAVA_HOME%jrelibsecurity. We either need to import the CA certificate in this keystore or set the CA's keystore as the truststore for the Tomcat program using JSSE system properties. We talked about these system properties in Chapter 6, Securing the Wire. One might expect to specify the truststore information in the configuration file server.xml itself. But this is not supported. To import CA's certificate in the default truststore, issue the following command (from JSTK home directory): C:jstk>keytool -import -keystore %JAVA_HOME%jrelibsecuritycacerts -storepass changeit -file ca.cer -alias jstkkey Owner: CN=JSTK Test Root CA, OU=JSTK Operations, O=JSTK Inc, C=US Issuer: CN=JSTK Test Root CA, OU=JSTK Operations, O=JSTK Inc, C=US Serial number: 64 Valid from: Fri Jan 17 11:53:00 PST 2003 until: Thu Oct 13 12:53:00 PDT 2005 Certificate fingerprints: MD5: 71:D0:3C:8E:BF:03:D2:66:AC:FB:61:02:19:BC:E3:10 SHA1: 9B:DA:DC:E7:E0:E3:84:3F:75:D5:D4:19:9B:8E:31:06:27:0E:A2:70 Trust this certificate? [no]: yes Certificate was added to keystore Another option is to set the CA's keystore as the truststore for Tomcat. This is done by setting the environment variable CATALINA_OPTS so that appropriate system properties will be set for the Tomcat JVM: C:apache...jdk14>set CATALINA_OPTS=-Djavax.net.ssl.truststore= %JSTK_HOME%cadirca.ks –Djavax.net.ssl.trustStoreType=JCEKS After doing this, restart the Tomcat for the new settings to be effective. |
Step 4. |
Test the Tomcat setup with ssltool.
We are now ready to run a client program against the Tomcat Server. Let us first use ssltool as the client: C:jstk>set JSTK_OPTS=-Djavax.net.ssl.keyStore=client.ks -Djavax.net.ssl.keyStorePassword=clntpass C:jstk>binssltool client -action read-url -url https://localhost:8443 You will have to specify the truststore details as well in the environment variable JSTK_OPTS if you have not imported the CA's certificate in the cacerts keystore. |
Step 5. |
Export the private key and the user certificate into a PKCS12-format file.
For accessing an HTTPS URL where the server requires certificate-based authentication of the client, the user's private key and the corresponding certificate must be imported in the browser. This is different from simply importing a trusted certificate. There is an added complexity due to format mismatch. Popular browsers like MS-IE and Netscape Navigator can directly import a x.509 certificate exported from either JKS or JCEKS keystore. However, the tool used for certificate export, keytool, does not support export of private key and client certificate in PKCS12 format, the format expected by both MS-IE and Netscape Navigator. JSTK utility crypttool can help in exporting a private key and corresponding certificate chain in PKCS12 format. Find below the command to do so from key entry "pankaj" in the keystore client.ks: C:jstk>bincrypttool export -keystore client.ks -storepass clntpass -outform PKCS12 -alias pankaj Exported PrivateKey to file: pankaj.pem Appended Certificate#0 to file: pankaj.pem Appended Certificate#1 to file: pankaj.pem Converted PEM file pankaj.pem to PKCS12 file pankaj.p12 A similar command can be used to export "veena" key entry. The exported files pankaj.p12 and veena.p12 are password protected, the password being the same as the one protecting the keystore client.ks, i.e.; "clntpass". |
Step 6. |
Import the private key and certificate chain into a browser.
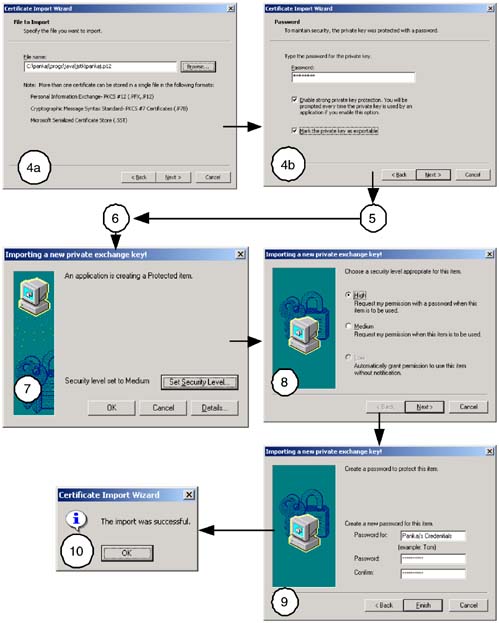
Now that we have the private key and the certificate chain in file PKCS12 files pankaj.p12 and veena.p12, they can be imported into a browser the same way a trusted certificate is imported, as illustrated in Figure 9-5. There are some extra steps as shown in Figure 9-6. Note that Figure 9-6 reuses some of the screen shots of Figure 9-5. After selecting the PKCS12 file in screen #4a, you are prompted for a password in screen #4b. Additionally, you can specify the security level in screen #7. A high security level implies that the private key will be protected by a user-selected password. This password must be supplied every time the private key is accessed. Figure 9-6. Importing a User certificate with private key in MS-IE 6.0.
|
Step 7. |
Access the protected Web page.
Assuming that Tomcat is configured for certificate-based authentication, access a webpage, specifying the https URL. This operation will fail if the browser does not have a user certificate with a private key. If you have imported a certificate along with the private key then you will be informed that a protected item is being accessed. You will also be asked to supply the password if the security level of this item is set high during import. |
In case there are more than one user certificates in the browser, you will be asked to pick a particular certificate based on the certificate common name.
Troubleshooting HTTPS Setup
Setting up a Web container for HTTPS access and testing the setup involves a number of complex steps and could be quite frustrating.
Below you will find a list of commonly encountered problems:
Tomcat setup for HTTPS access doesn't work. A number of things can go wrong here: the keystore filename is not properly specified; the keystore password is wrong or misspelled; the keystore has multiple key entries; key entry has its own password which is different from the keystore password; keystore has a non-default type (JCEKS or PKCS12) and the type is not specified in the configuration file confserver.xml; attributes to specify parameters in the file confserver.xml are misspelled or have letters differing in case; and so on. In most of these cases, Tomcat simply exits.
The server private key and the certificate have problems. A common problem is to generate the key pair using DSA key algorithm, the default for keytool. A DSA private key works with a Java client but would fail with most of the standard browsers.
The Web container is configured for client authentication and the keystore with trusted certificates on the Web container machine doesn't have the certificate of the client's issuer. This is more of a problem with self-generated certificates. To resolve this, you should either import the issuer's certificate in the default truststore (%JAVA_HOME%jrelibsecuritycacerts) or set the system properties javax.net.ssl.trustStore and javax.net.ssl.trustStoreType (these properties are matched case-sensitively) to point to the appropriate keystore.
The server certificate is issued by an issuer not capable of issuing server certificates. The certificate of an issuer indicates whether it can sign server certificates or not. In the absence of such indication, the issuer is not expected to sign server certificates. Some clients may accept such server certificates but some may not.
The client doesn't have a private key and corresponding certificate chain trusted by the server.
There is no common cipher suit. The client lists its cipher suits during SSL handshake but the server doesn't find any that it is willing to accept. This happens when the server certificate is signed using an algorithm not supported by the client or vice versa.
Cryptographic material is corrupted or is not recognized. May be the keystore file got corrupted or you got the wrong file.
SSL implementations are incompatible. This could happen if you are working with the client or server software running on different platforms.
Well, you get an idea of what could go wrong. Of course, once you know that, getting it right is trivial. The challenge is often in discovering what is wrong.
The following tips should help in systematic trouble-shooting:
Start with simple cases. Is the HTTP connectivity working? If the answer is yes then the network connectivity problems are ruled out. If HTTPS with client authentication is not working then try HTTPS without client authentication.
Isolate the problem. If a particular combination of client and server are not working then try with a different client or a different server. For example, if IE is not working then try it with Netscape or even ssltool. If you suspect a particular certificate then try it with something that is known to work. Try the certificate with ssltool.
Look at the file. If you suspect data corruption, examine the file. Try keytool with –list option for a keystore file. Use JSTK utility asn1parse for PEM or DER formatted data files.
Look at the SSL debug messages. You can enable these messages by setting the system property javax.net.debug to ssl as in "java -Djavax.net.debug=ssl ...". The console output is quite readable and should be able to point you in the right direction.
When all is said and done, troubleshooting is an art that you learn only by real experimentation.
Performance Issues with HTTPS
What kind of runtime performance penalty does one pay for using HTTPS, rather than HTTP? We have already talked about the performance issues of SSL in comparison with plain TCP in Chapter 6, Securing the Wire. The focus there was more on data transfer and connection establishment rate, the effect of different cipher suites and so on. In this section we are interested in comparing access to the same Web application, once over HTTP and then over HTTPS, by making measurements using simple test programs.
There are two metrics of primary interest: best response time and system capacity. The best response time is a measure of time taken to retrieve a page served by the Web application when the system is lightly loaded, as measured at the client. The system capacity is a measure of simultaneous users the system can serve without causing response time at each client to become unacceptably large. Measuring system capacity requires modeling the behavior of each client and running multiples of them from different machines. In contrast, measurement of the best response time is fairly straightforward and requires only one client program to be run.
The best response time would depend on the network latency and the raw bandwidth between the client and Web application machine, the size of request and response messages, processing overhead at the Web application, the protocol used and many others. Not all of these factors are independent. For example, the protocol used could increase the size of messages exchanged. Similarly, handshake messages for a protocol could cause greater delays where network latency is large.
A simple setup to measure response time consists of a client program repeatedly accessing a URL served by a Web application. In fact, the tool ssltool can act as one such client and Tomcat's default home page accessed at http://hostname:8080/index.jsp could be the test URL.
The following ssltool command accesses the Tomcat default homepage on machine vishnu in a loop, iterating 10 times and prints the elapsed time:
C:jstk>binssltool client -action read-url –mode bench –num 10
							-url http://vishnu:8080/index.jsp
  Client Mode  : bench
  OUT protocol : HTTP
  Client Action: read-url
  Buffer Size  : 8192
  Iterations   : 10
  URL          : http://localhost:8080/index.jsp
Read URL http://localhost:8080/index.jsp 10 times in 0.19 seconds.
 Browse Rate: 436736.84210526315 bytes/sec.
DONE
We can change the number of iterations in the loop by changing the –num parameter, we can access the same page over HTTPS by changing the URL to https://localhost:8443/index.jsp, we can enable client authentication by modifying the Tomcat configuration file server.xml and setting the appropriate system properties as explained earlier, and we can force a disconnect of the underlying TCP connection after every request in the loop by adding the parameter "–conn close" to the command.
The client-side code run by ssltool is best explained through the following code fragment. You can also look at the complete working code within the source files of the ssltool utility:
// urlString: URL to be accessed. Could be https URL.
// num: no. of iterations.
// connClose: disconnect if true.
URL url = new URL(urlString);
byte[] buf = new byte[8*1024];
long st = System.currentTimeMillis();
for (int i = 0; i < num; i++){
  HttpURLConnection urlCon = (HttpURLConnection)url.openConnection();
  BufferedInputStream bis =
    new BufferedInputStream(urlCon.getInputStream());
  int n, nread = 0;
  while ((n = bis.read(buf)) != -1) nread += n;
  if (connClose) urlCon.disconnect();
}
long et = System.currentTimeMillis();
The requests are made sequentially from a single-threaded program. Keep in mind that we aren't really trying to simulate real load on a Web application. Our objective is to get an idea of impact on response time when moving from HTTP to HTTPS. What is the rationale behind accessing the URL in a loop? Just to make sure that the measurement window is large enough to compensate for the low resolution of our stopwatch based on System.currentTimeMillis().
Table 9-1 shows the measurements on three different client machines against the Tomcat running on a 900MHz Athlon, Windows 2000 server machine for –num value of 1000. The server machine is on a private LAN, connected to a 10/100 Netgear hub. This hub connects to a 10/100 Linksys router for home networking with Ethernet cable. The router also supports 802.11b wireless connections and is connected to the Internet over a cable modem.
The network characteristics for these three client machines are given below:
Client I: 350 MHz Pentium Laptop running Linux. Connected to the same hub as the server machine running Tomcat. Ping latency is around 0.35 ms.
Client II: 350 MHz Pentium Laptop running Windows 2000. Connected to the Linksys router through Wireless LAN. Ping latency is around 2.3 ms.
Client III: 1.3 GHz Pentium machine running Linux. Connected to the Internet in a different geographical location via a cable modem. Ping latency varies from 20ms to 150 ms.
The protocols used are: plain HTTP, HTTPS and HTTPS with certificate-based client authentication. Both server and client certificates use 1024-bit RSA keys for signature and are signed by the same CA. For SSL connection, the selected cipher suite is SSL_RSA_WITH_RC4_128_MD5, the same as the default selection with IE6.0 or Netscape7.0 and Tomcat on J2SE v1.4.x.
Two sets of measurements are reported—one for persistent connection, meaning all 1000 requests are made over the same TCP/IP connection and another for non-persistent connections, meaning each request created its own TCP/IP connection.
| Access Protocol | Persistent Connection | Non-persistent Connection | ||||
|---|---|---|---|---|---|---|
| I | II | III | I | II | III | |
| HTTP | 14.3 | 25.8 | 296 | 25.8 | 32.9 | 320 |
| HTTPS | 28.5 | 40.5 | 327 | 91.8 | 222 | 472 |
| HTTPS w/ clientAuth | 31.0 | 43.5 | 334 | 98.3 | 225 | 501 |
| Measurements were taken against an Athlon 900 MHz, Windows 2000 machine running Apache Tomcat 4.1.18 as server and JSTK utility ssltool as client. | ||||||
What can we infer from these numbers? Though micro-benchmarks like these have their limitations and are a poor guide for predicting performance in a real deployment scenario, it is safe to conclude, for the measurement setup, that:
For persistent connection, the percentage slowdown from HTTP to HTTPS is smaller for higher latency network connections. Note that the slowdown is 100% for Client I, 58% for Client II, and 10% for Client III.
The overhead of certificate-based client authentication, over normal HTTPS, is not very significant, usually less than 10%.
The HTTPS overhead for a new connection per request (i.e., non-persistent connection) is high for Client II. This may have to do with the fact that this client uses wireless LAN.
Compute-intensive nature of HTTPS connections mean that a Web application serving many users, each user accessing a small number of pages, would be hard pressed to serve these pages over HTTPS.
The measurements presented here are only for getting a rough idea of the HTTPS overhead and due care should be taken before applying these results to real Web applications. Specifically, there would be many more clients accessing the Web application concurrently, and the response time experienced by the users would depend on many factors not included in our measurements here.