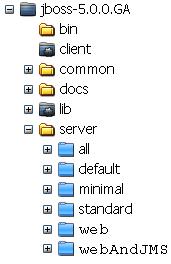
JBoss AS 5.0 offers a wide choice of server configurations. However, you are not limited to the existing built-in configurations. You can create your own custom configuration that suits your needs best.
You have two choices. You can either add an empty directory under JBOSS_HOMEserver and create all the infrastructure beneath, or preferably (as we suggest) start from the existing configuration that is closest to your needs and then add/remove the services.
The following table summarizes the modules installed in the single server configurations, so you can decide which configuration is closest to the one you have in mind:
|
Module |
minimal |
web |
default |
standard |
all |
|---|---|---|---|---|---|
|
Microcontainer |
X |
X |
X |
X |
X |
|
Naming service |
X |
X |
X |
X |
X |
|
Log4j |
X |
X |
X |
X |
X |
|
Deployment scanner |
X |
X |
X |
X |
X |
|
JPA |
X |
X |
X |
X | |
|
EJB container |
X |
X |
X | ||
|
JCA support |
X |
X |
X |
X | |
|
JMS |
X |
X |
X | ||
|
Mail service |
X |
X |
X | ||
|
HSQL DB |
X |
X |
X |
X | |
|
JBoss WS |
X |
X |
X | ||
|
XA transactions |
X |
X |
X |
X | |
|
Monitoring services |
X |
X |
X | ||
|
Quartz service |
X |
X |
X | ||
|
Clustering support |
X | ||||
|
RMI-IIOP and jUDDI |
X |
X |
The name of the new directory you created matches the name of the server configuration. You will need to pass the server configuration name to instruct JBoss to use the new configuration. For example, if your new configuration directory is named performance then you would need to start JBoss using:
run -c performance # Windows users
$ ./run.sh -c performance # Unix users
If you need to customize your server configuration, the first step is identifying which are the libraries and configuration needed to start a specific service. This serves different purposes, such as adding new services to your JBoss AS or simply skimming your configuration by reducing unwanted services.
Here you have a comprehensive list of core JBoss AS services and the corresponding libraries:
|
Service |
server/<node>/deploy |
server/<node>/deployers/ |
|---|---|---|
|
EJB 3 |
|
|
|
EJB 2 |
| |
|
JBoss WS |
|
|
|
Messaging |
|
|
|
jUDDI |
| |
|
Key Generator |
| |
|
JBoss Mail |
| |
|
Scheduling |
| |
|
Hypersonic DB |
| |
|
Bsh deployer |
| |
|
Hot deployment |
|
How do you read this table? In the first column (Service) you can find the list of JBoss AS core services. The next two columns describe the files and folders (marked with "D") that need to be added or removed in order to activate or deactivate the service. We have split the file list into two columns, so that the reader can immediately find the right folder location.
The web configuration is an interesting configuration option. It enables you to run web applications that use the Java Persistence API and Java Transaction API. Let's say it's like a Tomcat + JPA configuration. One thing that could be added with little effort is the JMS server.
Adding the JMS server is not a complicated matter. Let's start from a web configuration: we'll duplicate the web directory structure as follows:
$ cd $JBOSS_HOME/server
$ cp –R web webAndJMS
Windows users simply need to cut and paste the folder web and rename it to webAndJMS
Looking back at our service map, we discover that we need to add the following files to the deploy folder:
messaging(folder)jms-ra.rar
We add the files as follows:
$ cp r $JBOSS_HOME/server/default/deploy/messaging $JBOSS_HOME/server/webAndJMS/deploy
$ cp $JBOSS_HOME/server/default/deploy/jms-ra.rar $JBOSS_HOME/server/webAndJMS/deploy
Note
If you were to use JBoss AS 5.1.0, it would also be required to copy messaging-definitions-jboss-beans.xml, which contains the messaging profile definitions, into the server/xxx/deployers folder.
So now your deploy folder should look like this:
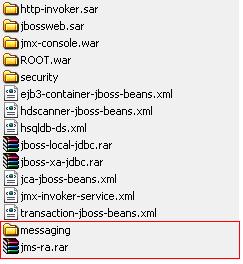
That's all. You now are able to add JMS capabilities to your web applications.
Start the server with the-c option:
$ cd $JBOSS_HOME/bin
$ run.sh c webAndJMS
Tip
This configuration enables your web application to send/receive JMS messages configured on the application server. However, you cannot deploy MDB components as you don't have the EJB container. If you need to further expand this server configuration adding EJB support, then it's likely easier to start from the "default" configuration and maybe remove the services you don't require.
Deploying an application can be imagined as being similar to when you drop a coin in your office coffee machine—lots of sounds clatter in the room but what you see is only the cup of coffee coming out.
What happens when you deploy an application to JBoss ? Well, a few checks need to be done, a first check being on the structure of the deployment. This means finding out if it contains any deployment descriptors and/or classes, and if so where they are located.
Once the structure of a deployment has been determined, then a DeploymentContext is built for handling information such as the location of the classes, references to other components, and the location of deployment descriptors.
At this point the actual process of deployment starts. This activity goes through several steps:
- PARSE: Deployment descriptors are parsed into deployment metadata
- DESCRIBE: Dependencies on other deployments or runtime components are determined
- CLASSLOADER: A classloader for the deployment is created
- POST_CLASSLOADER: Any action to be performed after classloader creation
- REAL: Components are deployed into runtime
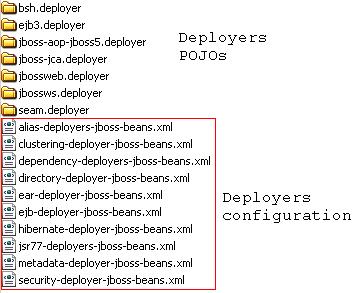
Once the REAL phase is completed successfully, the application is fully deployed to JBoss. Knowing a bit of theory will help you to understand how the deployment can be tuned to your needs. The actual deployment configuration is located in the new server/xxx/deployers folder.
You'll notice this folder is populated with many *-deployer-beans.xml files. These files make up the application deployers, which are used to deploy a specific type of application. For example, the ear-deployer-jboss-beans.xml file contains all the deployment logic for EAR applications.
On the other hand, the .deployer folders contain the actual POJO, which are in charge of managing the deployment process for the specific needs of your server.
Besides this, the .deployer folders can hold some special metadata files in the META-INF folder. What are these metadata files? They are some configuration files that can help customize your server configuration. For example, the jboss-scanning.xml file can be used to customize the scanning path of the application server, and the jboss-structure.xml file allows you to deploy applications with a different filesystem structure. For example, it can be used to deploy on JBoss applications that don't have a standard Java EE structure. If you are interested in some inner details about the new deployer metadata files, you can have a look at http://www.jboss.org/community/wiki/JBoss5custommetadatafiles.