
Apache Tomcat provides the core functionality of JBoss Web Server. Its embedded engine allows seamless integration with JBoss components, by using the underlying Microkernel system. JBoss Web Server currently uses the Apache Tomcat 6.0 release and it is ships as service archive (SAR) application in the deploy folder. The location of the embedded web server has changed at almost every new release of JBoss. The following table could be a useful reference if you are using different versions of JBoss:
|
JBoss release |
Location of Tomcat |
|---|---|
|
5.0.0 GA |
|
|
4.2.2 GA |
|
|
4.0.5 GA |
|
|
3.2.X |
|
The main configuration file is server.xml which, by default, has the following minimal configuration:
<Server>
<Listener className="org.apache.catalina.core.AprLifecycleListener" SSLEngine="on" />
<Listener className="org.apache.catalina.core.JasperListener" />
<Service name="jboss.web">
<Connector protocol="HTTP/1.1" port="8080" address="${jboss.bind.address}"
connectionTimeout="20000" redirectPort="8443" />
<Connector protocol="AJP/1.3" port="8009" address="${jboss.bind.address}"
redirectPort="8443" />
<Engine name="jboss.web" defaultHost="localhost">
<Realm className="org.jboss.web.tomcat.security.JBossWebRealm" certificatePrincipal="org.jboss.security. auth.certs.SubjectDNMapping" allRolesMode="authOnly" />
<Host name="localhost">
<Valve className="org.jboss.web.tomcat.service. jca.CachedConnectionValve" cachedConnectionManagerObjectName="jboss. jca:service=CachedConnectionManager" transactionManagerObjectName="jboss: service=TransactionManager" />
</Host>
</Engine>
</Service>
</Server>
Following is a short description for the key elements of the configuration:
|
Element |
Description |
|---|---|
|
|
The |
|
|
An |
|
|
This is the gateway to Tomcat Engine. It ensures that requests are received from clients and are assigned to the |
|
|
|
|
|
One virtual host. Each virtual host is differentiated by a fully qualified hostname. |
|
|
A component that will be inserted into the request processing pipeline for the associated Catalina container. Each |
|
|
This contains a set of users and roles. |
As you can see, all the elements are organized in a hierarchical structure where the Server element acts as top-level container:

The lowest elements in the configuration are Valve and Realm, which can be nested into Engine or Host elements to provide unique processing capabilities and role management.
Most of the time when you want to customize your web container, you will have to change some properties of the connector.
<Connector protocol="HTTP/1.1" port="8080" address="${jboss.bind.address}" connectionTimeout="20000" redirectPort="8443" />
A complete list of the connector properties can be found on the Jakarta Tomcat site (http://tomcat.apache.org/). Here, we'll discuss the most useful connector properties:
port:The TCP port number on which this connector will create a server socket and await incoming connections. Your operating system will allow only one server application to listen to a particular port number on a particular IP address.acceptCount:The maximum queue length for incoming connection requests, when all possible request processing threads are in use. Any requests received when the queue is full will be refused. The default value is10.connectionTimeout:The number of milliseconds the connector will wait after accepting a connection for the request URI line to be presented. The default value is60000(that is, 60 seconds).address:For servers with more than one IP address, this attribute specifies which address will be used for listening on the specified port. By default, this port will be used on all IP addresses associated with the server.enableLookups:Set totrueif you want to perform DNS lookups in order to return the actual hostname of the remote client and tofalsein order to skip the DNS lookup and return the IP address in string form instead (thereby improving performance). By default, DNS lookups are enabled.maxHttpHeaderSize:The maximum size of the request and response HTTP header, specified in bytes. If not specified, this attribute is set to4096(4 KB).maxPostSize:The maximum size in bytes of thePOST, which will be handled by the containerFORMURL parameter parsing. The limit can be disabled by setting this attribute to a value less than or equal to zero. If not specified, this attribute is set to2097152(2 megabytes).maxThreads:The maximum number of request processing threads to be created by this connector, which therefore determines the maximum number of simultaneous requests that can be handled. If not specified, this attribute is set to200.
Apache Portable Runtime (APR) is a core Apache 2.x library designed to provide superior scalability, performance, and better integration with native server technologies.
The mission of the Apache Portable Runtime (APR) project is to create and maintain software libraries that provide a predictable and consistent interface to underlying platform-specific implementations. The primary goal is to provide an API to which software developers may code and be assured of predictable if not identical behaviour regardless of the platform on which their software is built, relieving them of the need to code special-case conditions to work around or take advantage of platform-specific deficiencies or features.
The high-level performance of the new APR connector is made possible by the introduction of socket pollers for persistent connections (keepalive). This increases the scalability of the server, and by using sendfile system calls, static content is delivered faster and with lower CPU utilization.
Once you have set up the APR connector, you are allowed to use the following additional properties in your connector:
keepAliveTimeout:The number of milliseconds the APR connector will wait for another HTTP request, before closing the connection. If not set, this attribute will use the default value set for theconnectionTimeoutattribute.pollTime:The duration of a poll call; by default it is2000(5 ms). If you try to decrease this value, the connector will issue more poll calls, thus reducing latency of the connections. Be aware that this will put slightly more load on the CPU as well.pollerSize:The number of >sockets that the poller kept alive connections can hold at a given time. The default value is768, corresponding to 768 keepalive connections.useSendfile:Enables using kernelsendfilefor sending certain static files. The default value istrue.sendfileSize:The number of sockets that the poller thread dispatches for sending static files asynchronously. The default value is1024.
If you want to consult the full documentation of APR, you can visit http://apr.apache.org/.
In order to install the APR connector, you need to add some native libraries to your JBoss server. The native libraries can be found at http://www.jboss.org/jbossweb/downloads/jboss-native/.
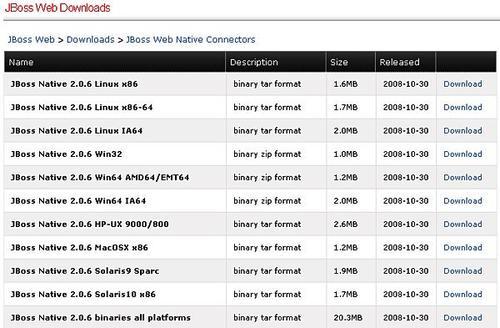
Download the version that is appropriate for your OS. Once you are ready, you need to simply unzip the content of the archive into your JBOSS_HOME directory.
As an example, Unix users (such as HP users) would need to perform the following steps:
cd jboss-5.0.0.GA
tar tvfz jboss-native-2.0.6-hpux-parisc2-ssl.tar.gz
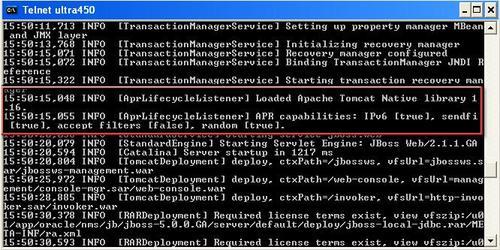
Now, restart JBoss and, from the console, verify that the connector is bound to Http11AprProtocol.
Tip
A word of caution!
At the time of writing, the APR library still has some open issues that prevent it from loading correctly on some platforms, particularly on the 32-bit Windows.
Please consult the JBoss Issue Tracker (https://jira.jboss.org/jira/secure/IssueNavigator.jspa?) to verify that there are no open issues for your platform.
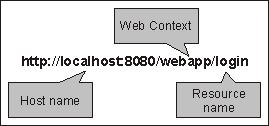
Every request issued to a web server can basically be split into three sections. The first one is made up of the hostname and logical port where the web server is running. By default, the embedded web server is started on port 8080.
The second piece of information is the web context. This is a virtual path to a web application and by default corresponds to the name of the web application archive deployed. So, for example, if you have deployed your application with the name webapp.war, then your default web context will be webapp.
The last element is the individual resource that we are trying to access such as a JavaServer Page, a servlet, or an HTML page.
However, the default web context provided by Tomcat can be overridden. In standalone Tomcat installations, you can customize the context configuration by nesting its element inside the Engine configuration. However, in JBoss-embedded Tomcat, you need to use a JBoss-specific configuration file descriptor named jboss-web.xml. This file is located in the WEB-INF folder of your web application and can be used to add JBoss-specific information. Consider, for example, if you place the following jboss-web.xml file under the WEB-INF folder of your webapp.war:
<jboss-web>
<context-root>/newWebContext</context-root>
</jboss-web>
Then the new location for your resource will be http://localhost/newWebContext/home.jsp.
By default, web applications are accessible through the localhost hostname. However, it is sometimes desirable to add virtual hosts to the basic configuration. What are virtual hosts? Simply put, virtual hosts refers to the practice of maintaining more than one server on a machine, as differentiated by their apparent hostname or IP address.
Many businesses utilize virtual hosts for internal purposes, where there is a technology or administrative reason to keep several separate websites, such as a customer extranet website, employee extranet, and intranets for different departments.
If you want to add a virtual host to your configuration, you first have to declare your virtual host in a Host section, as shown in the following code snippet:
<Host name="myvirtualhost" autoDeploy="false"
deployOnStartup="false" deployXML="false" />
The name element defines your virtual host. The other attributes are set to false, so as to avoid conflicts between the Tomcat deployer and the JBoss deployer.
The second step needs to be performed in the deployment stage, adding the virtual host information into the JBoss-specific deployment descriptor, jboss-web.xml.
<jboss-web>
<virtual-host>myvirtualhost</virtual-host>
</jboss-web>
If you have deployed an application named webapp.war that is targeted on the host myvirtualhost, then you can invoke it like this:
http://myvirtualhost:8080/webapp.
You can further expand your virtual host configuration by adding Alias for each virtual host, as follows:
<Host name="myvirtualhost1" autoDeploy="false" deployOnStartup="false" deployXML="false">
<Alias>myvirtualhost2</Alias>
</Host>
Alias can be quite useful if you need to define multiple domain names for a single virtual host.
Note
When creating a virtual host, it's assumed that your network administrator has registered the virtual host domain name on the DNS. If you want to perform a quick and dirty test, simply add an entry for your virtual host in the hosts filename of your OS.
127.0.0.1 myvirtualhost
On a Windows machine, the hosts file is located at Windowssystem32driversetc, on a Unix/Linux box it's in filesystem /etc.
JBoss Web Server, as it ships, doesn't track incoming requests. However, if you want to enable detailed logs of the requests, you can uncomment two valves that are present in the main configuration file, server.xml. The first one is the AccessLogValve that is responsible for tracking all incoming requests.
<Valve className="org.apache.catalina.valves.AccessLogValve"
prefix="localhost_access_log." suffix=".log"
pattern="common" directory="${jboss.server.log.dir}"
resolveHosts="false" />
The prefix parameter defines the prefix added to the start of each log file's name (by default it is localhost_access_log). The suffix parameter is clearly the suffix added to the end of each log file's name. The pattern is the formatting layout identifying the various information fields from the request and response to be logged. Finally, resolveHosts is set to true, if you want to convert the IP address of the remote host into the corresponding hostname through a DNS lookup. Here, it is set to false to skip this lookup and report the remote IP address instead. Values for the pattern attribute are made up of literal text strings and pattern identifiers. These patterns are introduced by the % character and cause replacement of the variable with the corresponding value. Here are a few useful patterns. For an exhaustive description of all code take a look at http://tomcat.apache.org/tomcat-5.5-doc/config/valve.html.
Note
Useful patterns for logging
%a—remote IP address
%A—local IP address
%b—bytes sent, excluding HTTP headers, or '-' if zero
%q—query string (prepended with a '?' if it exists)
%r—first line of the request (method and request URI)
%s—HTTP status code of the response
%S—user session ID
%t—date and time, in Common Log Format
%u—remote user that was authenticated (if any), else '-'
%U—requested URL path
%D —timetaken to process the request, in milliseconds
%T—time taken to process the request, in seconds
%I —currentrequest thread name (can compare later with stacktraces)
The second valve is the RequestDumperValve that performs a dump of the request, both on the console appender and on the file appender of JBoss.
<Valve className="org.apache.catalina.valves.RequestDumperValve" />
By default, this valve is commented. Uncommenting it will produce a dump of the HTTP request, for every request:
============================================
REQUEST URI=/jmx-console/filterView.jsp
authType=null
characterEncoding=null
contentLength=-1
contentType=null
contextPath=/jmx-console
header=referer=http://10.2.20.245:8080/jmx-console/
header=user-agent=Mozilla/4.0
header=host=10.2.20.245:8080
header=connection=Keep-Alive
header=cookie=JSESSIONID=736DBB892CCB331E2E972BA9E4711396
method=GET
remoteAddr=10.2.20.245
remoteHost=10.2.20.245
remoteUser=null
requestedSessionId=736DBB892CCB331E2E972BA9E4711396
serverName=10.2.20.245
serverPort=8080
servletPath=/filterView.jsp
isSecure=false
----------------------------------------------------------------------------------------
If you want to tune your configuration, then the connector parameters we have described are the right place to investigate. Let's see a few useful tips to improve the performance of your web server.
Setting enableLookups to true forces the web engine to retrieve the fully qualified hostname of every HTTP client that connects to your site. This adds latency to every request, as performing a DNS lookup on every request is an expensive operation. It's always recommended to turn off DNS lookups on production sites. Remember that you can always look up the names later with any network software/command-line utility.
As we have seen in the previous section, you have three different options about the protocol of the connector. There is no clear winner; all of them have some advantages. The new APR is the most advanced tuning solution, and it is clearly the best solution when your configuration is using the Keep-Alive extension that allows persistent connections causing multiple long-lived HTTP session requests to be sent over the same TCP connection.
APR is also a perfect choice if your application needs to be secured using SSL —APRuses the fast OpenSSL libraries. On the other hand, the earlier HTTP connector has the advantage of major stability, which could be a good match if your web container doesn't expect a high volume of requests.
The Java non-blocking I/O (NIO) protocol is a compromise between the two solutions, having better performances than the older HTTP connector, but not as good as the APR. On the other hand, this connector has the advantage of being a pure Java solution.
The following table presents these statements in a matrix:
|
Requirement |
Preference order | ||
|---|---|---|---|
|
High traffic—KeepAlive on |
APR |
NIO |
HTTP 1.1 |
|
High traffic—KeepAlive off |
HTTP 1.1 |
APR |
NIO |
|
Low traffic |
HTTP 1.1 |
APR |
NIO |
|
Stability |
HTTP 1.1 |
APR |
NIO |
|
Secure connections |
APR |
NIO |
HTTP 1.1 |
Setting an appropriate value for the thread pool plays an essential role in the web server's processing throughput capacity. Every single request directed into JBoss Web Server goes through the web thread pool.
If this pool has very few active request-processing objects and if the traffic increases dramatically, then a delay in request processing results due to pool component instantiation. If the pool is too large (that is, the number of ready threads is too high), then the CPU cycles and memory may become overused.
You can control the number of threads allocated through the maxThreads attribute that, by default, allows a maximum of 200 threads.
This setting can be optimal for medium-load web servers. However, when your servers are performing heavy-duty work, let's say 1000 requests per second, then you need to increase the maxThreads value. A good starting point for high-volume sites could be around 400 maxThreads. However, the best criterion to set this to the optimal value is to try many different settings, and then test them with simulated traffic loads while watching response times and memory utilization.
The JMX console is an indispensable tool for monitoring your thread. The thread pool information can be reached from the jboss.web domain. From the agent view, select the MBean name=http-localhost-8080,type=ThreadPool (or whatever your hostname is). The most interesting attributes are located in the lower part of the screen.
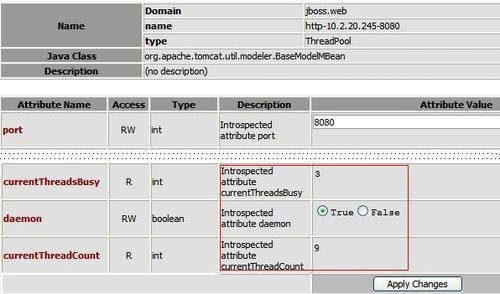
The currentThreadsBusy attribute accounts for the total number of threads that are handling HTTP requests. The attribute currentThreadCount states how many worker threads have been created up to that moment.
On the other hand, if you need low-level information about the request such as bytes sent/received, processing time, error count, max time, and request count, then you need to switch to the MBean name=http-localhost-8080,type=GlobalRequestProcessor that is available in the same jboss.web domain.