Java EE applications are usually considered to be three-tiered applications, as they are distributed over three layers.
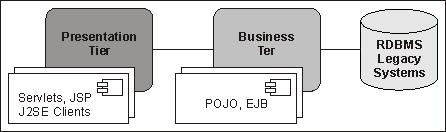
This diagram depicts a view of the three-layer architecture with the associated components. Here's a synthetic explanation:
- Presentation Tier: Built with dynamic pages and application clients, this layer is able to generate the user interface of the application.
- Business Tier: Also known as the middle tier, this layer contains the business logic of the application. All the business logic is centralized into this tier as opposed to client/server applications where the business logic is scattered between the frontend and the backend. The main benefit of having a centralized business tier is that the same business logic can support different types of clients.
- Data Tier: This provides the information infrastructure that is vital to the business processes of an Enterprise. This includes Enterprise infrastructure systems such as ERP, mainframe transactions processing, database systems, and other related legacy systems.
These layers provide an excellent model of how EJBs fit into a Java Enterprise system. EJBs provide both components for handling the application logic layer and JavaBeans-like abstraction of the data layer. There are actually three kinds of EJBs—Session Beans, Entities, and Message-driven Beans. In this chapter, we will discuss Session Beans and Entities. Message-driven Beans will be covered in Chapter 7, Developing Applications with JBoss Messaging Service.
Session Beans are reusable components that contain the logic for business processes. For example, a stock trading application might have a Session Bean that contains logic for buying/selling futures. Another Session Bean might collect the line numbers in a telecom company. Every object that performs a relatively short-lived task on behalf of client code is a good candidate for a Session Bean.
There are two types of Session Beans—Stateless Session Bean (SLSB) and Stateful Session Beans (SFSB). Each is used to model a different type of conversation between the client and the EJB.
A Stateless Session Bean does not maintain a conversational state for a particular client. When a client invokes the method of a Stateless Session Bean, the bean's instance variables may contain a state, but only for the duration of the invocation. When the method is finished, the state is no longer retained. Therefore, except for the duration of method invocation, all instances of a Stateless Session Bean are equivalent, allowing the EJB container to assign an instance to any client.
The container creates instances of a Stateless Session Bean and keeps them in a pool of instances. When there is a method call from a client, the container checks if there is a handy instance in the pool. If the resource is available, the Bean is associated to the client for the duration of the call. Then it is returned to the pool.
If all Bean instances are busy, the container checks the Stateless Bean's maxSize attribute; if maxSize is smaller than the pool size, then a new Bean instance is created and immediately served to the client.
If the Container is not able to create any more Beans, the last chance for our client is that a new resource will be available before the EJB timeout. (See the section Configuring Stateless Session Bean pool size later in the chapter.)
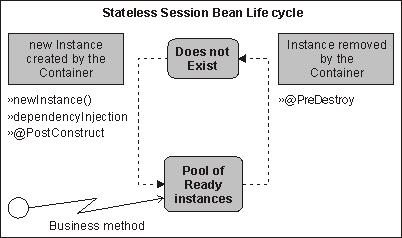
You can perform any initialization your Bean needs by tagging a method of your Bean with the @PostConstruct annotation.
@PostConstruct
public void init( ) {
// Initialize some resources here
}
The @PreDestroy annotation can also be used to free allocated resources before the Bean is removed.
@PreDestroy
public void destroy( ) {
// Deallocate resources acquired here
}
Tip
Use @PreDestroy with caution
We have tested the behavior of @PreDestroy even in critical situations such as a JBoss server crash. Before shutting down, JBoss 5 correctly invokes the callback method defined by the @PreDestroy annotation. However, this is not guaranteed to work the same in all application servers. When possible, evicting resources from an external application would be safer. For example, if you plan to restore a database structure before destroying the Bean, you could consider running an external script periodically.
It is now time to put all this theory into practice. In this section, we are going to develop our first session Bean. First, we will walk through the Bean-creation code in a good bit of detail, reinforcing concepts we just covered and introducing new ones. Then we will explain how to run the example.
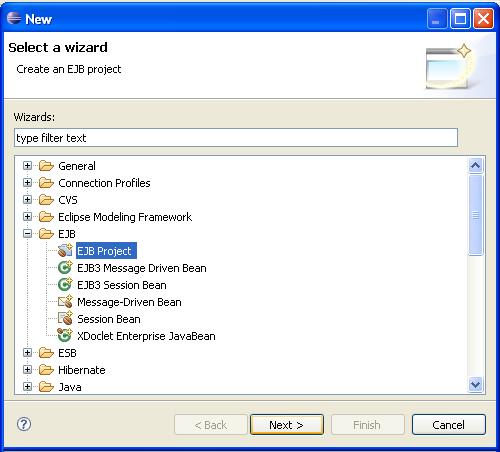
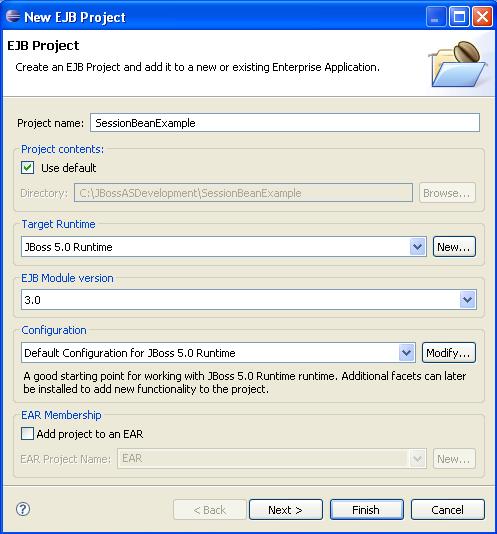
Launch Eclipse IDE and choose a workspace for our example. Once there, we need to create a new EJB Project. From File, select New | Other | EJB | EJB Project.
First, choose a name for this project. We will use SessionBeanExample. Then select the Target Runtime (JBoss 5). The EJB Module version is 3.0. The Configuration used for this chapter will be the default JBoss configuration. For this example, we don't need to create an EAR package, so we leave that flag unchecked.
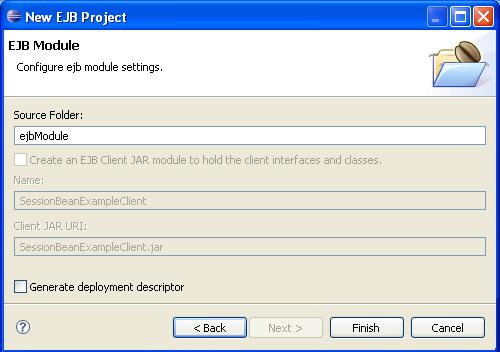
In the next menu, just leave the default Source Folder proposed (ejbModule). We have decided not to use an EAR packaging, so the wizard will not generate an EJB client JAR. The last option available is Generate deployment descriptor, which will create EJB deployment descriptors. We don't select this option in the following example:
When you click Finish, Eclipse will suggest you to move to the Java EE perspective. Accept by clicking Yes. Let's have a glimpse at the Project Explorer:

The folder ejbModule is the container for our EJB classes. You can see that Eclipse has automatically added both the JRE System Library and the JBoss 5.0 Runtime libraries. These libraries are automatically picked up from the JBoss 5 runtime configuration.
The first taste of EJB will be a simple Stateless Bean named Mailer that has a sendMail method for sending an e-mail.
Go to File | New | Other. Select the EJB 3 Session Bean option from the EJB folder. The New Session Bean wizard will appear. Choose com.packtpub.ejb.example1 as the Bean Package and Mailer as the Bean Name.
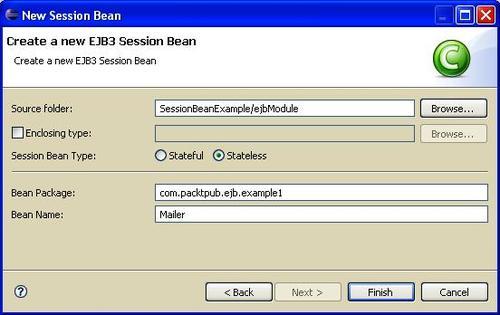
This image is slimmer than the actual wizard window; it has been intentionally resized to skim unused options from the page.
Leave the other options unchanged and click Finish.
You will see that the wizard has created a bare bones EJB with a remote interface named Mailer and an implementation class MailerBean. We are now going to add a method sendMail in the remote interface, which will be used to send an e-mail.
package com.packtpub.ejb.example1;
import javax.ejb.Remote;
@Remote
public interface Mailer {
public void sendMail(String aToEmailAddr,
String aSubject, String aBody);
}
}
Notice the @Remote annotation; it indicates that the interface Mailer is exposed as a remote service. If you would like to expose your EJB to local clients only, you would need the @Local annotation.
Tip
Most EJB 3 annotations are optional
If you don't specify the type of your interface, it's assumed that your EJB interface is a local interface. Actually, the EJB 3 specification mandates the use of a large set of default values for common EJB attributes.
Following is the concrete Bean implementation for the remote interface:
package com.packtpub.ejb.example1;
import javax.annotation.Resource;
import javax.ejb.*;
import javax.mail.*;
import com.packtpub.ejb.Mailer;
@Stateless [1]
@RemoteBinding(jndiBinding="remote/MailerEJB")
public class MailerBean implements Mailer {
...@Resource(mappedName="java:/Mail")
...private javax.mail.Session session;
...
...public void sendMail(String aToEmailAddr,
......... String aSubject, String aBody)
...... {
............
...... MimeMessage message = new MimeMessage( session );
...... try {
......
...... message.addRecipient(
...... Message.RecipientType.TO, new InternetAddress(aToEmailAddr)
...... );
...... message.setSubject( aSubject );
...... message.setText( aBody );
...... Transport.send( message );
...... }
...... catch (MessagingException ex){
...... throw new EJBException("Cannot send email. " + ex);
...... }
......}
...
}
Here the @Stateless
[1] annotation declares the EJB as a Stateless Session Bean. This is the only mandatory annotation for creating an SLSB.
Tip
Annotation shortcut
Fortunately, you don't have to remember all the annotations. Eclipse has a built-in shortcut key to display all annotations. Start typing "@" and press Ctrl + Space to browse between the available annotations. You can also use the same shortcut (Ctrl + Space ) to retrieve the parameters of an individual annotation.
The annotation @RemoteBinding is used here to assign a custom JNDI binding to your Bean. If we don't use this annotation, a default JNDI binding will be assigned to your Bean (in our case it would be MailerBean/remote).
Tip
Default JNDI bindings
The default JNDI for your EJBs is determined by the archive name and the Bean name.
If you deploy your Bean in a JAR file, the JNDI name is EJB-CLASS-NAME/local for local interfaces and EJB-CLASS-NAME/remote for remote ones.
If the application is deployed in an EAR archive, the default JNDI name is the EAR-FILE-BASE-NAME/EJB-CLASS-NAME/local for the stub of the local interface. For the remote interface, it is EAR-FILE-BASE-NAME/EJB-CLASS-NAME/remote.
In this sample we are "injecting" the mail session as an @Resource in our EJB. The support for resource injection makes accessing resources significantly easier, avoiding the need to look up the resource, cast it, and handle exceptions.
The last step is deploying your client and testing it. The quickest way to deploy an application to JBoss is copying the archive file (.jar , .war, .ear, and so on.) into the deploy folder of your configured server. Now we will see how to deploy your application from within the Eclipse environment.
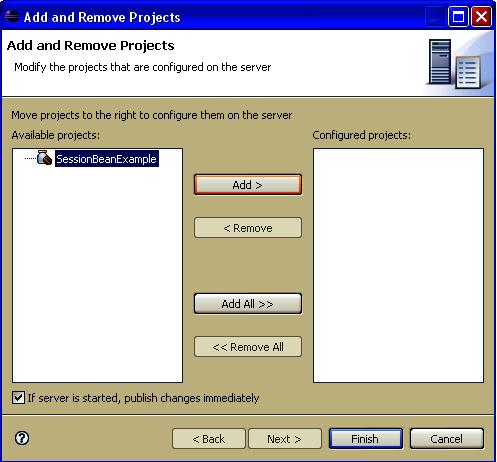
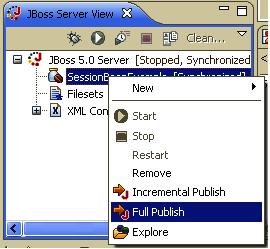
Switch to the JBoss Server View, which can be reached from Window | Open Perspective | Other. Right-click on your JBoss Server label and select Add and Remove Projects. A little wizard will let you move your applications in or out of your JBoss server. Add the SessionBeanExample project and click Finish.
Now expand your JBoss label. It should contain your new deployment unit SessionBeanExample; right-click on it and select Full Publish.
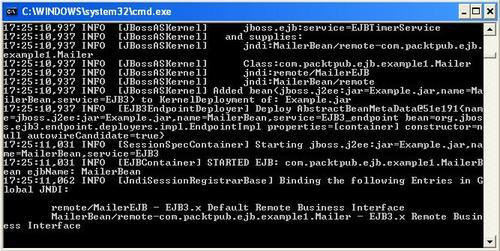
Now it's time to start JBoss AS, if you haven't already. Right-click on the JBoss 5.0 Server and choose Start. JBoss will start to throttle, your CPU will peak as well; however, don't panic but check on the console to see if your EJB has been deployed correctly.
Creating the EJB wasn't a big deal; let's see how to set up a remote client for testing it. Add another Java class to the project by selecting File | New | Class. Choose a convenient name and package. Following is our sample client:
package com.packtpub.example1.client;
import javax.naming.InitialContext;
import com.packtpub.ejb.Mailer;
public class MailClient {
public static void main(String[] args) throws Exception
{
InitialContext ctx = new InitialContext();
Mailer mailer = (Mailer) ctx.lookup("remote/MailerEJB");
mailer.sendMail("[email protected]","subject","text");
}
}
The InitialContext constructor is used to look up resources on the network. When you are getting an initial context from outside of the EJB container, you must specify the properties for the initial context. These properties include the InitialContextFactory class, the URL of the server, and possibly authentication parameters. These properties can either be created programatically using a java.util.Properties object, or can be loaded at runtime from the jndi.properties file that can be found in the classpath.
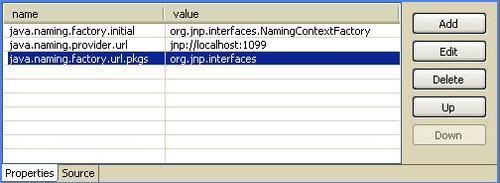
In order to get acquainted with the Eclipse build path, we will show how to provide these properties with a jndi.properties file. Create a new folder named client-config somewhere in your project. Add a new file named jndi.properties in it.
java.naming.factory.initial=org.jnp.interfaces.NamingContextFactory
java.naming.provider.url=jnp://localhost:1099
java.naming.factory.url.pkgs=org.jnp.interfaces
Eclipse is a sensible tool and recognizes this file as being a configuration file. You can view or edit it either from a graphical interface or from a plain text editor.
Now we are going to tell Eclipse to append this folder to the classpath. Right-click on your project and select Properties. There, select the Java Build Path option.
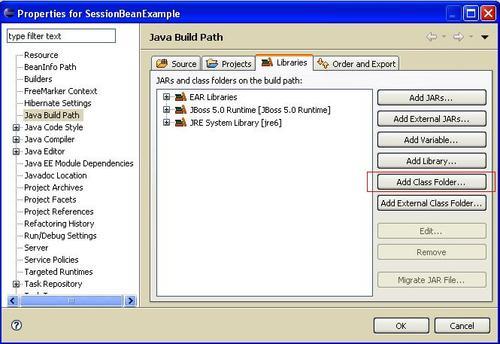
Click on the Add Class Folder... button and select the newly created client-config directory in the Class Folder Selection window.
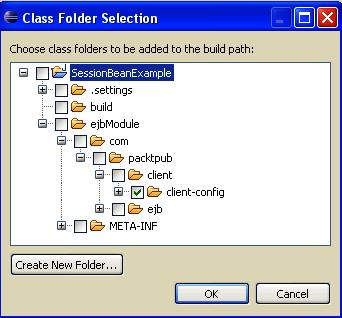
Now your client is instructed to hunt for classes/files in the client-config folder. Running your application is just a matter of right-clicking on your class and selecting Run As | Java Application.
EJB 3.0 allows you to define interceptor methods that are called around the business methods and life cycle events of the Bean instances. An interceptor method will always be executed before any of the Bean's business methods are invoked. The great benefit of interceptors is that they are a seamless way to add aspect-oriented programming to your business methods.
Interceptors can be bound to your EJB in three different ways:
- Default interceptors: These interceptors need to be declared in your
ejb-jar.xmland are valid across all your EJB deployed.<assembly-descriptor> <interceptor-binding> <ejb-name>*</ejb-name> <interceptor-class>com.packtpub.DefaultInterceptor </interceptor-class> </interceptor-binding> ... </assembly-descriptor> <assembly-descriptor> <interceptor-binding> <ejb-name>*</ejb-name> <interceptor-class>sample.interceptor. MyDefaultInterceptor</interceptor-class> </interceptor-binding> ... </assembly-descriptor>
- Class-level interceptors: This kind of interceptor wraps calls to every method of the enclosing EJB.
@Stateless @Interceptors(value= com.packtpub.SampleInterceptor.class) public class StatelessBean { } - Method-level interceptors: The method level interceptor intercepts only calls to a single method.
@Interceptors(value=com.packtpub.MethodInterceptor.class)
public void doSomething() { ... }
In our example, we will apply an interceptor at method level, which can be used to validate the parameters of the sendMail method.
public class MailerBean implements Mailer {
@Interceptors(value= com.packtpub.ejb.MailInterceptor.class)
public void sendMail(String aToEmailAddr,
String aSubject, String aBody) { }
}
This is the interceptor implementation, which can be added as a new class to your application.
package com.packtpub.ejb;
import javax.ejb.EJBException;
import javax.interceptor.*;
public class MailInterceptor {
@AroundInvoke [1]
public Object checkMail(InvocationContext ctx) throws Exception
{
System.out.println("*** Entering MailInterceptor method " + ctx.getMethod().getName());
String mailAddress = (String)ctx.getParameters()[0];
if (mailAddress.indexOf("@")== -1 ||
mailAddress.indexOf(".") == -1) {
throw new EJBException("Invalid mail address");
}
try
{
return ctx.proceed(); [2]
}
catch(Exception e)
{
throw e;
}
finally
{
System.out.println("*** Leaving MailInterceptor");
}
}
}
As you can see, EJB 3.0 interceptors take the form of methods annotated with the @javax.ejb.AroundInvoke
[1] annotation. Our checkMail method validates the email address and then, if successful, invokes the method ctx.proceed()
[2]. This method is used to invoke the next interceptor in the chain (if you had defined any) and finally the business method.
Interceptors are particularly useful if you need to perform fine-grained activities such as logging, performance measuring, parameters validation, or any other functionality in your business methods, without modifying the methods' code.
Stateful Session Beans are called stateful because they maintain a conversational state with the client. In other words, they have instance fields that can be initialized and changed by the client with each method invocation. The Bean can use the conversational state as it processes business methods invoked by the client.
Stateful Session Beans are usually developed to act as agents for the client, managing the interaction of other Beans and performing work on behalf of the client application.
Whenever a new client session is started, the default constructor of the SFSB is invoked, resources are injected (if any), and the @PostConstruct callback takes place. At this stage, the newly created Bean is stored in a cache and executes the requested business method invoked through the business interface by the client.
If the client remains idle for a certain amount of time, the container passivates the bean instance. Passivating a Stateful bean means moving it from the active cache, serializing, and storing it in temporary storage. If the client happens to invoke a passivated bean, it is then reactivated (brought back into memory from temporary storage).
If the client does not invoke a passivated bean instance for a period of time, it is destroyed. The Bean can also be destroyed on demand, by means of the "remove" method.
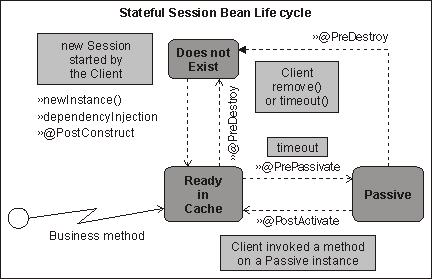
In addition to the @PostConstruct and @PreDestroy life cycle callback methods, SFSB also has the @PrePassivate and @PostActivate callback methods. A @PrePassivate method is invoked before a Stateful Bean instance is passivated. This can be used to release resources that cannot be serialized such as database connections or sockets. If needed, you might save some "pointers" to your connections into serializable fields.
The @PostActivate callback is invoked after a bean instance is brought back into the memory and is method ready. This callback can be used accordingly to restore the Bean's functionalities such as dropped connections.
Another annotation, which is specific to SFSB, is the @Remove annotation. When a method marked with the @Remove annotation is called, the container will remove the Bean instance from the cache after the method is executed. For example, the following removeBean() method, which has the @Remove annotation, can be used to evict the Bean from memory.
@Remove
public void removeBean()
{
// The method body can be empty.
System.out.println("Session terminated");
}
Do you like gambling? To make this reading lighter, we will dissect Stateful Beans with a tiny game application. Add a new EJB 3 Session Bean named BlackJack to your project. From the File Menu select New | Other | EJB | EJB3 Session Bean.
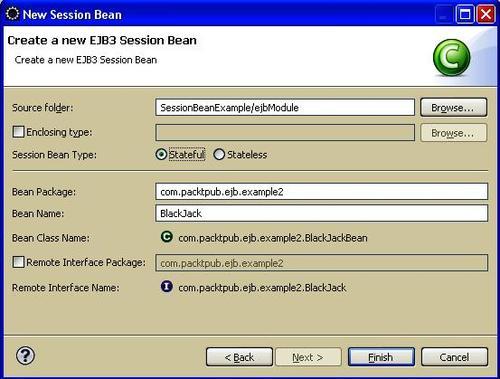
Here is the implememtation class:
package com.packtpub.ejb.example2;
import javax.ejb.Remote;
@Remote
public interface BlackJack {
public int deal();
public int quit();
}
As you can see, it is a pretty simple class. Black Jack fans might be disappointed that we did not consider all aspects of the game; however, this will give you an immediate perception of how an SFSB works.
package com.packtpub.ejb.example2;
import java.util.Random;
import javax.ejb.*;
import com.packtpub.ejb.BlackJack;
@Stateful [1]
public class BlackJackBean implements BlackJack {
int score;
public int deal() { [2]
Random randomGenerator = new Random();
int randomInt = (randomGenerator.nextInt(13)) + 1;
if (randomInt > 10) randomInt = 10; // Q J - K
score+=randomInt;
if (score > 21){
score = 0;
throw new BustedException("You Busted!");
}
return score;
}
@Remove
public int quit() { [3]
return score;
}
}
The bean, declared as Stateful
[1], contains only two methods. The deal method [2], used for extracting a random number that is added to the score, and the quit method [3] that destroys the Bean instance when the game ends. In this class, we use a BustedException class that simply extends the EJBException.
package com.packtpub.ejb.example2;
import javax.ejb.EJBException;
public class BustedException extends EJBException {
public BustedException(String string) {
super(string);
}
}
The client application is a plain Java client, which requests the player to deal or quit.
package com.packtpub.client.example2;
import java.util.Scanner;
import javax.naming.*;
import com.packtpub.ejb.example2.BlackJack;
public class BlackJackClient {
public static void main(String[] args) throws Exception
{
Context ctx = new InitialContext();
BlackJack b = (BlackJack) ctx.lookup ("BlackJackBean/remote");
Scanner keyIn = new Scanner(System.in);
while (true) {
System.out.print("
Enter 'd' to deal and 'q' to quit");
String key = keyIn.next();
if (key.startsWith("d")) {
System.out.println("You have got "+b.deal());
}
else if (key.startsWith("q")) {
System.out.println("You quit with "+b.quit());
break;
}
else { System.out.print("
Unrecognized character");
}
}
}
}
Run your application by right-clicking on the class and selecting Run as | Java Application. If you want to send keyboard input to an Eclipse application, you need to select the Console window, thus making it the active window.