
In the first deliverable, we will show how easily you can turn a plain Java class into a Web Service. The newly created service will be then tested using both Java and non-Java clients. The second part of this chapter will draw your attention to how EJB can be exposed as Web Service endpoints.
We will approach Web Services with a simple Java class, which will be used as endpoint for our Web Service. If you browse across the Eclipse menus, you will find that the Enterprise release of this IDE ships with a Wizard for Web Service creation. You can find it the New | Other | Web Services menu.
However, we will not use this wizard for creating our bottom-up Web Services and we encourage you to do the same. As you'll see in a while, all your effort will be adding some annotations to your classes; furthermore, using a Web Service Wizard locks you to a development environment, making it difficult for you to switch to another IDE that hasn't got the same features.
That being said, a good compromise will be starting a new dynamic web project; name the project as WebServiceProject. Now add to it a Java class named com.packtpub.webservice.example1.POJOWebService. This class has a method calculatePower that returns the power of an argument, as shown in the following highlighted code:
public class POJOWebService
{
public double calculatePower(double argument,
double power)
{
return Math.pow(argument,power);
}
}
Now we will turn this simple class into a Web Service by adding the mandatory @WebService annotation.
package com.packtpub.webservice.example1;
import javax.jws.WebMethod;
import javax.jws.WebParam;
import javax.jws.WebResult;
import javax.jws.WebService;
import javax.jws.soap.SOAPBinding;
@WebService(targetNamespace = "http://www.packtpub.com/", serviceName = "CalculatePowerService")
@SOAPBinding(style = SOAPBinding.Style.RPC)
public class POJOWebService
{
@WebMethod
@WebResult(name="result") [1]
public double calculatePower(@WebParam(name="base") [2]
double base,
@WebParam(name="exponent")
double exponent
{
return Math.pow(base,exponent);
}
}
Inside the @WebService annotation, you can specify additional elements such as the targetNamespace element that declares the namespace used for the WSDL elements generated by the Web Service. If you don't specify this element, the Web Service container will use the Java package name to generate a default XML namespace.
You can also use the serviceName element to specify the service name. The name specified using serviceName is used for generating the name attribute in the service element in the WSDL. If you don't specify the serviceName element, the server will generate it using the default, which is the bean class name appended with Service.
In the next row, we have stated that the Web Service is of the type Remote Procedure Call, by using the @javax.jws.SOAPBinding annotation. Possible values are DOCUMENT and RCP, the first one being the default value.
Attaching the @WebMethod attribute to a public method indicates that you want the method exposed as part of the Web Service.
The @WebParam
[2] annotation is used to specify the parameter's name to exhibit in the WSDL. You should always consider using a WebParam annotation, especially using multiple parameters, else the WSDL will use the default argument parameter (in this case arg0), which is meaningless for the Web Service consumers.
The @WebResult annotation [1] is quite similar to @WebParam in that it can be used to specify the name of the value returned by the WSDL.
Note
What are the defaults for Web Services?
JAX WS specification mandates only a minimal set of annotations to be added to your Web Service (actually only @WebService is mandatory). If you don't provide a target namespace, your Web Service will expose the Java class package name as target namespace in reverse order (in our example, http://example1.webservice.packtpub.com/).
The serviceName, if not included, will be defaulted to the class name with "Service" appended (in the example it would be POJOWebServiceService).
Finally, if parameter names are not specified, the default is "argN", where N is replaced with the zero-based argument index. Therefore, in our example, the list of arguments would turn into "arg0" and "arg1".
Your Web Service is now completed. In order to register it on the JBossWS directory, you have to add it to your web.xml and declare it as a servlet:
<servlet>
<servlet-name>POJOService</servlet-name>
<servlet-class>com.packtpub.webservice.example1.POJOWebService</servlet-class>
</servlet>
<servlet-mapping>
<servlet-name>POJOService</servlet-name>
<url-pattern>/pojoService</url-pattern>
</servlet-mapping>
Now deploy your web application in the usual way, that is, first add the project to your server. Then choose Full Publish from the JBoss AS Server View.
JBoss AS will provide a minimal output on the console, which informs you that the Web Service project has been deployed and the WSDL file generated.
16:36:57,224 INFO [DefaultEndpointRegistry] register: jboss.ws:context=WebServi
ceProject,endpoint=POJOService
16:36:58,068 INFO [TomcatDeployment] deploy, ctxPath=/WebServiceProject
16:37:01,427 INFO [WSDLFilePublisher] WSDL published to: file:/C:/jboss-5.0.0.G
A-1.6/server/default/data/wsdl/WebServiceProject.war/HelloWorldPOJOService.Wsdl
From this short log, you can pick up some useful information. For example, the first line states that the Web Service has been bound in the endpoint registry as "POJOService". Next is the information about the web context path, which by default has the same name as your project, that is, "WebServiceProject". The last piece of information is about the generated WSDL, which is placed in the server/default/data/wsdl/WebServiceProject.war folder.
The data directory contains a versioned list of all generated WSDL. So, you might find all the history of your Web Service tagged as CalculatePowerServiceXXX.wsdl.
JBossWS ships with a Web Service console, which gathers some useful information about the services deployed. In fact, its most useful option is the list of endpoint contracts available, which is needed when developing our clients.
You can access the console using the URL http://localhost:8080/jbossws. (Of course replace localhost with the actual host name when accessing from a remote browser.)
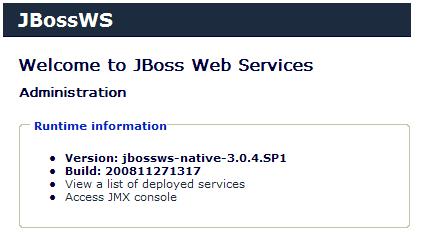
Follow the link View a list of deployed services, which will take you to the list of available Web Services.
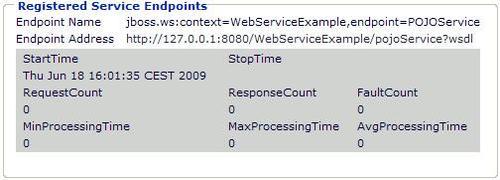
Apart from some statistics information, we have got here the Web Service endpoint address, which is http://127.0.0.1:8080/WebServiceProject/pojoService?wsdl.
If you click on the WSDL link, you will see in the browser the contract published for the Web Service.

In the screenshot, you can see how the required (and optional) annotations mix and match into the WSDL contract. In particular, you can appreciate the usefulness of the @WebParam annotation, which enriches the WSDL with information about the parameter, which would be otherwise named with meaningless default values.
If you look at the JBOSS_HOME/bin folder, you will find a few handy tools for Web Service development. Let's have a look at them:
|
Command |
Action |
|---|---|
|
|
Generates JAX-WS portable artifacts, and provides the abstract contract. Used for bottom-up development. |
|
|
Consumes the abstract contract (WSDL and schema files), and produces artifacts for both a server and client. Used for top-down and client development. |
|
|
Executes a Java client (has a main method) using the JBossWS classpath. |
The reason for using these tools resides in the JAX-WS specification, which requires that a Web Service stack provides some offline tools for generating Web Service wrapper classes. When you deployed your Web Service, the application server created these Wrapper classes along with the WSDL contract; however, if you need to port your Web Service to another environment, you will need to generate these artifacts offline.
For example, if you want to produce the abstract contract starting from your Java classes, you could use the wsprovide command, which has the following syntax:
usage: WSProvide [options] <endpoint class name>
For a detailed explanation of all wsprovide's options, we suggest you to consult the JBossWS documentation. In our example, we will instruct the tool to generate the WSDL (-w option) and to output the file (-o option) in a folder of our project.
Let's first set the path to your project in a shell variable:
set PATH_TO_PROJECT=C:chap08WebServiceProject #Windows
$PATH_TO_PROJECT=/usr/eclipse/WebServiceProject #Unix
Then you have to launch the wsprovide shell to generate the WSDL. Again we will illustrate both the Windows version and the Unix one:
wsprovide -w -o %PATH_TO_PROJECT%wsdl --classpath %PATH_TO_PROJECT%uildclasses com.packtpub.webservice.example1.POJOWebService #Win
wsprovide.sh -w -o $PATH_TO_PROJECT/wsdl --classpath $PATH_TO_PROJECT/build/classes com.packtpub.webservice.example1.POJOWebService #Unix
This wsprovide shell script is placed in the JBOSS_HOME/bin folder in the two varieties—wsprovide.cmd (in the case of Windows) and wsprovide.sh (in the case of Unix/Linux). As you might guess, you can either issue this command from this folder or you can opt for adding the JBOSS_HOME/bin folder in your system PATH.
The output of wsprovide will be as follows:
Generating WSDL:
HelloWorldPOJOService.wsdl
If you need to generate your Web Service client, you may find the wsconsume tool quite useful. This tool is useful because it consumes the WSDL contract and generates portable artifacts for both client and server development.
We highly recommend you to use this approach for client development because it helps you to design loosely coupled clients that are not tied to any particular environment, location, or even programming language. After all that's why we are using Web Services to cleanly decouple the client from the server, otherwise we would have stuck to RPC technologies that are tightly coupled but obviously faster.
If you are not too comfortable with shell scripts, then you can configure Eclipse to execute them directly from the IDE and even associate an icon in the toolbar to the command. Go to the option Run | External Tools | External Tool Configurations. The External Tools wizard is quite intuitive. You have to specify your command line tool (In the Location field), then you have to provide arguments just as you would do with the command line.
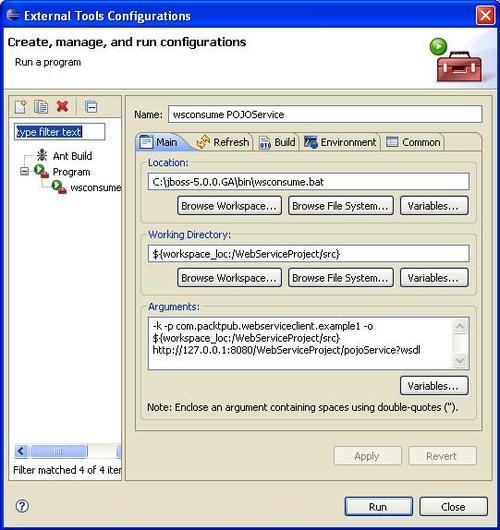
We have added a few more parameters to our script. The-k option specifies to generate Java sources. The-p parameter is used to specify the package name of our artifacts. Finally, the-o option is the output destination of our classes. Notice the use of Eclipse variables that let you use a path relative to the workspace (for a full list of all the available Eclipse variables, click on the Variables button).
The last argument of wsconsume is the WSDL document of our POJOWebService, which must be available on the server when you issue Run command.
Now refresh your Project Explorer view and take a look at the generated classes:
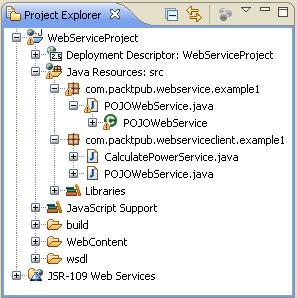
As you can see, wsconsume has generated two source files—POJOWebService.java and CalculatePowerService.java. The first one is merely the service interface for our Web Service as it's obtained from the WSDL. The other file, CalculatorPowerService.java, is the client artifact. Let's have a look at it:
@WebServiceClient(name = "CalculatePowerService", targetNamespace = "http://www.packtpub.com/", wsdlLocation = "http://127.0.0.1:8080/WebServiceProject/pojoService?wsdl") [1]
public class CalculatePowerService
extends Service
{
private final static URL CALCULATEPOWERSERVICE_WSDL_LOCATION;
static {
URL url = null;
try {
url = new URL("http://127.0.0.1:8080/ WebServiceProject/pojoService?wsdl");
} catch (MalformedURLException e) {
e.printStackTrace();
}
CALCULATEPOWERSERVICE_WSDL_LOCATION = url;
}
public CalculatePowerService(URL wsdlLocation, QName serviceName) {
super(wsdlLocation, serviceName);
}
public CalculatePowerService() {
super(CALCULATEPOWERSERVICE_WSDL_LOCATION, new QName("http://www.packtpub.com/", "CalculatePowerService"));
}
@WebEndpoint(name = "POJOWebServicePort") [2]
public POJOWebService getPOJOWebServicePort() {
return (POJOWebService)super.getPort( new QName("http://www.packtpub.com/", "POJOWebServicePort"), POJOWebService.class);
}
}
The generated class extends the javax.xml.ws.Service and is tagged with the @WebServiceClient annotation [1]. This annotation provides a client view of the Web Service, which is uniquely identified by the wsdlLocation and targetNamespace elements.
Tip
Performance tip
When you are running your Web Service clients in a production environment, it's advised to refer to a local copy of your WSDL. This will avoid the burden of network latency, each time you have to retrieve the WSDL from a remote location.
The other relevant annotation is @WebEndpoint
[2], which is used to specify the port name of the Web Service. By definition, a Web Service port is an abstract set of operations supported by one or more endpoints. Its name attribute provides a unique name among all port types defined within in the enclosing WSDL document. In our case, the name attribute (obtained from the WSDL) is POJOWebServicePort.
Invoking our Web Service is just a matter of requesting the Web Service port and issuing the operations, which are listed in the exposed interface. For this purpose, add a class to your project and name it com.packtpub.webserviceclient.example1.Client.
package com.packtpub.webserviceclient.example1;
public class Client {
public static void main(String[] args) {
if (args.length != 2) {
System.err.println("usage: Client <arg> <power>");
System.exit(1);
}
double arg = Double.parseDouble(args[0]);
double power = Double.parseDouble(args[1]);
CalculatePowerService pojo = new CalculatePowerService();
POJOWebService pojoService = pojo.getPOJOWebServicePort();
System.out.println("Result is " +pojoService.calculatePower(arg,power));
}
}
As you can see, the client is not aware of the Web Service location, nor does it know any details about the OS or the Web Service language.
You can execute it either from the Eclipse environment or from the wsrunclient shell, which is a handy tool for Web Service clients located in the JBOSS_HOME/bin folder. (Actually, it builds up for you the correct Web Service classpath for client execution.)
wsrunclient --classpath %PATH_TO_PROJECT%uildclasses com.packtpub.webservice.example1.Client 2 4 #Win
wsrunclient.sh --classpath $PATH_TO_PROJECT/build/classes com.packtpub.webservice.example1.Client 2 4 #Unix
The expected output of wsrunclient should be:
Result: 16.0
Tip
The Black art of Web Services
If you have been working with Web Services before, you have probably drawn the conclusion that they are intrinsically difficult, much more then it seems at first glance. Writing a Web Service in Java itself is not hard at all, what's difficult is to connect all the standards such as SOAP, WSDL, XML, and Java EE container services.
To make things harder we must account for a few issues with Eclipse environment and also with XML parsers library which are anyway solved in the newer JBoss 5.1.0 release.
To make your journey through Web Services as pleasant as it can be, here's a checklist of fixes you should know before diving into JBossWS.
When you add a new JBoss server runtime to your Eclipse Java EE project, a system library is created and placed in the project build path. This includes two jar files (jaxws-rt.jar, jaxws-tools.jar) that might cause a standalone client error as the JAX-WS provider is accessed by a jar service loader. Depending on which jar is in the classpath, it either loads the JBossWS one or the Sun RI one. In the latter case, a weird java.lang.UnsupportedOperationException is thrown to the client.
So as a general rule, use the wsclient utility to run client Web Services instead of running them through Eclipse. If you feel uncomfortable with shells, you can still mimic the behavior of the wsclient utility by having a look at its content and adding the right libraries to the Eclipse build path. A quick fix that we have tested on our examples is replacing Eclipse's JBoss Runtime libraries with JBossWS native libraries (http://www.jboss.org/jbossws) and then adding the single libraries required for the project.
Another advice you should consider, is switching to release 5.1.0 of the application server, which fixes some issues relative to the XML parses libraries that are now overridden in the JBOSS_HOME/lib/endorsed lib (see this interesting thread http://www.jboss.org/index.html?module=bb&op=viewtopic&t=158265).
Finally, if you still cannot run your Web Service clients, check that the JBoss variant release matches with the JDK release, for example, verify that you use the JDK 1.6 variant for running the JBoss 5.1.0.
JBoss Web Services can be consumed by a variety of external applications; you can easily find on the Web, examples of .NET or PHP Web Service clients.
If you don't have installed the required client environment on your PC, it will take a while to complete a full Web Service example. We suggest you to try the versatile Flex platform. Flex is a free, open source framework for building highly interactive, expressive web applications that deploy consistently on all major browsers, desktops, and operating systems. All you need is the Adobe Flex Builder 3 software, which is a highly productive, Eclipse-based IDE. You can download a trial copy of it at http://www.adobe.com/cfusion/entitlement/index.cfm?e=flex3email.
Flex uses a declarative language, MXML, that has many built-in functions. For our purpose we'll use the<mx:WebService> tag. It requires mainly knowing the WSDL address of the Web Service and the operation to invoke.
public var o:Object;
private function callWS():void
{
webService.calculatePower.send();
}
private function displayfault(evt:FaultEvent):void {ta.text+="FAULT";}
private function getMyJobMng(evt:ResultEvent):void {
o=evt.result;
ta.text = "Result from operation : " + o ;
}
]]>
</mx:Script>
<mx:WebService id="webService"
wsdl="http://127.0.0.1:8080/WebServiceProject/ pojoService?wsdl"
useProxy="false">
<mx:operation name="calculatePower"
resultFormat="object"
result="getMyJobMng(event);"
fault="displayfault(event);">
<mx:request xmlns="" >
<argument>{argument.text}</argument>
<power>{power.text}</power>
</mx:request>
</mx:operation>
</mx:WebService>
Running the example will invoke the calculatePower service that is hosted by the POJO service.

So far we have seen how you can promote your Java classes to Web Services by merely adding some annotations at the class level; however, the JAX-WS specification also allows exposing a Stateless Session Bean as Web Services by deploying it as a JAR file in an EJB container.
For this purpose, we will create a quintessential Account Manager that registers user deposits and withdrawals from their accounts. In this example, we will exhibit only the Session Bean façade, which is our main concern. In the book source code, you can find the complete example including the entity classes for persisting the accounts.
Start by creating a new EJB Project WebServiceEJBProject and add a new Stateless Session Bean named com.packtpub.webservice.example2.AccountManager. The EJB Wizard will create the interface EJBWebService for you along with its implementation class EJBWebServiceBean.
In our interface, we will add three basic methods for managing the accounts plus a generic method for querying data.
package com.packtpub.webservice.example2;
import java.util.List;
import javax.ejb.Remote;
@Remote
public interface AccountManager {
public void createAccount(String name);
public void withdraw(String name, Double amount) throws AccountException;
public void deposit(String name, Double amount);
public List<Account> findAccounts();
}
The implementation class follows here:
package com.packtpub.webservice.example2;
EJB, as Web Servicesexposingimport java.util.List;
import javax.ejb.*;
import javax.jws.*;
import javax.persistence.*;
import org.jboss.ejb3.annotation.*;
@Stateless
@RemoteBinding(jndiBinding="AccountManagerEJB/remote")
@WebService(targetNamespace = "http://www.packtpub.com/",
serviceName = "AccountManagerService") [1]
public class AccountManagerBean implements AccountManager {
@PersistenceContext(unitName="AppStore")
private EntityManager em; [2]
@WebMethod
public void createAccount(@WebParam(name="name")
String name) { [3]
Account account = new Account();
account.setName(name);
account.setAmount(0d);
em.persist(account);
}
@WebMethod
public void withdraw(@WebParam(name="name")
String name,
@WebParam(name="amount")
Double amount) [4]
throws AccountException
{
Query query = em.createQuery("FROM Account WHERE name= :name");
query.setParameter("name", name);
Account account = (Account)query.getSingleResult();
double currentAmount = account.getAmount().doubleValue();
double newAmount = currentAmount - (amount.doubleValue());
if (newAmount < 0) {
throw new AccountException("Unsufficient funds for account "+ account.getAccountId());
}
account.setAmount(newAmount);
em.persist(account);
}
@WebMethod
public void deposit(@WebParam(name="name")
String name,
@WebParam(name="amount")
Double amount) [5]
{
Query query = em.createQuery("FROM Account WHERE name= :name");
EJB, as Web Servicesexposingquery.setParameter("name", name);
Account account = (Account)query.getSingleResult();
double currentAmount = account.getAmount().doubleValue();
account.setAmount(currentAmount + (amount.doubleValue()));
em.persist(account);
}
@WebMethod
public List<Account> findAccounts() [6]
{
Query query = em.createQuery("FROM Account");
List <Account>items = query.getResultList();
return items;
}
}
The AccountManager is declared as @Web Service
[1] as using the namespace www.packtpub.com
and the service name AccountManagerService.
This EJB will use a PersistenceContext, which is injected [2] to provide JPA connectivity. In our sample, we are recycling the AppStore's persistence.xml, which we created in the Chapter 5, Developing JPA Entities.
The method createAccount
[3] allows our client to create a new account with a starting empty account. The methods withdraw
[4] and deposit
[5] are conceptually used to add/remove money from the account. Finally, the method findAccounts
[6] returns the list of accounts created.
Tip
Exposing all EJB methods as Web Service
In this example, we are exposing all EJB methods to Web Service clients by adding the @WebMethod annotation before each method. A shortcut to perform the same thing is by adding the @WebService annotation on the EJB interface, which automatically exposes all EJB methods.
Your EJB endpoint doesn't need any extra configuration like the POJO Web Service. Add the project to your server and deploy it to JBoss AS.
In the Web Service console, verify that your AccountManagerService has been added to the available services.

If you have kept an eye on the Web Service contract, you surely have noticed that the method withdraw raises a runtime exception named AccountException.
When implementing a Web Service using Java and JAX-WS, you might want to code your exceptions using Java natural style, that is, throwing an exception from your service operation. In terms on Web Services, this would require the runtime translation of the exception into a SOAP fault that is received on the client. For example, here's how the AccountException is translated into the WSDL:
<operation name="withdraw" parameterOrder="withdraw">
<input message="tns:AccountManagerBean_withdraw" />
<output message="tns:AccountManagerBean_withdrawResponse" />
<fault message="tns:AccountException" name="AccountException" />
</operation>
If you don't want to rely on JAX WS default mapping of exceptions, then you can use the @WebFault annotation:
@WebFault(name = "AccountExceptionFault",
targetNamespace = "http://www.packtpub.com/")
public class AccountException extends RuntimeException implements Serializable{
public AccountException(String error) {
super(error);
}
public AccountException( ) {
super();
}
}
The fault message, as a consequence of the @WebFault annotation, would become:
<operation name="withdraw" parameterOrder="withdraw">
<input message="tns:AccountManagerBean_withdraw" />
<output message="tns:AccountManagerBean_withdrawResponse" />
<fault message="tns:AccountExceptionFault" name="AccountExceptionFault" />
</operation>
If you have not skipped the first Web Service example, creating a client for our EJB Web Service should be a matter of seconds.
We will again use wsconsume to generate the client artifacts and wrapper classes. Go to Run | External tools | External tools Configuration and add the following configuration for the wsconsume tool.
-k -p com.packtpub.webserviceclient.example2 -o ${workspace_loc:/WebServiceEJBProject/ejbModule} http://127.0.0.1:8080/WebServiceEJBProject/AccountManagerBean?wsdl
Running the tool will generate a quite a lot of classes as shown from the Project Explorer view:
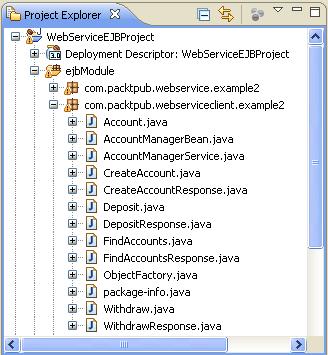
As you can see, wsconsume has generated both the service artifacts and the JAX WS client for the Web Service. The class AccountManagerService is the JAX-WS Client, which we will use to interact with the Web Service.
The class AccountManageBean contains the ServiceEndpoint interface with all exposed service methods. In this interface, each service method is wrapped by a Request/Response wrapper. For example, the createAccount method declares a wrapper Bean for the request named CreateAccount, along with a response wrapper Bean named CreateAccountResponse.
@WebMethod
@RequestWrapper(localName = "createAccount", targetNamespace = "http://www.packtpub.com/", className = "com.packtpub.webserviceclient.example2.CreateAccount")
@ResponseWrapper(localName = "createAccountResponse", targetNamespace = "http://www.packtpub.com/", className = "com.packtpub.webserviceclient.example2.CreateAccountResponse")
public void createAccount(String name);
For testing our example, we will set up a minimal client class that creates an account, performs some operations on it, and then invokes the findAccounts method that rolls out the list of accounts with their balance.
package com.packtpub.webserviceclient.example2;
public class Client {
public static void main(String[] args) {
AccountManagerService accountService = new AccountManagerService();
AccountManagerBean ejb = accountService.getAccountManagerBeanPort();
ejb.createAccount("John Nash");
ejb.deposit("John Nash", 1000d);
ejb.withdraw("John Nash", 500d);
List <Account> list = ejb.findAccounts();
for (int ii=0;ii<list.size();ii++) {
Account acc = list.get(ii);
System.out.println(acc.getName());
System.out.println(acc.getAmount());
}
}
}
Running the test client will return the balance for the single account, registered in the name of professor John Nash.
In the above example, we are creating a Service stub in the client code in order to access the Web Service. However, this is a costly operation and you might consider using the @WebServiceRef annotation, which is used to declare a reference to a Web Service.
This annotation follows the Resource pattern exemplified by the javax.annotation.Resource annotation in JSR-250. However, JBossWS provides some additional properties that extend the JSR specification; these include:
- Definition of the port that should be used to resolve a container-managed port
- Definition of the stub property settings for stub objects
- Definition of the URL of a final WSDL document to be used
For example, in the following EJB, we are declaring a reference to our AccountManagerService and injecting a service stub into the accountService field:
@Stateless
public class EJBWebServiceClientBean implements EJBWebServiceClient {
@WebServiceRef(name = "EJBWebService",wsdlLocation = "http://127.0.0.1:8080/WebServiceEJBProject/AccountManagerBean?wsdl")
public AccountManagerService accountService;
}
You can then safely use the accountService reference in your EJB to invoke the Web Service operations defined in AccountManagerService.
Web Services are all about messaging. A message enters the server and another is returned after the Web Service is invoked. A Handler is simply a class that pre-processes the message before it reaches the endpoint and also post-processes the message before it is returned to the client.
The Handler class can be used to perform core operations on the SOAP message like validations on the SOAP request message, to encrypt or decrypt the message for security reasons, or to perform logging at various points while the SOAP request is served.
We will present here a sample Handler, which performs some basic operations on the messages targeted at the AccountManagerService. The first step we need to do is declaring the Handler Chain in our EJB:
import javax.jws.HandlerChain;
@HandlerChain(file = "META-INF/jaxws-handlers-server.xml")
public class AccountManagerBean implements AccountManager {
...
}
The annotation HandlerChain associates the Web Service with an externally defined handler chain. The chain of Web Service can be reached both from a virtual path (http://yourhost:8080/jaxws-handlers-servers.xml) and from a physical path (as in our case).
The next step is adding a file named jaxws-handlers-server.xml into the META-INF folder of your application. This file will contain the list of declared Handler Chains:
<handler-chains xmlns="http://java.sun.com/xml/ns/javaee"
xmlns:xsi="http://www.w3.org/2001/XMLSchema-instance"
xsi:schemaLocation="http://java.sun.com/xml/ns/javaee javaee_web_services_1_2.xsd">
<handler-chain>
<protocol-bindings>##SOAP11_HTTP</protocol-bindings>
<handler>
<handler-name>DebugHandler</handler-name>
<handler-class>com.packtpub.webservice.example2.DebugHandler</handler-class>
</handler>
</handler-chain>
</handler-chains>
Here, we have declared a single Handler named DebugHandler, which is mapped by the class com.packtpub.webservice.example2.DebugHandler.
The first thing you have to know, when coding your Handler, is that you have to extend the class GenericSOAPHandler.
public class DebugHandler extends GenericSOAPHandler
{
...
}
Once inside your Handler, you can override the two main methods—handleInbound and handleOutbound. These methods are intuitively called for pre-processing and post-processing the message.
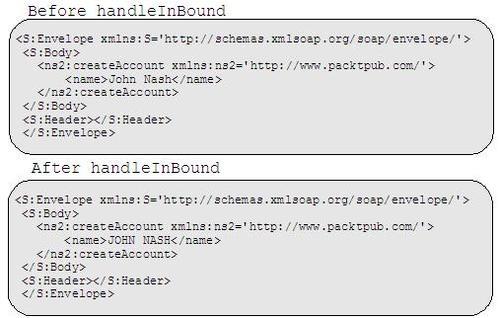
In this example, we will use the handleInBound processor to modify the SOAP message. Starting from the MessageContext, we will extract the SOAP message, its header (using a safe method named getFailsafeSOAPHeader) and body. Inside the body, we trace the parameter name
[1], which is subsequently uppercased [2].
protected boolean handleInbound(MessageContext msgContext)
{
try
{
SOAPMessage soapMessage = ((SOAPMessageContext)msgContext).getMessage();
SOAPHeader soapHeader = getFailsafeSOAPHeader(soapMessage);
SOAPBody soapBody = soapMessage.getSOAPBody();
log.debug("[handleInbound]");
SOAPBodyElement soapBodyElement = (SOAPBodyElement)soapBody.getChildElements().next();
Iterator iter = soapBodyElement.getChildElements(new QName("name")); [1]
while (iter.hasNext()) {
SOAPElement nameElement = (SOAPElement)iter.next();
nameElement.setValue(nameElement.getValue(). toUpperCase()); [2]
}
}
catch (SOAPException e)
{
throw new WebServiceException(e);
}
return true;
}
private SOAPHeader getFailsafeSOAPHeader(SOAPMessage soapMessage) throws SOAPException
{
SOAPHeader soapHeader = soapMessage.getSOAPHeader();
if (soapHeader == null)
{
soapHeader =
soapMessage.getSOAPPart().getEnvelope().addHeader();
}
return soapHeader;
}
catch (SOAPException e)
{
throw new WebServiceException(e);
}
return true;
}
private SOAPHeader getFailsafeSOAPHeader(SOAPMessage soapMessage) throws SOAPException
{
SOAPHeader soapHeader = soapMessage.getSOAPHeader();
if (soapHeader == null)
{
soapHeader = soapMessage.getSOAPPart().getEnvelope().addHeader();
}
return soapHeader;
}
Here's the dump of the SOAP packet before and after processing the inbound message:
This operation is intentionally simple (and maybe a bit silly); however, once you have digested the concept of SOAP handlers, it will take little time to improve this example with an Enterprise solution.
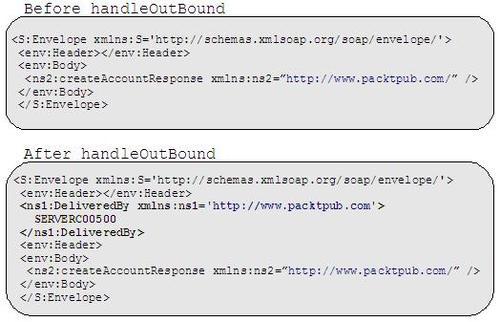
The outbound callback also demonstrates how you can add extra payload to your message by attaching another element in the header, containing the hostname of the host that delivered the response.
protected boolean handleOutbound(MessageContext msgContext)
{
try
{
SOAPMessage soapMessage = ((SOAPMessageContext)msgContext).getMessage();
SOAPHeader soapHeader = getFailsafeSOAPHeader (soapMessage);
SOAPBody soapBody = soapMessage.getSOAPBody();
SOAPFactory soapFactory = SOAPFactory.newInstance();
javax.xml.soap.Name headerName = soapFactory.createName("DeliveredBy", "ns1","http://www.packtpub.com");
SOAPHeaderElement she = soapHeader.addHeaderElement(headerName);
InetAddress localMachine = InetAddress.getLocalHost();
she.setValue(localMachine.getHostName());
}
catch (SOAPException exc2)
{
throw new WebServiceException(exc2);
}
return true;
}
Here is the SOAP message before and after processing:
Tip
SOAP debugging
If you are curious to know how you can get a dump of the SOAP message, it's obtained by wiring the SOAP message (collected in the inbound/outbound methods) into an output stream.
ByteArrayOutputStream baos = new ByteArrayOutputStream();
soapMessage.writeTo(baos);
System.out.println(baos.toString());
Another option that allows debugging of SOAP messages is creating a new category for the SOAP message class in your conf/jboss-log4j.xml.
All you have to do is add the following XML fragment in your category section:
<category name="jbossws.SOAPMessage">
<priority value="DEBUG" />
</category>