
13. File System
The NetBeans Platform File System API provides an abstraction for standard Java files. With the File System API you can perform all the expected file operations that create, rename, and delete files and folders. You can read and write files with IOStreams and use convenience methods for reading. Furthermore, the NetBeans Platform enhances this abstraction by providing attributes for files and folders. You can also monitor changes to file system hierarchies with FileChangeListeners.
This chapter explores the File System API with several examples. You’ll also learn about the Layer file, how it affects your application’s configuration data, and how to access and contribute to this configuration information.
What You Will Learn
• Use the File System API classes FileSystem, FileObject, and FileUtil to explore file-oriented operations.
• Use file attributes to store information about files and folders.
• Use FileChangeListener to monitor file and folder changes.
• Use the Output window to display status information.
• Include the Favorites window in your NetBeans Platform application to access the local file system within the UI.
• Install and access files in modules.
• Create and modify a module’s Layer file.
• Access the System FileSystem programmatically.
• Use the Layer file for inter-module communication.
13.1 File System API
So far the applications we’ve built have persisted data in a database or in memory. The FamilyTree Application developed in Chapter 10 lets users manipulate data using the full CRUD operations of create, read, update, and delete. This application, however, does not perform any file-level operations.
In this chapter we examine the File System API that lets you manipulate files and folders on disk, in ZIP files, or in XML files. First, we’ll explore the File System API with an application that creates and manipulates folders and files on the user’s local file system. Next, we’ll show you how to use the File System API’s FileChangeListener to monitor changes to a file system hierarchy. You’ll also learn how to include files in a NetBeans Platform application and how to access these files programmatically. Finally, we’ll examine the Layer file, which is the gateway to a NetBeans Platform application’s System FileSystem, and show you how to access this configuration file system programmatically. In the process of building these examples, you’ll also learn how to use the Favorites window and write information to the Output window.
13.2 The File System API Overview
Let’s begin with an overview of the File System API, the API that NetBeans uses to manipulate files and directories. The NetBeans Platform File System API provides support for virtual files. These files (or folders) may reside on disk, in memory, in a JAR or ZIP file, on a remote server, or even as elements in an XML document. The File System API provides this abstraction with the help of three main classes, FileSystem (a hierarchical collection of FileObjects), FileObject (an abstraction for java.io.File), and FileUtil, a utility class with many methods that manipulate FileSystems, FileObjects, and even standard java.io.File objects.
A FileSystem is a collection of FileObjects, which can be your computer’s file system or a single JAR file, for example. A FileSystem is hierarchical and has a root. The FileSystem abstraction lets you view data from physically different sources in the same way.
A FileObject represents either a file or a directory (folder) in the FileSystem. A FileObject must exist in the FileSystem (unlike Java’s java.io.File) and has a MIME type (which determines how the file is handled), but the data associated with a FileObject is just raw data. (The importance of MIME types will become clearer when we examine the Data System API in the next chapter.) If the FileObject represents a folder, you can delete, create, or obtain a list of its “children” (subfolders or files). You read FileObjects with InputStream and write to them with OutputStream. You can also read FileObjects with the convenience methods asBytes(), or in the case of text files, asLines() and asText().
A FileObject also includes support for attributes. Attributes are arbitrary objects identified with a String and accessible with getters and setters. The File System API stores these String/serialized Object pairs according to the FileObject’s path in an XML file called attributes.xml in the application’s user directory.
With FileChangeListener, the FileSystem API supports notification for events such as file creation, folder creation, renaming, file modification, deletion, or attribute changing. You can add a FileChangeListener to a FileObject (file or folder) or to a java.io.File object using FileUtil.1 You can also add a recursive listener to a folder, which receives file change events for all files and folders under the provided folder. Depending on the size of the hierarchy and the nature of the underlying file system, recursive listeners can be expensive in processing file change events.
1. Since JDK 7, Java also supports file change events with java.nio.FileSystem, Path, and WatchServices. Here, you register a WatchService to listen for key events. This is a low-level mechanism, necessary to account for differences in the underlying operating system. In contrast, the NetBeans Platform is able to provide event listener notification, since the NetBeans Platform File System API provides a level of abstraction above the traditional Java File class.
In general, event notification works with file system modifications that occur within your application. Event notifications for modifications made outside of your application may not be received by your program.
Exploring the FileSystem API
FileSystem, FileObject, and FileUtil all contain methods that manipulate files. Let’s explore several of these methods by building a NetBeans Platform application that performs file operations and displays information in the Output window, as shown in Figure 13.1. This file system exploration is activated with an action called Explore File Actions, which we add to the toolbar and the top-level Tools menu.
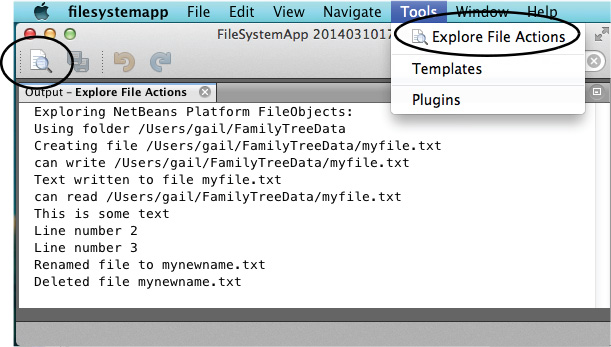
The Explore File Actions menu item performs several operations. First, the action creates a folder and a text file in the user’s local file system. Next, the action writes text to the file and reads the text back. Finally, the action renames the text file and then deletes it. Along the way, this action displays each step in the Output window.
Building this applications requires the following steps.
• Create a NetBeans Platform application called FileSystemApp.
• Create a module called FSExploration.
• Create and register a new action for the top-level Tools menu and the toolbar.
• Add module dependencies to the File System API, the I/O APIs, and the Lookup API.
• Implement the action.
Create a NetBeans Platform Application and Module
Here are the steps to create the application and add the FSExploration module.
1. Create a new application called FileSystemApp using the NetBeans Platform New Project wizard.
2. Next, create a module and add it to the FileSystemApp application. Call the module FSExploration and provide package name com.asgteach.fsexploration. The application and module are shown in the Projects view in Figure 13.2.

Create a New Action
Create and register an action to perform File System API operations.
1. In module FSExploration, expand Source Packages and right click on the package name. Select New | Action from the context menu.
2. NetBeans initiates the New Action wizard. In the Action Type dialog, select Always Enabled and click Next.
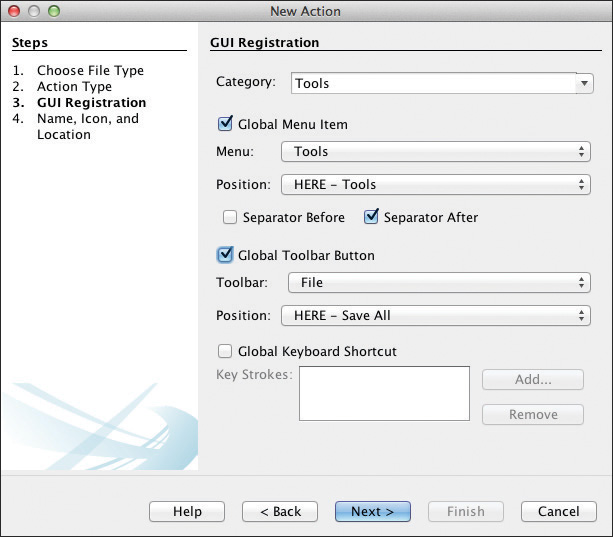
3. In the GUI Registration dialog, select Category Tools. Select the Global Menu Item checkbox. Specify Menu Tools with position Here - Tools, and Separator After. Select the Global Toolbar Button checkbox. Specify Toolbar File and Position Here - Save All. Click Next. Figure 13.3 shows this dialog.
4. NetBeans displays the Name, Icon, and Location dialog. For Class Name specify ExploreFileAction, for Display Name specify Explore File Actions, and click the Browse button and navigate to the provided icon file ExploreFS.png, as shown in Figure 13.4. Click Finish.
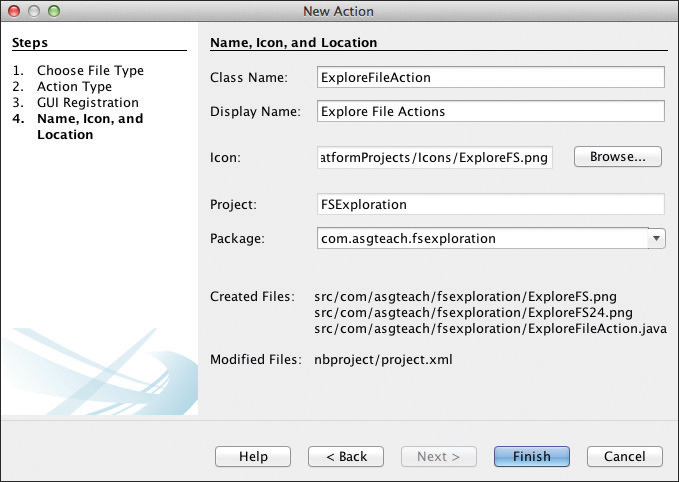
NetBeans creates ExploreFileAction.java and copies the icon files to the module’s source package.
Add Module Dependencies
Add module dependencies for File System API (for file actions), Lookup API (the FileObject class uses Lookups), and I/O APIs (to write to the Output window).
The Output Window
The NetBeans IDE uses an Output window to communicate status and job progress (such as running a program) to the user. Let’s display the information from our application to this Output window. We’ll configure the Output window with a labeled tab and set up the I/O in the ExploreFileAction’s constructor. (More than one module or process can write to the Output window, each having its own tabbed window.) We’ll also create a helper method to display the content.
Listing 13.1 shows ExploreFileAction.java with the annotations that register the ExploreFileAction. We’ve included a label for the Output window’s tab in the @Messages annotation and fields io and writer that write content to the window. The displayMessage() helper method writes a String to the Output window.
Static method IOProvider.getDefault().getIO() returns an InputOutput object for the Output window (field io), and method io.getOut() returns an OutputWriter. All of this configuration happens the first time the user invokes the Explore File Actions menu item.
Listing 13.1 ExploreFileAction—Configure Output Window
@ActionID(
category = "Tools",
id = "com.asgteach.fsexploration.ExploreFileAction"
)
@ActionRegistration(
iconBase = "com/asgteach/fsexploration/ExploreFS.png",
displayName = "#CTL_ExploreFileAction"
)
@ActionReferences({
@ActionReference(path = "Menu/Tools", position = 0, separatorAfter = 50),
@ActionReference(path = "Toolbars/File", position = 300)
})
@Messages({
"CTL_ExploreFileAction=Explore File Actions",
"CTL_FileActionTab=Explore File Actions"
})
public final class ExploreFileAction implements ActionListener {
private final InputOutput io;
private final OutputWriter writer;
public ExploreFileAction() {
io = IOProvider.getDefault().getIO(Bundle.CTL_FileActionTab(), false);
writer = io.getOut();
}
private void displayMessage(String msg) {
writer.println(msg);
}
@Override
public void actionPerformed(ActionEvent e) {
// TODO implement action body
}
}
Now let’s walk you through the different file manipulation activities that the Explore File Actions menu item performs in the overridden actionPerformed() method. We’ll discuss the implementation code in separate sections.
Clear and Select the Output Window
Each time a user invokes the Explore File Actions menu item, we clear the Output window and select its tab. (Since the Output window can be shared among multiple modules performing multiple tasks, selecting a tab with io.select() makes the contents associated with this InputOutput object visible.) Listing 13.2 shows this code. Note that the reset() method (invoked on the Output window’s OutputWriter) requires catching IOException.
Listing 13.2 Method actionPerformed—Clear and Select Output Window
@Override
public void actionPerformed(ActionEvent e) {
try {
writer.reset(); // clear the window each time
} catch (IOException ex) {
Exceptions.printStackTrace(ex);
return;
}
io.select(); // select this tab
displayMessage("Exploring NetBeans Platform FileObjects:");
. . .
}
Create a Folder
In the File System API, directories are referred to as “folders,” so we will use this terminology. We first invoke the System property to find the user’s home folder and create a standard Java java.io.File object for a subfolder under it. Creating the File object, however, does not necessarily mean the target folder FamilyTreeData exists.
Next, we create a FileObject from the file using the FileUtil toFileObject() method. If the folder doesn’t exist, the FileUtil method returns null. We then create the folder with the FileUtil createFolder() method. Listing 13.3 shows this code.
Listing 13.3 Method actionPerformed—Create a Folder
@Override
public void actionPerformed(ActionEvent e) {
. . .
// Look in the User's home directory
String home = System.getProperty("user.home");
File dir = new File(home + "/FamilyTreeData");
FileObject myfolder = FileUtil.toFileObject(dir);
if (myfolder == null) {
displayMessage("Creating folder " + dir.getPath());
try {
// Create folder
myfolder = FileUtil.createFolder(dir);
} catch (IOException ex) {
Exceptions.printStackTrace(ex);
}
}
. . .
}
Get or Create a File in a Folder
The next step is to see if file myfile.txt exists and if not, create it, as shown in Listing 13.4. Here, we use methods in the parent folder’s FileObject instance. Object myfolder can return an individual entry with the getFileObject() method, which we use here to see if folder myfolder contains our target file. You can also return a folder’s children as an array of FileObjects with the getChildren() method.
As before, a null return value indicates the file does not exist. In this case, we create the file in the myfolder folder using the FileObject method createData(). (The createData() method creates a file, and the createFolder() method creates a folder.)
Here are several FileObject methods that return a file or folder’s name and/or path.
• getpath()—Return the FileObject’s full path.
• getName()—Get the file or folder’s name excluding the extension.
• getExt()—Get the file or folder’s extension.
• getNameExt()—Get the file or folder’s name and include the extension.
Listing 13.4 Method actionPerformed—Create a File
@Override
public void actionPerformed(ActionEvent e) {
. . .
if (myfolder != null) {
displayMessage("Using folder " + myfolder.getPath());
// Is there a file called myfile.txt in this folder?
FileObject myfile = myfolder.getFileObject("myfile.txt");
if (myfile == null) {
// No, create the file
displayMessage("Creating file " + myfolder.getPath()
"/myfile.txt");
try {
// Create file
myfile = myfolder.createData("myfile.txt");
} catch (IOException ex) {
displayMessage("Can't create file "
+ myfolder.getPath() + "/myfile.txt");
Exceptions.printStackTrace(ex);
}
}
. . .
}
Write to and Read from Files
We’ve created a text file. Now let’s write some text to it, read it back, and display the text in the Output window. Listing 13.5 shows this code.
First, we make sure FileObject myfile is not null and check to see if we can perform write operations with the canWrite() method. Next, we use a try-with-resources statement to obtain resource PrintWriter from the file’s output stream.2 With a try-with-resources statement, PrintWriter closes automatically, so we don’t need to invoke close() in a finally clause.
2. The try-with-resources statement was introduced in JDK 7.
We write three lines of text to the file with the PrintWriter println() method and then read the text back. FileObject has several convenience methods for reading files, as follows (all methods throw IOException). We use the asLines() method and display each line to the Output window (as shown in Figure 13.1 on page 626).
• asLines()—Read the full text of a file line by line and return as a List<String>.
• asLines(String encoding)—Read the full text of a file line by line using the supplied encoding and return as a List<String>.
• asText()—Read the full text of a file and return as a String.
• asText(String encoding)—Read the full text of a file using the supplied encoding and return as a String.
• asBytes()—Read the file and return an array of bytes.
Listing 13.5 Method actionPerformed—Write and Read Files
@Override
public void actionPerformed(ActionEvent e) {
. . .
if (myfile != null) {
// write some text to file
if (myfile.canWrite()) {
displayMessage("can write " + myfile.getPath());
try (PrintWriter output = new PrintWriter(
myfile.getOutputStream())) {
output.println("This is some text");
for (int i = 0; i < 2; i++) {
output.println("Line number " + (i + 2));
}
displayMessage("Text written to file "
+ myfile.getNameExt());
} catch (IOException ex) {
displayMessage("Warning: problems writing file "
+ myfile.getNameExt());
Exceptions.printStackTrace(ex);
}
}
// read file
if (myfile.canRead()) {
displayMessage("can read " + myfile.getPath());
try {
for (String line : myfile.asLines()) {
displayMessage(line);
}
} catch (IOException ex) {
displayMessage("Warning: problems reading file "
+ myfile.getNameExt());
Exceptions.printStackTrace(ex);
}
}
. . .
}
You can also read FileObjects with streams using BufferedReader. Here is the equivalent code, as shown in Listing 13.6 (again, using a try-with resource statement).
Listing 13.6 Read a File with Streams
// read file
if (myfile.canRead()) {
displayMessage("can read " + myfile.getPath());
try (BufferedReader input = new BufferedReader(
new InputStreamReader(myfile.getInputStream()))) {
String line;
while ((line = input.readLine()) != null) {
displayMessage(line);
}
} catch (IOException ex) {
Exceptions.printStackTrace(ex);
}
}
Rename and Delete Files
Listing 13.7 shows the code for renaming and deleting files. Since we rename and delete our sample file, the user can invoke the Explore File Actions menu item multiple times.
Before renaming a folder or file, you must acquire a lock from the FileObject with the lock() method, which returns a FileLock object. Put the lock’s releaseLock() call in a finally block. Rename will fail if the new name already exists. In our example, we rename the FileObject myfile (myfile.txt) to mynewname.txt.
Next, we delete our sample file (still referenced with FileObject myfile). The FileObject delete() method takes care of acquiring and releasing a lock. Alternatively, you can supply a FileLock object to the delete() method, which will be used instead of the one that’s used implicitly.
Deleting a FileObject folder recursively deletes its contents.
Listing 13.7 Method actionPerformed—Rename and Delete Files
@Override
public void actionPerformed(ActionEvent e) {
. . .
// rename, requires a lock
FileLock lock = null;
try {
lock = myfile.lock();
myfile.rename(lock, "mynewname", myfile.getExt());
displayMessage("Renamed file to " + myfile.getNameExt());
} catch (IOException ex) {
displayMessage("Warning: " + ex.getLocalizedMessage());
Exceptions.printStackTrace(ex);
} finally {
if (lock != null) {
lock.releaseLock();
}
}
try {
// delete file
myfile.delete();
displayMessage("Deleted file " + myfile.getNameExt());
} catch (IOException ex) {
displayMessage("Warning: " + ex.getLocalizedMessage());
Exceptions.printStackTrace(ex);
}
}
}
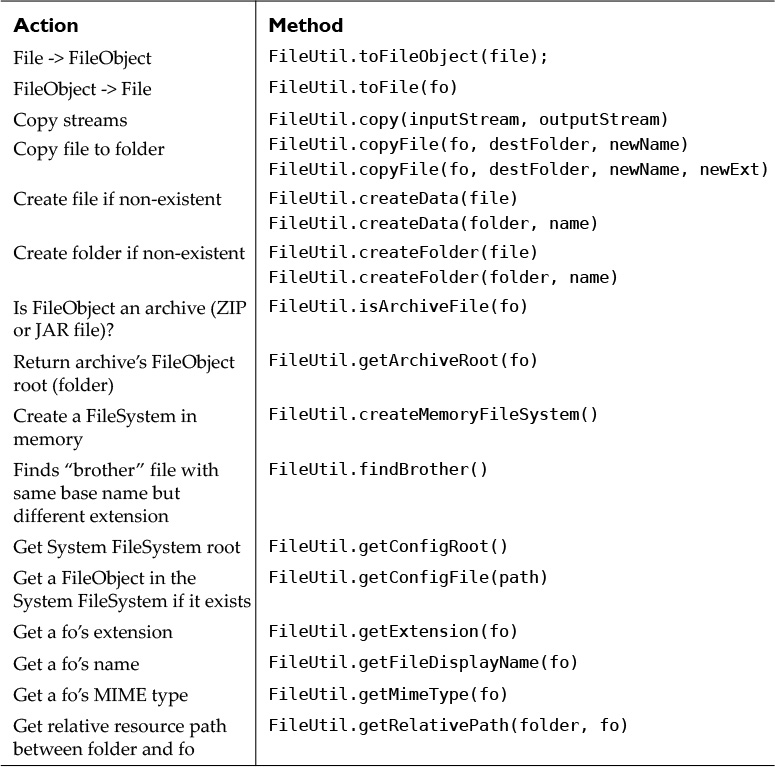
File System API Useful Methods
Table 13.1 provides a list of useful methods available with FileObject. (This is a partial list. The reader is encouraged to access the File System API documentation for a complete list.) In this table, fo represents a FileObject (file or folder), and folder represents a FileObject folder.
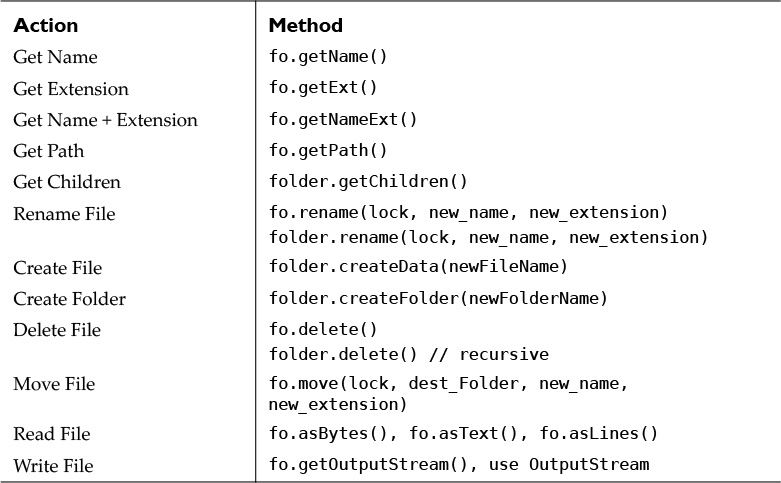
Table 13.2 provides a partial list of methods available with utility class FileUtil. These are all static methods. In this table, fo represents a FileObject (file or folder), file represents a java.io.File, and folder represents a FileObject folder.
13.3 Monitoring File Changes
One of the big advantages with the NetBeans Platform File System API is that you can attach FileChangeListeners to FileObjects (either files or folders). You can also attach recursive FileChangeListeners to folders in a directory tree. In this section, we’ll add a new module to the FileSystemApp we built in the previous section to show you how you can monitor changes to a file system.
FileObject Attributes
For this file monitor, we’ll use the FileObject attribute feature, which lets you associate arbitrary objects with FileObjects. These attributes persist through restarts of the application and are stored in the application’s user directory (that is, they are not stored in the files themselves). During development, the attributes.xml file that stores the serialized attributes is deleted when you perform a Clean of the project.
We’ll also introduce the Favorites window in this section. You enable this feature when you include the Favorites module from the platform cluster in your application. Here’s a summary of the steps to create and configure this new module.
• Include the Favorites and Templates modules from cluster platform. (The Templates module lets you create empty files and folders from the Favorites window.)
• Add new module ChangeDetector to the FileSystemApp application.
• Add a new window (TopComponent) to module ChangeDetector.
• Add dependencies to the File System API and the I/O APIs in module ChangeDetector.
• Implement the TopComponent code to display a portion of the user’s file system on the local disk. The display uses a FileObject’s attributes to indicate its most recent modification to the file. The TopComponent uses a FileChangeListener to report event notification messages to a new tab in the Output window and refresh the TopComponent’s display.
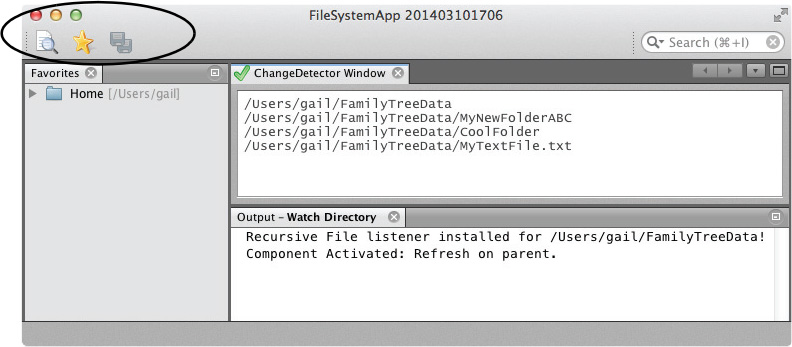
Figure 13.5 shows this application running with the Favorites window on the left and the ChangeDetector window in the editor position. The Output window appears below with two tabs, the previously built Explore File Actions tab, and a new tab entitled Watch Directory.
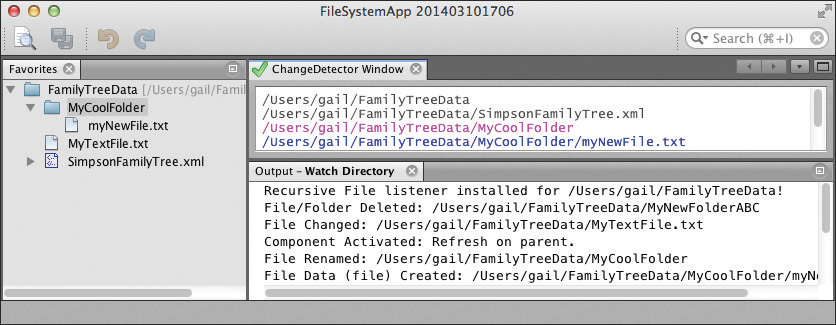
The application reports any changes made to the file system starting from directory FamilyTreeData under the user’s home directory. After invoking the Explore File Actions menu item from the previous section, the Watch Directory Output window displays the changes that create, rename, and delete a text file.
Let’s show you how to build these windows, starting with the Favorites window.
Favorites Window
The Favorites window lets you view files in the your local file system, as well as create new empty files and folders (when you also add the Templates module).
Once the Favorite modules is installed, an action appears in the top-level Windows menu to open the Favorites window in the Explorer mode. Follow these steps to include both the Favorites and Templates modules in the FileSystemApp application.
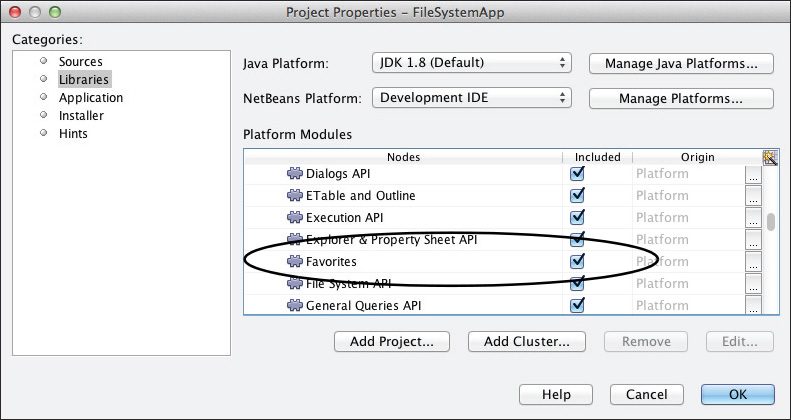
1. Right click project FileSystemApp in the Projects view and select Properties from the context menu.
2. Under Categories, select Libraries. NetBeans lists all of the Platform Modules organized in clusters. Under cluster platform, select modules Favorites (as shown in Figure 13.6) and Templates. Select OK.
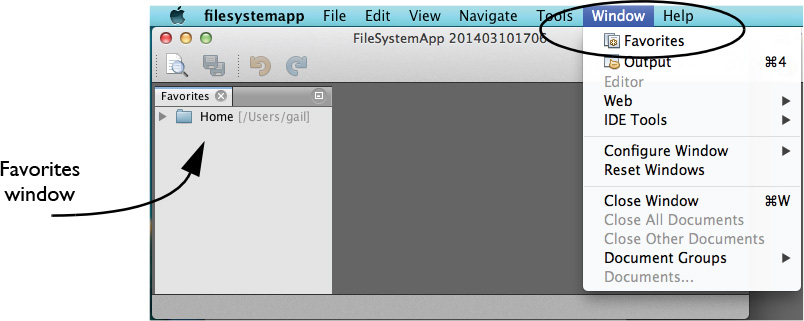
3. Now run the FileSystemApp application. When the application comes up, open the top-level Window menu and select Favorites. This opens the Favorites window in the Explorer view, as shown in Figure 13.7.
4. Expand the top-level directory (the home directory on your local file system). You can selectively add folders to and remove them from the Favorites window.
5. Experiment with different file manipulation actions. Create a new folder in a selected folder using right-click New | All Templates. In the Choose Template dialog, expand Other and select Folder. Click Next. Provide a new Folder Name and click Finish.
6. Create a new empty file with New | All Templates. Now expand Other, select Empty File, and click Next. In the New Object Name dialog, provide a file name. If the extension is recognized and corresponds to a text file (such as .txt or .xml), NetBeans will open the file in a plain Text Editor.
Use these file manipulation actions to test the FileChangeListener example in this section.
Favorites Window Tip
You may find the Favorites window useful when working in the NetBeans IDE. Select the top-level Windows menu and select Favorites. With the Favorites window, you can open a file that does not belong to a NetBeans Platform project and edit the file depending on its MIME type: HTML, XML, FXML, or even Java, for example.
Add Module ChangeDetector
Use these steps to create module ChangeDetector in the FileSystemApp application.
1. Expand project FileSystemApp, select the Modules node, right-click, and select New . . . .
2. NetBeans initiates the New Module Project wizard. In the Name and Location dialog, specify ChangeDetector for Project Name and accept the defaults for the remaining fields. Click Next.
3. NetBeans displays the Basic Module Configuration dialog. Specify com.asgteach.changedetector for Code Name Base, accept the defaults for the remaining fields, and click Finish.
NetBeans creates module ChangeDetector in application FileSystemApp.
Add the ChangeDetector Window
The ChangeDetector module displays a TopComponent (window) in the application. Follow these steps to create and register a TopComponent window in module ChangeDetector.
1. In the Projects view, expand module ChangeDetector | Source Packages. Select the package name, right click, and select New | Window. NetBeans initiates the New Window wizard.
2. In the Basic Settings dialog, select Window Position editor and Open at Application Start. Click Next.
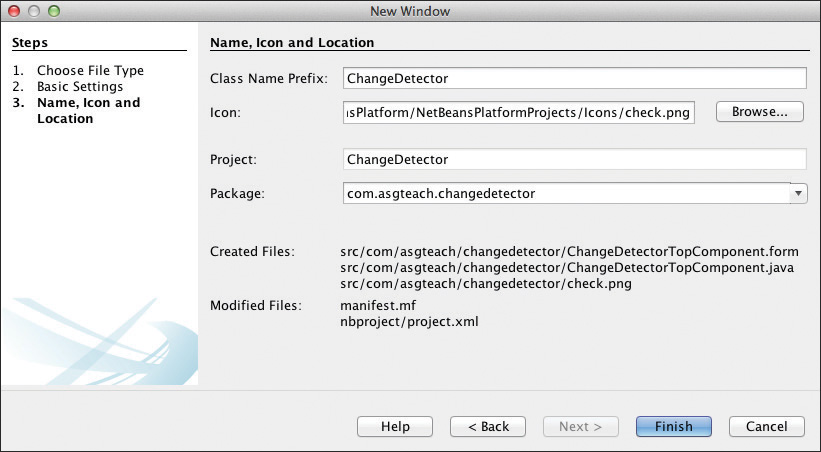
3. NetBeans displays the Name, Icon, and Location dialog. For Class Name Prefix specify ChangeDetector. For the icon, click Browse and select the provided icon file check.png, and click Finish, as shown in Figure 13.8.
The ChangeDetector window is now registered. Next, we’ll add code to the TopComponent.
Add Module Dependencies
Add module dependencies in module ChangeDetector for the File System API (for file actions) and I/O APIs (to write content to the Output window).
Configure the TopComponent
We use a Swing Text Panel to display information about the user’s file system. The JTextPanel component lets you manipulate the text color. Here are the steps to configure the TopComponent’s layout with a Text Panel.
1. Open ChangeDetectorTopComponent in the Design view.
2. In the Palette under Swing Controls, select Text Panel and drop it onto the Design view.
3. NetBeans automatically encloses the JTextPanel with a JScrollPane. Expand the JScrollPane so that it covers the entire design area.
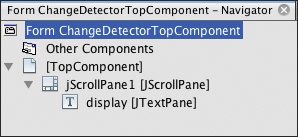
4. In the Navigator window, select the JTextPane component, right click, and select Change Variable Name. . . . In the dialog, provide new variable name display and click OK. Figure 13.9 shows the Navigator view for this TopComponent with the renamed JTextPanel component.
5. Click Source to return to the Source view and save your changes.
Add TopComponent Code
The code we add to the TopComponent provides all the functionality of this module. This window opens when the application starts and displays the file hierarchy under folder FamilyTreeData in the user’s home directory.
As the user makes changes to the hierarchy, the TopComponent refreshes and any file system events are reported in the Output window (under tab Watch Directory). We’ll present this code in sections and explain each part.
First, Listing 13.8 shows the generated code to register the TopComponent. We add a Watch Directory label to the @Messages annotation and class fields to configure. We also create margins for the JTextPanel component.
Listing 13.8 ChangeDetectorTopComponent
@ConvertAsProperties(
dtd = "-//com.asgteach.changedetector//ChangeDetector//EN",
autostore = false
)
@TopComponent.Description(
preferredID = "ChangeDetectorTopComponent",
iconBase = "com/asgteach/changedetector/check.png",
persistenceType = TopComponent.PERSISTENCE_ALWAYS
)
@TopComponent.Registration(mode = "editor", openAtStartup = true)
@ActionID(category = "Window",
id = "com.asgteach.changedetector.ChangeDetectorTopComponent")
@ActionReference(path = "Menu/Window" /*, position = 333 */)
@TopComponent.OpenActionRegistration(
displayName = "#CTL_ChangeDetectorAction",
preferredID = "ChangeDetectorTopComponent"
)
@Messages({
"CTL_ChangeDetectorAction=ChangeDetector",
"CTL_ChangeDetectorTopComponent=ChangeDetector Window",
"HINT_ChangeDetectorTopComponent=This is a ChangeDetector window",
"CTL_ChangeLabel=Watch Directory"
})
public final class ChangeDetectorTopComponent extends TopComponent {
private FileObject root;
private OutputWriter writer;
private boolean updateOK = true;
public static final String FO_MODIFICATION_COLOR = "FOModificationColor";
public ChangeDetectorTopComponent() {
initComponents();
setName(Bundle.CTL_ChangeDetectorTopComponent());
setToolTipText(Bundle.HINT_ChangeDetectorTopComponent());
display.setMargin(new Insets(5, 5, 5, 5));
}
. . .
}
Configure the TopComponent Life Cycle Methods
Listing 13.9 shows the code for the componentOpened(), componentActivated(), and componentClosed() life cycle methods (see “Window System Life Cycle Management” on page 369 for more on window life cycle methods). The componentOpened() method configures the Output window, adds a FileChangeListener (fcl) to the target folder in the user’s home directory (class variable root), and updates the TopComponent’s display with the updateDisplay() helper method (shown later).
We add a recursive FileChangeListener to the target folder. This potentially expensive arrangement (depending on how big the hierarchy is) fires change events for any of the files and folders below the target folder, including the target folder. Here, the hierarchy is small. We present the FileChangeListener implementation in an upcoming section.
The componentActivated() method is invoked when the user selects the ChangeDetector window. Here, we force a refresh on the parent of our target folder. This allows the FileChangeListener to detect changes made outside the FileSystemApp application.
The componentClosed() method removes the FileChangeListener from the target folder (root) so that the listener isn’t active when the window is closed.
We also include the displayMessage() helper method that writes its String argument to the Output window using class field writer (OutputWriter).
Listing 13.9 ChangeDetectorTopComponent—Life Cycle Methods
public final class ChangeDetectorTopComponent extends TopComponent {
. . .
@Override
public void componentOpened() {
InputOutput io = IOProvider.getDefault().getIO(
Bundle.CTL_ChangeLabel(), false);
io.select(); // tab is selected
writer = io.getOut();
String home = System.getProperty("user.home");
File file = new File(home + "/FamilyTreeData");
root = FileUtil.toFileObject(file);
if (root == null) {
displayMessage("Warning: File Object " + file.getPath()
+ " does not exist.");
displayMessage("Create " + file.getPath()
+ ", close & reopen Window "
+ Bundle.CTL_ChangeDetectorTopComponent());
return;
}
root.addRecursiveListener(fcl);
displayMessage("Recursive File listener installed for "
+ root.getPath() + "!");
updateDisplay();
}
@Override
protected void componentActivated() {
if (root != null) {
try {
root.getParent().getFileSystem().refresh(true);
displayMessage("Component Activated: Refresh on parent.");
updateDisplay();
} catch (FileStateInvalidException ex) {
Exceptions.printStackTrace(ex);
}
}
}
@Override
public void componentClosed() {
if (root != null) {
root.removeFileChangeListener(fcl);
}
}
private void displayMessage(String message) {
writer.println(message); }
}
Updating and Displaying the Hierarchy in the Window
Our TopComponent consists of a Swing JTextPanel added to a JScrollPane. Listing 13.10 shows how to write String messages to the window that are color coded and how to display the complete hierarchy that we are monitoring with the FileChangeListener.
Method appendToDisplay() writes a String with Color to the JTextPanel display. We temporarily make the Text Panel editable and set attributes that define the text color, font style, and alignment. We set the caret position at the end, add the String argument to the Text Panel, and return the Text Panel to non-editable.
The updateDisplay() method is invoked in componentOpened() and in the FileChangeListener code when a file change event is received. This method calls displayFiles() with the root (which then recursively calls itself for the entire hierarchy) so that each file and folder in the hierarchy is written to the window’s Text Panel. The displayFiles() method handles archives by obtaining the archive’s root and recursively displaying its contents (showing the power of the FileObject and FileSystem abstraction).
The displayFiles() method is invoked with a FileObject argument. If the FileObject has a Color attribute, this color is used to write the FileObject’s path name. If the Color attribute is not present, then a default Color.DARK_GRAY color value is used.
Recall that a FileObject’s attributes are stored in the user directory of the NetBeans Platform application. These attributes persist when the user reruns the FileSystemApp application.
Listing 13.10 ChangeDetectorTopComponent—Updating the Text Panel
private void appendToDisplay(String msg, Color c) {
display.setEditable(true);
StyleContext sc = StyleContext.getDefaultStyleContext();
AttributeSet attrset = sc.addAttribute(SimpleAttributeSet.EMPTY,
StyleConstants.Foreground, c);
attrset = sc.addAttribute(attrset, StyleConstants.FontFamily,
"Lucida Console");
attrset = sc.addAttribute(attrset, StyleConstants.Alignment,
StyleConstants.ALIGN_JUSTIFIED);
display.setCaretPosition(display.getDocument().getLength());
display.setCharacterAttributes(attrset, false);
display.replaceSelection(msg);
display.setEditable(false);
}
private void updateDisplay() {
if (root == null || !updateOK) {
return;
}
updateOK = false;
display.setText("");
displayFiles(root);
updateOK = true;
}
private void displayFiles(FileObject fo) {
Color displayColor = (Color) fo.getAttribute(FO_MODIFICATION_COLOR);
if (displayColor == null) {
displayColor = Color.DARK_GRAY;
}
appendToDisplay(FileUtil.getFileDisplayName(fo) + "
", displayColor);
if (FileUtil.isArchiveFile(fo)) {
FileObject arcRoot = FileUtil.getArchiveRoot(fo);
displayFiles(arcRoot);
} else if (fo.isFolder()) {
for (FileObject childFileObject : fo.getChildren()) {
displayFiles(childFileObject);
}
}
}
Implementing the FileChangeListener
The FileChangeListener interface has six methods to override, as listed in Table 13.3. (If it is not necessary to handle all the events in the FileChangeListener interface, you can use the FileChangeAdapter adapter class.)
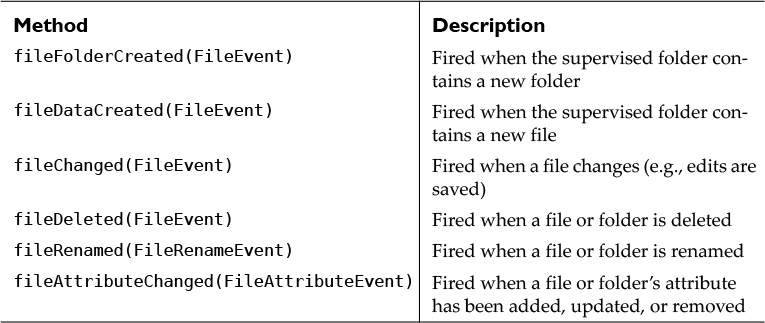
Listing 13.11 shows the FileChangeListener implementation. For each method (except for the fileAttributeChanged() method, which is empty), we write the event name and affected file to the Output window and update the hierarchy in the TopComponent. We also set an attribute in the affected FileObject that color codes the event. (This attribute is read by the displayFiles() method shown previously in Listing 13.10 on page 645.) Green corresponds to a new folder, orange for a new file, blue for a changed file or folder, and magenta for a renamed file or folder. No attribute is set for a delete event, since that folder or file will no longer be displayed in the hierarchy.
Listing 13.11 ChangeDetectorTopComponent—FileChangeListener
private final FileChangeListener fcl = new FileChangeListener() {
@Override
public void fileFolderCreated(FileEvent fe) {
displayMessage("File Folder Created: " + fe.getFile().getPath());
try {
fe.getFile().setAttribute(FO_MODIFICATION_COLOR, Color.GREEN);
updateDisplay();
} catch (IOException ex) {
Exceptions.printStackTrace(ex);
}
}
@Override
public void fileDataCreated(FileEvent fe) {
displayMessage("File Data (file) Created: "
+ fe.getFile().getPath());
try {
fe.getFile().setAttribute(FO_MODIFICATION_COLOR, Color.ORANGE);
updateDisplay();
} catch (IOException ex) {
Exceptions.printStackTrace(ex);
}
}
@Override
public void fileChanged(FileEvent fe) {
displayMessage("File Changed: " + fe.getFile().getPath());
try {
fe.getFile().setAttribute(FO_MODIFICATION_COLOR, Color.BLUE);
updateDisplay();
} catch (IOException ex) {
Exceptions.printStackTrace(ex);
}
}
@Override
public void fileDeleted(FileEvent fe) {
displayMessage("File/Folder Deleted: " + fe.getFile().getPath());
updateDisplay();
}
@Override
public void fileRenamed(FileRenameEvent fre) {
displayMessage("File Renamed: " + fre.getFile().getPath());
try {
fre.getFile().setAttribute(FO_MODIFICATION_COLOR,
Color.MAGENTA);
updateDisplay();
} catch (IOException ex) {
Exceptions.printStackTrace(ex);
}
}
@Override
public void fileAttributeChanged(FileAttributeEvent fae) { }
};
Trying Out the ChangeDetector Using the Favorites Window
With the TopComponent code in place, you can now use the Favorites window to create and rename files and folders and edit text files. You can also view how the hierarchy is updated in the ChangeDetector window. Figure 13.10 shows the FileSystemApp after several files and folders have been manipulated.
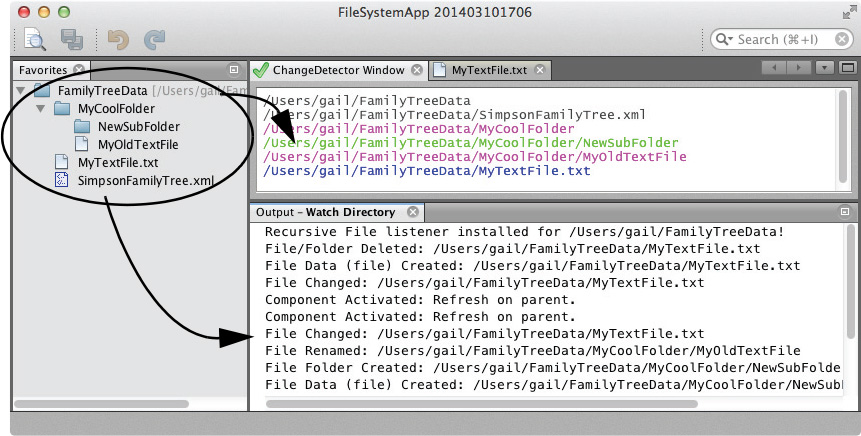
Here, we add files and folders to folder FamilyTreeData (the target directory that module ChangeDetector watches). We also edit a text file and delete several files. The Output window (tab Watch Directory) lists the FileChange events and the ChangeDirectory window shows the most recent state of the hierarchy.3
3. You can also modify the target hierarchy using your native system file utility. The detected events might be different, however. For example, on our system a rename event is reported as a file create event followed by a file delete event.
13.4 Including a File with Your Application
Suppose you want to include a file in one of your modules and access the file programmatically. Let’s show you how to do this in a new module called AppConfigFile. The file that we provide is SimpsonFamilyTree.xml and we’ll install it in a folder called configFile within our module.
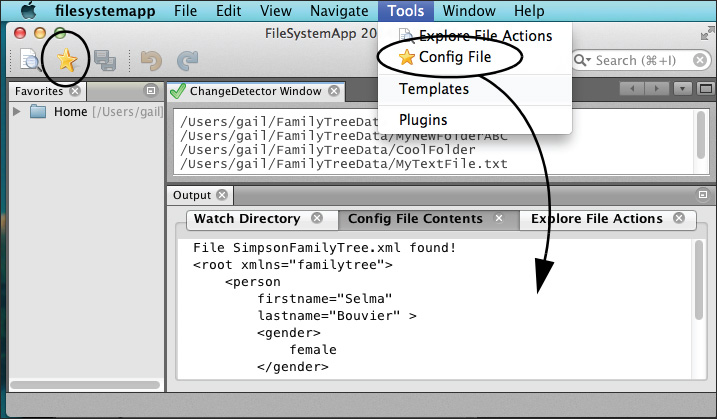
For testing, we’ll create an action in the FileSystemApp application that locates the file and displays its contents in the Output window, as shown in Figure 13.11. (Note that we now have three independent tabs in the Output window: Watch Directory, Config File Contents, and Explore File Actions. The order of the tabs depends on the order that you invoke the actions associated with the tabs.)
Here’s a summary of the steps we’ll perform to create and configure this module.
• Add new module AppConfigFile to the FileSystemApp application.
• Install file configFile/SimpsonFamilyTree.xml in module AppConfigFile’s release directory.
• Register a new action in module AppConfigFile.
• Add module dependencies to the File System API, I/O APIs, Module System API, and Lookup API.
• Implement the action.
Create Module AppConfigFile
Use these steps to create module AppConfigFile in the FileSystemApp application.
1. Expand project FileSystemApp, select the Modules node, right-click, and select New . . . .
2. NetBeans initiates the New Module Project wizard. In the Name and Location dialog, specify AppConfigFile for Project Name and accept the defaults for the remaining fields. Click Next.
3. NetBeans displays the Basic Module Configuration dialog. Specify com.asgteach.appconfigfile for Code Name Base, accept the defaults for the remaining fields, and click Finish.
NetBeans creates module AppConfigFile in application FileSystemApp.
Install a File in a Module
To include a file (which could be a third-party library, a data file, documentation files, or a configuration file, for example), you place the file in a directory called release under the main directory of your module. The build process automatically includes any files or directories it finds in this specially-named directory. Here are the steps.
1. In the Files view, create a folder called release in the top-level directory of your module. (You must use name release.)
2. Next, create a containing folder (or folders) for your files. We create folder configFile. You can use any folder name here.
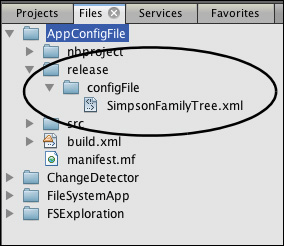
3. Copy any files you want included to this folder. We added file SimpsonFamilyTree.xml, as shown in Figure 13.12.
1. In module AppConfigFile, expand Source Packages and right click on the package name. Select New | Action from the context menu.
2. NetBeans initiates the New Action wizard. In the Action Type dialog, select Always Enabled and click Next.
3. In the GUI Registration dialog, select Category Tools. Select the Global Menu Item checkbox. Specify Menu Tools with position Here - Tools, and Separator After. Select the Global Toolbar Button checkbox. Specify Toolbar File and Position Here - Save All. Click Next.
4. NetBeans displays the Name, Icon, and Location dialog. For Class Name specify ConfigFileAction, for Display Name specify Config File, and click the Browse button and navigate to the provided icon file Favorites.png. Click Finish.
NetBeans creates ConfigFileAction.java and copies the icon files to the module’s source package.
Add Module Dependencies
Add module dependencies for File System API (for file actions), I/O APIs (to write content to the Output window), and both Lookup API and Module System API (required by the InstalledFileLocator service).
Implement the Action
We show the implementation of the ConfigFileAction in two parts. Listing 13.12 shows the action’s registration annotations and the code that configures the Output window. This code is similar to Listing 13.1 on page 629 (see “The Output Window” on page 628 for a detailed description).
Listing 13.12 ConfigFileAction—Registration Annotations
@ActionID(
category = "Tools",
id = "com.asgteach.appuserfile.ConfigFileAction"
)
@ActionRegistration(
iconBase = "com/asgteach/appconfigfile/Favorites.png",
displayName = "#CTL_ConfigFile"
)
@ActionReferences({
@ActionReference(path = "Menu/Tools", position = 25, separatorAfter = 37),
@ActionReference(path = "Toolbars/File", position = 350)
})
@Messages({
"CTL_ConfigFile=Config File",
"CTL_configFileTab=Config File Contents"
})
public final class ConfigFileAction implements ActionListener {
private final InputOutput io;
private final OutputWriter writer;
private static final String filename = "configFile/SimpsonFamilyTree.xml";
public ConfigFileAction() {
io = IOProvider.getDefault().getIO(Bundle.CTL_configFileTab(), false);
writer = io.getOut();
}
private void displayMessage(String msg) {
writer.println(msg);
}
. . .
}
We implement the actionPerformed() method in Listing 13.13. First, we configure the Output window by resetting its content and activating the window with io.select(). Next, we get the default service provider for InstalledFileLocator and invoke the locate() method. This method looks for the provided file in the application and returns null if the file is not there.
We convert the File to FileObject and use the convenience method asLines() to read the file and display each line in the Output window.
Listing 13.13 ConfigFileAction—actionPerformed() Method
@Override
public void actionPerformed(ActionEvent e) {
try {
writer.reset(); // clear the window each time
} catch (IOException ex) {
Exceptions.printStackTrace(ex);
return;
}
io.select(); // select this tab
File configFile = InstalledFileLocator.getDefault().locate(filename,
"com.asgteach.appconfigfile", false);
FileObject fo = null;
if (configFile != null) {
fo = FileUtil.toFileObject(configFile);
if (fo != null) {
displayMessage("File " + fo.getNameExt() + " found!");
try {
for (String lines : fo.asLines()) {
displayMessage(lines);
}
} catch (IOException ex) {
Exceptions.printStackTrace(ex);
}
}
}
if (fo == null || configFile == null) {
displayMessage("Warning: File " + filename + " is missing!");
}
}
Using the InstalledFileLocator Service
Let’s take a closer look at the locate() method of the InstalledFileLocator service. The first argument is the path of the target file, including its enclosing directory but excluding the release directory. The second argument is the code name of the module that contains the file. This can be null and may (or may not) be used in the location service. However, providing the code name can speed up the location process. The third argument is a boolean indicating whether or not the file is localized. This is useful when the target file is a zip file containing localized documentation files, for example. In this case, you provide the “unlocalized” file name with locate() method, set the localized boolean to true, and install the localized file, as shown here.
docs/mydocs_es.zip // installed in release directory of module MyModule
File file = locate("docs/mydocs.zip", "com.mymodule", true);
The InstalledFileLocator service also provides method locateAll(), which is useful when locating more than one file from a directory. The path should not include the trailing “/” and the return value is a (possibly empty) Set<File>.
Set<File> set = locateAll("docs", "com.mymodule", true); // or false
The exact location of the file depends on the environment in which this module runs. In the development environment, the file is copied to the cluster/configFile directory of the application’s build directory.
Installing an NBM in NetBeans IDE
Now let’s show you that you can use the InstalledFileLocator service in a module installed in the NetBeans IDE with no changes, although the file is physically located in a different place. You can install module AppConfigFile in your running NetBeans IDE as a PlugIn using the following steps.
1. First, create an NBM file (NBM stands for NetBeans Module). See “Create the Module NBM” on page 861. An NBM file can be installed in the IDE as a PlugIn.
2. From the NetBeans IDE top-level Tools menu, select PlugIns.
3. In the PlugIns window, click Downloaded.
4. Click the Add PlugIns . . . button.
5. Browse to the build/updates directory where you will see NBM files for each module in your application, as shown in Figure 13.13.
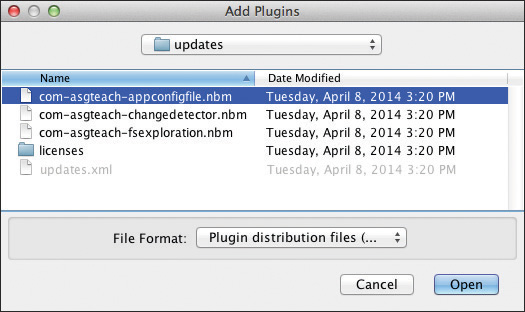
6. Select com-asgteach-appconfigfile.nbm, then Open to install this module.
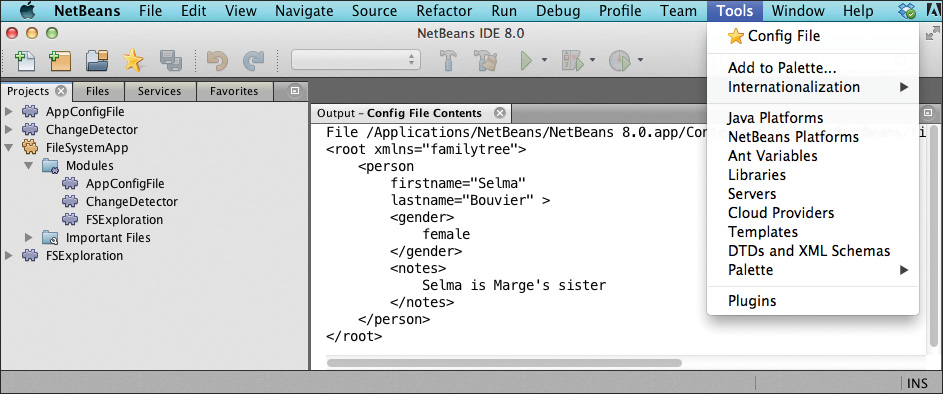
Figure 13.14 shows that the Config File action has been added to the NetBeans IDE and the installed file, SimpsonFamilyTree.xml, has been located within the running application. (We changed the Config File actionPerformed() method to display the file’s complete path, which is shown in the screen shot.)
13.5 The Layer File and System FileSystem
Someday someone will write a book on the NetBeans Platform and not have to discuss the Layer file, that ubiquitous file that historically showed up regularly in your module’s Projects view. Traditionally (and tediously) configured manually by the developer, the Layer file is now mostly generated by the various NetBeans IDE wizards. You can specify many configuration options with annotations (such as TopComponents, actions, menu and toolbar items, key bindings, and service providers, for example). Viewed from the Files window under the build directory as classes/META-INF/generated-layer.xml, a module now includes a generated Layer file if you’ve used any of these “configuration-type” annotations in your Java code.
But there are still occasions when creating a Layer file in a module is necessary (see, for example “Window Groups” on page 381). Furthermore, the Layer file is the gateway to your NetBeans Platform application’s complete configuration data. From the information in each module’s contributed Layer file, the Platform builds an actual writable file system on disk (called the System FileSystem) used to define all of the actions, menus, menu items, icons, key bindings, toolbars, and services available in your application. This configuration data tells the application how to configure menus and actions (for example) and even how to instantiate objects! Importantly, you can contribute to your application’s configuration by specifying files and Java objects in a module’s Layer file.
You can manipulate files and folders on the local disk file system with the File System API. The same File System API can also examine the System FileSystem and modify content. In this section, we’ll examine both the Layer file and its relationship to the System FileSystem.
Layer Files and Configuration
Let’s examine Layer files now and see how a Layer file affects a NetBeans Platform application. First, most modules don’t have an editable Layer file. Even when you create a Java class with annotations that affects registration information, the Layer file is quietly generated behind the scenes and regenerated with each build of your application.
But you can explicitly create a Layer file for a module and then modify its contents. Let’s do that now and show you how a Layer file is structured.
Create a Layer File
We’ll continue to work with the application that was built in this chapter, FileSystemApp. First, we create a Layer file in module AppConfigFile. This is the module we created in the previous section that includes a file in our application’s release directory (see “Including a File with Your Application” on page 649).
1. Select project AppConfigFile, right click, and select New | Other from the context menu.
2. NetBeans initiates the New File wizard and displays the Choose File Type dialog. Under Categories select Module Development and under File Types select XML Layer. Click Next.
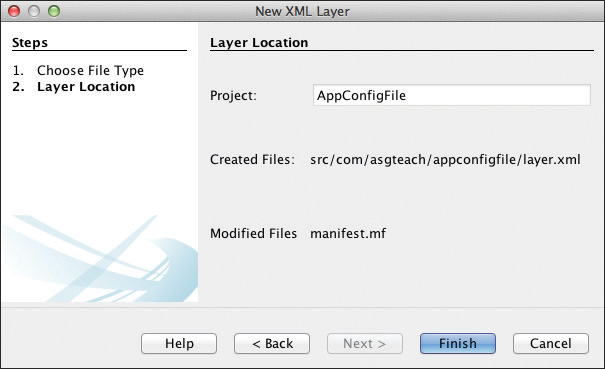
3. NetBeans displays the Layer Location dialog and specifies AppConfigFile for the Project, as shown in Figure 13.15. Click Finish.
NetBeans creates file layer.xml in the module’s Source Package, brings up layer.xml in the XML text editor, and modifies the Module Manifest file (under Important Files) to include the entry describing its location in the module, as follows.
OpenIDE-Module-Layer: com/asgteach/appconfigfile/layer.xml
To add entries to this Layer file, break up the <filesystem/> tag into an open and close tag with <filesystem></filesystem> on separate lines, as shown in Listing 13.14.
Listing 13.14 Layer.xml—Initial Contents
<?xml version="1.0" encoding="UTF-8"?>
<!DOCTYPE filesystem PUBLIC "-//NetBeans//DTD Filesystem 1.2//EN"
"http://www.netbeans.org/dtds/filesystem-1_2.dtd">
<filesystem>
</filesystem>
The Projects view is extremely useful for examining the concept of a Layer file. Once you’ve created a Layer file in a module (even one with no new content, as in Listing 13.14), build the application. You’ll see two entries under Important Files | XML Layer called <this layer> and <this layer in context>. Entry <this layer> refers to configuration information in this module, and entry <this layer in context> refers to the entire application.
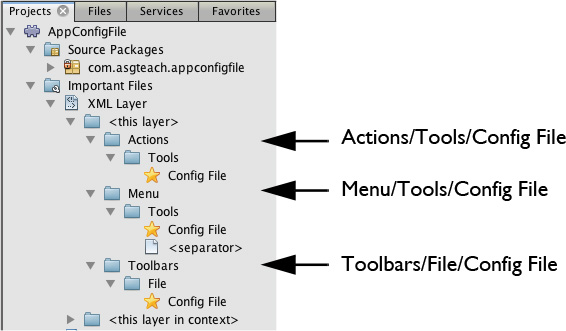
The AppConfigFile module also includes an Action that we registered previously via annotations. Because of this registration, our newly created XML Layer displayed in the Projects view under <this layer> contains this registration information, as shown in Figure 13.16 (even though the file layer.xml is empty). You see the Config File action is registered in three places: folders Actions/Tools, Menu/Tools, and Toolbars/File.
Dissecting the Layer File
Now let’s look at the generated XML Layer file that corresponds to the Projects view displayed in Figure 13.16. Listing 13.15 shows the Actions folder and the Toolbars folder. (We omitted the Menu folder.)
The Layer file consists of four main tags: <filesystem>, <folder>, <file>, and <attr>.
• The <filesystem> tag defines the overall file system and is merged with an actual file system on disk, specifically the System FileSystem. You can use the File System API FileUtil class to access the root folder. (We’ll show you how later in this chapter.)
• The <folder> tag defines folders (i.e., directories) within the file system. These are accessed with the File System API class FileObject, and the isFolder() method returns true for folders.
• The <file> tag refers to a file and can also be accessed with the FileObject class. In this case, isFolder() returns false.
• The <attr> tag defines attributes, arbitrary Objects identified by String names. Attributes are accessed with FileObject method getAttribute(name) shown previously (see “FileObject Attributes” on page 637). For examples that show attribute getters and setters, see Listing 13.10 on page 645 and Listing 13.11 on page 647.
Listing 13.15 Folder “Actions” in Generated Layer File
<filesystem>
<folder name="Actions">
<folder name="Tools">
<file name="com-asgteach-appuserfile-ConfigFileAction.instance">
<!--com.asgteach.appconfigfile.ConfigFileAction-->
<attr
bundlevalue=
"com.asgteach.appconfigfile.Bundle#CTL_ConfigFile" name="displayName"/>
<attr
methodvalue=
"org.openide.awt.Actions.alwaysEnabled" name="instanceCreate"/>
<attr name="delegate" newvalue=
"com.asgteach.appconfigfile.ConfigFileAction"/>
<attr name="iconBase" stringvalue=
"com/asgteach/appconfigfile/Favorites.png"/>
<attr boolvalue="false" name="noIconInMenu"/>
</file>
</folder>
</folder>
<folder name="Toolbars">
<folder name="File">
<file name="com-asgteach-appuserfile-ConfigFileAction.shadow">
<!--com.asgteach.appconfigfile.ConfigFileAction-->
<attr name="originalFile" stringvalue=
"Actions/Tools/com-asgteach-appuserfile-ConfigFileAction.instance"/>
<attr intvalue="350" name="position"/>
</file>
</folder>
</folder>
</filesystem>
Files as Objects
Instance files (file names ending in .instance) describe objects created either with a default constructor or a static method. Listing 13.15 shows the instance file for ConfigFileAction. This arrangement lets the application delay instantiating objects (for example, an Action) until it is actually needed. This optimizes startup time and system resources, such as memory.
Shadow files refer to previously referenced instance files and include attribute “originalFile” that references the instance file. The ConfigFileAction is defined in folder Action, where it is described as an instance file. ConfigFileAction is also defined in folder Toolbars, where it is a shadow file linked to the previously described instance file.
Layer File in Context
Now let’s examine the Layer file for the entire application, which you can view under <this layer in context>, as shown in Figure 13.17. Here, we’ve shown the Toolbars folder, which contains the File, Clipboard, and Undo/Redo subfolders. The Config File action appears under the File subfolder.
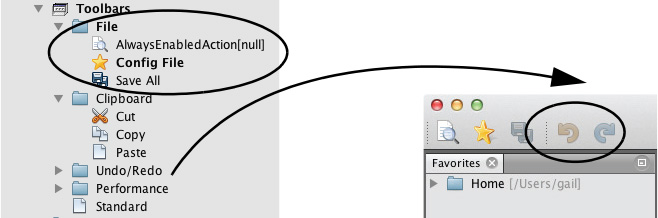
Other actions contributed by other modules also appear here. In the File subfolder, you see the AlwaysEnabledAction previously added and the Save All action, which is part of the NetBeans Platform.
Similarly, in subfolder Clipboard, you see the Cut, Copy, and Paste actions. The toolbar also includes Undo/Redo. This subfolder refers to the icons in the toolbar fragment in the FileSystemApp application shown in Figure 13.17.
Removing Layer Configuration Items
In general, you can remove a menu item or other configuration object from your application by deleting its corresponding entry in the Layer file. These items are not actually deleted, however. Rather, their definition is modified in the Layer file to include the suffix “_hidden,” which effectively hides that menu item from the configuration. You can also hide individual files (actions or menu items, for example), or you can hide complete folders.
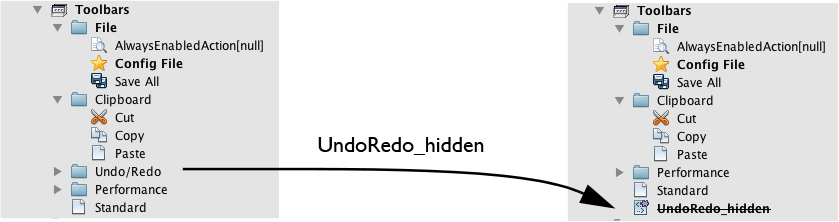
To remove the Undo/Redo folder from the toolbar, select the Undo/Redo folder in the Projects view, right click, and select Delete from the context menu. Figure 13.18 shows the Projects view Layer file before and after this folder is hidden. The next time you run the application, the Undo/Redo items will not appear in the toolbar, as shown in Figure 13.19.
To restore this Layer file entry, right click on the UndoRedo_hidden item and select Restore from the context menu.
You can also remove items from the Layer file by directly editing their entry in any module’s Layer file. For example, to remove the Undo/Redo toolbar items, provide the following modified entry for folder UndoRedo in the local Layer file, as shown in Listing 13.16.
Listing 13.16 Hiding Undo/Redo Manually in Layer File
<?xml version="1.0" encoding="UTF-8"?>
<!DOCTYPE filesystem PUBLIC "-//NetBeans//DTD Filesystem 1.2//EN" "http://
www.netbeans.org/dtds/filesystem-1_2.dtd">
<filesystem>
<folder name="Toolbars">
<folder name="UndoRedo_hidden"/>
</folder>
</filesystem>
To restore this folder, remove the folder name with “_hidden” suffix in the Layer file.
Exploring the System FileSystem
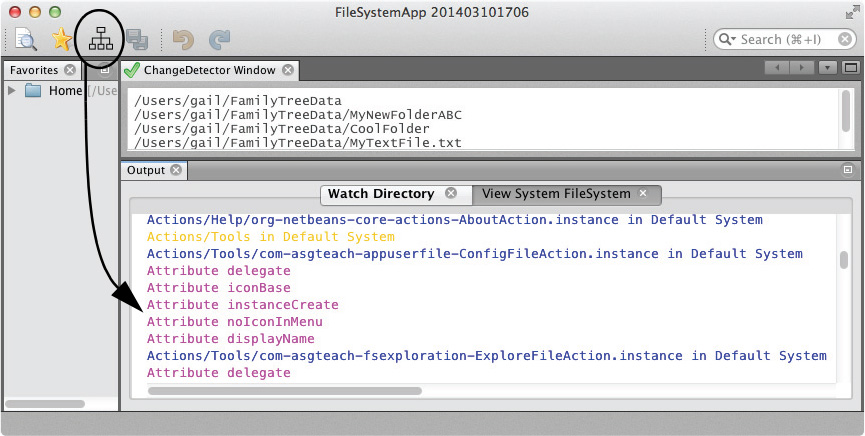
Let’s apply what you’ve learned about Layer files and the File System API and display the contents of the System FileSystem to the Output window. We’ll include all files and folders and color code them according to FileObject type (orange for folders and blue for Files). Furthermore, let’s display the attributes for any of the files that have them defined. Figure 13.20 shows this application running.
Here’s a summary of the steps we need to display the contents of the System FileSystem.
• Add a new module to the FileSystemApp application called FileSystemViewer.
• Create an Action called View System FileSystem to the Toolbar and under the top-level menu Tools.
• Add dependencies to the File System API, Lookup API, and I/O APIs.
• Implement the action.
Create Module FileSystemViewer
Use these steps to create module FileSystemViewer in the FileSystemApp application.
1. Expand project FileSystemApp, select the Modules node, right-click, and select New . . . .
2. NetBeans initiates the New Module Project wizard. In the Name and Location dialog, specify FileSystemViewer for Project Name and accept the defaults for the remaining fields. Click Next.
3. NetBeans displays the Basic Module Configuration dialog. Specify com.asgteach.filesystem.viewer for Code Name Base, accept the defaults for the remaining fields, and click Finish.
NetBeans creates module FileSystemViewer in application FileSystemApp.
Create the View System FileSystem Action
Register a new action in module FileSystemViewer using these steps.
1. In module FileSystemViewer, expand Source Packages and right click on the package name. Select New | Action from the context menu.
2. NetBeans initiates the New Action wizard. In the Action Type dialog, select Always Enabled and click Next.
3. In the GUI Registration dialog, select Category Tools. Select the Global Menu Item checkbox. Specify Menu Tools with position Here - Tools, and Separator After. Select the Global Toolbar Button checkbox. Specify Toolbar File and Position Config File - Here - Save All. Click Next.
4. NetBeans displays the Name, Icon, and Location dialog. For Class Name specify ViewSysFSAction. For Display Name specify View System File System. Click the Browse button and navigate to icon file fileSysIcon.png. Click Finish.
NetBeans creates ViewSysFSAction.java and copies the icon files to the module’s source package.
Add Module Dependencies
Add module dependencies for File System API (for file actions), Lookup API (certain FileObject operations), and I/O APIs (to write content to the Output window).
Implement the Action
We show the implementation of the ViewSysFSAction in two parts. Listing 13.17 includes the action’s registration annotations and the code that configures the Output window. This code is similar to Listing 13.1 on page 629 (see “The Output Window” on page 628 for a detailed description).
Listing 13.17 ViewSysFSAction—Registration Annotations
@ActionID(
category = "Tools",
id = "com.asgteach.filesystem.viewer.ViewSysFSAction"
)
@ActionRegistration(
iconBase = "com/asgteach/filesystem/viewer/fileSysIcon.png",
displayName = "#CTL_ViewSysFSAction"
)
@ActionReferences({
@ActionReference(path = "Menu/Tools", position = -100,
separatorAfter = -50),
@ActionReference(path = "Toolbars/File", position = 375)
})
@Messages("CTL_ViewSysFSAction=View System FileSystem")
public final class ViewSysFSAction implements ActionListener {
private final InputOutput io;
private final OutputWriter writer;
public ViewSysFSAction() {
io = IOProvider.getDefault().getIO(
Bundle.CTL_ViewSysFSAction(), false);
writer = io.getOut();
}
. . .
}
Listing 13.18 shows the implementation of the actionPerformed() method. Static FileUtil getConfigRoot() method returns the root folder of the System FileSystem. We then select the System FileSystem tab and clear the Output window. The file system is displayed by invoking the recursive displayChildren() method with the System FileSystem root folder (root). The root path is the application project’s folder in directory build/testuserdir/config, as follows.
/[. . . local file system path . . .]/FileSystemApp/build/testuserdir/config
Note that some of the configuration information is in the NetBeans Platform distribution, which in our system is as follows.
/Applications/NetBeans/NetBeans 8.0.app/Contents/Resources/NetBeans/platform/
config/Modules
And some of the folders and files are displayed relative to the Default System, as follows.
Actions in Default System
Actions/Window in Default System
If the displayChildren() argument is a folder, each child returned from the getChildren() method is subsequently used as an argument with the displayChildren() method.
If the displayChildren() argument is a file, a different color is used with the display. The getAttributes() method is called for each file and each attribute name is displayed with color magenta.
Listing 13.18 ViewSysFSAction—actionPerformed() Method
@Override
public void actionPerformed(ActionEvent e) {
FileObject root = FileUtil.getConfigRoot();
// "System FileSystem" tab is created in output window
io.select(); // select System FileSystem tab
try {
writer.reset(); // clear the output window
displayChildren(root);
} catch (IOException ex) {
Exceptions.printStackTrace(ex);
} finally {
writer.flush();
writer.close();
}
}
private void displayChildren(FileObject fo) throws IOException {
if (fo.isFolder()) { // display folder (orange)
writeMsg(FileUtil.getFileDisplayName(fo), Color.ORANGE);
for (FileObject childFileObject : fo.getChildren()) {
displayChildren(childFileObject);
}
} else { // display file (blue)
writeMsg(FileUtil.getFileDisplayName(fo), Color.BLUE);
Enumeration<String> attrNames = fo.getAttributes();
while (attrNames.hasMoreElements()) {
// display attributes (magenta)
writeMsg("Attribute " + attrNames.nextElement(), Color.MAGENTA);
}
}
}
private void writeMsg(String str, Color color) {
try {
if (IOColorLines.isSupported(io)) {
IOColorLines.println(io, str, color);
} else {
writer.println(str);
}
} catch (IOException ex) {
Exceptions.printStackTrace(ex);
}
}
Using the Layer File for Inter-Module Communication
You’ve seen how you use the Lookup API for inter-module communication. One module can implement a service provider that is available to other modules. The client modules must declare a dependency on the module that defines the interface, but not on the module that provides the implementation. You also use Lookup to manage selection and context sensitivity. This system helps create an application consisting of loosely-coupled modules.
The file system provides another type of inter-module communication. Using the Layer file, a module can register folders and files that another module can use. These folders and files affect the system file system and can be accessed to build any number of application artifacts.
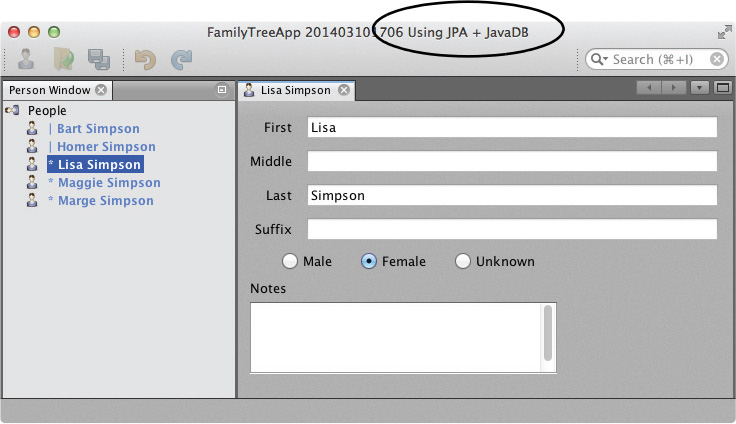
Let’s show you an example. Here, we’ll modify the FamilyTreeApp we built in a previous chapter (see “Using CRUD with a Database” on page 501) and supply a customized application title using the Layer file. Figure 13.21 shows the application running. The module that implements the FamilyTreeManager using JPA and JavaDB also supplies text for a customized title identifying its persistence strategy.
The module that actually customizes the title, however, is not dependent on the module that provides the customized text. Instead, this information is accessed through the file system.
Here are the steps to build this customized title.
1. Open the FamilyTreeApp application in the NetBeans IDE. Expand the FamilyTreeModel project.
2. Add Module Dependencies to the FileSystem API and the WindowSystem API.
3. Under Source Packages | com.asgteach.familytree.model.data edit file Installer.java. This Java class is annotated with @OnStart to provide code that executes when the application starts and the module loads (see “Using @OnStart” on page 242).
4. Add code to the run() method to read the file system and possibly customize the application title, as shown in Listing 13.19. Note that we must use the invokeWhenUIReady() method because code that modifies the UI must run on the EDT. We check for null in case the target folder or attribute does not exist.
Listing 13.19 Installer.java—Read for System File System to Customize
@OnStart
public final class Installer implements Runnable {
. . .
@Override
public void run() {
FamilyTreeManager ftm =
Lookup.getDefault().lookup(FamilyTreeManager.class);
. . .
// Read configuration information from the system filesystem
FileObject root = FileUtil.getConfigRoot();
FileObject persistencetype = root.getFileObject("PersistenceType");
if (persistencetype != null) {
final String persistenceTypeName
= persistencetype.getAttribute("pTypeName").toString();
if (persistenceTypeName != null) {
WindowManager.getDefault().invokeWhenUIReady(() -> {
WindowManager.getDefault().getMainWindow().setTitle(
WindowManager.getDefault().getMainWindow().getTitle()
+ " Using "
+ persistenceTypeName);
});
}
}
}
5. Follow the steps in “Create a Layer File” on page 656 to create a Layer file for the FamilyTreeManagerJPA module. This is the module that provides the FamilyTreeManager implementation using JPA and JavaDB.
6. Add a folder and attribute to the file system, as shown in Listing 13.20.
Listing 13.20 Layer.xml—Adding Application Configuration
<?xml version="1.0" encoding="UTF-8"?>
<!DOCTYPE filesystem PUBLIC "-//NetBeans//DTD Filesystem 1.2//EN" "http://
www.netbeans.org/dtds/filesystem-1_2.dtd">
<filesystem>
<folder name="PersistenceType">
<attr name="pTypeName" stringvalue="JPA + JavaDB" />
</folder>
</filesystem>
When you run the FamilyTreeApp application, you’ll see the customized application title as shown in Figure 13.21. Another module providing a different persistence strategy could then supply its own “PersistenceType” folder and attribute and similarly affect the application title.
13.6 Key Point Summary
This chapter shows you how to use the NetBeans Platform File System API. You learn how to create folders and files in the local file system, how to read and write files, and how to rename and delete files and folders. You learn how to use FileObject attributes and monitor changes within a file system hierarchy, folder, or file with FileChangeListener. You learn how to include files with your NetBeans Platform application and access them using the File System API. And, you learn about the System FileSystem and Layer file, which define the complete configuration data for a NetBeans Platform application. You see how to customize your application by creating folders, files, and attributes in a module’s Layer file. Here are the key points in this chapter.
• The NetBeans Platform File System API lets you manipulate folders and files.
• A FileSystem is a collection of FileObjects. This collection is hierarchical and has a root. The FileSystem abstraction lets you view data from physically different sources in the same way.
• A FileObject represents either a file or folder and is an abstraction above the standard Java File. A FileObject supports file creation, deletion, reading, writing, and accessing attributes with getters and setters.
• FileObjects representing folders let you create subfolders and files. FileObjects also let you access their containing files and folders (children).
• Deleting a FileObject folder performs a recursive delete.
• FileUtil provides static methods for manipulating FileObjects.
• You can add a FileChangeListener to a FileObject (folder or file) and monitor changes to files and folders. You can also add a recursive FileChangeListener to folders in a directory tree.
• FileChangeListener receives events for folder creation, file creation, file (or folder) changes, file (or folder) delete, file (or folder) rename, and file (or folder) attribute changes. There are six methods to override in the FileChangeListener. Alternatively, you can use the FileChangeAdapter adapter class to override only the methods you need.
• The Output window is a predefined TopComponent that supports multiple tabs. This window is convenient for reporting status from different modules.
• The Favorites window lets you view files in your local file system. To add the Favorites window to a NetBeans Platform application, include module Favorites from the platform cluster.
• Add the Templates module to your NetBeans Platform application to let users create empty files and folders from the Favorites window.
• Create folder release in the top-level directory of your module to install one or more files in your NetBeans application.
• Access installed files with the locate() or locateAll() method from InstalledFileLocator. These methods handle localized files as well.
• To install a module as a PlugIn in the NetBeans IDE, create an NBM file and install it with the PlugIns menu under Tools.
• The Layer file is the gateway to your NetBeans Platform application configuration data. This configuration data is written as a hierarchical file system to disk, called the System FileSystem.
• A module may contribute at most one Layer file. When your application runs, each module’s Layer file is read and merged into a single application-wide Layer file.
• Typically, you contribute content to a generated Layer file with annotations. These annotations register services, actions, TopComponents, menu items, toolbar contents, and key bindings.
• You can create a Layer file and view it in context in the Projects view.
• To remove standard NetBeans Platform actions, menu items, and toolbar entries, append the suffix “_hidden” to the entry in a module’s Layer file.
• Alternatively, use the context menu delete from the Projects view to remove items in the Layer file. Use context menu restore to subsequently restore any hidden items.
• You can access an application’s System FileSystem programmatically with FileUtil.getConfigRoot(). This method returns a FileObject representing the System FileSystem root.
• Customize an application in a loosely-coupled way by having one module register folders and/or files in its Layer file that another module can access.