
9. Action Framework
Actions perform work within an application and users initiate this work by selecting menu items, clicking toolbar buttons, or issuing keyboard shortcuts. The NetBeans Platform has an Action framework that provides a configurable UI for action initiation. This framework also provides ways to dynamically enable and disable actions and customize behavior based on selection context. In this chapter we’ll show you how to hook into the NetBeans Platform Action framework, create your own actions, and reuse some of the standard actions provided by the platform. We’ll also introduce context-sensitive actions and capabilities in our continuing effort to create loosely-coupled, modular applications.
What You Will Learn
• Create always-enabled, callback, and conditionally-enabled actions.
• Use annotations to register actions.
• Configure a TopComponent’s ActionMap and a node’s context menu.
• Use the capability pattern to dynamically enable and disable actions.
• Implement drag and drop, delete, cut, copy, and paste, and node reordering actions.
• Implement inter-window drag and drop behaviors.
9.1 Type of Actions
An application’s UI has various ways for users to select actions. By default, a NetBeans Platform application includes a top-level menu bar, an icon-decorated toolbar, and individual context menus that pop up with a right mouse click on configured components. The action itself is identified in the menu item with a display name, an optional icon, and an optional shortcut key sequence. In the toolbar, a required icon identifies the action, and the display name and key shortcut appear in a tooltip.
Actions in menus and in the toolbar have state. They can be enabled or not and pressed or not. In addition, the icon in a menu item is a 16 x 16 PNG or GIF file. In the toolbar, the NetBeans Platform uses a 24 x 24 PNG or GIF file, if available.
You register an action in the menu and toolbar framework with annotations. These annotations also specify the action’s display name, icon, shortcut key sequence, and whether or not separators appear either before or after the menu item (in menus) or icon (in the toolbar). The NetBeans Platform has a New Action wizard that lets you register actions easily. Because actions are configured, a module generally does not need to set a dependency on the module that defines the action. You connect to an action by referencing its key or “path,” or by providing an implementation of a context that the action needs. We’ll show you examples in this chapter.
Menu System Configuration
A NetBeans Platform skeletal application includes a default top-level menu bar and an icon-decorated toolbar. See “Removing Layer Configuration Items” on page 659 to learn how to configure (or hide) the default menu and toolbar framework. Additionally, “Editing the Node Hierarchy” on page 444 shows you how to implement some of the pre-configured menu items, such as Copy, Cut, Paste, and others.
Always-Enabled Actions
We call an action that can be selected in any state of the application an always-enabled action. For example, in the NetBeans IDE top menu bar under menu item NetBeans, both About NetBeans and Quit NetBeans are menu items that are always enabled. These actions don’t depend on the availability of objects, data, or files for their execution. They also don’t depend on a user-selected item or items in any of the application’s windows.
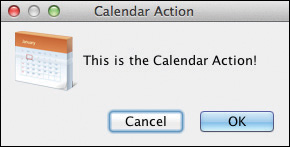
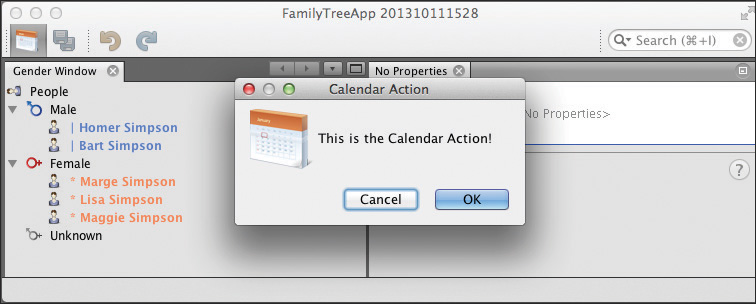
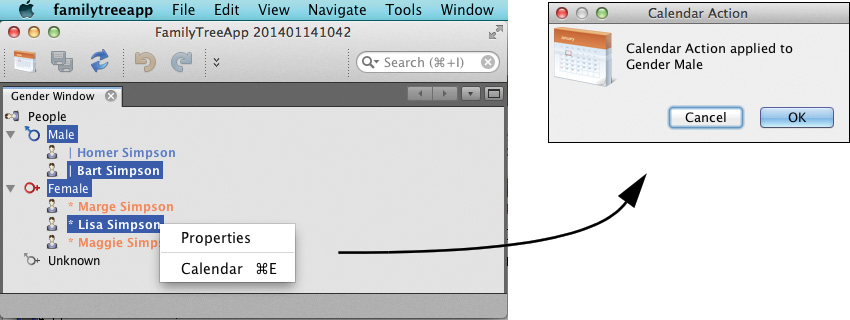
Let’s show you how to create an always-enabled action by adding an action called Calendar to our FamilyTreeApp application. We’ll start with the application previously created in Chapter 7 (see “Creating Your Own Property Sheet” on page 314). This new action pops up a custom dialog with an image, text, and Cancel and OK buttons. Figure 9.1 shows you what it looks like.1
1. Icons for this chapter are from http://www.visualpharm.com.
Add an Always-Enabled Action
Follow these steps to add an always-enabled action to an application.
1. Create a new module called FamilyTreeActions with code name base com.asgteach.familytree.actions (or use an already-existing module).
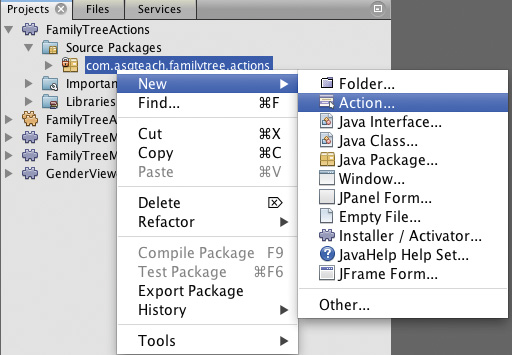
2. Expand the Source Packages node, right click on the package name, and select New | Action . . . from the context menu, as shown in Figure 9.2.
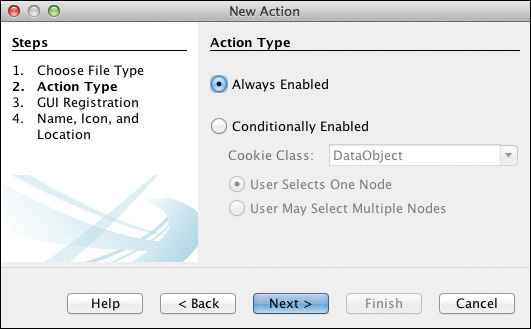
3. NetBeans displays New Action’s Action Type dialog. Select Always Enabled, as shown in Figure 9.3 and click Next.
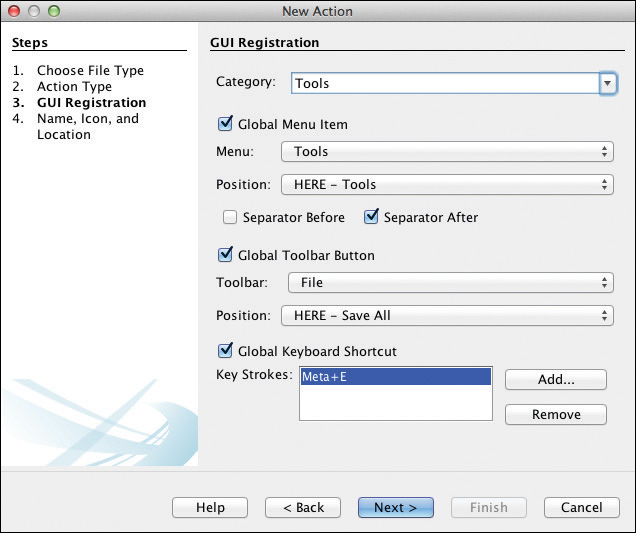
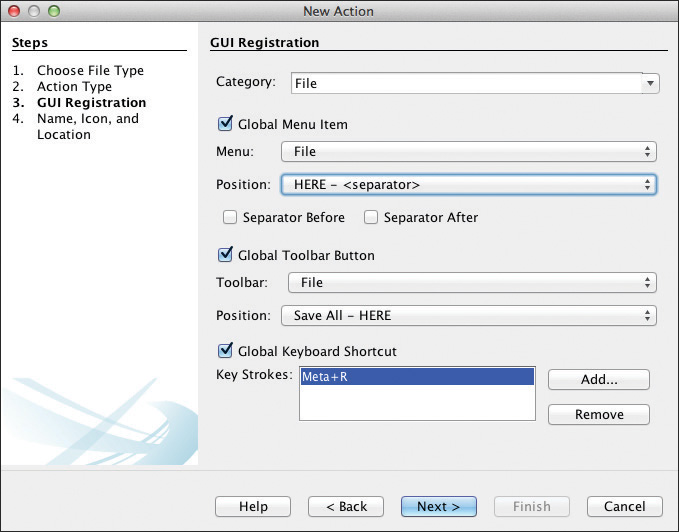
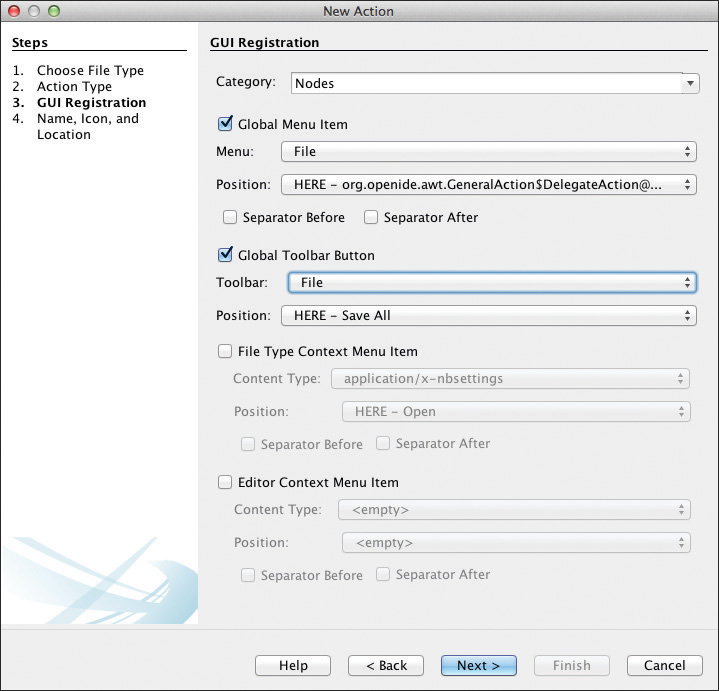
4. NetBeans displays the GUI Registration dialog. Here you specify where your action should appear (under which menu in the top-level menu bar) and if it should appear in the toolbar.
Actions in the toolbar require an icon. In menus, icons are optional. We register the action in Category Tools under Menu Tools and specify a Separator after the action. We also place the action in the Toolbar (before the Save All icon) and provide a shortcut key combination (Command-E on the Mac, which translates to Meta+E) to initiate the action directly from the keyboard. (E is for Calendar Event.) Figure 9.4 shows these selections. Click Next.
New Action Category
An action’s category determines its “path” in the application’s virtual file system. You can obtain a list of actions for a particular path. There are situations when you want to use a general category name (such as Tools) or a more refined name (such PersonNodeOpen).
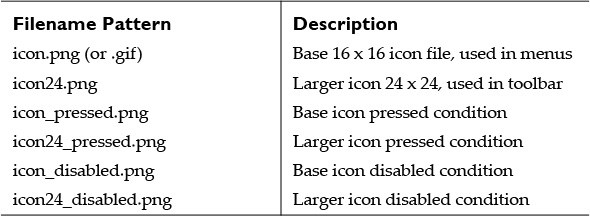
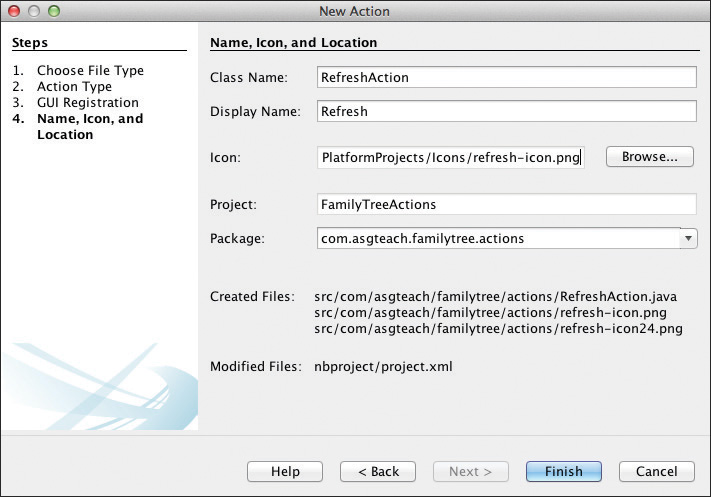
5. NetBeans displays the New Action’s Name, Icon and Location dialog. Here, you specify the class file that implements this action, the action’s display name, and the action’s icon, as shown in Figure 9.5. NetBeans’ naming convention for icon files is listed in Table 9.1. You specify a 16 x 16 PNG or GIF file, and NetBeans automatically includes other icon files as long as they’re in the same directory. If you don’t provide the other files, NetBeans provides default presenters for these (although the smaller 16 x 16 doesn’t look very good on the toolbar). Click Finish.
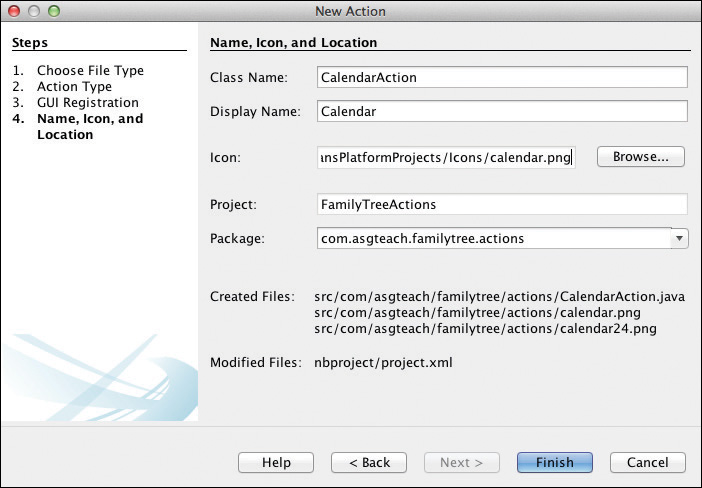
NetBeans creates the CalendarAction.java class in the FamilyTreeActions project and copies the icon files to the same directory. Listing 9.1 shows the generated annotations that define and register your action class with the application. Class CalendarAction implements the standard Java AWT ActionListener interface, which requires an implementation of the actionPerformed() method.
Listing 9.1 CalendarAction.java
@ActionID(
category = "Tools",
id = "com.asgteach.familytree.actions.CalendarAction"
)
@ActionRegistration(
iconBase = "com/asgteach/familytree/actions/calendar.png",
displayName = "#CTL_CalendarAction"
)
@ActionReferences({
@ActionReference(path = "Menu/Tools", position = 0, separatorAfter = 50),
@ActionReference(path = "Toolbars/File", position = 300),
@ActionReference(path = "Shortcuts", name = "M-E")
})
@Messages("CTL_CalendarAction=Calendar")
public final class CalendarAction implements ActionListener {
@Override
public void actionPerformed(ActionEvent e) {
// TODO implement action body
}
}
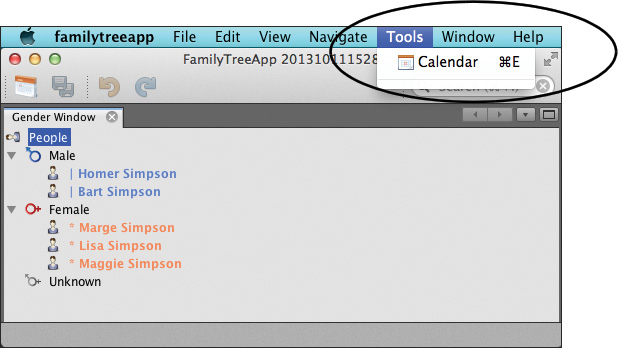
While our action doesn’t do anything yet, let’s run the application to see how the new Calendar action is configured in the menu bar and toolbar. Figure 9.6 shows the top-level Tools menu open with the Calendar action, including its icon, display name, and shortcut key sequence.
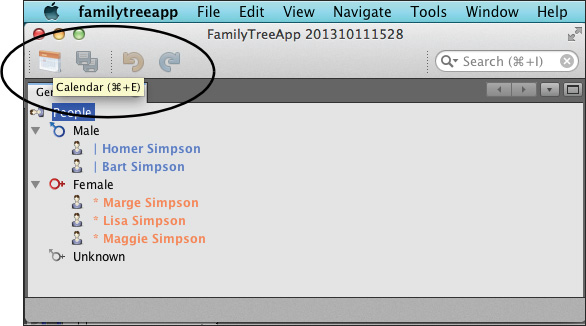
Similarly, Figure 9.7 shows the Calendar action’s icon (the 24 x 24 size) configured in the toolbar. A tooltip displays the action’s name and shortcut key sequence.
Build a Custom JPanel Form
Now let’s provide an implementation for our Calendar action, as shown in Figure 9.1 on page 415. First, we’ll create a custom panel to hold an image with some text. We’ll then use this custom panel in a NetBeans Platform dialog.2 Build the custom panel with these steps.
2. We discuss dialogs in detail in Chapter 11 and dialogs with custom panels in “Custom Dialogs” on page 533.
1. Expand project FamilyTreeActions Source Packages node and right click on the package name. Select New | JPanel Form . . . from the context menu. In the dialog, specify CalendarPanel for the class name and click Finish.
2. NetBeans creates a new Java class CalendarPanel.java with a top-level JPanel and brings up the form designer.
3. From the Swing Controls palette, add a Label to the form in the upper left. In the Properties view under the Properties tab, specify calendar64.png for the icon property and change the text property to This is the Calendar Action!.
4. Resize the panel so that it holds the Label’s icon and text, as shown in Figure 9.8.

Implement ActionListener
Dialogs require a dependency on the Dialogs API.
1. Expand the FamilyTreeActions project, right click on the Libraries node, and select Add Module Dependency . . . . In the Module Dependency dialog, select Dialogs API and click OK.
2. Provide code to implement the Calendar action, as shown in Listing 9.2.
Listing 9.2 CalendarAction.java
@Messages({
"CTL_CalendarAction=Calendar",
"CTL_CalendarTitle=Calendar Action"
})
public final class CalendarAction implements ActionListener {
private CalendarPanel panel = null;
private DialogDescriptor dd = null;
@Override
public void actionPerformed(ActionEvent e) {
if (panel == null) {
panel = new CalendarPanel();
}
if (dd == null) {
dd = new DialogDescriptor(panel, Bundle.CTL_CalendarTitle());
}
// display & block
if (DialogDisplayer.getDefault().notify(dd) ==
NotifyDescriptor.OK_OPTION) {
// User clicked OK . . .
}
}
}
The DialogDisplayer centers the dialog in the application and blocks until the user dismisses it by clicking either the Cancel or OK button. Figure 9.9 shows the application after clicking on the toolbar Calendar icon. (The toolbar icon remains “pressed” until the user dismisses the dialog.)
9.2 Actions and Lookup
Both TopComponents and nodes have Lookups that hold objects. These objects enable menu items (or toolbar icons) that apply specifically to the focused TopComponent or to the selected node or nodes. You’ll see that the contents of the Global Selection Lookup affect the actions that are available for the user to select.
Callback Actions
Callback actions are global actions with different behaviors depending on which component has focus. They are registered with a key, and you configure them in TopComponents by installing them in the TopComponent’s ActionMap. An ActionMap is inherited by the TopComponent class from Swing JComponent and provides a mapping between a key String and an Action object. You can use the TopComponent’s ActionMap to enable NetBeans Platform actions (such as cut, copy, paste) for your TopComponent.
Furthermore, a callback action can have a “fallback” implementation that is invoked when there isn’t a version installed in the focused TopComponent’s ActionMap. In this case, the action is always enabled, since the fallback version is accessed in the absence of a version referenced in the focused window.
Let’s show you an example of a callback action and explore its behavior by changing the callback action’s configuration, as follows.
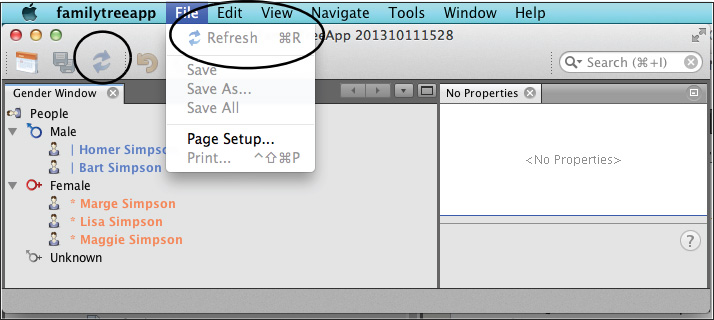
1. First, register a Refresh callback action with a fallback implementation. Because the callback action has a fallback implementation, it is always enabled.
2. Next, install a version of this callback action in the Gender TopComponent’s ActionMap. This locally installed implementation executes when the Gender TopComponent has focus. Otherwise, the fallback implementation executes.
3. Last, remove the fallback implementation and you’ll see that the Refresh callback action is enabled only when the Gender TopComponent has focus.
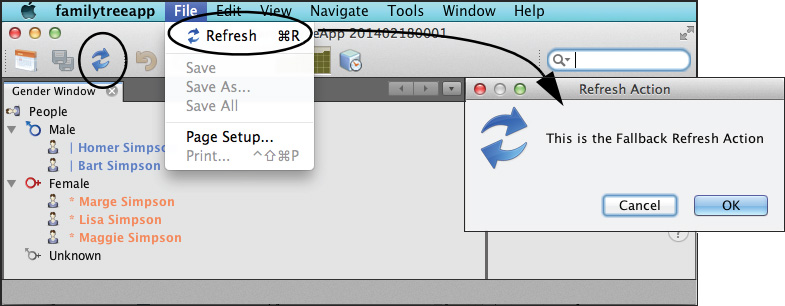
Creating the Fallback Action
Figure 9.10 shows the Refresh menu item and toolbar icon enabled in the application. Executing the Refresh action pops up a dialog that displays “This is the Fallback Refresh Action.”
To build this callback action, create a Refresh action similar to an always-enabled action. The NetBeans Platform New Action wizard creates the annotations that register the action in the application. Here are the steps.
1. Add the Refresh action to the FamilyActions module. Expand the FamilyActions Source Packages node, right click on the source package name, and select New | Action . . . from the context menu.
2. In the Action Type dialog, select Always Enabled and click Next.
3. In the GUI Registration dialog, specify Category File, and put this action in the Global Menu under File at position HERE - <separator>. Also include this action in the Global Toolbar under File after the Save All icon. Specify a Global Shortcut Key sequence (Command - R). Figure 9.11 shows these settings. Click Next.
4. NetBeans displays the Name, Icon, and Location dialog as shown in Figure 9.12. Specify RefreshAction for the Class Name, Refresh for the Display Name, and refresh-icon.png for the Icon base name. Click Finish.
NetBeans creates the RefreshAction class and generates the annotations. At this point, the Refresh action is an always-enabled action. To make Refresh a callback action, add a key to the @ActionRegistration, as shown in Listing 9.3. Here we use the key “MyCoolRefreshAction.”
Listing 9.3 RefreshAction.java
@ActionID(
category = "File",
id = "com.asgteach.familytree.actions.RefreshAction"
)
@ActionRegistration(
iconBase = "com/asgteach/familytree/actions/refresh-icon.png",
displayName = "#CTL_RefreshAction",
key = "MyCoolRefreshAction"
)
@ActionReferences({
@ActionReference(path = "Menu/File", position = 1300),
@ActionReference(path = "Toolbars/File", position = 500),
@ActionReference(path = "Shortcuts", name = "M-R")
})
@Messages("CTL_RefreshAction=Refresh")
public final class RefreshAction implements ActionListener {
@Override
public void actionPerformed(ActionEvent e) {
// Put fallback code here
}
}
Add code to the actionPerformed() method to execute the fallback behavior, as shown in Listing 9.4. In our example, the fallback implementation displays a dialog, as shown in Figure 9.10 on page 423. (The DialogDescriptor uses RefreshPanel, which you build using the same steps used to build the CaldendarPanel. See “Build a Custom JPanel Form” on page 419.)
Listing 9.4 RefreshAction.java—actionPerformed() Fallback Code
. . . Action annotations unchanged . . .
@Messages({
"CTL_RefreshAction=Refresh",
"CTL_RefreshTitle=Refresh Action"
})
public final class RefreshAction implements ActionListener {
private RefreshPanel panel = null;
private DialogDescriptor dd = null;
@Override
public void actionPerformed(ActionEvent e) {
if (panel == null) {
panel = new RefreshPanel();
}
if (dd == null) {
dd = new DialogDescriptor(panel, Bundle.CTL_RefreshTitle());
}
// display & block
if (DialogDisplayer.getDefault().notify(dd) ==
NotifyDescriptor.OK_OPTION) {
// User clicked OK . . .
}
}
}
Create and Install a Callback Action Performer
Next, we’ll define a version of Refresh callback action in the Gender window that is invoked when this window has focus. Recall that when a TopComponent has focus, its ActionMap is in the Global Selection Lookup and any defined actions become enabled.
The Refresh action is already registered in our application. Listing 9.5 shows how to install an implementation of “MyCoolRefreshAction” into the ActionMap of the Gender TopComponent. In the NetBeans Platform documentation, a callback action implementation is called an action “performer.” Note that three steps are required for the TopComponent’s version of RefreshAction to be invoked.
1. Include the ActionMap in the TopComponent’s Lookup. This is accomplished with the associateLookup() method shown in Listing 9.5.
2. Add the action and its key to the TopComponent’s ActionMap, as shown with the getActionMap().put() statement. The key must match the action’s key attribute.
3. When running the application, the Gender window must have focus in order to invoke its version of RefreshAction.
Listing 9.5 GenderTopComponent.java—Installing “MyCoolRefreshAction”
public final class GenderTopComponent extends TopComponent
implements ExplorerManager.Provider {
private final ExplorerManager em = new ExplorerManager();
public GenderTopComponent() {
initComponents();
setName(Bundle.CTL_GenderTopComponent());
setToolTipText(Bundle.HINT_GenderTopComponent());
BeanTreeView view = new BeanTreeView();
add(view, BorderLayout.CENTER);
associateLookup(ExplorerUtils.createLookup(em, this.getActionMap()));
em.setRootContext(new RootNode());
for (Node node : em.getRootContext().getChildren().getNodes()) {
view.expandNode(node);
}
getActionMap().put("MyCoolRefreshAction", new AbstractAction() {
@Override
public void actionPerformed(ActionEvent e) {
em.setRootContext(new RootNode());// Rebuild Node hierarchy
}
});
}
Once an implementation of AbstractAction is installed in the Gender TopComponent’s ActionMap with key “MyCoolRefreshAction” and the Gender TopComponent has focus, invoking the Refresh action executes the local implementation of the actionPerformed() method. Here, the installed, local implementation rebuilds the Explorer View’s node hierarchy (the RootNode is newly instantiated, rebuilding the entire hierarchy). If another window gains focus, the fallback implementation executes unless this other window installs a Refresh action performer as well. In this way, windows can implement their own versions of callback actions.
Removing the Fallback Implementation
Sometimes it may not make sense for a callback action to have a fallback implementation. In this case, the action in the menu and toolbar should enable only if an implementation is installed in the focused component’s ActionMap. To remove the fallback implementation, modify the RefreshAction class, as shown in Listing 9.6. Here are the steps.
1. Define a public static final String inside the class with the same value as the key.
2. Remove the key attribute from the @ActionRegistration annotation.
3. Move the action registration annotations inside the class so that they apply to the static String definition.
4. Remove the ActionListener implementation.
With these changes, the Refresh action is still registered in the top-level Menu and the toolbar, but now there is no fallback implementation.
Listing 9.6 RefreshAction.java—Remove the Fallback Implementation
@Messages({
"CTL_RefreshAction=Refresh",
"CTL_RefreshTitle=Refresh Action"
})
public final class RefreshAction {
@ActionID(
category = "File",
id = "com.asgteach.familytree.actions.RefreshAction"
)
@ActionRegistration(
iconBase = "com/asgteach/familytree/actions/refresh-icon.png",
displayName = "#CTL_RefreshAction"
)
@ActionReferences({
@ActionReference(path = "Menu/File", position = 1300),
@ActionReference(path = "Toolbars/File", position = 500),
@ActionReference(path = "Shortcuts", name = "M-R")
})
public static final String REFRESH_ACTION = "MyCoolRefreshAction";
}
With no fallback implementation, the Refresh action is only enabled if the Gender window has focus. Otherwise, Refresh is disabled on the toolbar as well as under the File menu, as shown in Figure 9.13.
Context-Aware Actions
The previous examples showed you how to register an always-enabled action (Calendar action) and a callback action that is enabled when the TopComponent in which it is registered has focus (Refresh action). Now let’s show you how to create an action that is context aware. This action observes the current selection for a given type and enables itself if instances of the given type are present. Context-aware actions enable when their context is in the Lookup of a selected entity. Typically, the selected entity is one or more nodes, but it can also be a TopComponent.
NetBeans Platform Capability Pattern
Nodes in the NetBeans Platform have context menus and Lookups. The NetBeans Platform builds a node’s context menu from a list of actions provided by the node’s getActions() method. Furthermore, a node’s Lookup holds various “context” objects that enable an action when present in the selected node. Thus, we use a node’s Lookup to install capabilities. In the NetBeans Platform, a capability is described generally by a Java interface or abstract class and realized by the implementation of the interface or concrete class added to the Lookup of an object. This arrangement lets objects dynamically configure their own capabilities that perform actions, such as reloading, storing (saving), opening, and deleting. Capabilities encourage loose coupling, since an unrelated entity can “look up” a capability and invoke it (if it exists) without being privy to the details of its implementation. This is similar to the Global Lookup, which makes Service Providers available to interested entities.
The NetBeans IDE, for example, uses this capability pattern. In the Java Editor, the Save All icon in the toolbar enables when you first make a change to your source code. How exactly does this happen?
When the editor detects an edit to the source code, it adds an implementation of AbstractSavable to its Lookup. The Action framework listens for the presence of an AbstractSavable object in the Global Lookup. When detected, the LookupListener event handler enables the Save All icon in the toolbar and the Save and Save All menu items in the File menu. When you click one of these menu items, the AbstractSavable handleSave() method is invoked. Your file is saved, the AbstractSavable is removed from the Java Editor’s Lookup, and these menu items are once again disabled.3
3. We show you how to do all this with the FamilyTreeApp in Chapter 10. See “Implementing Update” on page 488. We also have an example of dynamically enabling a capability later in this chapter. See “Add Drop Support to the Root Node” on page 465.
The same principle applies to node selection. When you select a node that has a capability in its Lookup that corresponds to the context of a registered action, the action associated with that capability becomes enabled (available). Let’s show you how this works with a different version of the Calendar action.
Implementing a Context-Aware Action
Here’s an overview of how we’ll create a context-aware action and use it with PersonNodes in the GenderTopComponent.
• Remove the always-enabled CalendarAction from the application.
• Create a new Capabilities module and a CalendarCapability interface. Make its package public so that other modules can set a dependency on this module.
• Create a new conditionally-enabled action using the New Action wizard. Name this action Calendar and implement the action with context CalendarCapability.
• Modify PersonNode in module GenderViewer. Implement the CalendarCapability and add it to the PersonNode’s Lookup. Reuse the CalendarPanel form and icons.
• Configure the PersonNode’s list of actions so its context menu includes the Calendar action.
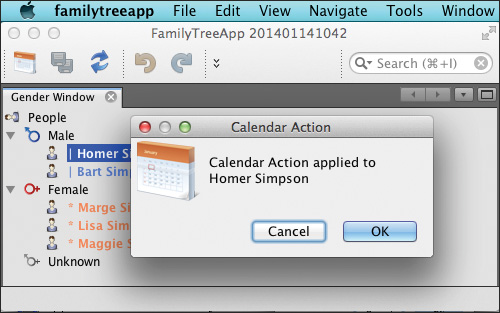
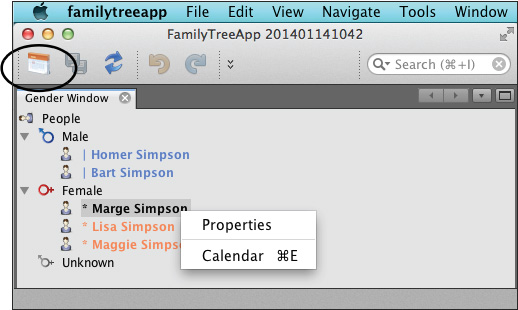
Initially, the Calendar action is disabled until the user selects a single PersonNode. Then, Calendar action is enabled in the File menu, toolbar, and the node’s context menu. The action displays a dialog with the selected Person’s name, as shown in Figure 9.14.
Create the Capabilities Module
Let’s first create a capability. Since capabilities are viewed as potentially application-wide definitions, we put CalendarCapability in a module (called Capabilities) and make its enclosing package public.
1. Select the Modules node in the FamilyTreeApp project, right-click, and select Add New . . . from the context menu. NetBeans displays the Name and Location dialog for the New Project wizard.
2. For Project Name, specify Capabilities and accept the defaults for the remaining fields. Click Next.
3. NetBeans displays the Basic Module Configuration dialog. Specify com.asgteach.familytree.capabilities for the Code Name Base and accept the defaults for the remaining fields. Click Finish. NetBeans creates project Capabilities in the FamilyTreeApp application.
Create the Capability Interface
1. Expand the Capabilities project Source Packages node, right click on the package name, and select New | Java Interface from the context menu.
2. In the New Interface dialog, specify CalendarCapability for Class Name and click Finish.
3. NetBeans brings up CalendarCapability.java in the Java Editor. Provide the doCalendar() abstract method for the interface, as shown in Listing 9.7.
Listing 9.7 CalendarCapability.java
public interface CalendarCapability {
public void doCalendar();
}
Make the Capabilities Module’s Package Public
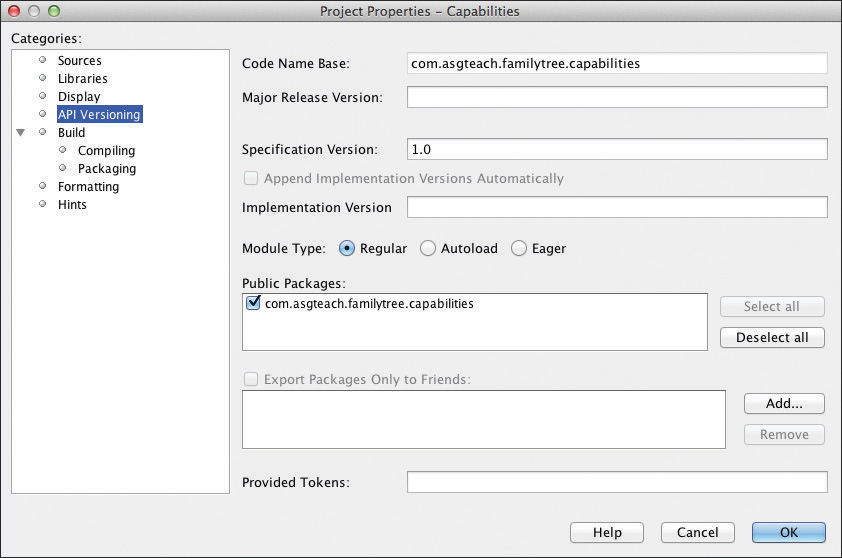
1. Right click on the Capabilities project and select Properties from the context menu. NetBeans displays the Project Properties dialog.
2. Under Categories, select API Versioning.
3. Under Public Packages, select package com.asgteach.familytree.capabilities as shown in Figure 9.15. Click OK to close the dialog.
Create a Context-Aware Action
Use the New Action wizard to create the Calendar action in the FamilyTreeActions module. Since the Calendar action will use the CalendarCapability, first set a dependency on the Capabilities module.
1. In the FamilyTreeActions project, select the Libraries node, right click, and select Add Module Dependency . . . from the context menu.
2. In the dialog, select the Capabilities module and click OK.
3. Now still in the FamilyTreeActions project, expand the Source Packages node, right click on the package name, and select New | Action . . . from the context menu.
4. NetBeans displays the Action Type dialog of the New Action wizard. Select Conditionally Enabled and specify CalendarCapability for the Cookie Class (the Cookie Class is the context). Select User Selects One Node, as shown in Figure 9.16. Click Next.
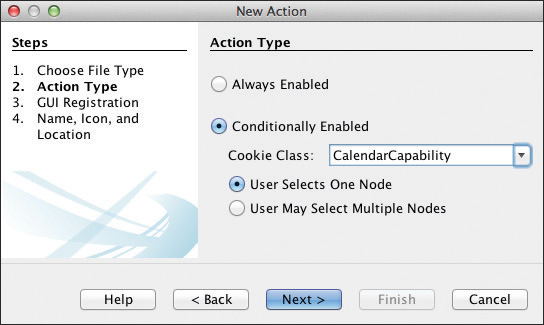
One Node or Multiple Nodes
We’ll configure this action for single-node selection first. Then we’ll show you how to make it work for multiple-node selections. Finally, we’ll show you how to make the NodeCalendarAction work for different kinds of nodes (both PersonNode and GenderNode).
5. NetBeans display the GUI Registration dialog. Register this new action in category Nodes, in the File menu and before the Save All icon in the toolbar. Leave the other options unselected, as shown in Figure 9.17. Click Next.
The action’s Category name lets you categorize actions and identify a set of actions to include in a node’s context menu.
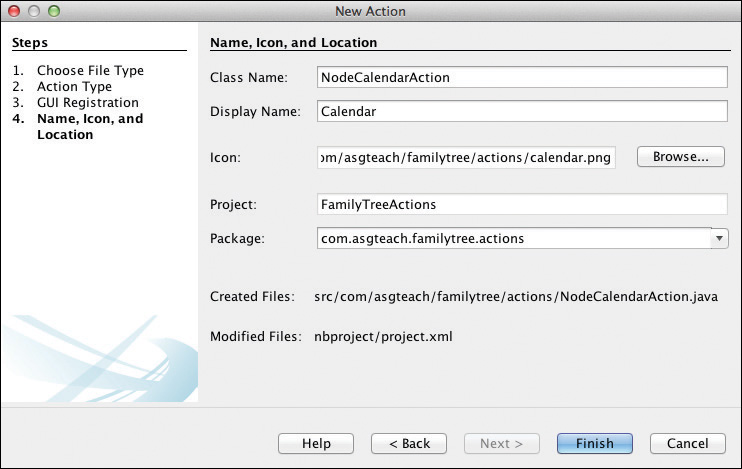
6. NetBeans displays the Name, Icon, and Location dialog. Specify NodeCalendarAction for the Class Name, Calendar for the Display Name, and calendar.png for the icon file, as shown in Figure 9.18. Click Finish.
7. NetBeans creates the NodeCalendarAction.java file, which uses CalendarCapability for its context type. Implement the actionPerformed() method as shown in Listing 9.8. We also register the shortcut “Meta-E” (E for Event) to invoke the NodeCalendar action. Note that this shortcut is active only when a PersonNode is selected.
Listing 9.8 NodeCalendarAction.java
@ActionID(
category = "Nodes",
id = "com.asgteach.familytree.actions.NodeCalendarAction"
)
@ActionRegistration(
iconBase = "com/asgteach/familytree/actions/calendar.png",
displayName = "#CTL_NodeCalendarAction"
)
@ActionReferences({
@ActionReference(path = "Menu/File", position = 1200),
@ActionReference(path = "Toolbars/File", position = 300),
@ActionReference(path = "Shortcuts", name = "M-E")
})
@Messages("CTL_NodeCalendarAction=Calendar")
public final class NodeCalendarAction implements ActionListener {
private final CalendarCapability context;
public NodeCalendarAction(CalendarCapability context) {
this.context = context;
}
@Override
public void actionPerformed(ActionEvent ev) {
context.doCalendar();
}
}
Make Changes to the GenderViewer Module
If you run the FamilyTreeApp application at this point, you will see a Calendar icon in the toolbar and a Calendar menu item in the File menu, but these actions are disabled. Furthermore, if you right click on a PersonNode, you will see only Properties in its context menu (because we configured a PropertiesSheet in PersonNode). To enable the Calendar action, we must provide an implementation of the Calendar action’s context and add it to the PersonNode’s Lookup. Here are the steps to set a dependency on both the Capabilities and the Dialogs API modules and copy the CalendarPanel and icon PNG file to the GenderViewer module.
1. Expand the GenderViewer project, right click on the Libraries node, and select Add Module Dependency . . . . In the Module Dependency dialog, select Capabilities and Dialogs API. Click OK.
2. Reuse the CalendarPanel created earlier (see “Build a Custom JPanel Form” on page 419). Expand the FamilyTreeActions project Source Packages and package name node. Select CalendarPanel.java and copy it into the GenderViewer Source Packages com.asgteach.familytree.genderviewer package.
3. Repeat the above step and copy file calendar64.png into the GenderViewer Source Packages com.asgteach.familytree.genderviewer.resources package.
4. Bring up CalendarPanel.java into the design view (click the Design tab). Make sure its JLabel component has Variable Name myLabel. Reset the icon property so that it uses the calendar64.png file in the resources package.
5. Bring up CalendarPanel.java in the Java Editor (click the Source tab). Add the setText() public method to the class, as shown in Listing 9.9.
Listing 9.9 CalendarPanel.java
public class CalendarPanel extends javax.swing.JPanel {
. . .
public void setText(String text) {
myLabel.setText(text);
}
}
Implement CalendarCapability in PersonNode
There are several modifications required to make PersonNode have the CalendarCapability. Previously, the PersonNode Lookup contained a single object (Person), which was set in the constructor. Now, however, we want to add other objects to the Lookup. As previously discussed, class InstanceContent lets you dynamically add and remove objects to and from a Lookup (see “Lookup as an Object Repository” on page 225). We’ll use InstanceContent here to give us a Lookup to which we can add objects. We use a private constructor, since a node’s Lookup must be created in a constructor. Note that we now add the Person object to the Lookup in the constructor with instanceContent.add().
Our second modification includes adding an implementation of CalendarCapability to the node’s Lookup. We use an anonymous class and override the doCalendar() method. In it, we instantiate the CalendarPanel and invoke the setText() method to include the Person’s name in the displayed dialog.
Finally, we override the getActions() method to include the Calendar action in the node’s context menu. The getActions() method returns an array of actions. We call super() to include any actions already configured (Properties is already configured in this example). The NetBeans Platform provides the Utilities actionsForPath() method that returns a list of actions registered for a given path (that is, its location in the application’s virtual file system, specified by its category). If you want to include a separator in the context menu, add a null to the List at the appropriate slot. Here, we add a separator before the Calendar menu item.
Listing 9.10 shows these modifications.
Listing 9.10 PersonNode.java—Configuring Calendar Action
@Messages({
"HINT_PersonNode=Person",
"CTL_CalendarTitle=Calendar Action"
})
public class PersonNode extends AbstractNode implements
PropertyChangeListener {
private static final Logger logger = Logger.getLogger(
PersonNode.class.getName());
private final InstanceContent instanceContent;
public PersonNode(Person person) {
this(person, new InstanceContent());
}
private PersonNode(Person person, InstanceContent ic) {
super(Children.LEAF, new AbstractLookup(ic));
instanceContent = ic;
instanceContent.add(person);
setIconBaseWithExtension(
"com/asgteach/familytree/genderviewer/resources/personIcon.png");
setName(String.valueOf(person.getId()));
setDisplayName(person.toString());
setShortDescription(Bundle.HINT_PersonNode());
// Add a Calendar Capability to this Node
instanceContent.add(new CalendarCapability() {
@Override
public void doCalendar() {
CalendarPanel panel = new CalendarPanel();
panel.setText("<html>Calendar Action applied to<p/>"
+ person + "</html>");
DialogDescriptor dd = new DialogDescriptor(panel,
Bundle.CTL_CalendarTitle());
DialogDisplayer.getDefault().notify(dd); // display & block
}
});
}
@SuppressWarnings("unchecked")
@Override
public Action[] getActions(boolean context) {
List<Action> personActions = new ArrayList<>(
Arrays.asList(super.getActions(context)));
// add a separator
personActions.add(null);
personActions.addAll(Utilities.actionsForPath("Actions/Nodes"));
return personActions.toArray(
new Action[personActions.size()]);
}
}
The code we added to PersonNode provides two distinct features.
• One, adding a CalendarCapability implementation to the PersonNode’s Lookup enables the Calendar action when a user selects the node.
• Two, overriding the getActions() method and including the Calendar action in PersonNode’s list of actions makes Calendar show up in PersonNode’s context menu.
If you don’t put the CalendarCapability context in the node’s Lookup but you still override getActions(), then the action will never be enabled, but it will still show up disabled in the node’s context menu.
Conversely, if you put the context in the Lookup but you don’t override the getActions() method, the Calendar action is enabled in the File menu and in the toolbar when a user selects the node, but it does not appear in the node’s context menu.
Figure 9.19 shows the application with the PersonNode’s context menu and the Calendar action icon enabled in the toolbar.
Configuring a Node’s Preferred Action
Double clicking a node invokes a node’s preferred action. To set a node’s preferred action, override the getPreferredAction() method and return an action. To make Calendar action PersonNode’s preferred action, we return the first (and only) action in the path "Actions/Nodes," as shown in Listing 9.11.
Listing 9.11 PersonNode.java—getPreferredAction() Method
@SuppressWarnings("unchecked")
@Override
public Action getPreferredAction() {
List<Action> personActions = (List<Action>) Utilities.actionsForPath(
"Actions/Nodes");
if (!personActions.isEmpty()) {
return personActions.get(0);
} else {
return super.getPreferredAction();
}
}
Note that you can override getPreferredAction() with or without also overriding getActions(). If you don’t override getActions(), the node’s context menu does not include the Calendar action, but you can still invoke the Calendar action with a double click.
The Layer File
The NetBeans Platform Layer file is part of our discussion on window groups (see “Window Group Example” on page 382 in Chapter 8). Historically, you registered actions by editing a module’s Layer file, an XML file used to configure NetBeans Platform applications. The build process in the NetBeans Platform still parses a module’s Layer file (if it exists) and generates a single layer.xml file for the application.
Now, modules can be mostly configured with annotations and a per module Layer file is generally not needed for direct editing. Under the hood, however, Layer files still exist, and it can be helpful to examine them. When registering actions, for example, the category that you assign to an action affects its “path” (its location in the application’s virtual file system).
Listing 9.12 shows the generated Layer file for the FamilyTreeActions module. The Layer file includes the registration information for the NodeCalendarAction and the RefreshAction from our examples. You can view a module’s Layer file in the File view of the application’s build directory, as follows.
build/cluster/modules/module-name.jar/META-INF/generated-layer.xml
where module-name.jar is the code name base-named jar file for a module. Not all modules will have a generated Layer file.
Looking at the Layer file, you can see that each action category has its own folder (here you see folder “Nodes” and folder “File”). Similarly, the top-level Menu has its own folder (“Menu”), as well as the Toolbar (“Toolbars”). This Layer file includes the registration information for the actions defined in this module. Other modules provide their own Layer file and action registrations, if any. The context-aware NodeCalendar action is registered for single node selection only ("EXACTLY_ONE"). (See “The File System API Overview” on page 624 for more details on the Layer file.)
Listing 9.12 FamilyTreeActions Module—generated-layer.xml
<?xml version="1.0" encoding="UTF-8"?>
<!DOCTYPE filesystem PUBLIC "-//NetBeans//DTD Filesystem 1.2//EN"
"http://www.netbeans.org/dtds/filesystem-1_2.dtd">
<filesystem>
<folder name="Actions">
<folder name="Nodes">
<file name=
"com-asgteach-familytree-actions-NodeCalendarAction.instance">
<!--com.asgteach.familytree.actions.NodeCalendarAction-->
<attr
bundlevalue=
"com.asgteach.familytree.actions.Bundle#CTL_NodeCalendarAction"
name="displayName"/>
<attr methodvalue="org.openide.awt.Actions.context"
name="instanceCreate"/>
<attr name="type" stringvalue=
"com.asgteach.familytree.capabilities.CalendarCapability"/>
<attr methodvalue="org.openide.awt.Actions.inject"
name="delegate"/>
<attr name="injectable" stringvalue=
"com.asgteach.familytree.actions.NodeCalendarAction"/>
<attr name="selectionType" stringvalue="EXACTLY_ONE"/>
<attr name="iconBase" stringvalue=
"com/asgteach/familytree/actions/calendar.png"/>
<attr boolvalue="false" name="noIconInMenu"/>
</file>
</folder>
<folder name="File">
<file name=
"com-asgteach-familytree-actions-RefreshAction.instance">
<!--com.asgteach.familytree.actions.RefreshAction.REFRESH_ACTION-->
<attr
bundlevalue="
com.asgteach.familytree.actions.Bundle#CTL_RefreshAction"
name="displayName"/>
<attr methodvalue="org.openide.awt.Actions.callback"
name="instanceCreate"/>
<attr name="key" stringvalue="MyCoolRefreshAction"/>
<attr name="iconBase" stringvalue=
"com/asgteach/familytree/actions/refresh-icon.png"/>
<attr boolvalue="false" name="noIconInMenu"/>
</file>
</folder>
</folder>
<folder name="Menu">
<folder name="File">
<file name=
"com-asgteach-familytree-actions-NodeCalendarAction.shadow">
<!--com.asgteach.familytree.actions.NodeCalendarAction-->
<attr name="originalFile" stringvalue="Actions/Nodes/
com-asgteach-familytree-actions-NodeCalendarAction.instance"/>
<attr intvalue="1200" name="position"/>
</file>
<file name="com-asgteach-familytree-actions-RefreshAction.shadow">
<!--com.asgteach.familytree.actions.RefreshAction.REFRESH_ACTION-->
<attr name="originalFile" stringvalue=
"Actions/File/com-asgteach-familytree-actions-RefreshAction.instance"/>
<attr intvalue="1300" name="position"/>
</file>
</folder>
</folder>
<folder name="Toolbars">
<folder name="File">
<file name=
"com-asgteach-familytree-actions-NodeCalendarAction.shadow">
<!--com.asgteach.familytree.actions.NodeCalendarAction-->
<attr name="originalFile" stringvalue="Actions/Nodes/
com-asgteach-familytree-actions-NodeCalendarAction.instance"/>
<attr intvalue="300" name="position"/>
</file>
<file name="com-asgteach-familytree-actions-RefreshAction.shadow">
<!--com.asgteach.familytree.actions.RefreshAction.REFRESH_ACTION-->
<attr name="originalFile" stringvalue="Actions/File/
com-asgteach-familytree-actions-RefreshAction.instance"/>
<attr intvalue="500" name="position"/>
</file>
</folder>
</folder>
<folder name="Shortcuts">
<file name="M-E.shadow">
<!--com.asgteach.familytree.actions.NodeCalendarAction-->
<attr name="originalFile" stringvalue="Actions/Nodes/
com-asgteach-familytree-actions-NodeCalendarAction.instance"/>
</file>
<file name="M-R.shadow">
<!--com.asgteach.familytree.actions.RefreshAction.REFRESH_ACTION-->
<attr name="originalFile" stringvalue="Actions/File/
com-asgteach-familytree-actions-RefreshAction.instance"/>
</file>
</folder>
</filesystem>
Multi-Select Context-Aware Actions
When we built the NodeCalendarAction, we specified that the user selects one node (see Figure 9.16 on page 432). To build a context-aware action that allows users to select multiple nodes, you select the appropriate radio button in the New Action wizard. Then, the wizard generates a List in the action class for the appropriate context type.
If you decide that users can select multiple nodes after you have already created the context-aware action, you can easily modify the action class by converting the context type to a List, as shown in Listing 9.13 (compare this to the single-selection version in Listing 9.8 on page 434).
Listing 9.13 NodeCalendarAction.java—Select Multiple Nodes
. . . Annotations Unchanged . . .
public final class NodeCalendarAction implements ActionListener {
private final List<CalendarCapability> context;
public NodeCalendarAction(List<CalendarCapability> context) {
this.context = context;
}
@Override
public void actionPerformed(ActionEvent ev) {
for (CalendarCapability calendarCapability : context) {
calendarCapability.doCalendar();
}
}
}
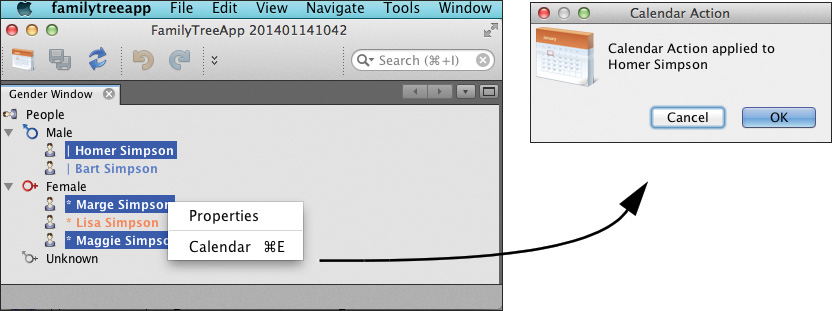
Now, when you select multiple PersonNodes, the Calendar action is enabled, as shown in Figure 9.20. In this example, invoking the action results in a succession of dialogs displayed for each selected node. As each dialog is dismissed, the next one appears.
To emphasize the flexibility and power of capabilities, let’s add this CalendarCapability to GenderNode by adding an implementation to its Lookup. Again, we restructure the GenderNode class to provide for an InstanceContent to which we can add things. Listing 9.14 shows the changes. We also override getActions() so that GenderNode context menu will also include the Calendar action. Note that this implementation of CalendarCapability is customized for GenderNode.
Listing 9.14 GenderNode.java—with CalendarCapability
public class GenderNode extends AbstractNode {
private final InstanceContent instanceContent;
public GenderNode(Gender gender) {
this(gender, new InstanceContent());
}
private GenderNode(Gender gender, InstanceContent ic) {
super(Children.create(new PersonChildFactory(gender), false),
new AbstractLookup(ic));
instanceContent = ic;
instanceContent.add(gender);
setGenderStuff(gender);
setShortDescription(Bundle.HINT_GenderNode());
// Add a Calendar capability to this Node
instanceContent.add(new CalendarCapability() {
@Override
public void doCalendar() {
CalendarPanel panel = new CalendarPanel();
panel.setText("<html>Calendar Action applied to<p/>Gender "
+ getDisplayName() + "</html>");
DialogDescriptor dd = new DialogDescriptor(panel,
Bundle.CTL_CalendarTitle());
DialogDisplayer.getDefault().notify(dd); // display & block
}
});
}
@SuppressWarnings("unchecked")
@Override
public Action[] getActions(boolean context) {
List<Action> nodeActions = new ArrayList<>(
Arrays.asList(super.getActions(context)));
// add a separator
nodeActions.add(null);
nodeActions.addAll(Utilities.actionsForPath("Actions/Nodes"));
return nodeActions.toArray(
new Action[nodeActions.size()]);
}
. . . unchanged code omitted . . .
}
Figure 9.21 shows that we can select both PersonNodes and GenderNodes and invoke the Calendar action, which executes according to the selected context.
9.3 Editing the Node Hierarchy
Applications may require modifying node hierarchies with drag and drop as well as cut, copy, paste, and delete. You may also want to reorder nodes within a node group. The NetBeans Platform provides actions and support for these tasks. To use these actions, you supply support code that hooks into the Action framework and the Explorer View/node hierarchy.4
4. This example is adapted from blog posts and articles provided by Geertjan Wielenga (https://blogs.oracle.com/geertjan/entry/node_cut_copy_paste_delete) and Toni Epple (http://netbeans.dzone.com/nb-how-to-drag-drop-with-nodes-api).
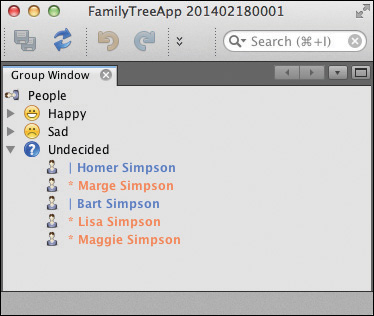
Let’s create a new node hierarchy so that users can move and reorder PersonNodes within three groups (implemented with a GroupNode). We call these groups Happy, Sad, and Undecided. We’ll use the Simpson family from the FamilyTreeManager and let users Cut, Copy, Paste, Delete, Drag and Drop, as well as Reorder, Move Up, and Move Down. In this section, we’ll show you how to implement all of these actions.
Group Window Node Actions
Let’s first look at the Group window and its node structure. Figure 9.22 shows the FamilyTreeApp in its initial state. It includes a single window (Group window) with our favorite group of Person objects from the Simpson family. All family members appear under Group Undecided. You can move one or more Person objects among the three Groups (Happy, Sad, and Undecided) using Copy/Paste, Cut/Paste, or Drag and Drop, putting Person objects in different groups or moving them within the same group. In addition, you can reorder any group.
The Group nodes include context menu item Change Order ..., as shown in Figure 9.23. Change Order pops up a separate dialog and lets you use Move Up and Move Down buttons to reorder the group. You dismiss the dialog with either OK to accept the changes or Cancel.
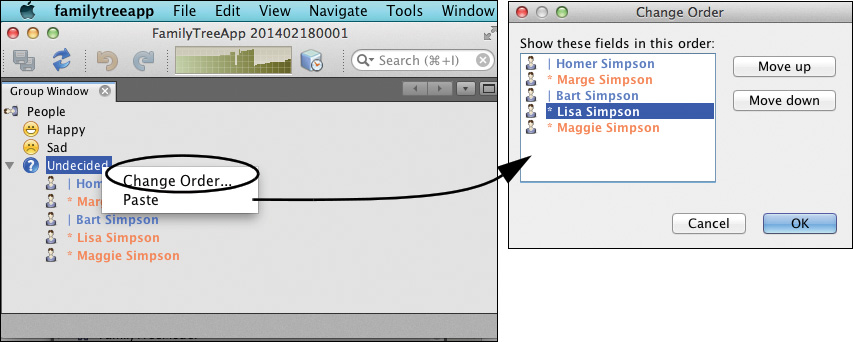
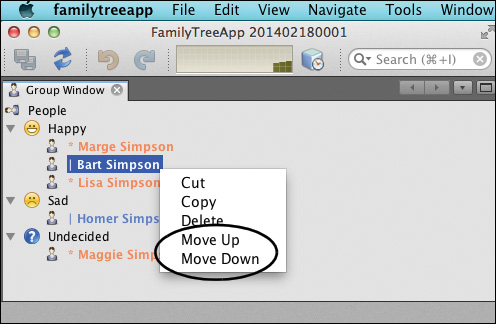
Figure 9.24 shows node Bart Simpson selected and its context menu, which includes Cut, Copy, Delete, Move Up, and Move Down. The Move Up and Move Down actions move the selected node within its group.
Basic Node Hierarchy
Let’s first examine the node hierarchy. From Figure 9.24 you see a root node labeled People, intermediate GroupNodes (Happy, Sad, and Undecided), and the familiar PersonNodes with their wrapped Simpson family Person objects.
Because we have a reordering capability, we create a model class (PersonModel) to manipulate the list of Person objects within a GroupNode. Each GroupNode, the PersonChildFactory, and all PersonNodes keep a reference to this model. Listing 9.15 shows the PersonModel class, which maintains an array list of Person objects for each GroupNode. The model also provides methods for adding, removing, and reordering objects as well as change support.
Listing 9.15 PersonModel—Maintaining the GroupNode’s List
public class PersonModel {
private final List<Person> persons;
private final ChangeSupport cs = new ChangeSupport(this);
public PersonModel(List<Person> persons) {
this.persons = new ArrayList<>(persons);
}
public List<? extends Person> getPersons() {
return persons;
}
public void add(Person p) {
persons.add(p);
cs.fireChange();
}
public void remove(Person p) {
persons.remove(p);
cs.fireChange();
}
public void reorder(int[] indexOrder) {
Person[] reordered = new Person[persons.size()];
for (int i = 0; i < indexOrder.length; i++) {
int j = indexOrder[i];
Person p = persons.get(i);
reordered[j] = p;
}
persons.clear();
persons.addAll(Arrays.asList(reordered));
cs.fireChange();
}
public void addChangeListener(ChangeListener l) {
cs.addChangeListener(l);
}
public void removeChangeListener(ChangeListener l) {
cs.removeChangeListener(l);
}
}
The hierarchy is built with GroupChildFactory, which creates each GroupNode. GroupNode in turn builds its children with PersonChildFactory, creating each PersonNode. Here are the responsibilities of each of these classes.
• GroupNodeChildFactory instantiates PersonModel for each GroupNode, as shown in Listing 9.16. It puts the Simpson family in the GroupNode Undecided when building the hierarchy. Otherwise, it builds an empty model.
Listing 9.16 GroupChildFactory.java
public class GroupChildFactory extends ChildFactory<PersonGroup> {
private static final Logger logger = Logger.getLogger(
GroupChildFactory.class.getName());
private final FamilyTreeManager ftm;
private final List<Person> people = new ArrayList<>();
GroupChildFactory() {
ftm = Lookup.getDefault().lookup(FamilyTreeManager.class);
if (ftm == null) {
logger.log(Level.SEVERE, "Cannot get FamilyTreeManager object");
LifecycleManager.getDefault().exit();
}
people.addAll(ftm.getAllPeople());
}
@Override
protected boolean createKeys(List<PersonGroup> list) {
list.addAll(Arrays.asList(GroupNode.PersonGroup.values()));
return true;
}
@Override
protected Node createNodeForKey(PersonGroup key) {
// Put all people in group UNDECIDED to start
if (key.equals(PersonGroup.UNDECIDED)) {
return new GroupNode(key, new PersonModel(people));
}
return new GroupNode(key, new PersonModel(new ArrayList<>()));
}
}
• GroupNode is one of Happy, Sad, or Undecided and receives a reference to its PersonModel in the constructor, as shown in Listing 9.17. The constructor passes this reference to its Children class (PersonChildFactory).
@NbBundle.Messages({
"HINT_GroupNode=Group Node"
})
public class GroupNode extends AbstractNode {
private static final Logger logger = Logger.getLogger(
GroupNode.class.getName());
private final PersonModel personModel;
private final InstanceContent instanceContent;
public enum PersonGroup {
HAPPY, SAD, UNDECIDED
}
public GroupNode(PersonGroup group, final PersonModel personModel) {
this(group, personModel, new InstanceContent());
}
private GroupNode(PersonGroup group,
final PersonModel personModel,InstanceContent ic) {
super(Children.create(new PersonChildFactory(personModel), false),
new AbstractLookup(ic));
this.instanceContent = ic;
this.personModel = personModel;
this.instanceContent.add(group);
setGroupStuff(group);
setShortDescription(Bundle.HINT_GroupNode());
. . .
}
private void setGroupStuff(PersonGroup group) {
StringBuilder sb = new StringBuilder();
StringBuilder iconString = new StringBuilder(
"com/asgteach/familytree/groupviewer/resources/");
switch (group) {
case HAPPY:
sb.append("Happy");
iconString.append("happy.png");
break;
case SAD:
sb.append("Sad");
iconString.append("sad.png");
break;
case UNDECIDED:
sb.append("Undecided");
iconString.append("undecided.png");
break;
}
setName(sb.toString());
setDisplayName(sb.toString());
setIconBaseWithExtension(iconString.toString());
}
}
• PersonChildFactory (Listing 9.18) extends ChildFactory.Detachable<Person>, which provides the life cycle methods addNotify() and removeNotify(). Here, PersonChildFactory adds/removes itself as a listener to the PersonModel object. PersonChildFactory receives a reference to its PersonModel in the constructor and is the “keeper” of the model, reacting to changes by invoking the refresh() method.
Listing 9.18 PersonChildFactory.java
public class PersonChildFactory extends ChildFactory.Detachable<Person>
implements ChangeListener {
private final PersonModel personModel;
public PersonChildFactory(final PersonModel personModel) {
this.personModel = personModel;
}
@Override
protected boolean createKeys(List<Person> list) {
list.addAll(personModel.getPersons());
return true;
}
@Override
protected Node createNodeForKey(Person key) {
PersonNode node = new PersonNode(key, personModel);
return node;
}
// Called immediately before the first call to createKeys().
@Override
protected void addNotify() {
personModel.addChangeListener(this);
}
// Called when this child factory is no longer in use,
// to dispose of resources, detach listeners, etc.
@Override
protected void removeNotify() {
personModel.removeChangeListener(this);
}
@Override
public void stateChanged(ChangeEvent e) {
refresh(false);
}
}
• Listing 9.19 shows PersonNode, which wraps the Person object. Its constructor receives the Person object and a reference to PersonModel. You’ll see that PersonNode uses the PersonModel reference when it overrides the destroy() method for the delete-type actions Cut, Drag, and Delete (see Listing 9.23 on page 454).
@NbBundle.Messages({
"HINT_PersonNode=Person"
})
public class PersonNode extends AbstractNode {
// This is the list that this PersonNode is part of!
private final PersonModel personModel;
public PersonNode(Person person, PersonModel personModel) {
super(Children.LEAF, Lookups.singleton(person));
this.personModel = personModel;
setIconBaseWithExtension(
"com/asgteach/familytree/groupviewer/resources/personIcon.png");
setName(String.valueOf(person.getId()));
setDisplayName(person.toString());
setShortDescription(Bundle.HINT_PersonNode());
}
. . .
@Override
public String getHtmlDisplayName() {
. . . unchanged code . . .
}
}
Reorder and Index.Support
You reorder a group in two ways. You can either select a GroupNode’s Change Order ... context menu item (see Figure 9.23 on page 445) or you select a PersonNode’s context menu Move Up or Move Down (see Figure 9.24 on page 446). Here are the steps to implement reorder with GroupNode and PersonNode.
1. In GroupNode, include ReorderAction in the getActions() method, as shown in Listing 9.20. This puts menu item Change Order . . . in the GroupNode’s context menu.
2. Add an implementation of Index.Support to GroupNode’s Lookup, overriding the getNodes(), getNodeCount(), and reorder() methods, as shown in Listing 9.20. This enables the Change Order . . . menu item. The reorder() method manipulates the model (PersonModel).
Listing 9.20 GroupNode.java—Index.Support Implementation
public class GroupNode extends AbstractNode {
. . .
private GroupNode(PersonGroup group, final PersonModel personModel,
InstanceContent ic) {
super(Children.create(new PersonChildFactory(personModel), false),
new AbstractLookup(ic));
. . .
// A support class that implements methods of Index.Support.
// This class must be in the Node's Lookup to support the Reorder Action
// and Move Up and Move Down in its children.
instanceContent.add(new Index.Support() {
@Override
public Node[] getNodes() {
return getChildren().getNodes(true);
}
@Override
public int getNodesCount() {
return getNodes().length;
}
// Reorder by permutation
@Override
public void reorder(int[] orderIndex) {
personModel.reorder(orderIndex);
}
});
}
@Override
public Action[] getActions(boolean context) {
return new Action[]{
ReorderAction.get(ReorderAction.class),
PasteAction.get(PasteAction.class),};
}
}
3. PersonNode includes MoveUpAction and MoveDownAction in the PersonNode’s getActions() method, as shown in Listing 9.21. This puts menu items Move Up and Move Down in the PersonNode’s context menu. These menu items are contextually enabled based on the Index.Support added to the parent GroupNode’s Lookup and the PersonNode’s current position in the group.
Listing 9.21 PersonNode—Implementing MoveUp and MoveDown
public class PersonNode extends AbstractNode {
. . .
@Override
public Action[] getActions(boolean context) {
return new Action[]{
CutAction.get(CutAction.class),
CopyAction.get(CopyAction.class),
DeleteAction.get(DeleteAction.class),
MoveUpAction.get(MoveUpAction.class),
MoveDownAction.get(MoveDownAction.class)
};
}
. . .
}
Implementing Drag and Drop
Drag and drop are closely related to cut, copy, and paste with shared support code. We’ll look at drag and drop first, since these actions don’t require menu items.
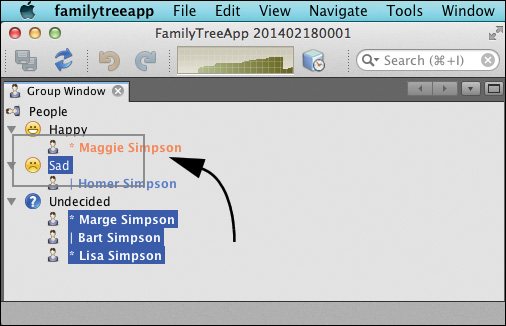
The drag and drop gesture executes the equivalent of a cut and paste without using menu items. You can select single or multiple PersonNodes. The target of a drop is a GroupNode, whose responsibility is to receive the dropped object (or objects). Figure 9.25 shows three PersonNodes being dragged to GroupNode Sad, with the target position indicated by a gray rectangle outline. The nodes are dropped into their new position and removed from their original position when the user releases the mouse.
Drag and drop requires building a Transferable object that contains the transferred data, as well as meta information associated with the Transferable (such as whether the transfer is a cut or copy). The Transferable data must be serializable. Transferable support is provided by Swing/AWT (many Swing components support drag and drop). The NetBeans Platform provides an extended Transferable object, called ExTransferable, that works with nodes.
Data integrity is maintained by setting the DataFlavor on a Transferable. DataFlavor encapsulates meta information about the data being transferred. This lets the drop target accept a Transferable of supported flavors (and reject unsupported flavors) and properly extract the data. Swing supports standard DataFlavors such as image (imageFlavor), String (stringFlavor), and a list of java.io.File objects (javaFileList). For this example, we create a new DataFlavor for Person objects.
Here are the steps to implement drag and drop in the Group window. Note that you don’t configure any actions in a node’s getActions() method for drag and drop.
1. Create a new DataFlavor for Person (PersonFlavor), as shown in Listing 9.22. Add this class to the FamilyTreeModel module public package so we can access it from multiple modules (which we access in a later example—see “Inter-Window Drag and Drop” on page 458).
Listing 9.22 PersonFlavor.java
public class PersonFlavor extends DataFlavor {
public static final DataFlavor PERSON_FLAVOR = new PersonFlavor();
public PersonFlavor() {
super(Person.class, "Person");
}
}
2. In PersonNode, override the clipboardCut() method, which builds an ExTransferable with PersonFlavor and adds it to the application clipboard. Put an ExTransferable.Single in the ExTransferable object and override the getData() method to return the Person object from this node. You must also override the node’s canDestroy(), canCut(), and destroy() methods, since these are invoked during the drag and drop gesture. Listing 9.23 shows these methods.
Note that the destroy() method removes the wrapped Person object from the underlying model (PersonModel in Listing 9.15 on page 446), which then fires a state change event processed by PersonChildFactory (Listing 9.18 on page 449).
Listing 9.23 PersonNode—Implementing Drag and Drop
public class PersonNode extends AbstractNode {
. . .
@Override
public Transferable clipboardCut() throws IOException {
ExTransferable extrans = ExTransferable.create(super.clipboardCut());
extrans.put(new ExTransferable.Single(PersonFlavor.PERSON_FLAVOR) {
@Override
protected Person getData() {
return getLookup().lookup(Person.class);
}
});
return extrans;
}
@Override
public boolean canCut() {
return true; // OK to cut this node
}
@Override
public boolean canDestroy() {
return true; // OK to destroy this node
}
@Override
public void destroy() throws IOException {
personModel.remove(getLookup().lookup(Person.class));
}
}
3. In GroupNode, override the getDropType() method, as shown in Listing 9.24. This method receives the Transferable from either a cut, copy, or drag and creates a PasteType object if the Transferable is supported. The Person object is extracted from the Transferable and added to this group’s model (personModel). If the transfer is either a cut or a drag and drop, the original node is destroyed.
Note that here, the Person object is added to the GroupNode’s model. Similar to the destroy() method, PersonModel fires a state change event processed by PersonChildFactory, and the ensuing refresh() builds the new PersonNode for the transferred Person object.
Listing 9.24 GroupNode—Implementing Drag and Drop
public class GroupNode extends AbstractNode {
. . .
// getDropType is required to support drop targets for drag and drop
// as well as paste for cut/copy actions
@Override
public PasteType getDropType(Transferable t, int action, int index) {
if (t.isDataFlavorSupported(PersonFlavor.PERSON_FLAVOR)) {
return new PasteType() {
@Override
public Transferable paste() throws IOException {
try {
personModel.add((Person) t.getTransferData(
PersonFlavor.PERSON_FLAVOR));
final Node node = NodeTransfer.node(t,
NodeTransfer.DND_MOVE + NodeTransfer.CLIPBOARD_CUT);
// only destroy the original node for DND move or cut
if (node != null) {
node.destroy();
}
} catch (UnsupportedFlavorException ex) {
logger.log(Level.WARNING, null, ex);
}
return null;
}
};
}
return null;
}
}
Implementing Cut, Copy, Paste, Delete
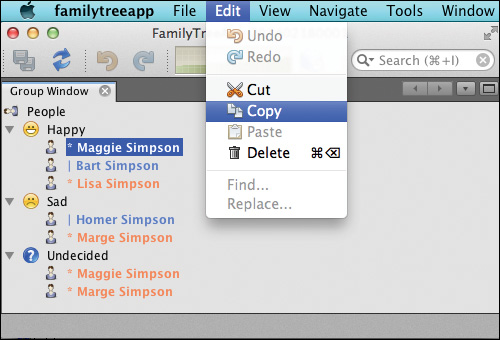
PersonNode supports Cut, Copy, and Delete context menu items (see Figure 9.24 on page 446). In addition, Figure 9.26 shows the top-level Edit menu. PersonNode supports menu items Cut, Copy, and Delete and GroupNode supports Paste (after a PersonNode Cut or Copy action). (Figure 9.23 on page 445 shows the GroupNode Paste context menu item.)
Follow these steps to implement these Edit menu actions.
1. Put the Copy, Cut, Paste, and Delete actions in the TopComponent’s ActionMap, as shown in Listing 9.25. This enables these actions in the Edit menu (if the selected node supports the actions).
Listing 9.25 GroupTopComponent—Implementing Edit Menu Actions
public final class GroupTopComponent extends TopComponent
implements ExplorerManager.Provider {
private final ExplorerManager em = new ExplorerManager();
public GroupTopComponent() {
initComponents();
setName(Bundle.CTL_GroupTopComponent());
setToolTipText(Bundle.HINT_GroupTopComponent());
. . .
ActionMap map = getActionMap();
map.put(DefaultEditorKit.copyAction, ExplorerUtils.actionCopy(em));
map.put(DefaultEditorKit.cutAction, ExplorerUtils.actionCut(em));
map.put(DefaultEditorKit.pasteAction, ExplorerUtils.actionPaste(em));
map.put("delete", ExplorerUtils.actionDelete(em, true));
associateLookup(ExplorerUtils.createLookup(em, map));
}
. . .
}
2. In PersonNode, include CutAction, CopyAction, and DeleteAction in the getActions() method, as shown in Listing 9.21 on page 452. This puts Cut, Copy, and Delete in the node’s context menu.
3. For Copy, override the canCopy() and clipboardCopy() methods, as shown in Listing 9.26. The clipboardCopy() method builds the ExTransferable that supports Copy with PersonFlavor.PERSON_FLAVOR data flavor. For Cut and Delete, the canCut(), clipboardCut(), canDestroy(), and destroy() methods were shown previously in Listing 9.23 on page 454.
Listing 9.26 PersonNode—Implementing Edit Menu Actions
public class PersonNode extends AbstractNode {
. . .
@Override
public Transferable clipboardCopy() throws IOException {
ExTransferable extrans = ExTransferable.create(super.clipboardCopy());
extrans.put(new ExTransferable.Single(PersonFlavor.PERSON_FLAVOR) {
@Override
protected Person getData() {
return getLookup().lookup(Person.class);
}
});
return extrans;
}
@Override
public boolean canCopy() {
return true; // OK to copy this node
}
}
4. In GroupNode, include PasteAction in the node’s context menu and override the createPasteTypes() method, as shown in Listing 9.27. Note that createPasteTypes() invokes the getDropType() method, which is also used with drag and drop (see Listing 9.24 on page 455).
Listing 9.27 GroupNode—Implementing Paste
public class GroupNode extends AbstractNode {
. . .
@Override
public Action[] getActions(boolean context) {
return new Action[]{
ReorderAction.get(ReorderAction.class),
PasteAction.get(PasteAction.class),};
}
// This is required for cut and copy actions
// It is not required for Drag and Drop
@Override
protected void createPasteTypes(Transferable t, List<PasteType> s) {
super.createPasteTypes(t, s);
PasteType p = getDropType(t, 0, 0);
if (p != null) {
s.add(p);
}
}
}
9.4 Inter-Window Drag and Drop
The Group window in the previous section illustrates drag and drop that occurs within the same window. You can also drag and drop objects between different windows, since the Transferable object contains all of the necessary information a receiving node needs to accept the transferred object.
Trash Window Node Actions
Let’s build on the previous section and implement a drag and drop Delete operation where the user drags a node to a special Trash window for later removal. The user can retrieve nodes from this Trash container, returning them to the Group window, or empty the Trash for their final removal. Let’s also remove the previously implemented Delete action from the PersonNode context menu. We’ll implement this “fancy delete” feature by creating a new module called TrashCan.
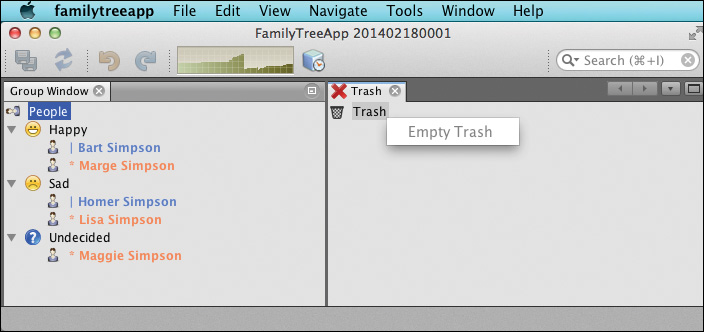
Figure 9.27 shows the Trash window with an empty trash icon, a disabled Empty Trash menu item, and no nodes under the Trash node.
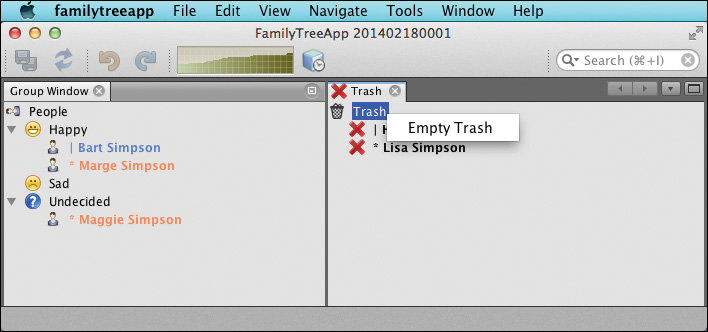
In contrast, Figure 9.28 shows two nodes in the Trash window, the trash icon is “full,” and the Empty Trash menu item is active.
Basic Node Hierarchy
Let’s start with the basic classes for the root node (TrashNode), its Children class (PersonNodeContainer), and the node that wraps a Person object (RemovePersonNode). The Trash window root node is implemented by TrashNode, as shown in Listing 9.28. It uses InstanceContent so that capabilities can be added and removed from its Lookup.
public class TrashNode extends AbstractNode {
private final InstanceContent instanceContent;
private static final Logger logger = Logger.getLogger(
TrashNode.class.getName());
public TrashNode(String title) {
this(title, new InstanceContent());
}
private TrashNode(String title, InstanceContent ic) {
super(new PersonNodeContainer(), new AbstractLookup(ic));
instanceContent = ic;
setDisplayName(title);
setIconBaseWithExtension(
"com/asgteach/familytree/trashcan/resources/EmptyTrashicon.png");
}
}
TrashNode’s children are defined by PersonNodeContainer, which uses Index.ArrayChildren for its structure, as shown in Listing 9.29. Method initCollection() initializes an empty collection.
Children
Note that since we aren’t providing a reorder capability for TrashNode, we don’t need a separate model to hold the children. Index.ArrayChildren supplies a simple ArrayList that contains the child nodes.
Listing 9.29 PersonNodeContainer
public class PersonNodeContainer extends Index.ArrayChildren {
private final List<Node> personList = new ArrayList<Node>();
@Override
protected List<Node> initCollection() {
return personList;
}
}
Each Person object is wrapped in a RemovePersonNode, as shown in Listing 9.30. RemovePersonNode overrides getHtmlDisplayName() to include the Person’s gender. The node’s icon is a delete symbol to emphasize its precarious condition “in the Trash” (see Figure 9.28 on page 459).
Listing 9.30 RemovePersonNode.java
@NbBundle.Messages({
"HINT_RemoveNode=Person"
})
public class RemovePersonNode extends AbstractNode {
public RemovePersonNode(Person person) {
super(Children.LEAF, Lookups.singleton(person));
setIconBaseWithExtension(
"com/asgteach/familytree/trashcan/resources/delete.png");
setName(String.valueOf(person.getId()));
setDisplayName(person.toString());
setShortDescription(Bundle.HINT_RemoveNode());
}
@Override
public String getHtmlDisplayName() {
Person person = getLookup().lookup(Person.class);
StringBuilder sb = new StringBuilder();
if (person == null) {
return null;
}
sb.append("<b>");
switch (person.getGender()) {
case MALE:
sb.append("| ");
break;
case FEMALE:
sb.append("* ");
break;
case UNKNOWN:
sb.append("? ");
break;
}
sb.append(person.toString()).append("</b>");
return sb.toString();
}
}
The TrashTopComponent uses familiar constructor code to initialize the node hierarchy and set the Explorer Manager’s context root, as shown in Listing 9.31.
Listing 9.31 TrashTopComponent.java
@ConvertAsProperties(
dtd = "-//com.asgteach.familytree.trashcan//Trash//EN",
autostore = false
)
@TopComponent.Description(
preferredID = "TrashTopComponent",
iconBase = "com/asgteach/familytree/trashcan/resources/delete.png",
persistenceType = TopComponent.PERSISTENCE_ALWAYS
)
@TopComponent.Registration(mode = "editor", openAtStartup = true)
@ActionID(category = "Window",
id = "com.asgteach.familytree.trashcan.TrashTopComponent")
@ActionReference(path = "Menu/Window" /*, position = 333 */)
@TopComponent.OpenActionRegistration(
displayName = "#CTL_TrashAction",
preferredID = "TrashTopComponent"
)
@Messages({
"CTL_TrashAction=Trash",
"CTL_TrashTopComponent=Trash",
"HINT_TrashTopComponent=This is a Trash window",
"CTL_TrashTitle=Trash"
})
public final class TrashTopComponent extends TopComponent implements
ExplorerManager.Provider {
private final ExplorerManager em = new ExplorerManager();
public TrashTopComponent() {
initComponents();
setName(Bundle.CTL_TrashTopComponent());
setToolTipText(Bundle.HINT_TrashTopComponent());
BeanTreeView view = new BeanTreeView();
add(view, BorderLayout.CENTER);
em.setRootContext(new TrashNode(Bundle.CTL_TrashTitle()));
associateLookup(ExplorerUtils.createLookup(em, getActionMap()));
}
@Override
public ExplorerManager getExplorerManager() {
return em;
}
. . .
}
The new “Fancy Delete” drag and drop replaces the Group window’s Delete. Fortunately, only minor changes are required to the GroupViewer module to remove the original Delete capability.
1. Remove “delete” from the GroupTopComponent’s ActionMap (see Listing 9.25 on page 456 and remove ExplorerUtils.actionDelete() from the map).
2. Remove DeleteAction from PersonNode’s getActions() method (see Listing 9.21 on page 452).
The PersonNode and GroupNode in the GroupViewer module already provide the needed drag behavior, as well as the receiving drop behavior to work with the Trash window.
Implementing Drag and Drop Delete
To implement the Trash window drag and drop Delete, you provide the same drag and drop support methods presented in the previous section. TrashNode is the drop target for the drag gesture originating with the Group window, and RemovePersonNode supports the returning drag gesture. Here are the general tasks.
• In TrashNode, override getDropType() in TrashNode to receive a Transferable.
• In RemovePersonNode, override methods clipboardCut(), canCut(), canDestroy(), and destroy() to support the drag gesture back to the Group window.
• Create a context-aware EmptyTrash action.
The EmptyTrash action is conditionally enabled when at least one RemovePersonNode exists in the node hierarchy. The action is disabled when the node hierarchy is empty. The TrashNode icon also changes depending on whether or not the EmptyTrash action is enabled.
Importantly, you’ll see how to dynamically enable and disable actions by adding and removing capabilities to a node’s Lookup. This is a central pattern with the NetBeans Platform. You will see this pattern again in the next chapter with the FamilyTreeApp Save and Save All actions (see “Implementing Update” on page 488).
Let’s begin with the EmptyCapability interface and the EmptyTrash action.
Create Capability and Context-Aware Action
Add interface EmptyCapability interface and its corresponding context-aware action, EmptyTrashAction to module TrashCan. Listing 9.32 shows the EmptyCapability interface.
Listing 9.32 EmptyCapability.java
public interface EmptyCapability {
public void emptyTrash();
}
Listing 9.33 shows the EmptyTrashAction, created with the New Action wizard. You specify a conditionally enabled action type and EmptyCapability for the Cookie Class (the context type).
Listing 9.33 EmptyTrashAction.java
@ActionID(
category = "TrashNode",
id = "com.asgteach.familytree.trashcan.EmptyTrashAction"
)
@ActionRegistration(
displayName = "#CTL_EmptyTrashAction"
)
@Messages("CTL_EmptyTrashAction=Empty Trash")
public final class EmptyTrashAction implements ActionListener {
private final EmptyCapability context;
public EmptyTrashAction(EmptyCapability context) {
this.context = context;
}
@Override
public void actionPerformed(ActionEvent ev) {
context.emptyTrash();
}
}
Add Support for the Action and Implement Its Capability
Listing 9.34 shows the implementation code to support the EmptyTrashAction that is contextually enabled. First, we override the getActions() method to include the EmptyTrashAction in the TrashNode context menu.
The enableEmptyAction() method adds an EmptyCapability implementation to the Lookup and changes the node’s icon. The clearEmptyAction() method removes the EmptyCapability object from the Lookup and changes the node’s icon back to the original “empty trash.” With these two methods, we dynamically enable and disable the EmptyTrashAction in TrashNode.
EmptyCapability’s emptyTrash() method destroys the node’s children. The clearEmptyAction() method is invoked from the nodeDestroyed() event handler shown in Listing 9.35 when the children node count is zero.
Listing 9.34 TrashNode.java—EmptyAction Support
public class TrashNode extends AbstractNode implements NodeListener {
. . .
@SuppressWarnings("unchecked")
@Override
public Action[] getActions(boolean context) {
List<Action> actions = new ArrayList<>();
actions.addAll(Utilities.actionsForPath("Actions/TrashNode"));
return actions.toArray(new Action[actions.size()]);
}
private void enableEmptyAction() {
EmptyCapability ec = getLookup().lookup(EmptyCapability.class);
if (ec == null) {
setIconBaseWithExtension(
"com/asgteach/familytree/trashcan/resources/FullTrashicon.png");
instanceContent.add(new EmptyCapability() {
@Override
public void emptyTrash() {
for (Node node : getChildren().getNodes()) {
try {
node.destroy();
} catch (IOException ex) {
logger.log(Level.WARNING, null, ex);
}
}
}
});
}
}
// invoked from the NodeListener nodeDestroyed() method
private void clearEmptyAction() {
EmptyCapability ec = getLookup().lookup(EmptyCapability.class);
if (ec != null) {
instanceContent.remove(ec);
setIconBaseWithExtension(
"com/asgteach/familytree/trashcan/resources/EmptyTrashicon.png");
}
}
. . .
}
Add Drop Support to the Root Node
Listing 9.35 shows the all-important getDropType() method. This method returns a PasteType and overrides the paste() method, which performs several steps. First, the paste() method extracts the transferred node and disallows drag gestures from within the same hierarchy. Next, the method extracts the Person object, creates a RemovePersonNode, adds the TrashNode as a NodeListener, and adds the new node to the TrashNode hierarchy. Last, the method invokes the enableEmptyAction() method (see Listing 9.34) and deletes the transferred node from its original hierarchy.
TrashNode implements NodeListener, which requires overriding five methods. We’re interested only in events that destroy nodes, handled by the nodeDestroyed() method. This method removes TrashNode as a listener and disables the EmptyTrashAction if the children node count is now zero.
Listing 9.35 TrashNode.java—Handling Drop
public class TrashNode extends AbstractNode implements NodeListener {
. . .
@Override
public PasteType getDropType(Transferable t, int action, int index) {
if (t.isDataFlavorSupported(PersonFlavor.PERSON_FLAVOR)) {
return new PasteType() {
@Override
public Transferable paste() throws IOException {
final Node node = NodeTransfer.node(
t, NodeTransfer.DND_MOVE + NodeTransfer.CLIPBOARD_CUT);
if (node != null && !TrashNode.this.equals(
node.getParentNode())) {
try {
final Person person = ((Person) t.getTransferData(
PersonFlavor.PERSON_FLAVOR));
Node newNode = new RemovePersonNode(person);
newNode.addNodeListener(TrashNode.this);
getChildren().add(new Node[]{newNode});
// we have at least one RemovePersonNode
enableEmptyAction();
if ((action & DnDConstants.ACTION_MOVE) != 0) {
node.destroy();
}
} catch (UnsupportedFlavorException ex) {
logger.log(Level.WARNING, null, ex);
}
}
return null;
}
};
}
return null;
}
@Override
public void childrenAdded(NodeMemberEvent nme) {}
@Override
public void childrenRemoved(NodeMemberEvent nme) {}
@Override
public void childrenReordered(NodeReorderEvent nre) {}
@Override
public void nodeDestroyed(NodeEvent ne) {
ne.getNode().removeNodeListener(this);
if (getChildren().getNodesCount() == 0) {
clearEmptyAction();
}
}
@Override
public void propertyChange(PropertyChangeEvent evt) {}
}
Add Drag Support to Child Nodes
To provide drag support back to the Group window, override the canCut(), canDestroy(), destroy(), and clipboardCut() methods in RemovePersonNode, as shown in Listing 9.36. The clipboardCut() method is the same code we used for PersonNode (see Listing 9.23 on page 454). The destroy() method fires a node destroyed event, which the TrashNode listens for.
Listing 9.36 RemovePersonNode.java—Handling Drag
public class RemovePersonNode extends AbstractNode {
. . .
@Override
public boolean canCut() {
return true;
}
@Override
public boolean canDestroy() {
return true;
}
@Override
public void destroy() throws IOException {
getParentNode().getChildren().remove(new Node[] { this } );
fireNodeDestroyed();
}
@Override
public Transferable clipboardCut() throws IOException {
ExTransferable extrans = ExTransferable.create(super.clipboardCut());
extrans.put(new ExTransferable.Single(PersonFlavor.PERSON_FLAVOR) {
@Override
protected Person getData() {
return getLookup().lookup(Person.class);
}
});
return extrans;
}
}
9.5 Key Point Summary
This chapter shows you how to hook into the NetBeans Platform Action framework. You learn how to create actions that are always enabled and actions that depend on the state of your application. We introduce the concept of capabilities and how to dynamically add and remove them to create loosely-coupled behaviors. Finally, we show you how to use the standard NetBeans Platform Edit actions to manipulate nodes in an Explorer View with Cut, Copy, Paste, Move Up, Move Down, Delete, and Drag and Drop. Here are the key points in this chapter.
• The NetBeans Platform New Action wizard lets you register actions with annotations.
• These annotations configure the top-level Menu and Toolbar as well as configure the action’s display name, icon, shortcut key sequence, and action class.
• An action that can be selected in any state of the application is an always-enabled action. These actions do not depend on user-selected objects or the availability of objects, data, or files.
• NetBeans Platform actions implement ActionListener and override the actionPerformed() method.
• A TopComponent’s ActionMap associates a key with a registered callback action.
• Callback actions perform different functions depending on which component has focus. Callback actions with a fallback implementation are always enabled. The fallback implementation is invoked if the focused TopComponent does not provide its own implementation in its ActionMap.
• Callback actions without a fallback implementation are only enabled when the TopComponent with focus has an implementation in its ActionMap.
• Context-aware actions are enabled when a particular context (Cookie class) becomes available through the Global Selection Lookup.
• Specify Conditionally Enabled in the New Action wizard to create context-aware actions.
• A capability is the implementation of an action context that can be dynamically added and removed from an object’s Lookup. Capabilities encourage loose coupling, since an unrelated entity can look up a capability and invoke it without knowing about its implementation.
• The NetBeans Platform uses the capability pattern to implement the Save and Save All actions.
• You configure context-aware actions for either single or multiple node selection.
• Action categories let you classify actions and include them in a node’s context menu.
• To add an action to a node’s context menu, override the getActions() method and include the action’s path.
• To enable a context-aware action for a node, include an implementation of the action’s context in the node’s Lookup.
• Override the getPreferredAction() method to set a node’s preferred action. The action is invoked with a double click on the node.
• Implement node reordering by adding an implementation of Index.Support in the node’s Lookup. Generally, you provide a model to maintain child node ordering. Include ReorderAction in the node’s getActions() method.
• Include MoveUpAction and MoveDownAction in the context menu of child nodes when the parent node supports reordering.
• Implement drag and drop by configuring an ExTransferable object with a supported DataFlavor. Override the getDropType() method in the target node and the clipboardCut(), canCut(), canDestroy(), and destroy() methods in the draggable.
• Implement Cut, Copy, and Paste with clipboardCut() and clipboardCopy() in the source node and createPasteTypes() and getDropType() in the target node.
• Drag and Drop actions (as well as Cut/Copy and Paste) apply between windows since the ExTransferable object contains all the information the receiving node needs to accept or reject the transferred object.