
17. Branding, Distribution, and Internationalization
NetBeans Platform applications should be customized to fit the distributor and the users of the application. By customizing the splash screen, application title, and text, you can control the look and usefulness of your application.
This chapter shows you how to brand your application so that it correctly reflects what the application does and who its users are. You’ll learn how to configure applications for dynamic updates, create distribution files, and build localized versions for international users.
What You Will Learn
• Customize an application name and title.
• Provide version numbers in an application title.
• Customize the splash screen.
• Customize text in Resource Bundles.
• Enable updates of your application.
• Build an update center.
• Create distribution files for your application.
• Internationalize and localize your application.
17.1 What Is Branding?
Branding lets you customize your application with a display name, splash screen, and text that your users see. You can also customize Resource Bundles or modify Window System behavior. (See “Limiting the Window System’s Behavior” on page 349 for modifications to the Window System.)
In this section we’ll show you how to modify an application’s display name (its title) and the name in the top-level menu bar. You’ll also learn how to customize the application “branding name” and change the splash screen.
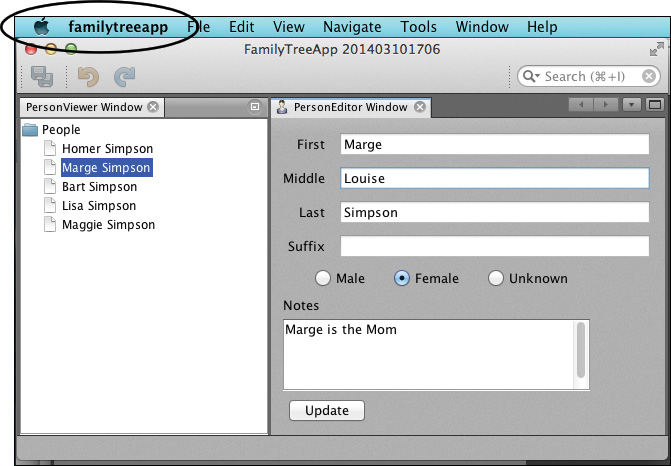
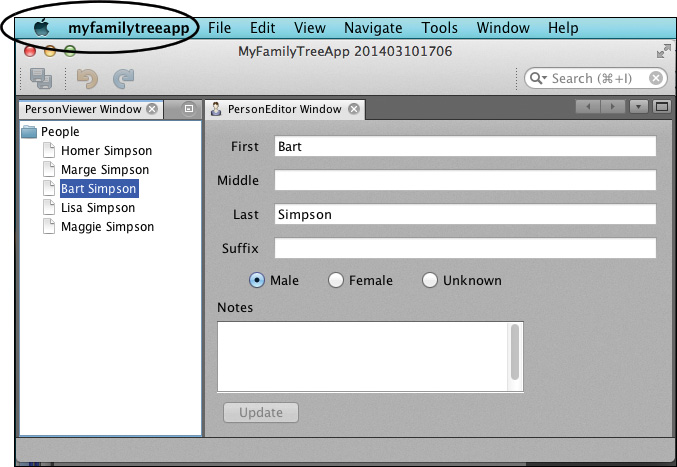
Figure 17.1 shows an application from Chapter 5 running. By default, an application’s branding name appears in the top-level menu (familytreeapp). The application’s title (FamilyTreeApp) appears in the top JFrame title bar with a build number. Let’s first show you how to change the project name, application title, and branding name.
Using the Branding Menu
Here are the steps to change the project name and application title using the project’s Branding menu.
1. Right click the project name in the Projects view window and select Branding . . . from the context menu. NetBeans displays the Branding dialog with the Basic tab selected.
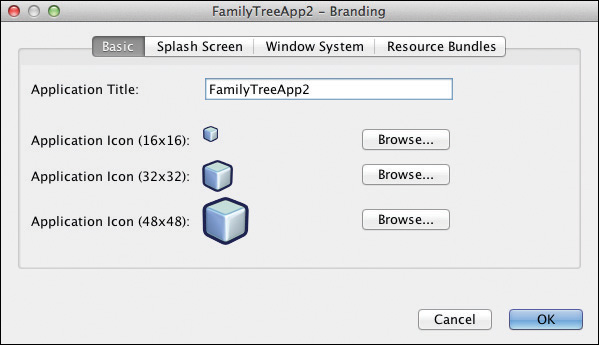
2. Supply another title in the Application Title text field, as shown in Figure 17.2. This menu item changes the title and project name. (Note that the project’s directory name does not change.)
3. Click OK to accept the name change and rerun the application.
The application’s title and project name change, but not its branding name, which remains familytreeapp, as shown in Figure 17.3.
1. In the Projects view, select the application project name, right click, and select Properties from the context menu. In the Project Properties dialog under Categories, select Application.
2. Change property Branding Name to myfamilytreeapp and click OK, as shown in Figure 17.4.
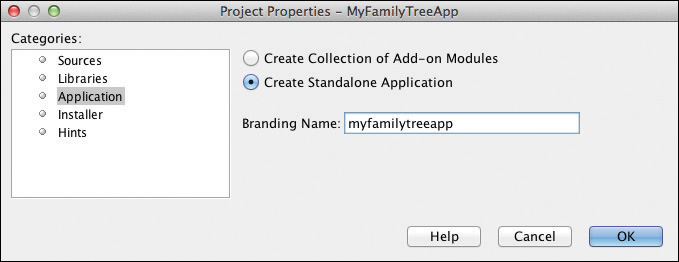
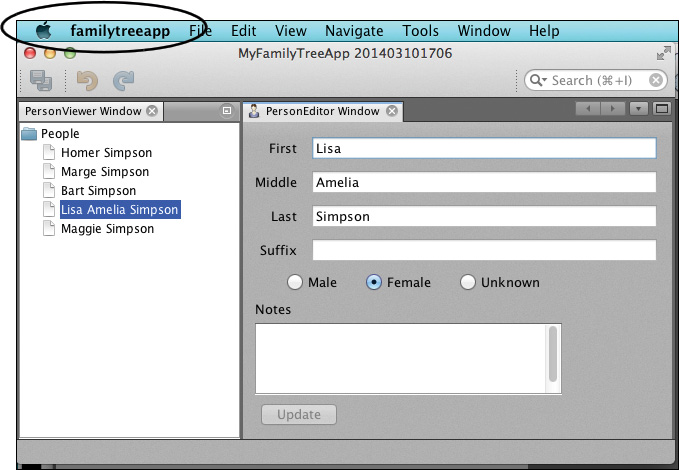
Figure 17.5 shows the MyFamilyTreeApp application running with the top-level menu title changed to myfamilytreeapp.
When you modify the application’s title and branding name, this affects the application’s Project Properties file (project.properties) and NetBeans Platform Config file (platform.properties). In the Project Properties file, the app.title property is set to MyFamilyTreeApp. The app.name property is ${branding.token}.
app.name=${branding.token}
app.title=MyFamilyTreeApp
The platform.properties file defines property branding.token, as follows.
branding.token=myfamilytreeapp
Branding Token Tip
Note that the branding token is for internal code use and is not intended for display to the user.
You can change the branding token, but it must begin with a lowercase letter and exclude special characters. Here are the rules for branding.token names.
1. Only lowercase letters, numbers, and the _ character (under bar) are allowed.
2. The branding token must begin with a lowercase letter.
3. At least one lowercase letter must follow an _ character (under bar).
If you supply an illegal name, the Branding Token dialog lets you know.
By default, NetBeans Platform applications use the branding.token property to create the name that appears in the top-level menu and in the operating system’s task manager (property app.name). If you want this name to match the application title (property app.title), change these properties so that they are the same, as follows.
app.name=MyFamilyTreeApp
app.title=${app.name}
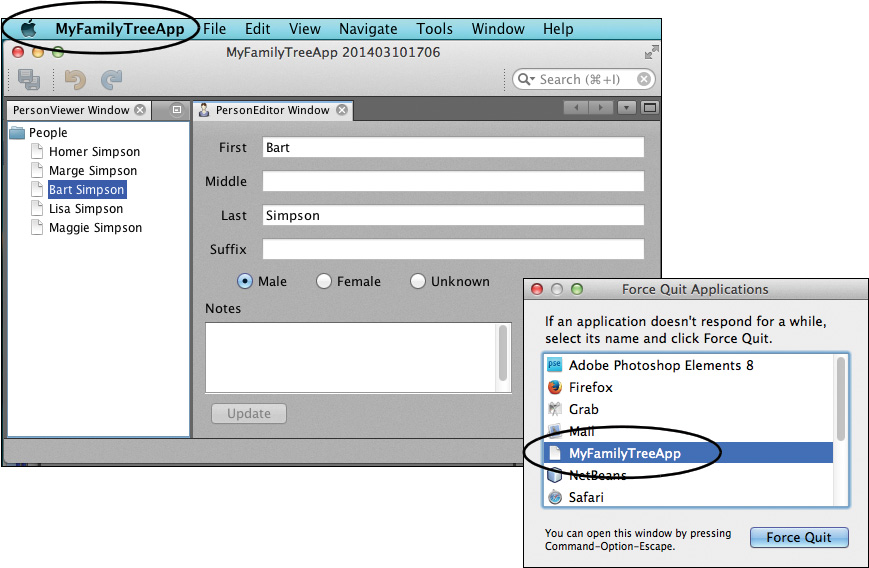
Figure 17.6 shows the application running with its application name and title both set to MyFamilyTreeApp (with mixed case letters). Figure 17.6 also shows the Mac OS X Force Quit applications list with application name MyFamilyTreeApp.
Customizing the Application Title
By default, NetBeans includes a NetBeans IDE build number with your application title. You might prefer to include a version number for your application instead of the build number from NetBeans IDE in the title. One way to do this is to modify the Build Script in the Important Files folder of your application. Here are the steps.
1. In the Projects view, expand the Important Files node under your application project.
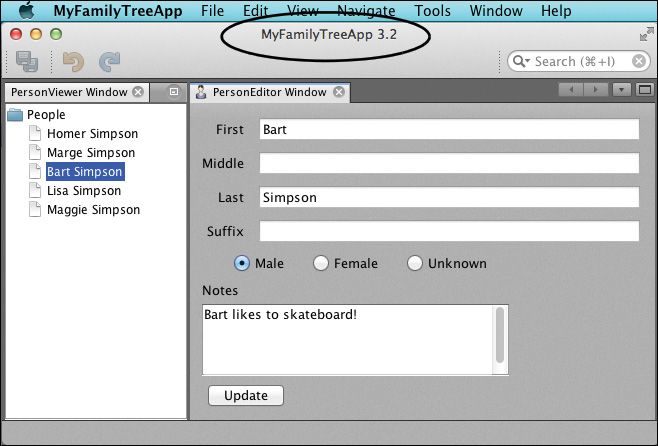
2. Add an app.version property to the project.properties file. Set it to the desired version number for your application. Here we use 3.2, as shown in Listing 17.1.
Listing 17.1 Project Properties—Add app.version Property
app.name=MyFamilyTreeApp
app.title=${app.name}
app.version=3.2
modules=
${project.com.asgteach.familytree.model}:
${project.com.asgteach.familytree.personviewer}:
${project.com.asgteach.familtree.personeditor}:
${project.com.asgteach.familytree.manager.impl}
project.com.asgteach.familtree.personeditor=PersonEditor
project.com.asgteach.familytree.manager.impl=FamilyTreeManagerImpl
project.com.asgteach.familytree.model=FamilyTreeModel
project.com.asgteach.familytree.personviewer=PersonViewer
3. Double click the Build Script node to bring the build.xml file up into the XML editor. (The Build Script lets you make changes to the ANT-based build system provided by the NetBeans IDE.)
4. Add the XML code as shown in bold in Listing 17.2.1
1. This build script is adapted from a blog by Tonny Kohar at http://blogs.kiyut.com/tonny/2007/08/06/netbeans-platform-branding-and-version-info/.
Listing 17.2 Build Script—Show Application Build Information in Title
<?xml version="1.0" encoding="UTF-8"?>
<!-- You may freely edit this file. -->
<!-- See harness/README in the NetBeans platform -->
<!-- for some information on what you could do (e.g. targets to override). -->
<!-- If you delete this file and reopen the project it will be recreated. -->
<project name="FamilyTreeApp" basedir=".">
<description>Builds the module suite FamilyTreeApp.</description>
<!-- override build to add update branding -->
<target name="build" depends="build-brand,suite.build"/>
<target name="build-brand" depends="-init">
<propertyfile
file="${basedir}/branding/core/core.jar/org/netbeans/core/startup/
Bundle.properties"
comment="Updated by build script">
<entry key="currentVersion" value="${app.title} ${app.version} " />
</propertyfile>
<propertyfile
file="${basedir}/branding/modules/org-netbeans-core-windows.jar/
org/netbeans/core/windows/view/ui/Bundle.properties"
comment="Updated by build script">
<entry key="CTL_MainWindow_Title"
value="${app.title} ${app.version}" />
<entry key="CTL_MainWindow_Title_No_Project"
value="${app.title} ${app.version}" />
</propertyfile>
</target>
<import file="nbproject/build-impl.xml"/>
</project>
Figure 17.7 shows the customized version number displayed with the application’s title.
Branding and Resource Bundles
Now let’s show you how to remove version and build information from the application title. (If you added the code in Listing 17.1 and Listing 17.2, you should remove it first.)2
2. Note that you can use these steps to modify menus or dialog text in any NetBeans Platform module.
1. Bring up the Branding dialog.
2. Click the Resource Bundles tab.
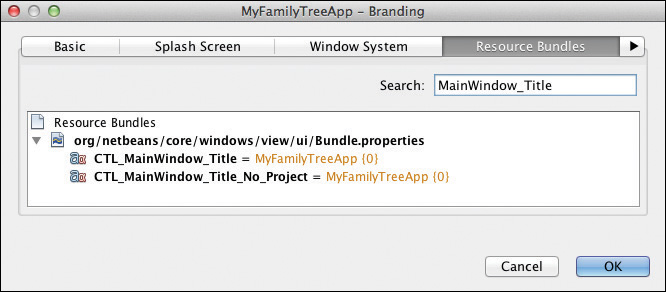
3. In the search window, specify MainWindow_Title for the search string. NetBeans displays two entries as shown in Figure 17.8.
4. For both entries, right click on the property entry and select Add to Branding. NetBeans displays an editing dialog. Remove the {0} argument placeholder, which removes the build number from the title. Click OK to accept the change. In the Branding dialog, click OK to complete the process.
5. In the Files view, expand the branding folder as shown in Figure 17.9, and open the modified .properties file shown in the Editor.
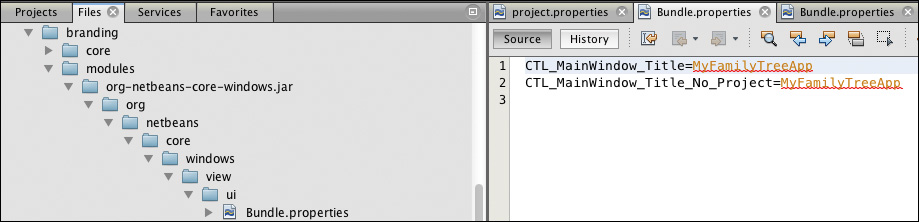
With this change, your application JFrame will include a title without any version information.
Customizing the Splash Screen
Your application will display a standard NetBeans Platform splash screen unless you provide your own. We’ve created a custom PNG splash screen for the FamilyTreeApp application. Here’s how to incorporate this custom splash screen into the application.
1. In the Projects view, right click the application name and select Branding . . . from the context menu.
2. Select the Splash Screen tab and click Browse to select a .gif or .png graphic file.
3. Adjust the color and placement of the progress bar and the size, color, and placement of the running text. Figure 17.10 shows the dialog with the adjustable options for the splash screen.
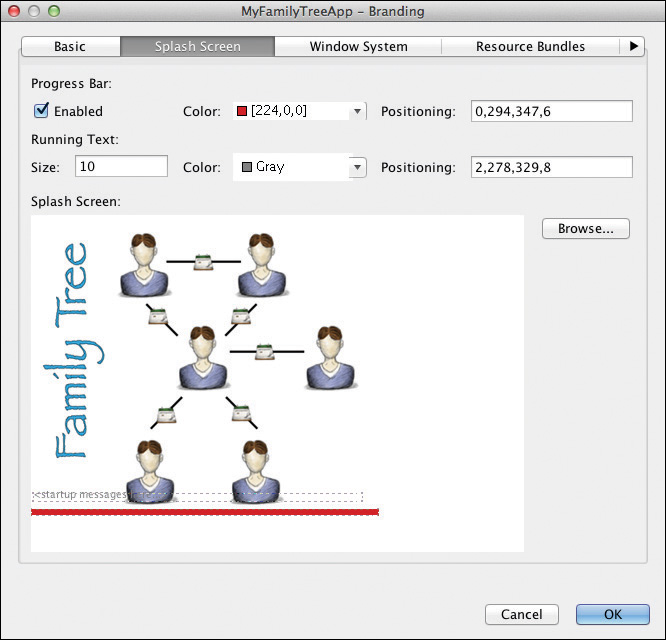
4. Click OK to accept the settings.
When you customize the splash screen, NetBeans adds the following entry to the Project Properties file.
app.icon=branding/core/core.jar/org/netbeans/core/startup/frame48.gif
Removing the Splash Screen
Add the following line to the application’s Project Properties file to eliminate the splash screen in your application.
17.2 Application Updates
Two important events occur with a released application: distribution and updates. You can generate an Installer for your NetBeans Platform application, and you can configure your application for dynamic updates. For updates to work, however, you must first include two modules in your application. With these modules installed, users can update applications by accessing an Update Center or by installing downloaded modules individually. We’ll discuss application updates first and then cover creating application installers in the next section. To show you these features, we’ll use the FamilyTreeApp we created in Chapter 7 (see “Creating a Selection History Feature” on page 332).
Enable Updates of Your Application
To let users dynamically update your NetBeans Platform application, you must include the AutoUpdate Services and AutoUpdate UI modules in the platform cluster, as follows.
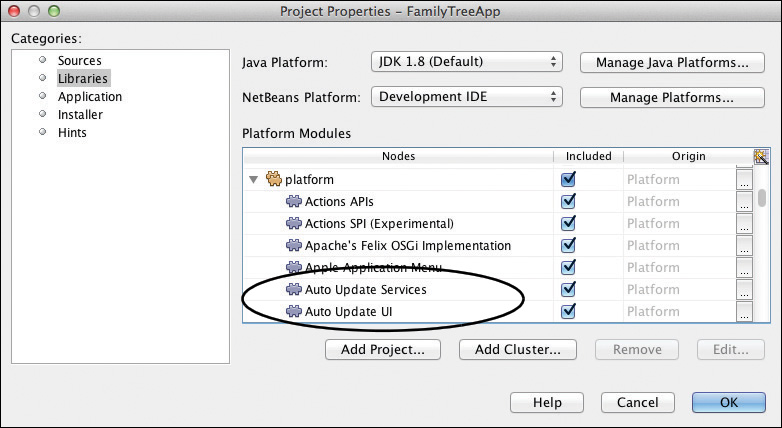
1. In the Projects view window, right click FamilyTreeApp and select Properties from the context menu. NetBeans displays the Project Properties window.
2. Under Categories, select Libraries. Under Nodes, scroll down and expand the platform cluster.
3. Select modules AutoUpdate Services and AutoUpdate UI as shown in Figure 17.11. Click OK.
4. Run the FamilyTreeApp. (Note that you must perform a Clean and Build to see the Plugins menu item.) You will now have a Plugin Manager that you access through the top-level menu item Tools | Plugins.
Create an Update Center
This section shows you how to create an Update Center for your application and activate it through your application’s Plugin Manager.
An Update Center consists of a URL that contains an updates.xml file and the most up-to-date versions of all of your application’s modules. Fortunately, NetBeans will build these files for you through your application’s context menu.
For the FamilyTreeApp, follow these steps to create the Update Center contents.
• In the Projects view window of the NetBeans IDE, right click the FamilyTreeApp project and select Package As | NBMs from the context menu.
NetBeans creates directory build/updates and includes the updates.xml file and your application module NBM files, as shown in Figure 17.12. The XML file contains descriptions for each module with required dependencies and build and version information.
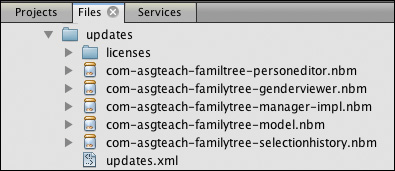
This is the content you need for an Update Center. The Update Center itself resides at a publicly accessible URL or in a directory on the local file system (for testing or local use only). Here we use the local file system.
Now you need to configure an Update Center inside your application. To do this, run the FamilyTreeApp application and follow these steps.
1. From the top-level menu bar, select Tools | Plugins. NetBeans displays the Plugin Manager.
2. In the Plugin Manager, select Settings. Click Add to add an Update Center.
3. In the Update Center Customizer, supply an Update Center name and URL. You can use the location of the updates directory you created in the previous steps with URL resource file://, as shown in Figure 17.13 (or the appropriate URL with the required files). Click OK.
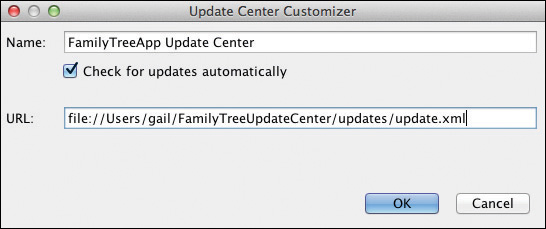
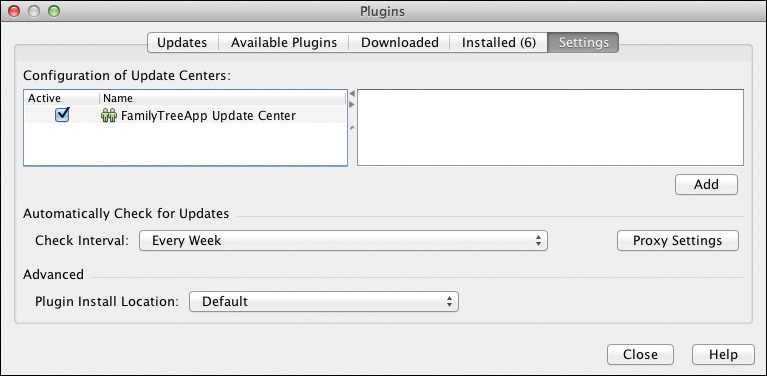
Figure 17.14 shows the newly customized FamilyTreeApp Update Center. Note that the Plugin Manager now shows six Installed plugins under tab Installed.
With the Plugin Manager configured in your application, let’s now show you how to dynamically remove a plugin as well as a few options for re-installing a plugin.
Dynamically Uninstall a Module (Plugin)
Let’s remove the SelectionHistory module from the FamilyTreeApp. Recall from Chapter 7 that the FamilyTreeApp runs just fine without this module (plugin) installed. To remove the plugin, run the FamilyTreeApp and follow these steps.
1. From the top-level menu, select Tools | Plugins. NetBeans brings up the Plugin Manager.
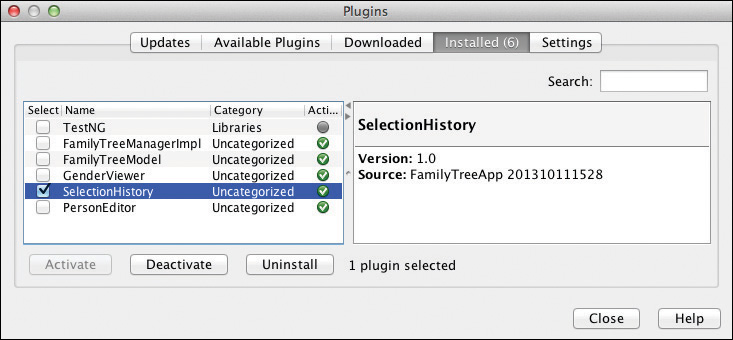
2. Select the Installed tab. In the list, select plugin SelectionHistory and click Uninstall, as shown in Figure 17.15.
3. NetBeans begins the Plugin Uninstaller process, as shown in Figure 17.16. Click Uninstall.

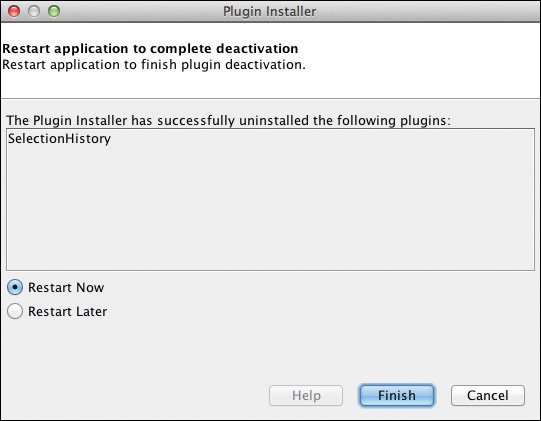
4. NetBeans removes the SelectionHistory module from the FamilyTreeApp. You can choose to restart the application now or later. Click Finish, as shown in Figure 17.17.
Adding Modules to an Application
You can add modules to an application with either your application’s Update Center or by installing a downloaded NetBeans Module (NBM). Both options require an application with a Plugin Manager.
Let’s first show you how you might add a new NBM to a running application by adding the SelectionHistory module to the FamilyTreeApp. This scenario applies when you’ve downloaded an NBM file and now wish to install it in your running application. You use the Plugin Manager, but you do not need to access the Update Center.
Create the Module NBM
To add the SelectionHistory module to a running application as an NBM, you first must create the NBM file (if you haven’t done this previously) and somehow send to your user.
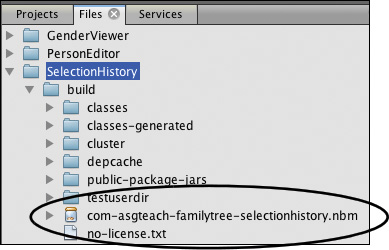
1. In the Projects view, right click project SelectionHistory and select Create NBM from the context menu.
2. NetBeans builds the module and places the NBM file under the modules build directory with the name com-asgteach-familytree-selectionhistory.nbm. You can view the NBM using the Files window as shown in Figure 17.18.
Install a Downloaded NBM
You’ll now add the module to the FamilyTreeApp using the following steps.
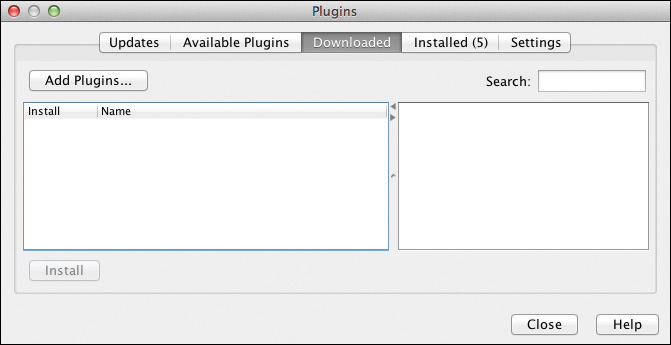
1. Run the FamilyTreeApp and from the top menu, select Tools | Plugins. The application displays the Plugin Manager.
2. Select the Downloaded tab, then click Add Plugins . . . as shown in Figure 17.19.
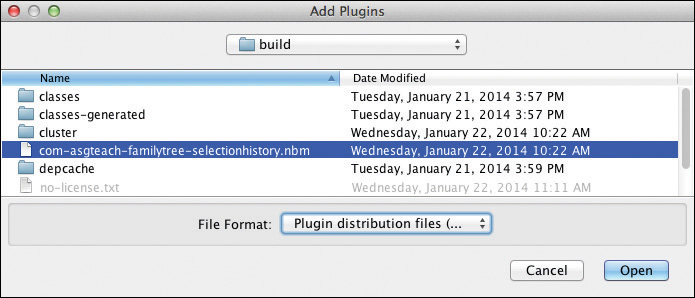
3. NetBeans displays a file chooser window. Browse to the directory that contains the NBM file (here we browse to the build directory under project SelectionHistory) and select the NBM file, as shown in Figure 17.20. Click Open.
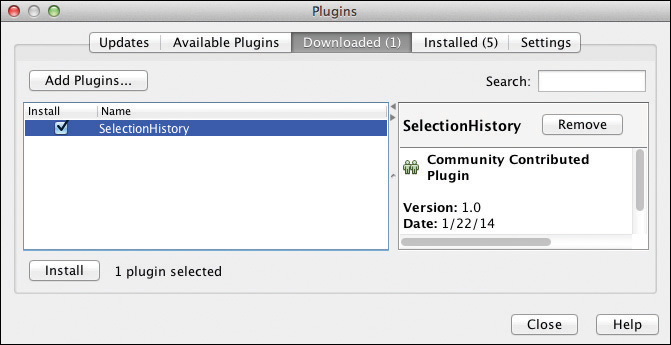
4. NetBeans displays the Plugin in the Downloaded window. Select plugin SelectionHistory and click Install, as shown in Figure 17.21.
5. NetBeans initiates the Plugin Installer, which takes you through the steps to install the NBM into the FamilyTreeApp, including a license agreement. When the installation completes, click Finish and then close the Plugin Manager.
When the Plugin Manager closes, you’ll see the SelectionHistory window open in your application.
Install a Plugin
When you create and configure an Update Center with your application’s modules, new and updated modules become available for installation through the Update Center. A Plugin Manager checks for updates and categorizes available plugins. With an Update Center configured and the SelectionHistory module uninstalled, this module shows up under tab Available Plugins. Follow these steps to install it.
1. From the top-level menu bar, select Tools | Plugins. NetBeans displays the Plugin Manager.
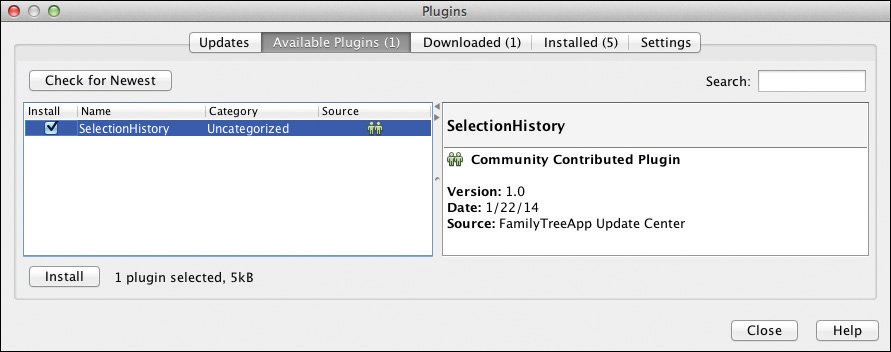
2. Click Available Plugins and select the SelectionHistory plugin.
3. Click Install, as shown in Figure 17.22.
4. NetBeans initiates the Plugin Installer, which takes you through the steps to install the NBM into the FamilyTreeApp, including a license agreement. When the installation completes, click Finish and then close the Plugin Manager.
When the Plugin Manager closes, you’ll see the SelectionHistory window open in your application.
17.3 Application Distribution
The NetBeans IDE lets you create distribution files for users to install your application. You can create an installation that is compatible with Windows, Linux, Mac OS X, or Solaris. As part of the process for creating a distribution, you can include a custom License Agreement.
Prior to creating a distribution for your application, if you want to provide updates either through an Update Center or with individual NBM files, you must enable the Plugin Manager, as described in “Enable Updates of Your Application” on page 857.
Create an Installer
By default, NetBeans assumes you want to create an Installer that is compatible with your development system. To create Installers for other systems, use the Properties menu, as follows.
1. Right click on the FamilyTreeApp application project and select Properties from the context menu. Under Categories, select Installer, as shown in Figure 17.23.
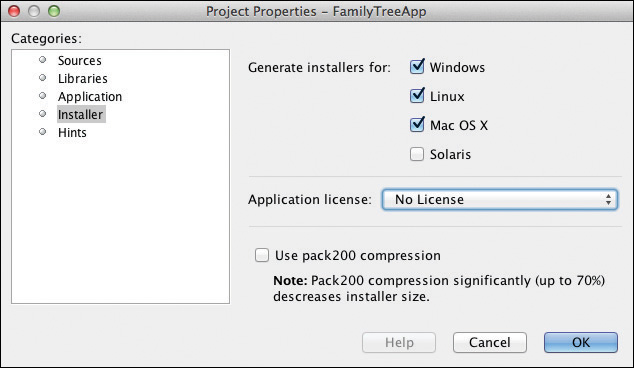
2. Options include Windows, Linux, Mac OS X, and Solaris. Check all that apply.
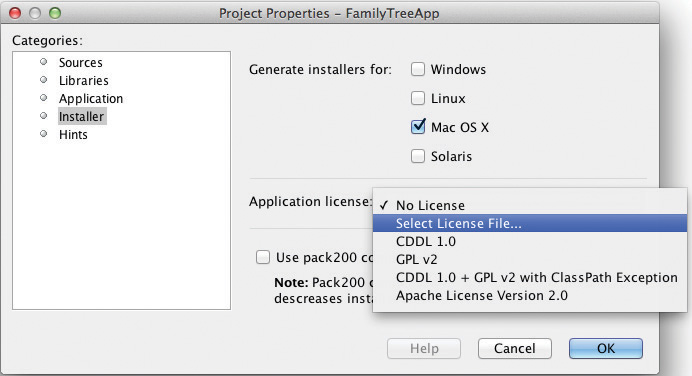
3. For Application license, select the option that applies to your application from the drop down menu, as shown in Figure 17.24. If you want to supply your own license, choose Select license file . . . and a File Chooser lets you select a text file that contains the license wording. This license text will then be used during application installation.
4. Specify Use pack200 compression if you want to reduce the installer size.
5. Click OK to set the Installer properties.
6. To create the Installers, right click project FamilyTreeApp and select Package as ... | Installers from the context menu. NetBeans builds installers in the application’s dist directory (as shown in Figure 17.25) for each target specified, as follows.
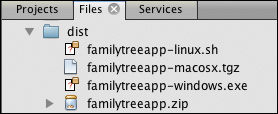
Installer(s) for [windows linux macosx] are available
at <full path>/FamilyTreeApp/dist
Installer Tip
Creating Installers can take a long time. Monitor the process in the NetBeans IDE Output window.
Installing the Application
Let’s show you the installation process on a Mac. Other target systems have similar installation processes.
On a Mac, once you double-click the .zip or .tgz file, you’ll see an executable Installer. When you run the Installer, an Installer wizard takes you through the installation. Figure 17.26 shows the first panel. Click Next to continue to successive panels, which include a License Agreement, installation directory and icon creation, and a summary panel that recaps the install features.
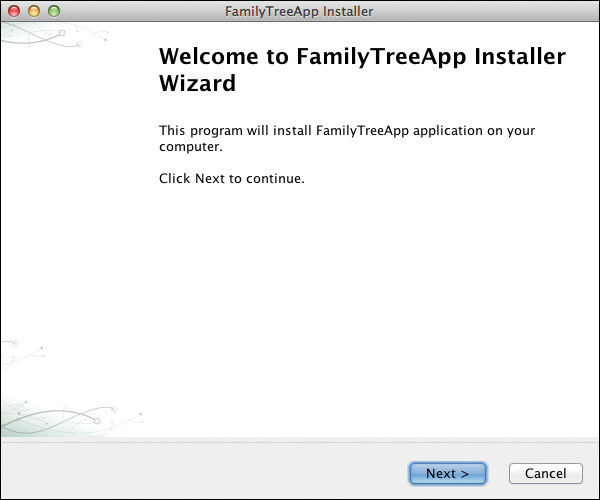
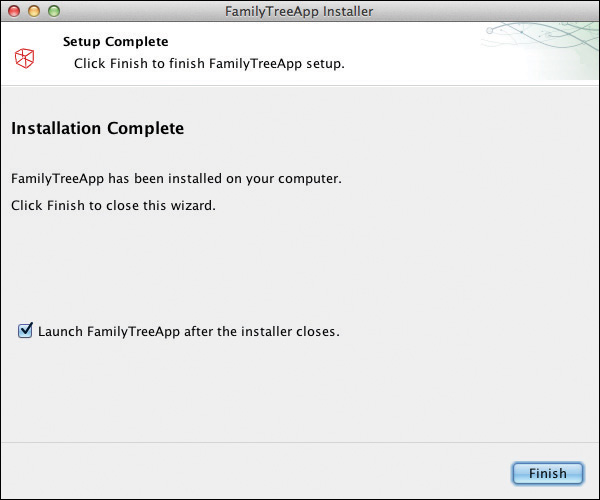
Figure 17.27 shows the last panel after the installation completes. You can optionally launch the application when you click Finish to end the Installer wizard.
Customizing the Installer Images
The default Installer uses standard images for the Installer wizard. You can customize these images by modifying image files found in the standard NetBeans Installation (nbi) hierarchy in your NetBeans installation directory, located at <Your NetBeans Installation>/harness/nbi.
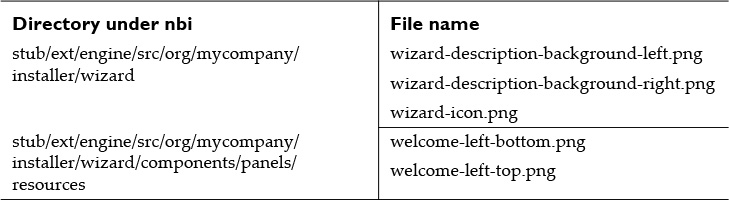
Table 17.1 shows the images used in the standard Installer wizard and their locations. You can replace these files with your own. After regenerating the Installer, you’ll see the new images.
17.4 Application Internationalization
Internationalizing an application configures the application for one or more locales. Internationalization includes target language translations and localizing the look and feel, such as number formatting and currency symbols. Internationalization is a big topic, but with an example, you’ll gain a good understanding of the issues.
We have internationalized the SmartPhoneDataApp presented in the previous chapter and localized the application for English, Spanish, and Portuguese. (See “RESTful Web Services and the NetBeans Platform” on page 800 for a description of this application.)3
3. With apologies to native speakers of Spanish and Portuguese, we have mainly relied on web-based translation services.
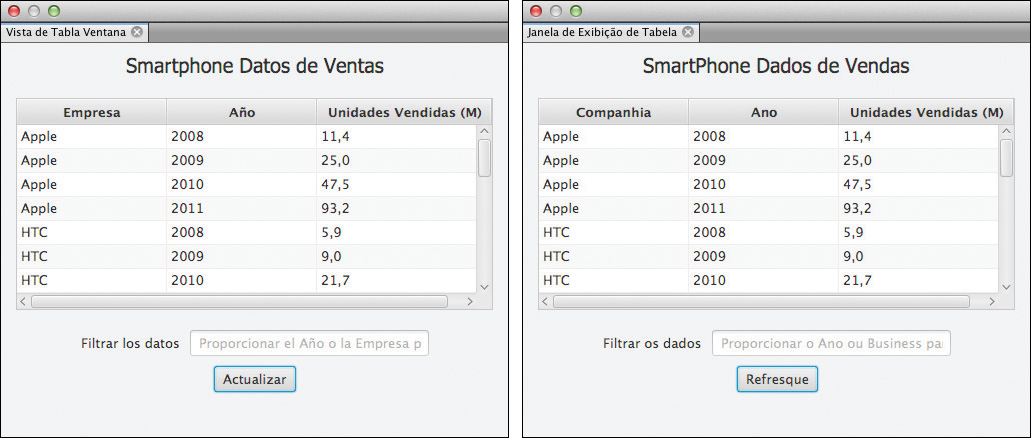
Figure 17.28 shows the TableView window of the SmartPhoneDataApp. The left window is localized for Spanish, and the right window is localized for Brazilian Portuguese. Localization includes text for the window names, titles, labels, and buttons, as well as localized number formatting.
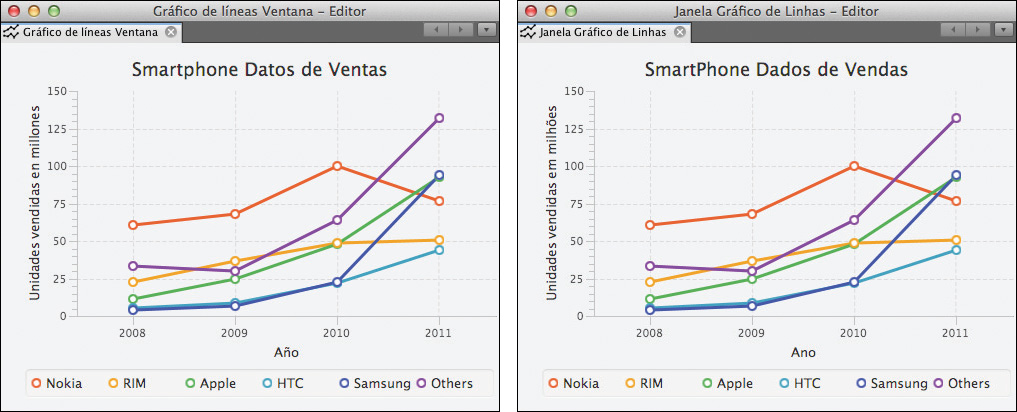
Similarly, Figure 17.29 shows localized versions of the LineChart window from the same application.
Internationalization and Java
Java and the NetBeans Platform have long supported application internationalization. You can find helpful documentation and tutorials at the following URLs.
• http://docs.oracle.com/javase/tutorial/i18n/—Internationalization Learning Trail
• http://docs.oracle.com/javase/7/docs/technotes/guides/intl/—Internationalization Technical Guide
• http://bits.netbeans.org/dev/javadoc/org-openide-modules/org/openide/modules/doc-files/i18n-branding.html—Internationalization and Branding Guide for NetBeans
Internationalization and the NetBeans Platform
Let’s describe how to internationalize your application and provide examples with the SmartPhoneDataApp. In general, the process includes the following steps.
1. Identify all text that should be localized and assign a key, unique within the Java package where the text appears.
2. Provide translations of these text strings in the target language or languages in locale-specific .properties files.
3. Use the @Messages annotation (described below) to define key-value properties for the text.
4. Provide localized JAR files for the NetBeans Platform modules’ localized text (discussed in the next section).
The NetBeans Platform provides the @Messages annotation to isolate text for localization. You put all of the key-value text Strings directly in the Java source file. This annotation generates a Bundle.properties file and creates static methods based on the message key. Keys must be unique within the same package. You can have multiple @Messages annotations within a Java file. For example, when you create a TopComponent, NetBeans generates an initial @Messages annotation for you.
@Messages({
"HINT_TableViewTopComponent=This is a TableView window",
"CTL_TableViewAction=TableView",
"CTL_TableViewTopComponent=TableView Window"
})
. . .
setName(Bundle.CTL_TableViewTopComponent());
setToolTipText(Bundle.HINT_TableViewTopComponent());
The @Messages annotation generates static methods as follows.
• A Bundle.java file is generated in your module’s directory build/classes-generated/your_package_name with the static methods.
package com.asgteach.coretableview;
/** Localizable strings for {@link com.asgteach.coretableview}. */
@javax.annotation.Generated(value=
"org.netbeans.modules.openide.util.NbBundleProcessor")
class Bundle {
/**
* @return <i>TableView</i>
* @see TableViewTopComponent
*/
static String CTL_TableViewAction() {
return org.openide.util.NbBundle.getMessage(Bundle.class,
"CTL_TableViewAction");
}
/**
* @return <i>TableView Window</i>
* @see TableViewTopComponent
*/
static String CTL_TableViewTopComponent() {
return org.openide.util.NbBundle.getMessage(Bundle.class,
"CTL_TableViewTopComponent");
}
. . .
}
• This file updates as you save your Java source file, giving you edit-time source code checks for static methods with localized Strings. This edit-time source code checking avoids run-time MissingResourceException errors.
• The build system then compiles your Java classes, including Bundle.java, and generates the proper Bundle.properties file in directory build/classes/your_package_name. (Resource properties files are loaded by classloader.)
• The key-value pairs configured in the @Messages annotation create the default message bundle for that package.
You build alternate Bundle.properties files as needed when internationalizing an application, as follows.
• To create message bundles for other locales, create Bundle_xx.properties files for each locale that you support. Use either a two-character language code or a combined four character language_region code with a separator. For example, a properties file that supports Portuguese uses suffix _pt and Portuguese localized for Brazil is suffix pt_BR, as follows.
Bundle_pt.properties
Bundle_pt_BR.properties
• When users run your application, the user’s default Locale applies. If the user’s Locale does not match any of the provided .properties files, then the default message bundle applies.
Number Formatting
The Java NumberFormat class supports Locales. Thus, if your application displays numbers, you can format them with NumberFormat using the default locale. For example, the DecimalFormat class in the SmartPhoneDataApp shown in Listing 17.3 instantiates a NumberFormat object with the default Locale. The toString() method invokes the NumberFormat format() method for locale-sensitive formatting. Similarly, the fromString() method accepts the locale-specific decimal and number separator characters used with the in-place editor. Note that the decimal separator in both the Spanish and Portuguese TableView windows shown in Figure 17.28 on page 869 is a comma.
Listing 17.3 DecimalFormat.java
private class DecimalConverter extends StringConverter<BigDecimal> {
NumberFormat nf = NumberFormat.getInstance(Locale.getDefault());
public DecimalConverter() {
nf.setMaximumFractionDigits(2);
nf.setMinimumFractionDigits(1);
}
@Override
public String toString(BigDecimal t) {
try {
return nf.format(t);
} catch (Exception e) {
return null;
}
}
@Override
public BigDecimal fromString(String string) {
try {
Number newValue = nf.parse(string);
BigDecimal result = new BigDecimal(newValue.doubleValue());
return result.setScale(2, BigDecimal.ROUND_HALF_EVEN);
} catch (ParseException e) {
return null;
}
}
}
Editing Properties Files
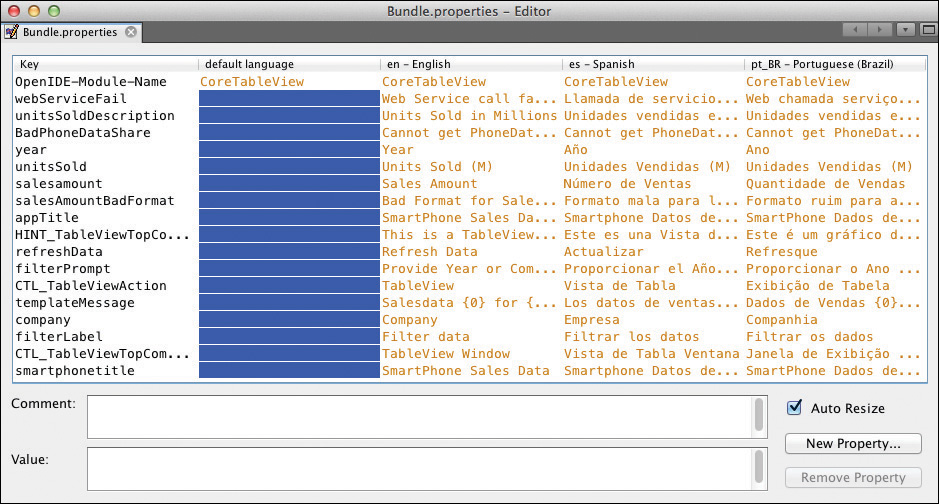
The @Messages annotation generates a default Bundle.properties file. To support additional locales, you must create the Bundle.properties file for each supported locale. You can either edit these files individually or edit them together. Figure 17.30 shows the NetBeans IDE simultaneous edit capability with the Bundle.properties file for en, es, and pt_BR locales. The default language is empty, since these Strings are generated from the @Messages annotation.
Internationalization and JavaFX
The SmartPhoneDataApp windows also include JavaFX content. You can specify a ResourceBundle when you build the JavaFX scene graph, typically in TopComponent code. The JavaFX controller class (Java code) uses the @Messages static methods and can define additional key-value pairs with the @Messages annotation. Listing 17.4 shows you how to invoke the FXMLLoader to set the resources for the scene graph described by TableView.fxml inside the TopComponent code.
Listing 17.4 TableViewTopComponent.java—Initializing ResourceBundle
public final class TableViewTopComponent extends TopComponent {
private static JFXPanel fxPanel;
private TableViewController controller;
private final ResourceBundle resources;
public TableViewTopComponent() {
initComponents();
resources = ResourceBundle.getBundle(
"com.asgteach.coretableview.Bundle", Locale.getDefault());
setName(Bundle.CTL_TableViewTopComponent());
setToolTipText(Bundle.HINT_TableViewTopComponent());
setLayout(new BorderLayout());
init();
}
public void init() {
fxPanel = new JFXPanel();
add(fxPanel, BorderLayout.CENTER);
Platform.setImplicitExit(false);
Platform.runLater(() -> createScene());
}
private void createScene() {
try {
URL location = getClass().getResource("TableView.fxml");
FXMLLoader fxmlLoader = new FXMLLoader();
fxmlLoader.setResources(resources);
fxmlLoader.setLocation(location);
fxmlLoader.setBuilderFactory(new JavaFXBuilderFactory());
Parent root = (Parent) fxmlLoader.load(location.openStream());
fxPanel.setScene(new Scene(root));
controller = (TableViewController) fxmlLoader.getController();
} catch (IOException ex) {
Exceptions.printStackTrace(ex);
}
}
. . .
}
With the ResourceBundle defined, you can use the %key notation in FXML, as shown in Listing 17.5. Here is a portion of TableView.fxml that defines the TableView control and its embedded TableColumns. We define each TableColumn text property with the %key notation.
Listing 17.5 TableView.fxml—Using Resource Keys
<TableView fx:id="tableview"
editable="true"
GridPane.columnIndex="0"
GridPane.rowIndex="0" >
<columns>
<TableColumn fx:id="colCompany" text="%company"
sortable="false" minWidth="150" />
<TableColumn fx:id="colYear" text="%year"
sortable="false" minWidth="150" />
<TableColumn fx:id="colUnitsSold" text="%unitsSold"
editable="true" sortable="false"
minWidth="175" />
</columns>
</TableView>
Note that %key bypasses compile-time checking for valid keys, however. Here is the exception you get when using a key that doesn’t exist.
SEVERE [org.openide.util.Exceptions]
javafx.fxml.LoadException: Resource "blahblah" not found.
@Messages and FXML
To retain the compile-time safeguards of @Messages , move the FXML text property initializations into the controller code, as follows. Here we invoke the setText() method with the static Bundle methods for the appropriate keys.
@Override
public void initialize(final URL url, final ResourceBundle resources) {
. . .
colCompany.setText(Bundle.company());
colYear.setText(Bundle.year());
colUnitsSold.setText(Bundle.unitsSold());
. . .
Testing Target Locales
Test your application for different locales by defining the run.args.extra property with the target locale in the application’s project.properties file, as shown in Listing 17.6. Here the default locale changes to pt_BR for the Portuguese language (Brazil). The project.properties file appears in the Projects view under node Important Files of your NetBeans Platform Application project.
Listing 17.6 Application’s project.properties File
app.name=${branding.token}
app.title=SmartPhoneDataApp
# to test a new locale, uncomment the following line
# and specify your target locale
run.args.extra=run.args.extra=-J-Duser.language=pt -J-Duser.region=BR
modules=
${project.com.asgteach.coretableview}:
${project.com.asgteach.phonedata.webservice}:
${project.com.asgteach.linechart}:
${project.com.asgteach.phonedatashareimpl}
project.com.asgteach.coretableview=CoreTableView
project.com.asgteach.linechart=LineChart
project.com.asgteach.phonedata.webservice=PhoneDataWebService
project.com.asgteach.phonedatashareimpl=PhoneDataShareImpl
NetBeans Platform Application Internationalization
The preceding steps show how to internationalize/localize text that you provide in your application. However, since you are building on top of the NetBeans Platform, there are still menus, tooltips, error messages, and other text that originate from the NetBeans Platform modules. These will still be in English unless you provide the JAR files containing localized property bundles.4
4. Geertjan Wielenga provided guidance for this approach to localization.
The NetBeans IDE (and therefore, the NetBeans Platform) supports the following languages.
• Brazilian Portuguese (locale pt_BR)
• Russian (locale ru)
• Japanese (locale ja)
• Simplified Chinese (locale zh_CN)
If you specify one of these languages on the NetBeans IDE Download page (https://netbeans.org/downloads/), you can install an international version of the IDE. (This version includes English as well.) With the international version installed, you can use localized JAR files in your own NetBeans Platform application. Here are the steps to add support for Brazilian Portuguese. We’ll continue to use the SmartPhoneDataApp described in this chapter.
1. Download and install the international version of the NetBeans IDE.
2. Open up the SmartPhoneDataApp in the international version of the IDE.
3. Specify the target locale in the application’s project.properties file for testing, as shown in Listing 17.6 on page 876.
4. Run the application using the international version of the NetBeans IDE. You will see Brazilian Portuguese for the NetBeans Platform modules.
Creating a Localized Application Bundle
The previous steps test the application using the localized bundles from the international version of the NetBeans IDE. These next steps are necessary to run a localized version of your application as a stand-alone application outside the environment of the NetBeans IDE.
For this, you must copy the localized JAR files (which are included in the international version of the IDE) from the NetBeans distribution into your application. Furthermore, to create a modularized structure for localization support, create a module for each target locale. As an example, here are the steps to add support for Brazilian Portuguese.
1. Create a new module in the SmartPhoneDataApp called Locale_PT_BR with code name com.asgteach.localeptbr.
2. Switch to the File view and create the following folders at the top level. These folders will be at the same level as nbproject and src.
• release/core/locale
• release/lib/locale
• release/modules/locale
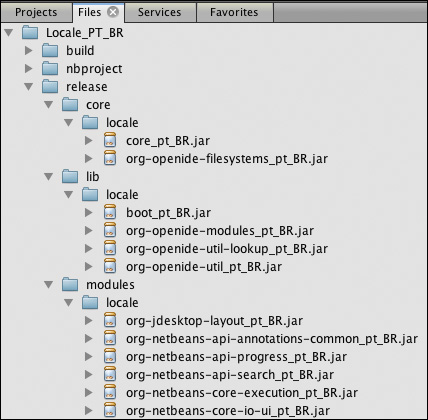
3. Now browse to the NetBeans IDE installation and find the corresponding platform/core/locale, platform/lib/locale, and platform/modules/locale folders. For Brazilian Portuguese support, copy all JAR files with names ending in pt_BR.jar to the corresponding folders in the Locale_PT_BR module under the release directory, as shown in Figure 17.31 (the list of JAR files under release/modules/locale is truncated).
4. For each supported language, create a module with these release folders to hold the NetBeans Platform locale JAR files as shown in the above steps.
Using this modular approach, users can dynamically add or remove language support for the NetBeans Platform modules (see “Dynamically Uninstall a Module (Plugin)” on page 860 and “Adding Modules to an Application” on page 861).
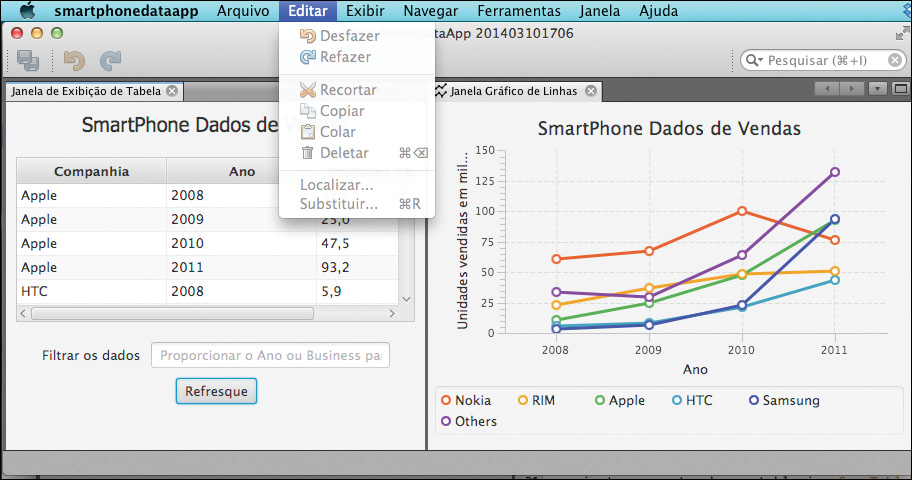
Figure 17.32 shows the SmartPhoneDataApp with localized top-level menus and menu items from the NetBeans Platform module localized bundles in Portuguese.
Note that your application probably doesn’t require the full complement of locale JAR files. However, the entire group of JAR files for Brazilian Portuguese, for example, does not consume much space.
Localization Support for Additional Languages5
5. Besides the information presented here, NetBeans.org has created a NetBeans localization project. See the following Blog Entry by Geertjan Wielenga at https://blogs.oracle.com/geertjan/entry/lightweight_process_for_translating_netbeans.
Although the NetBeans IDE gives you the localized bundles for languages that NetBeans officially supports, you may want to support other languages. Fortunately, a community project exists that provides localized bundles for additional languages.
The AgroSense6 team led by Timon Veenstra has published community translations for additional languages. These localized JARs are from the NetBeans Platform 7.2 release. Fortunately, most changes to the NetBeans Platform modules since then do not affect UI components and other text-sensitive behaviors.
6. See http://agrosense.eu/.
Let’s now access this resource that includes localized JAR files to support Spanish. Here are the steps using the same modularized approach.
1. Create a new module in the SmartPhoneDataApp called Locale_ES with code name com.asgteach.localees.
2. Switch to the File view and create the same folders at the top level that you created for the Portuguese localization: release/core/locale, release/lib/locale, and release/modules/locale.
3. Go to https://java.net/projects/nb-library-wrappers/sources/core/show/lib-platform-l10n/nb72_platform_l10n/platform and download the JARs you need for your target language. For Spanish, download the JAR files ending in _es.jar.7
7. Alternatively, check out the entire project to access all of the localized JAR files.
4. Populate the locale folders in the Locale_ES module, as shown in Figure 17.33 (the list of JAR files under modules/locale is truncated).
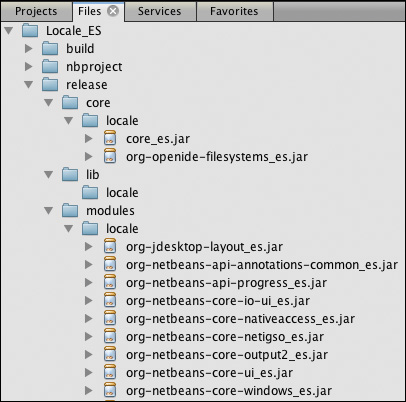
Figure 17.34 shows the SmartPhoneDataApp with localized top-level menus and menu items for Spanish.
Customizing Resource Bundles
The JAR files that you add to your module’s locale directories are Resource Bundles. You can customize these if the translations are incomplete or if you’d like to modify a particular translation.
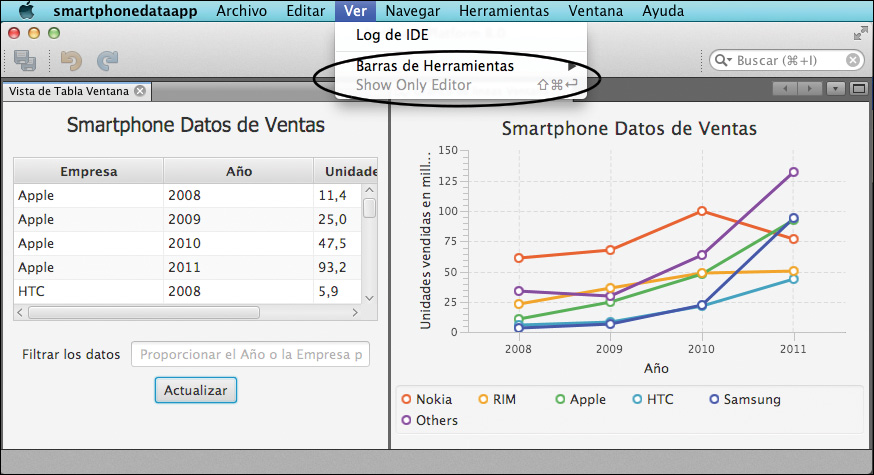
For example, in the Spanish version we acquired, Figure 17.34 shows that there isn’t a translation for the Show Only Editor menu item under View (Ver). Here’s how to fix this omission.
1. In the SmartPhoneDataApp Projects view, right click on the application name and select Branding . . . from the context menu.
2. Select the Internationalization Resource Bundles tab and choose the locale you want to modify. Here, we specify the locale “es” for Spanish.
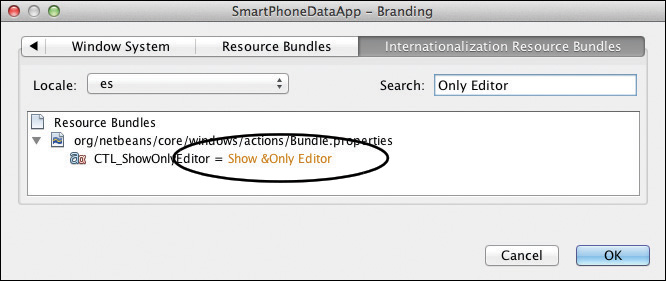
3. Use the Search field to look for the target text as shown in Figure 17.35 (here, we search for “Only Editor”).
Search Tip
If your target search string is a menu item with an attached accelerator (as in our example), then include an ampersand before the accelerator letter when searching. Alternatively, try limiting the search term.
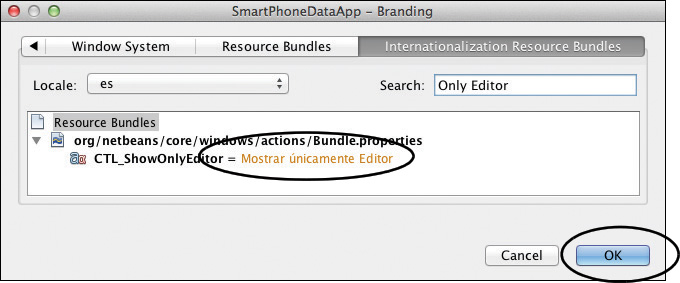
4. Right click the target text and select Add to Branding. In the dialog, provide the translated text and click OK. NetBeans changes the value associated with this key for the es resource bundle, as shown in Figure 17.36. Click OK to close the Branding dialog.
5. The Files view shows that NetBeans created file Bundle_es.properties under folders branding/modules (expand the directory hierarchy under the JAR file). Figure 17.37 shows the directory hierarchy and the corresponding .properties file in the Editor.
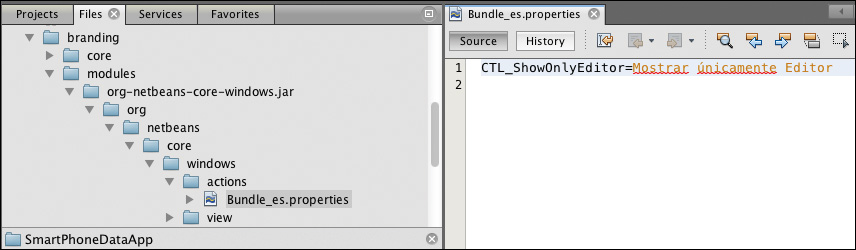
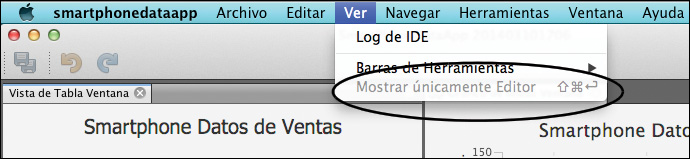
And now, when you re-run the SmartPhoneDataApp, the Show Only Editor menu item has a Spanish translation, as shown in Figure 17.38.
17.5 Key Point Summary
This chapter shows you how to brand your application, provide distribution files and updates to your users, and internationalize and localize your application. Here are the key points in this chapter.
• Branding lets you customize your application’s name and title, splash screen, as well as any text found in the application’s resource bundles.
• Use the Branding dialog to change an application’s title.
• Use the Properties dialog to change an application’s branding name. The branding name is mainly for internal use and has restrictions on its form.
• Modify the app.name property in the application’s Project Properties file to customize the application’s name as it appears in the top-level menu and your operating system’s task manager.
• You can customize an application’s title to include your own version number (instead of the NetBeans IDE build number). You can also remove any version information from the title.
• Use the Branding dialog to customize your application’s splash screen. You can also modify how the progress bar appears and the position, font size, and color of the running text.
• In order for users to dynamically update a NetBeans Platform application, include the AutoUpdate Services and AutoUpdate UI modules.
• Create content for an Update Center using the application’s Package As | NBMs menu.
• Configure an Update Center for your application using the Plugin Manager.
• Use the Plugin Manager to dynamically install and uninstall modules in your application.
• You can create distribution files so that users can install your application. NetBeans supports Windows, Linux, Mac OS X, and Solaris.
• You can customize an installer by providing your own License Agreement and installer images.
• Internationalizing an application means configuring the application for one or more locales.
• The first step to internationalize an application is to isolate its text.
• The NetBeans Platform @Messages annotation provides edit-time checking for key-value properties stored in resource bundles.
• The Java NumberFormat class is locale-sensitive, and any numbers used in your application can be localized.
• The NetBeans IDE lets you simultaneously edit multiple .properties files.
• You can easily internationalize your JavaFX code. We recommend using the @Messages annotation to retain edit-time checking for the key-value properties.
• Add the -J-Duser.language and -J-Duser.region properties to the application’s Project Properties file to test target locales.
• The NetBeans Platform officially supports English, Brazilian Portuguese, Russian, Japanese, and simplified Chinese. Download the international version of the IDE to access the localized JAR files for these locales and add them to your application.
• You can access the AgroSense community project that supports localizing bundles for other languages. See also the NetBeans Localization project at java.net described at https://blogs.oracle.com/geertjan/entry/lightweight_process_for_translating_netbeans.
• Use the Internationalization Resource Bundles tab in the Branding dialog to customize any localized JAR files in your application.