
10. Building a CRUD Application
The FamilyTreeApp application has evolved considerably up to this point. Chapter 2 presents a loosely-coupled Swing application that lets you update Person objects. Chapter 5 shows you how to turn this example program into a modularized NetBeans Platform application. Chapter 7 improves the application with nodes and Explorer Views. And Chapter 9 introduces the Action framework and capabilities.
With these pieces in place, we can now turn our FamilyTreeApp application into a full CRUD-based system. For this enhancement, we’ll use capabilities and the Action framework for the implementation and provide a back-end database for persistence. Finally, we make sure the application remains responsive by accessing the database asynchronously.
What You Will Learn
• Apply capabilities and the Action framework to create context-aware actions.
• Use the NetBeans Platform DeleteAction and NewAction for deletes and object creation.
• Build context menus for application nodes.
• Integrate the Save and Save All menu items and Save All toolbar icon.
• Leverage @ServiceProvider to provide an alternate service implementation.
• Provide persistence with DerbyClient (JavaDB database) and EclipseLink (JPA).
• Use the Nodes API to build a node hierarchy asynchronously.
• Use SwingWorker to implement long-running tasks.
10.1 Create-Read-Update-Delete Application
Now that we’ve discussed the types of actions available with the NetBeans Platform Action framework in Chapter 9, we can show you how to create a CRUD-type application. CRUD is the well-known acronym for Create-Read-Update-Delete for database-type applications. Although the FamilyTreeApp is not a database application yet (we just store Person objects in a HashMap), the loosely-coupled design approach provided by the NetBeans Platform lets us easily migrate to a database implementation.
We’ll use capabilities to implement the functions of a CRUD-based application, using the NetBeans Platform provided context where appropriate. We begin with a version of the FamilyTreeApp that includes a Person Viewer window (implemented by module PersonViewer). This window uses Explorer Views and nodes to display a hierarchy of the Person objects supplied by the FamilyTreeManager service provider.
The example application also includes the PersonEditor module you’ve seen before. However, we modify this module to remove the Update button. In its place, we use the NetBeans Platform Openable and AbstractSavable capabilities for editing. When a user opens a Person in a PersonEditor, the Person object receives a dedicated PersonEditor window. Thus, the user can have more than one Person open concurrently.
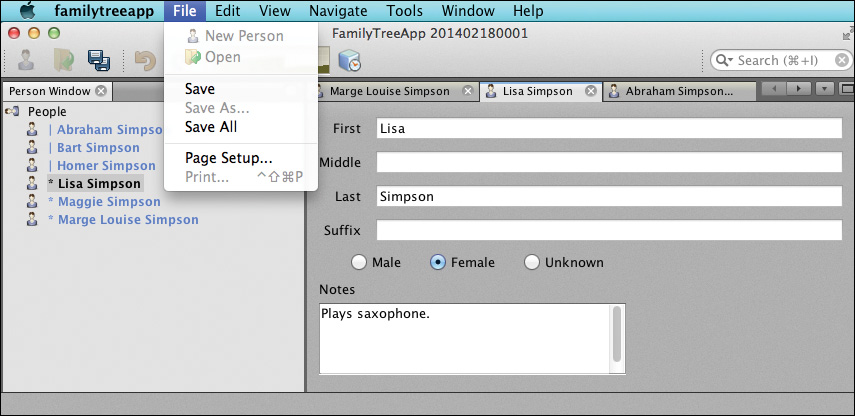
Figure 10.1 shows the old application and the starting point for our CRUD development. Figure 10.2 shows what the fully CRUD-based version looks like.
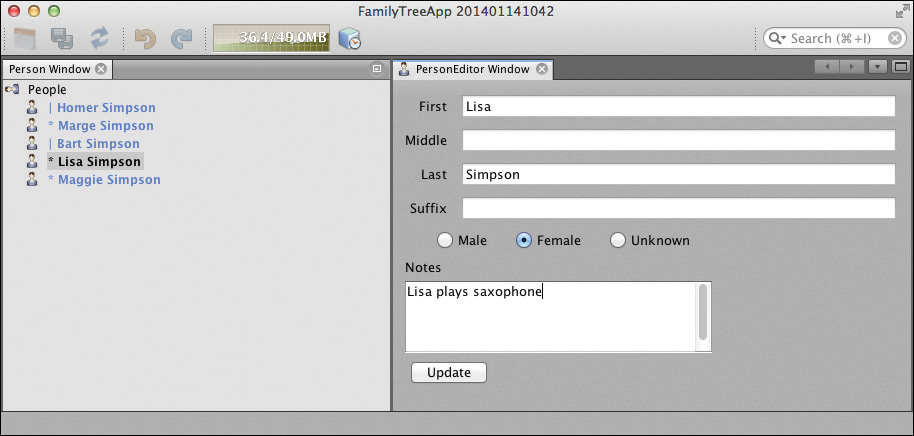
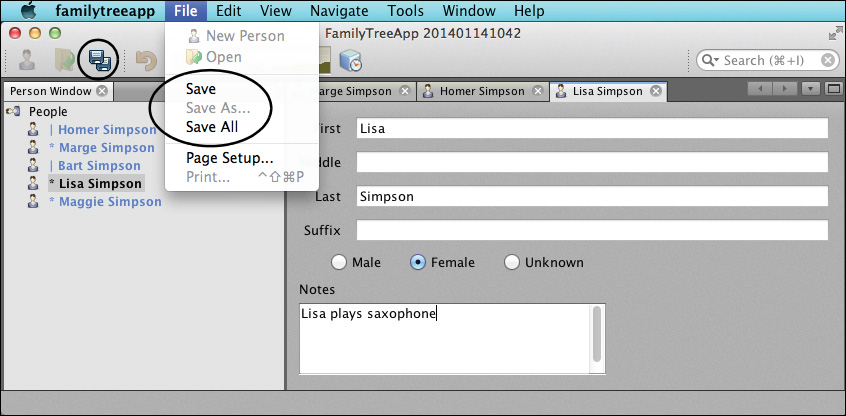
Before we begin, let’s point out a few features in this new version (Figure 10.2). First, you’ll see that we have three PersonEditor windows opened and the editor’s tab displays the Person’s name and icon. The Update button is gone from the editor window. Instead, when a user edits a Person, the toolbar’s Save All icon becomes enabled as well as the Save and Save All menu items (as shown in Figure 10.2). These UI actions save changes to the underlying data store.
An Open icon appears on the toolbar, in the PersonNode’s context menu, and under the File menu. Open is also the PersonNode’s preferred action, so a double-click opens the selected Person in an editor window or gives the editor window focus when it’s already open.
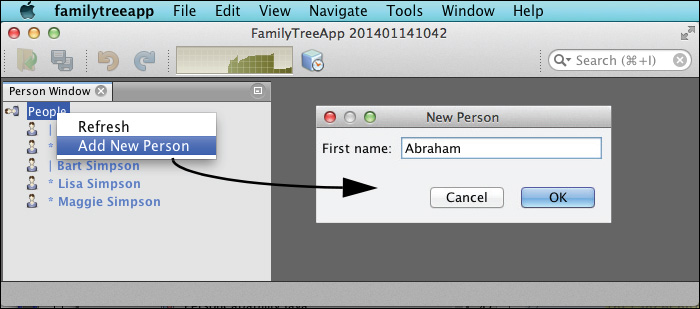
The root node (labeled People) has two context menu items: Refresh and Add New Person. Refresh provides the Read function in our CRUD application, and Add New Person (also available in the toolbar and under the File menu) provides the Create function.
A PersonNode has Open and Delete context menu items. Delete is enabled for both single and multiple node selection, but Open applies to single node selection only. In addition, the NetBeans Platform standard Delete menu item (under top-level Edit menu) is enabled when one or more PersonNodes are selected. Open (along with Save and Save All) provide the Update function in our CRUD application, and Delete provides the Delete function.
We’ll show each CRUD implementation in detail. Let’s begin by describing the capabilities that we need.
Defining Capabilities
We define four capabilities (Java interfaces) and add them to the Capabilities module’s public package, as follows.
• RefreshCapability—performs a read
• RemovablePersonCapability—performs a delete
• CreatablePersonCapability—performs a create
• SavablePersonCapability—performs an update
Listing 10.1 shows these interfaces (stored in separate class files in module Capabilities). They are implemented and used within the appropriate context, either in PersonNode (RemovablePersonCapability and SavablePersonCapability), in a PersonCapability object (CreatablePersonCapabilty and RefreshCapability), or in the RootNode (also RefreshCapability). The interfaces throw IOExceptions in anticipation of migrating to a database implementation.
Listing 10.1 FamilyTreeApp Capabilities Defined
public interface RefreshCapability {
public void refresh() throws IOException;
}
public interface RemovablePersonCapability {
public void remove(Person person) throws IOException;
}
public interface CreatablePersonCapability {
public void create(Person person) throws IOException;
}
public interface SavablePersonCapability {
public void save(Person person) throws IOException;
}
There are two NetBeans Platform defined capabilities that we also need.
• Openable—opens a Person in a PersonEditor
• AbstractSavable—enables the NetBeans Platform Save and Save All UI elements
Implementing Read
RefreshCapability implements Read in our CRUD application. First, the RootNode context menu uses a context-aware Refresh action, which rebuilds the Person Viewer window’s node hierarchy. Figure 10.3 shows the RefreshAction in the context menu of the root node.
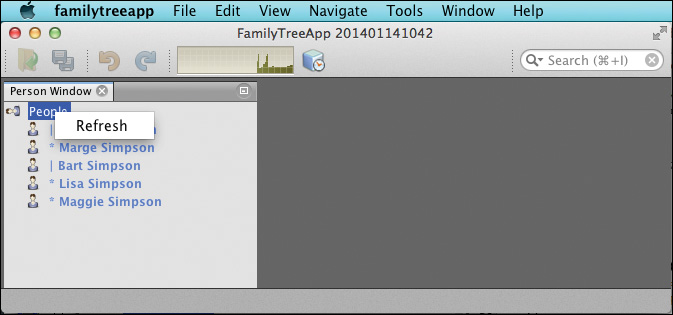
Second, the PersonChildFactory class uses the RefreshCapability to read Person objects from the FamilyTreeManager. We’ll show you both of these “refresh” capabilities, starting with the root node RefreshAction.
Create a Context-Aware Action
In module FamilyTreeActions, use the New Action wizard to create a conditionally enabled action called RefreshAction and use RefreshCapability for the Cookie Class. Put the action in category RootNode and do not select any Toolbar or Menu UI registrations. Make its display name “Refresh.” (Optionally, to register this action with an icon on the toolbar or a menu item in the top-level menu, provide additional annotations in the RefreshAction class, as described in “Create a Context-Aware Action” on page 432.)
After NetBeans creates class RefreshAction.java, implement the actionPerformed() method to use the RefreshCapability, as shown in Listing 10.2.
Listing 10.2 RefreshAction.java
@ActionID(
category = "RootNode",
id = "com.asgteach.familytree.actions.RefreshAction"
)
@ActionRegistration(
displayName = "#CTL_RefreshAction"
)
@Messages("CTL_RefreshAction=Refresh")
public final class RefreshAction implements ActionListener
{
private final RefreshCapability context;
public RefreshAction(RefreshCapability context) {
this.context = context;
}
@Override
public void actionPerformed(ActionEvent e) {
try {
context.refresh();
} catch (IOException ex) {
Exceptions.printStackTrace(ex);
}
}
}
Implement the Capability
Implement the RefreshCapability in RootNode and put RefreshAction (included with path "Actions/RootNode") in the getActions() method. Note that we use InstanceContent to add objects to the node’s Lookup, as described in Chapter 9 (see “Implement CalendarCapability in PersonNode” on page 436). Listing 10.3 shows the changes to RootNode.
By adding an implementation of RefreshCapability to the node’s Lookup, we enable the RefreshAction in the node’s context menu. The call to refresh() happens through the RefreshAction’s actionPerformed() method (Listing 10.2).
@Messages({
"HINT_RootNode=Show all people",
"LBL_RootNode=People"
})
public class RootNode extends AbstractNode {
private final InstanceContent instanceContent;
public RootNode() {
this(new InstanceContent());
}
private RootNode(InstanceContent ic) {
super(Children.create(new PersonChildFactory(), false),
new AbstractLookup(ic));
instanceContent = ic;
setIconBaseWithExtension(
"com/asgteach/familytree/personviewer/resources/personIcon.png");
setDisplayName(Bundle.LBL_RootNode());
setShortDescription(Bundle.HINT_RootNode());
instanceContent.add(new RefreshCapability(){
@Override
public void refresh() throws IOException {
setChildren(Children.create(new PersonChildFactory(), false));
}
});
}
@SuppressWarnings("unchecked")
@Override
public Action[] getActions(boolean context) {
List<Action> actions = new ArrayList<>(Arrays.asList(
super.getActions(context)));
actions.addAll(Utilities.actionsForPath("Actions/RootNode"));
return actions.toArray(new Action[actions.size()]);
}
}
Using WeakListeners
Since Refresh rebuilds the node hierarchy each time, PersonChildFactory and PersonNode should use WeakListeners. This ensures that replaced node and ChildFactory objects are properly garbage collected. (We discuss WeakListeners in “Create ChildFactory for Person” on page 300.)
Using Refresh in the ChildFactory
Listing 10.4 shows PersonCapability.java, an object with its own Lookup. We store various capabilities in PersonCapability’s Lookup that interact with the FamilyTreeManager routines. Capabilities help centralize implementations, yet they can also be customized. Here, we implement RefreshCapability. Note that RefreshCapability does not correspond to an action, but we invoke the capability directly to build children nodes (see the createKeys() method in Listing 10.5 on page 479).
PersonCapability includes property personList, providing access to the list of Person objects read from the FamilyTreeManager.
Listing 10.4 PersonCapability.java
public final class PersonCapability implements Lookup.Provider {
private final Lookup lookup;
private final InstanceContent instanceContent = new InstanceContent();
private static final Logger logger = Logger.getLogger(
PersonCapability.class.getName());
private final List<Person> personList = new ArrayList<>();
private FamilyTreeManager ftm = null;
public PersonCapability() {
lookup = new AbstractLookup(instanceContent);
ftm = Lookup.getDefault().lookup(FamilyTreeManager.class);
if (ftm == null) {
logger.log(Level.SEVERE, "Cannot get FamilyTreeManager object");
LifecycleManager.getDefault().exit();
}
instanceContent.add(new RefreshCapability() {
@Override
public void refresh() throws IOException {
if (ftm != null) {
personList.clear();
personList.addAll(ftm.getAllPeople());
} else {
logger.log(Level.SEVERE, "Cannot get FamilyTreeManager");
}
}
});
. . . other capabilities can be added . . .
}
public List<Person> getPersonList() {
return personList;
}
@Override
public Lookup getLookup() {
return lookup;
}
}
We modify PersonChildFactory to instantiate PersonCapability, look up the RefreshCapability, and use this capability in its createKeys() method, as shown in Listing 10.5. Also note that PersonChildFactory has a property change listener. This listener calls its own refresh() method to rebuild child nodes as necessary when the underlying data store adds or removes Person objects.
Listing 10.5 PersonChildFactory
public class PersonChildFactory extends ChildFactory<Person> {
private static final Logger logger = Logger.getLogger(
PersonChildFactory.class.getName());
private final PersonCapability personCapability = new PersonCapability();
private FamilyTreeManager ftm = null;
public PersonChildFactory() {
ftm = Lookup.getDefault().lookup(FamilyTreeManager.class);
if (ftm == null) {
logger.log(Level.SEVERE, "Cannot get FamilyTreeManager object");
LifecycleManager.getDefault().exit();
} else {
ftm.addPropertyChangeListener(
WeakListeners.propertyChange(familytreelistener, ftm));
}
}
@Override
protected boolean createKeys(List<Person> list) {
RefreshCapability refreshCapability =
personCapability.getLookup().lookup(RefreshCapability.class);
if (refreshCapability != null) {
try {
refreshCapability.refresh();
list.addAll(personCapability.getPersonList());
logger.log(Level.FINER, "createKeys called: {0}", list);
} catch (IOException ex) {
logger.log(Level.WARNING, null, ex);
}
}
return true;
}
@Override
protected Node createNodeForKey(Person key) {
logger.log(Level.FINER, "createNodeForKey: {0}", key);
PersonNode node = new PersonNode(key);
return node;
}
// PropertyChangeListener for FamilyTreeManager
private final PropertyChangeListener familytreelistener =
(PropertyChangeEvent evt) -> {
if (evt.getPropertyName().equals(FamilyTreeManager.PROP_PERSON_ADDED)
|| evt.getPropertyName().equals(
FamilyTreeManager.PROP_PERSON_DESTROYED)) {
this.refresh(true);
}
};
}
Implementing Delete
The system DeleteAction implements the Delete capability for our nodes. The NetBeans Platform TopComponents and nodes are already set up to perform delete actions—you just need to configure them. We install a Delete context menu item in PersonNode and use the NetBeans Platform Delete menu item under the top-level Edit menu, as shown in Figure 10.4.
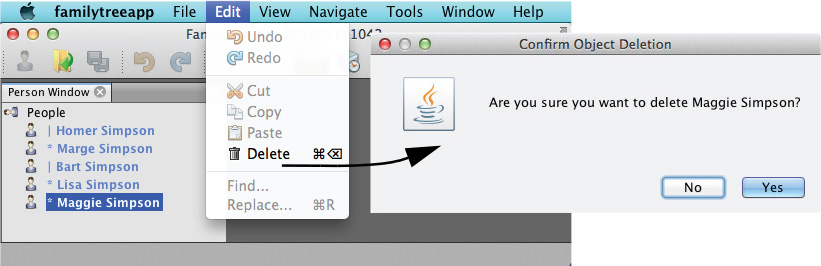
Delete requires the following modifications. Note that Delete automatically works for multiple PersonNode selections.
• In the PersonViewer TopComponent constructor, create a DeleteAction and register it with the TopComponent’s Explorer Manager. Helper function ExplorerUtils.actionDelete() includes a boolean to specify whether or not a confirmation dialog should appear before DeleteAction calls the node’s destroy() method. Adding the DeleteAction to the TopComponent’s ActionMap (and its Lookup) is required to enable the NetBeans Platform Delete menu items.
map.put("delete", ExplorerUtils.actionDelete(manager, true)); // or false
• In PersonNode, override the canDestroy() and destroy() methods. The canDestroy() method returns true and the destroy() method performs the delete. The system’s DeleteAction invokes these methods.
• Add the NetBeans Platform DeleteAction to the PersonNode’s getActions() method to include Delete in the node’s context menu.
Listing 10.6 shows PersonNode.java. Here you see the canDestroy() and destroy() methods, the modified getActions() method, and the implementation of RemovablePersonCapability that is added to PersonNode’s Lookup.
@NbBundle.Messages({
"HINT_PersonNode=Person"
})
public class PersonNode extends AbstractNode {
private final InstanceContent instanceContent;
private static final Logger logger = Logger.getLogger(
PersonNode.class.getName());
public PersonNode(Person person) {
this(person, new InstanceContent());
}
private PersonNode(Person person, InstanceContent ic) {
super(Children.LEAF, new AbstractLookup(ic));
instanceContent = ic;
instanceContent.add(person);
. . . other capabilities added to Lookup. . .
// Add a RemovablePersonCapability to this Node
instanceContent.add(new RemovablePersonCapability() {
@Override
public void remove(final Person p) throws IOException {
if (ftm != null) {
ftm.deletePerson(p);
}
}
});
}
@SuppressWarnings("unchecked")
@Override
public Action[] getActions(boolean context) {
List<Action> personActions = new ArrayList<>(Arrays.asList(
super.getActions(context)));
personActions.add(DeleteAction.get(DeleteAction.class));
return personActions.toArray(
new Action[personActions.size()]);
}
@Override
public boolean canDestroy() {
return true;
}
@Override
public void destroy() throws IOException {
final RemovablePersonCapability doRemove = getLookup().lookup(
RemovablePersonCapability.class);
final Person person = getLookup().lookup(Person.class);
if (doRemove != null && person != null) {
doRemove.remove(person);
}
}
. . . code omitted . . .
}
Note that the Person Viewer window updates after the DeleteAction executes. That’s because PersonChildFactory listens for FamilyTreeManager.PROP_PERSON_DESTROYED and invokes refresh() in the property change event handler (see Listing 10.5 on page 479).
Implementing Create
To create new objects, the NetBeans Platform provides a NewType context as well as a standard NewAction that is responsive to context NewType. In the FamilyTreeApp, we implement the Create function with dialogs that prompt for a new Person’s first and last names and a capability that adds the new Person to the FamilyTreeManager’s data store.
A user can add a new Person through the context menu of the RootNode, as shown in Figure 10.5. Later, we’ll show you how to configure NewAction in the top-level menu or toolbar.
NewAction and NewType
The NetBeans Platform provides a built-in action called NewAction that enables creation-type actions for nodes. You provide an implementation of NewType and configure NewAction in the node’s context menu, as follows.
• Override the node’s getActions() method and include the system’s NewAction in the returned array of actions.
• Override the node’s getNewTypes() method and include an implementation of NewType in the returned array of NewTypes.
To add NewAction to the RootNode (the top-level node in the Person Viewer window), we configure methods getActions() and getNewTypes(), as shown in Listing 10.7.
@Messages({
"HINT_RootNode=Show all people",
"LBL_RootNode=People"
})
public class RootNode extends AbstractNode {
. . . code omitted . . .
private final PersonType personType = new PersonType();
@Override
public Action[] getActions(boolean context) {
List<Action> actions = new ArrayList<>(
Arrays.asList(super.getActions(context)));
actions.addAll(Utilities.actionsForPath("Actions/RootNode"));
// This puts the NewAction in the context menu
actions.add(SystemAction.get(NewAction.class));
return actions.toArray(new Action[actions.size()]);
}
@Override
public NewType[] getNewTypes() {
return new NewType[] { personType };
}
}
Create a Class That Extends NewType
Listing 10.8 shows PersonType.java, a class that extends NewType and overrides the create() method, which NewAction invokes. Here, we look up a CreatablePersonCapability and use it to create a new Person.
@Messages({
"LBL_NewFirst_dialog=First name:",
"LBL_NewLast_dialog=Last name:",
"TITLE_NewPerson_dialog=New Person"
})
public class PersonType extends NewType {
private final PersonCapability personCapability = new PersonCapability();
private static final Logger logger = Logger.getLogger(
PersonType.class.getName());
@Override
public String getName() {
return Bundle.TITLE_NewPerson_dialog();
}
@Override
public void create() throws IOException {
NotifyDescriptor.InputLine msg = new NotifyDescriptor.InputLine(
Bundle.LBL_NewFirst_dialog(), Bundle.TITLE_NewPerson_dialog());
Object result = DialogDisplayer.getDefault().notify(msg);
if (NotifyDescriptor.CANCEL_OPTION.equals(result)) {
return;
}
String firstname = msg.getInputText();
// check for a zero-length firstname
if (firstname.equals("")) {
return;
}
msg = new NotifyDescriptor.InputLine(Bundle.LBL_NewLast_dialog(),
Bundle.TITLE_NewPerson_dialog());
result = DialogDisplayer.getDefault().notify(msg);
String lastname = msg.getInputText();
if (NotifyDescriptor.YES_OPTION.equals(result)) {
// Create a new Person object
final Person person = new Person();
person.setFirstname(firstname);
person.setLastname(lastname);
final CreatablePersonCapability cpc = personCapability
.getLookup().lookup(CreatablePersonCapability.class);
if (cpc != null) {
try {
cpc.create(person);
logger.log(Level.FINER, "Creating person {0}", person);
} catch (IOException e) {
logger.log(Level.WARNING, e.getLocalizedMessage(), e);
}
}
}
}
}
Implement the Capability
PersonType requires an implementation of interface CreatablePersonCapability (shown previously in Listing 10.1 on page 474). We implement CreatablePersonCapability in PersonCapability, a class previously shown with RefreshCapability (see Listing 10.4 on page 478).
Listing 10.9 shows PersonCapability.java modified to include an implementation of CreatablePersonCapability.
Listing 10.9 PersonCapability.java
public final class PersonCapability implements Lookup.Provider {
. . . code omitted . . .
public PersonCapability() {
lookup = new AbstractLookup(instanceContent);
ftm = Lookup.getDefault().lookup(FamilyTreeManager.class);
if (ftm == null) {
logger.log(Level.SEVERE, "Cannot get FamilyTreeManager object");
LifecycleManager.getDefault().exit();
}
. . . RefreshCapability implementation omitted . . .
instanceContent.add(new CreatablePersonCapability() {
@Override
public void create(Person person) throws IOException {
if (ftm != null) {
ftm.addPerson(person);
}
}
});
}
. . . code omitted . . .
}
Configuring NewAction in the Toolbar and Menu
With these changes, Add New Person now appears in the RootNode’s context menu, as shown in Figure 10.5 on page 483. To configure NewAction for the toolbar and top-level menu, you first register the action. The easiest way to do this is to create a new context-aware action (call it NewPersonAction) and make its context NewType. Listing 10.10 shows this action, which we add to the FamilyTreeActions module.
Listing 10.10 NewPersonAction.java
@ActionID(
category = "NewNode",
id = "org.openide.actions.NewAction")
@ActionRegistration(
iconBase = "com/asgteach/familytree/actions/personIcon.png",
displayName = "#CTL_NewPersonAction")
@ActionReferences({
@ActionReference(path = "Menu/File", position = 75),
@ActionReference(path = "Toolbars/File", position = 50)
})
@Messages("CTL_NewPersonAction=New &Person")
public final class NewPersonAction implements ActionListener {
private final NewType context;
public NewPersonAction(NewType context) {
this.context = context;
}
@Override
public void actionPerformed(ActionEvent ev) {
try {
context.create();
} catch (IOException ex) {
Exceptions.printStackTrace(ex);
}
}
}
Now put the context (NewType) into the RootNode’s Lookup to enable the toolbar and menu items. You can continue to use the NewAction in the context menu or use NewPersonAction instead, which is registered under Actions/NewNode. If you use NewPersonAction, then omit the getNewTypes() method, as shown in the modified RootNode in Listing 10.11.
public class RootNode extends AbstractNode {
private final InstanceContent instanceContent;
private final PersonType personType = new PersonType();
public RootNode() {
this(new InstanceContent());
}
private RootNode(InstanceContent ic) {
super(Children.create(new PersonChildFactory(), false),
new AbstractLookup(ic));
instanceContent = ic;
setIconBaseWithExtension(
"com/asgteach/familytree/personviewer/resources/personIcon.png");
setDisplayName(Bundle.LBL_RootNode());
setShortDescription(Bundle.HINT_RootNode());
// Required to enable New Person in context menu and Toolbar and Menus
instanceContent.add(personType);
. . .
}
@SuppressWarnings("unchecked")
@Override
public Action[] getActions(boolean context) {
List<Action> actions = new ArrayList<>(Arrays.asList(
super.getActions(context)));
actions.addAll(Utilities.actionsForPath("Actions/RootNode"));
actions.addAll(Utilities.actionsForPath("Actions/NewNode"));
return actions.toArray(new Action[actions.size()]);
}
// No longer necessary to override public NewType[] getNewTypes()
}
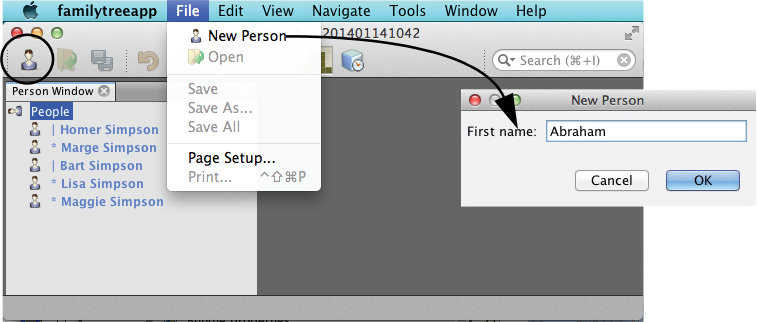
Figure 10.6 shows a New Person icon in the toolbar, as well as a New Person menu item under the top-level File menu.
Implementing Update
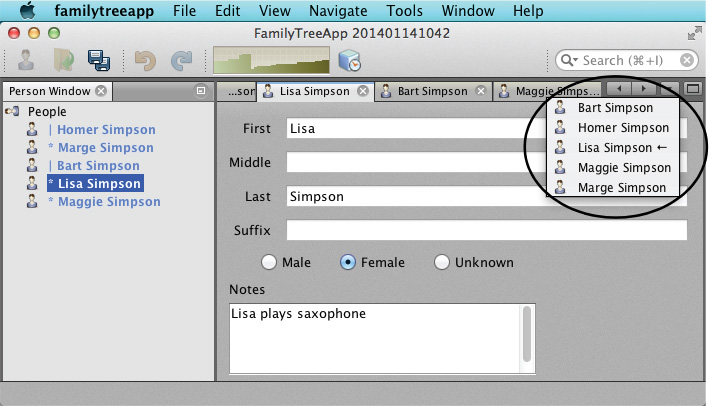
The Update function occurs when a user opens the selected PersonNode in an editor, makes changes, and clicks the Save or Save All menu item. For updates, AbstractSavable enables and disables the Save and Save All menu items. We use Openable to implement opening a Person in an editor. Figure 10.2 on page 473 shows the Save / Save All menu items and the Save All icon enabled after a user makes changes in a PersonEditor. Figure 10.7 shows the built-in Show Opened Document List feature displaying the list of currently opened PersonEditor TopComponents.
Implementing Update requires several disparate modifications to the application, but the modifications all follow known guidelines in the NetBeans Platform Action framework. The result is a cohesive and cooperative feature. Here is a summary of the changes.
• Create a new module to hold the EditorManager service provider interface and make its package public.
• Implement the EditorManager service provider and add it to the PersonEditor module. (The PersonEditorTopComponent is already included in the PersonEditor module.)
• Use the standard NetBeans Platform context Openable to implement opening an editor. Put an implementation of Openable in PersonNode. The Openable implementation will look up the EditorManager service provider and acquire and open an editor for the selected PersonNode.
• Create OpenAction as a context-aware action with context Openable. Make OpenAction the preferred action for PersonNode. This makes a double click open the node’s Person in the editor.
• Each Person gets its own PersonEditor (a TopComponent), which is permanently associated with that Person. An EditorManager finds the TopComponent or creates it on demand, and opens the TopComponent with focus.
• In the editor, detect when a user makes changes to the domain object (Person) and put an implementation of AbstractSavable into the editor’s Lookup. This enables Save All in the toolbar and Save and Save All in the File menu.
• Use a FamilyTreeManager property change listener to detect when the Person being edited has been deleted. When a delete occurs, unregister the editor (the TopComponent) and close it.
• The editor overrides the canClose() method and prompts the user to close if there are unsaved changes.
Let’s start with the EditorManager service and its implementation.
Create and Configure Module EditorManager
1. Expand the FamilyTreeApp, right click on the Modules node, and select Add New... from the context menu.
2. NetBeans displays the Add New Module Name and Location dialog. For Project Name, specify EditorManager. Accept the defaults for the remaining fields and click Next.
3. In the Basic Module Configuration dialog, specify com.asgteach.familytree.editor.manager for Code Name Base. Accept the defaults for the remaining fields and click Finish.
NetBeans creates project EditorManager. Now set dependencies.
1. Expand project EditorManager, right click on the Libraries node, and select Add Module Dependency... from the context menu.
2. In the Add Module Dependency dialog under Modules, select FamilyTreeModel and Nodes API. Click OK to add these dependencies.
Create the Java interface for the EditorManager service provider, as follows.
1. In project EditorManager, expand the Source Packages, right click on the package name, and select New | Java Interface....
2. In the New Java Interface dialog, specify Class Name EditorManager and click Finish.
3. In the Java Editor, provide abstract methods for EditorManager.java, as shown in Listing 10.12.
Listing 10.12 EditorManager.java
public interface EditorManager {
public void openEditor(Node node);
public void unRegisterEditor(Person person);
}
4. Using the Properties context menu of project EditorManager under API Versioning, make the package com.asgteach.familytree.editor.manager public so that other modules can set a dependency on this module.
Implement the EditorManager Service Provider
Put the EditorManager service provider implementation in module PersonEditor. Here are the steps.
1. Expand project PersonEditor, right click on the Libraries node, and select Add Module Dependency... from the context menu.
2. In the Add Module Dependency dialog under Modules, select EditorManager and Nodes API. Click OK to add these dependencies.
3. In project PersonEditor, expand the Source Packages, right click on the package name, and select New | Java Class....
4. In the New Java Class dialog, specify Class Name EditorManagerImpl and click Finish.
5. In the Java Editor, provide the following code for EditorManagerImpl.java, as shown in Listing 10.13. Use annotation @ServiceProvider to register this class as a service provider for EditorManager.
The EditorManager service provider manages a HashMap of PersonEditorTopComponents using Person for the key. When the user opens a Person, the map is checked to see if a TopComponent for that Person exists. If one is found, it is opened and activated (request focus). If none exists, a TopComponent is created for that Person. The PersonEditorTopComponent setPerson() method configures the TopComponent with the Person and PersonNode. (The PersonNode includes needed capabilities in its Lookup.)
Listing 10.13 EditorManagerImpl.java
@ServiceProvider(service = EditorManager.class)
public class EditorManagerImpl implements EditorManager {
private static final Logger logger = Logger.getLogger(
EditorManagerImpl.class.getName());
Map<Person, PersonEditorTopComponent> tcMap = new HashMap<>();
@Override
public void openEditor(Node node) {
Person person = node.getLookup().lookup(Person.class);
if (person == null) {
return;
}
PersonEditorTopComponent tc = tcMap.get(person);
if (tc != null) {
if (!tc.isOpened()) {
tc.open();
}
tc.setPerson(node);
tc.requestActive();
return;
}
// Create a new TopComponent and open it...
logger.log(Level.INFO, "Creating new Editor for {0}", person);
tc = new PersonEditorTopComponent();
tcMap.put(person, tc);
tc.setPerson(node);
tc.open();
tc.requestActive();
}
@Override
public void unRegisterEditor(Person person) {
logger.log(Level.INFO, "Unregistering editor for {0}", person);
tcMap.remove(person);
}
}
Configure PersonEditor to Work with AbstractSavable
The PersonEditor described in Chapter 5 (see “Configuring a Window with Form Editing” on page 231) lets a user edit a Person from the Global Selection Lookup. In that version, the TopComponent is a singleton. Now, each Person and PersonNode receive its own PersonEditorTopComponent.
To fulfill the Update portion of our CRUD application and use capabilities, we must make several changes to the PersonEditor. We’ll show you these modifications in several parts. Note that much of the PersonEditorTopComponent is unchanged. This includes the components that let a user make changes, the listeners that detect edits, and the methods for updating the form.
Listing 10.14 shows the PersonEditorTopComponent code with the following updates.
• Change the annotations on the TopComponent so that it’s no longer a singleton (see “Creating Non-Singleton TopComponents” on page 364 for a discussion).
• Add InstanceContent to the TopComponent so that you can add nodes and capabilities to its Lookup as needed.
• Implement a public setPerson() method so that the EditorManager can configure the Editor with the Person and its PersonNode (which has capabilities needed by the PersonEditor).
• Remove the Update button and its actionPerformed() event handler.
• Remove the LookupListener event handler code.
• Modify the window’s name and tooltip to display the Person’s name.
• Change the modify() method so that it puts an AbstractSavable implementation (SavableViewCapability) in the TopComponent’s Lookup.
• Remove the AbstractSavable after a Save or when a Save is no longer needed.
Listing 10.14 PersonEditorTopComponent.java—Modifications for CRUD
@TopComponent.Description(
preferredID = "PersonEditorTopComponent",
iconBase =
"com/asgteach/familytree/personeditor/personIcon.png",
persistenceType = TopComponent.PERSISTENCE_NEVER
)
@TopComponent.Registration(mode = "editor", openAtStartup = false)
@Messages({
"CTL_PersonEditorAction=PersonEditor",
"CTL_PersonEditorTopComponent=PersonEditor Window",
"CTL_PersonEditorSaveDialogTitle=Unsaved Data",
"CTL_PersonEditorSave_Option=Save",
"CTL_PersonEditorDiscard_Option=Discard",
"CTL_PersonEditorCANCEL_Option=Cancel",
"# {0} - person",
"HINT_PersonEditorTopComponent=This is an Editor for {0}",
"# {0} - person",
"CTL_PersonEditorSaveDialogMsg=Person {0} has Unsaved Data.
Save?"
})
public final class PersonEditorTopComponent extends TopComponent {
/*
TopComponents implement Lookup.Provider.
In order to add objects to a TopComponents Lookup, instantiate
InstanceContent and associate it with its Lookup using
the associateLookup() method and create a Lookup with
AbstractLookup.
*/
private Person thePerson = null;
private static final Logger logger = Logger.getLogger(
PersonEditorTopComponent.class.getName());
private boolean changeOK = false;
private boolean noUpdate = true;
private final InstanceContent instanceContent = new InstanceContent();
private FamilyTreeManager ftm;
public PersonEditorTopComponent() {
initComponents();
associateLookup(new AbstractLookup(instanceContent));
}
// The EditorManager must invoke the setPerson method with the Node
// that contains the wrapped Person object in its Lookup
public void setPerson(Node node) {
thePerson = node.getLookup().lookup(Person.class);
Node oldNode = getLookup().lookup(Node.class);
if (oldNode != null) {
instanceContent.remove(oldNode);
}
instanceContent.add(node);
}
private void updateModel() {
if (noUpdate) {
return;
}
thePerson.setFirstname(firstTextField.getText());
thePerson.setMiddlename(middleTextField.getText());
thePerson.setLastname(lastTextField.getText());
thePerson.setSuffix(suffixTextField.getText());
if (maleButton.isSelected()) {
thePerson.setGender(Gender.MALE);
} else if (femaleButton.isSelected()) {
thePerson.setGender(Gender.FEMALE);
} else if (unknownButton.isSelected()) {
thePerson.setGender(Gender.UNKNOWN);
}
thePerson.setNotes(notesTextArea.getText());
// Update the TopComponent's name and tooltip
setName(thePerson.toString());
setToolTipText(Bundle.HINT_PersonEditorTopComponent(
thePerson.toString()));
}
private void modify() {
// Add AbstractSavable to Lookup
if (getLookup().lookup(SavableViewCapability.class) == null) {
instanceContent.add(new SavableViewCapability());
}
}
private void clearSaveCapability() {
SavableViewCapability savable = getLookup().lookup(
SavableViewCapability.class);
while (savable != null) {
savable.removeSavable();
instanceContent.remove(savable);
savable = getLookup().lookup(SavableViewCapability.class);
}
}
@Override
public void componentOpened() {
setName(thePerson.toString());
setToolTipText(Bundle.HINT_PersonEditorTopComponent(
thePerson.toString()));
configureComponentListeners();
updateForm();
ftm = Lookup.getDefault().lookup(FamilyTreeManager.class);
if (ftm == null) {
logger.log(Level.SEVERE, "Cannot get FamilyTreeManager object");
LifecycleManager.getDefault().exit();
} else {
ftm.addPropertyChangeListener(familyListener);
}
}
• If the Person being edited in this PersonEditor is deleted, the TopComponent unregisters itself with the EditorManager and closes down. The delete is detected by the PropertyChangeListener, as shown in Listing 10.15. You must wrap the TopComponent close() in a Runnable and call it with invokeWhenUIReady(). This ensures the Window System modification is performed on the EDT.
Listing 10.15 PersonEditorTopComponent—PropertyChangeListener
// PropertyChangeListener for FamilyTreeManager
private final PropertyChangeListener familyListener =
(PropertyChangeEvent pce) -> {
if (pce.getPropertyName().equals(
FamilyTreeManager.PROP_PERSON_DESTROYED) &&
pce.getNewValue() != null) {
if (pce.getNewValue().equals(thePerson)) {
// Our person has been removed from the FamilyTreeManager, so we
// need to close!
clearSaveCapability();
EditorManager edManager = Lookup.getDefault().lookup(
EditorManager.class);
if (edManager != null) {
edManager.unRegisterEditor(thePerson);
PersonEditorTopComponent.shutdown(this);
}
}
}
};
private static void shutdown(final TopComponent tc) {
WindowManager.getDefault().invokeWhenUIReady(() -> tc.close());
}
• Override the TopComponent’s canClose() method to prompt the user what to do with unsaved changes, as shown in Listing 10.16. Here, we customize a NetBeans Platform dialog so that the button labels are Cancel, Discard, and Save. (See “Customizing Standard Dialogs” on page 531 for more on dialogs.)
Listing 10.16 PersonEditor.java—Method canClose()
// Check to see if we have unsaved changes
// If so, ask the user if the changes should be saved or discarded
@Override
public boolean canClose() {
SavableViewCapability savable = getLookup().lookup(
SavableViewCapability.class);
if (savable == null) {
// No modified data, so just close
return true;
}
// Detected modified data, so ask user what to do
String saveAnswer = Bundle.CTL_PersonEditorSave_Option();
String discardAnswer = Bundle.CTL_PersonEditorDiscard_Option();
String cancelAnswer = Bundle.CTL_PersonEditorCANCEL_Option();
String[] options = {cancelAnswer, discardAnswer, saveAnswer};
String msg = Bundle.CTL_PersonEditorSaveDialogMsg(
thePerson.toString());
NotifyDescriptor nd = new NotifyDescriptor(msg, // the question
Bundle.CTL_PersonEditorSaveDialogTitle(), // the title
NotifyDescriptor.YES_NO_CANCEL_OPTION, // the buttons provided
NotifyDescriptor.QUESTION_MESSAGE, // the type of message
options, // the button text
saveAnswer // the default selection
);
Object result = DialogDisplayer.getDefault().notify(nd);
if (result == cancelAnswer ||
result == NotifyDescriptor.CLOSED_OPTION) {
// Cancel the close
return false;
}
if (result == discardAnswer) {
// Don't save, just close!
clearSaveCapability();
return true;
}
try {
// Yes, save the data, then close
savable.handleSave();
StatusDisplayer.getDefault().setStatusText(thePerson + " saved.");
return true;
} catch (IOException ex) {
logger.log(Level.WARNING, null, ex);
return false;
}
}
• In PersonEditor.java, extend AbstractSavable with private class SavableViewCapability to handle saves, as shown in Listing 10.17. With AbstractSavable, you override the findDisplayName(), handleSave(), equals(), and hashcode() methods. Note that the handleSave() method looks up the node in the TopComponent’s Lookup, then looks up SavablePersonCapability to perform the actual save. (We show you the implementation of SavablePersonCapability in the next section.) When the user clicks the Save menu item, the NetBeans Platform SaveAction invokes the AbstractSavable object’s handleSave() method. Here, the handleSave() method makes a copy of the TopComponent’s Person object after invoking updateModel(). This copy is required to safely add concurrency with the CRUD actions.
Listing 10.17 SavableViewCapability Class
private class SavableViewCapability extends AbstractSavable {
SavableViewCapability() {
register();
}
public void removeSavable() {
unregister();
}
@Override
protected String findDisplayName() {
return thePerson.toString();
}
@Override
protected void handleSave() throws IOException {
final Node node = getLookup().lookup(Node.class);
if (node != null) {
final SavablePersonCapability savable
= node.getLookup().lookup(SavablePersonCapability.class);
if (savable != null) {
updateModel();
final Person p = new Person(thePerson);
clearSaveCapability();
changeOK = true;
try {
savable.save(p);
} catch (IOException ex) {
logger.log(Level.WARNING, null, ex);
}
}
}
}
@Override
public boolean equals(Object other) {
if (other instanceof SavableViewCapability) {
SavableViewCapability sv = (SavableViewCapability) other;
return tc() == sv.tc();
}
return false;
}
@Override
public int hashCode() {
return tc().hashCode();
}
PersonEditorTopComponent tc() {
return PersonEditorTopComponent.this;
}
}
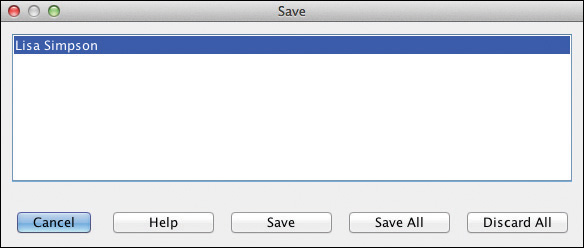
Note that with AbstractSavable, you automatically get a confirmation dialog if there are unsaved changes and the user attempts to Quit the application, as shown in Figure 10.8.
Create and Configure the OpenAction
A user initiates editing by executing an Open action on a PersonNode. Create a context-aware action (put the action in module FamilyTreeActions) and register it under category OpenNodes. This OpenAction (with an icon) is registered with the File menu and the toolbar. Make the context Openable, which is a standard NetBeans Platform capability. Figure 10.9 shows the Open icon in the toolbar and under the File menu. Listing 10.18 shows the code for OpenAction.java.

@ActionID(
category = "OpenNodes",
id = "com.asgteach.familytree.actions.OpenAction"
)
@ActionRegistration(
iconBase = "com/asgteach/familytree/actions/open.png",
displayName = "#CTL_OpenAction"
)
@ActionReferences({
@ActionReference(path = "Menu/File", position = 1100,
separatorAfter = 1150),
@ActionReference(path = "Toolbars/File", position = 200)
})
@Messages("CTL_OpenAction=Open")
public final class OpenAction implements ActionListener {
private final Openable context;
public OpenAction(Openable context) {
this.context = context;
}
@Override
public void actionPerformed(ActionEvent ev) {
context.open();
}
}
Implement Openable and SavablePersonCapability
The Openable capability is used by OpenAction and the SavablePersonCapability capability is used in the PersonEditorTopComponent to save edits made by the user (see Listing 10.17 on page 497). Listing 10.19 shows the code that implements both of these capabilities and adds them to the PersonNode Lookup.
Listing 10.19 PersonNode.java—Openable and SavablePersonCapability
public class PersonNode extends AbstractNode {
. . . code omitted . . .
private PersonNode(Person person, InstanceContent ic) {
super(Children.LEAF, new AbstractLookup(ic));
instanceContent = ic;
instanceContent.add(person);
. . . code omitted . . .
// Add an Openable object to this Node
instanceContent.add(new Openable() {
@Override
public void open() {
EditorManager edmanager = Lookup.getDefault().lookup(
EditorManager.class);
if (edmanager != null) {
edmanager.openEditor(PersonNode.this);
}
}
});
// Add a SavablePersonCapability to this Node
instanceContent.add(new SavablePersonCapability() {
@Override
public void save(final Person p) throws IOException {
if (ftm != null) {
ftm.updatePerson(p);
}
}
});
. . .
Configure the Node’s Actions
Add Open to the context menu of PersonNode and make it the preferred action, as shown in Listing 10.20. Note that OpenAction is registered under category OpenNodes and is the only action in that category.
Listing 10.20 PersonNode.java—Configure Actions
@SuppressWarnings("unchecked")
@Override
public Action[] getActions(boolean context) {
List<Action> personActions = new ArrayList<>(
Arrays.asList(super.getActions(context)));
personActions.addAll(Utilities.actionsForPath("Actions/OpenNodes"));
personActions.add(DeleteAction.get(DeleteAction.class));
return personActions.toArray(
new Action[personActions.size()]);
}
@SuppressWarnings("unchecked")
@Override
public Action getPreferredAction() {
// Make OpenAction the preferred action
List<Action> actions = new ArrayList<>(
Utilities.actionsForPath("Actions/OpenNodes"));
if (!actions.isEmpty()) {
return actions.get(0);
} else {
return null;
}
}
10.2 Using CRUD with a Database
At this point, we’ve built a FamilyTreeApp with a hashmap for its data store. With our simple example (Person objects with no relationships), a hashmap provides an adequate solution to illustrate many of the NetBeans Platform features. However, this is not a viable solution when your application requires a permanent data store. As we move to the next step, which includes using a database, the NetBeans Platform helps us with this migration in several ways.
• Database CRUD operations are a “black box” operation carried out by the FamilyTreeManager.
• Since the FamilyTreeManager is already a service provider, we can easily substitute a new one that uses a database.
In this section, we’ll show you how to implement a FamilyTreeManager with JavaDB and JPA. JavaDB is a built-in database available with the NetBeans IDE. JPA (Java Persistence API) provides the middleware for persistence-based applications. Note that any JPA and database software is applicable here. We use JavaDB and EclipseLink JPA since they are bundled with the NetBeans IDE and JDK software.
When using a database (or a web service), you must ensure that the application remains responsive. The solution is to execute potentially long-running code in the background. We laid the groundwork for this approach in Chapter 2 (see “Swing Background Tasks” on page 73) and in Chapter 4 (see “JavaFX Background Tasks” on page 176). In the next section, we’ll add concurrency to our application to keep the UI responsive.
Here’s the approach we’ll take to migrate the FamilyTreeApp application to a database.
• Create wrapped libraries for the database and JPA software. Wrapped libraries are NetBeans Platform modules that contain library JAR files configured with public packages.
• Start the JavaDB built-in database server and create a database to hold the application’s data.
• Create a module to hold the persistence unit, entity classes, and FamilyTreeManager service provider to perform the JPA/database operations.
• Create an entity class corresponding to each table in the database (there is just one in this example).
• Create a Persistence Unit to describe the entity classes, database, and table generation strategy for JPA.
• Implement a FamilyTreeManager service provider that uses JPA.
• Modify Person.java so that it no longer auto-increments the id property, but instead gets an id generated from the database.
The improvements to the FamilyTreeApp for CRUD operations can be used with no further modifications (thanks to NetBeans Platform module system and service providers).
Create Wrapped Libraries
The NetBeans Platform lets you use external libraries in applications by creating modules called Library Wrapper Modules or wrapped libraries. Wrapped libraries are modules that contain JAR files (that is, external library archive files). The JAR files’ packages are public so that other modules can set dependencies as needed. You can bundle multiple JAR files into one module.
To implement database functionality, we’ll create two wrapped libraries. The first library contains the JavaDB connection software (the Derby Client JAR file). The second library includes the EclipseLink JAR files that provide JPA. These library files are available with the NetBeans IDE distribution.
Derby Client Module
First, create the Derby Client module, as follows.
1. Select the FamilyTreeApp Modules node, right click, and select Add New Library .... NetBeans initiates the New Library Wrapper Module Project wizard and displays the Select Library dialog.
2. Click the Browse button, navigate to the NetBeans Glassfish distribution subdirectory javadb/lib, and select derbyclient.jar, as shown in Figure 10.10. Click Select and then Next in the Select Library dialog.

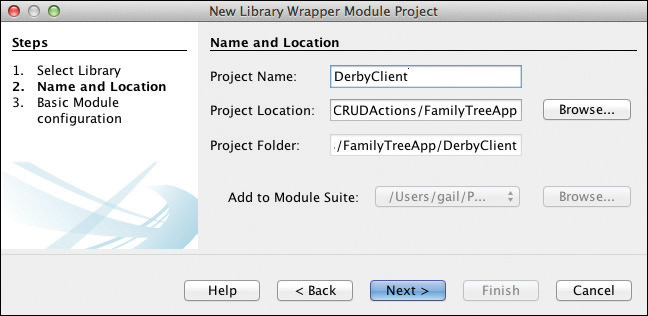
3. In the Name and Location dialog, specify DerbyClient for Project Name, accept the default for the remaining fields, and click Next, as shown in Figure 10.11.
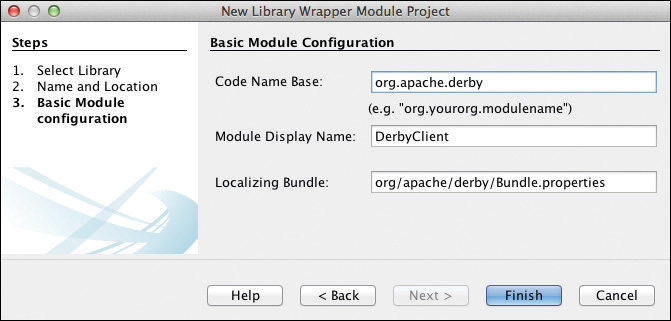
4. In the Basic Module Configuration dialog, specify org.apache.derby for Code Name Base, accept the default for the remaining fields, and click Finish, as shown in Figure 10.12.
NetBeans creates a new module named DerbyClient and makes all its packages public.
EclipseLink Module
Follow the same steps to create a second Library Wrapper Module called EclipseLink. The EclipseLink library consists of four JAR files found in the NetBeans IDE distribution under NetBeans/java/modules/ext/eclipselink (the exact location depends on your operating system and the NetBeans distribution). The JAR files you need are as follows (xx refers to various version numbers). In the JAR file chooser dialog, Control-Click lets you select multiple JAR files.
eclipselink-xx.jar
javax.persistence_xx.jar
org.eclipse.persistence.jpa.jpql_xx.jar
org.eclipse.persistence.jpa.modelgen_xx.jar
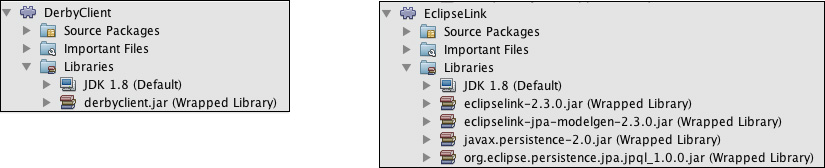
Select all of the above JAR files. Use project name EclipseLink and code name base org.eclipselink. The two Library Wrapper Modules (DerbyClient and EclipseLink) appear as shown in Figure 10.13 in the Projects view with the Libraries node expanded.
JavaDB Server and Database
The NetBeans IDE comes with a complete SQL database. To use it, you must start the JavaDB Server, as follows.
• In the NetBeans IDE Services tab, expand the Databases node, right click on JavaDB, and select Start Server from the context menu.
In the IDE Output window, you’ll see a JavaDB Data Process tab with output similar to the following.
Tue Feb 18 16:02:47 PST 2014 : Apache Derby Network Server - 10.8.1.2 -
(1095077) started and ready to accept connections on port 1527
JavaDB Server Tip
Note that you must start the JavaDB Server before running the FamilyTreeApp once you add this database functionality to the application.
Create Database
With the JavaDB Server running, you can now create a database that holds the data managed by the FamilyTreeApp.
1. In the Services window, right click on JavaDB and select Create Database ... from the context menu.
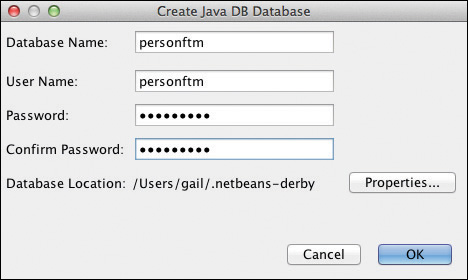
2. NetBeans displays a Create Java DB Database dialog. Specify personftm for all fields (Database Name, User Name, Password, and Confirm Password), as shown in Figure 10.14. Click OK.
3. You’ll now see personftm listed under JavaDB (expand it) as well as a JDBC-Derby URL. You can connect to this database, but it doesn’t have any tables or structure yet. You’ll provide the structure by defining a persistence unit and entity class.
Implement FamilyTreeManager
Create a new module to implement the FamilyTreeManager that uses JPA.
Create a New Module and Add Dependencies
1. In the FamilyTreeApp application, right click on the Modules node and select Add New... from the context menu.
2. Make the Project Name FamilyTreeManagerJPA and its code name base com.asgteach.familytree.manager.jpa.
3. This module requires some dependencies. Right click on the Libraries node and select Add Module Dependencies... in the context menu.
4. Set dependencies for modules DerbyClient, EclipseLink, FamilyTreeModel, Lookup API, and Utilities API and click OK.
Create an Entity Class
JPA uses entity classes to persist data. Our entity class will be very similar to the Person class you’ve already seen with annotations that define its persistence behavior. We will keep the entity class (PersonEntity) isolated within this module and retain Person as an application-wide domain object that is not a persistent entity.
Create the class, as follows.
1. Right click on the FamilyTreeManagerJPA package name and select New | Java Class from the context menu.
2. Specify PersonEntity for the class name. Provide code, as shown in Listing 10.21.
There are a few important features worth discussing about this JPA entity class.
• PersonEntity uses @Entity to designate the class as a JPA entity class. The optional annotation @Table specifies its table name (otherwise, JPA uses the class name, PersonEntity, as the table name).
• Annotation @Id and @GeneratedValue specify that field id is the primary key and that its value is automatically generated. (This will require that we remove the auto-increment code in the Person class.)
• Annotation @Version is used by JPA to track the modifications made to the entity and maps to a column named VERSION in the table.
• The PersonEntity properties (firstname, middlename, lastname, suffix, gender, and notes) are mapped to equivalently named columns in the database.
Listing 10.21 PersonEntity.java
@Entity
@Table(name="Person")
public class PersonEntity implements Serializable {
private static final long serialVersionUID = 1L;
@Id
@GeneratedValue(strategy = GenerationType.AUTO)
private Long id;
@Version
private int version;
private String firstname = "";
private String middlename = "";
private String lastname = "Unknown";
private String suffix = "";
private Person.Gender gender = Person.Gender.UNKNOWN;
private String notes = "";
public PersonEntity() {
}
public synchronized String getFirstname() {
return firstname;
}
public synchronized void setFirstname(String firstname) {
this.firstname = firstname;
}
public synchronized String getLastname() {
return lastname;
}
public synchronized void setLastname(String lastname) {
this.lastname = lastname;
}
public synchronized String getMiddlename() {
return middlename;
}
public synchronized void setMiddlename(String middlename) {
this.middlename = middlename;
}
public synchronized String getNotes() {
return notes;
}
public synchronized void setNotes(String notes) {
this.notes = notes;
}
public synchronized Person.Gender getGender() {
return gender;
}
public synchronized void setGender(Person.Gender gender) {
this.gender = gender;
}
public synchronized String getSuffix() {
return suffix;
}
public synchronized void setSuffix(String suffix) {
this.suffix = suffix;
}
public synchronized Long getId() {
return id;
}
@Override
public boolean equals(Object o) {
if (o == null) {
return false;
}
if (getClass() != o.getClass()) {
return false;
}
return this.getId().equals(((PersonEntity) o).getId());
}
@Override
public int hashCode() {
int hash = 7;
hash = 97 * hash + (this.id != null ? this.id.hashCode() : 0);
return hash;
}
@Override
public String toString() {
StringBuilder sb = new StringBuilder();
sb.append("[").append(getId()).append("] ");
if (!this.getFirstname().isEmpty()) {
sb.append(this.getFirstname());
}
if (!this.getMiddlename().isEmpty()) {
sb.append(" ").append(this.getMiddlename());
}
if (!this.getLastname().isEmpty()) {
sb.append(" ").append(this.getLastname());
}
if (!this.getSuffix().isEmpty()) {
sb.append(" ").append(this.getSuffix());
}
return sb.toString();
}
}
Create a Persistence Unit
With an entity class and database created and the Java DB server running, you can now create a Persistence Unit for this module. The Persistence Unit is described by an XML file called persistence.xml. You add it to the META-INF directory of module FamilyTreeManagerJPA.
Listing 10.22 shows an example persistence.xml file. The Persistence Unit has a name (PersonFTMPU) and specifies a persistence provider (org.eclipse.persistence.jpa.PersistenceProvider). The persistence unit also describes how to connect to the database (here using JDBC/Derby) and (importantly) the table generation strategy. Here, we specify “drop-and-create-tables,” which creates the database tables each time (deleting any data). If you want to keep the data between program executions, change the generation strategy to “create-tables” (which creates the tables only if needed) or “none” (which performs no table generation).
Table Generation Strategy
Note that if you change the generation strategy from “drop-and-create-tables,” you’ll need to remove the generation of test data in the FamilyTreeModel’s Installer class, which creates the Simpson family test data each time.
You can also change the default logging level for EclipseLink to FINE to see more detailed logging output from the persistence provider. (Warning: FINE produces many messages.)
<?xml version="1.0" encoding="UTF-8"?>
<persistence version="2.0" xmlns="http://java.sun.com/xml/ns/persistence"
xmlns:xsi="http://www.w3.org/2001/XMLSchema-instance"
xsi:schemaLocation=
"http://java.sun.com/xml/ns/persistence
http://java.sun.com/xml/ns/persistence/persistence_2_0.xsd">
<persistence-unit name="PersonFTMPU" transaction-type="RESOURCE_LOCAL">
<provider>org.eclipse.persistence.jpa.PersistenceProvider</provider>
<class>com.asgteach.familytree.manager.jpa.PersonEntity</class>
<properties>
<property name="driverClass" value="org.apache.derby.jdbc.ClientDriver"/>
<!-- <property name="eclipselink.logging.level" value="FINE"/>-->
<property name="javax.persistence.jdbc.url"
value="jdbc:derby://localhost:1527/personftm"/>
<property name="javax.persistence.jdbc.user" value="personftm"/>
<property name="javax.persistence.jdbc.driver"
value="org.apache.derby.jdbc.ClientDriver"/>
<property name="javax.persistence.jdbc.password" value="personftm"/>
<property name="eclipselink.ddl-generation"
value="drop-and-create-tables"/>
</properties>
</persistence-unit>
</persistence>
Database Configuration Options
You can alternatively use a pre-existing database. In this case, the NetBeans IDE can generate the entity classes and the Persistence Unit for you. To do this, create a Java Class Library Project. Then, from the top-level menu, select File | New File. In the dialog specify category Persistence, then choose Entity Classes from Database. This will create the entity classes and the Persistence Unit you need based on the database connection you provide. Once you have these files, you can copy them into a module in your NetBeans Platform application.
Create a New FamilyTreeManager Service Provider
Now it’s time to create a new class that implements FamilyTreeManager. Call this class FamilyTreeManagerJPA and make it a service provider (using @ServiceProvider) for FamilyTreeManager. Attribute supersedes specifies that this implementation takes precedence over the original FamilyTreeManager service provider. (You can also remove module FamilyTreeManagerImpl from the application.)
A static initializer initializes the EntityManagerFactory and creates an EntityManager. Creating the EntityManager fails if the JavaDB Database server is not running.
Similar to class FamilyTreeManagerImpl, this implementation provides property change support when Person objects are updated, added to, and removed from the database. We use SwingPropertyChangeSupport so that the property change events are fired on the EDT.
Private method buildPerson() creates a Person object with its database-generated id property. (Class Person in module FamilyTreeModel now requires a new constructor.) This replaces the auto-increment id in class Person used in the hashmap version.
With JPA, you execute database operations using the EntityManager, which provides the database management. Listing 10.23 shows class FamilyTreeManagerJPA.java.
Listing 10.23 FamilyTreeManagerJPA.java
@ServiceProvider
(service = com.asgteach.familytree.model.FamilyTreeManager.class,
supersedes = {
"com.asgteach.familytree.manager.impl.FamilyTreeManagerImpl"})
public class FamilyTreeManagerJPA implements FamilyTreeManager {
// SwingPropertyChangeSupport is thread-safe
// true means fire property change events on the EDT
private SwingPropertyChangeSupport propChangeSupport = null;
private static final EntityManagerFactory EMF;
private static final Logger logger = Logger.getLogger(
FamilyTreeManagerJPA.class.getName());
static {
try {
EMF = Persistence.createEntityManagerFactory("PersonFTMPU");
logger.log(Level.INFO, "Entity Manager Factory Created.");
// Create/close entity manager to make sure JavaDB Server is running
// This will fail if the JavaDB Server is not running
EntityManager em = EMF.createEntityManager();
em.close();
} catch (Throwable ex) {
logger.log(Level.SEVERE,
"Make sure that the JavaDB Database Server has been started.", ex);
throw new ExceptionInInitializerError(ex);
}
}
private PropertyChangeSupport getPropertyChangeSupport() {
if (this.propChangeSupport == null) {
this.propChangeSupport = new SwingPropertyChangeSupport(this, true);
}
return this.propChangeSupport;
}
@Override
public void addPropertyChangeListener(PropertyChangeListener listener) {
getPropertyChangeSupport().addPropertyChangeListener(listener);
}
@Override
public void removePropertyChangeListener(PropertyChangeListener listener) {
getPropertyChangeSupport().removePropertyChangeListener(listener);
}
private Person buildPerson(PersonEntity pe) {
Person person = new Person(pe.getId());
person.setFirstname(pe.getFirstname());
person.setGender(pe.getGender());
person.setLastname(pe.getLastname());
person.setMiddlename(pe.getMiddlename());
person.setNotes(pe.getNotes());
person.setSuffix(pe.getSuffix());
return person;
}
@Override
public void addPerson(final Person newPerson) {
EntityManager em = EMF.createEntityManager();
try {
em.getTransaction().begin();
PersonEntity person = new PersonEntity();
person.setFirstname(newPerson.getFirstname());
person.setLastname(newPerson.getLastname());
person.setGender(newPerson.getGender());
person.setMiddlename(newPerson.getMiddlename());
person.setSuffix(newPerson.getSuffix());
person.setNotes(newPerson.getNotes());
em.persist(person);
em.getTransaction().commit();
logger.log(Level.INFO,
"New Person: {0} successfully added.",newPerson);
getPropertyChangeSupport().firePropertyChange(
FamilyTreeManager.PROP_PERSON_ADDED, null, buildPerson(person));
} catch (Exception ex) {
logger.log(Level.SEVERE, null, ex);
} finally {
em.close();
}
}
@Override
public void updatePerson(final Person p) {
EntityManager em = EMF.createEntityManager();
try {
em.getTransaction().begin();
PersonEntity target = em.find(PersonEntity.class, p.getId());
if (target != null) {
target.setFirstname(p.getFirstname());
target.setGender(p.getGender());
target.setLastname(p.getLastname());
target.setMiddlename(p.getMiddlename());
target.setNotes(p.getNotes());
target.setSuffix(p.getSuffix());
em.merge(target);
em.getTransaction().commit();
logger.log(Level.FINE, "Person {0} successfully updated.", p);
getPropertyChangeSupport().firePropertyChange(
FamilyTreeManager.PROP_PERSON_UPDATED, null,
buildPerson(target));
}
logger.log(Level.WARNING, "No entity for Person {0}.", p);
} catch (Exception ex) {
logger.log(Level.SEVERE, null, ex);
} finally {
em.close();
}
}
@Override
public void deletePerson(Person p) {
EntityManager em = EMF.createEntityManager();
try {
em.getTransaction().begin();
PersonEntity target = em.find(PersonEntity.class, p.getId());
if (target != null) {
em.remove(target);
em.getTransaction().commit();
logger.log(Level.FINE, "Person {0} successfully removed.", p);
getPropertyChangeSupport().firePropertyChange(
FamilyTreeManager.PROP_PERSON_DESTROYED, null, p);
} else {
logger.log(Level.WARNING, "No entity for Person {0}.", p);
}
} catch (Exception ex) {
logger.log(Level.SEVERE, null, ex);
} finally {
em.close();
}
}
@SuppressWarnings("unchecked")
@Override
public List<Person> getAllPeople() {
EntityManager em = EMF.createEntityManager();
try {
List<Person> people = Collections.synchronizedList(
new ArrayList<>());
em.getTransaction().begin();
Query q = em.createQuery(
"select p from PersonEntity p order by p.lastname asc, p.firstname asc");
List<PersonEntity> results = (List<PersonEntity>) q.getResultList();
if (results != null && results.size() > 0) {
results.stream().forEach((pe) -> {
people.add(buildPerson(pe));
});
}
em.getTransaction().commit();
return Collections.unmodifiableList(people);
} catch (Exception ex) {
logger.log(Level.SEVERE, null, ex);
return null;
} finally {
em.close();
}
}
}
Updating Class Person
Listing 10.24 shows the modified Person class. The new constructor uses the id generated by the database.
public final class Person implements Serializable {
private long id;
private String firstname;
private String middlename;
private String lastname;
private String suffix;
private Person.Gender gender;
private String notes;
. . . code omitted . . .
public Person() {
this("", "", Gender.UNKNOWN);
}
public Person(long id) {
this("", "", Gender.UNKNOWN);
this.id = id;
}
public Person(String first, String last, Person.Gender gender) {
this.firstname = first;
this.middlename = "";
this.lastname = last;
this.suffix = "";
this.gender = gender;
this.notes = "";
}
public Person(Person person) {
this.firstname = person.getFirstname();
this.middlename = person.getMiddlename();
this.lastname = person.getLastname();
this.suffix = person.getSuffix();
this.gender = person.getGender();
this.notes = person.getNotes();
this.id = person.getId();
}
. . . code omitted . . .
}
Running the Application
To run this application, start the JavaDB Database server and execute the FamilyTreeApp. The first time you run the application, the Persistence Unit generates the database table. The FamilyTreeModel @OnStart class creates the sample data (see “Using @OnStart” on page 242).
Figure 10.15 shows the FamilyTreeApp running after the user makes changes (Person Abraham Simpson is added and several records have been updated). The full CRUD actions we implemented earlier work as before, except now the data is stored in a database.
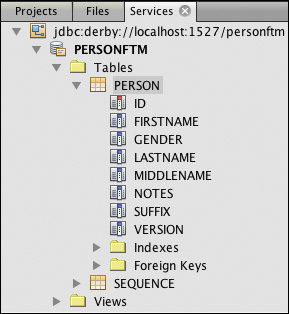
Viewing the Database
After running the application, you can view the database structure in the Services window of the NetBeans IDE. Expand the Databases node, right click on database jdbc:derby://localhost:1527/personftm [personftm on PERSONFTM], and select Connect. After connecting, expand PERSONFTM | Tables | PERSON to view the database columns, as shown in Figure 10.16.
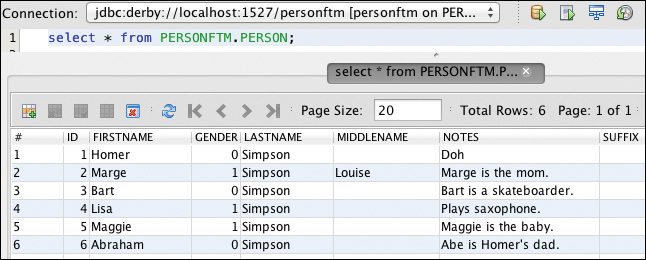
You can also view the data. In the Services window, right click on table PERSON and select View Data from the context menu. After executing the SQL, you see the data displayed in the IDE’s window, as shown in Figure 10.17.
10.3 Concurrency in the FamilyTreeApp Application
Now that we’ve added database access to the FamilyTreeApp, we must make sure our application UI remains responsive. To that end, we’ll execute database access code in background threads. In general, SwingWorker provides the needed concurrency (see “Introducing SwingWorker” on page 73) . However, the NetBeans Platform also has built-in concurrency with the Nodes API that we can leverage.
Concurrency with Read
Database reads occur when we build the node structures in the Person Viewer window. Class RootNode invokes Children.create() to build child nodes. The Children.create() method includes an asynchronous flag, which when set to true, builds the children nodes in a background thread and automatically includes a placeholder node with display name “Please wait ... ”. Modify RootNode.java to set the asynchronous flag to true, as shown in Listing 10.25.
@Messages({
"HINT_RootNode=Show all people",
"LBL_RootNode=People"
})
public class RootNode extends AbstractNode {
private final InstanceContent instanceContent;
private final PersonType personType = new PersonType();
public RootNode() {
this(new InstanceContent());
}
private RootNode(InstanceContent ic) {
// create children asynchronously
super(Children.create(
new PersonChildFactory(), true), new AbstractLookup(ic));
instanceContent = ic;
setIconBaseWithExtension(
"com/asgteach/familytree/personviewer/resources/personIcon.png");
setDisplayName(Bundle.LBL_RootNode());
setShortDescription(Bundle.HINT_RootNode());
// Required to enable New Person in context menu and Toolbar and Menus
instanceContent.add(personType);
instanceContent.add(new RefreshCapability(){
@Override
public void refresh() throws IOException {
// create children asynchronously
setChildren(Children.create(new PersonChildFactory(), true));
}
});
}
. . . code omitted . . .
}
When you invoke the ChildFactory with the asynchronous flag set to true, the factory’s createKeys() and refresh() methods execute in a background thread (the refresh() method’s boolean flag is ignored). No other changes are required in PersonChildFactory to achieve this concurrency.
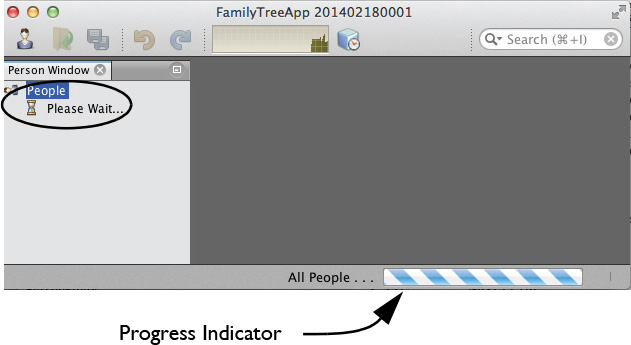
Progress Indicator
You can configure a progress indicator in the PersonChildFactory’s createKeys() method. In this example, the database read is indeterminate. Figure 10.18 shows the progress indicator, as well as the node hierarchy display (“Please wait ... “) indicating a background thread is busy. You must add a module dependency on Progress API to use this progress indicator.
Listing 10.26 shows PersonChildFactory.java with the progress indicator configured. Note that a progress indicator does not appear if a background task is short lived. To make the progress indicator appear and test how a long-running background task affects the responsiveness of the application, we add a call to Thread.sleep() (for testing only) in the createKeys() method.
Listing 10.26 PersonChildFactory—Using a Progress Indicator
@NbBundle.Messages({
"LBLPersonRead=All People . . . "
})
public class PersonChildFactory extends ChildFactory<Person> {
. . . code omitted . . .
@Override
protected boolean createKeys(List<Person> list) {
RefreshCapability refreshCapability =
personCapability.getLookup().lookup(RefreshCapability.class);
if (refreshCapability != null) {
ProgressHandle handle = ProgressHandleFactory.createHandle(
Bundle.LBLPersonRead());
try {
handle.start();
// testing only !!!
Thread.sleep(1000);
refreshCapability.refresh();
list.addAll(personCapability.getPersonList());
logger.log(Level.FINER, "createKeys called: {0}", list);
} catch (IOException | InterruptedException ex) {
logger.log(Level.WARNING, null, ex);
} finally {
handle.finish();
}
}
return true;
}
. . . code omitted . . .
}
Concurrency with Delete and Create
Both the delete and create functions of the FamilyTreeApp update the Person Viewer window. This invokes the createKeys() method in the background. However, we must perform the delete and create database functions in the background, too.
The delete function is performed by PersonNode’s destroy() method, as shown in Listing 10.27. It looks up RemovablePersonCapability and Person from the Lookup and invokes the remove() method. Here, we use SwingWorker to execute this remove() method in a background task.
Listing 10.27 PersonNode—Performing Destroy in the Background
public class PersonNode extends AbstractNode {
. . . code omitted . . .
@Override
public void destroy() throws IOException {
final RemovablePersonCapability doRemove = getLookup().lookup(
RemovablePersonCapability.class);
final Person person = getLookup().lookup(Person.class);
if (doRemove != null && person != null) {
SwingWorker<Void, Void> worker = new SwingWorker<Void, Void>() {
@Override
protected Void doInBackground() {
try {
doRemove.remove(person);
} catch (IOException e) {
logger.log(Level.WARNING, null, e);
}
return null;
}
};
worker.execute();
}
}
}
Similarly, Listing 10.28 shows how class PersonType implements the create function. It looks up CreatablePersonCapability in the Lookup of PersonCapability and invokes the create() method in a background thread with SwingWorker. We configure a progress indicator (again, the indicator only appears if the background task is not short lived).
Listing 10.28 PersonType—Performing Create in the Background
public class PersonType extends NewType {
. . . code omitted . . .
@Override
public void create() throws IOException {
. . . code omitted . . .
if (NotifyDescriptor.YES_OPTION.equals(result)) {
// Create a new Person object
final Person person = new Person();
person.setFirstname(firstname);
person.setLastname(lastname);
final CreatablePersonCapability cpc = personCapability.getLookup()
.lookup(CreatablePersonCapability.class);
if (cpc != null) {
SwingWorker<Void, Void> worker = new SwingWorker<Void, Void>() {
@Override
protected Void doInBackground() throws Exception {
ProgressHandle handle = ProgressHandleFactory
.createHandle(Bundle.TITLE_NewPerson_dialog());
try {
handle.start();
cpc.create(person);
logger.log(Level.INFO,
"Creating person {0}", person);
} catch (IOException e) {
logger.log(Level.WARNING,
e.getLocalizedMessage(), e);
} finally {
handle.finish();
}
return null;
}
};
worker.execute();
}
}
}
}
Concurrency with Update
Updating occurs in the PersonEditorTopComponent when a user clicks the Save or SaveAll menu item, or when a user selects Save when closing the window with unsaved data. Listing 10.29 shows the handleSave() method. Here, the SavablePersonCapability save() method is invoked in a background thread with SwingWorker. We configure a progress indicator that includes the Person’s name. Again, using the progress indicator requires a module dependency on the Progress API.
Listing 10.29 SavableViewCapability—Performing Update in the Background
private class SavableViewCapability extends AbstractSavable {
. . . code omitted . . .
@Override
protected void handleSave() throws IOException {
final Node node = getLookup().lookup(Node.class);
if (node != null) {
final SavablePersonCapability savable
= node.getLookup().lookup(SavablePersonCapability.class);
if (savable != null) {
updateModel();
// make a copy of Person for the background thread
final Person p = new Person(thePerson);
clearSaveCapability();
changeOK = true;
// perform the save on a background thread
SwingWorker<Void, Void> worker =
new SwingWorker<Void, Void>() {
@Override
protected Void doInBackground() throws Exception {
ProgressHandle handle = ProgressHandleFactory
.createHandle(Bundle.CTL_PersonUpdating(p));
try {
handle.start();
savable.save(p);
} catch (IOException ex) {
logger.log(Level.WARNING, "handleSave", ex);
} finally {
handle.finish();
}
return null;
}
};
worker.execute();
}
}
}
}
Figure 10.19 shows the progress indicator during execution of the handleSave() method.
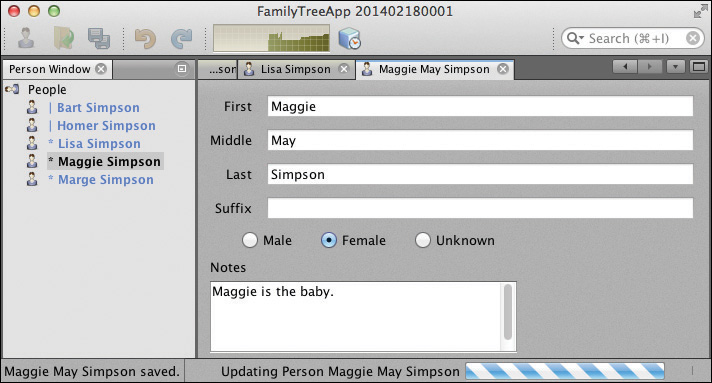
10.4 Key Point Summary
This chapter shows you how to apply capabilities and actions to implement CRUD operations for a NetBeans Platform application. You also learn how to implement a database for the persistent store and use concurrency to keep your application responsive. Here are the key points in this chapter.
• Adding capabilities to a Lookup (of a node or any object) is an effective way to customize actions. Capabilities and Lookup provide loose coupling between objects that invoke a capability’s method and objects that own the capability.
• Read operations build node hierarchies in a CRUD application.
• The NetBeans Platform system DeleteAction lets you hook into the pre-configured Delete in the Edit menu. To use Delete with nodes, override a node’s canDestroy() and destroy() methods.
• Add DeleteAction to a node’s getActions() method to include Delete in the node’s context menu.
• Use NewType and NewAction to configure Create operations. Override a node’s getNewTypes() method and include an implementation of NewType. You can also register a create action for the top-level menu and toolbar.
• Implement Update operations with open/edit actions. Open an editor suitable for making changes to the domain object. A non-singleton TopComponent allows multiple editors to be opened concurrently.
• For Updates, use AbstractSavable to enable and disable the Save and Save All menu items and toolbar icon. Override TopComponent method canClose() to see if unsaved changes should be saved before closing an editor.
• Implement AbstractSavable to provide the save operation.
• Detect when an opened domain object has been deleted and gracefully close the editor.
• Migrating to a database implementation is straightforward when a service provider performs database actions.
• Create Library Wrapper Modules for library JAR files that your application requires. This integrates the libraries into the NetBeans module system.
• JavaDB provides a database that’s built into the NetBeans Platform.
• EclipseLink provides an implementation of Java Persistence API (JPA) to interface with an underlying database.
• Create or use NetBeans to generate entity classes and a persistence unit that define the JPA/Database properties of your application.
• To keep NetBeans Platform applications responsive, use SwingWorker and the Nodes API asynchronous mode to execute database access in the background.
• Use the progress indicator to provide feedback to the user for long-running tasks.