
16. Using Web Services
A RESTful web service is a common technology that lets remote clients interact with services. In this chapter, we’ll show you the steps to create and test RESTful web services and how to build a RESTful web service client in a NetBeans Platform application. Since web services should be accessed in background threads, we’ll show you how to build several JavaFX Service objects to handle multi-threading.
We’ll build JavaFX-integrated content with the JavaFX TableView control and provide another look at the JavaFX LineChart. We’ll also show you how to add JavaFX properties to JPA entity classes.
What You Will Learn
• Create RESTful web services from a database.
• Add JavaFX properties to JPA entity classes.
• Create a Java Application RESTful web service client for testing.
• Configure a Jersey client in a NetBeans Platform module.
• Use the JavaFX Service class for re-usable background tasks.
• Create JavaFX-integrated modules as web service clients.
16.1 RESTful Web Services and the NetBeans Platform
REST is an architectural style based on web standards and the HTTP protocol. Access to a RESTful web service is provided by resources. A RESTFul web service typically defines the base URI (resource) for the service and a set of operations (POST, GET, PUT, DELETE). Resources can have different representations, such as text, XML, JSON, or even user-defined.
Java supports RESTful web services with JAX-RS (Java API for RESTful Web Services), defined with the JSR 311 specification. Jersey is the reference implementation for JSR 311. The NetBEans IDE bundles Jersey with the Java EE download.
RESTful web services are scalable and flexible. The HTTP protocol is stateless, cacheable, and layered. The NetBeans IDE lets you build both RESTful web services and web service clients. Furthermore, the IDE includes registered RESTful web services from Amazon, Delicious, Flickr, Google, StrikeIron, Weatherbug, Zillow, and Zevents.
In this chapter, we’ll build a RESTful web service client in a NetBeans Platform application. Such a client must include the RESTful client code, support libraries, and any applicable entity classes. Furthermore, you’ll want to invoke web service calls within a background thread to keep the UI responsive.
The RESTful client application in this chapter is similar to our JavaFX Charts application that displays smartphone sales data (see “JavaFX Charts and the NetBeans Platform” on page 744). With this example, we’ll focus on the support that consumes sales data from the web service.
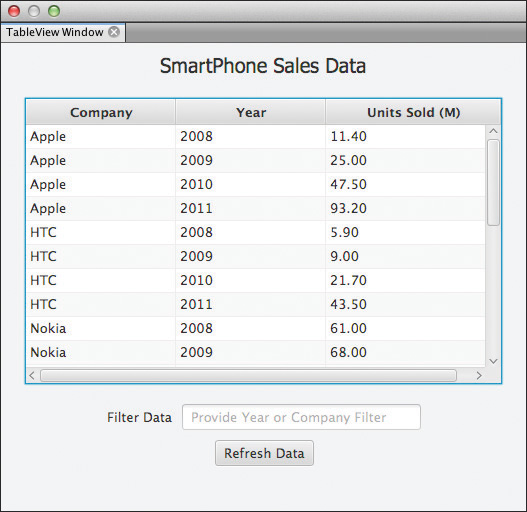
The SmartPhoneDataApp consists of two windows, as shown in Figure 16.1. The TableView window displays smartphone data with a JavaFX TableView control. The second window visualizes the same data with a JavaFX LineChart. The windows are in separate modules and have no dependencies on each other. They both form dependencies on the modules that provide access to the data via web services.
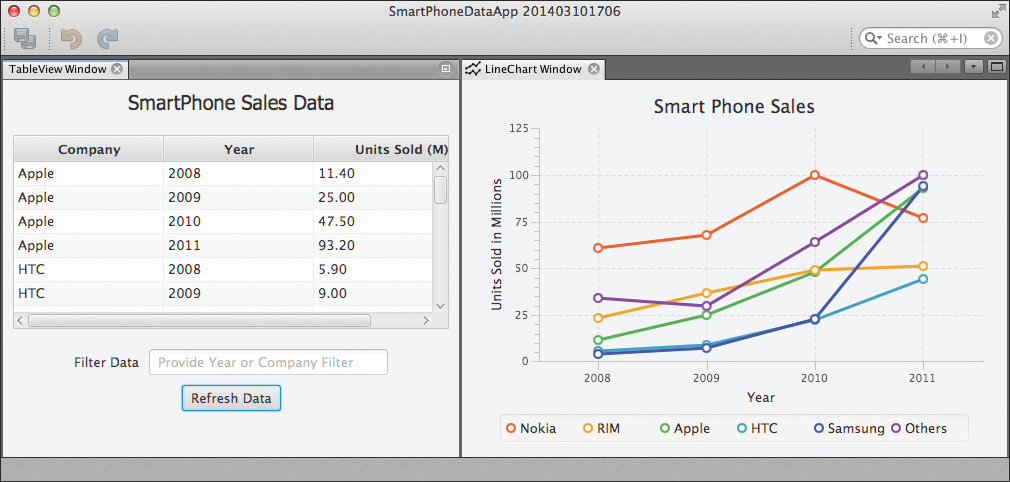
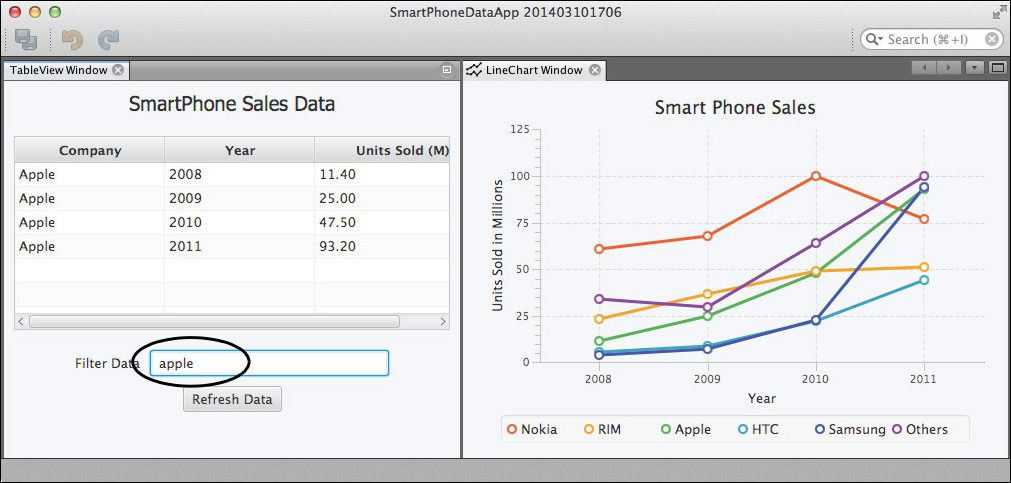
The TableView window supports data filtering using the JavaFX FilteredList class. Figure 16.2 shows a user-supplied filter text String “apple” that limits the TableView window to Company names matching this text. You can filter by year as well.
TableView also supports column sorting by default. Our application disables this feature and instead pre-sorts the data by Company then Year using the JavaFX SortedList class.
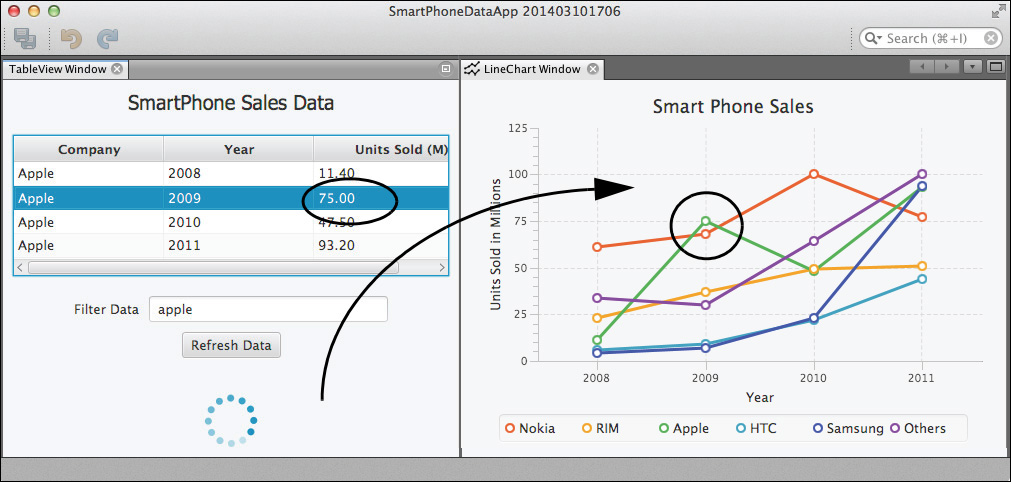
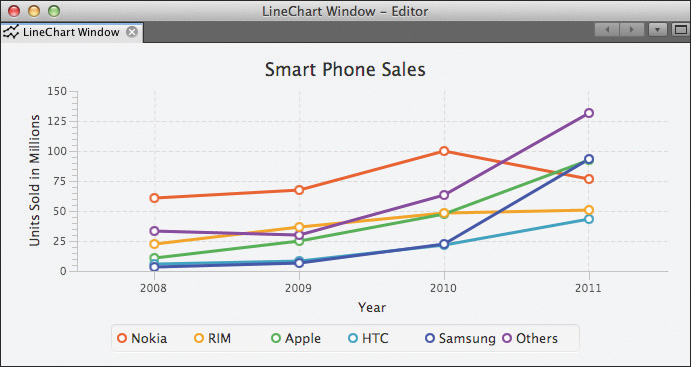
The TableView window configures the Units Sold column to support editing, as shown in Figure 16.3. When the user supplies a new value and presses the Return or Enter key, the Update Salesdata web service is invoked in the background. Here, you see the new value 75.0 for year 2009. A progress indicator shows the background thread is active. Upon completion, the LineChart reflects the new value by animating the updated plot point to its new position on the chart.1
1. Despite the image in Figure 16.3, the chart doesn’t actually update until after the web service successfully completes.
Before we build this application, let’s take you through the steps to create the underlying database. We’ll also show you how to build the web application that provides the RESTful smartphone sales data web services.
16.2 Creating RESTful Web Services
In this section, you’ll create a database, populate the database with data, and create a web application with RESTful web services to manipulate the data. Fortunately, the NetBeans IDE generates much of this code for you.
Create Database
Using the NetBeans IDE built-in database server JavaDB, create a database with these steps.
1. Follow the steps in Chapter 10 to start the JavaDB Server and create a database. See “JavaDB Server and Database” on page 505 and “Create Database” on page 505.
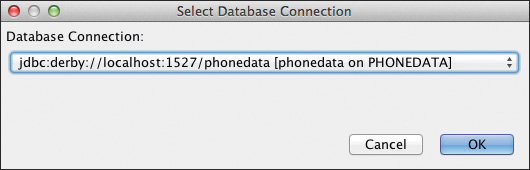
2. In the Create Java DB Database dialog, specify phonedata for all the fields. JavaDB creates a database listed under the Databases node as
jdbc:derby://localhost:1527/phonedata [phonedata on PHONEDATA]
3. Right-click on this phonedata database node and select Connect.
4. Open the SmartPhoneDataSales.sql file in the book’s download bundle and connect to the PhoneData database as shown in Figure 16.4. Click the Run SQL icon in the SQL Editor window to execute the SQL. These SQL statements create the Salesdata and Company tables and populate them with data. Disregard any errors that say “‘DROP TABLE’ cannot be performed.”
5. You can re-execute this SQL file any time to restore the data. The ‘DROP TABLE’ errors do not appear with subsequent executions of this SQL file.
Create RESTful Web Service Application
You’ll now create a RESTful web service application.
NetBeans IDE Configuration
This project uses Java EE technologies and a bundled server (GlassFish), optionally included with the NetBeans IDE. Download and install these technologies if your configuration does not include them. You can add these modules with the IDE’s Plugin Manager (Tools | Plugins).
1. In the Projects window, select File | New Project. In the Choose Project dialog, under Categories, select Java Web and under Projects select Web Application.
2. NetBeans displays the Name and Location dialog. Specify SmartPhoneDataServer for the Project Name. Click the Browse button to choose the appropriate Project Location and click Next.
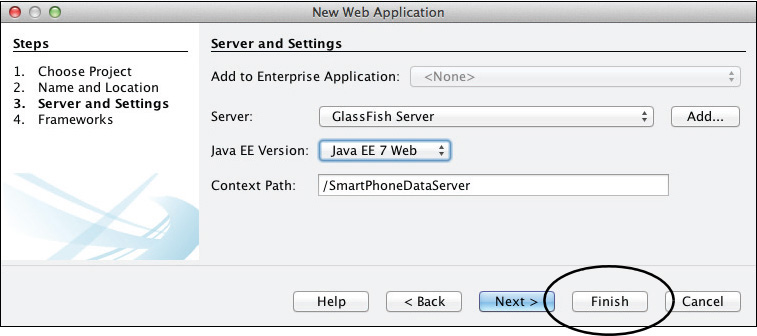
3. Figure 16.5 shows the Server and Settings dialog. Specify the Server (GlassFish Server). If you haven’t yet added a Server to the IDE, click the Add button to do that. Select Java EE 7 Web for the Java EE Version. Accept the default for the web application Context Path and click Finish.
(Note that if you click Next, you’ll be asked to specify a framework. Leave the frameworks unchecked and click Finish.)
With the SmartPhoneDataServer web application project created, you can now use the RESTful Services from Database wizard to generate entity classes and the RESTful web services. This wizard also generates the persistence unit.
RESTful Services from Database
Create the RESTful services with the NetBeans IDE wizard using these steps.
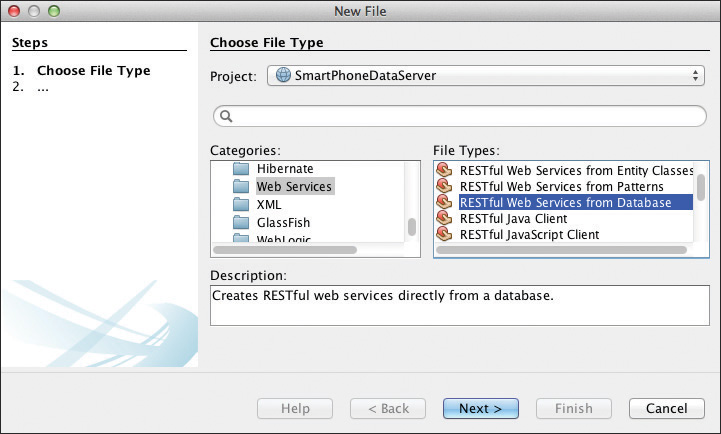
1. In the Projects window, right click on the SmartPhoneDataServer project and select New | Other. In the Choose File Type dialog, select Web Services under Categories and RESTful Web Services from Database under File Types, as shown in Figure 16.6. Click Next.
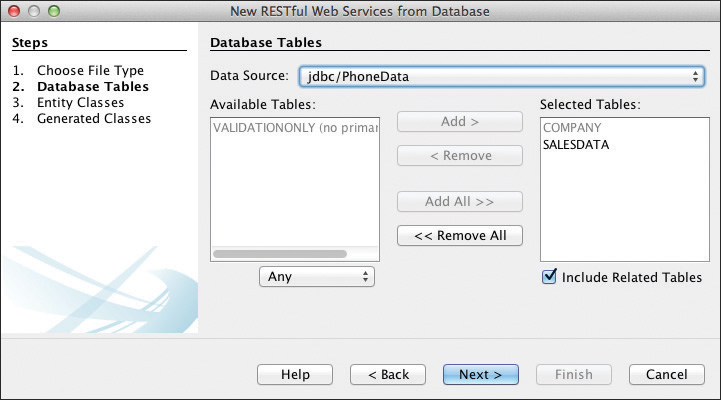
2. NetBeans prompts you to configure the connection to the PhoneData database. After the database data source is configured, you’ll see the tables in the selection list. Choose both Company and Salesdata and click Add. The selected tables then move to the right side, as shown in Figure 16.7. Click Next.
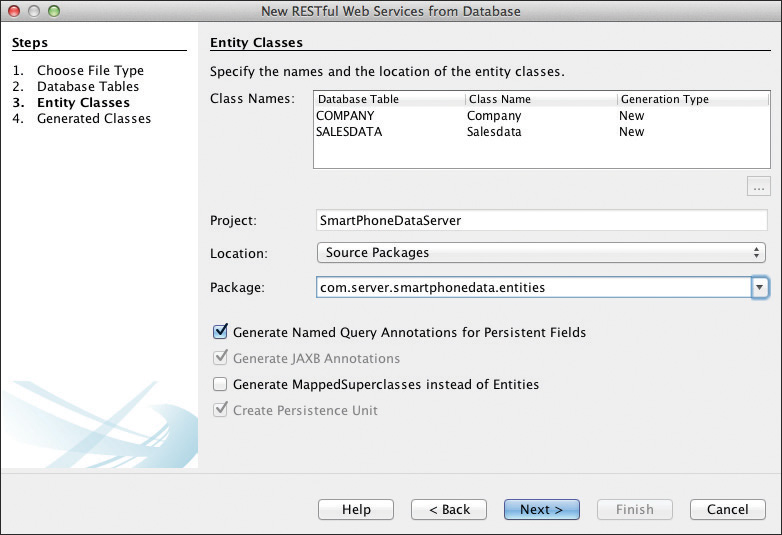
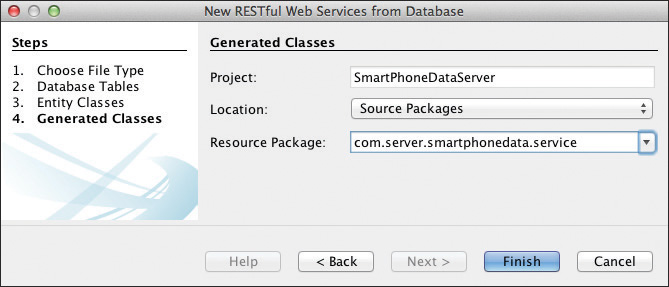
3. Supply a package name for the entity classes that NetBeans will generate. Here we use package com.server.smartphonedata.entities, as shown in Figure 16.8. Click Next.
4. Review the configuration information for the generated classes and click Finish, as shown in Figure 16.9.
5. NetBeans generates both the services and entity classes. Now deploy the application. In the Services window, expand Servers | GlassFish Server | Applications. You should see the web application SmartPhoneDataServer listed.
Entity Classes and JavaFX Properties
The RESTful services wizard generates the Company and Salesdata entity classes. These are Plain Old Java Objects (POJOs) with Java Persistence API (JPA) annotations. By default, the wizard annotates the POJO’s class fields. Thus, JPA uses the class fields to synchronize the entity’s state with the database.
Although JPA is not aware of JavaFX properties, you can implement JavaFX properties in entity classes and still maintain compatibility with JPA. Instead of using class fields to synchronize the entity’s state with the database, you tell JPA to use the Java property getters and setters. To do this, move the annotations from the class fields to the property getters. Since entity classes must define a consistent JPA access strategy, you can annotate either class fields or property getters (but you can’t mix the access strategy).
Once you move the annotations to the property getters, replace the class fields with corresponding JavaFX properties. You’ll then modify the accessors to use the JavaFX property and add a JavaFX property getter. Listing 16.1 shows these modifications for the Salesdata.java entity class in bold. Perform similar modifications to the Company.java entity class.
Listing 16.1 Salesdata.java—Entity Class and JavaFX Properties
@Entity
@Table(name = "SALESDATA")
@XmlRootElement
@NamedQueries({ . . . })
public class Salesdata implements Serializable {
private static final long serialVersionUID = 1L;
private final IntegerProperty salesidProperty =
new SimpleIntegerProperty();
private final StringProperty salesyearProperty =
new SimpleStringProperty();
private final ObjectProperty<BigDecimal> unitsinmillionsProperty =
new SimpleObjectProperty<>();
private final ObjectProperty<Company> companyidProperty =
new SimpleObjectProperty<>();
public Salesdata() {
}
public Salesdata(Integer salesid) {
salesidProperty.set(salesid);
}
@Id
@GeneratedValue(strategy = GenerationType.IDENTITY)
@Basic(optional = false)
@Column(name = "SALESID")
public Integer getSalesid() {
return salesidProperty.get();
}
public void setSalesid(Integer salesid) {
salesidProperty.set(salesid);
}
public IntegerProperty salesidProperty() {
return salesidProperty;
}
@Size(max = 10)
@Column(name = "SALESYEAR")
public String getSalesyear() {
return salesyearProperty.get();
}
public void setSalesyear(String salesyear) {
salesyearProperty.set(salesyear);
}
public StringProperty salesyearProperty() {
return salesyearProperty;
}
@Column(name = "UNITSINMILLIONS")
public BigDecimal getUnitsinmillions() {
return unitsinmillionsProperty.get();
}
public void setUnitsinmillions(BigDecimal unitsinmillions) {
unitsinmillionsProperty.set(unitsinmillions);
}
public ObjectProperty<BigDecimal> unitsinmillionsProperty() {
return unitsinmillionsProperty;
}
@JoinColumn(name = "COMPANYID", referencedColumnName = "COMPANYID")
@ManyToOne
public Company getCompanyid() {
return companyidProperty.get();
}
public void setCompanyid(Company companyid) {
companyidProperty.set(companyid);
}
public ObjectProperty<Company> companyidProperty() {
return companyidProperty;
}
@Override
public int hashCode() {
int hash = 0;
hash += (getSalesid() != null ? getSalesid().hashCode() : 0);
return hash;
}
@Override
public boolean equals(Object object) {
if (!(object instanceof Salesdata)) {
return false;
}
Salesdata other = (Salesdata) object;
return (getSalesid() != null || other.getSalesid() == null)
&& (getSalesid() == null
|| getSalesid().equals(other.getSalesid()));
}
@Override
public String toString() {
return "com.server.smartphonedata.entities.Salesdata[ salesid="
+ getSalesid() + " ]";
}
}
Test the Web Services
Test your newly-created web services using the following steps.
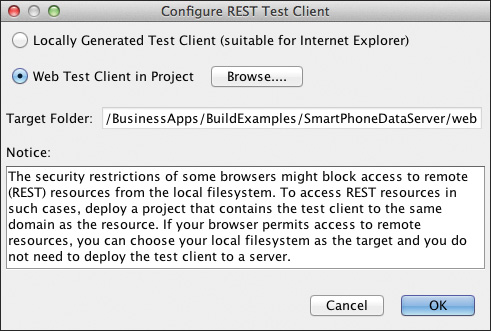
1. In the Projects view, right click on the SmartPhoneDataServer project and select Test RESTful Web Services. NetBeans displays a dialog to configure the Test Client. Select the Web Test Client in Project radio button and click Browse.
2. Select the SmartPhoneDataServer project. NetBeans supplies the Target Folder path, as shown in Figure 16.10. Click OK.
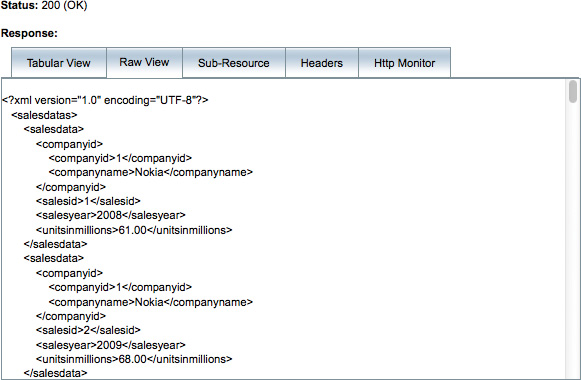
3. NetBeans brings up a browser and provides a testing menu for either Company or Salesdata. Here, we select the Salesdata service for GET() and select Test. Figure 16.11 shows a portion of the (successful) response displaying raw XML-formatted data.
16.3 A Java Application Web Service Client
Next, let’s build a RESTful web service client as a regular Java application. While it is not necessary to create this web service client, we recommend this step if you’re unfamiliar with working with RESTful web services. Once you’re able to successfully execute a Java application web service client, moving the pieces to a NetBeans Platform application is straightforward.
To successfully execute client code you must do the following.
• Deploy a web application and start its required database and enterprise servers.
• Include libraries to access RESTful resources.
• Include libraries to convert XML and/or JSON responses to POJOs.
• Include access to entity classes (POJOs).
Create Java Application
Create a Java application client to test the web services with these steps.
1. In the Projects view, select File | New Project. Under Categories select Java and under Projects select Java Application. Click Next.
2. In the Name and Location dialog, specify SmartPhoneDataClient for Project Name. Click the Browse button to choose an appropriate location for the project. Accept the defaults for the remaining fields and make sure option Create Main Class is selected. Click Finish.
Add RESTful Java Client
Generate RESTful Java client code and add the necessary libraries with these steps.
1. In the Projects view, expand SmartPhoneDataClient, right click on the Source Packages node, and select New | Other.
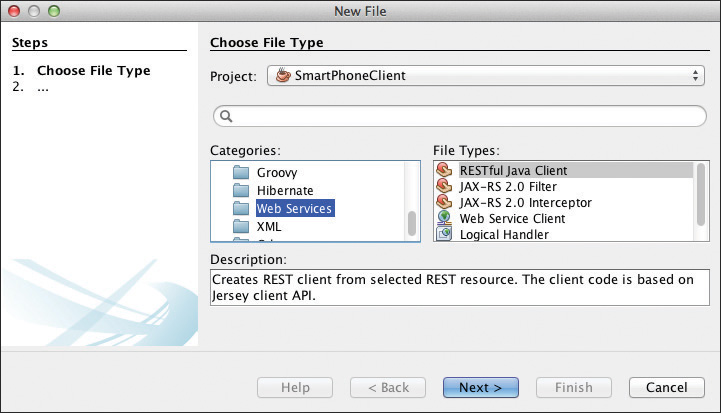
2. In the Choose File Type dialog, select Web Services under Categories and RESTful Java Client under File Types, as shown in Figure 16.12. Click Next.
3. In the Name and Location dialog, specify CompanyJerseyClient for Class Name and select the smartphoneclient package (or provide another package name), as shown in Figure 16.13.
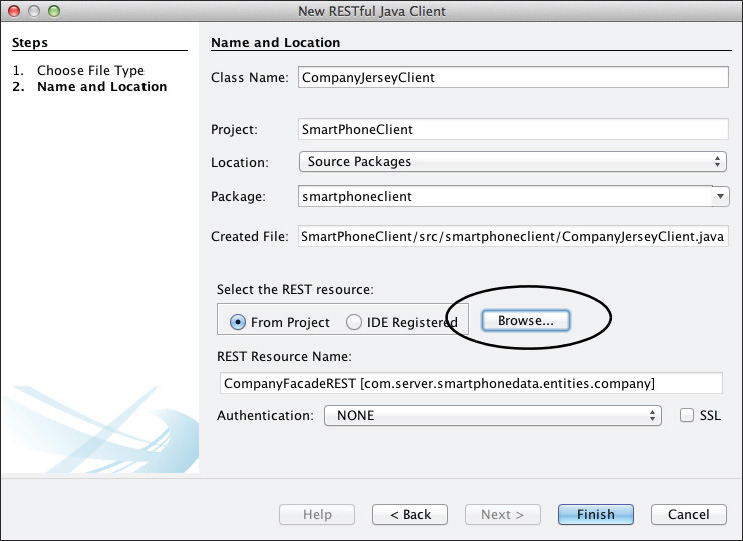
4. Still in the same dialog, click Browse to select the REST resource. In the Select REST Resource dialog, expand the SmartPhoneDataServer node and select CompanyFacadeREST from the available choices, as shown in Figure 16.14 (the SmartPhoneDataServer web application must be deployed). Click OK.

5. Now with the RESTful Java client configured, click Finish. NetBeans generates file CompanyJerseyClient.java in your Java Application project and adds support libraries to the project.
6. Repeat the above steps and add a RESTful Java client called SalesdataJerseyClient for the REST resource SalesdataFacadeREST.
Add JAR Files to Project
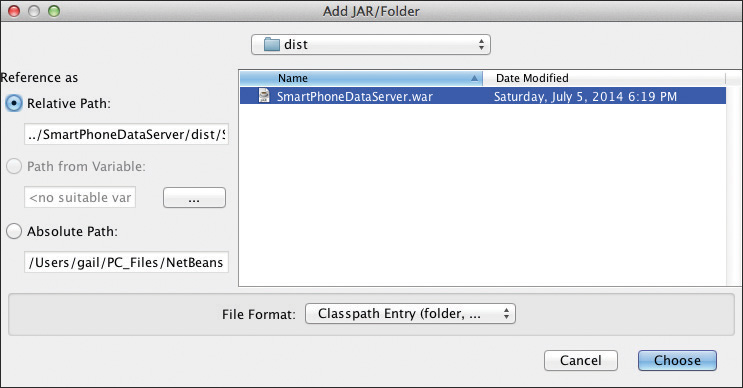
The client code (shown in Listing 16.2 on page 814) references entity classes. You can either copy these from the SmartPhoneDataServer project or include the SmartPhoneDataServer WAR file in the Java application web service client’s build. Here are the steps to include the WAR file.
1. In the Projects view, right click on SmartPhoneDataClient | Libraries and select Add JAR/Folder from the context menu.
2. In the dialog, navigate to the dist folder in project SmartPhoneDataServer and select the WAR file, as shown in Figure 16.15. Click Choose. NetBeans adds SmartPhoneDataServer.war to the list of Libraries.
The test program also invokes JSON resources. When you generate a RESTful Java client, the libraries do not include a JSON MessageBodyReader provider. For JSON, use the third-party Genson Library available at http://owlike.github.io/genson/.
1. Click the Download link on the owlike.gethub.io/genson/ page and download the Genson library JAR file.
2. Follow the above steps and add the Genson library to your project.
Add Client Code to Main Program
Next, add the following code to the main() method in SmartPhoneClient.java, as shown in Listing 16.2. Right-click and select Fix Imports to resolve any errors.2
2. Note that NetBeans currently bundles Jersey 2.x, which provides different classes than Jersey 1.x.
Listing 16.2 SmartPhoneClient.java—main() Method
import com.server.smartphonedata.entities.Company;
import com.server.smartphonedata.entities.Salesdata;
import java.util.List;
import javax.ws.rs.core.GenericType;
import javax.ws.rs.core.Response;
public class SmartPhoneClient {
public static void main(String[] args) {
CompanyJerseyClient client = new CompanyJerseyClient();
Company company = client.find_XML(Company.class, "2");
System.out.println("Company = " + company.getCompanyname());
Response response = client.find_XML(Response.class, "1");
company = response.readEntity(Company.class);
System.out.println("Company = " + company.getCompanyname());
company = client.find_JSON(Company.class, "2");
System.out.println("Company = " + company.getCompanyname());
GenericType<List<Company>> gType1 =
new GenericType<List<Company>>() {};
response = client.findAll_XML(Response.class);
List<Company> companies = response.readEntity(gType1);
System.out.println("Companies = " + companies);
SalesdataJerseyClient client2 = new SalesdataJerseyClient();
Salesdata data = client2.find_XML(Salesdata.class, "1");
System.out.println("Salesdata = " + data.getSalesyear() + ", "
+ data.getCompanyid() + ", "
+ data.getUnitsinmillions());
GenericType<List<Salesdata>> gType2 =
new GenericType<List<Salesdata>>() {};
response = client2.findAll_XML(Response.class);
List<Salesdata> dataList = response.readEntity(gType2);
System.out.println("Data List = " + dataList);
// print out all the data
for(Company c : companies) {
System.out.println("Data for Company: " + c.getCompanyname());
for (Salesdata dataItem : dataList) {
if (dataItem.getCompanyid().getCompanyid().equals(
c.getCompanyid())) {
System.out.println("Year=" + dataItem.getSalesyear()
+ ", " + "Units Sold in Millions = "
+ dataItem.getUnitsinmillions());
}
}
}
// test JSON
System.out.println("Testing JSON");
response = client2.findAll_JSON(Response.class);
List<Salesdata> dataList2 = response.readEntity(gType2);
System.out.println("Data List = " + dataList2);
// print out all the data
for(Company c : companies) {
System.out.println("Data for Company: " + c.getCompanyname());
for (Salesdata dataItem : dataList2) {
if (dataItem.getCompanyid().getCompanyid().equals(
c.getCompanyid())) {
System.out.println("Year=" + dataItem.getSalesyear()
+ ", " + "Units Sold in Millions = "
+ dataItem.getUnitsinmillions());
}
}
}
}
}
Run this Java RESTful client application. Listing 16.3 shows the truncated output.
Listing 16.3 SmartPhoneClient—Output
Company = RIM
Company = Nokia
Company = RIM
Companies = [com.server.smartphonedata.entities.Company[ companyid=1 ],
com.server.smartphonedata.entities.Company[ companyid=2 ],
com.server.smartphonedata.entities.Company[ companyid=3 ],
com.server.smartphonedata.entities.Company[ companyid=4 ],
. . . truncated . . .
Salesdata = 2008,
com.server.smartphonedata.entities.Company[ companyid=1 ], 61.00
Data List = [com.server.smartphonedata.entities.Salesdata[ salesid=1 ],
com.server.smartphonedata.entities.Salesdata[ salesid=2 ],
com.server.smartphonedata.entities.Salesdata[ salesid=3 ],
com.server.smartphonedata.entities.Salesdata[ salesid=4 ],
. . . truncated . . .
Data for Company: Nokia
Year=2008, Units Sold in Millions = 61.00
Year=2009, Units Sold in Millions = 68.00
Year=2010, Units Sold in Millions = 100.10
Year=2011, Units Sold in Millions = 77.30
Data for Company: RIM
Year=2008, Units Sold in Millions = 23.10
Year=2009, Units Sold in Millions = 37.00
Year=2010, Units Sold in Millions = 48.80
Year=2011, Units Sold in Millions = 51.10
Data for Company: Apple
Year=2008, Units Sold in Millions = 11.40
Year=2009, Units Sold in Millions = 25.00
Year=2010, Units Sold in Millions = 47.50
Year=2011, Units Sold in Millions = 93.20
. . . truncated . . .
Testing JSON
Data List = [com.server.smartphonedata.entities.Salesdata[ salesid=1 ],
com.server.smartphonedata.entities.Salesdata[ salesid=2 ],
com.server.smartphonedata.entities.Salesdata[ salesid=3 ],
. . . truncated . . .
Data for Company: Nokia
Year=2008, Units Sold in Millions = 61.0
Year=2009, Units Sold in Millions = 68.0
Year=2010, Units Sold in Millions = 100.1
Year=2011, Units Sold in Millions = 77.3
. . . truncated . . .
16.4 RESTful Web Services in a NetBeans Platform Application
Let’s now show you how to build a NetBeans Platform application that consumes our two RESTful web services. You’ll create this application with the following steps.
1. Build a new NetBeans Platform application called SmartPhoneDataApp and a new module for the RESTful web services clients with the name PhoneDataWebService.
2. Use the NetBeans IDE to generate the RESTful web service clients and add JAR files to the module. Create an @OnStart Runnable to test the client.
3. Create JavaFX Services to invoke the RESTful web service clients in a background thread. Create a service provider so that other modules can access these services in a loosely-coupled way.
4. Build a new module that displays the data using a JavaFX TableView control. Let the user edit and update the sales amount field.
5. Build a new module that displays the data using a JavaFX LineChart control. Update the chart with any changes in the underlying data.
Create a NetBeans Platform Application and Module
First, let’s create the application and the PhoneDataWebService module.
1. Create a new application called SmartPhoneDataApp using the NetBeans Platform New Project wizard.
2. Create a module and add it to the SmartPhoneDataApp application. Call the module PhoneDataWebService and provide code name com.asgteach.phonedata.webservice.
Generate RESTful Web Service Clients
Use the NetBeans IDE to generate RESTful Java clients as follows.
1. Expand PhoneDataWebService | Source Packages, right click and select New | RESTful Java Client.
2. Use the same steps to complete the wizard (see “Add RESTful Java Client” on page 811) to add the RESTful Java client to the PhoneDataWebService module. Figure 16.16 shows the Project View with the CompanyJerseyClient.java and SalesdataJerseyClient.java files added. Note that you must manually add JAR files to the module to resolve the source code errors.

Add Libraries to the Module
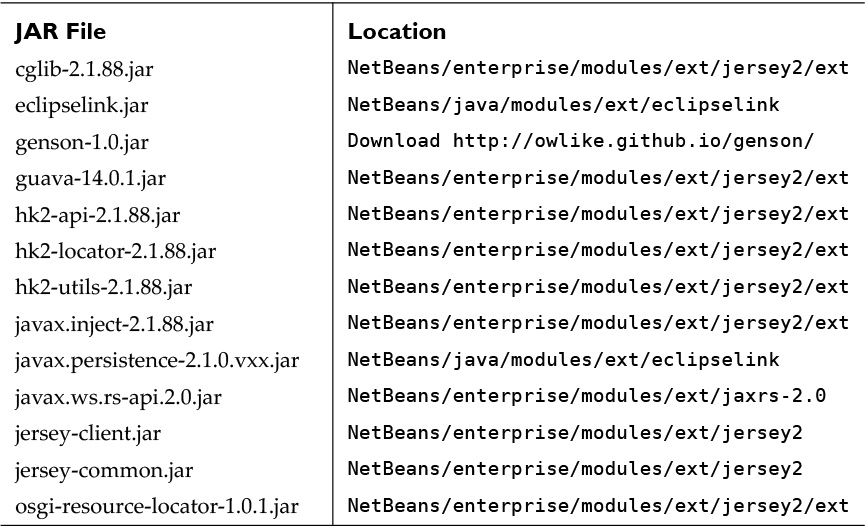
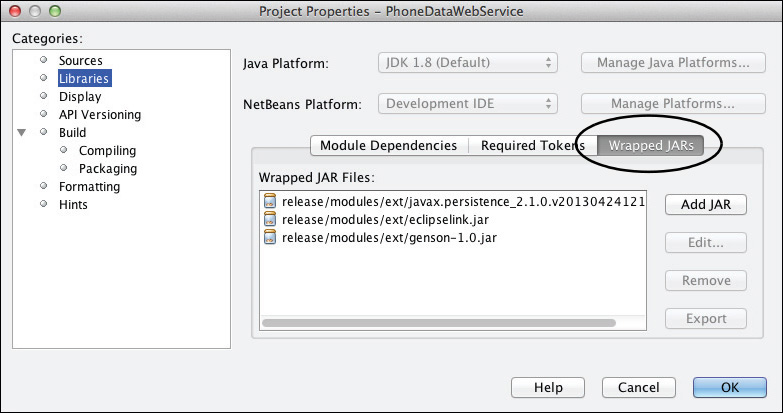
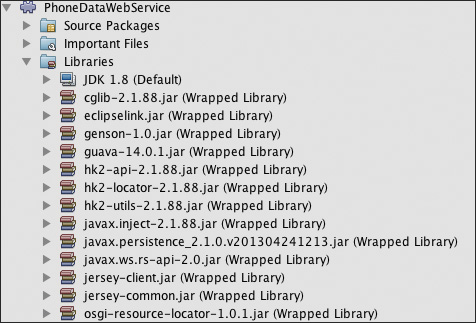
Add the JAR files to the PhoneDataWebService module as listed in Table 16.1.3 Right click the module name and select Properties then Libraries. In the dialog, select the Wrapped JARs tab and click Add JAR. You can add more than one JAR file at once. Figure 16.17 shows several JARs. Click OK to complete the process.
3. These JAR files may not always be in the listed locations, and the version numbers will certainly change as new releases of these libraries are distributed. (On Mac OS X, create a symbolic link to the directory that contains the NetBeans application to view the directory contents from the NetBeans IDE dialogs.)
Adding a Library to a Module vs. Wrapped Library Modules
Note that we add libraries directly to a module here instead of creating Wrapped Library Modules (see “Create Wrapped Libraries” on page 502). Wrapped Library Modules allow other modules to add dependencies on these libraries. The packages of the added libraries are not exposed and therefore can only be used by a specific module (here, the PhoneDataWebService module). In general, use Wrapped Library Modules. However, when you know that libraries will be used exclusively by a single module, you can add them directly. This avoids cluttering your application with additional modules.
Figure 16.18 shows the PhoneDataWebService module after adding the required JAR files. Now you can fix imports in the CompanyJerseyClient.java and SalesdataJerseyClient.java files and any source code errors should resolve.
Create the @OnStart Runnable for Testing
You’re almost ready to test the application. Here are the steps to create a Java class for testing.
1. In the PhoneDataWebService module, add a module dependency on the Module System API.
2. In the PhoneDataWebService module Source Packages node, create a new Java package called com.asgteach.phonedata.entities.
3. Copy and Refactor | Paste classes Salesdata.java and Company.java from the SmartPhoneDataServer web application. (You can disregard the warnings associated with the @Entity annotation.)
4. Create a new Java class called ClientTest.java that implements Runnable. Add the @OnStart annotation and implement the run() method as shown in Listing 16.4. Include the test code from the SmartPhoneClient project’s main() method (Listing 16.2 on page 814).
Listing 16.4 ClientTest—run() Method
package com.asgteach.phonedata.webservice;
import com.asgteach.phonedata.entities.Company;
import com.asgteach.phonedata.entities.Salesdata;
import java.util.List;
import javax.ws.rs.core.GenericType;
import javax.ws.rs.core.Response;
import org.openide.modules.OnStart;
@OnStart
public final class ClientTest implements Runnable {
@Override
public void run() {
CompanyJerseyClient client = new CompanyJerseyClient();
Company company = client.find_XML(Company.class, "2");
System.out.println("Company = " + company.getCompanyname());
. . . remaining test code omitted, see Listing 16.2 on page 814 . . .
}
}
5. Run the SmartPhoneDataApp. The application will execute and create an empty window frame. In the NetBeans IDE Output window, the same test output should appear as shown in Listing 16.3 on page 816.
Now that you have a working NetBeans Platform application client module, you can add JavaFX services and windows with integrated JavaFX content.
Application Overview
Figure 16.19 shows the modules in the SmartPhoneDataApp. The PhoneDataWebService module contains the entity classes and the RESTful web service client code. This module also contains a Java interface called PhoneDataShare, which defines how other modules can access the smartphone data. In the next section, you’ll add JavaFX Services to this module. These classes provide access to the RESTful services in a background thread.
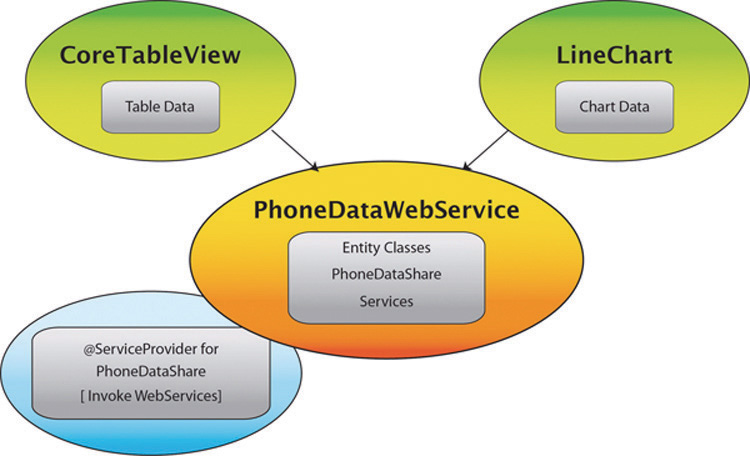
The CoreTableView module implements the JavaFX TableView window (see Figure 16.1 on page 801) and the LineChart module implements the JavaFX LineChart window. Finally, the @ServiceProvider module implements the PhoneDataShare interface.
Using JavaFX Services
Chapter 4 describes the JavaFX Worker interface, which lets you create background tasks and services (see “JavaFX Background Tasks” on page 176). Here we’ll use the Service class to create a reusable implementation of the Worker interface for background execution.
Recall that Service (like Task) is aware of the JavaFX Application Thread. Therefore, all Service methods and state must be invoked from the JavaFX Application Thread. However, you can initially configure and start a service from any thread.
Service includes the same Worker.State values as Task (see Table 4.1 on page 176) as well as the Worker JavaFX Properties and Task Update Methods (see Table 4.2 on page 177 and Table 4.3 on page 178).
Let’s show you how to define a Service first. Then we’ll show you code that uses it.
Listing 16.5 shows the GetSmartPhoneSalesService class, which extends Service. Here, the generic type for Service is ObservableList<Salesdata>, which is also the return type for a successful completion of this Service.
When you extend Service, you must override the protected createTask() method. This method builds a Task object and overrides the call() method. Here, call() invokes the findAll_XML() method in the SalesdataJerseyClient RESTful Java client. By providing GenericType, we transform the Response object with readEntity() into a List<Salesdata>. We then create the ObservableList with the FXCollections observableArrayList() method.
Listing 16.5 GetSmartPhoneSalesService.java
public class GetSmartPhoneSalesService extends
Service<ObservableList<Salesdata>> {
private static final Logger logger =
Logger.getLogger(GetSmartPhoneSalesService.class.getName());
private ObservableList<Salesdata> salesdata =
FXCollections.observableArrayList();
@Override
protected Task<ObservableList<Salesdata>> createTask() {
return new Task<ObservableList<Salesdata>>() {
private final SalesdataJerseyClient client1 =
new SalesdataJerseyClient();
@Override
protected ObservableList<Salesdata> call() throws Exception {
logger.log(Level.INFO, "GetSmartPhoneSalesTask called.");
Response response = client1.findAll_XML(Response.class);
GenericType<List<Salesdata>> genericType =
new GenericType<List<Salesdata>>() {};
int status = response.getStatus();
if (status != Response.Status.OK.getStatusCode()) {
logger.log(Level.WARNING, "Bad status {0}",
response.getStatusInfo().getReasonPhrase());
throw new Exception("Bad status: " + status
+ " for web service call");
}
// Returns an ArrayList of SalesData from the web service
List<Salesdata> data = (response.readEntity(genericType));
salesdata = FXCollections.observableArrayList(data);
return salesdata;
}
};
}
}
Listing 16.6 shows how to use this service. The UseService class instantiates the GetSmartPhoneSalesService service (salesService) and defines public method refreshData() with an optional ProgressIndicator control. The refreshData() method, in turn, invokes the private getDataInBackground() method. Inside this method, the salesService service is started. Note that you must reset the service each time it completes in order to reuse the service.
UseService also defines two event handlers, setOnSucceeded() and setOnFailed(). The setOnSucceeded() event handler provides access to the underlying Task’s return object with t.getSource().getValue(), where t is WorkerStateEvent.
Note that the event handlers run in the JavaFX Application Thread. Therefore, we can safely update visual controls (such as the ProgressIndicator) and safely manipulate JavaFX properties. Here, the setOnSucceeded() event handler sets the underlyingData ListProperty. A JavaFX TableView control can safely bind to this property.
Listing 16.6 UseService Example
public class UseService {
private final ListProperty<Salesdata> underlyingData = new
SimpleListProperty<Salesdata>(FXCollections.observableArrayList());
private final GetSmartPhoneSalesService salesService = new
GetSmartPhoneSalesService();
public void refreshData(ProgressIndicator progressIndicator) {
getDataInBackground(progressIndicator);
}
@SuppressWarnings("unchecked")
private void getDataInBackground(ProgressIndicator progressIndicator) {
// This service can be invoked multiple times
salesService.setOnSucceeded((WorkerStateEvent t) -> {
logger.log(Level.INFO, "sales data Done.");
if (progressIndicator != null) {
progressIndicator.setVisible(false);
}
underlyingData.set((ObservableList<Salesdata>)
t.getSource().getValue());
}
});
salesService.setOnFailed((WorkerStateEvent t) -> {
if (progressIndicator != null) {
progressIndicator.setVisible(false);
}
logger.log(Level.WARNING, "Failed: Read Salesdata");
});
// only start the service if it's ready
if (salesService.getState() == Worker.State.SUCCEEDED) {
salesService.reset();
}
if (salesService.getState() == Worker.State.READY) {
if (progressIndicator != null) {
progressIndicator.setVisible(true);
}
salesService.start();
}
}
}
Add JavaFX Service Classes to the Module
Here are the steps to add the JavaFX Service classes to the PhoneDataWebService module.
1. Create a new Java package in the PhoneDataWebService module called com.asgteach.phonedata.services and add the following Service classes to the package.
• GetSmartPhoneSalesService.java—a service that accesses the smartphone sales data via a RESTful web service client
• GetCompanyDataService.java—a service that accesses the smartphone companies via a RESTful web service client
• UpdateSalesItemService.java—a service that updates a single Salesdata item via a RESTful web service client
2. Make the com.asgteach.com.phonedata.services package public.
Listing 16.5 on page 822 shows the code for GetSmartPhoneSalesService. Using a similar approach, Listing 16.7 shows GetCompanyDataService.java. Here, the Task’s call() method invokes the findAll_XML() method of the RESTful Java client, CompanyJerseyClient.
Listing 16.7 GetCompanyDataService.java
public class GetCompanyDataService extends Service<ObservableList<Company>> {
private static final Logger logger =
Logger.getLogger(GetCompanyDataService.class.getName());
@Override
protected Task<ObservableList<Company>> createTask() {
return new Task<ObservableList<Company>>() {
private final CompanyJerseyClient client1 =
new CompanyJerseyClient();
@Override
protected ObservableList<Company> call() throws Exception {
Response response = client1.findAll_XML(Response.class);
GenericType<List<Company>> genericType =
new GenericType<List<Company>>() {};
int status = response.getStatus();
if (status != Response.Status.OK.getStatusCode()) {
logger.log(Level.WARNING, "Bad status {0}",
response.getStatusInfo().getReasonPhrase());
throw new Exception("Bad status: " + status
+ " for web service call");
}
// Returns an ArrayList of Companies from the web service
List<Company> data = (response.readEntity(genericType));
ObservableList<Company> companyList =
FXCollections.observableArrayList(data);
return companyList;
}
};
}
}
Listing 16.8 shows the code for UpdateSalesItemService, which invokes the Salesdata web service for edit (update) using the data stored in the salesdata class variable. The createTask() method accesses the salesdata variable in the JavaFX Application Thread before creating the Task. The call() method invokes the edit_XML() SalesdataJerseyClient method. To reuse this service, the caller invokes the setSalesdata() method with the new data before calling the UpdateSalesItemService start() method.
Listing 16.8 UpdateSalesItemService.java
public class UpdateSalesItemService extends Service<Salesdata> {
private Salesdata salesdata;
public Salesdata getSalesdata() {
return salesdata;
}
public void setSalesdata(Salesdata salesdata) {
this.salesdata = salesdata;
}
@Override
protected Task<Salesdata> createTask() {
final Salesdata _salesdata = getSalesdata();
return new Task<Salesdata>() {
private final SalesdataJerseyClient client1 =
new SalesdataJerseyClient();
@Override
protected Salesdata call() throws Exception {
client1.edit_XML(_salesdata,
_salesdata.getSalesid().toString());
return _salesdata;
}
};
}
}
Implementing a RESTful Client Service Provider
The windows in the SmartPhoneDataApp display the data with a TableView control and in a JavaFX Line Chart. These modules use a Service Provider to access the data. In this section, you’ll perform the steps to configure this Service Provider.
• Create package com.asgteach.phonedata.share in the PhoneDataWebService module and make this package public.
• Create the PhoneDataShare interface in package com.asgteach.phonedata.share.
• Create the PhoneDataShareImpl module. Add a dependency to the PhoneDataWebService module and the Lookup API.
• Create class PhoneDataShareImpl and implement PhoneDataShare.
Listing 16.9 shows the PhoneDataShare interface, which you add to the PhoneDataWebService module.
The refreshData() and updateSales() methods include a ProgressIndicator control. This is useful for keeping the user informed when a background task is currently executing. Note that a caller can supply a null value when not using a ProgressIndicator. The implementation code must therefore check for a null-value ProgressIndicator.
Listing 16.9 PhoneDataShare Interface
public interface PhoneDataShare {
// Salesdata
public abstract ListProperty<Salesdata> theDataProperty();
// Company
public abstract ListProperty<Company> companyNamesProperty();
// year as a String
public abstract ListProperty<String> categoryListProperty();
public abstract String getDataDescription();
public abstract String getNameDescription();
public abstract String getTitle();
public abstract double getTickUnit();
public abstract void refreshData(ProgressIndicator progressIndicator);
public abstract void updateSales(Salesdata salesdata,
ProgressIndicator progressIndicator);
}
Listing 16.10 shows the PhoneDataShareImpl class, which you add to the PhoneDataShareImpl module. This class creates several JavaFX ListProperty objects to manage the ObservableLists for the Salesdata, Company names, and Category names.
The class also instantiates the JavaFX Service classes we described in the previous section: GetSmartPhoneSalesService, GetCompanyDataService, and UpdateSalesItemService. The services manipulate the ListProperty objects.
Listing 16.10 PhoneDataShareImpl—Implement PhoneDataShare
@ServiceProvider(service = PhoneDataShare.class)
public class PhoneDataShareImpl implements PhoneDataShare {
private final ListProperty<Salesdata> underlyingData = new
SimpleListProperty<>(FXCollections.observableArrayList());
private final ListProperty<Company> companyDataNames = new
SimpleListProperty<>(FXCollections.observableArrayList());
private final ListProperty<String> categoryDataNames = new
SimpleListProperty<>(FXCollections.observableArrayList());
private static final String dataDescription = "Units Sold in Millions";
private final String nameDescription = "Year";
private final String title = "Smart Phone Sales";
private final GetSmartPhoneSalesService salesService =
new GetSmartPhoneSalesService();
private final GetCompanyDataService companyService =
new GetCompanyDataService();
private final UpdateSalesItemService update = new UpdateSalesItemService();
private static final Logger logger
= Logger.getLogger(PhoneDataShareImpl.class.getName());
public PhoneDataShareImpl() {
getDataInBackground(null);
getCompanyDataInBackground();
}
@Override
public ListProperty<Company> companyNamesProperty() {
return companyDataNames;
}
@Override
public ListProperty<String> categoryListProperty() {
return categoryDataNames;
}
@Override
public String getDataDescription() {
return dataDescription;
}
@Override
public String getNameDescription() {
return nameDescription;
}
@Override
public String getTitle() {
return title;
}
@Override
public double getTickUnit() {
return 1000;
}
@Override
public void refreshData(ProgressIndicator progressIndicator) {
getDataInBackground(progressIndicator);
}
@Override
public void updateSales(Salesdata salesdata,
ProgressIndicator progressIndicator) {
updateSalesDataInBackground(salesdata, progressIndicator);
}
@Override
public ListProperty<Salesdata> theDataProperty() {
return underlyingData;
}
@SuppressWarnings("unchecked")
private void getCompanyDataInBackground() {
// This service is only invoked once
companyService.setOnSucceeded((WorkerStateEvent t) -> {
companyDataNames.set(
(ObservableList<Company>) t.getSource().getValue());
});
companyService.setOnFailed((WorkerStateEvent t) -> {
logger.log(Level.WARNING, "Failed: Read Company data.");
});
companyService.start();
}
private void updateSalesDataInBackground(final Salesdata newSalesdata,
ProgressIndicator progress) {
// This service can be invoked multiple times
update.setOnSucceeded((WorkerStateEvent t) -> {
if (progress != null) {
progress.setVisible(false);
}
// this will cause 2 separate change events: a remove and then an add
underlyingData.remove(newSalesdata);
underlyingData.add(newSalesdata);
});
update.setOnFailed((WorkerStateEvent t) -> {
logger.log(Level.WARNING, "Failed: Salesdata UPDATED for {0}",
newSalesdata.getCompanyid().getCompanyname());
if (progress != null) {
progress.setVisible(false);
}
});
// only start the service if it's ready
if (update.getState() == Worker.State.SUCCEEDED) {
update.reset();
}
if (update.getState() == Worker.State.READY) {
if (progress != null) {
progress.setVisible(true);
}
update.setSalesdata(newSalesdata);
update.start();
}
}
@SuppressWarnings("unchecked")
private void getDataInBackground(ProgressIndicator progressIndicator) {
// This service can be invoked multiple times
salesService.setOnSucceeded((WorkerStateEvent t) -> {
if (progressIndicator != null) {
progressIndicator.setVisible(false);
}
underlyingData.set(
(ObservableList<Salesdata>) t.getSource().getValue());
for (Salesdata sales : underlyingData.get()) {
if (!categoryDataNames.contains(sales.getSalesyear())) {
categoryDataNames.add(sales.getSalesyear());
}
}
});
salesService.setOnFailed((WorkerStateEvent t) -> {
if (progressIndicator != null) {
progressIndicator.setVisible(false);
}
logger.log(Level.WARNING, "Failed: Read Salesdata");
});
// only start the service if it's ready
if (salesService.getState() == Worker.State.SUCCEEDED) {
salesService.reset();
}
if (salesService.getState() == Worker.State.READY) {
if (progressIndicator != null) {
progressIndicator.setVisible(true);
}
salesService.start();
}
}
}
There is a subtle relationship between the Services and the JavaFX ListProperty objects. When a client looks up PhoneDataShare, the PhoneDataShareImpl constructor code (invoked once, since this class is a singleton) calls the getDataInBackground() method. Because this method invokes the web services in a background thread, the data may not yet be installed in the ListProperty object returned by theDataProperty() method. However, since we use JavaFX properties, the client will be notified with either a bind expression or a listener when the ListProperty changes. We’ll show you how to do this with JavaFX UI code in the upcoming sections.
JavaFX TableView
The SmartPhoneDataApp includes a TableView window implemented with the CoreTableView module (see Figure 16.19 on page 822 for a diagram of the applications modules). Here is a summary of the steps you’ll follow to build this module.
• Create module CoreTableView with code name com.asgteach.coretableview.
• Add a new window (TopComponent) to the module in the Explorer position with name TableView. This creates file TableViewTopComponent.java.
• Set a dependency on the PhoneDataWebService module and the Lookup API.
• This module includes integrated JavaFX content, which you structure using FXML and JavaFX as described in “Integrating with the NetBeans Platform” on page 265. Add the FXML markup with file TableView.fxml and its controller class with file TableViewController.java.
Let’s first explore the JavaFX TableView control and then we’ll examine the TableView.fxml and TableViewController.java files in detail.
JavaFX TableView Control
Figure 16.20 shows the TableView window, which includes a JavaFX TableView control, a title, a TextField control for filtering table data, and a Button control to refresh the data.
The JavaFX TableView control is a general purpose visualization of tabular data. Minimally, you instantiate the control with an ObservableList. The generic type of the ObservableList matches the generic type for the TableView. For example, the following code instantiates a TableView of Salesdata objects and invokes the TableView setItems() method to set its data. Note that when data in the ObservableList changes, the TableView automatically updates.
TableView<Salesdata> tableview = new TableView<>();
ObservableList<Salesdat> theList = getTheListSomeHow();
tableview.setItems(theList);
To define columns in a TableView control, use the TableColumn class. If the data matches a JavaFX property in the TableView’s generic type, the TableColumn configuration is straightforward. For example, here we define a String TableColumn for year data and set the heading to “Year.” We specify that the value is from the salesyear property using the setCellValueFactory() method.
TableColumn<Salesdata, String> colYear = new TableColumn<>("Year");
colYear.setCellValueFactory(
new PropertyValueFactory<Salesdata, String>("salesyear"));
The Company column is trickier, since a company name is not a direct property. Instead, we get the company name from the companyid property with the getCompanynameProperty() method in a JavaFX Callback construct, as follows.
TableColumn<Salesdata, String> colCompany = new TableColumn<>("Company");
colCompany.setCellValueFactory(new Callback<CellDataFeatures<Salesdata,
String>, ObservableValue<String>>() {
@Override
public ObservableValue<String> call(CellDataFeatures<Salesdata,
String> p) {
// p.getValue() returns the Salesdata instance for a row
return p.getValue().getCompanyid().companynameProperty();
}
});
Since Callback is a functional interface, we can use a lambda expression, as follows (the return statement is implied).
colCompany.setCellValueFactory((TableColumn.CellDataFeatures
<Salesdata, String> p) ->
p.getValue().getCompanyid().companynameProperty());
Similarly, we define the colUnitsSold TableColumn with a BigDecimal type set from the unitsinmillions property in a JavaFX Callback construct, as follows.
TableColumn<Salesdata, BigDecimal> colUnitsSold
= new TableColumn<>("Units Sold");
colUnitsSold.setCellValueFactory((TableColumn.CellDataFeatures
<Salesdata, BigDecimal> cell) ->
cell.getValue().unitsinmillionsProperty());
Finally, here’s how you add columns to the TableView control.
tableview.getColumns().setAll(colCompany, colYear, colUnitsSold);
Build the JavaFX TableView UI
With the basics of TableView explored, let’s show you how to use TableView to display and edit the Salesdata obtained from the RESTful web services client. We’ll examine the FXML markup first.
Listing 16.11 shows TableView.fxml, the FXML for this window. Let’s point out a few interesting constructs.
• The "%key" notation references a key in a Resource file (a properties file) containing key value pairs for text. This makes internationalizing applications straightforward. (See “Application Internationalization” on page 868 for how to adapt a NetBeans Platform application to different languages and locales.)
• We define all our JavaFX controls in this FXML file. This means you don’t need to create the controls in Java code. You also don’t need to add the TableColumns to the TableView, since the FXML Loader performs this step.
• Although FXML definitions do not include generic notation, you still use generics with the Java object declaration in the controller class (for example, see the TableView declaration in Listing 16.12 on page 836).
• Each TableColumn disables sorting, and the colUnitsSold TableColumn enables editing.
• The "#refreshData" notation defines the Button’s onAction event handler. This references the refreshData() method in the TableViewController class.
• The ProgressIndicator control is set to indeterminate (-1) and initially not visible. Its visibility is controlled by the JavaFX Service classes.
<?xml version="1.0" encoding="UTF-8"?>
<?import java.lang.*?>
<?import java.util.*?>
<?import javafx.geometry.Insets?>
<?import javafx.scene.*?>
<?import javafx.scene.control.*?>
<?import javafx.scene.layout.*?>
<?import javafx.collections.*?>
<BorderPane fx:controller="com.asgteach.coretableview.TableViewController"
xmlns:fx="http://javafx.com/fxml">
<top>
<GridPane alignment="center" hgap="10" vgap="15">
<padding>
<Insets top="10" right="10" bottom="10" left="10"/>
</padding>
<Label text="%smartphonetitle"
GridPane.columnIndex="0"
GridPane.rowIndex="0"
GridPane.halignment="center"
style="-fx-font: NORMAL 20 Tahoma;"/>
</GridPane>
</top>
<center>
<GridPane alignment="center" hgap="10" vgap="15">
<padding>
<Insets top="10" right="10" bottom="10" left="10"/>
</padding>
<TableView fx:id="tableview"
editable="true"
GridPane.columnIndex="0"
GridPane.rowIndex="0" >
<columns>
<TableColumn fx:id="colCompany" text="%company"
sortable="false" minWidth="150" />
<TableColumn fx:id="colYear" text="%year"
sortable="false" minWidth="150" />
<TableColumn fx:id="colUnitsSold" text="%unitsSold"
editable="true" sortable="false"
minWidth="175" />
</columns>
</TableView>
</GridPane>
</center>
<bottom>
<GridPane alignment="center" hgap="10" vgap="15">
<padding>
<Insets top="10" right="10" bottom="10" left="10"/>
</padding>
<VBox spacing="10" alignment="BOTTOM_CENTER"
GridPane.columnIndex="0"
GridPane.rowIndex="0">
<HBox spacing="10" alignment="CENTER" >
<Label text="Filter Data" />
<TextField fx:id="filterText" prefColumnCount="20"
promptText="%filterPrompt" />
</HBox>
<Button text="%refreshData" onAction="#refreshData" />
<Label fx:id="displayMessage" />
<ProgressIndicator fx:id="progress"
visible="false"
progress="-1" />
</VBox>
</GridPane>
</bottom>
</BorderPane>
TableViewController Class
Now let’s show you the TableViewController class, which we’ll present in several parts. Listing 16.12 shows the @FXML annotations and class fields. Note that the TableView and TableColumn fields have generic types.
The other fields include a logger and a PhoneDataShare reference (which is instantiated via the Global Lookup). To both filter and sort the data, we also define a FilteredList, SortedList, and Comparator. These are all initialized in the initialize() method.
Listing 16.12 TableViewController—Class Fields
public class TableViewController implements Initializable {
@FXML
private TableView<Salesdata> tableview;
// Columns
@FXML
private TableColumn<Salesdata, String> colCompany;
@FXML
private TableColumn<Salesdata, String> colYear;
@FXML
private TableColumn<Salesdata, BigDecimal> colUnitsSold;
@FXML
private ProgressIndicator progress;
@FXML
private Label displayMessage;
@FXML
private TextField filterText;
private static final Logger logger
= Logger.getLogger(TableViewController.class.getName());
private PhoneDataShare share = null;
FilteredList<Salesdata> filteredData = null;
SortedList<Salesdata> sortedData = null;
Comparator<? super Salesdata> comparatorSalesdata = null;
. . .
}
Listing 16.13 shows the first part of the initialize() method. Recall that the FXML Loader invokes this method after instantiating all the declared objects in the FXML markup and the controller class.
First, we look up a Service Provider for PhoneDataShare. This is how we invoke the web service calls to access the data and update the persistent store when the user edits the table.
Next, we configure the TableColumns using the setCellValueFactory() method to configure all three columns. For the Units Sold column, we invoke the setCellFactory() method to create a TextField control for editing. We also define a converter to convert values between BigDecimal and String during edits.
The onEditCommit() event handler (defined for the Units Sold column) updates the edited data in the table and also invokes the PhoneDataShare service provider updateSales() method. This method eventually invokes the JavaFX Service previously defined with the new data and the ProgressIndicator control (progress). The updated Salesdata value is available through the CellEditEvent object t.
If the conversion between String and BigDecimal fails, the converter returns null. In this case, the handler leaves the old data intact and displays an error message.
Listing 16.13 TableViewController—initialize() Method Part I
@Override
public void initialize(final URL url, final ResourceBundle resources) {
share = Lookup.getDefault().lookup(PhoneDataShare.class);
if (share == null) {
logger.log(Level.SEVERE, "Cannot get PhoneDataShare object");
LifecycleManager.getDefault().exit();
}
// Configure the Columns
colCompany.setCellValueFactory((TableColumn.CellDataFeatures
<Salesdata, String> p) ->
p.getValue().getCompanyid().companynameProperty());
colYear.setCellValueFactory(new PropertyValueFactory<Salesdata,
String>("salesyear"));
colUnitsSold.setCellValueFactory((TableColumn.CellDataFeatures
<Salesdata, BigDecimal> cell) ->
cell.getValue().unitsinmillionsProperty());
colUnitsSold.setCellFactory(TextFieldTableCell.
<Salesdata, BigDecimal>forTableColumn(
new DecimalConverter()));
// Configure editing for the UnitsSold column
colUnitsSold.setOnEditCommit(
(TableColumn.CellEditEvent<Salesdata, BigDecimal> t) -> {
// If the new value is null, use the old value
BigDecimal bd;
if (t.getNewValue() != null) { // good value
bd = t.getNewValue();
t.getRowValue().setUnitsinmillions(bd);
displayMessage.setText("");
displayMessage.setStyle("-fx-text-fill: black;");
share.updateSales(t.getRowValue(), progress);
} else { // bad conversion
bd = t.getOldValue();
t.getRowValue().setUnitsinmillions(bd);
// force a refresh
t.getTableColumn().setVisible(false);
t.getTableColumn().setVisible(true);
displayMessage.setStyle("-fx-text-fill: red;");
displayMessage.setText(Bundle.salesAmountBadFormat());
}
});
. . .
Listing 16.14 shows you how to filter and sort the ObservableList displayed in the TableView control. First, we define a comparator for sorting. The Salesdata list is sorted first by company name and then by year.
Next, we define a change listener for the ListProperty returned by the PhoneDataShare theDataProperty() method. The change listener builds a FilteredList based on the user-provided text String and a SortedList based on the previously defined comparator. The FilteredList predicate converts the filter target to lowercase and compares first the company name, then the year for a match. The predicate returns true for a match (or if the filter TextField text is empty).
Next, we define a change listener for the filterText TextField’s textProperty. This change listener is invoked for each key stroke and dynamically reapplies the filter.
Listing 16.14 TableViewController—initialize() Method Part II
@Override
public void initialize(final URL url, final ResourceBundle resources) {
, , ,
// Define the Comparator for Sorting
comparatorSalesdata = (Salesdata o1, Salesdata o2) -> {
// First compare the company name, then compare the year
int result = o1.getCompanyid().getCompanyname().compareToIgnoreCase(
o2.getCompanyid().getCompanyname());
if (result == 0) {
return o1.getSalesyear().compareTo(o2.getSalesyear());
}
return result;
};
// When the underlying data change, reset the filtering and sorting
share.theDataProperty().addListener(
(ListChangeListener.Change<? extends Salesdata> change) -> {
filteredData = new FilteredList<>(
share.theDataProperty().get(), salesdata -> {
// Reapply filter when data changes
String newValue = filterText.getText();
// If filter text is empty, display all data
if (newValue == null || newValue.isEmpty()) {
return true;
}
// Compare company name and year with filter text
String lowerCaseFilter = newValue.toLowerCase();
if (salesdata.getCompanyid().getCompanyname().toLowerCase()
.contains(lowerCaseFilter)) {
return true; // Filter matches company
} else if (salesdata.getSalesyear().contains(lowerCaseFilter)) {
return true; // Filter matches sales year
}
return false; // No match
});
sortedData = new SortedList<>(filteredData);
sortedData.setComparator(comparatorSalesdata);
tableview.setItems(sortedData);
});
// Reapply the filter when the user supplies a new filter text
filterText.textProperty().addListener(
(observable, oldValue, newValue) -> {
filteredData.setPredicate(salesdata -> {
// If filter text is empty, display all data.
if (newValue == null || newValue.isEmpty()) {
return true;
}
// Compare company name and year with filter text.
String lowerCaseFilter = newValue.toLowerCase();
if (salesdata.getCompanyid().getCompanyname().toLowerCase()
.contains(lowerCaseFilter)) {
return true;
} else if (salesdata.getSalesyear().contains(lowerCaseFilter)) {
return true;
}
return false;
});
});
}
Listing 16.15 shows the DecimalConverter that performs conversions for String and BigDecimal in the TableColumn’s in-place editor. You override both the toString() and fromString() methods. The NumberFormat class is sensitive to the locale because we invoke Locale.getDefault() with the getInstance() method.
Listing 16.15 TableViewController—DecimalConverter
private class DecimalConverter extends StringConverter<BigDecimal> {
NumberFormat nf = NumberFormat.getInstance(Locale.getDefault());
public DecimalConverter() {
nf.setMaximumFractionDigits(2);
nf.setMinimumFractionDigits(1);
}
@Override
public String toString(BigDecimal t) {
try {
return nf.format(t);
} catch (Exception e) {
return null;
}
}
@Override
public BigDecimal fromString(String string) {
try {
Number newValue = nf.parse(string);
BigDecimal result = new BigDecimal(newValue.doubleValue());
return result.setScale(2, BigDecimal.ROUND_HALF_EVEN);
} catch (ParseException e) {
return null;
}
}
}
JavaFX Chart Module
The SmartPhoneDataApp also includes a LineChart window, shown in Figure 16.21. This chart is implemented with the LineChart module. (See Figure 16.19 on page 822 for a diagram of the application’s modules.)
Here is a summary of the steps you’ll follow to build this module.
• Create the LineChart module with code name com.asgteach.linechart.
• Add a new window (TopComponent) to the module in the Editor position with name LineChart. This creates file LineChartTopComponent.java.
• Set a dependency on the PhoneDataWebService module and the Lookup API.
• This module includes integrated JavaFX content, which you structure using FXML and JavaFX as described in “Integrating with the NetBeans Platform” on page 265. Add the FXML markup with file LineChart.fxml and its controller class with file LineChartController.java. Refer to the description of the JavaFX Chart package in Chapter 15, especially “Line Chart” on page 764.
Build the JavaFX LineChart UI
Let’s examine the FXML markup and then show you the LineChartController code.
Listing 16.16 is LineChart.fxml, the FXML for this window. We define a LineChart control inside of a StackPane. The LineChart has a CategoryAxis for its X-axis and a NumberAxis for its Y-axis. The fx:id attributes allow the controller class to access these controls.
<?xml version="1.0" encoding="UTF-8"?>
<?import java.lang.*?>
<?import java.util.*?>
<?import javafx.geometry.*?>
<?import javafx.scene.*?>
<?import javafx.scene.control.*?>
<?import javafx.scene.layout.*?>
<?import javafx.scene.chart.*?>
<StackPane id="StackPane" fx:id="stackpane"
xmlns:fx="http://javafx.com/fxml"
fx:controller="com.asgteach.linechart.LineChartController">
<padding>
<Insets top="10" right="10" bottom="10" left="10"/>
</padding>
<LineChart fx:id="chart" >
<xAxis>
<CategoryAxis fx:id="xAxis"/>
</xAxis>
<yAxis>
<NumberAxis fx:id="yAxis"/>
</yAxis>
</LineChart>
</StackPane>
The controller class, LineChartController, initializes the LineChart’s data and keeps the data current when changes are detected. Since the user can edit data in the TableView window, the LineChart must react to these updates. We’ll present the LineChartController class in several parts.
Listing 16.17 shows the LineChartController class fields, including the controls defined in the FXML file. These class fields include the LineChart data (lcdata) and a logger. The data field is the PhoneDataShare service provider. Finally, we have a SortedList and a comparator that sorts sales data before initializing and/or updating the chart.
Listing 16.17 LineChartController—Class Fields
public class LineChartController implements Initializable {
@FXML
private StackPane stackpane;
@FXML
private CategoryAxis xAxis;
@FXML
private NumberAxis yAxis;
@FXML
private LineChart<String, Number> chart;
private ObservableList<XYChart.Series<String, Number>> lcData
= FXCollections.observableArrayList();
private static final Logger logger
= Logger.getLogger(LineChartController.class.getName());
private PhoneDataShare data = null;
SortedList<Salesdata> sortedData = null;
Comparator<? super Salesdata> comparatorSalesdata = null;
Listing 16.18 shows the LineChartController’s initialize() method. Although this code is similar to the LineChartController presented in Chapter 15, here we use data from an ObservableList instead of the Swing TableModel’s two-dimensional array.
First, we look up the PhoneDataShare service provider from the Global Lookup, which provides the label text for the chart axes and the Y-axis tick unit.
Next, we define the comparator for sorting. We sort by company name, then year. Sorting the data by year makes LineChart plot points always appear in increasing year order. We then set the chart’s title and its data.
Last, we add ListChangeListeners to both the data list (theDataProperty()) and the company names list (companyNamesList()). Because these lists are populated after web service calls complete in a background thread, these lists may not yet contain data. Adding a ListChangeListener to these properties notifies the LineChartController code when the lists are complete. Changes make the handlers invoke the getLineChartData() method, shown next.
Listing 16.18 LineChartController—initialize() Method
@Override
public void initialize(URL url, ResourceBundle rb) {
data = Lookup.getDefault().lookup(PhoneDataShare.class);
if (data == null) {
logger.log(Level.SEVERE, "Cannot get PhoneDataShare object");
LifecycleManager.getDefault().exit();
}
xAxis.setCategories(data.categoryListProperty());
xAxis.setLabel(data.getNameDescription());
yAxis.setTickUnit(data.getTickUnit());
yAxis.setLabel(data.getDataDescription());
logger.log(Level.INFO, "yAxis label = {0}", data.getDataDescription());
logger.log(Level.INFO, "xAxis label = {0}", data.getNameDescription());
comparatorSalesdata = (Salesdata o1, Salesdata o2) -> {
// First compare the company name, then compare the year
int result = o1.getCompanyid().getCompanyname().compareToIgnoreCase(
o2.getCompanyid().getCompanyname());
if (result == 0) {
return o1.getSalesyear().compareTo(o2.getSalesyear());
}
return result;
};
chart.setTitle(data.getTitle());
chart.setData(lcData);
data.theDataProperty().addListener(
(ListChangeListener.Change<? extends Salesdata> c) -> {
while (c.next()) {
if (c.wasAdded()) {
logger.log(Level.INFO, "was added");
getLineChartData();
}
}
});
data.companyNamesProperty().addListener(
(ListChangeListener.Change<? extends Company> change) -> {
getLineChartData();
});
}
Listing 16.19 shows the getLineChartData() method, which builds the XYChart.Series for each company. After sorting the data, this method installs the data into the appropriate series. Note that the processing code only creates new XYChart.Data objects if necessary. This avoids completely redrawing the LineChart when changes are detected. Instead, changed plot points animate to new plot point locations.
Listing 16.19 LineChartController—getLineChartData() Method
private void getLineChartData() {
// create all the series if necessary
if (data.companyNamesProperty().getSize() != lcData.size()) {
for (int i = 0; i < lcData.size(); i++) {
lcData.clear();
}
for (int row = 0; row < data.companyNamesProperty().getSize();
row++) {
XYChart.Series<String, Number> series = new XYChart.Series<>();
series.setName(data.companyNamesProperty().get(row)
.getCompanyname());
lcData.add(series);
}
}
// Sort the data so that the Chart looks nice
sortedData = new SortedList<>(data.theDataProperty().get());
sortedData.setComparator(comparatorSalesdata);
// install each datum in the correct series if necessary
for (Salesdata sales : sortedData) {
boolean processed = false;
for (XYChart.Series<String, Number> series : lcData) {
if (sales.getCompanyid().getCompanyname().equals(
series.getName())) {
// correct series
for (XYChart.Data<String, Number> currentDatum :
series.getData()) {
// correct year
if (currentDatum.getXValue().equals(
sales.getSalesyear())) {
processed = true;
if (!currentDatum.getYValue().equals(
sales.getUnitsinmillions())) {
// replace
currentDatum.setYValue(
sales.getUnitsinmillions());
}
break;
}
}
// need new data point
if (!processed) {
XYChart.Data<String, Number> datum = new XYChart.Data<>(
sales.getSalesyear(), sales.getUnitsinmillions());
series.getData().add(datum);
}
break;
}
}
}
}
16.5 Key Point Summary
This chapter shows you how to use RESTful web services in a NetBeans Platform application. Here are the key points in this chapter.
• You can create RESTful web services from a database with the NetBeans IDE RESTful Services from Database wizard. This generates the web services, entity classes, and database persistence unit.
• You can add JavaFX property support to JPA entity classes by moving generated annotations. This approach synchronizes the entity class with the database using accessor methods instead of class fields. JavaFX properties replace the class fields. Accessor methods then use the JavaFX properties to get and set the data.
• When you deploy a web application that implements web services, you can test the RESTful web services with the NetBeans IDE.
• A Java application web service client helps you correctly configure libraries for a RESTful web service client.
• A NetBeans IDE wizard generates RESTful web service clients for a NetBeans Platform module. You can then add the required libraries to the module.
• Adding Wrapped JARs lets you add libraries to a module without creating wrapped library modules.
• The SmartPhoneDataApp consists of a PhoneDataWebService module that includes Jersey clients, entity classes, and a service provider interface.
• Our application includes two windows: a TableView window with a JavaFX TableView control and a LineChart window with a JavaFX LineChart. Both windows access the data through RESTful clients.
• The JavaFX Service class lets you build re-usable Worker objects that manage their execution in a background thread.
• A Service object lets you safely access setup and return objects on the JavaFX Application Thread. Service objects are suitable for RESTful web service clients.
• The JavaFX TableView is a general-purpose control with TableColumns for visualizing tabular data. Use the setCellValueFactory() method to configure TableColumns.
• Configure a TableColumn with TextFieldTableCell to create a TextField component for editing. Use the setOnEditCommit() method to configure an event handler to handle edits.
• The TableView control supports an ObservableList. Use SortedList with a comparator for sorting and FilteredList with a filter predicate for filtering.
• When configuring JavaFX Charts, sort the data before you create the XYChart.Data objects. This makes the chart’s plot points appear in a consistent order.