
5. A Taste of Modularity
With the background basics of Swing covered, it’s time to explore the NetBeans Platform application architecture. In this chapter, you’ll learn how to build a modular application that uses the NetBeans Platform Window System and leverages NetBeans Platform techniques to keep modules loosely coupled.
What You Will Learn
• Understand the NetBeans module system.
• Create a NetBeans Platform application and add modules to it.
• Port a Swing application to the NetBeans Platform.
• Create windows for a NetBeans Platform application.
• Use Lookup to discover service providers.
• Use Lookup to share objects between modules.
5.1 Modular Architecture
Even though the applications in Chapter 2 are basic, they follow a loosely-coupled design. That is, a user event that changes model data generates a property change event and lets interested subscribers respond. Similarly, when a user selects a different Person to edit, a selection listener lets subscribers know the user selected a new object. These mechanisms keep event-processing code isolated from property change and selection events. However, the applications we presented in Chapter 2 are themselves monolithic, and we encapsulate functionality using Java class visibility. As you add more features to applications like these, it becomes difficult to isolate the different parts of the application, and the dependencies become more entangled.
Not only does the NetBeans Platform provide a wide range of features (window system, action framework, menu bar and toolbar, and so forth), but the NetBeans Platform also provides an architectural framework for your application. That is, the NetBeans Platform provides an execution environment that supports a module system called the Runtime Container. The Runtime Container consists of the minimum modules required to load and execute your application.
Modules
Modules are the basic building blocks of the NetBeans Platform. A module is a collection of functionally related classes stored in a JAR file along with metadata. The metadata provides information to the Runtime Container about the module, such as the module’s name, version information, dependencies, and a list of its public packages, if any.
The NetBeans Platform Runtime Container enforces the encapsulation of modules. This keeps applications loosely coupled and avoids accidental dependencies. Specifically, in order to use or access code in another module (say, Module B accesses classes in Module A), two conditions must be met, as shown in Figure 5.1.
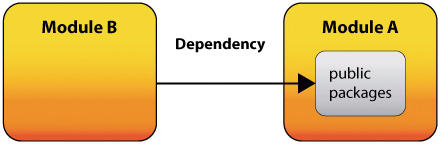
1. You must put Module A classes in a public package and assign a version number.
2. Module B must declare a dependency on a specified version of Module A.
This arrangement keeps dependencies between modules deliberate, documented, and enforced by the Runtime Container.
NetBeans Runtime Container
The NetBeans Runtime Container consists of the following six modules, as shown in Figure 5.2.
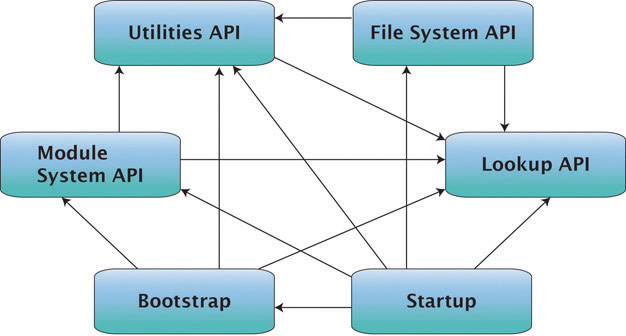
• Bootstrap—executes initially and loads and executes the Startup module.
• Startup—contains the Main method of the application and initializes the module system and the virtual file system.
• Module System API—manages modules, enforces module visibility and dependencies, and provides access to module life cycle methods.
• Utilities API—provides general utility classes.
• File System API—provides a virtual file system for your application.
• Lookup API—provides a mechanism for finding and loading classes that is loosely coupled and allows modules to communicate with each other.
Note that a NetBeans Platform application can run with just these modules, but your application will lack a GUI and many other useful features.
To show you the NetBeans Platform architecture, including its module system and communication mechanism, let’s port the Swing application presented in Chapter 2, PersonSwingAppEnhancedUI (see “Improving the User Experience” on page 63). The application’s basic functionality will remain unchanged, but the end result is a modular application with very specific dependencies. Furthermore, due to its modular structure, you’ll see how to add features (in later chapters) without the fear of breaking code. And with the NetBeans Platform, we automatically get a fully functional window system, menu bar, and toolbar.
Figure 5.3 shows our complete NetBeans Platform application running (FamilyTreeApp). While this application is very similar to the Swing version, there are key differences.
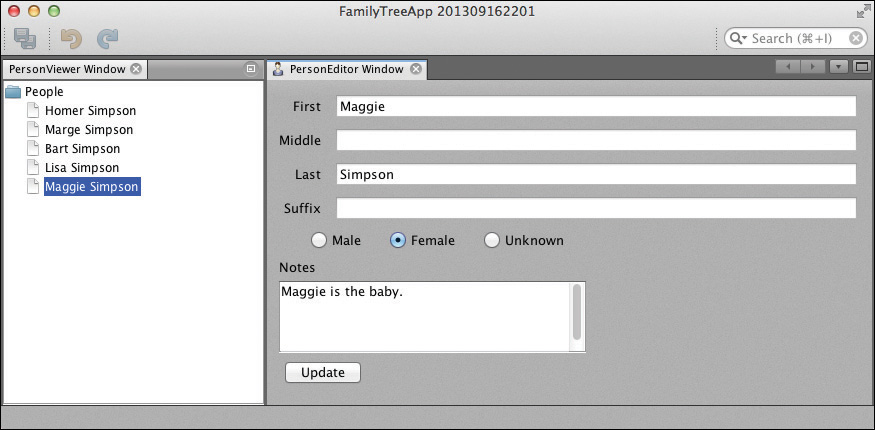
• The application has a toolbar and menu bar (the menu bar uses the native operating system’s menu bar, so it does not appear in the screen shot).
• The PersonViewer window (on the left) and the PersonEditor window (on the right) are both independently detachable and resizable windows.
• The application is divided into modules.
• The FamilyTreeManager is now a service, and the class that implements this service is in its own module.
• Each of the windows is implemented by separate modules.
• When you select a Person in the PersonViewer window, the selected Person is displayed in the PersonEditor window. This communication requires no dependency between the two windows, only a mutual dependency on the NetBeans Lookup module.
• The Person and FamilyTreeManager classes are in the same module (FamilyTreeModel). This package is public so that other modules can declare a dependency on it.
We’ll show you exactly how to build this application and along the way, we’ll describe two very important features of the NetBeans Platform: Modules and Lookup.
5.2 Creating a NetBeans Platform Application
A NetBeans Platform application project consists of a top-level structure containing one or more modules. When you use the New Project wizard to create a NetBeans Platform application, your application includes the Runtime Container. This application also contains additional modules needed to support the window system, actions, menu, and other features.
Follow these steps to create your NetBeans Platform application project with the NetBeans IDE.
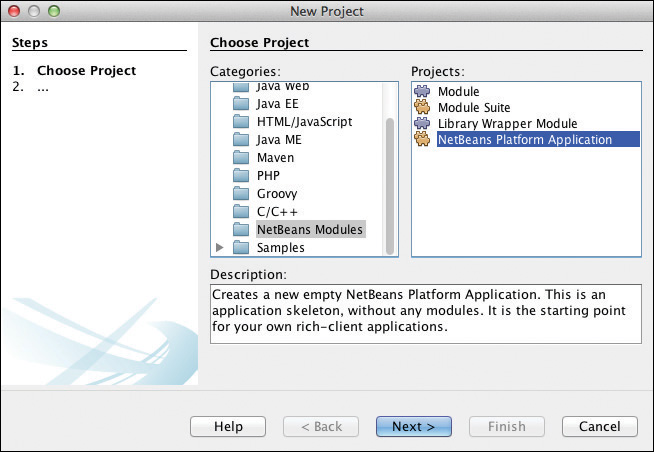
1. From the NetBeans IDE top-level menu bar, select File | New Project. The NetBeans New Project wizard pops up the Choose Project dialog.
2. Under Categories select NetBeans Modules and under Projects select NetBeans Platform Application, as shown in Figure 5.4. Select Next. This is how you create a top-level NetBeans Platform Application to which you can then add your own modules.
3. NetBeans now displays the Name and Location dialog. Provide the Project Name FamilyTreeApp and click Browse to select a Project Location directory. Accept the defaults for the remaining fields and click Finish, as shown in Figure 5.5.

NetBeans creates your NetBeans Platform application project with the modules necessary to include a menu bar, toolbar, and empty window system. Let’s examine the project structure and a few of the artifacts before we add functionality to this program.
NetBeans Platform Project
Figure 5.6 shows project FamilyTreeApp in the Projects view. It has no user-created modules (the Modules node is empty). The metadata associated with the application appears under the Important Files node. These files include a Build Script (file build.xml), the Project Properties (file project.properties), NetBeans Platform Config (file platform.properties), and Per-user NetBeans Platform Config (file platform-private.properties).
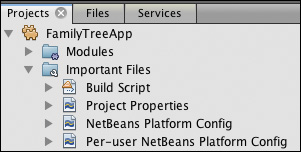
• An Ant build script is automatically generated for your project in file nbproject/build-impl.xml. You can customize this script by editing the Build Script (file build.xml) under Important Files.
• File Project Properties (file project.properties) describes the modules in your NetBeans Platform application as well as your application’s name. Listing 5.1 shows this file before you create any new modules for your application.
Listing 5.1 Project Properties (project.properties)
app.name=${branding.token}
app.title=FamilyTreeApp
modules=
• Listing 5.2 shows the NetBeans Platform Config file (file platform.properties), which describes the collection of modules (a cluster) that is automatically included in your application. The standard cluster for NetBeans Platform applications is called platform.
This configuration also includes property branding.token (used in the Project Properties file) and the list of disabled modules from the platform cluster. Since these modules are not frequently used, they are disabled to minimize your application’s footprint.
Listing 5.2 NetBeans Platform Config (platform.properties)
branding.token=FamilyTreeApp
cluster.path=
${nbplatform.active.dir}/platform
disabled.modules=
org.jdesktop.layout,
org.netbeans.api.visual,
org.netbeans.core.execution,
org.netbeans.libs.jsr223,
org.netbeans.modules.autoupdate.cli,
org.netbeans.modules.autoupdate.services,
org.netbeans.modules.autoupdate.ui,
org.netbeans.modules.core.kit,
org.netbeans.modules.favorites,
org.netbeans.modules.templates,
org.openide.compat,
org.openide.execution,
org.openide.options,
org.openide.util.enumerations
nbplatform.active=default
The project’s Properties dialog lets you examine and change a project’s settings. Let’s look at the Properties dialog now.
To examine your application’s various properties, select the application’s project node in the Projects window, right click, and select Properties from the context menu. NetBeans displays a Project Properties dialog. Under Categories select Libraries. NetBeans displays the Libraries dialog, as shown in Figure 5.7.
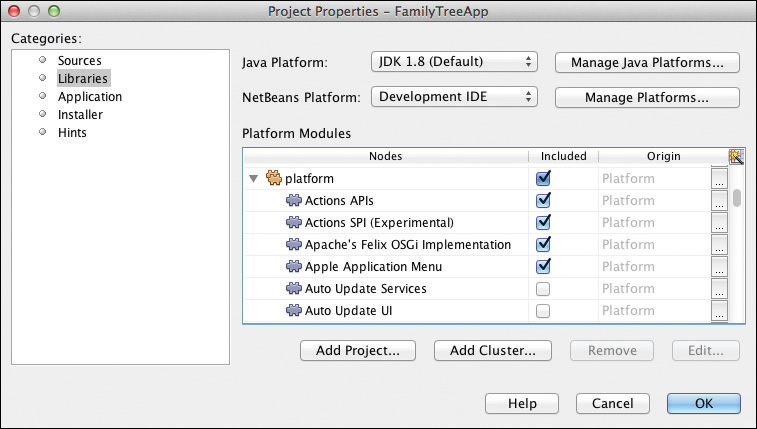
The list of clusters available appears under heading Nodes. You see all clusters are excluded except cluster platform. If you expand the platform cluster, you’ll see the modules included in this cluster. As you scroll down, module names appear that are included in your application, as well as additional available modules that are excluded. These excluded modules are the ones listed in the NetBeans Platform Config file (Listing 5.2).
You can also add additional projects or clusters to your application using the Add Project or Add Cluster buttons. Dismiss this dialog now by clicking OK.
• The Per-user NetBeans Platform Config file (platform-private.properties) lets you configure build properties that apply only to the local machine or to a specific user. This file is not typically checked into a source repository.
Although you have not yet added any modules of your own, your project contains NetBeans Platform modules that let you run this (not very interesting) application. Select the project in the Projects view and click the green chevron on the toolbar to run FamilyTreeApp. Figure 5.8 shows the application running. Note that the application includes a top-level menu bar, a toolbar, an application title, a search window, a main window area that is empty, and a status line. All of the icons in the toolbar are disabled (Save All, Undo, and Redo), but the menu bar includes many active menu items.
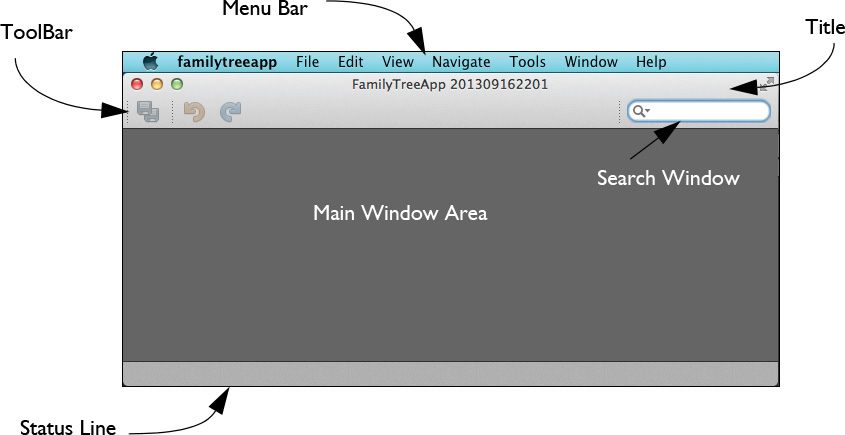
The top-level menu bar has several useful features that you can select. Menu item View configures additional icons in the toolbar, such as the clipboard icons (copy, cut, and paste) and lets you view the IDE output log. Menu item Window opens and closes a Property Window or an Output Window. Most selections under menu item File are disabled except for Page Setup. Many artifacts come pre-configured, and with minimal effort on your part, you can incorporate these items in your application. We will show you how to do this in upcoming chapters.
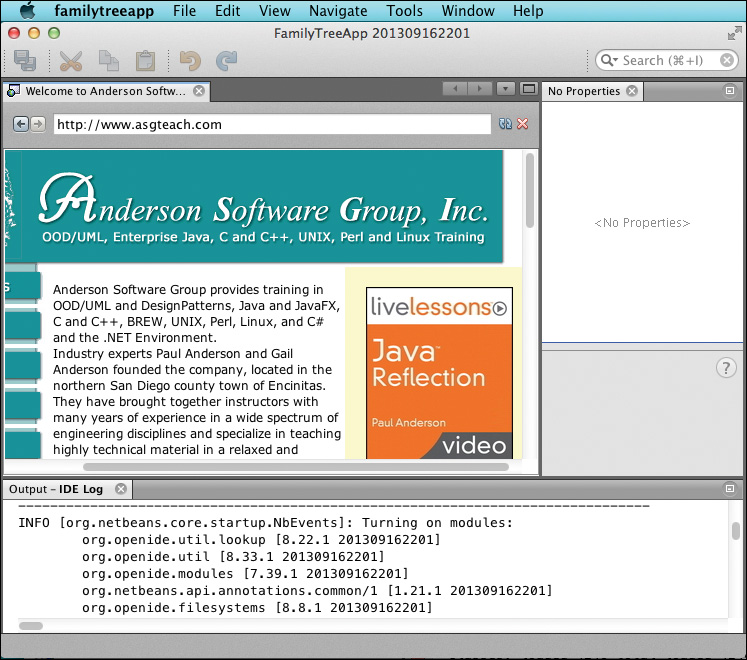
Figure 5.9 shows the same application running with additional configurations, all performed with the menu bar. Here, we enabled a web browser to display the Anderson Software Group home page (Window | Web | Web Browser), configured the clipboard icons (View | Toolbars | Clipboard), enabled the IDE Output window (View | IDE Log), and opened a Properties window (Window | IDE Tools | Properties).
If you performed any of the above configurations, you can return to the default configurations as follows. First, exit the application. Next, right click on project FamilyTreeApp and select Clean from the context menu. The next time you run the application, the NetBeans Platform will use the default settings.
5.3 Creating Modules
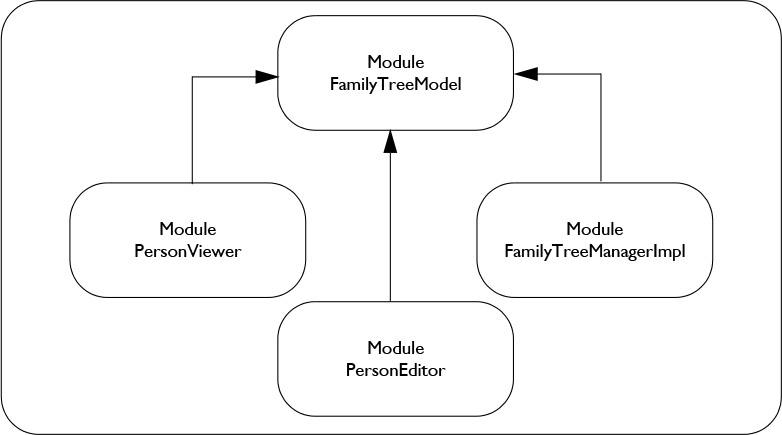
With the bare bones structure of a NetBeans Platform Application created, it’s time to add modules and functionality to the FamilyTreeApp application. To do this, we’ll add four modules, as follows.
• Module FamilyTreeModel—This module contains class Person.java (our model), and a FamilyTreeManager interface. This interface includes all of the FamilyTreeManager public methods from the Swing version of our application declared as abstract methods.
• Module FamilyTreeManagerImpl—This module contains the implementation of the FamilyTreeManager interface and registers itself as a service provider for the application.
• Module PersonViewer—This module includes a NetBeans Platform TopComponent (window) to display the Person objects from the FamilyTreeManager in a window. We discuss TopComponents in detail in Chapter 8.
• Module PersonEditor—This module also includes a NetBeans Platform TopComponent. Here, we display detailed information about the selected Person in a window that the user can edit and save to the FamilyTreeManager.
Figure 5.10 shows these four modules and the dependencies they form together in application FamilyTreeApp.
Creating a NetBeans Module
To create a module for a NetBeans Platform application, follow these steps. Here we create module FamilyTreeModel.
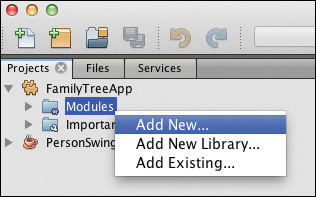
1. Right click on the Modules node in project FamilyTreeApp and choose Add New... as shown in Figure 5.11. NetBeans begins the New Module Project wizard.
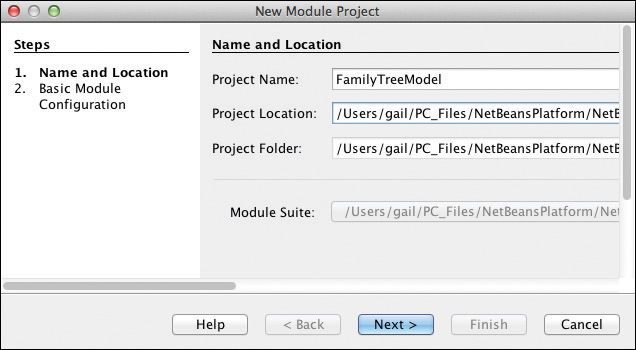
2. NetBeans displays the Name and Location dialog. Specify FamilyTreeModel for the Project Name. Accept the defaults for Project Location and Project Folder and click Next, as shown in Figure 5.12.
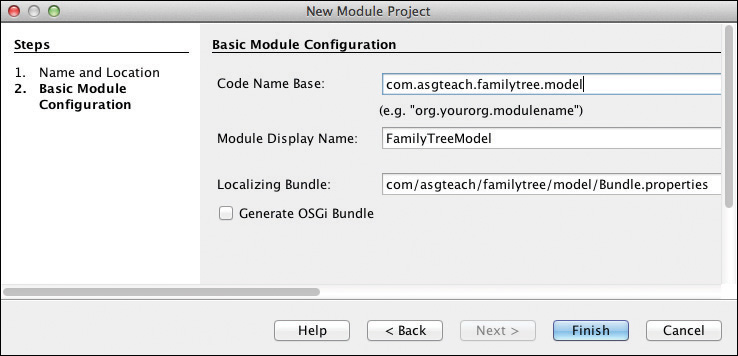
3. NetBeans displays the Basic Module Configuration dialog. Specify com.asgteach.familytree.model for the Code Name Base. Accept the defaults for the Module Display Name (FamilyTreeModel) and Localizing Bundle (com/asgteach/familytree/model/Bundle.properties) and leave Generate OSGi Bundle unchecked, as shown in Figure 5.13. Click Finish.
Creating Additional Modules
The FamilyTreeApp application now contains one user-added module called FamilyTreeModel. Before we add code to this module, repeat the above steps and add three more modules: FamilyTreeManagerImpl, PersonViewer, and PersonEditor, as follows.
1. New Module FamilyTreeManagerImpl, code name base com.asgteach.familytree.manager.impl, and display name FamilyTreeManagerImpl.
2. New Module PersonViewer, code name base com.asgteach.familytree.personviewer, and display name PersonViewer.
3. New Module PersonEditor, code name base com.asgteach.familytree.personeditor, and display name PersonEditor.
Figure 5.14 shows the Projects view for application FamilyTreeApp. When you expand the Modules node, you see the four newly-added modules. You also see new projects for each module. Note that when you work with these module projects, you select the project name outside the FamilyTreeApp project, not the module name under the Modules node, as indicated in Figure 5.14.

5.4 Configuring a Module with Public Packages
The FamilyTreeModel module contains the model for our application. This includes class Person.java and interface FamilyTreeManager. As shown previously (see Figure 5.10 on page 209), this module will be used by the other modules in our application. Follow these steps to add the Java source files to FamilyTreeModel and configure them so that these classes can be accessed by other modules.
1. Select project FamilyTreeModel in the Projects view (be sure to select the project name, not the module name under Modules).
2. Expand the project name and Source Packages node. You will see package name com.asgteach.familytree.model.
3. As a starting point, use the code from project PersonSwingAppEnhancedUI and copy both Person.java and FamilyTreeManager.java to package com.asgteach.familytree.model. Class Person.java is unchanged. (Listing 2.5 on page 30 shows the version of Person.java used in project PersonSwingAppEnhancedUI.)
4. Modify class FamilyTreeManager so that it is an interface and all methods are abstract. Do not include static method getInstance() or the constructor. (You’ll see soon why we don’t need these anymore.) Remove all class variables except the property names (static final Strings). Listing 5.3 shows the new FamilyTreeManager interface.
Listing 5.3 Interface FamilyTreeManager
package com.asgteach.familytree.model;
import java.beans.PropertyChangeListener;
import java.util.List;
public interface FamilyTreeManager {
// FamilyTreeManager property change names
public static final String PROP_PERSON_DESTROYED = "removePerson";
public static final String PROP_PERSON_ADDED = "addPerson";
public static final String PROP_PERSON_UPDATED = "updatePerson";
public void addPropertyChangeListener(PropertyChangeListener listener);
public void removePropertyChangeListener(PropertyChangeListener listener);
public void addPerson(Person p);
public void updatePerson(Person p);
public void deletePerson(Person p);
public List<Person> getAllPeople();
}
Module FamilyTreeModel now has code for Person and the FamilyTreeManager interface, but we want other modules to reference these classes. Therefore, we must declare the package com.asgteach.familytree.model in this module as public, as illustrated in Figure 5.1 on page 200 (FamilyTreeModel is “Module A”). Let’s do this now.
1. In the Projects view, select project FamilyTreeModel, right click, and select Properties from the context menu.
2. Under Categories, select API Versioning.
3. In the panel, click the checkbox to specify that package com.asgteach.familytree.model is Public, as shown in Figure 5.15. Accept the default for Specification Version 1.0. Click OK.
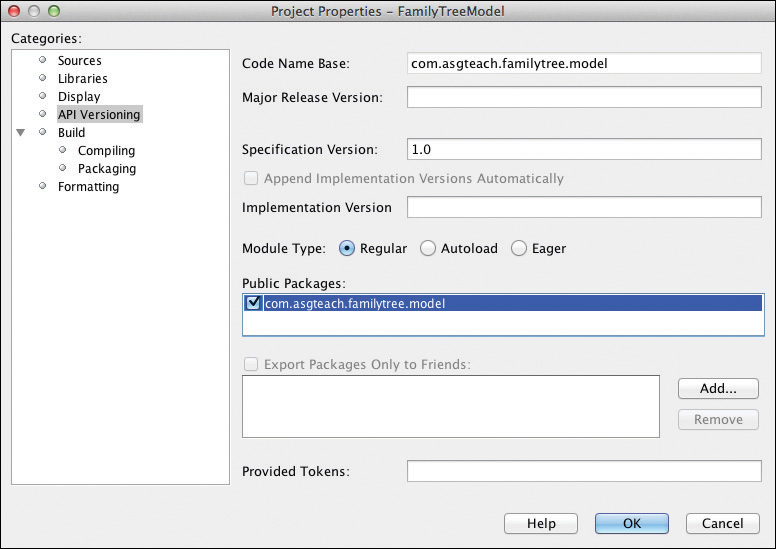
Note that this is the first of two required steps in the NetBeans Platform for one module to access a class in another module. We’ll show you the second step next.
5.5 Registering a Service Provider
The FamilyTreeManagerImpl module contains the code that implements interface FamilyTreeManager. Furthermore, it registers itself as a Service Provider for service FamilyTreeManager. The NetBeans Platform Lookup module makes services available in an application’s Global Lookup, which means other modules can “look up” Services based on a class type. You register a service provider with annotation @ServiceProvider.
Because the FamilyTreeManagerImpl module provides an implementation for interface FamilyTreeManager and FamilyTreeManager is in a separate module, you must declare a dependency on module FamilyTreeModel to access classes Person and FamilyTreeManager. This is the second step required in creating module dependencies. Furthermore, in order to register the FamilyTreeManager implementation as a service, you must also declare a dependency on the Lookup API module. Follow these steps to declare module dependencies.
1. In project FamilyTreeManagerImpl, right click the Libraries node and select Add Module Dependency . . . as shown in Figure 5.16. NetBeans displays the Add Module Dependency dialog.
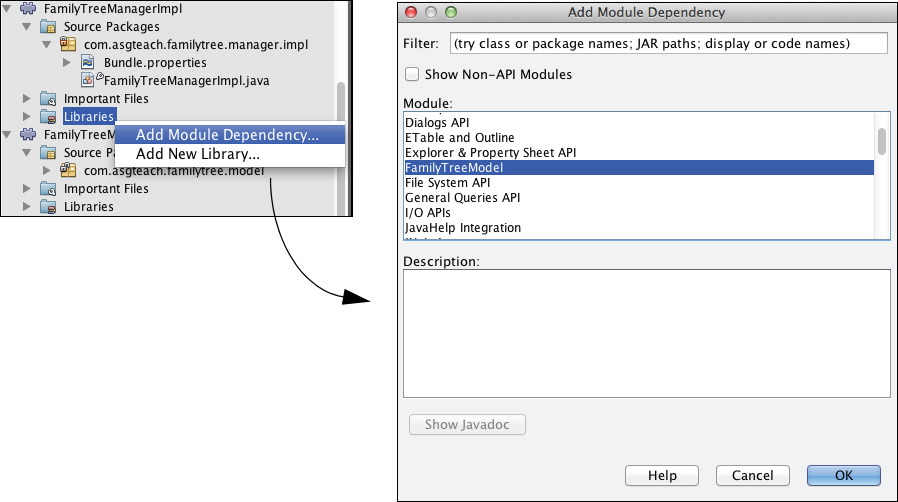
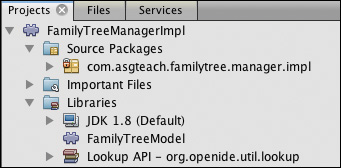
2. In the list of modules, select both FamilyTreeModel and Lookup API. Click OK. NetBeans adds both FamilyTreeModel and Lookup API to FamilyTreeManagerImpl’s list of dependencies. When you expand the Libraries node, you’ll see these modules listed, as shown in Figure 5.17.
When you add a module dependency, NetBeans updates the module’s metadata so that the Runtime Container can enforce the declared dependencies. You can view a module’s metadata as follows. Expand the Important Files node and double click Project Metadata (file project.xml). Listing 5.4 shows the project metadata for the FamilyTreeManagerImpl module after adding the module dependencies for the FamilyTreeModel and Lookup API modules. Note that a runtime dependency exists for specification version 1.0 for FamilyTreeModel and specification version 8.22.1 for Lookup API (your Lookup API specification version number may be different).
Listing 5.4 Project Metadata for Module FamilyTreeManagerImpl
<?xml version="1.0" encoding="UTF-8"?>
<project xmlns="http://www.netbeans.org/ns/project/1">
<type>org.netbeans.modules.apisupport.project</type>
<configuration>
<data xmlns="http://www.netbeans.org/ns/nb-module-project/3">
<code-name-base>com.asgteach.familytree.manager.impl
</code-name-base>
<suite-component/>
<module-dependencies>
<dependency>
<code-name-base>com.asgteach.familytree.model
</code-name-base>
<build-prerequisite/>
<compile-dependency/>
<run-dependency>
<specification-version>1.0</specification-version>
</run-dependency>
</dependency>
<dependency>
<code-name-base>org.openide.util.lookup</code-name-base>
<build-prerequisite/>
<compile-dependency/>
<run-dependency>
<specification-version>8.22.1</specification-version>
</run-dependency>
</dependency>
</module-dependencies>
<public-packages/>
</data>
</configuration>
</project>
Now add the implementation class for interface FamilyTreeManager to the FamilyTreeManagerImpl module. The NetBeans IDE helps out quite a bit with this.
1. In project FamilyTreeManagerImpl, expand the Source Packages node.
2. Select package com.asgteach.familytree.manager.impl, right click, and select New then Java Class from the context menus.
3. In the New Java Class dialog, provide FamilyTreeManagerImpl for Class Name and click Finish. You’ll now see file FamilyTreeManagerImpl.java under the selected package name and the file opens in the Java editor.
4. Edit the Java class so that it implements FamilyTreeManager. Fix imports (right click and select Fix Imports from the context menu).
5. Let NetBeans generate override method stubs for all of the abstract methods in interface FamilyTreeManager. (Click the icon in the left margin and select Implement all abstract methods from the displayed menu as shown in Figure 5.18.)

6. Copy the method bodies as well as any class variables and private methods from the FamilyTreeManager class in project PersonSwingAppEnhancedUI.
7. Add private method getPropertyChangeSupport() and invoke this method in all the methods that require accessing class variable propChangeSupport, as shown in Listing 5.5.
8. Add annotation @ServiceProvider to class FamilyTreeManagerImpl. Listing 5.5 shows the entire class.
Listing 5.5 Class FamilyTreeManagerImpl.java
package com.asgteach.familytree.manager.impl;
import com.asgteach.familytree.model.FamilyTreeManager;
import com.asgteach.familytree.model.Person;
import java.beans.PropertyChangeListener;
import java.beans.PropertyChangeSupport;
import java.util.ArrayList;
import java.util.HashMap;
import java.util.List;
import java.util.Map;
import org.openide.util.lookup.ServiceProvider;
@ServiceProvider(service = FamilyTreeManager.class)
public class FamilyTreeManagerImpl implements FamilyTreeManager {
private final Map<Long, Person> personMap = new HashMap<>();
private PropertyChangeSupport propChangeSupport = null;
private PropertyChangeSupport getPropertyChangeSupport() {
if (this.propChangeSupport == null) {
this.propChangeSupport = new PropertyChangeSupport(this);
}
return this.propChangeSupport;
}
@Override
public void addPropertyChangeListener(PropertyChangeListener listener) {
getPropertyChangeSupport().addPropertyChangeListener(listener);
}
@Override
public void removePropertyChangeListener(PropertyChangeListener listener) {
getPropertyChangeSupport().removePropertyChangeListener(listener);
}
@Override
public void addPerson(Person p) {
Person person = new Person(p);
personMap.put(person.getId(), person);
getPropertyChangeSupport().firePropertyChange(
FamilyTreeManager.PROP_PERSON_ADDED, null, person);
}
@Override
public void updatePerson(Person p) {
Person person = new Person(p);
personMap.put(person.getId(), person);
getPropertyChangeSupport().firePropertyChange(
FamilyTreeManager.PROP_PERSON_UPDATED, null, person);
}
@Override
public void deletePerson(Person p) {
Person person = personMap.remove(p.getId());
if (person != null) {
getPropertyChangeSupport().firePropertyChange(
FamilyTreeManager.PROP_PERSON_DESTROYED, null, person);
}
}
@Override
public List<Person> getAllPeople() {
List<Person> copyList = new ArrayList<>();
personMap.values().stream().forEach((p) -> {
copyList.add(new Person(p));
});
return copyList;
};
}
Note that the FamilyTreeManagerImpl class provides a HashMap to manage Person objects and fires property change events when Person objects are added to, updated, or deleted from the map. Clients can become listeners with the addPropertyChangeListener() method and remove themselves as listeners with the removePropertyChangeListener() method. This is the same behavior you saw with the Swing version of this program.
Annotation @ServiceProvider puts an instance of this class into the application’s Global Lookup so that other modules can find and use it. This automatically provides a singleton object for our application, so we no longer need to provide code to create a singleton instance. We’ll show you how client modules find and use this service provider when we add code to modules PersonViewer and PersonEditor.
Global Lookup
The Global Lookup is an application-wide repository for modules to discover and provide services. This allows the separation of the service interface (FamilyTreeManager) and the service provider (FamilyTreeManagerImpl). A client module can thus use a service without being aware of or dependent on its implementation. This supports loose coupling between modules. Annotation @ServiceProvider lets you register an implementation as a service provider for an interface. The service interface is also known as an extension point of the interface’s module (here, FamilyTreeModel).
The class that is annotated with @ServiceProvider must implement the interface for which it is providing the service. Furthermore, the class must be public and include a public no-argument constructor (or no constructor, as with class FamilyTreeManagerImpl). A module that uses this service does not declare a dependency on the provider’s module (FamilyTreeManagerImpl). Instead, the client declares a dependency on the module that contains the service interface (FamilyTreeModel). We discuss the Lookup API in more detail in “Lookup API” on page 224.
5.6 Configuring a Window for Selection
Application FamilyTreeApp (see Figure 5.3 on page 202) has two windows. The left-side window provides a list of Person objects, which we implement in the PersonViewer module. As described earlier, when a user selects a Person in the PersonViewer window, the selected Person is displayed in the PersonEditor window, the right-side window.
NetBeans Platform Windows
A window in a NetBeans Platform application is provided by class TopComponent, the main display component that is automatically integrated into the NetBeans Platform Window System. We’ll defer details on the Window System and Window Manager to Chapter 8 (“NetBeans Platform Window System”). For now, we’ll show you how to create a TopComponent and add Swing components to it.
In this section, we’ll show you how to create a NetBeans Platform window, add Swing components, and make the Person object selected by the user available to other modules in the application. Let’s begin by configuring module PersonViewer so that it can access classes Person and FamilyTreeManager.
As indicated in Figure 5.10 on page 209, module PersonViewer must declare a dependency on module FamilyTreeModel, as follows.
1. In project PersonViewer, right click the Libraries node and select Add Module Dependency . . . . NetBeans displays the Add Module Dependency dialog.
2. In the list of modules, select FamilyTreeModel. Click OK. NetBeans adds FamilyTreeModel to PersonViewer’s list of dependencies. When you expand the Libraries node, you’ll see this module listed.
Now let’s add a window to the PersonViewer module with the following steps.
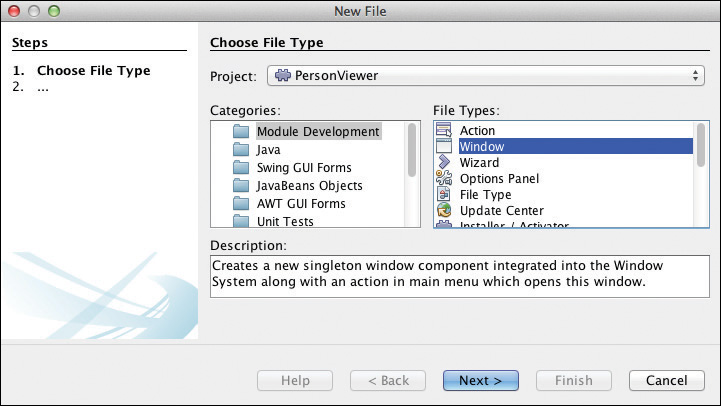
1. Expand project PersonViewer and Source Packages. Right click on package name com.asgteach.familytree.personviwer and select New | Other from the context menu.
2. NetBeans displays the Choose File Type dialog. Select Module Development under Categories and Window under File Type, as shown in Figure 5.19. Click Next.
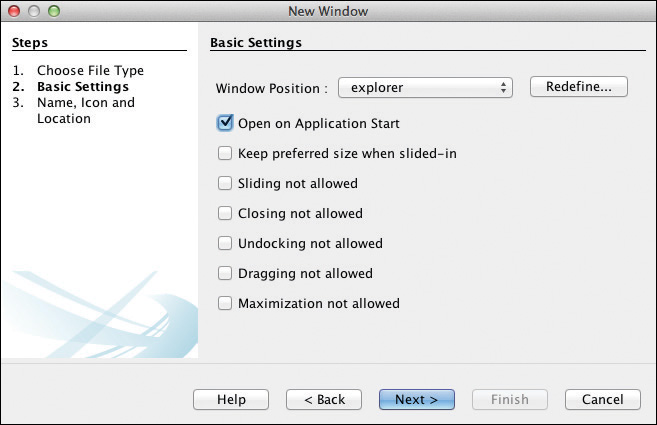
3. NetBeans displays the Basic Settings dialog. For Window Position, select explorer from the drop down control and check the box Open on Application Start. This window position setting determines where the window will appear in your application’s frame. This selection also influences window behavior.
Leave the other checkboxes unchecked (these options limit the window’s behaviors). Click Next as shown in Figure 5.20.
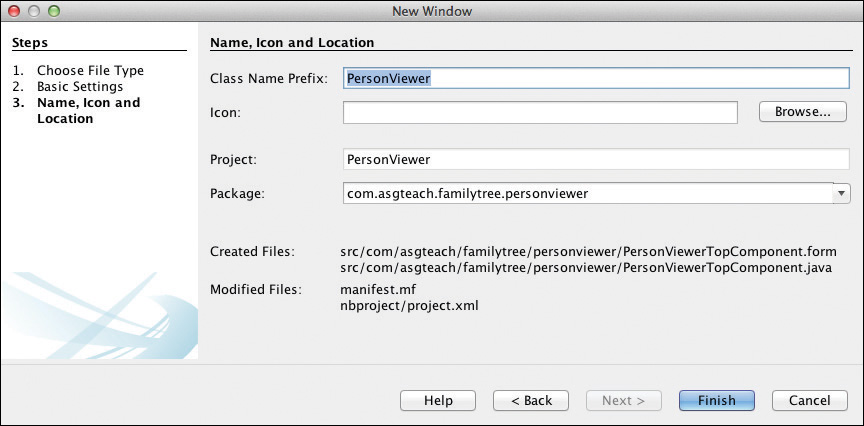
4. NetBeans displays the Name, Icon and Location dialog. Provide PersonViewer for the Class Name Prefix. Leave the Icon blank and accept the defaults for the rest, as shown in Figure 5.21. Click Finish.
NetBeans creates class PersonViewerTopComponent and brings the class up in the Swing Design View. If you click the Source button, you’ll see the generated code, as shown in Listing 5.6. If you expand the Libraries node under project PersonViewer, you’ll also see that the New Window wizard added dependencies for the following NetBeans Platform modules, in addition to the dependency already configured for FamilyTreeModel.
Lookup API
Settings API
UI Utilities API
Utilities API
Window System API
Listing 5.6 PersonViewerTopComponent.java
package com.asgteach.familytree.personviewer;
. . . import statements omitted . . .
@ConvertAsProperties(
dtd = "-//com.asgteach.familytree.personviewer//PersonViewer//EN",
autostore = false)
@TopComponent.Description(
preferredID = "PersonViewerTopComponent",
//iconBase="SET/PATH/TO/ICON/HERE",
persistenceType = TopComponent.PERSISTENCE_ALWAYS)
@TopComponent.Registration(mode = "explorer", openAtStartup = true)
@ActionID(category = "Window",
id = "com.asgteach.familytree.personviewer.PersonViewerTopComponent")
@ActionReference(path = "Menu/Window" /*, position = 333 */)
@TopComponent.OpenActionRegistration(
displayName = "#CTL_PersonViewerAction",
preferredID = "PersonViewerTopComponent")
@Messages({
"CTL_PersonViewerAction=PersonViewer",
"CTL_PersonViewerTopComponent=PersonViewer Window",
"HINT_PersonViewerTopComponent=This is a PersonViewer window"
})
public final class PersonViewerTopComponent extends TopComponent {
public PersonViewerTopComponent() {
initComponents();
setName(Bundle.CTL_PersonViewerTopComponent());
setToolTipText(Bundle.HINT_PersonViewerTopComponent());
}
. . . form designer code omitted . . .
@Override
public void componentOpened() {
// TODO add custom code on component opening
}
@Override
public void componentClosed() {
// TODO add custom code on component closing
}
void writeProperties(java.util.Properties p) {
// better to version settings since initial version as advocated at
// http://wiki.apidesign.org/wiki/PropertyFiles
p.setProperty("version", "1.0");
// TODO store your settings
}
void readProperties(java.util.Properties p) {
String version = p.getProperty("version");
// TODO read your settings according to their version
}
}
Porting Swing UI Code to a TopComponent
Because TopComponent is a subtype of JComponent in Swing, we can port our Swing layout code from project PersonSwingAppEnhancedUI, as follows.
1. Open project PersonSwingAppEnhancedUI in NetBeans and expand the project node, Source Packages, and package personswingapp. Open PersonJFrame.java in the editor.
2. Click the Design tab to open the Swing Design View.
3. Right click inside the left panel that contains the JTree and select Copy from the context menu.
4. Return to project PersonViewer and make sure PersonViewerTopComponent.java is open in the Swing Form Designer. Paste the copied contents into the Form Designer. You may see the following message.
Copied or inserted - not placed in layout yet.
Move the component via mouse to place it.
5. Move the newly pasted component using the mouse to place the copied components in the layout.
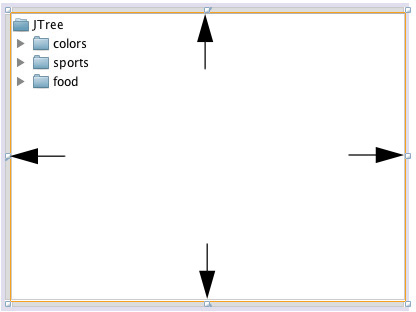
6. Expand (grow) the component (grab the handles on the JTree component and drag them to the parent panel’s edge) so that it takes up the entire window, as shown in Figure 5.22. There will be red lines in the source code, indicating compilation errors. You will fix these shortly.
You still need to add configuration code to PersonViewerTopComponent.java. Some of the code can be copied over directly from PersonJFrame.java. Before you do that, it’s time to explain how the Lookup API lets you discover and use service providers. We’ll also show you how Lookup allows modules to communicate with each other.
Lookup API
Lookups are one of the most powerful features of the NetBeans Platform. Lookups can be application wide (called the “Global Lookup”) or attached to objects within an application. For example, all TopComponents have a Lookup. Let’s see how you can use Lookups to leverage loosely-coupled communication strategies.
In the previous section we used annotation @ServiceProvider to register a service provider in the application’s Global Lookup. A Lookup is a map where the keys are class types and the values are class type instances. Lookups allow modules to communicate with each other by querying an object’s Lookup. They are also type safe. You can use Lookups to discover service providers, but you can also discover arbitrary objects—not just service providers. You will see examples of both types of Lookups in this chapter as we configure the FamilyTreeApp application.
Lookup as a Service Provider
Before you can use a Lookup, you must obtain it somehow. The Global Lookup that maintains all registered service providers is accessible with static method Lookup.getDefault(). Use the lookup() method to discover a service provider for a particular service interface. For the FamilyTreeApp application, you need a service provider for interface FamilyTreeManager. Here is how you obtain this service provider.
FamilyTreeManager ftm =
Lookup.getDefault().lookup(FamilyTreeManager.class);
if (ftm == null) {
logger.log(Level.SEVERE, "Cannot get FamilyTreeManager object");
LifecycleManager.getDefault().exit();
}
// do something with ftm
Note that this code assumes the service provider is registered elsewhere via the @ServiceProvider annotation. With a successful return value, ftm holds a reference to a FamilyTreeManagerImpl instance, provided by the Lookup API. This client code has no dependency on the FamilyTreeManagerImpl module. Indeed, you can later provide another implementation without any changes to this client code. We only need a dependency on the FamilyTreeModel module, which includes interface FamilyTreeManager.
Lookup Tip
You should check the lookup() method’s return value against null. In this example, if the return value is null, we exit the application with the NetBeans Platform LifecycleManager method exit().
Lookup as an Object Repository
You’ve seen how Lookup can help you discover and obtain instances of service providers. In the FamilyTreeApp application, we also need a way to communicate the selected Person object to the PersonEditor when the user selects a different node in the JTree UI control. In the Swing version of this program, the TreeSelectionListener directly updates the Swing UI controls (see Listing 2.19 on page 60). In the NetBeans Platform application, however, the PersonEditor code and its UI controls are in their own, separate module. The PersonViewer module (which has the JTree component) must somehow make its selection available to the PersonEditor module. Furthermore, we want to maintain a loosely-coupled architecture, so we don’t want to make either module dependent on the other. Using Lookups is the answer.
Lookups have been described as a data structure or a “bag of things.” Importantly, Lookups help share objects, so that the bag of things can be discovered and accessed by other modules. Again, just like Lookups for service providers, object-sharing Lookups store objects in a map with class types as keys and instances as a set of values. Furthermore, Lookups are observable. That is, you can attach listeners to the result of a Lookup discovery. When a class or TopComponent puts something different into its Lookup, you can listen for this change and grab the new object (or objects) in the Lookup listener’s event handler.
This is exactly how the PersonViewerTopComponent makes the user’s Tree selection object available to any interested modules. The current Tree selection is placed in the TopComponent’s Lookup.
As it turns out, TopComponents already have a Lookup, and TopComponents implement Lookup.Provider, an interface that lets others ask for its Lookup with method getLookup().
Here are the steps required to add and remove content to a TopComponent’s Lookup.
1. First, create the content holder with convenience class InstanceContent.
private final InstanceContent instanceContent = new InstanceContent();
2. Next, create a Lookup to hold the InstanceContent and associate this Lookup with the TopComponent’s Lookup. This lets you use the TopComponent Lookup.Provider method getLookup() to access the Lookup. Class AbstractLookup extends Lookup and provides a default way to store class object and type pairs in the Lookup. You typically place this code in the TopComponent’s constructor.
public PersonViewerTopComponent() {
. . .
associateLookup(new AbstractLookup(instanceContent));
}
3. Now you can add, remove, or search for objects of a certain type in instanceContent. For example, in a TreeSelectionListener, add the selected item using InstanceContent method set().
// Put person in this TopComponent's Lookup
instanceContent.set(Collections.singleton(person), null);
Similarly, if you want to remove this Person object from the Lookup, search for it and then remove it, as follows. (The PersonViewer TopComponent removes the Person object from the Lookup when the user selects the top node “People.”)
// Search for a person object in this TopComponent's Lookup
// and remove if it's present
Person person = getLookup().lookup(Person.class);
if (person != null) {
instanceContent.remove(person);
}
The NetBeans Platform provides additional features that are sensitive to what’s in a TopComponent’s Lookup. We explore these in more detail in Chapter 10 (see “Implementing Update” on page 488).
Configuring the TopComponent
With an understanding of Lookups, let’s finish configuring the PersonViewer TopComponent. We’ll add class variables, configure the constructor code, and add code to the TopComponent’s life cycle methods. We’ll also write a TreeSelectionListener (to put the selected Person in the TopComponent’s Lookup) and a PropertyChangeListener (to update the displayed Person objects when they change). These listener methods are similar to the ones you’ve seen already in the Swing version of this program. But here we will take advantage of the NetBeans Platform features that promote modularity and loose coupling.
We’ll add this code starting from the top (class variables). You will encounter compilation errors when the source file is in intermediate states, but these will all be fixed when you are finished.
Configure Class Variables and Constructor
1. Add the following class variables and constructor code to PersonViewerTopComponent.java (as shown in Listing 5.7 in bold). These same class variables are used in the Swing version of this program, except for treeModel and instanceContent. We previously described instanceContent. Variable treeModel provides access to JTree’s model and lets you automatically expand the JTree hierarchy. We show this code later in Listing 5.11 on page 231.
Listing 5.7 PersonViewerTopComponent—Class Variables and Constructor
public final class PersonViewerTopComponent extends TopComponent {
private FamilyTreeManager ftm;
private final DefaultMutableTreeNode top =
new DefaultMutableTreeNode("People");
private final DefaultTreeModel treeModel = new DefaultTreeModel(top);
private static final Logger logger = Logger.getLogger(
PersonViewerTopComponent.class.getName());
private final InstanceContent instanceContent = new InstanceContent();
public PersonViewerTopComponent() {
initComponents();
setName(Bundle.CTL_PersonViewerTopComponent());
setToolTipText(Bundle.HINT_PersonViewerTopComponent());
associateLookup(new AbstractLookup(instanceContent));
}
2. Because we defined a model for the JTree component, its constructor requires different instantiation code. This is done in the Design View. Click tab Design to bring up the Design View.
3. From the Design canvas, select the JTree component. In the Properties window, click tab Code. As shown in Figure 5.23, specify property Custom Creation Code as
new JTree(treeModel)

When finished, click the Source tab to return to the Java Editor.
Add Listeners
As in the Swing version of the program, this module has a PropertyChangeListener to respond to changes generated from the FamilyTreeManager and a TreeSelectionListener to respond to the user’s selections.
1. Add the PropertyChangeListener code to PersonViewerTopComponent to listen for changes to the FamilyTreeManager, as shown in Listing 5.8. This code is unchanged from the Swing version of the program.
Listing 5.8 PropertyChangeListener for FamilyTreeManager
// PropertyChangeListener for FamilyTreeManager
private final PropertyChangeListener familyTreeListener =
(PropertyChangeEvent evt) -> {
if (evt.getPropertyName().equals(FamilyTreeManager.PROP_PERSON_UPDATED)
&& evt.getNewValue() != null) {
Person person = (Person) evt.getNewValue();
DefaultTreeModel model = (DefaultTreeModel) personTree.getModel();
for (int i = 0; i < model.getChildCount(top); i++) {
DefaultMutableTreeNode node =
(DefaultMutableTreeNode) model.getChild(top, i);
if (person.equals(node.getUserObject())) {
node.setUserObject(person);
// Let the model know we made a change
model.nodeChanged(node);
logger.log(Level.FINE, "Node updated: {0}", node);
break;
}
}
}
};
2. Add the TreeSelectionListener to PersonViewerTopComponent to respond to changes in the selected JTree node, as shown in Listing 5.9.
Note that in this code, we check to make sure the selected JTree node is a leaf node, which means the user selected a Person. If the selected node is not a leaf node, we remove the previously added Person object from the Lookup, if one is present. This lets us implement the ability to clear the PersonEditor forms when no Person object is selected. We show you the code to detect an empty Lookup result when we describe the PersonEditorTopComponent module in the next section.
Listing 5.9 TreeSelectionListener Uses TopComponent’s Lookup
// TreeSelectionListener for JTree
private final TreeSelectionListener treeSelectionListener =
(TreeSelectionEvent e) -> {
DefaultMutableTreeNode node = (DefaultMutableTreeNode)
personTree.getLastSelectedPathComponent();
if (node == null) {
return;
}
if (node.isLeaf()) {
Person person = (Person) node.getUserObject();
logger.log(Level.INFO, "{0} selected", person);
// Put person in this TopComponent's Lookup
instanceContent.set(Collections.singleton(person), null);
} else {
logger.log(Level.INFO, "{0} selected", node.getUserObject());
Person person = getLookup().lookup(Person.class);
if (person != null) {
instanceContent.remove(person);
}
}
};
Note that in Listing 5.9, method instanceContent.set() resets the Lookup to the singleton Person object. To remove a Person object currently in the Lookup, use lookup(Person.class) to find a Person object and instanceContent.remove() to remove it.
Configure TopComponent Life Cycle Methods
Configure the TopComponent life cycle methods componentOpened() and componentClosed() as shown in Listing 5.10. (You typically add listeners in method componentOpened() and remove them in method componentClosed(). TopComponent life cycle methods are discussed in “Window System Life Cycle Management” on page 369.)
In method componentOpened(), we obtain an instance of service provider FamilyTreeManager using the application’s Global Lookup, as explained earlier. Then, using code you’ve seen previously in the Swing application version, we invoke buildData() to instantiate several Person objects and register a property change listener with the FamilyTreeManager service provider.
Method createNodes() builds the JTree data structure. We also register a tree selection listener with JTree personTree. Method componentClosed() removes the registered listeners.
Listing 5.10 TopComponent componentOpened() and componentClosed()
@Override
public void componentOpened() {
ftm = Lookup.getDefault().lookup(FamilyTreeManager.class);
if (ftm == null) {
logger.log(Level.SEVERE, "Cannot get FamilyTreeManager object");
LifecycleManager.getDefault().exit();
}
buildData();
ftm.addPropertyChangeListener(familyTreeListener);
personTree.getSelectionModel().setSelectionMode(
TreeSelectionModel.SINGLE_TREE_SELECTION);
createNodes();
personTree.addTreeSelectionListener(treeSelectionListener);
}
@Override
public void componentClosed() {
personTree.removeTreeSelectionListener(treeSelectionListener);
ftm.removePropertyChangeListener(familyTreeListener);
}
Adding Helper Methods
Add the code for methods buildData() and createNodes(), as shown in Listing 5.11. Note that buildData() is unchanged from PersonJFrame.java, but createNodes() now contains extra code to expand the JTree with method scrollPathToVisible(). Since this method requires a TreePath argument, we use DefaultTreeModel treeModel to obtain the path. Class variable treeModel is defined in Listing 5.7 on page 227.
Listing 5.11 Methods buildData() and createNodes()
private void buildData() {
ftm.addPerson(new Person("Homer", "Simpson", Person.Gender.MALE));
ftm.addPerson(new Person("Marge", "Simpson", Person.Gender.FEMALE));
ftm.addPerson(new Person("Bart", "Simpson", Person.Gender.MALE));
ftm.addPerson(new Person("Lisa", "Simpson", Person.Gender.FEMALE));
ftm.addPerson(new Person("Maggie", "Simpson", Person.Gender.FEMALE));
logger.log(Level.FINE, ftm.getAllPeople().toString());
}
private void createNodes() {
ftm.getAllPeople().stream().forEach((p) -> {
top.add(new DefaultMutableTreeNode(p));
});
// Expand the tree
if (top.getChildCount() != 0) {
TreeNode[] nodes = treeModel.getPathToRoot(top.getLastChild());
TreePath path = new TreePath(nodes);
personTree.scrollPathToVisible(path);
}
}
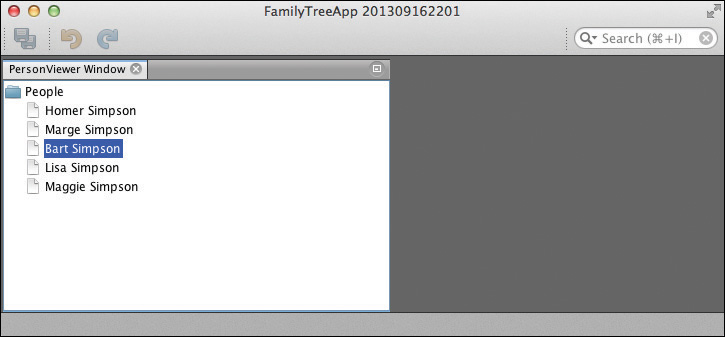
With these changes, you can now build and run the FamilyTreeApp application. Only the PersonViewer window appears, populated with Person objects, as shown in Figure 5.24. You can select different Person objects in the JTree component to test the TreeSelectionListener.
5.7 Configuring a Window with Form Editing
The PersonEditor module provides code to implement the right-side window of the FamilyTreeApp application from Figure 5.3 on page 202. Since PersonEditor has a window, we create a TopComponent for this. Also, we declare a dependency on the FamilyTreeModel module to access Person and FamilyTreeManager. We’ll begin with the same steps we used to build the PersonViewer module.
1. In project PersonEditor, right click the Libraries node and select Add Module Dependency . . . . NetBeans displays the Add Module Dependency dialog.
2. In the list of modules, select FamilyTreeModel. Click OK. NetBeans adds FamilyTreeModel to PersonEditor’s list of dependencies. When you expand the Libraries node, you’ll see the module listed.
Create a Window
Create a window (TopComponent) in module PersonEditor.
1. Expand project PersonEditor and Source Packages. Right click on package name com.asgteach.familytree.personeditor and select New | Other from the context menu (or select New | Window if the choice is available and skip the next step).
2. NetBeans displays the Choose File Type dialog. Select Module Development under Categories and Window under File Type. Click Next.
3. NetBeans displays the Basic Settings dialog. For Window Position, select editor from the drop down control and check the box Open on Application Start. Position editor creates a large window for your application. Leave the other checkboxes unchecked. Click Next.
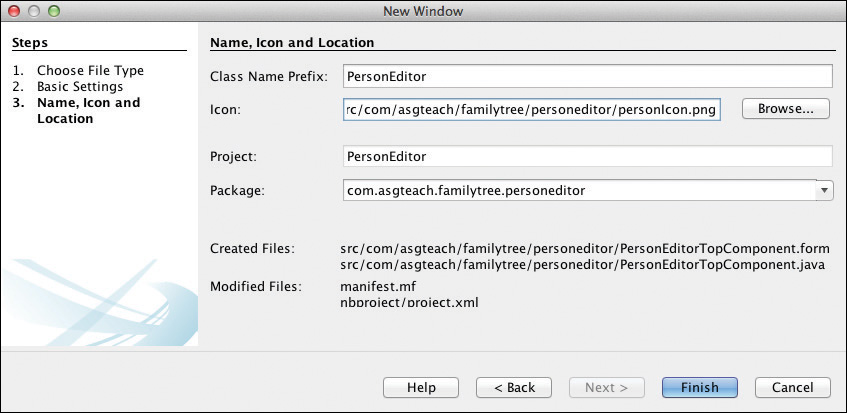
4. NetBeans displays the Name, Icon and Location dialog. Provide PersonEditor for the Class Name Prefix. Editor windows display icons (if one is provided) on their tab. For Icon, optionally provide a suitable 16 x 16 GIF or PNG graphic. (You can use file personIcon.png found in the download bundle for this book.) Click Finish, as shown in Figure 5.25.
Configure PersonEditorTopComponent UI
NetBeans creates class PersonEditorTopComponent and brings the class up in the Swing Design View. Once again, you can copy and paste the components from project PersonSwingAppEnhancedUI to create the UI form for editing Person objects. Use these steps to create the UI form for PersonEditorTopComponent.
1. Select the UI components for editing as well as the Update button from PersonJFrame.java and paste the components into the Design View of PersonEditorTopComponent.
2. Move the newly pasted components using the mouse to place the copied components in the layout.
3. Resize the panel that contains the components so that it takes up the entire space of the form. Figure 5.26 shows the UI components in PersonEditorTopComponent’s Design View.

For mutually exclusive behavior, add the radio buttons to the same ButtonGroup with the following steps.
1. Add a ButtonGroup from the Swing Controls palette to the form. You’ll see the ButtonGroup appear in the Navigator View under Other Components.
2. Right click on the ButtonGroup in the Navigator View and choose Change Variable Name from the context menu. Use variable name genderButtonGroup.
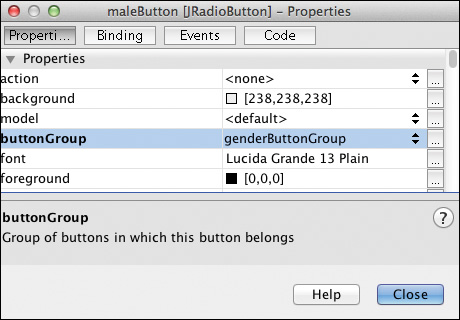
3. Right click on the Male radio button in the Design View and select Properties from the context menu. Select genderButtonGroup in the drop down for property buttonGroup, as shown in Figure 5.27. Click Close.
4. Repeat this step for the Female and Unknown radio buttons so that all three radio buttons belong to the same ButtonGroup.
Add Code to PersonEditorTopComponent
You’ll now add code to PersonEditorTopComponent.java. You’ll see that we can reuse much of the code from PersonJFrame.java to process user input. (We are still using project PersonSwingAppEnhancedUI described in “Improving the User Experience” on page 63 as our Swing porting reference.)
1. Select the Source button to return to the Java editor for PersonEditorTopComponent.java.
2. Add the following class variables, as shown in Listing 5.12. We add class variable lookupResult in order to attach a listener to a Lookup.Result object for Person objects. The remaining class variables are the same ones used in PersonJFrame.java. The constructor is unchanged from the generated code.
Listing 5.12 PersonEditorTopComponent—Class Variables and Constructor
public final class PersonEditorTopComponent extends TopComponent {
private FamilyTreeManager ftm;
private Person thePerson = null;
private static final Logger logger = Logger.getLogger(
PersonEditorTopComponent.class.getName());
private boolean changeOK = false;
private Lookup.Result<Person> lookupResult = null;
public PersonEditorTopComponent() {
initComponents();
setName(Bundle.CTL_PersonEditorTopComponent());
setToolTipText(Bundle.HINT_PersonEditorTopComponent());
}
3. As shown in Listing 5.13, add method configureListeners() from PersonJFrame.java, but do not include the code to configure the PropertyChangeListener or TreeSelectionListener. (These listeners are now in the PersonViewer module.)
Listing 5.13 Method configureListeners()
private void configureListeners() {
// add action listener to Update button
updateButton.addActionListener(updateListener);
// add document listeners to textfields, textarea
firstTextField.getDocument().addDocumentListener(docListener);
middleTextField.getDocument().addDocumentListener(docListener);
lastTextField.getDocument().addDocumentListener(docListener);
suffixTextField.getDocument().addDocumentListener(docListener);
notesTextArea.getDocument().addDocumentListener(docListener);
// add action listeners to radiobuttons
maleButton.addActionListener(radioButtonListener);
femaleButton.addActionListener(radioButtonListener);
unknownButton.addActionListener(radioButtonListener);
}
4. Add helper methods updateForm(), clearForm(), updateModel(), and modify() unchanged from PersonJFrame.java, as shown in Listing 5.14.
Listing 5.14 Code Ported Unchanged from PersonJFrame.java
private void updateForm() {
See Listing 2.24 on page 65.
}
private void clearForm() {
See Listing 2.23 on page 65.
}
private void updateModel() {
See Listing 2.26 on page 66.
}
private void modify() {
See Listing 2.25 on page 66.
}
5. Add action and document listeners unchanged as shown in Listing 5.15. These include the DocumentListener (to detect editing changes), ActionListener (to detect radio button changes), and a second ActionListener (for the Update button’s event handler).
Listing 5.15 Listeners from PersonJFrame.java
// Define listeners
// DocumentListener for text fields and text area
private final DocumentListener docListener = new DocumentListener() {
@Override
public void insertUpdate(DocumentEvent evt) {
if (changeOK) {
modify();
}
}
@Override
public void removeUpdate(DocumentEvent evt) {
if (changeOK) {
modify();
}
}
@Override
public void changedUpdate(DocumentEvent evt) {
if (changeOK) {
modify();
}
}
};
// ActionListener for Radio Buttons
private final ActionListener radioButtonListener = (ActionEvent e) -> {
if (changeOK) {
modify();
}
};
// ActionListener for Update button
private final ActionListener updateListener = (ActionEvent e) -> {
updateModel();
ftm.updatePerson(thePerson);
};
Configure TopComponent Life Cycle Methods
The TopComponent life cycle componentOpened() method lets you configure a TopComponent when it opens.
PersonEditorTopComponent requires access to the FamilyTreeManager service provider, which we obtain using the application’s Global Lookup. This code is the same that we used in PersonViewerTopComponent. Note that we obtain the same instance, since Lookup returns a singleton for service providers.
After we invoke method configureListeners(), we obtain the PersonViewerTopComponent’s Lookup. In the same way that static method Lookup.getDefault() provides the default Lookup, we use WindowManager.getDefault() to obtain the default Window Manager. The Window Manager manages all the application’s TopComponents. We can find a particular TopComponent using WindowManager method findTopComponent(). (See Table 8.1, “Window Manager Useful Methods,” on page 352 for a description of useful Window Manager methods.) Argument “PersonViewerTopComponent” is the TopComponent’s preferredID property as shown in the TopComponent annotations in Listing 5.6 on page 222.
With a reference to the TopComponent, we obtain its Lookup with method getLookup() and register a LookupListener on its Lookup.Result. The LookupListener’s resultChanged() method is invoked whenever PersonViewerTopComponent’s Lookup changes with an addition or removal of a Person.class object.
Why do we invoke the checkLookup() method in componentOpened()? The user can close the PersonEditor window. When the window re-opens, you want to make sure that whatever is currently selected in the PersonViewer also appears in the editor. Since the user can make selection changes while the PersonEditor window is closed, it’s necessary to invoke the checkLookup() method in componentOpened() and not wait for a LookupListener event to update the PersonEditor window.
Method componentClosed() removes the LookupListener.
• Add the following code to the TopComponent life cycle methods componentOpened() and componentClosed(), as shown in Listing 5.16.
Listing 5.16 TopComponent componentOpened() and componentClosed()
@Override
public void componentOpened() {
ftm = Lookup.getDefault().lookup(FamilyTreeManager.class);
if (ftm == null) {
logger.log(Level.SEVERE, "Cannot get FamilyTreeManager object");
LifecycleManager.getDefault().exit();
}
configureListeners();
// Listen for Person objects in the PersonViewerTopComponent Lookup
TopComponent tc = WindowManager.getDefault().findTopComponent(
"PersonViewerTopComponent");
if (tc != null) {
lookupResult = tc.getLookup().lookupResult(Person.class);
checkLookup();
lookupResult.addLookupListener(lookupListener);
}
}
@Override
public void componentClosed() {
lookupResult.removeLookupListener(lookupListener);
}
Add the LookupListener
Listing 5.17 shows the LookupListener code. Lookup inner class Lookup.Result method allInstances() returns a collection of Person objects currently in the Lookup. Recall that in the TreeSelectionListener, we put the selected Person object in the TopComponent’s Lookup (when the user selects a Person). If the user selects the top node, we remove the Person object from the Lookup, if one is present. Thus, in the LookupListener, if a new Person is present in the Lookup, we update the UI form with the Person’s data. Otherwise, the Lookup is empty, so we clear the UI form. This behavior matches the behavior of the Swing version of this program (project PersonSwingAppEnhancedUI).
• Add the following LookupListener code to the PersonEditor TopComponent, as shown in Listing 5.17.
// LookupListener to detect changes in PersonViewer's Lookup
LookupListener lookupListener = (LookupEvent le) -> checkLookup();
private void checkLookup() {
Collection<? extends Person> allPeople = lookupResult.allInstances();
if (!allPeople.isEmpty()) {
thePerson = allPeople.iterator().next();
logger.log(Level.FINE, "{0} selected", thePerson);
updateForm();
} else {
logger.log(Level.FINE, "No selection");
clearForm();
}
}
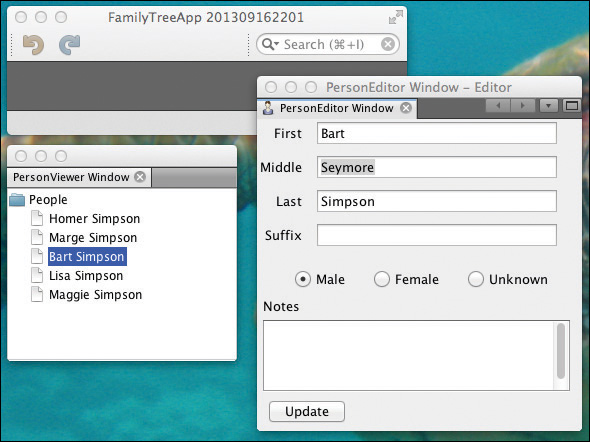
Figure 5.28 shows application FamilyTreeApp running with both windows undocked. Like the Swing version of this application, you can select different Person objects in the left PersonViewer window, edit the selected Person in the right PersonEditor window, and save your changes with the Update button. You can also undock either window, resize or maximize it, and re-dock it. You can use the top level Window menu to open and close either window. Furthermore, because the program is modular and uses the Lookup API for discovering service providers and inter-module communication, the application is well designed and loosely coupled.
Another Look at Lookup
The handshaking between the TreeSelectionListener in module PersonViewer (Listing 5.9 on page 229) and the LookupListener in module PersonEditor (Listing 5.17 on page 239) is a straightforward solution for the use case of editing the selected Person object and clearing the form when the user selects the top node. However, the PersonEditorTopComponent depends on the PersonViewerTopComponent, if for no other reason than it must know the PersonViewerTopComponent’s preferredID string when invoking method findTopComponent().
Tracking Global Selection
A more general solution lets us track the Global Selection Lookup, a Lookup of the TopComponent that currently has focus. When you make a selection in the PersonViewer window, the PersonViewerTopComponent has focus and the contents of its Lookup are available in the Global Selection Lookup. You access this Lookup with
private Lookup.Result<Person> lookupResult = null;
. . .
// Listen for Person objects in the Global Selection Lookup
lookupResult = Utilities.actionsGlobalContext()
.lookupResult (Person.class);
lookupResult.addLookupListener(lookupListener);
Now, whenever a Person object is added to or removed from the Global Selection Lookup, the LookupListener (lookupListener) is invoked. This removes the dependency on the PersonViewerTopComponent’s name.
There is just one problem. When the user clicks inside the PersonEditorTopComponent’s form to begin editing, the form clears because the Person object is no longer in the Global Selection Lookup. Because PersonEditorTopComponent has focus, its (empty) Lookup is now the Global Selection Lookup.
One way to solve this problem is to ignore the Global Selection Lookup when PersonEditorTopComponent has focus. Here is the modified LookupListener, as shown in Listing 5.18. As described in Chapter 8, the TopComponent registry keeps track of the application’s TopComponents. The registry returns the TopComponent that has focus with method getActivated(). If the TopComponent with focus is the PersonEditorTopComponent (this), then the result change is ignored.
Listing 5.18 LookupListener That Ignores Its Own TopComponent
// LookupListener to detect changes in PersonViewer's Lookup
LookupListener lookupListener = (LookupEvent le) -> checkLookup();
private void checkLookup() {
Collection<? extends Person> allPeople = lookupResult.allInstances();
// Make sure that the TopComponent with focus isn't this one
TopComponent tc = TopComponent.getRegistry().getActivated();
if (tc != null && tc.equals(this)) {
logger.log(Level.FINER, "PersonEditorTopComponent has focus.");
return;
}
if (!allPeople.isEmpty()) {
thePerson = allPeople.iterator().next();
logger.log(Level.FINE, "{0} selected", thePerson);
updateForm();
} else {
logger.log(Level.FINE, "No selection");
clearForm();
}
}
Listing 5.19 shows the modified componentOpened() code that now uses the more general Global Selection Lookup instead of the PersonViewerTopComponent’s Lookup.
Listing 5.19 Method componentOpened()
@Override
public void componentOpened() {
ftm = Lookup.getDefault().lookup(FamilyTreeManager.class);
if (ftm == null) {
logger.log(Level.SEVERE, "Cannot get FamilyTreeManager object");
LifecycleManager.getDefault().exit();
}
configureListeners();
// Listen for Person objects in the Global Selection Lookup
lookupResult = Utilities.actionsGlobalContext()
.lookupResult (Person.class);
lookupResult.addLookupListener(lookupListener);
checkLookup();
}
We’ve just scratched the surface on the Lookup API. In upcoming chapters you will see how to use the Global Selection Lookup together with the Nodes API to handle object selection. Stay tuned!
5.8 Module Life Cycle Annotations
The Module System API lets you build classes with specific methods that are invoked when your application starts as well as when your application shuts down. You use annotation @OnStart for the startup and @OnStop for the shutdown process. Note that these Runnables are executed in a background thread. If you need to execute UI code, you must be in the EDT. (See “Custom Login Dialog” on page 539 for an example.) If a module needs to invoke code after the UI is initialized, the Window System includes the @OnShowing annotation. (See “Using @OnShowing” on page 374.)
Let’s show you how to use @OnStart by moving the FamilyTreeManager data initialization out of the TopComponent and into one of these special classes invoked during application startup. We’ll build this startup code in module FamilyTreeModel in its own private package, making it easier to add and remove TopComponent modules without being concerned about where we initialize our test data.
We’ll also add shutdown code with the @OnStop annotation to show you how you can customize your module or application shutdown process.
Using @OnStart
To install startup code in module FamilyTreeModel, we define a class that implements Runnable annotated with @OnStart. The system invokes the run() method of such a Runnable as soon as possible during startup. If more than one module has an @OnStart Runnable, the system runs them in parallel to minimize the startup time of the application. The following steps create a module’s @OnStart Runnable. Here, we add the @OnStart Runnable to the FamilyTreeModel module in a private package.
1. The @OnStart annotation requires a dependency on the Module System API, Lookup requires the Lookup API, and LifecycleManager requires Utilities API. Add all of these dependencies to the FamilyTreeModel module. (Select the Libraries node, right click, and select Add Module Dependency . . . from the context menu. In the Add Module Dependencies dialog, select Lookup API, Module System API, and Utilities API from the list of modules. Click OK.)
2. In the FamilyTreeModel project Source Packages node, right click on the package name, and add a new package called data to com.asgteach.familytree.model.
3. Right click on package data and select New | Java Class . . . .
4. NetBeans displays the New Java Class dialog. For Class Name, specify DataInstaller (any name is fine) and click Finish. NetBeans adds DataInstaller.java to package com.asgteach.familytree.model.data.
5. Add the following code to DataInstaller.java to initialize the FamilyTreeManager with test data. The run() method is invoked during startup. Listing 5.20 shows the added code.
Listing 5.20 Module FamilyTreeModel—DataInstaller Class
package com.asgteach.familytree.model.data;
. . . imports omitted . . .
@OnStart
public final class DataInstaller implements Runnable {
private static final Logger logger = Logger.getLogger(
DataInstaller.class.getName());
@Override
public void run() {
FamilyTreeManager ftm = Lookup.getDefault().lookup(
FamilyTreeManager.class);
if (ftm == null) {
logger.log(Level.SEVERE, "Cannot get FamilyTreeManager object");
LifecycleManager.getDefault().exit();
}
populateMap(ftm);
}
private void populateMap(FamilyTreeManager ftm) {
ftm.addPerson(new Person("Homer", "Simpson", Person.Gender.MALE));
ftm.addPerson(new Person("Marge", "Simpson", Person.Gender.FEMALE));
ftm.addPerson(new Person("Bart", "Simpson", Person.Gender.MALE));
ftm.addPerson(new Person("Lisa", "Simpson", Person.Gender.FEMALE));
ftm.addPerson(new Person("Maggie", "Simpson", Person.Gender.FEMALE));
logger.log(Level.INFO, "Map populated: {0}", ftm.getAllPeople());
}
}
Using @OnStop
The @OnStop annotation can be applied to both a Runnable or a Callable. The Callable implementation includes the Boolean call() method. If the call() method returns true, then the system proceeds with shutdown. If you don’t provide an @OnStop Callable, then permission is implicitly granted. If the shutdown is approved, all registered @OnStop Runnables are invoked to perform any module or system cleanup code. The Runnables are invoked in parallel, and their execution will finish before the shutdown process completes.
For an example, add a class called DataRemover to the same module and package as the DataInstaller class. Listing 5.21 shows the code that removes the test data from the FamilyTreeManager data store when the application quits. (This doesn’t do anything useful here, but you see the form for @OnStop Runnables.)
Listing 5.21 FamilyTreeModel—DataRemover Class
package com.asgteach.familytree.model.data;
. . . imports omitted . . .
@OnStop
public final class DataRemover implements Runnable {
private static final Logger logger = Logger.getLogger(
DataRemover.class.getName());
@Override
public void run() {
FamilyTreeManager ftm = Lookup.getDefault().lookup(
FamilyTreeManager.class);
if (ftm != null) {
ftm.getAllPeople().stream().forEach((p) -> {
logger.log(Level.INFO, "Removing {0}.", p);
ftm.deletePerson(p);
});
}
}
}
5.9 What We Know So Far
The application that we built—that you built—does many things right. We’ve divided the application’s functionality into loosely-coupled modules. Our model (Person and FamilyTreeManager) is in a public package in its own module. The other three modules declare dependencies on this FamilyTreeModel module. Furthermore, we provide an implementation of FamilyTreeManager as a service in a separate module. With Lookups and service providers, we can easily provide alternate implementations without changing client code.
We display the application’s artifacts in separate windows: a PersonViewer window displays a tree view of Person objects and a PersonEditor window provides UI controls for editing Person data. There is no direct dependency between these two modules. This is a good first example of a modular NetBeans Platform application. TopComponents use the NetBeans Platform window system and Lookup provides a loosely-coupled architecture for both service providers and inter-module communication.
But let’s take a critical look at what we have so far, if for no other reason than to point to features in our application that don’t quite conform to the “NetBeans Platform” way of doing things (yet). We’d also like to remind you that we want to introduce the NetBeans Platform gradually by building on the work we’ve done both in this chapter and the previous chapters.
Here’s a brief summary of why the application we’ve built so far is not yet complete.
• The Update button doesn’t use the NetBeans Platform action framework. Although button event handlers are a convenient way to port a Swing application, NetBeans Platform applications use the top-level menu bar, the toolbar, and perhaps a right-click context sensitive menu to perform such actions as saving Person data. We cover the action framework in Chapter 9.
• The NetBeans Platform includes a Presentation Layer for displaying hierarchical data: the Nodes API. Wrapping your model data in nodes lets you add different behaviors to selectable, visual objects. Importantly, nodes also have a Lookup. You’ve learned how to add objects to a TopComponent’s Lookup. In the same way, you can add objects to a node’s Lookup, including capabilities which let you dynamically implement node-specific behaviors. We discuss nodes in Chapter 7.
• Explorer Views display your model data using nodes. The NetBeans Platform has multiple Explorer Views that are interchangeable, since they all work with nodes. We discuss Explorer Views in Chapter 7 as well.
• Using a selection to “open” a Person for editing is not a typical user experience. It is better to open a target with a deliberate action, such as a double click, a selection in a context menu, or a selection in a menu or toolbar. We will discuss this common use case when we cover the Action framework in Chapter 9.
• Finally, in the next chapter, we’ll show you how to add JavaFX content to windows to leverage the improvements offered by this UI.
5.10 Key Point Summary
In this chapter you built your first NetBeans Platform application by porting a Swing application from Chapter 2. In the process, you learned about two important features of the NetBeans Platform: Modularity and Lookup.
Here are the key points in this chapter.
• The NetBeans Platform provides an execution environment that includes a Runtime Container and a module system.
• The Runtime Container is responsible for loading the modules and classes in your application, providing the Main method, and executing your application.
• Modules are the basic building blocks of the NetBeans Platform. A module is a JAR file with related classes and metadata that describe a module’s dependencies and public packages.
• A module can only access code from other modules when that code is in a public package and when the module specifically declares a dependency on the module that contains the public package. This enforces loose coupling between modules and prevents accidental dependencies. The Runtime Container enforces the declared dependencies.
• NetBeans Platform applications include default modules that provide (among other features) the menu and toolbar framework, the window system, the modular system, and inter-module communication.
• When porting a Swing application, place each major UI area in its own window and in its own module. This is a guideline only; let your application’s GUI and logic determine how to modularize your application.
• TopComponents are windows that use the NetBeans Platform window system.
• Put service interfaces in public packages to make them accessible by other modules.
• Create a service provider implementation with annotation @ServiceProvider. You typically put service providers in their own modules.
• The Lookup API maintains an application-wide directory of available service providers (the Global Lookup). Use static method Lookup.getDefault().lookup() to discover a service provider. The discovery of service providers with Lookup is type safe and keeps your code loosely coupled.
• Use the Lookup API to share objects between modules. One module can place objects in a Lookup and another module can access objects of a specified type in a Lookup.
• TopComponents implement Lookup.Provider. Use InstanceContent to create a container for objects that can be added or removed. Use AbstractLookup to create a default implementation of Lookup.
• The TopComponent method associateLookup() designates a Lookup as the TopComponent’s Lookup.
• Obtain a TopComponent’s Lookup using TopComponent method getLookup(). Obtain a reference to a TopComponent with the Window Manager method findTopComponent() using a TopComponent’s preferredID string as the argument.
• A LookupListener’s event handler responds to changes in one or more Lookups in a type safe way. In application FamilyTreeApp, we use Lookups and LookupListener to make the selected Person object accessible to the PersonEditor module without module dependencies.
• The Global Selection Lookup provides the Lookup of the TopComponent that has focus. You can listen for the addition or removal of specific object types in the Global Selection Lookup. This lets you track a user’s selection actions without creating dependencies on specific TopComponents.
• Use the @OnStart and @OnStop annotations to implement startup or shutdown code in your application.
What’s Next?
Let’s now turn our attention back to JavaFX and see how we can leverage the improved functionality of JavaFX UI controls with JavaFX integration in a NetBeans Platform application.