
7. Nodes and Explorer Views
Most applications require a user to select objects from among many displayed in a window. Fortunately, the NetBeans Platform lets you easily organize your business objects, display them in a window, and manipulate them. In this chapter you’ll learn how to use the Nodes API to organize your business objects. You’ll also learn how to use Explorer Views to display objects and use the Explorer Manager to control the process.
What You Will Learn
• Create a node hierarchy that reflects the structure of business objects.
• Take advantage of node property support, the Properties window, and other components to display and edit business object properties.
• Make user selections available in the Global Selection Lookup.
• Create alternate states of a node hierarchy with FilterNode.
• Select and use the appropriate Explorer View for your presentation requirements.
• Display your business data in table form with business object properties as columns.
• Create a Selection History module that displays a running list of users’ selections.
7.1 The NetBeans Model View Controller
In Chapter 5 (see “What We Know So Far” on page 244) we suggested that the Nodes API makes selection management and display of business objects easier and more flexible. In this chapter, we’ll show you how by introducing the Nodes API, Explorer Views, and a TopComponent’s Explorer Manager.
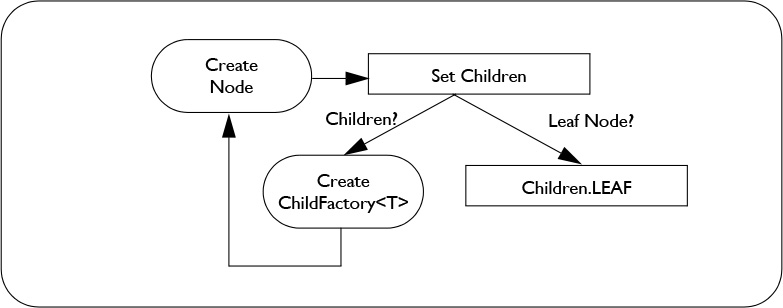
NetBeans nodes wrap application business objects. In the context of the Model View Controller pattern, nodes are the Model. Nodes have a hierarchical structure with a root node at the top, and every node includes a child container. A leaf node’s child container has the special designation Children.LEAF. To display a node hierarchy, NetBeans provides several Explorer Views, which are Swing components that work with nodes as their model. One or more Explorer View components constitute the View. NetBeans also has an Explorer Manager to manipulate the view and model as a Controller. Figure 7.1 shows the relationship among these three components.
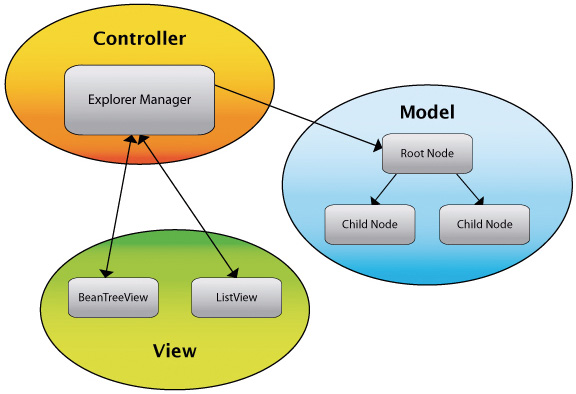
You do not directly connect the Explorer Views to the Explorer Manager. Instead, you set the root node of the Explorer Manager (called the Root Context) to the root node of your node hierarchy. The Explorer Views access the Explorer Manager by searching the component tree to find the first component that implements ExplorerManager.Provider. Explorer Views use this provider to access the Explorer Manager and its node hierarchy. You don’t write any code for this. All Explorer Views look for an Explorer Manager provider and take care of finding the node hierarchy. Furthermore, you can have multiple Explorer Views that display the same node hierarchy and share the same Explorer Manager.
All Explorer Views share the following behaviors.
• Display a node hierarchy.
• Respond to user selections.
• Respond to changes in the node hierarchy.
• Find their controller (their Explorer Manager) by searching the component tree for the first component that implements ExplorerManger.Provider. They access the node hierarchy through the Explorer Manager.
Why is this design approach significant to the NetBeans Platform application developer?
• Since all Explorer Views use the same model (nodes), your node hierarchy works with all of them. This means if you want to change the look from a tree view to an icon view or a table view, you only have to change the Explorer View component (one or two lines of code).
• You can use more than one Explorer View with the same node hierarchy by using the same Explorer Manager. This lets you display the same node hierarchy with different views.
• With a single line of code, you can tell the Explorer Manager to put all node selections (single or multi-selection) in the TopComponent’s Lookup.
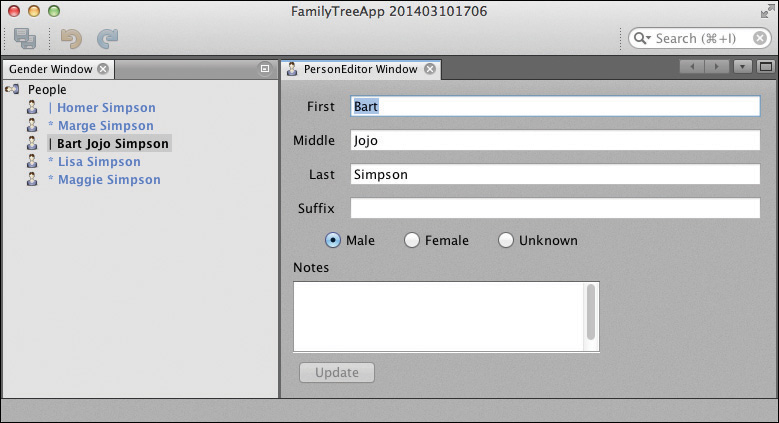
In this chapter, we’ll show you how to use the Explorer Manager, Explorer Views, and Nodes API to present and manage hierarchical data. We’ll provide multiple examples to show different node types as well as different Explorer Views. As an example, Figure 7.2 shows the FamilyTreeApp just after the user has finished updating Person Bart. This version of the application is based on the FamilyTreeApp presented in Chapter 5. The left window, however, displays its data using the Nodes and Explorer API instead of the Swing JTree component. No changes were made to the Person Editor module.
7.2 Nodes
Let’s begin with the Nodes API. Nodes wrap a business object and create a hierarchical structure. They provide a configurable display for a business object. Nodes have a Lookup, which generally holds the wrapped object. Nodes also have a context, that is, a set of Actions that can be dynamically enabled and disabled. With its Lookup, nodes have a set of dynamically configurable capabilities. In this chapter, however, we’ll limit ourselves to building node hierarchies and describing how nodes interact with the Explorer Manager and Explorer Views. We discuss the Action framework and capabilities in Chapter 9.
The Nodes API offers several implementations of super class Node. AbstractNode (which is not abstract) provides a general-purpose implementation of the Node class. BeanNode uses introspection to provide JavaBean property support of its wrapped object. When using BeanNode, you’ll see other component features enabled that let you inspect and modify the wrapped object. IndexedNode lets you sort lists of data, although you can achieve list sorting and reordering with AbstractNode and BeanNode as well. FilterNode is used in conjunction with an already-created node hierarchy that helps you display a subset of nodes based on one or more criteria. We’ll show you how to use AbstractNode, BeanNode, and FilterNode in this chapter. We discuss DataNode in Chapter 14 (see “Using DataNode and Lookup” on page 677).
Figure 7.3 shows the Node class hierarchy.

All nodes include a child container with class Node.Children. When you create a node, you also specify how to create its children. If the node is a leaf node (no children), you use the special designation Children.LEAF. The Nodes API includes several options for creating child nodes. However, the recommended approach is to extend ChildFactory<T>, where T is the type of your wrapped business object. This means that when you create a node with children, you provide a ChildFactory.
NodeListener and PropertyChangeListener
Nodes also support the standard Java Event Model and fire change events. Nodes support both NodeListener and PropertyChangeListener. NodeListener support covers changes in the node itself, such as node destroyed, children added, children removed, children reordered, and name, display name, icon and short description changes. PropertyChangeListener support applies to changes to the node’s underlying Property Sets. (We discuss a node’s Property Sets later in the chapter.) When a node hierarchy changes because children are added or removed, the listening Explorer Views respond to these node events and subsequently update the view. All this happens quietly behind the scenes, but you can listen for node events yourself when updates to the underlying model require some action. We will discuss node events further as we explore building a multi-level node hierarchy.
Building a Node Hierarchy
Let’s show you how to build a single-level node hierarchy by replacing the PersonViewer module in the FamilyTreeApp application from Chapter 5 (see Figure 5.3 on page 202). In this example, we’ll create a window that displays Person objects from the FamilyTreeManager. The new module will use nodes and Explorer Views, as shown in Figure 7.2. Once again you’ll see the advantages of using modules when building an application.
Create Module GenderViewer
Remove the PersonViewer module from the FamilyTreeApp application and create a new module using these steps.
1. In the Projects view, expand FamilyTreeApp | Modules node. Right-click on module PersonViewer. From the context menu, select Remove. This removes the PersonViewer module from the application.
Benefits of Modules
Interestingly, the FamilyTreeApp runs without the PersonViewer module, although the PersonEditor window has nothing to display or edit.
2. Select the Modules node in the FamilyTreeApp project, right-click, and select Add New . . . from the context menu. NetBeans displays the Name and Location dialog for the New Project wizard.
3. For Project Name, specify GenderViewer and accept the defaults for the remaining fields. Click Next.
4. NetBeans displays the Basic Module Configuration dialog. Specify com.asgteach.familytree.genderviewer for the Code Name Base and accept the defaults for the remaining fields. Click Finish. NetBeans creates project GenderViewer in the FamilyTreeApp application.
Create a TopComponent
The GenderViewer module requires a TopComponent to display its content.
1. In the Projects view, expand project GenderViewer Source node and right click on node com.asgteach.familytree.genderviewer. Select New | Window . . . from its context menu.
2. NetBeans displays the Basic Settings dialog of the New Window wizard. Select explorer in the Window Position drop down menu and check Open on Application Start. Click Next.
3. NetBeans displays the Name, Icon and Location dialog. Specify Gender for Class Name Prefix, leave the Icon field blank, and accept the defaults for the remaining fields. Click Finish.
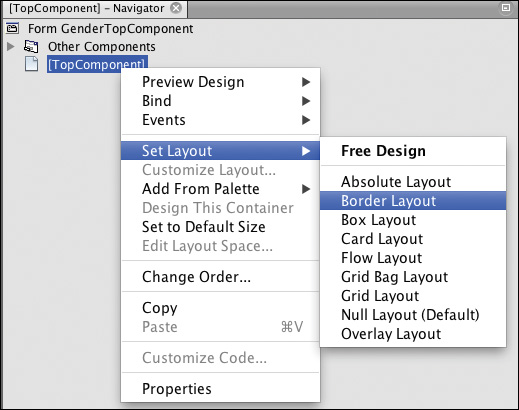
NetBeans creates the GenderTopComponent class and brings it up in the Design view. Create a BorderLayout to use with the TopComponent.
1. In the Design view, select the TopComponent in the Navigator window.
2. Right click and select Set Layout | BorderLayout in the context menu, as shown in Figure 7.4.
Create PersonNode Class
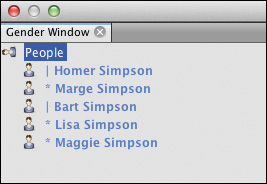
Now let’s create the Java classes we need to build our node hierarchy. Figure 7.5 shows the Gender window (detached) with the Person nodes that appear under the root node People. Here we display special symbols in front of a person’s name to indicate gender. We use | for Gender.MALE, * for Gender.FEMALE, and ? for Gender.UNKNOWN.
In order to access the NetBeans Nodes API and the Explorer and Property Sheet API with the Gender window, you’ll need to set dependencies. You’ll also set a dependency on the FamilyTreeModel module to access both Person and FamilyTreeManager.
1. In the NetBeans Projects view, right click on the Libraries node of project GenderViewer. In the context menu, select Add Module Dependency.
2. NetBeans displays the Add Module Dependency dialog. Select modules Explorer and Property Sheet API, FamilyTreeModel, and Nodes API. Click OK.
NetBeans adds a dependency to these modules, adding the libraries to the Libraries node in the GenderViewer module.
Now let’s build the node classes for the Gender window node hierarchy from the bottom up. That is, we’ll first build class PersonNode, a node that extends AbstractNode and implements PropertyChangeListener. This is a leaf node that wraps a Person object, and its children designation will be Children.LEAF. Listing 7.1 shows PersonNode.java.
@NbBundle.Messages({
"HINT_PersonNode=Person"
})
public class PersonNode extends AbstractNode
implements PropertyChangeListener {
public PersonNode(Person person) {
super(Children.LEAF, Lookups.singleton(person));
setIconBaseWithExtension(
"com/asgteach/familytree/genderviewer/resources/personIcon.png");
setName(String.valueOf(person.getId()));
setDisplayName(person.toString());
setShortDescription(Bundle.HINT_PersonNode());
}
@Override
public String getHtmlDisplayName() {
Person person = getLookup().lookup(Person.class);
StringBuilder sb = new StringBuilder();
if (person == null) {
return null;
}
sb.append("<font color='#5588FF'><b>");
switch (person.getGender()) {
case MALE:
sb.append("| ");
break;
case FEMALE:
sb.append("* ");
break;
case UNKNOWN:
sb.append("? ");
break;
}
sb.append(person.toString()).append("</b></font>");
return sb.toString();
}
@Override
public void propertyChange(PropertyChangeEvent evt) {
fireDisplayNameChange(null, getDisplayName());
}
}
The PersonNode constructor takes a Person object. The call to super() provides Children.LEAF for the children designation and a Lookup for the Person object. The Explorer Manager uses a node’s Lookup to manage the selection behavior. (Nodes implement Lookup.Provider.)
The constructor sets the node’s icon with setIconBaseWithExtension(). This loads not only file personIcon.png, but personIconOpen.png, personIcon32.png, and personIconOpen32.png, if present. (Icon files ending in 32 are larger than the standard 16 x 16 icon file.) Those that include Open are used when a node is opened (or expanded). If these extra icon files don’t exist, NetBeans uses the same icon file for all states of the node. If you don’t provide an icon file, NetBeans uses a generic “document” icon.
The setName() method provides a name for the node. In general, you don’t change a node’s name after setting it. Here, we use the Person getId() method converted to a String.
Nodes also have a human-friendly display name (set with setDisplayName()). The Explorer Views use this (along with the node’s icon) to display the node. Additionally, the Explorer View invokes a node’s getHtmlDisplayName() method, if provided. As its name implies, you can use a subset of HTML codes to alter the font color and style. Here we use a blue font color and specify bold (<b>), as well as provide the gender symbols.
The setShortDescription() method sets a node’s tooltip.
The property change listener is invoked with changes to the wrapped Person object, which invokes the fireDisplayNameChange() method in the event handler. (We add the listener to the Person object in the PersonChildFactory class, shown in Listing 7.2.)
Why do we explicitly fire a display name change event instead of updating the name directly with the setDisplayName() method? The answer to this question is a subtle reflection on how property change events work in general.
A property change event does not fire if the old value and new value are non-null and equal. Here, we’re forcing a NodeListener property change event so that the view will correctly update the node’s display name. When you change the gender of a Person object without changing any other Person properties that affect the name, the setDisplayName() method will not fire a property change event. The getDisplayName() method relies only on the Person toString() method. However, the getHtmlDisplayName() depends on the Person gender property as well. Thus, the displayNameChange event forces the Explorer View to refresh the node’s changed (HTML) display name when only the gender property changes.
Create ChildFactory for Person
Next, we specify how to create the collection of PersonNodes. To do this, we extend ChildFactory<Person> and provide code to build the nodes. Here we’ll need to access the FamilyTreeManager to get the list of Person objects.
1. Right click on the package name under Source Packages for the GenderViewer module and select New | Java Class from the context menu. Provide name PersonChildFactory.
2. NetBeans creates the class and brings it up in the Java Editor. Modify the class so that it extends ChildFactory<Person>. Fix Imports.
3. Use the NetBeans hints in the left column and select Implement all abstract methods for this class. NetBeans generates protected method createKeys().
4. You also override the protected createNodeForKey() method. Use the IDE Insert Code context menu to create a stub for this method.
Listing 7.2 shows the code for the PersonChildFactory class.
Listing 7.2 PersonChildFactory.java
public class PersonChildFactory extends ChildFactory<Person> {
private final FamilyTreeManager ftm;
private static final Logger logger = Logger.getLogger(
PersonChildFactory.class.getName());
public PersonChildFactory() {
this.ftm = Lookup.getDefault().lookup(FamilyTreeManager.class);
if (ftm == null) {
logger.log(Level.SEVERE, "Cannot get FamilyTreeManager object");
LifecycleManager.getDefault().exit();
}
ftm.addPropertyChangeListener(familyTreeListener);
}
@Override
protected boolean createKeys(List<Person> list) {
list.addAll(ftm.getAllPeople());
logger.log(Level.FINER, "createKeys called: {0}", ftm.getAllPeople());
return true;
}
@Override
protected Node createNodeForKey(Person key) {
logger.log(Level.FINER, "createNodeForKey: {0}", key);
PersonNode node = new PersonNode(key);
key.addPropertyChangeListener(WeakListeners.propertyChange(node, key));
return node;
}
// PropertyChangeListener for FamilyTreeManager
private final PropertyChangeListener familyTreeListener =
(PropertyChangeEvent evt) -> {
if (evt.getPropertyName().equals(FamilyTreeManager.PROP_PERSON_UPDATED)
&& evt.getNewValue() != null) {
this.refresh(true);
}
};
}
In the constructor, we obtain a reference to the FamilyTreeManager service provider using the Global Lookup and add a property change listener. Recall that the FamilyTreeManager service provider fires a property change event when it updates the underlying store of Person objects.
The createKeys() method specifies how the factory obtains the business objects for the child nodes this factory creates. Here we invoke the familiar getAllPeople() method to add the list of Person objects to the method’s List<Person> list. The return value true means that the list is complete. To build the list with multiple invocations of createKeys(), you return false until the list is complete. This is useful when the list of business objects is extremely large and you want to return data in chunks.
The createNodeForKey() method builds each child node, here PersonNode, with the provided Person argument. We add a property change listener to the wrapped Person object with NetBeans Platform utility method WeakListeners.propertyChange(), as follows.
key.addPropertyChangeListener(WeakListeners.propertyChange(node, key));
A “weak” listener lets the Person object weakly reference PersonNode (which may have a shorter life span than the Person object). This technique avoids memory leaks since this listener is never explicitly removed.
Note that the node system invokes these methods for you as the Explorer View displays its content and nodes are dynamically expanded.
The PersonChildFactory property change listener reacts to changes in the FamilyTreeManager. When the user clicks the Update button in the PersonEditor UI, the edited Person object is updated with the FamilyTreeManager. This invokes the property change listener which calls refresh().
The refresh() method is very powerful and efficient. When changes to the underlying data affect the node hierarchy, the refresh() method (and the listening Explorer View) handles the changes. Our simple hierarchy’s structure never changes, so calling refresh() is not really needed. However, if the FamilyTreeManager update results in a re-ordering or restructuring of the node hierarchy, the call to refresh() becomes necessary. We’ll show you this behavior in the next section.
Create the Root Node
The final step in building the classes for this node hierarchy is to create the root node class. In this case, the root node’s job is to use the ChildFactory to specify how to build its children. Note that you don’t create the nodes directly (you don’t call either method createKeys() or createNodeForKey()). Instead, the Nodes API coupled with the Explorer Manager and Explorer Views build the node hierarchy on demand. Listing 7.3 shows the code for the RootNode class, which also extends AbstractNode.
@NbBundle.Messages({
"HINT_RootNode=Show all people",
"LBL_RootNode=People"
})
public class RootNode extends AbstractNode {
public RootNode() {
super(Children.create(new PersonChildFactory(), false));
setIconBaseWithExtension(
"com/asgteach/familytree/genderviewer/resources/personIcon.png");
setDisplayName(Bundle.LBL_RootNode());
setShortDescription(Bundle.HINT_RootNode());
}
}
The constructor invokes super() with a PersonChildFactory instance and boolean false, which builds the nodes synchronously. Boolean true tells the Node system to build the child nodes on a background thread. This keeps the UI responsive when building the node hierarchy requires time-consuming calls.
Our root node uses the same icon that we use for PersonNode. If you run the application, you’ll see how the icon changes as you expand and collapse the root node.
Displaying the Node Hierarchy
With our node hierarchy defined, let’s show you how to display the nodes in a TopComponent. This requires some plumbing code to connect the three parts of the Model View Controller elements as described in Figure 7.1 on page 292.
• Make the TopComponent class implement ExplorerManager.Provider and instantiate an ExplorerManager class field.
• Override abstract method getExplorerManager() and return the ExplorerManager object.
• Choose an appropriate Explorer View and add it to the TopComponent. Here, we use BeanTreeView. To use an alternate Explorer View, substitute its class name, such as OutlineView for example. Everything else will just work.
• Use ExplorerUtils.createLookup() to create a new Lookup that contains selected nodes and their Lookups. Associate the TopComponent’s Lookup with this new Explorer Manager Lookup. This puts the Explorer View’s selected node(s) in the TopComponent’s Lookup. Other modules that listen for changes in the Global Selection Lookup can access these objects, as described in “Tracking Global Selection” on page 240 and further leveraged in “Creating a Selection History Feature” on page 332. The ActionMap holds actions associated with the nodes.
• Set the EntityManager’s context root to the root of your node hierarchy.
• Activate the Entity Manager in componentOpened() and de-activate it in componentClosed(). This eliminates any Entity Manager processing while the window is closed.
Listing 7.4 lists the TopComponent code that displays the node hierarchy. We’ll describe alternate Explorer Views later in this chapter.
Listing 7.4 Displaying the Node Hierarchy
public final class GenderTopComponent extends TopComponent
implements ExplorerManager.Provider {
private final ExplorerManager em = new ExplorerManager();
public GenderTopComponent() {
initComponents();
setName(Bundle.CTL_GenderTopComponent());
setToolTipText(Bundle.HINT_GenderTopComponent());
BeanTreeView view = new BeanTreeView();
add(view, BorderLayout.CENTER);
associateLookup(ExplorerUtils.createLookup(em, this.getActionMap()));
em.setRootContext(new RootNode());
}
. . . unchanged code omitted . . .
@Override
public void componentOpened() {
ExplorerUtils.activateActions(em, true);
}
@Override
public void componentClosed() {
ExplorerUtils.activateActions(em, false);
}
@Override
public ExplorerManager getExplorerManager() {
return em;
}
}
A Multi-Level Node Hierarchy
Our node hierarchy has a root with a list of child nodes. These child nodes are all leaf nodes, so the hierarchy is only two levels: the root node and its children. In a more complex example, the node hierarchy can be many levels. In fact, a node hierarchy can be infinite. Since children nodes are created on demand, you can expand a potentially infinite hierarchy until you run out of resources.
Let’s review the process for creating the classes you need to represent a node hierarchy, as shown in Figure 7.6. Each time you create a node class, you specify if that node is a leaf node or if it has Children nodes. If it has Children nodes, you build a ChildFactory specific to that type of child node. That child node, in turn, may have its own ChildFactory (quite possibly a different ChildFactory, depending on the structure of your business data).
Let’s modify the node structure and create a set of Gender nodes for Male, Female, and Unknown. Under each Gender node you’ll see the appropriate Person that matches its parent Gender node. Figure 7.7 shows this more complex node hierarchy in our running application. We also color code the PersonNode display name and use the same gender symbols as before.

Again, let’s build the node classes we need from the bottom up.
PersonNode and PersonChildFactory
PersonNode (the leaf node that displays a Person) has a slightly different getHtmlDisplayName() method, as shown in Listing 7.5.
public class PersonNode extends AbstractNode implements
PropertyChangeListener {
. . . unchanged code omitted . . .
@Override
public String getHtmlDisplayName() {
Person person = getLookup().lookup(Person.class);
StringBuilder sb = new StringBuilder();
if (person == null) {
return null;
}
switch (person.getGender()) {
case MALE:
sb.append("<font color='#5588FF'><b>| ");
break;
case FEMALE:
sb.append("<font color='#FF8855'><b>* ");
break;
case UNKNOWN:
sb.append("<b>? ");
break;
}
sb.append(person.toString()).append("</b></font>");
return sb.toString();
}
. . . unchanged code omitted . . .
}
Next, we’ll modify PersonChildFactory so that it only builds PersonNodes that match the factory’s gender. To do this, we set the Factory’s gender in its constructor and modify the createKeys() method, as shown in Listing 7.6.
Listing 7.6 PersonChildFactory
public class PersonChildFactory extends ChildFactory<Person> {
private final FamilyTreeManager ftm;
private static final Logger logger = Logger.getLogger(
PersonChildFactory.class.getName());
private final Person.Gender gender;
public PersonChildFactory(Person.Gender gender) {
this.gender = gender;
this.ftm = Lookup.getDefault().lookup(FamilyTreeManager.class);
if (ftm == null) {
logger.log(Level.SEVERE, "Cannot get FamilyTreeManager object");
LifecycleManager.getDefault().exit();
}
ftm.addPropertyChangeListener(familyTreeListener);
}
@Override
protected boolean createKeys(List<Person> list) {
ftm.getAllPeople().stream().forEach((Person p) -> {
if (p.getGender().equals(gender)) {
list.add(p);
}
});
logger.log(Level.FINER, "createKeys called: {0}", list);
return true;
}
@Override
protected Node createNodeForKey(Person key) {
. . . code unchanged . . .
}
// PropertyChangeListener for FamilyTreeManager
private final PropertyChangeListener familyTreeListener =
(PropertyChangeEvent evt) -> {
. . . code unchanged . . .
};
}
GenderNode and GenderChildFactory
Above the Person nodes in our node hierarchy is the GenderNode, a node that displays child nodes categorized by gender. Each of the different GenderNodes has its own icon and display name. The GenderNode uses PersonChildFactory to specify its children. Listing 7.7 shows this code. The icon, name, and display name all depend on the value of the gender argument passed in the constructor.
@Messages({
"HINT_GenderNode=Gender Node"
})
public class GenderNode extends AbstractNode {
public GenderNode(Gender gender) {
super(Children.create(new PersonChildFactory(gender), false),
Lookups.singleton(gender));
setGenderStuff(gender);
setShortDescription(Bundle.HINT_GenderNode());
}
private void setGenderStuff(Gender gender) {
StringBuilder sb = new StringBuilder();
StringBuilder iconString = new StringBuilder(
"com/asgteach/familytree/genderviewer/resources/");
switch (gender) {
case MALE:
sb.append("Male");
iconString.append("maleIcon.png");
break;
case FEMALE:
sb.append("Female");
iconString.append("femaleIcon.png");
break;
case UNKNOWN:
sb.append("Unknnown");
iconString.append("unknownIcon.png");
break;
}
setName(sb.toString());
setDisplayName(sb.toString());
setIconBaseWithExtension(iconString.toString());
}
}
The GenderChildFactory creates one GenderNode for each of the possible Person.Gender enum values, as shown in Listing 7.8.
Listing 7.8 GenderChildFactory
public class GenderChildFactory extends ChildFactory<Gender> {
private static final Logger logger =
Logger.getLogger(GenderChildFactory.class.getName());
@Override
protected boolean createKeys(List<Gender> list) {
list.addAll(Arrays.asList(Gender.values()));
logger.log(Level.FINER, "createKeys called: {0}", list);
return true;
}
@Override
protected Node createNodeForKey(Gender key) {
logger.log(Level.FINER, "createNodeForKey: {0}", key);
return new GenderNode(key);
}
}
Modify the Root Node
Finally, the root node now invokes the GenderChildFactory (instead of PersonChildFactory) for its children. Modify the RootNode class to reflect this change, as shown in Listing 7.9.
@NbBundle.Messages({
"HINT_RootNode=Show all people",
"LBL_RootNode=People"
})
public class RootNode extends AbstractNode {
public RootNode() {
super(Children.create(new GenderChildFactory(), false));
setIconBaseWithExtension(
"com/asgteach/familytree/genderviewer/resources/personIcon.png");
setDisplayName(Bundle.LBL_RootNode());
setShortDescription(Bundle.HINT_RootNode());
}
}
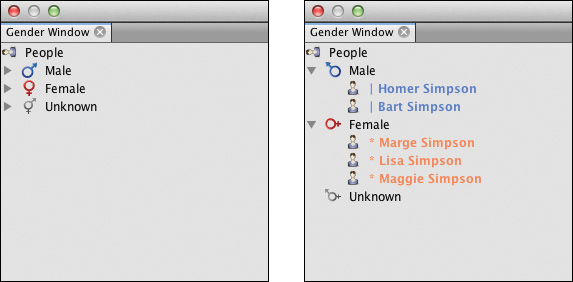
Figure 7.8 shows the Gender window (detached) as it looks initially (on the left) and with its hierarchy expanded (on the right). Male gender nodes display in blue, female gender in red, and unknown gender in the default color.
Expanding Nodes Programmatically
You expand a node by clicking its “open” handle in the UI (the small triangle shown in the left window in Figure 7.8). Explorer Views (that are based on trees) have two methods that expand a node hierarchy: expandNode(Node node) and expandAll(). Use the expandAll() method only when you know the size of the node hierarchy. To have the node hierarchy expand the gender nodes at startup, add the code in Listing 7.10 to the end of the GenderTopComponent constructor.
Listing 7.10 Expand the Gender Nodes
public GenderTopComponent() {
. . .
// expand the second level of nodes
for (Node node : em.getRootContext().getChildren().getNodes()) {
view.expandNode(node);
}
}
Here we access the gender nodes through the Explorer Manager’s root context and expand them using the Explorer View.
Using BeanNode
Selection and Editing
Selection is not a typical user experience case for displaying business objects in an editor. A better approach opens an editor with a context-sensitive menu item. In this section, we’ll eliminate the PersonEditor module from our application and make changes to the business objects with property editors. In Chapter 9, we’ll show you how to implement Open or Edit actions with editors.
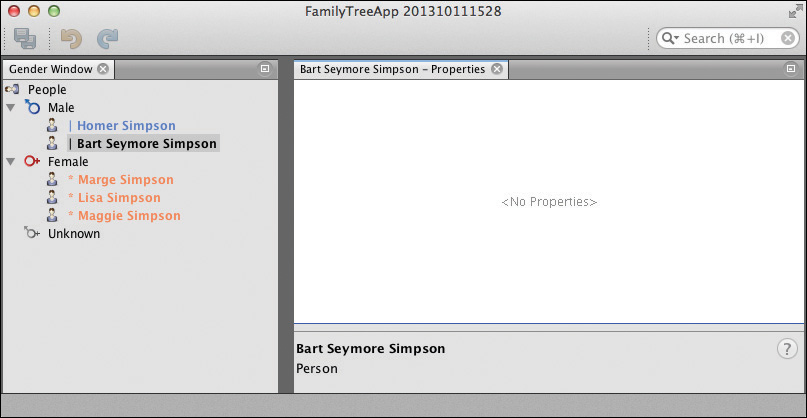
NetBeans Platform applications include a Properties window that you can open from the main menu with Window | IDE Tools | Properties. Because this window is hooked into the Global Selection, each selection appears in the Properties window when you select different nodes in the Gender window. The Properties window displays the node (using its display name) and its tooltip, if present. The Properties window also displays the node’s properties in a default property sheet editor. As you can see from Figure 7.9, there are no properties to display when you select different nodes in the Gender window.
When PersonNode extends BeanNode rather than AbstractNode, a Person’s properties appear in the Properties window. Furthermore, all writable properties can be modified in the BeanNode’s default property sheet. Let’s remove the PersonEditor module (aren’t modules convenient?) and use a Properties window to update Person objects. We’ll open the Properties window when the program starts and move the Gender window into the vacated editor position. The changes are quite straightforward.
1. Remove module PersonEditor from the FamilyTreeApp application. Select the Modules node, right click, and choose Remove from the context menu.
2. In GenderTopComponent.java, change the @TopComponent.Registration annotation to window position (mode) “editor.” (Removing the PersonEditor module vacated the editor position, so we’ll put the GenderTopComponent into this central position.)
3. Include code to open the Properties window at startup.
These changes are shown in Listing 7.11.
Listing 7.11 GenderTopComponent Changes
@TopComponent.Registration(mode = "editor", openAtStartup = true)
. . . unchanged code omitted . . .
public final class GenderTopComponent extends TopComponent
implements ExplorerManager.Provider {
private final ExplorerManager em = new ExplorerManager();
public GenderTopComponent() {
initComponents();
setName(Bundle.CTL_GenderTopComponent());
setToolTipText(Bundle.HINT_GenderTopComponent());
BeanTreeView view = new BeanTreeView();
add(view, BorderLayout.CENTER);
associateLookup(ExplorerUtils.createLookup(em, this.getActionMap()));
em.setRootContext(new RootNode());
// expand the second level of nodes
for (Node node : em.getRootContext().getChildren().getNodes()) {
view.expandNode(node);
}
// open the Properties window by default
TopComponent tc = WindowManager.getDefault()
.findTopComponent("properties");
if (tc != null) {
tc.open();
}
}
. . .
}
Listing 7.12 shows the modified PersonNode. Note that we supply the Person object to the BeanNode constructor and add a throws clause to the PersonNode constructor. BeanNode uses introspection to determine the wrapped object’s properties and automatically generates property support for each property in your object.
We also modify the PersonNode property change listener to update the FamilyTreeManager when the user updates a Person using the Properties window. The listening PersonChildFactory’s event handler will update the node hierarchy as before.
Listing 7.12 PersonNode Extending BeanNode
@NbBundle.Messages({
"HINT_PersonNode=Person"
})
public class PersonNode extends BeanNode<Person> implements
PropertyChangeListener {
public PersonNode(Person person) throws IntrospectionException {
super(person, Children.LEAF, Lookups.singleton(person));
setIconBaseWithExtension(
"com/asgteach/familytree/genderviewer/resources/personIcon.png");
setName(String.valueOf(person.getId()));
setDisplayName(person.toString());
setShortDescription(Bundle.HINT_PersonNode());
}
. . . unchanged code omitted . . .
private final PropertyChangeListener propListener =
(PropertyChangeEvent evt) -> {
Person person = (Person) evt.getSource();
FamilyTreeManager ftm = Lookup.getDefault().lookup(
FamilyTreeManager.class);
if (ftm == null) {
logger.log(Level.SEVERE, "Cannot get FamilyTreeManager object");
LifecycleManager.getDefault().exit();
} else {
ftm.updatePerson(person);
fireDisplayNameChange(null, getDisplayName());
}
};
}
Extending BeanNode affects the ChildFactory code as well. Listing 7.13 shows the modified PersonChildFactory class. Because of the throws clause in the constructor, the createNodeForKey() method must now wrap the PersonNode instantiation code in a try / catch block.
Listing 7.13 PersonChildFactory with BeanNode Child
public class PersonChildFactory extends ChildFactory<Person> {
. . . unchanged code omitted . . .
@Override
protected Node createNodeForKey(Person key) {
logger.log(Level.FINER, "createNodeForKey: {0}", key);
PersonNode node = null;
try {
node = new PersonNode(key);
key.addPropertyChangeListener(
WeakListeners.propertyChange(node, key));
} catch (IntrospectionException ex) {
logger.log(Level.WARNING, "IntrospectionException: {0}", ex);
}
return node;
}
}
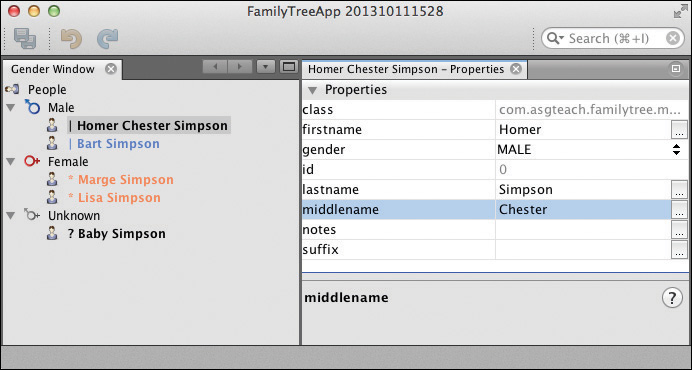
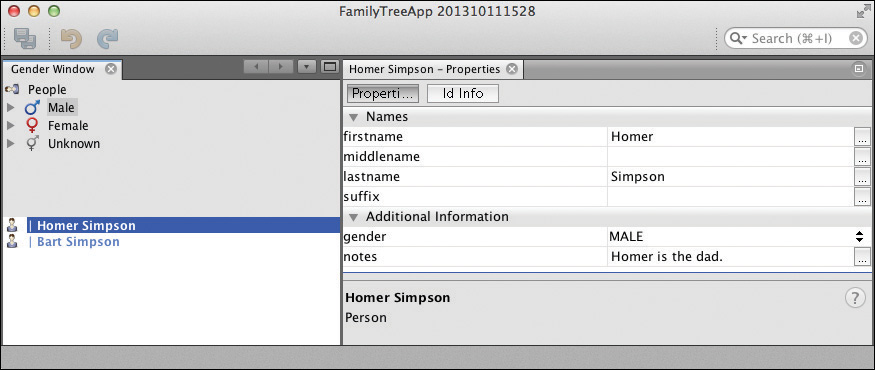
Figure 7.10 shows the FamilyTreeApp running using BeanNode<Person> as the super class for PersonNode and the effect it has on the Properties window. Because of the property change listener, updates made in the Properties window are written to the FamilyTreeManager and reflected in the Gender node hierarchy in the left window.
BeanNode Tip
BeanNode is a good option when you want to experiment with a node’s property support, since it provides property support automatically. However, BeanNode has some overhead, since it builds the property support using introspection with each node you create. An alternative is to build your own property support, giving you much more control.
Creating Your Own Property Sheet
Now you can edit the selected Person and make changes to the wrapped Person object. However, the standard Properties window with BeanNode is not particularly user friendly. Properties appear in alphabetical order rather than grouped according to their use. When you want more control over the presentation of the Properties window, you can create your own property sheet.
What is a property sheet? A property sheet holds the properties (that you choose) from the node’s wrapped object. You put properties into property sets. Furthermore, you can designate one or more sets to appear under separate tabs. And you can designate certain properties as read only.
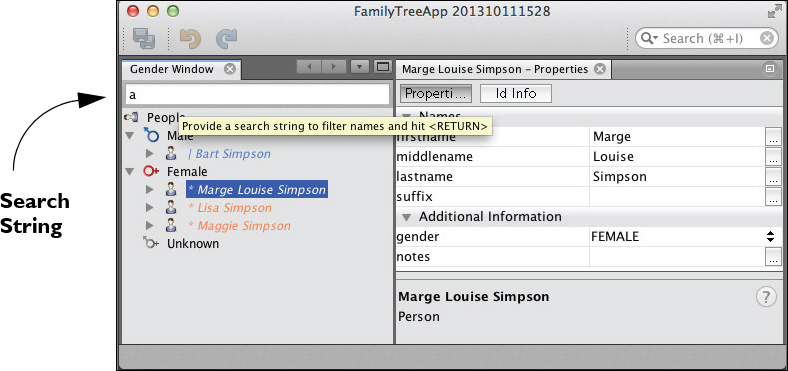
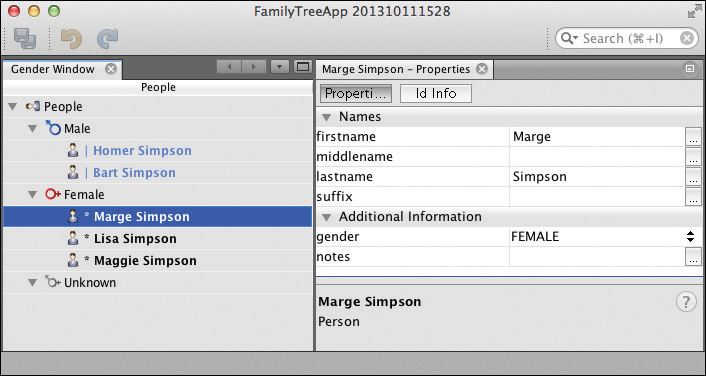
Figure 7.11 shows the FamilyTreeApp running. In the left window you see the node hierarchy arranged by gender. In the right window you see an editable Properties window. Two property sets appear. The first is under heading Names that includes Person properties firstname, middlename, lastname, and suffix. The second set appears under heading Additional Information and includes the gender and notes properties.

The second tab (Id Info) includes a third property set with the read-only id property. This arrangement is a substantial improvement over the default BeanNode presentation.
To create a custom property sheet for a node’s wrapped object, override the createSheet() method and return a Sheet object. Inside this method, create a Sheet and divide your object’s properties into Sets. Create the sets, configure them with display names, and add them to the Sheet. Finally, create PropertySupport objects for each property you want included in the sets and add the support objects to the appropriate set. Listing 7.14 shows how we built the property sheet displayed in Figure 7.11. Note that with custom property sheets, PersonNode extends AbstractNode, not BeanNode.
Listing 7.14 Creating a Property Sheet
public class PersonNode extends AbstractNode implements
PropertyChangeListener {
private static final Logger logger = Logger.getLogger(
PersonNode.class.getName());
public PersonNode(Person person) {
super(Children.LEAF, Lookups.singleton(person));
setIconBaseWithExtension(
"com/asgteach/familytree/genderviewer/resources/personIcon.png");
setName(String.valueOf(person.getId()));
setDisplayName(person.toString());
setShortDescription(Bundle.HINT_PersonNode());
}
. . . unchanged code omitted . . .
@Override
protected Sheet createSheet() {
Sheet sheet = Sheet.createDefault();
Person person = getLookup().lookup(Person.class);
// create a property set for the names (first, middle, last, suffix)
Sheet.Set setNames = Sheet.createPropertiesSet();
setNames.setDisplayName("Names");
// create a property set for read-only id
Sheet.Set readOnlySet = new Sheet.Set();
readOnlySet.setDisplayName("Identification");
// put it under its own tab
readOnlySet.setValue("tabName", " Id Info ");
// create a property set for gender and notes
Sheet.Set infoSet = new Sheet.Set();
infoSet.setName("Additional Information");
sheet.put(setNames);
sheet.put(infoSet);
sheet.put(readOnlySet);
try {
// create property support for the Names
Property<String> firstnameProp = new PropertySupport
.Reflection<String>(person, String.class, "firstname");
Property<String> middlenameProp = new PropertySupport
.Reflection<String>(person, String.class, "middlename");
Property<String> lastnameProp = new PropertySupport
.Reflection<String>(person, String.class, "lastname");
Property<String> suffixProp = new PropertySupport
.Reflection<String>(person, String.class, "suffix");
setNames.put(firstnameProp);
setNames.put(middlenameProp);
setNames.put(lastnameProp);
setNames.put(suffixProp);
// create property support for gender and notes
Property<Person.Gender> genderProp = new PropertySupport
.Reflection<Person.Gender>(person, Person.Gender.class, "gender");
Property<String> notesProp = new PropertySupport
.Reflection<String>(person, String.class, "notes");
infoSet.put(genderProp);
infoSet.put(notesProp);
// create read-only property support for id (the setter is null)
Property<Long> idProp = new PropertySupport.Reflection<Long>(
person, Long.class, "getId", null);
readOnlySet.put(idProp);
} catch (NoSuchMethodException ex) {
ErrorManager.getDefault();
}
return sheet;
}
}
Property support enables a Properties context menu item for that node and brings up a popup Properties window, as shown in Figure 7.12. (This Properties context menu item is available with BeanNode, too.)

Using FilterNode
FilterNode lets you filter a node hierarchy using an arbitrary criterion. You create a filtered node hierarchy by having a delegate node with perhaps specialized behavior and a criterion upon which the original hierarchy’s node is either included or not. In general, you implement the specialization by overriding methods that are also present in the original node. For example, if you’d like the filtered node to have a specialized display, then you can override either getDisplayName() or getHtmlDisplayName(), as we do in our example.
Note that when using FilterNode, you do not “replace” the original node or the original hierarchy. The original hierarchy remains intact and the filtered hierarchy affects which nodes are included.
For example, Figure 7.13 shows the Gender window with a filtered node hierarchy. You supply a search string in the provided text field followed by <Return> to display nodes with names that contain the search string (ignoring case). The filtered hierarchy uses italics in the display name instead of bold. To return to the “unfiltered” node hierarchy, you use an empty search String.
FilterNode is the “delegate” node. A special Children class extends FilterNode.Children to create the acceptance criterion. In our example we use a boolean accept() method that implements the decision logic. Let’s show you how to implement the filtered node hierarchy that appears in Figure 7.13.
Update the Design View
First, you update the TopComponent’s UI to include the text field control using these steps.
1. Bring up GenderTopComponent in the Design view. From the Swing Containers palette, select Panel and add it to the top of the design area. (The TopComponent should already use BorderLayout for its layout. Put the JPanel in BorderLayout.NORTH.)
2. Select the JPanel you just added in the Navigator window, right click, and change its layout to GridLayout.
3. From the Swing Controls palette, select TextField and add it to the JPanel component. The TextField will expand to the width of the Design view.
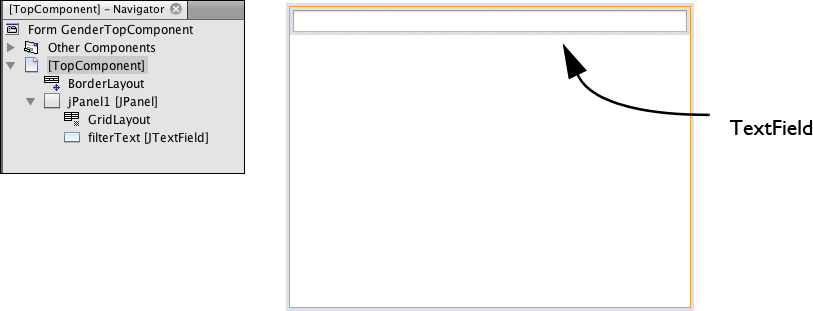
4. With the TextField selected, in the Properties window under the Code tab, change its Variable Name to filterText. Under the Properties tab, make its text property blank. Figure 7.14 shows the TopComponent Design and Navigator views.
5. Select the TextField in the Design view and double-click. This generates a Swing action event handler that is invoked when the user hits the <Return> key in the TextField. You’ll add the event handling code after creating the FilterNode classes.
With these Design view changes, you can run the program to test the new Gender window design, as shown in Figure 7.15. (The TextField doesn’t do anything yet.)
Create FilterNode Hierarchy Classes
With the Design view modifications made, let’s now create the classes we need to filter the Gender node hierarchy. We’ll start with PersonFilterNode, as shown in Listing 7.15.
public class PersonFilterNode extends FilterNode {
public PersonFilterNode(Node original, String searchString) {
super(original, new PersonFilterChildren(original, searchString));
}
@Override
public Node getOriginal() {
return super.getOriginal();
}
@Override
public String getHtmlDisplayName() {
Person person = getOriginal().getLookup().lookup(Person.class);
if (person == null) {
return null;
}
StringBuilder sb = new StringBuilder();
switch (person.getGender()) {
case MALE:
sb.append("<font color='#5588FF'><i>| ");
break;
case FEMALE:
sb.append("<font color='#FF8855'><i>* ");
break;
case UNKNOWN:
sb.append("<i>? ");
break;
}
sb.append(person.toString()).append("</i></font>");
return sb.toString();
}
}
PersonFilterNode is a proxy or delegate node for every node in the original hierarchy (including the original root node, the GenderNodes, and the selected PersonNodes). The constructor includes the original node. FilterNodes are configured so that the node methods of the original node are invoked, unless the FilterNode specifically overrides them. That’s how we can easily use a FilterNode to proxy all kinds of nodes.
PersonFilterNode overrides the getHtmlDisplayName() method to provide a special look for the filtered nodes. Note that getHtmlDisplayName() is invoked for the root node and each GenderNode. However, these nodes do not have a Person object in their Lookup, so getHtmlDisplayName() returns null and the original node’s getDisplayName() is used instead.
PersonFilterNode creates its children with PersonFilterChildren, as shown in Listing 7.16. This is where we store the search string (which we convert to lowercase in the event handler). The createNodes() method selects the nodes from the original hierarchy. Here, the boolean accept() method accepts the node if either it has no Person object in its Lookup or the Person object’s name contains the search string.
The copyNode() method builds the delegate node from the original one. The method is invoked as the filtered node hierarchy is built.
Listing 7.16 PersonFilterChildren
public class PersonFilterChildren extends FilterNode.Children {
private final String searchString;
public PersonFilterChildren(Node original, String searchString) {
super(original);
this.searchString = searchString;
}
@Override
protected Node[] createNodes(Node key) {
List<Node> result = new ArrayList<>();
for (Node node : super.createNodes(key)) {
if (accept(node)) {
result.add(node);
}
}
return result.toArray(new Node[0]);
}
@Override
protected Node copyNode(Node original) {
return new PersonFilterNode(original, this.searchString);
}
private boolean accept(Node node) {
Person p = node.getLookup().lookup(Person.class);
// make case insensitive
return (p == null || p.toString().toLowerCase()
.contains(searchString));
}
}
Display a Filtered Node Hierarchy
Listing 7.17 shows the TextField’s event handler as well as other modifications made to GenderTopComponent. First, we add a tool tip to the TextField in the annotated @Messages list. We also elevate BeanTreeView to a class field so that it is accessible in the event handler.
The event handler either restores the root context to the original root (if the search string is empty), or it builds a filtered node hierarchy based on the search string (converted to lowercase). When you invoke setRootContext(), the gender nodes collapse, so we include code to expand them.
Listing 7.17 GenderTopComponent—Displaying a FilteredNode Hierarchy
@Messages({
"CTL_GenderAction=Gender",
"CTL_GenderTopComponent=Gender window",
"HINT_GenderTopComponent=This is a Gender window",
"HINT_FilterTextField=Provide a search string to filter names and hit
<RETURN>"
})
public final class GenderTopComponent extends TopComponent
implements ExplorerManager.Provider {
private final ExplorerManager em = new ExplorerManager();
private final BeanTreeView view;
public GenderTopComponent() {
initComponents();
filterText.setToolTipText(Bundle.HINT_FilterTextField());
setName(Bundle.CTL_GenderTopComponent());
setToolTipText(Bundle.HINT_GenderTopComponent());
view = new BeanTreeView();
add(view, BorderLayout.CENTER);
associateLookup(ExplorerUtils.createLookup(em, this.getActionMap()));
em.setRootContext(new RootNode());
// expand the second level of nodes
for (Node node : em.getRootContext().getChildren().getNodes()) {
view.expandNode(node);
}
}
private void filterTextActionPerformed(java.awt.event.ActionEvent evt) {
Node root = em.getRootContext();
Node newRoot;
if (root instanceof PersonFilterNode) {
root = ((PersonFilterNode) root).getOriginal();
}
if (filterText.getText().isEmpty()) {
// use the original root
newRoot = root;
} else {
// make case insensitive
newRoot = new PersonFilterNode(root,
filterText.getText().toLowerCase());
}
em.setRootContext(newRoot);
for (Node node : em.getRootContext().getChildren().getNodes()) {
view.expandNode(node);
}
}
}
7.3 Explorer Views
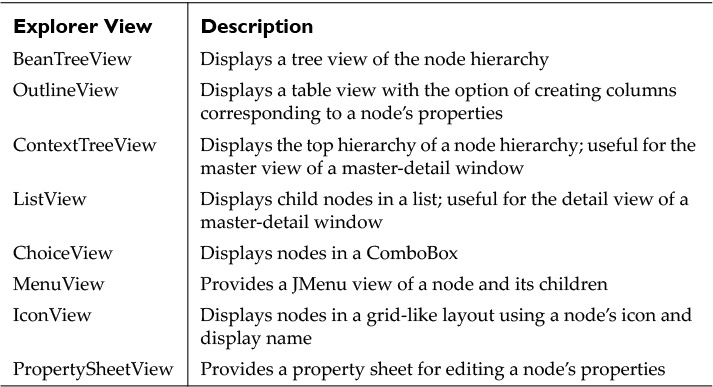
Explorer Views provide the View of a node hierarchy, as shown in Figure 7.1 on page 292. Explorer Views are not all inter-changeable, but they do all work with nodes. Explorer Views are useful for different presentation arrangements. The two most general Explorer Views are BeanTreeView (used in our TopComponent) and OutlineView. Both provide an expandable node tree structure. We briefly describe the Explorer Views in Table 7.1 and provide detailed examples of these in this section.
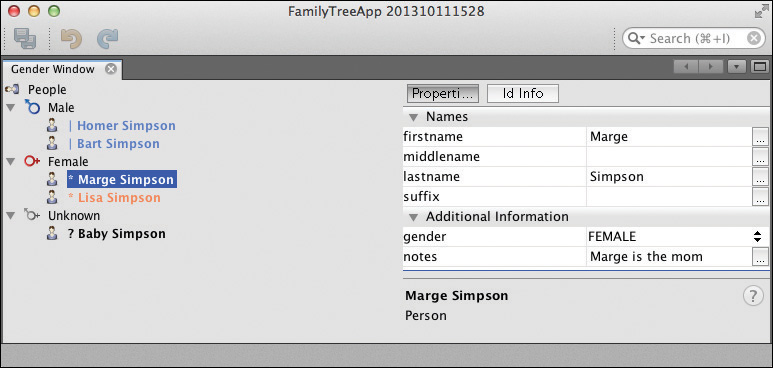
Quick Search
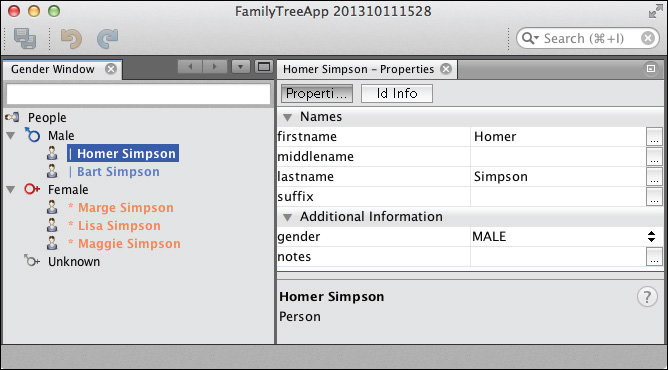
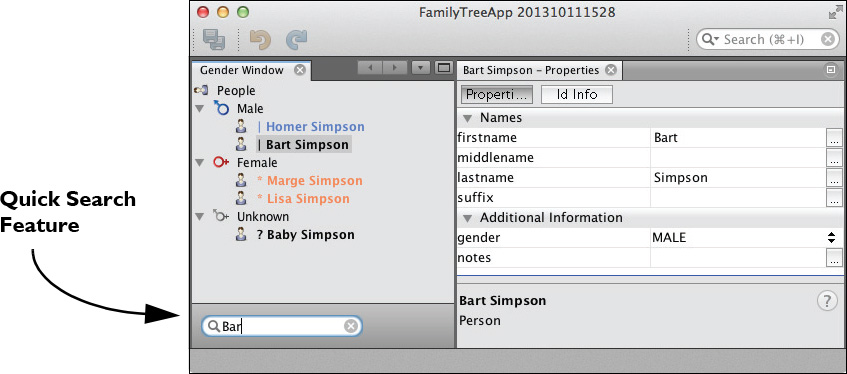
Explorer Views have a built-in quick search feature. To see this, start typing in the window with an Explorer View, and a text field component will appear. The Explorer View selects the “next” node that matches the text you provide. Figure 7.16 shows this behavior. When you type the text “Bar” in a BeanTreeView, you see the Bart Simpson node is highlighted. In a master-detail window (see “Master-Detail View” on page 327), the quick search applies to whichever portion of the window has focus.
BeanTreeView
BeanTreeView displays the node hierarchy as a tree of all the nodes. This is the Explorer View we’ve used in our examples and is perhaps the most widely-used Explorer View. BeanTreeView uses a triangle icon pointed right to indicate an unexpanded node and pointed down to indicate an expanded (or opened) node. The default action (activated with double click) for a non-leaf node is to toggle between its expanded and unexpanded states.
OutlineView
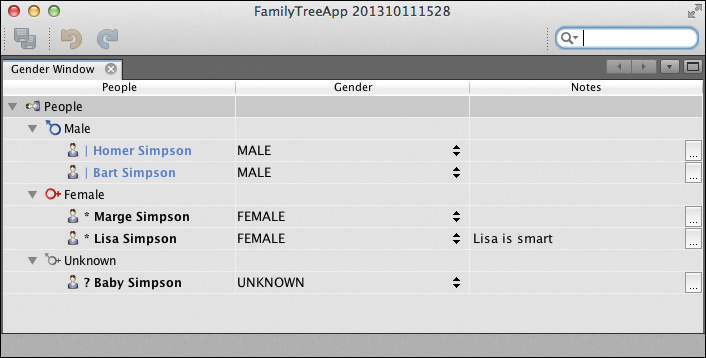
OutlineView is a powerful Explorer View that displays a node hierarchy in table form. The default configuration is similar to BeanTreeView. In our example, you see what’s shown in Figure 7.17, with a single column (with heading “People”). Listing 7.18 shows the code to create this view in the GenderTopComponent.
Listing 7.18 OutlineView Explorer View
public final class GenderTopComponent extends TopComponent
implements ExplorerManager.Provider {
private final ExplorerManager em = new ExplorerManager();
public GenderTopComponent() {
initComponents();
setName(Bundle.CTL_GenderTopComponent());
setToolTipText(Bundle.HINT_GenderTopComponent());
OutlineView view = new OutlineView("People");
add(view, BorderLayout.CENTER);
associateLookup(ExplorerUtils.createLookup(em, this.getActionMap()));
em.setRootContext(new RootNode());
}
. . . unchanged code omitted . . .
OutlineView’s columns are sortable (a click on the column header toggles between ascending / descending sort order). In our example, the default sorting behavior is to sort each Gender node, and within the Gender category, sort its children using the display name. Figure 7.18 shows the node hierarchy sorted in descending order.
With OutlineView, you can configure additional columns from a node’s wrapped object’s properties, as shown in Figure 7.19. When you configure OutlineView’s columns, you must provide property support for the properties that you use. You can use either BeanNode or your own property sheet with AbstractNode (see Listing 7.14 on page 315) as we have done here. Listing 7.19 shows the code to create columns Gender and Notes.
Listing 7.19 OutlineView Property Columns
public GenderTopComponent() {
initComponents();
setName(Bundle.CTL_GenderTopComponent());
setToolTipText(Bundle.HINT_GenderTopComponent());
OutlineView view = new OutlineView("People");
view.setPropertyColumns(
"gender", "Gender",
"notes", "Notes"
);
add(view, BorderLayout.CENTER);
associateLookup(ExplorerUtils.createLookup(em, this.getActionMap()));
em.setRootContext(new RootNode());
. . . unchanged code omitted . . .
}
Master-Detail View
You can easily implement a master-detail view using Explorer Views ContextTreeView for the master and ListView for the detail, as shown in Figure 7.20. These Explorer Views are designed to work together. Listing 7.20 shows you how to use these views when you add them to the same TopComponent. Both Explorer Views search the component tree to find the Entity Manager and hook into the node hierarchy. The master view displays the Gender nodes (which do not expand). When the user selects one of the “master” nodes, its children appear in the bottom area. As before, we open the Properties window so the user can edit a selected Person node.
Listing 7.20 Providing a Master-Detail View
public GenderTopComponent() {
initComponents();
setName(Bundle.CTL_GenderTopComponent());
setToolTipText(Bundle.HINT_GenderTopComponent());
ContextTreeView view = new ContextTreeView();
ListView list = new ListView();
add(view, BorderLayout.CENTER);
add(list, BorderLayout.SOUTH);
associateLookup(ExplorerUtils.createLookup(em, this.getActionMap()));
em.setRootContext(new RootNode());
// open the Properties window by default
TopComponent tc = WindowManager.getDefault()
.findTopComponent("properties");
if (tc != null) {
tc.open();
}
}
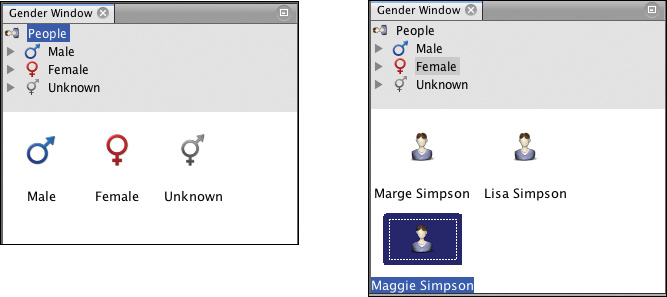
Master-Detail View with IconView
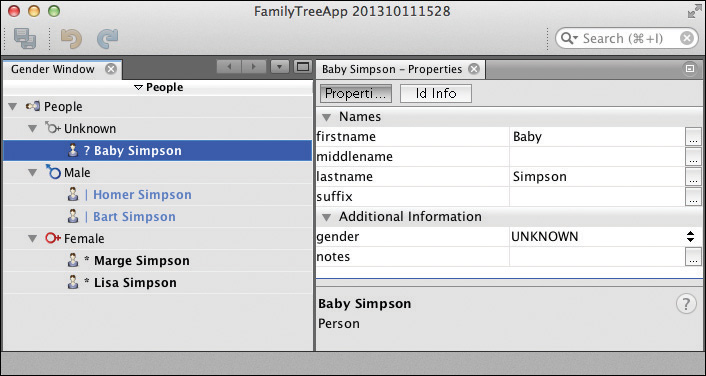
Instead of using ListView for the detail, you can also use IconView. This view displays node children in a grid-like layout similar to a Windows Explorer icon listing. Figure 7.21 shows the view when the user selects the root People node (left) and then when the Gender node Female is selected (right). Listing 7.21 shows the code that creates an IconView for the detail view in a master-detail window. Note that IconView uses a node’s 32 x 32 icon file, if available (as shown in Figure 7.21).
Listing 7.21 Using IconView in a Master-Detail Window
public GenderTopComponent() {
initComponents();
setName(Bundle.CTL_GenderTopComponent());
setToolTipText(Bundle.HINT_GenderTopComponent());
ContextTreeView view = new ContextTreeView();
IconView icon = new IconView();
add(view, BorderLayout.CENTER);
add(icon, BorderLayout.SOUTH);
associateLookup(ExplorerUtils.createLookup(em, this.getActionMap()));
em.setRootContext(new RootNode());
}
Master-Detail View with MenuView
An alternative to ContextTreeView in a master view window is MenuView, which provides two buttons to navigate your node hierarchy, as shown in Figure 7.22. The first button is “Browse from root” and provides a context selection mechanism for child nodes. Once a child node is selected, a second button, “Browse from current point,” is enabled. (In our node hierarchy, the current point is a child node, so it will be empty.) Listing 7.22 shows the code to create a master-detail window with MenuView.

Listing 7.22 Using MenuView in a Master-Detail Window
public GenderTopComponent() {
initComponents();
setName(Bundle.CTL_GenderTopComponent());
setToolTipText(Bundle.HINT_GenderTopComponent());
MenuView menu = new MenuView();
ListView list = new ListView();
add(menu, BorderLayout.CENTER);
add(list, BorderLayout.SOUTH);
associateLookup(ExplorerUtils.createLookup(em, this.getActionMap()));
em.setRootContext(new RootNode());
}
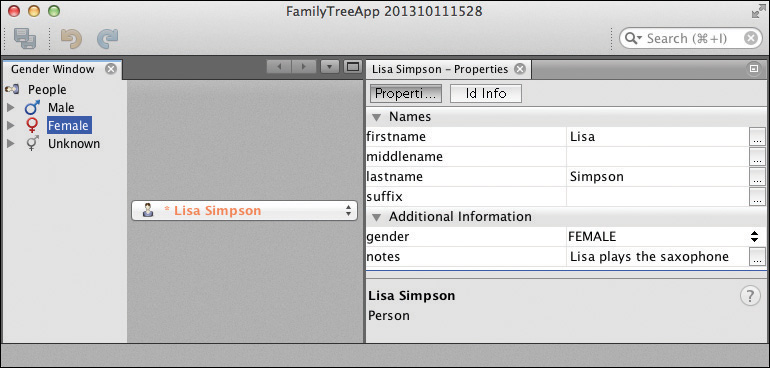
Master-Detail View with ChoiceView
Finally, let’s show you ChoiceView in a master-detail window for the detail view, as shown in Figure 7.23. ChoiceView provides a ComboBox with the children nodes of the selected Gender node in the master view. We provide ContextTreeView for the master view here. Listing 7.23 shows the code to create a master-detail window with ChoiceView.
Listing 7.23 Using ChoiceView with a Master-Detail Window
public GenderTopComponent() {
initComponents();
setName(Bundle.CTL_GenderTopComponent());
setToolTipText(Bundle.HINT_GenderTopComponent());
ContextTreeView view = new ContextTreeView();
ChoiceView choice = new ChoiceView();
add(view, BorderLayout.CENTER);
add(choice, BorderLayout.EAST);
associateLookup(ExplorerUtils.createLookup(em, this.getActionMap()));
em.setRootContext(new RootNode());
}
PropertySheetView
PropertySheetView is not really an Explorer View, but a view for presenting a node’s properties. Like the built-in Properties window, PropertySheetView displays the selected node’s properties when defined. Figure 7.24 shows a single window with a node hierarchy displayed with BeanTreeView (in BorderLayout.WEST). We define a PropertySheetView in BorderLayout.CENTER. You can use either BeanNode for your node’s superclass or specify your own property sheet as shown earlier (see “Creating Your Own Property Sheet” on page 314). Listing 7.24 shows the code to display the selected node’s properties with PropertySheetView. The GenderTopComponent window is in the “editor” position, which makes it easier to view the PropertySheetView at startup.
Listing 7.24 Using PropertySheetView
public GenderTopComponent() {
initComponents();
setName(Bundle.CTL_GenderTopComponent());
setToolTipText(Bundle.HINT_GenderTopComponent());
BeanTreeView view = new BeanTreeView();
PropertySheetView propView = new PropertySheetView();
add(view, BorderLayout.WEST);
add(propView, BorderLayout.CENTER);
associateLookup(ExplorerUtils.createLookup(em, this.getActionMap()));
em.setRootContext(new RootNode());
for (Node node : em.getRootContext().getChildren().getNodes()) {
view.expandNode(node);
}
}
7.4 Creating a Selection History Feature
Let’s pull together the concepts we’ve covered in this chapter and build a version of the FamilyTreeApp shown running in Figure 7.25. In this version, we’ll make all the PersonNode properties read only except the notes property. We configure the Properties window for edits and use OutlineView as our Explorer View with a column defined for the notes property.
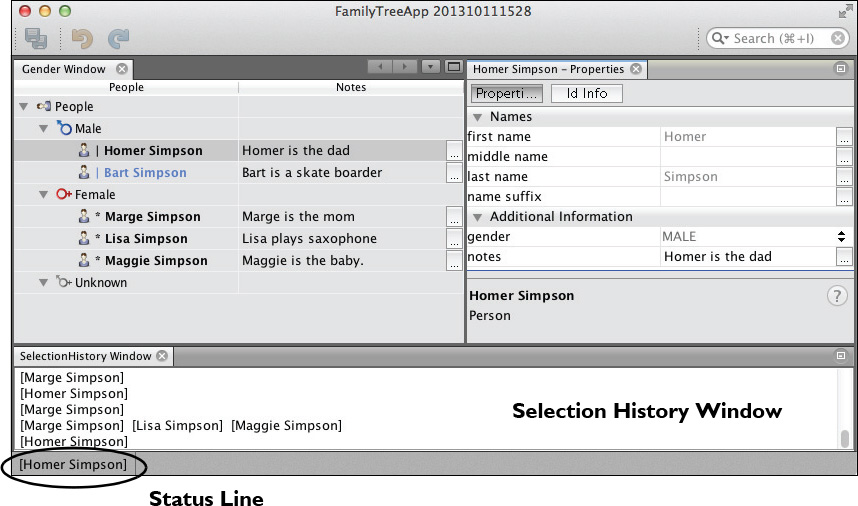
The FamilyTreeApp also includes a new Selection History window that is updated when the user makes a selection (and changes the Global Selection Lookup). This lets you maintain a history of the selected nodes. Furthermore, we display the user’s current selection in the application status line, where it remains for just a second or two before being cleared. The new window is implemented in its own module, so that it can be added or removed. In addition, if you configure the Plugin Manager for your application, users of your application can dynamically uninstall or re-install this module (see “Application Updates” on page 857 for instructions on how to configure the Plugin Manager, as well as how to dynamically install modules).
Modify PersonNode PropertySheet
We’ll begin with the version of FamilyTreeApp used with the OutlineView (see “OutlineView” on page 324). We’ll modify the PersonNode custom property sheet so that its properties are read only, except for the notes property.
1. In project GenderViewer, bring up PersonNode.java in the Java Editor.
2. Modify the createSheet() method for read-only PropertySupport, as shown in Listing 7.25. Note that you can create read-only PropertySupport using PropertySupport.Reflection and make the setter null, or you can use PropertySupport.ReadOnly as shown in Listing 7.25.
Listing 7.25 Modified PersonNode createSheet() Method
@Override
protected Sheet createSheet() {
Sheet sheet = Sheet.createDefault();
Person person = getLookup().lookup(Person.class);
// create a property set for the names (first, middle, last, suffix)
Sheet.Set setNames = Sheet.createPropertiesSet();
setNames.setDisplayName("Names");
// create a property set read-only id
Sheet.Set readOnlySet = new Sheet.Set();
readOnlySet.setDisplayName("Identification");
// put it under its own tab
readOnlySet.setValue("tabName", " Id Info ");
// create a property set for gender and notes
Sheet.Set infoSet = new Sheet.Set();
infoSet.setName("Additional Information");
sheet.put(setNames);
sheet.put(infoSet);
sheet.put(readOnlySet);
try {
// create read-only property support for the Names
Property<String> firstnameProp = new PropertySupport
.ReadOnly<String>(
"firstname", // Name of the property
String.class, // Type of property value
"first name", // Display name
"The person's first name") { // Description
@Override
public String getValue() throws IllegalAccessException,
InvocationTargetException {
return person.getFirstname();
}
};
// make similar changes to property support for
// middlenameProp
// lastnameProp
// suffixProp
setNames.put(firstnameProp);
setNames.put(middlenameProp);
setNames.put(lastnameProp);
setNames.put(suffixProp);
// create read only property support for gender
Property<Person.Gender> genderProp = new PropertySupport
.ReadOnly<Person.Gender>(
"gender",
Person.Gender.class,
"gender",
"The person's gender") {
@Override
public Person.Gender getValue() throws
IllegalAccessException, InvocationTargetException {
return person.getGender();
}
};
// use read-write property support for notes (unchanged)
Property<String> notesProp = new PropertySupport
.Reflection<String>(person, String.class, "notes");
infoSet.put(genderProp);
infoSet.put(notesProp);
// create read-only property support for id (the setter is null)
Property<Long> idProp = new PropertySupport.Reflection<Long>(
person, Long.class, "getId", null);
readOnlySet.put(idProp);
} catch (NoSuchMethodException ex) {
ErrorManager.getDefault();
}
return sheet;
}
Modify OutlineView in GenderTopComponent
Modify the GenderTopComponent constructor so that the OutlineView is configured for property column Notes, as shown in Listing 7.26.
Listing 7.26 Using OutlineView with Column Notes
public GenderTopComponent() {
initComponents();
setName(Bundle.CTL_GenderTopComponent());
setToolTipText(Bundle.HINT_GenderTopComponent());
OutlineView view = new OutlineView("People");
view.setPropertyColumns(
"notes", "Notes"
);
add(view, BorderLayout.CENTER);
associateLookup(ExplorerUtils.createLookup(em, this.getActionMap()));
em.setRootContext(new RootNode());
for (Node node : em.getRootContext().getChildren().getNodes()) {
view.expandNode(node);
}
// open the Properties window by default
TopComponent tc = WindowManager.getDefault()
.findTopComponent("properties");
if (tc != null) {
tc.open();
}
}
Add Features to Your Application
Now we are ready to add a brand new feature to the application—a Selection History window that tracks a user’s selections. The concept is straightforward. By listening to the Global Selection Lookup, the new module displays a running list of the user’s selections. To do this, we’ll add a new module to the application.
Create Module SelectionHistory
Add a new module to implement the SelectionHistory window.
1. Select the Modules node in the FamilyTreeApp project, right-click, and select Add New . . . from the context menu. NetBeans displays the Name and Location dialog for the New Project wizard.
2. For Project Name, specify SelectionHistory and accept the defaults for the remaining fields. Click Next.
3. NetBeans displays the Basic Module Configuration dialog. Specify com.asgteach.familytree.selectionhistory for the Code Name Base and accept the defaults for the remaining fields. Click Finish. NetBeans creates project SelectionHistory in the FamilyTreeApp application.
4. Expand project SelectionHistory, right click on node Libraries, and select Add Module Dependency from the context menu.
5. Select the Nodes API from the list of modules and click OK.
Create and Configure SelectionHistoryTopComponent
The SelectionHistory module requires a TopComponent to display its content.
1. In the Projects view, expand project SelectionHistory Source node and right click on node com.asgteach.familytree.selectionhistory. Select New | Window . . . from its context menu.
2. NetBeans displays the Basic Settings dialog of the New Window wizard. Select output in the Window Position drop down menu and check Open on Application Start. Click Next. (This will position the window below the editor position.)
3. NetBeans displays the Name, Icon and Location dialog. Specify SelectionHistory for Class Name Prefix, leave the Icon field blank, and accept the defaults for the remaining fields. Click Finish.
NetBeans creates the SelectionHistoryTopComponent class and brings it up in the Design view. Create a BorderLayout and add a TextArea component.
1. In the Design view, select the TopComponent in the Navigator window.
2. Right click and select Set Layout | BorderLayout in the context menu.
3. In the Swing Controls palette, select TextArea and add it to the center of the TopComponent Design view. This adds both a JScrollPane and a JTextArea.
4. Select the TextArea and in its Properties window under the Code tab, change property Variable Name to displayTextArea.
5. Switch to the Source view and add code to the TopComponent, as shown in Listing 7.27 and described here.
Add class field result to hold the result of Global Selection Lookup. In the componentOpened() method, request Lookup for objects of Node.class and add the TopComponent as a Lookup listener.
In the componentClosed() method, remove the TopComponent as a Lookup listener.
Implement the resultChanged() Lookup listener, which fires when a Node.class object is added to or removed from the Global Selection Lookup. We store the Lookup contents in nodes. If the list is non-empty, we write the display names to the TextArea component and the status line (using StatusDisplay.getDefault().setStatus()). Note that if the user selects multiple nodes, these are all included in the SelectionHistory Window.
This implementation listens for all node objects, including RootNode, GenderNode, and PersonNode. If you want to limit the selection history to Person objects, then listen for Person.class instead. Since PersonNode objects carry a Person object in their Lookup, the SelectionHistory Lookup listener fires when the user selects one or more of the Person nodes.
Listing 7.27 Listen for Changes to the Global Selection Lookup
public final class SelectionHistoryTopComponent extends TopComponent
implements LookupListener {
private Lookup.Result<Node> result;
. . . unchanged code omitted . . .
@Override
public void componentOpened() {
result = Utilities.actionsGlobalContext().lookupResult(Node.class);
result.addLookupListener(this);
}
@Override
public void componentClosed() {
result.removeLookupListener(this);
}
@Override
public void resultChanged(LookupEvent le) {
Collection<? extends Node> nodes = result.allInstances();
// only get the selection if there is one
// otherwise leave the selection unchanged!
if (!nodes.isEmpty()) {
StringBuilder status = new StringBuilder();
StringBuilder sb = new StringBuilder("
");
for (Node node : nodes) {
sb.append(" [").append(node.getDisplayName()).append("] ");
status.append(" [").append(node.getDisplayName()).append("] ");
}
StatusDisplayer.getDefault().setStatusText(status.toString());
displayTextArea.setText(sb.insert(0,
displayTextArea.getText()).toString());
}
}
}
With this design, module SelectionHistory is not dependent on the FamilyTreeModel module or the GenderViewer module. Adding the SelectionHistory module also does not affect any of these modules (other than to consume space in the application’s window frame). Yet the SelectionHistory module adds a distinct functionality to our application. Similarly, removing this module does not affect the remaining modules. This illustrates one of the major advantages of a modular system. You can add and remove functionality to your application without modifying the rest of the system!
7.5 Key Point Summary
When you use Nodes, Explorer Views, and the Explorer Manager, the NetBeans Platform provides a flexible system for displaying your business data. Together, these components handle selection events and let users dynamically expand and collapse trees of hierarchical data. Here are the key points in this chapter.
• Nodes, Explorer Views, and the Explorer Manager can be understood in the context of a Model View Controller pattern. Nodes are the Model, Explorer Views are the View, and the Explorer Manager is the Controller.
• Nodes wrap business objects and create a hierarchical structure for display.
• Nodes have a Lookup and place their wrapped business object in the Lookup.
• AbstractNode provides a general-purpose implementation of the Node class.
• To build a node hierarchy, create a root node and a ChildFactory for the root node’s children. The ChildFactory is responsible for creating its Child nodes, which will also have a ChildFactory unless the node is a leaf node. Leaf nodes have the designation Children.Leaf for their child container.
• Nodes have names, display names, icons, and optional HTML display code.
• Nodes support the Java Event Model. NodeListener event handlers are invoked for events that change the node, such as children added, removed, or reordered and changes to the node’s name, display name, icon, or tooltip. PropertyChangeListener event handlers are invoked for changes to the node’s underlying property support objects.
• To display a node hierarchy in a TopComponent, implement ExplorerManager.Provider, instantiate an Explorer Manager and an Explorer View, and set the Explorer Manager’s root context to the root node of your node hierarchy.
• BeanNode is an alternate implementation of the Node class that provides property support for its wrapped business object. The property support is used by the standard NetBeans Platform Properties window, as well as the PropertySheetView component and OutlineView Explorer View.
• Alternatively, you can create your own property sheet, which provides property support for its wrapped business object. A custom property sheet is also compatible with the Properties window, PropertySheetView, and the OutlineView Explorer View.
• Use FilterNode to create an alternate display for a node hierarchy. The FilterNode acts as a delegate for the original node. Whether or not a node is selected for display is controlled by the FilterNode.Children implementation.
• All Explorer Views work with Nodes and offer different types of presentation. BeanTreeView and OutlineView are both tree-based components. Other options include ContextTreeView and ListView to implement a master-detail window.
• Explorer Views provide a Quick Search feature for selection that is enabled by typing text into the view’s window.
• Adding a feature to your application, such as a Selection History window, can be accomplished by creating a new module and adding it to your application. Because a NetBeans Platform application is modular, such added features frequently do not require existing modules to be modified.