
8. Handling Events
Events are actions that the user performs while visiting your page. When the browser detects an event, such as a mouse click or a key press, it can trigger JavaScript objects associated with that event, called event handlers. In most of the previous chapters in this book, you’ve seen examples of how event handlers are used. But event handling is such an important technique to understand—and it encompasses virtually all of your pages’ interaction with the user—that it deserves its own chapter.
In this chapter, you’ll see how to use event handlers to work with windows, capture mouse movements and clicks, deal with form events, and react when the user presses keys on the keyboard.
Handling Window Events
Window events occur when the user does something affecting an entire browser window. The most common window event is simply loading the window by opening a particular Web page. You can also have events that trigger event handlers when windows are closed, moved, or even sent to the background.
When working with event handlers, you’ll often find it useful to connect an event handler to an object using dot syntax, like so:
window.onfocus
window.onload
document.onmousedown
Note that when you use the event handler as part of an object like this, the event handler is written all in lowercase. Also, keep your event handlers in external scripts, rather than placing them inside the HTML tag—this approach is more standards compliant, it separates out the JavaScript code from the HTML code, and it’s easier to edit (or replace) all your JavaScript code in an external file.
Listing 8.1. The HTML for the multiple onload example.
<!DOCTYPE html>
<html>
<head>
<title>Welcome!</title>
<script src="script01.js"></script>
</head>
<body id="pageBody">
<h1>Welcome to our Web site!</h1>
</body>
</html>
The onload event
We have used the onload event frequently throughout this book. It is triggered when the user enters your page and all its elements have completed loading. The epidemic of advertising pop-up windows is an example—though not an especially pleasant one—of the onload event handler in action.
Although we’ve shown onload repeatedly, up until now we’ve skipped one important bit of information: what to do when you have multiple things you need to have happen when the page loads. Listings 8.1 and 8.2 demonstrate how to do this.
1. addOnload(initOne);
addOnload(initTwo);
addOnload(initThree);
In this script, we want three entirely separate things to happen when the page first loads. Setting window.onload three times wouldn’t work, because the second time would overwrite the first, and then the third would overwrite the second. Instead, we’re calling a new function (defined below), addOnload(), which handles the onload handler for us. For each call, we’re passing one parameter: the name of the function we want to run when an onload event is triggered. You can see the result in ![]() .
.
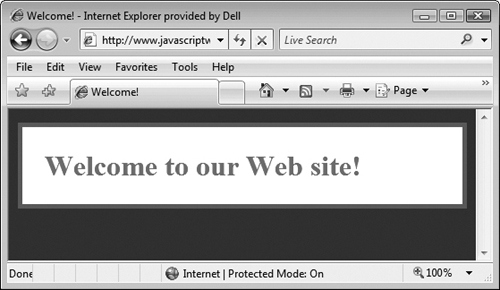
![]() The script is setting multiple
The script is setting multiple onload handlers (in this case, for color formatting) to be run when the page loads.
2. function addOnload(newFunction) {
This line starts off a new function, much like any other function. What’s being passed in is the name of a function.
This can be a bit confusing, so here’s an example. Instead of calling
window.onload = myNewFunction;
we’ll instead call
addOnload(myNewFunction);
which works out the same at the end.
3. var oldOnload = window.onload;
This line declares a new variable, oldOnload—if we’ve already set window.onload, we’ll store its value here. If we haven’t, it doesn’t hurt anything.
4. if (typeof oldOnload == "function") {
In this line, we check to see what kind of variable oldOnload is. If we’ve previously set window.onload, it’ll be a function call (otherwise, it’ll be nothing at all). If it’s a function, do the following.
Listing 8.2. Setting multiple onload attributes using our new addOnload() function.
addOnload(initOne);
addOnload(initTwo);
addOnload(initThree);
function addOnload(newFunction) {
var oldOnload = window.onload;
if (typeof oldOnload == "function") {
window.onload = function() {
  if (oldOnload) {
     oldOnload();
  }
  newFunction();
}
}
else {
  window.onload = newFunction;
}
}
function initOne() {
document.getElementById("pageBody").style.backgroundColor = "#00F";
}
function initTwo() {
document.getElementById("pageBody").style.color = "#F00";
}
function initThree() {
var allTags = document.getElementsByTagName("*");
for (var i=0; i<allTags.length; i++) {
if (allTags[i].nodeName == "H1") {
allTags[i].style.border = "5px green solid";
allTags[i].style.padding = "25px";
allTags[i].style.backgroundColor = "#FFF";
}
}
}
5. window.onload = function() {
if (oldOnload) {
oldOnload();
}
newFunction();
}
These lines of code reset the value of window.onload to do two things: whatever it was doing before, and our new function. The window.onload event handler is set to be an anonymous function (one that doesn’t have a name). Then, if oldOnload has a value (which it should, but this works around a bug in Internet Explorer 7), we tell window.onload to do what it was already doing. But before the function ends, we add that it needs to also do our newFunction() as well.
6. else {
window.onload = newFunction;
}
If oldOnload wasn’t a function—that is, it was undefined—we tell it to do our new function when the page completes loading. In this fashion, we can call addOnload() multiple times: the first time it assigns its function to window.onload; the second and later times it creates that anonymous function, telling JavaScript to do everything it’s been told to do previously and the new thing as well.
If you’re working with an existing body of code, it’s easy to accidentally reset window.onload—any given HTML page can call multiple external JavaScript files, any of which can set the event handler. If one place sets window.onload directly, but every time after that you call addOnload(), you’re fine. But if you set window.onload after you’ve set it previously (whether directly or via addOnload()), you’ll have walked on top of your handler and lost its original value.
This script is (very) loosely based on one by Simon Willison (simonwillison.net) and is used with his permission.
If you want to have an onload handler do more than one thing, the easiest way is to create one function that does everything, and then have the onload handler call that function. But make sure that each function returns—if, for example, your function contains a setTimeout() call to itself, it’ll never return and therefore never go on to the rest of the called functions.
The onunload event
The onunload handler is triggered when the user leaves your Web page. The most common use for this is advertising windows that pop up when you leave some commercial sites, especially pornographic sites. If you find yourself on one of the latter, you’ll often find that it’s almost impossible to leave—every time you close a window or attempt to navigate away from the site, window after window appears, re-opening the same or other pages, all of the same genre.
Consequently, people have come to hate the onunload handler with a passion, so use it sparingly.
The onresize event
Netscape 4.x had a well-known bug where dynamic content wasn’t redrawn when a Web page was resized. Listings 8.3 and 8.4 force the page to reload its contents to avoid this problem. Thankfully, Netscape versions 6 and later no longer suffer from this bug.
1. window.onresize = resizeFix;
The event handler is attached to the window object and calls the resizeFix function.
2. if (document.layers) {
We only want to do the following if the user has Netscape 4.x, and this is the simplest way to check that. The document.layers object only ever existed in this browser.
3. var origWidth = window.innerWidth;
var origHeight = window.innerHeight;
If we’re in Netscape 4.x, we want to save the current height and width of the browser window for later use.
Listing 8.3. This HTML includes the JavaScript hidden inside a multi-line comment, since it’s meant for use in older browsers.
<!DOCTYPE html>
<html>
<head>
<title>onResize Netscape fix</title>
<script src="script02.js"></script>
</head>
<body>
<h1>
<script>
<!-- Hide code from older browsers
document.write("This is dynamic content")
// Stop hiding code -->
</script>
</h1>
</body>
</html>
Listing 8.4. You can fix Netscape 4.x’s dynamic content redraw bug with this script.
window.onresize = resizeFix;
if (document.layers) {
var origWidth = window.innerWidth;
var origHeight = window.innerHeight;
}
function resizeFix() {
if (document.layers) {
if (window.innerWidth != origWidth || window.innerHeight != origHeight) {
window.location.reload();
}
}
}
Here’s where we actually handle the browser being resized.
5. if (document.layers) {
Again, check to make sure that this only happens if they are using Netscape 4.x.
6. if (window.innerWidth != origWidth || window.innerHeight != origHeight) {
If they came in here and either the height or the width of the window has changed, the user resized the window, and we want to force the page to reload. If the browser window size hasn’t changed, the onresize handler was triggered by Netscape drawing the scrollbars, and it can be ignored.
7. window.location.reload();
Reload the page if the user actually did resize the window ![]() .
.
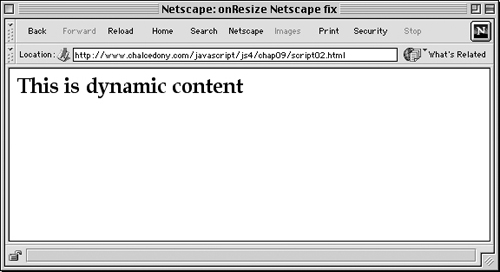
![]() The reloaded (but still kind of dull) page.
The reloaded (but still kind of dull) page.
The onmove event
The onmove event handler is triggered when the window is moved.
The onabort event
The onabort event handler is triggered when the user cancels an image loading on the Web page. It’s not used very often, and not all browsers seem to fully support it.
The onerror event
The onerror event may be triggered when a JavaScript error occurs on the page.
It can be polite to set onerror = null; in complex pages you put on the Web. With this line of code on your page, some error messages will not be displayed to the user in the unfortunate event that there’s a problem—but which errors will be hidden depends on the browser.
The onfocus event
The onfocus and onblur handlers are mirror images of each other. While they may sound like what happens when you’ve been working on JavaScript too late at night, in reality, the onfocus handler triggers when a page becomes the front-most active window. Listings 8.5 and 8.6 catch the onfocus handler and force the page to always go to the back ![]() .
.
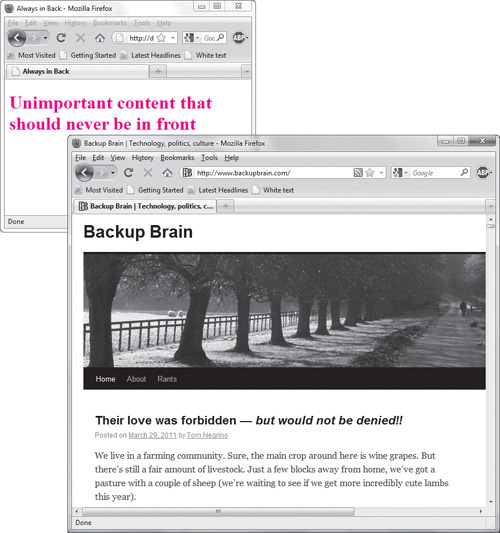
![]() The page in the back will stay there.
The page in the back will stay there.
1. window.onfocus = moveBack;
Here’s another example of the window and event handler object calling a function, in this case moveBack.
2. function moveBack() {
self.blur();
}
If the browser window becomes the active window, this function is triggered and forces the window to be blurred (i.e., inactive).
Listing 8.5. This HTML is for the page that’s in back.
<!DOCTYPE html>
<html>
<head>
<title>Always in Back</title>
<script src="script03.js"></script>
</head>
<body>
<h1>Unimportant content that should never be in front</h1>
</body>
</html>
Listing 8.6. Using the onfocus handler, you can control window stacking.
window.onfocus = moveBack;
function moveBack() {
  self.blur();
}
Listing 8.7. This HTML is for the page that stays in front.
<!DOCTYPE html>
<html>
<head>
<title>Always in Front</title>
<script src="script04.js"></script>
</head>
<body>
<h1>Important content that should always be in front</h1>
</body>
</html>
Listing 8.8. This script uses onblur to keep a window in the front (active) position.
window.onblur = moveUp;
function moveUp() {
  self.focus();
}
The onblur event
If you have a window that you always want to remain in front of all your other windows (a help window, for instance, that gives details about the content of the main page), Listings 8.7 and 8.8 are what you need. Any time the user tries to put this page in the background (triggering the onblur handler), it forces its way back up to the front again.
1. window.onblur = moveUp;
Here’s another example of the window and event handler object calling a function, in this case moveUp().
2. function moveUp() {
self.focus();
}
If the browser window becomes the inactive window, this function is triggered and forces the window to become active.
Be very careful not to accidentally open up two windows that both contain this bit of code. Chances are, your browser will not handle the result gracefully!
Instead of using this script on the help window, you could use Listing 8.6 on the main window to always make it go to the back, making the help window always the front-most window.
You may be more familiar with one of the more nefarious uses of the onblur event: advertisers who open ad windows behind your current Web page, which you don’t discover until you close the window and find a stack of them piled up. Unfortunately, people blame the last Web site they opened, when in fact the ads were likely created by a page browsed much earlier.
Mouse Event Handling
Many of the user’s interactions with your pages come in the form of mouse movements or mouse clicks. JavaScript provides a robust set of handlers for these events.
The onmousedown event
One of the questions most frequently asked by new JavaScripters is, “How do I hide my scripts from anyone coming to my page?” The answer is, simply: you can’t. If anyone is determined enough, they can always find out what’s in your code.
If you really need to try to hide your code from average surfers, though, Listings 8.9 and 8.10 keep them from viewing the page source via a mouse-click that would normally bring up the shortcut menu.
1. if (typeof document.oncontextmenu == "object") {
if (document.all) {
document.onmousedown = captureMousedown;
This first block checks to see if this browser is Firefox, which uses window.oncontextmenu (and so doesn’t know about document.oncontextmenu). If it isn’t Firefox, we next look for document.all, which is an easy way of checking to see if the browser is IE. If it is, we want to set captureMousedown() to run whenever onmousedown is triggered.
2. else {
document.oncontextmenu = captureMousedown;
If we’re here, it’s because your visitor is using Safari, and that browser needs oncontextmenu set on the document object.
Listing 8.9. You might be able to view the source of this page, but you’ll have to work for it.
<!DOCTYPE html>
<html>
<head>
<title>onMousedown capture</title>
<script src="script05.js"></script>
</head>
<body>
<h1>Important source data that someone
might want to look at.</h1>
</body>
</html>
Listing 8.10. This script will deter some inexperienced users from bringing up the shortcut menu on your pages.
if (typeof document.oncontextmenu == "object") {
  if (document.all) {
    document.onmousedown = captureMousedown;
}
else {
  document.oncontextmenu = captureMousedown;
}
}
else {
  window.oncontextmenu = captureMousedown;
}
function captureMousedown(evt) {
if (evt) {
  var mouseClick = evt.which;
}
else {
  var mouseClick = window.event.button;
}
if (mouseClick==1 || mouseClick==2 || mouseClick==3) {
  alert("Menu Disabled");
  return false;
}
}
3. else {
window.oncontextmenu = captureMousedown;
And finally, if the browser is Firefox, we want oncontextmenu events for the window to call the captureMousedown() function.
4. function captureMousedown(evt) {
The function that handles the onmousedown and oncontextmenu events begins here. Netscape-based browsers and Safari generate the evt parameter being passed in automatically whenever an event is triggered, and this variable contains information about the event.
5. if (evt) {
var mouseClick = evt.which;
}
else {
var mouseClick = window.event.button;
}
If the evt variable exists, we can determine which button the user clicked by checking evt.which. If the user has IE, the results of the user’s action will be found in window.event.button. Either way, we’ll store the result in the mouseClick variable.
6. if (mouseClick==1 || mouseClick==2 || mouseClick==3) {
alert("Menu Disabled");
return false;
}
If mouseClick is 1, 2, or 3, put up an alert ![]() saying that that functionality is disabled, and return false. Returning false keeps the menu window from being displayed.
saying that that functionality is disabled, and return false. Returning false keeps the menu window from being displayed.
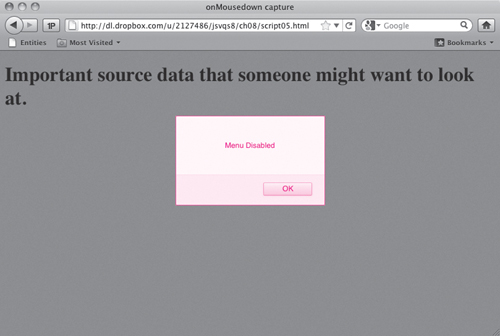
![]() This alert box scares off the timid (and annoys the rest).
This alert box scares off the timid (and annoys the rest).
Why are we checking for three different mouse clicks? Shouldn’t one be enough? In theory, yes, but in practice, no—as shown in Table 8.1. Unfortunately, this approach can backfire: you may successfully block left-click and right-click input (to block people from dragging images off Web pages, for example), but it also means that you might be keeping people from clicking any links on your page.

It’s very simple for savvy surfers to work around this: all they have to do is turn JavaScript off in their browser, and their clicking ability returns. Putting your JavaScript code into an external .js file seems like a tricky workaround, but users can look in their cache folder on their hard disk. Or they can look at the source of your page, find the name of the external file, and then enter the URL of the external file in their browser, which obediently displays the file’s contents. If you really worry about your source code being stolen, the only method that’s guaranteed to keep it from being looked at is to never put it on the Web.
Internet Explorer understands document.oncontextmenu, so you’d think that setting it would cause it to handle those events—not so. IE is the only browser that needs document.onmousedown to be set. And if you set both window.oncontextmenu and document.onmousedown, Firefox triggers every event twice, once for each action.
The onmouseup event
Similar to the onmousedown event, the onmouseup event is triggered when the user clicks the mouse and then releases the button.
The onmousemove event
The onmousemove event is triggered whenever a visitor to your page moves their mouse. In this example, the user gets the feeling that someone’s watching their every move ![]() . Listings 8.11, 8.12, and 8.13 show how to use JavaScript to display eyeballs that follow your visitor around.
. Listings 8.11, 8.12, and 8.13 show how to use JavaScript to display eyeballs that follow your visitor around.

![]() The eyeballs will follow the cursor, no matter where it goes.
The eyeballs will follow the cursor, no matter where it goes.
Listing 8.11. The HTML for the following-eyes example.
<!DOCTYPE html>
<html>
<head>
<title>Mouse Movements</title>
<link rel="stylesheet" href="script06.css">
<script src="script06.js"></script>
</head>
<body>
<img src="images/circle.gif" alt="left eye" id="lEye">
<img src="images/circle.gif" alt="right eye" id="rEye">
<img src="images/lilRed.gif" alt="left eyeball" id="lDot">
<img src="images/lilRed.gif" alt="right eyeball" id="rDot">
</body>
</html>
1. document.onmousemove = moveHandler;
For all browsers, if a mousemove event is triggered, call the moveHandler() function.
2. function moveHandler(evt) {
if (!evt) {
evt = window.event;
}
animateEyes(evt.clientX, evt.clientY);
}
The moveHandler() function will be triggered whenever a mousemove event occurs. If the visitor has Internet Explorer, we need to initialize evt, and then for all browsers, we call the animateEyes() function and pass it the X and Y cursor coordinates.
3. function animateEyes(xPos,yPos) {
Here’s where the actual eyeball movement is done, based on the X and Y coordinates passed in.
4. var rightEye = document.getElementById("rEye");
var leftEye = document.getElementById("lEye");
var rightEyeball = document.getElementById("rDot").style;
var leftEyeball = document.getElementById("lDot").style;
This section assigns variables that match up with the ids of the images of the circles of the eyeballs and the dots of the eyeballs.
Listing 8.12. The CSS for the following-eyes example.
body {
background-color: #FFF;
}
#lEye, #rEye {
position: absolute;
top: 100px;
width: 24px;
height: 25px;
}
#lDot, #rDot {
position: absolute;
top: 113px;
width: 4px;
height: 4px;
}
#lEye {
left: 100px;
}
#rEye {
left: 150px;
}
#lDot {
left: 118px;
}
#rDot {
left: 153px;
}
Listing 8.13. Keep an eye (OK, two eyes) on your users with this script.
document.onmousemove = moveHandler;
function moveHandler(evt) {
  if (!evt) {
     evt = window.event;
  }
  animateEyes(evt.clientX, evt.clientY);
}
function animateEyes(xPos,yPos) {
var rightEye = document.getElementById("rEye");
var leftEye = document.getElementById("lEye");
var rightEyeball = document.getElementById("rDot").style;
var leftEyeball = document.getElementById("lDot").style;
leftEyeball.left = newEyeballPos(xPos, leftEye.offsetLeft);
leftEyeball.top = newEyeballPos(yPos, leftEye.offsetTop);
rightEyeball.left = newEyeballPos(xPos, rightEye.offsetLeft);
rightEyeball.top = newEyeballPos(yPos, rightEye.offsetTop);
function newEyeballPos(currPos,eyePos) {
return Math.min(Math.max(currPos,eyePos+3), eyePos+17) + "px";
}
}
5. leftEyeball.left = newEyeballPos(xPos, leftEye.offsetLeft);
leftEyeball.top = newEyeballPos(yPos, leftEye.offsetTop);
rightEyeball.left = newEyeballPos(xPos, rightEye.offsetLeft);
rightEyeball.top = newEyeballPos(yPos, rightEye.offsetTop);
This block draws the eyeballs based on the mouse pointer’s position, using the results of the newEyeballPos() function defined in the next step.
6. function newEyeballPos(currPos,eyePos) {
return Math.min(Math.max(currPos, eyePos+3), eyePos+17) + "px";
}
We never want the eyeball to go outside the eye, do we? So, for each eyeball, we check to make sure that it gets as close to the cursor as possible, while still appearing within the circle of the eye.
There’s a common JavaScript widget on the Web where the page has a bunch of dots (or whatever the designer wanted) follow the cursor around the page. We didn’t want to re-create an already existing effect, so we did the eyeballs instead; but if you want to put tag-along dots on your page, you should be able to just tweak this script.
Netscape 6 had a bug where both eyeballs were always placed 10 pixels too low. This bug was fixed in Netscape 7.
The onmouseover event
By now, you should be familiar with this event: it’s our good buddy from image rollovers. This event will be triggered whenever the mouse is moved into any area for which the onmouseover has been registered.
The onmouseout event
And unsurprisingly by now, where there’s an onmouseover, there’s usually an onmouseout. This is triggered when the user moves the mouse out of an area for which the event has been registered.
The ondblclick event
One of the drawbacks of the Internet is that the user interface elements that computer users learned how to interact with have all changed on the Web. For instance, one of the first things that new computer users learn how to do is double-click with the mouse, but there’s no double-clicking on the Web. Or at least, there hasn’t been, but now with Listings 8.14, 8.15, and 8.16, you’ll be able to check for double mouse clicks.
• document.images[i].ondblclick = newWindow;
The newWindow() event handler gets triggered when a user double-clicks one of the thumbnail images. In that case, a new window pops up ![]() , showing the same image in a larger format.
, showing the same image in a larger format.

![]() A double-click on a thumbnail opens the larger version of the image.
A double-click on a thumbnail opens the larger version of the image.
Listing 8.14. This HTML helps you work with double clicks.
<!DOCTYPE html>
<html>
<head>
<title>Image Popup</title>
<link rel="stylesheet" href="script07.css">
<script src="script07.js"></script>
</head>
<body>
<h3>Double-click on an image to see the full-size version</h3>
<img src="images/Img0_thumb.jpg" alt="Thumbnail 0" id="Img0">
<img src="images/Img1_thumb.jpg" alt="Thumbnail 1" id="Img1">
<img src="images/Img2_thumb.jpg" alt="Thumbnail 2" id="Img2">
</body>
</html>
Listing 8.15. This CSS makes your images look good.
body {
background-color: #FFF;
}
img {
margin: 0 10px;
border: 3px #00F solid;
width: 160px;
height: 120px;
}
Listing 8.16. Capture and handle double clicks with this script.
window.onload = initImages;
function initImages() {
for (var i=0; i<document.images.length; i++) {
document.images[i].ondblclick = newWindow;
}
}
function newWindow() {
var imgName = "images/" + this.id + ".jpg"
var imgWindow = window.open(imgName, "imgWin", "width=320,height=240,scrollbars=no")
}
The onclick event
The onclick handler works in a similar fashion to the ondblclick handler, except that a single click triggers it instead of a double click. The onmouseup handler is also similar, except that the onclick requires that the user press the mouse button both down and up in order to be triggered, while the onmouseup requires just the latter.
Form Event Handling
You’ll want to use form event handling mainly for validating forms. With the events listed below, you can deal with just about any action the user takes with forms.
The onsubmit event
The onsubmit handler (as seen in Chapter 6) is triggered when the user clicks the Submit button to complete a form. In addition, depending on the browser, it can also be triggered when a user exits the last text entry field on a form. If a script contains an onsubmit handler, and the result of the handler is false, the form will not be sent back to the server.
The onreset event
The onreset handler is triggered when the user clicks the Reset button (if one is present) on a form. This can be handy if your form has default values that are set when the page loads—if the user clicks Reset, you’ll need to handle this situation with a script that resets the default values dynamically.
The onchange event
As shown in Listing 6.3, the onchange event handler is triggered when the user changes a form field. This can be used to verify they entered information immediately, or to respond to the user’s choice before they click the Submit button.
The onselect event
The onselect handler is triggered if the user selects text in either an input or a textarea form field.
Listing 8.17. This HTML creates the simple form.
<!DOCTYPE html>
<html>
<head>
<title>Requiring an entry</title>
<link rel="stylesheet" href="script08.css">
<script src="script08.js"></script>
</head>
<body>
<form action="#">
<h3>
Email address: <input type="text" class="reqd"><br><br>
Name (optional): <input type="text">
</h3>
</form>
</body>
</html>
Listing 8.18. A little bit of CSS goes a long way with JavaScript.
body {
background-color: #FFF;
}
.highlight {
background-color: #FF9;
}
The onclick event
While the onclick handler is mentioned earlier under “Mouse Event Handling,” it’s listed here again because it’s most commonly used when dealing with forms. This event is triggered when the user clicks a check box or radio button, as in Listing 6.14. Listing 2.10 also uses the onclick handler; in that case, it allows a single link to do one action for JavaScript-enabled browsers and another, entirely different action for browsers without JavaScript.
The onblur event
While onblur can be used for browser windows (as shown above), it’s more common for it to be used in forms. Listings 8.17, 8.18, and 8.19 show the onblur handler being used to force the user to enter data into a field.
1. if (allTags[i].className.indexOf("reqd") > -1) {
We’re using a class attribute (of reqd) to decide on the fly when the onblur event handler should be used. Simply adding class="reqd" to an input tag triggers the event, instead of having to put the onblur handler on fields individually.
2. allTags[i].onblur = fieldCheck;
This event handler on the field causes the fieldCheck() function to be called whenever the user leaves a required field.
3. function fieldCheck() {
if (this.value == "") {
this.className += " highlight";
this.focus();
}
else {
this.className = "reqd";
}
}
The fieldCheck() function checks to make sure that something (anything) was entered in the current field. If the field has no value, the field’s background is colored pale yellow by adding " highlight" to its class attribute ![]() , and the cursor gets put back into the form field with
, and the cursor gets put back into the form field with focus(). When the error is corrected, simply resetting the class attribute back to its initial value resets the background to white.
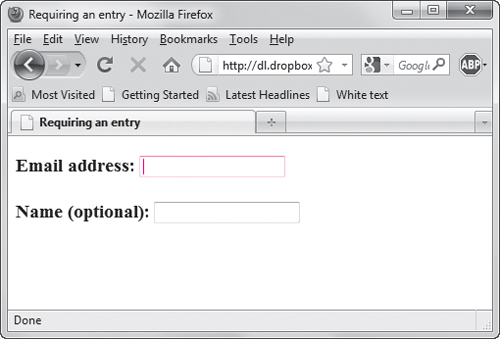
![]() When the user tabs out of the Email address field without entering anything, the field turns yellow and remains active until data is present.
When the user tabs out of the Email address field without entering anything, the field turns yellow and remains active until data is present.
Both the onblur and onchange events are triggered when the user leaves a field after changing it. If the user leaves a field without changing it, just the onblur handler is triggered.
Some versions of Firefox have had a problem with focus(): even though you tell the browser to stay in a field, it doesn’t. Changing the background color gives the user a visual cue that something’s wrong, though, so they’ll still know that there was a problem.
Listing 8.19. The onblur handler can be used in forms to trigger actions when the user leaves a field.
window.onload = initForm;
function initForm() {
var allTags = document.getElementsByTagName("*");
for (var i=0; i<allTags.length; i++) {
if (allTags[i].className.indexOf("reqd") > -1) {
allTags[i].onblur = fieldCheck;
}
}
}
function fieldCheck() {
  if (this.value == "") {
    this.className += " highlight";
    this.focus();
  }
  else {
    this.className = "reqd";
  }
}
Listing 8.20. The HTML creates the form, which won’t allow entries in the email field.
<!DOCTYPE html>
<html>
<head>
<title>Forbidding an entry</title>
<script src="script09.js"></script>
</head>
<body>
<form action="#">
<h3>
Your message: <textarea rows="5" cols="30">Enter your message here</textarea><br><br>
Will be sent to: <input type="text" value="[email protected]" readonly size="25" />
</h3>
</form>
</body>
</html>
Listing 8.21. Prevent wayward field entries with the onfocus handler in a form.
window.onload = initForm;
function initForm() {
var allTags = document.getElementsByTagName("*");
for (var i=0; i<allTags.length; i++) {
if (allTags[i].readOnly) {
allTags[i].onfocus = function() {
  this.blur();
}
}
}
}
The onfocus event
Sometimes you’ll have a form field on a page with data that you want to display as part of the form, without the user being able to modify that field. You can use the readonly HTML attribute to try to keep users out, but not all browsers support it. Listings 8.20 and 8.21 show how to use the onfocus event to bump users right back out of this field, on the off chance they made it to where they shouldn’t be.
• allTags[i].onfocus = function() {
this.blur();
}
When the user attempts to enter this field, the focus (in this case the active field) will automatically be kicked right back out again ![]() . This happens because the
. This happens because the onfocus event handler is set to call an anonymous function (one without a name) that does just one thing: call blur() on the current field, bouncing the user out.
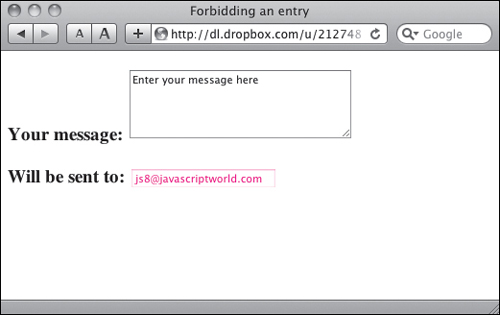
![]() The user can’t type anything into the bottom field.
The user can’t type anything into the bottom field.
Key Event Handling
Besides the mouse, the other main input device is the keyboard, at least until they get that cool computer thought-control device working. Just as with the mouse, JavaScript has the mojo to handle the keyboard.
The onkeydown event
It’s handy to allow users to control your Web page via their keyboard as well as via their mouse. With the key event handlers, you can trigger events to happen when the appropriate keys are pressed. In Listings 8.22, 8.23, and 8.24, a standard slideshow (similar to the one in Listing 4.19) can be viewed by pressing the left and right arrow keys on the keyboard ![]() .
.
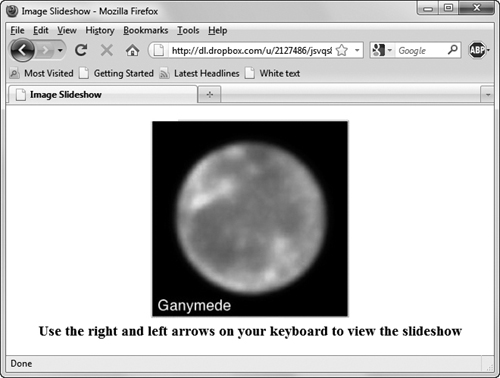
![]() This slideshow is controlled with keypresses, rather than mouse clicks on navigation buttons.
This slideshow is controlled with keypresses, rather than mouse clicks on navigation buttons.
1. document.onkeydown = keyHit;
Here we register the keyHit() function as the one to handle onkeydown events.
2. var thisPic = 0;
The variable thisPic is initialized and set globally, so that it’s stored and available for use every time keyHit() is called.
Listing 8.22. The HTML for the slideshow.
<!DOCTYPE html>
<html>
<head>
<title>Image Slideshow</title>
<link rel="stylesheet" href="script10.css">
<script src="script10.js"></script>
</head>
<body>
<h3 class="centered">
<img src="images/callisto.jpg" id="myPicture" alt="Slideshow"><br>
Use the right and left arrows on your keyboard to view the slideshow
</h3>
</body>
</html>
Listing 8.23. Once again, the CSS makes our images look good.
body {
background-color: #FFF;
}
.centered {
text-align: center;
}
img#myPicture {
width: 262px;
height: 262px;
}
Listing 8.24. Use the onkeydown handler in this script to trigger a slide change.
document.onkeydown = keyHit;
var thisPic = 0;
function keyHit(evt) {
var myPix = new Array("images/callisto.jpg", "images/europa.jpg","images/io.jpg", "images/ganymede.jpg");
var imgCt = myPix.length-1;
var ltArrow = 37;
var rtArrow = 39;
if (evt) {
  var thisKey = evt.which;
}
else {
  var thisKey = window.event.keyCode;
}
if (thisKey == ltArrow) {
   chgSlide(-1);
}
else if (thisKey == rtArrow) {
  chgSlide(1);
}
return false;
function chgSlide(direction) {
thisPic = thisPic + direction;
if (thisPic > imgCt) {
thisPic = 0;
}
if (thisPic < 0) {
thisPic = imgCt;
}
document.getElementById("myPicture").src = myPix[thisPic];
}
}
3. function keyHit(evt) {
The keyHit() function handles the event when keys are hit.
4. var ltArrow = 37;
var rtArrow = 39;
We need to store the appropriate values for when a key is hit. The left arrow key generates a 37, and the right arrow triggers a 39.
5. if (evt) {
var thisKey = evt.which;
}
else {
var thisKey = window.event.keyCode;
}
How we know which key the user hit depends on which browser they’re using. If it’s Firefox or Safari, we look at evt.which, which contains the code for the key hit. If it’s IE, that same value will be in window.event.keyCode. Either way, the result is saved in thisKey.
6. if (thisKey == ltArrow) {
chgSlide(-1);
}
else if (thisKey == rtArrow) {
chgSlide(1);
}
If the user pressed the left arrow, then go backward through the slideshow. If they pressed the right arrow, go forward. If they chose any other key, don’t do anything at all.
This line is there to work around a bug in a single browser: Safari. Other browsers handle this just fine, but Safari triggers two keystrokes instead of one (causing onkeydown to be triggered twice) every time you press an arrow. If you return a value of false, Safari knows that it should stop handling these events, and other browsers don’t care one way or another.
If you’re not sure what the key values are for a particular key, you can find out by putting the line alert(thiskey); in between the lines of code in steps 5 and 6 and then pressing the key for which you want to find the value. The alert box contains the numeric key value.
The onkeyup event
The onkeyup event handler is identical to the onkeydown handler, except that (big surprise) it gets called when the user has completed pressing the key down and is now letting it come back up again.
The onkeypress event
The onkeypress event is triggered when the user both presses a key down and also lets the key back up again—just for completeness’s sake.