Chapter 2
Placing JavaScript in an HTML File
Key Skills & Concepts
• Using the HTML Script Tags
• Creating Your First Script
• Using External JavaScript Files
• Using JavaScript Comments
Now that you have been introduced to JavaScript, you’re ready to start coding. Since JavaScript code is run from HTML documents, you need to know how to tell browsers to run your scripts. The most common way to set off a script is to use the HTML <script> and </script> tags in your document. You can place your script tags in either the head or the body section of an HTML document.
This chapter first shows you how to use the script tags to begin and end a segment of JavaScript code. Then, you will get started creating and running your first scripts. At the end of the chapter, you will learn how to add JavaScript comments to document your scripts.
Using the HTML Script Tags
Script tags are used to tell the browser where code for a scripting language will begin and end in an HTML document. In their most basic form, script tags appear just like any other set of HTML tags:

As you can see, there is the opening <script> tag, the JavaScript code, and then the closing </script> tag. When you use just the basic opening and closing tags like this, almost all browsers will assume that the scripting language to follow will be JavaScript.
In HTML, the script tag is not case sensitive. However, in XHTML, the script tag must be in lowercase. JavaScript is case sensitive in all versions, so you will need to be more careful with it. In this book, I will use HTML5 for the HTML code (even though HTML5 is not case sensitive, I will write the tag and attribute names in lowercase). For the JavaScript code, I will use the case that is needed for it to function correctly.
The <script> tag has six possible attributes: type, language (deprecated), charset, src, defer, and async. These attributes give the browser additional information about when the script should load, the scripting language, and the location of an external JavaScript file (if any).
Identifying the Scripting Language
The scripting language between the opening and closing script tags could be JavaScript, VBScript, or some other language, though JavaScript is almost always set as the default scripting language in browsers. If desired, you can explicitly identify JavaScript as the scripting language by adding the type attribute with the value of “text/javascript” to the opening script tag:

NOTE
The type attribute in the opening script tag is required in XHTML in order for the Web page to validate, but is optional in HTML.
In the past, the language attribute was used to identify the scripting language, but is ignored in modern browsers and will cause the page to be invalid in XHTML and HTML5. It should no longer be used.
The charset attribute, which allows for the character set of the JavaScript code to be specified, is not recognized by most browsers and is not recommended.
Calling External Scripts
Script tags allow you to call an external JavaScript file in your document. An external JavaScript file is a text file that contains nothing but JavaScript code, and it is saved with the .js file extension. By calling an external file, you can save the time of coding or copying a long script into each page in which the script is needed. Instead, you can use a single line on each page that points to the JavaScript file with all of the code.
You can call external scripts by adding the src (source) attribute to the opening script tag:
This example calls a JavaScript file named yourfile.js from any page on which you place this tag. Be sure there are no spaces or code between the opening and closing script tags, as this may cause the script call to fail.
If the script is extremely long, using the src attribute to add the script to multiple pages can be much quicker than inserting the entire code on each page. Also, the browser will cache the external JavaScript file the first time it is loaded, making subsequent Web pages that use the script render faster. Using an external script is also helpful when dealing with page validation and when trying to keep script code separated from markup (HTML) code.
By default, script files are loaded in the order in which they are placed in the HTML code (synchronously). There are some options for altering this behavior, which are described in the next section.
Specifying When the Script Should Load
The last two attributes, defer and async, allow you to specify when an external script should be loaded. These attributes are not fully supported by older browsers, or may behave differently, so be aware that an older browser may not execute the script when it is expected to do so.
The defer Attribute
The defer attribute allows you to specify that an external script file should be loaded, but should not execute until the page has completed parsing (the </html> tag has loaded). The following <script> tag would defer the execution of the external JavaScript code:
NOTE
If you are using XHTML, set this attribute using defer=“defer”.
Support for this attribute is available in Internet Explorer 4+, Firefox 3.5+, and Chrome 7+. Internet Explorer 4–7 will allow this attribute to work on inline scripts as well, but versions 8 and above only support this attribute on external scripts as other browsers do.
The async Attribute
When the async attribute is set, the page can continue to load without waiting for the script to load, and the script will execute before the document completes loading. Here is an example:
NOTE
If you are using XHTML, set this attribute using async="async".
Support for this attribute is available in Firefox 3.5+ and Chrome 7+.
Using <noscript></noscript> Tags
One way of providing alternate content for those viewers without JavaScript (or with JavaScript turned off) is to use the noscript tag. The <noscript></noscript> tags may be placed anywhere in the HTML document and can contain any content needed for those viewers browsing without JavaScript. For example:
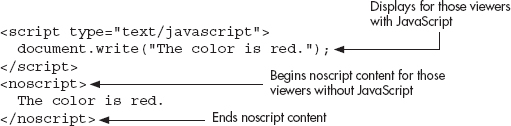
This example displays the phrase “The color is red.” to the viewer either through JavaScript or through the text within the <noscript></noscript> tags.
CAUTION
Some older browsers may not handle the noscript tag correctly and won’t display the content in either section. If your users have older browsers, another alternative is to display the content on the page and then use JavaScript to enhance the content for those who are able to display it with JavaScript on.
The <noscript> tag can be useful at times, but there are often better ways to provide the same content to those without JavaScript (avoiding the document.write() method, for instance). You will learn more about accessible JavaScript as you progress through this book.
Ask the Expert
Q: Do I always need to use script tags to add JavaScript to a page?
A: It’s possible to use event handlers that allow you to write short bits of script within the event-handling attribute of an HTML tag. You’ll learn about event handlers in Chapter 8.
Q: What about the language attribute?
A: The language attribute once was used to specify the scripting language to be used, and for a time some browsers allowed a JavaScript version to be specified (for example, language=“JavaScript1.2”). This is no longer the case, and the attribute has been deprecated. Since it is completely ignored in modern browsers and causes pages not to validate in XHTML and HTML5, it should no longer be used.
Q: My page won’t validate in XHTML strict (or transitional) when I add a script to it. How do I get the page to validate?
A: If the script contains characters used in XHTML such as < (which is used for “less than” in JavaScript but is seen as the beginning of a new tag in XHTML), then the page won’t validate with the script directly in the document without adding a CDATA section:
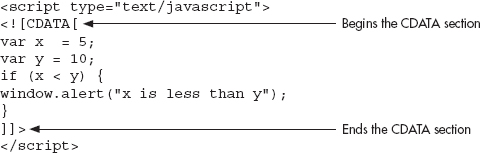
This will allow the page to validate, but because the <![CDATA[ and ]]> characters are in the script, the script will no longer work. To fix this, you need JavaScript comments (/* and */) around those characters when they are within the script tags:
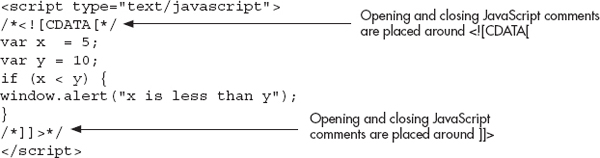
As you can see, this can get quite tedious very quickly! Typically, the better option is to use an external script file, which eliminates this problem because only the script tags themselves are needed in the XHTML document.
Creating Your First Script
Now that you know how to use the HTML script tags to tell browsers about the JavaScript in a document, you’re ready to learn how to add the actual JavaScript code between those script tags. The first coding example often given to teach any language is one that writes some sort of text to the default output area, commonly known as a basic “Hello World” script. Following that convention, your first script will write a string of text to a Web page.
Writing a “Hello World” Script
Rather than write “Hello World,” you’ll use another line of text for this script: “Yes! I am now a JavaScript coder!” This requires only a single line of code, using the document.write() method, which writes a string of text to the document:
Notice the parentheses and the quotation marks around the text. The parentheses are required because the document.write() method is a JavaScript function, which takes an argument contained in parentheses. You will learn more about JavaScript functions in Chapter 4.
The quotation marks denote a string of text. A string is a type of variable that is defined in JavaScript by placing it inside quotation marks. Chapter 3 provides details on strings and other types of JavaScript variables.
The last thing to notice about your script is the semicolon at the end of the line. The semicolon signals the end of a JavaScript statement. A statement is a portion of code that does not need anything added to it to be complete in its syntax (its form and order). A statement can be used to perform a single task, to perform multiple tasks, or to make calls to other parts of the script that perform several statements. Most JavaScript statements end with a semicolon, so it is a good idea to get in the habit of remembering to add one.
NOTE
In later chapters, you will see various lines that do not end in semicolons because they open or close a block of code. Also, many scripts you encounter may not end statements with semicolons. JavaScript is lenient about the use of a semicolon in most cases; however, it is best to use the semicolon to end a statement because it can prevent possible errors and aid in debugging (removing errors from) the script later.
So, to write a text string to the page, you use the document.write() method, followed by the text, surrounded by quotation marks and enclosed in parentheses. End the line (the statement) with a semicolon. JavaScript will handle the rest of the job.
Creating an HTML Document for the Script
In order to make this example complete and test the script, you need to insert it into an HTML document. First, create the following HTML document with the basic tags (using any text editor you prefer):
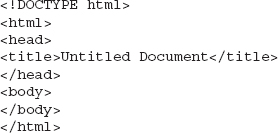
Save the document as test1.html in your text editor. You will call it later with a Web browser to see the results of the script. Next, you’ll add the script to this HTML document, so leave the file open.
Inserting the Script into the HTML Document
Now you need to insert the script in the document. Where should it go? You can place a script between the <head> and </head> tags, or between the <body> and </body> tags. Since this example writes a text string directly to the page, you want to insert the script between the <body> and </body> tags, wherever you want the text string to appear. It can come before, after, or between any HTML code on the page.
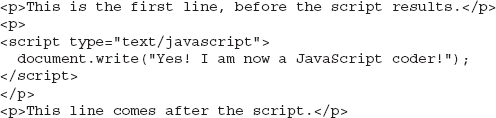
To make it clear how the script results appear, you’ll add HTML code to write lines of text before and after the script. The script tags and the script itself are inserted between those lines. Add the lines shown next between the <body> and </body> tags:
Save the test1.html document again. You should now be able to open the document in your Web browser to see the results of the script. Figure 2-1 shows how the text should look in your browser when you load the Web page.
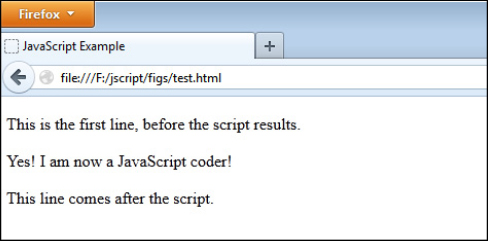
Figure 2-1 The test.html file in a Web browser
Congratulations, you have now finished your first script!
NOTE
The example code in this section uses the entire HTML document and all of its tags. In order to keep things as relevant as possible, from this point on the example code will use only the HTML tags involved with the scripts rather than the entirety of its tags. Project code may use entire HTML documents as needed.
Ask the Expert
Q: Why is there a dot (.) in the document.write() command?
A: Document is one of JavaScript’s predefined objects, and write() is a predefined method of the document object. The dot puts the object and the method together to make the function work. Chapter 9 explains JavaScript objects, and Chapter 10 is devoted to the document object.
Q: How do I know when to add the script inside the head section and when to add it inside the body section?
A: In the past, JavaScript code was almost always placed inside the head section, which kept it in a separate area from the rest of the HTML code. Modern coding practice is typically to place all JavaScript code in an external .js file and to place the <script> tag(s) right before the closing </body> tag. This ensures that the HTML page has loaded in the browser (since large scripts can delay the loading of the page if placed elsewhere), giving the user a better experience.
| Try This 2-1 | Insert a Script into an HTML Document |
This project gives you practice adding a script to your page. You will create an HTML document and insert a script that displays a short sentence in the browser window when the page loads. |
Step by Step
1. Set up an HTML document so that you have a simple file with nothing between the <body> and </body> tags yet.
2. Put the following line of text into the Web page within a paragraph:
I am part of the HTML document!
3. Insert a <p> tag after this line.
4. After the <p> tag, insert a script that will write the following line on the page:
This came from my script, and is now on the page!
5. After the script, add a </p> tag. Add another opening <p> tag.
6. Put the following line of text into the Web page after the last <p> tag, and make it emphasized (using <em></em> tags):
I am also part of the HTML document, after the script results!
7. Add a </p> tag to complete the paragraph.
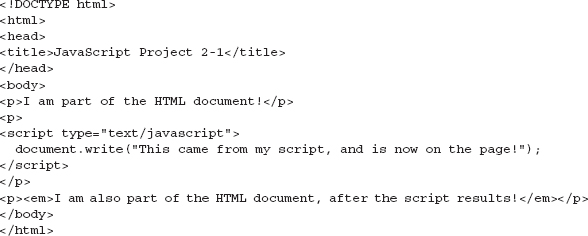
8. Here is what your HTML document should look like:
9. Save the file as pr2_1.html and view the page in your browser to see the results.
Try This Summary
In this project, you created an HTML file. Using the knowledge that you acquired thus far in this chapter, you inserted within the HTML file a script that writes a specific line of text on the page. When the HTML page is opened in a Web browser, the result of the script is displayed between two lines of text.
Using External JavaScript Files
Now suppose that you want to use your “Hello World” script (the one you created earlier in this chapter) on more than one page, but you do not want to write it out on each page. You can do this by putting the script in an external script file and calling it with the src attribute of the script tag. For this method, you need to create a JavaScript text file to hold your script. You also need one or more HTML files into which you will place the script tags to call your external script file.
Creating a JavaScript File
For this example, you will create a JavaScript file that contains only one line. For practical applications, you would use this approach for lengthier scripts—the longer the script is, the more useful this technique becomes (especially if you are trying to validate your Web pages or you are separating your script code from your markup).
Open a new file in your text editor and insert only the JavaScript code (the document.write() statement) itself. The script tags are not needed in the external JavaScript file. The file should appear like this:
Save the file as jsfile1.js in your text editor. To do this, you may need to use the Save As option on the File menu and place quotation marks around your filename, as shown in Figure 2-2 (using Notepad with Windows).
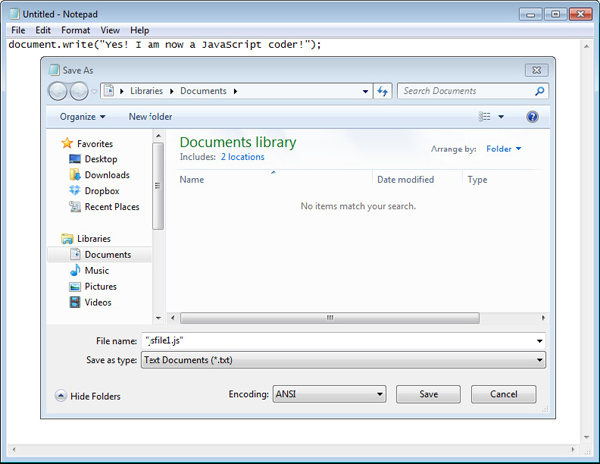
Figure 2-2 An example of saving a file with a .js extension using quote marks so it will save with the correct file extension
Once the file has been saved, you can move on to the next step, which is to create the HTML files in which to use the script.
Creating the HTML Files
You will create two files in which to place your script. The technique should work for any number of HTML files, though, as long as you add the required script tags to each file.
For the first file, create your base HTML document and insert the script tags into the body section of the document, using the src attribute to point to the jsfile1.js file, and add some HTML text to the body of the page to identify it as the first HTML document:

Save this file as jsext1.html in your text editor. Be sure to save it in the same directory as your jsfile1.js file.
The second HTML document looks the same as the first one, except that the HTML text says that it’s page 2:

Save this file as jsext2.html in your text editor. Again, be sure to place it in the same directory as the other files.
Viewing the Pages in Your Browser
Open the jsext1.html file in your Web browser. It should appear as shown in Figure 2-3, with the JavaScript inserted in the page from the external script file.
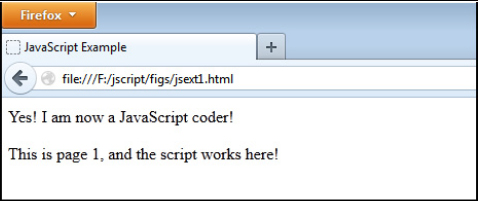
Figure 2-3 The result of calling the script in the jsext1.html file, the first HTML page
Next, open the jsext2.html file in your Web browser. It should appear as shown in Figure 2-4, with only the small difference of the text you added to the HTML file to say that this is page 2. The JavaScript should write the same text to this page as it did to the first HTML page.
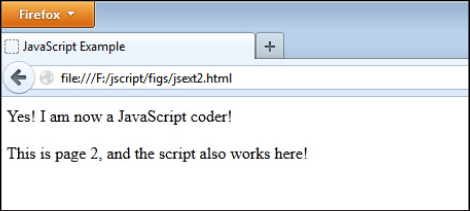
Figure 2-4 The result of calling the script in the jsext2.html file, the second HTML page
Although we used a short script in this example, it should give you an idea of how using an external file could be a great time-saver when you have a large script.
| Try This 2-2 | Call an External Script from an HTML Document |
This project will allow you to practice creating external JavaScript files and using them to insert a script into a Web page. |
Step by Step
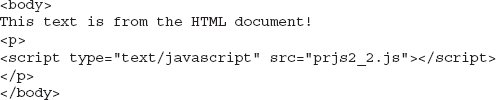
1. Set up a simple HTML document with nothing between the <body> and </body> tags.
2. Place the following line of text between the body tags of the page:
This text is from the HTML document!
3. Place a <p> tag after this text.
4. Save it as pr2_2.html.
5. Create an external JavaScript file that will write the following line when it is executed:
I love writing JavaScript and using external files!
6. Here is how your JavaScript file should look:
7. Save the JavaScript file as prjs2_2.js.
8. Go back to the HTML document. Place the script tags after the <p> tag in the document so that the external JavaScript file will write its sentence on the page.
9. Insert a </p> tag after the script tags.
10. The body of your HTML document should look like this:
11. Save the HTML file and view the results in your browser.
Try This Summary
In this project, you created an HTML page. Using your knowledge of external JavaScript files from the previous section, you created an external JavaScript file and placed the necessary code into the HTML file to include the external JavaScript file. When the HTML file is displayed in a Web browser, a line of plain text is shown, followed by the results of the external JavaScript file.
Using JavaScript Comments
You may need to make notes in your JavaScript code, such as to describe what a line of code is supposed to do. It’s also possible that you will want to disable a line of the script for some reason. For instance, if you are looking for an error in a script, you may want to disable a line in the script to see if it is the line causing the error. You can accomplish these tasks by using JavaScript comments. You can insert comments that appear on one line or run for numerous lines.
Inserting Comments on One Line
If you want to add commentary on a single line in your code, place a pair of forward slashes before the text of the comment:
In this format, anything preceding the two slashes on that line is “live” code—code that will be executed—and anything after the slashes on that line is ignored. For example, suppose that you wrote this line in your code:
The document.write() method will be run by the browser, so the text “This is cool!” will be written to the page. However, the comment after the slashes will be ignored by the browser.
If you place the forward slashes at the beginning of a line, the browser will ignore the entire line. Suppose that you move the slashes in the previous example to be the first items on the line:
In this format, the entire line is ignored, since it begins with the two slashes that represent a JavaScript comment. The text will not be written to the page, since the code will not be executed by the browser. In effect, you are disabling the document.write() statement. You may wish to do this if the script containing this line has an error and you want to know whether or not this line is causing the problem.
Adding Multiple-Line Comments
Comments denoted by a pair of forward slashes apply only to the line on which they appear; their effects are cut off at the end of the line. You can span multiple lines with this type of comment by adding the slashes to each line of code, as in this example:
To add comments that span any number of lines without placing slashes on every line, you can use a different comment format: a forward slash followed by an asterisk at the beginning of the comment, then the text of the comment, and then an asterisk followed by a forward slash at the end of the comment. Here’s an example:

Using this format, you can begin the comment on one line and end it on another line.
Multiple-line comments can be handy when you want to insert lengthier descriptions or other text, but you need to be careful when you use them. Look at this example to see if you can find a problem with it:
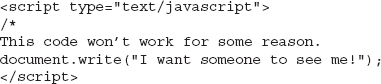
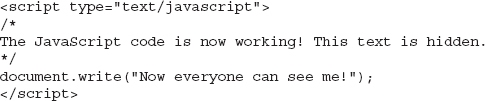
Did you notice that the closing JavaScript comment symbols are missing? When you use multiple-line comments, you need to be careful to close them. Otherwise, you might accidentally comment out code you need executed! In this example, the comment just keeps going on with no end in sight. To fix this, you need to close the JavaScript comments before the document.write() method is used:
Note, however, that multiple-line comments cannot be placed inside other multiple-line comments, since the closing comment code for the inner comment will close the comment early. For example, consider this code:
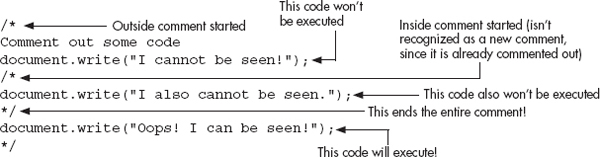
As you can see, the first instance of the ending */ causes the entire comment to end, and the code afterward could be executed.
In the preceding examples, you saw how comments can be used to provide some documentation of what to expect from each script. In Chapter 16, you will learn how using comments can help you debug your JavaScript code. For now, you should get in the habit of adding comments to your scripts as short documentation or instructions.
Chapter 2 Self Test
1. What is the purpose of the <script> and </script> tags?
A. To tell the browser where a script begins and ends
B. To let the browser know when the script should be loaded
C. To point to an external JavaScript file
D. All of the above
2. Why would you use the type attribute in the opening script tag?
A. To let the browser know what type of coder you are
B. To ensure the Web page validates when using XHTML
C. To create a typing script
D. To make sure the script does not make a grammatical error
3. Is JavaScript code case sensitive?
A. Yes
B. No
4. The noscript tag provides __________ for those without __________.
5. An external JavaScript file commonly uses a filename extension of __________.
A. .js
B. .html
C. .jav
D. .java
6. Which of the following correctly points to an external JavaScript file named yourfile.js?
A. <extscript type=“text/javascript” src=“yourfile.js”></extscript>
B. <script type= “text/javascript” src=“yourfile.js”></script>
C. <script language=“yourfile.js”></script>
D. <script type=“text/javascript” link=“yourfile.js”></script>
7. In HTML, the script tag is not case sensitive. However, with XHTML, the script tag must be in __________.
8. The __________ signals the end of a JavaScript statement.
A. colon
B. period
C. question mark
D. semicolon
9. To write a string of text on a Web page, the __________ method can be used.
A. document.write()
B. document.print()
C. document.type()
D. window.print()
10. When would it be a good idea to use an external JavaScript file?
A. When the script is short and going to be used in only one HTML document
B. When your Web site viewers have older browsers
C. When the script is very long or needs to be placed in more than one HTML document
D. External files are not a good idea
11. JavaScript comments can be very useful for the purpose of __________ or __________ your code.
12. Which of the following indicates that a single line of commentary will follow it within JavaScript code?
A. /*
B. /-
C. //
D. <!--
13. Which of the following indicates that more than one line of commentary will follow it within JavaScript code?
A. /*
B. /-
C. //
D. <!--
14. Which of the following indicates the end of a multiple-line JavaScript comment?
A. \
B. -->
C. /*
D. */
15. When you use multiple-line JavaScript comments, you need to be careful to __________ them.
A. close
B. read
C. program
D. compile
..................Content has been hidden....................
You can't read the all page of ebook, please click here login for view all page.