Chapter 10
Event Handlers
Key Skills & Concepts
• Understanding Event Handler Locations and Uses
• Learning the Event Handlers
• Other Ways to Register Events
• The Event Object
• Creating Scripts Using Event Handlers
When creating scripts, you will often find that there are user “events” (such as a user moving a mouse over a certain element or clicking a particular element) to which you want your script to react. The way you do this is through the use of event handlers.
To learn how the event handlers work, you need to learn what they are and why they are useful to you. You will then learn where event handlers are placed in a document and how to use them. Finally, you will see the various events in JavaScript and the event handlers that take care of each event. To get started, this chapter presents a general overview of event handlers.
What Is an Event Handler?
An event handler is a predefined JavaScript property of an object (in most cases an element in the document) that is used to handle an event on a Web page.
You may ask the question “What is an event?” An event is something that happens when the viewer of the page performs some sort of action, such as clicking a mouse button, clicking a button on the page, changing the contents of a form element, or moving the mouse over a link on the page. Events can also occur simply by the page loading or other similar actions.
When events occur, you are able to use JavaScript event handlers to identify them and then perform a specific task or set of tasks. JavaScript enables you to react to an action by the viewer and to make scripts that are interactive and more useful to you and to the viewer.
Why Event Handlers Are Useful
Event handlers are useful because they enable you to gain access to the events that may occur on the page. For instance, if you wanted to send an alert to the viewer when he or she moves the mouse over a link, you could use the event handler to invoke the JavaScript alert you have coded to react to the event. You are now making things happen based on the actions of the viewer, which enables you to make Web pages that are more interactive.
In creating this interactivity, many people find that JavaScript starts to become a little more fun to code and to use. With event handlers, you can create scripts that will add more functionality to the page. JavaScript can make a number of things happen on a Web page that will make the page more interesting than a static HTML document.
Understanding Event Handler Locations and Uses
To see how event handlers work, you need to know where you can place them in a document and how to use them to add JavaScript code for an event.
Event handlers can be used in a number of locations. They can be used directly within HTML elements by adding special attributes to those elements. They can also be used within the <script> and </script> tags or in an external JavaScript file.
To understand better where event handlers are located, you need to learn how to add event handlers to your script.
Using an Event Handler in an HTML Element
To use an event handler directly in an HTML element, you need to know the keyword for the event handler and where to place the event handler within the HTML code. To give you an example, I will introduce the onclick event handler, which is used to make something happen when the viewer clicks a specific area of the document.
One element that can be clicked is a form button. So, suppose you want to alert the viewer to something when the user clicks a form button. You would write something similar to the following code:
To use an event handler, you add it as an additional attribute to an HTML tag. The only difference between an event handler “attribute” and an HTML attribute is that you can add JavaScript code inside an event handler attribute rather than just an attribute value. In the previous code, you would replace the JavaScript code here text with some actual JavaScript code.
So, to make an alert pop up when the user clicks the button, you can add the necessary JavaScript code right inside your onclick attribute, as shown in the following example:

When the viewer clicks this plain button, an alert will pop up with a greeting. Notice that the rules on the quote marks apply here. Using the onclick event handler as an attribute requires you to use double quotes around all of your JavaScript code, so when you need quote marks for the alert, you use single quotes in order to avoid possible errors.
Also notice that the alert command ends with a semicolon. This enables you to add additional JavaScript code after the alert, which enables you to perform multiple actions on the click event rather than just a single JavaScript statement.
You could code in two alerts if you wanted to do so. All you have to do is remember to include the semicolons to separate the alert commands. This will be a little different because all of the code will be on one line rather than separate lines, as you normally see:

This example is able to perform two JavaScript statements on the same event by using semicolons to separate them. When using event handlers, you can execute multiple commands this way. It is important, however, to keep everything between the event handler keyword (in this case, onclick) and the ending set of quotes (in this case, after the last semicolon in the code) on one line in your text editor; otherwise, a line break in the code could cause it not to run properly or to give a JavaScript error.
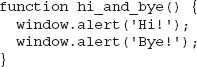
If the code you want to use becomes really long, you may wish to put the code in a function instead. The event handler can be used for any JavaScript code, so you can use it to call a function you have defined elsewhere. For example, you could place your two alerts within a function inside an external JavaScript file, and call the function from an event handler in the HTML code. First, code the external JavaScript file (here it will be saved as js_event_01.js) as follows:
Next, add the script tags and the event handler to your HTML code:

Notice how the function is called using the event handler just like a normal function call within a script. This enables you not only to shorten the code within the event handler, but also to reuse the function on another button click or event later in the page instead of writing the two alerts out again. The use of a function can help you quite a bit, especially when the code you want to use becomes extremely long.
Using an Event Handler in the Script Code
You can also use an event handler within the script code (whether using the script tags in the HTML document or using an external JavaScript file). One way to do this is to give the element an id attribute and then use the JavaScript method document.getElementById() to access the element, as you learned in Chapter 9.
Add the id Attribute
To use the previous script in this way, you will first add an id attribute to the HTML tag for the input button, as shown here:

Notice that the button input element was given an id of say_hi. You will use this to access the button and tie it to an event in your script.
Access the Element
The document.getElementById() method allows you to access any element in the HTML document that has an id attribute using the value of its id attribute. In order to access the button input element you have been using with an id of say_hi, you could use the following code:
Now, you can place the function code into a function expression in the JavaScript file (js_event_01.js), as shown here:
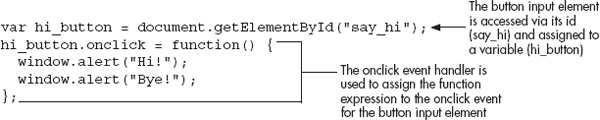
The function expression (which displays the two alerts) is assigned to handle the click event on the input button. Thus, when the button is clicked, the viewer will see the two alerts!
This method of handling events allows you to place all of your JavaScript code outside of your HTML elements, which keeps your HTML code cleaner (especially if an external JavaScript file is used). Later in this chapter, you will see that newer methods are also available to handle events.
CAUTION
Make sure an element has been added to the page before accessing it with getElementById(). This can be done by placing the <script></script> tags at the end of the document (just before the closing </body> tag) or by using the load event to determine that the document has loaded before accessing DOM elements.
Ask the Expert
Q: You mean I can just write some JavaScript by using an event handler like an HTML attribute?
A: Yes, but keep in mind that giving an element an id attribute and responding to the event in the JavaScript code will help keep your HTML code cleaner.
Q: Can you use events on elements other than buttons?
A: Yes, almost any element can react to an event. You will learn more about the events that are used in JavaScript in the next section.
Q: Didn’t I already learn this in Chapter 9?
A: So far, what you have seen is basically a review of some of the things you learned in Chapter 9. The remaining sections will build on this by providing you with the available events, discussing the event object, learning new event registration techniques, and building example scripts from what you have learned.
Learning the Events
Now that you know what event handlers are and how to use them, you need to see which event handlers are used for various events on a page. Begin by looking at Table 10-1, which lists the most common events, their event handlers, and samples of what actions might trigger each event.
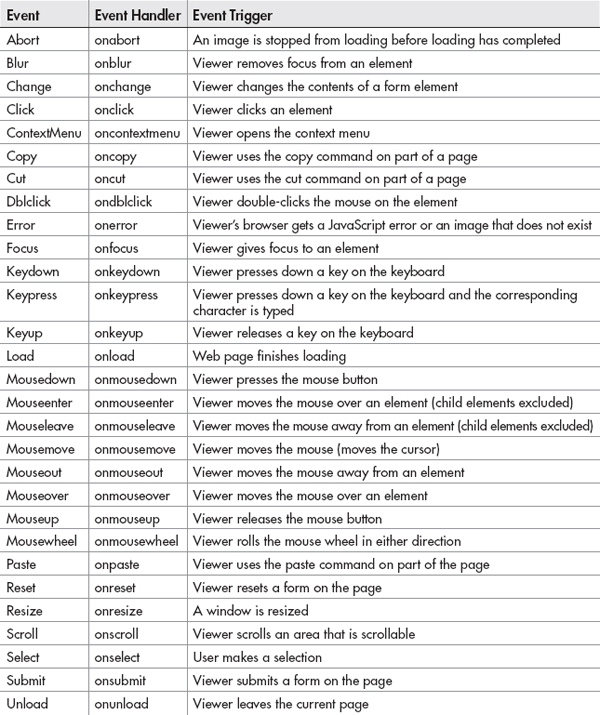
Table 10-1 The Events and Event Handlers
NOTE
Some of these events, such as the copy event, will only work with certain browsers (which may need to be running in their latest versions). There are also events that work only in Internet Explorer (see http://msdn.microsoft.com/en-us/library/ms533051(VS.85).aspx) or that are not necessarily cross-browser as of yet (see www.w3.org/TR/DOM-Level-3-Events/events.html#Events-EventTypes-complete). Drag events for drag-and-drop functionality are discussed in Chapter 16.
Now that you have a general idea about event handlers, you will take a look at some of the most often used ones in detail to see how they work.
The Click Event
The click event, which you have already been studying, occurs when a viewer clicks on an element in a Web page. For example, you could use a form button and send an alert when it is clicked:

This will send the viewer an alert once the button has been clicked. Figure 10-1 shows the result of this code when the viewer clicks the button.
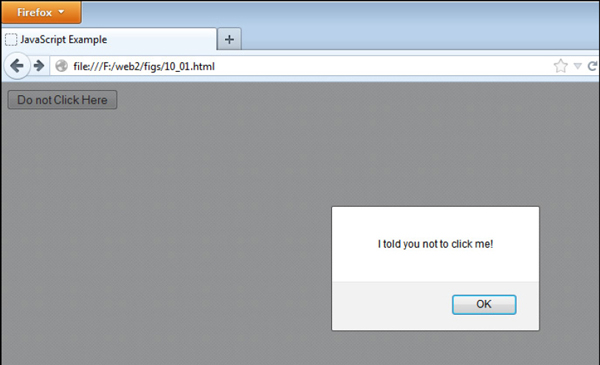
Figure 10-1 This alert pops up when the viewer clicks the button.
To use this event handler to do the same thing with a link, you might be tempted to do something similar to the following:

The problem with this code is that the alert will work, but the browser will try to continue the original action of the link tag and attempt to go to http://none. This would probably cause a “Server not found” error in the browser.
One way you can avoid a “Server not found” error is to link to an actual page (which is good for accessibility); however, if the viewer has JavaScript enabled, it may take the viewer away from the current page. To keep the link from being followed when JavaScript is enabled, you need to add an extra statement to the JavaScript in the click event. You need to tell the browser not to continue after you have shown the viewer your alert. To do this, you will add a return false statement, which will keep the browser from following the link after the alert has been shown. The following code shows how to add in the return statement inline:

With this code in place, the click event will be taken care of by the onclick event handler, and the browser will not need to worry about attempting to follow the link in the href attribute. Later in this chapter, you will learn how to use the modern method of preventing the default action, event.preventDefault().
NOTE
You can also code JavaScript for a link by using the javascript: command—for example, <a href=“javascript:window.alert(‘Hi’);”>Click</a>—but this method is not recommended for accessibility reasons (if JavaScript is off, the link doesn’t go anywhere).
Focus and Blur Events
The focus event occurs when the viewer gives focus to an element or window. A viewer gives focus to something by clicking somewhere within the item, by using the keyboard to move to the item (often via the tab key), or via a script. For instance, a viewer who clicks a text input box (before entering anything) gives that text box focus. Also, clicking an inactive window and making it the active window gives the window focus. The focus event also has a related method called focus(), which is covered in Chapter 11 and Chapter 14.
To see the focus event in action, you can create a text input box, which is one of the form elements that will enable you to give the element focus. The following example shows how to do this, as well as how to code a reminder alert to pop up when the viewer gives focus to the text box:

This code will give the viewer an alert before he or she can begin typing. The alert serves as a reminder to capitalize the name. Figure 10-2 shows the result of the preceding code in the browser when the viewer gives focus to the text box.
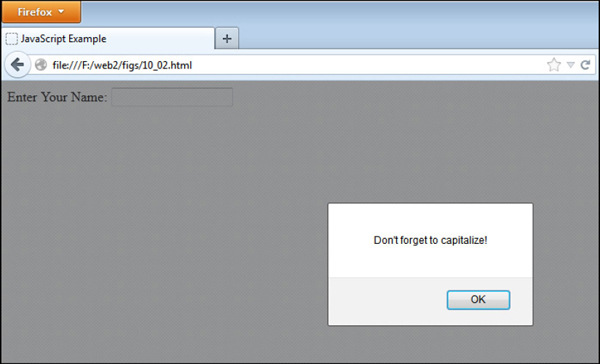
Figure 10-2 This alert pops up when the text box receives focus from the viewer.
The blur event occurs when the viewer takes the focus away from an element or a window. To take the focus off something, the viewer usually gives focus to something else. For instance, the viewer could move from one form element to another, or from one window to another. The blur event also has a related method called blur(), which will be covered in Chapter 11 and Chapter 14.
NOTE
The blur event is triggered only when the viewer gives focus to another area, which is the only way the browser will know the viewer released the focus from the first area. For example, when the viewer presses the enter key in an input field, the focus goes from the input field to the document window.
To see the blur event in action, the following example uses two text boxes: clicking the first text box gives it focus, and clicking the second text box invokes the blur event in the first text box.

When viewers click the second text box, they get the alert from the first one telling them to come back.
Figure 10-3 shows the result of the preceding code when run in the browser. Notice that the focus is in the second text box when the alert pops up. By clicking the second text box, the viewer invoked the blur event in the first text box.
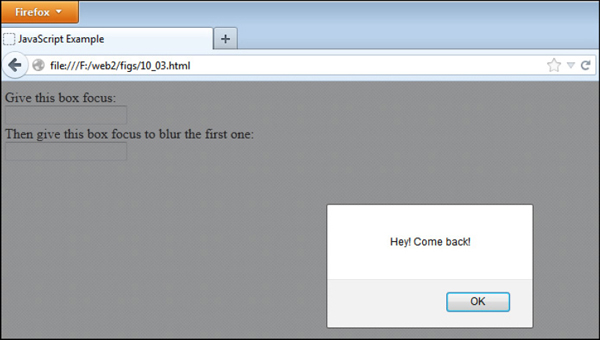
Figure 10-3 This alert pops up when the viewer takes the focus off a text box.
The Load and Unload Events
The load event occurs when a Web page finishes loading. If you want an alert to be shown when the page has finished loading, you could use the following code:

When the page has finished loading, viewers will get an alert that tells them it is finished. Figure 10-4 shows how the preceding code example would appear in the browser.
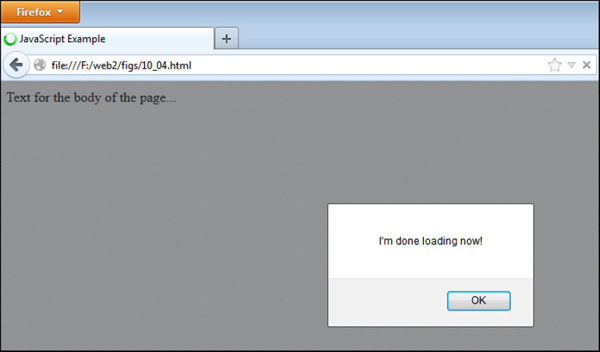
Figure 10-4 This is displayed in the browser window after the page has finished loading.
If you want to use the onload event handler in the script code rather than in the body tag, you could write this code into an external JavaScript file (save it as load_alert.js):
This will capture the load event for the current window (the window object will be explained in more detail in Chapter 11). You can now access all of the elements in the HTML code, and you can now remove the event handler from the opening <body> tag, as shown here:

NOTE
Once the load event occurs, you can no longer use document.write() to write to the document.
The unload event occurs when a viewer leaves the current Web page. The viewer could leave by clicking a link, typing another address in the browser, or closing the window.
This event is known to annoy viewers, because it enables the site owner to do something while visitors are trying to move on to another page or another Web site (forcing them to wait). To have an alert pop up when the user leaves the page, you could write the following code:

Figure 10-5 shows the result of the preceding script. As viewers try to leave the page that contains this script, an alert pops up telling them to be sure to come back. Of course, this could cause a viewer to become quite inconvenienced if it is used on an index page or on a number of pages within a Web site.
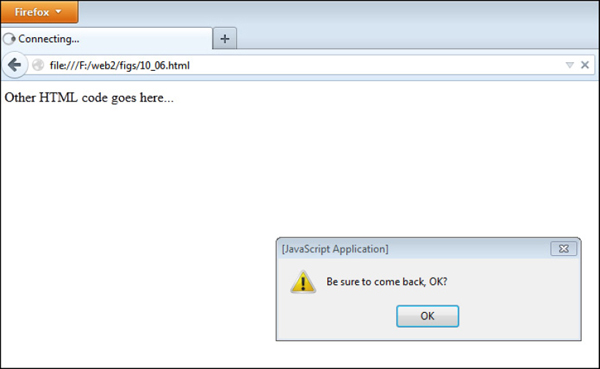
Figure 10-5 This alert pops up when the viewer tries to leave the page.
As with the onload event handler, you can use the onunload event handler in the script code rather than as an attribute of the body tag by using window.onunload.
Overall, be sure to think twice before using the unload event on a live page, because it will almost surely annoy most Web users.
TIP
If onunload does not work properly, you try using onbeforeunload if you need this functionality.
The Reset and Submit Events
Reset and submit events are used when one or more forms are included in a document. A form can have its contents reset or can be submitted for processing. These events allow you to program a response to one of these form actions.
The reset event occurs when a viewer uses a form reset button to reset the form fields in a form. The reset event also has a related method called reset(), which is covered in Chapter 14. The submit event occurs when the viewer submits a form. The submit event also has a related method called submit(), which will be covered in Chapter 14.
To see the submit event at work, you have to create a form that can be submitted with a submit button. The following code will give a “Thank You” alert to the viewer once the submit button is clicked:

The submit event doesn’t do you much good now (especially with the contents of the form not really going anywhere), but this event will become more useful when you get to form validation in Chapter 14.
The Mouse Events
There are a number of events that are available for user actions involving the mouse. These are listed below.
• mousedown Occurs when a viewer presses the mouse button down but before the click is complete (the button has not yet been released).
• mouseup Occurs when the viewer releases the mouse button after pressing it down.
• mouseenter Occurs when a viewer moves the mouse cursor over an element (excluding child elements
• mouseleave Occurs when a viewer moves the mouse cursor away from an element (excluding child elements)
• mouseover Occurs when a viewer moves the mouse cursor over an element
• mouseout Occurs when a viewer moves the mouse cursor away from an element
• mousemove Occurs when the viewer moves the mouse cursor
• mousewheel Occurs when the viewer scrolls the mouse wheel up or down
An example of using a mouse event can be shown by creating a text link. When you add the onmouseover event handler to the link, you have the option to perform JavaScript commands when the viewer passes the cursor over the link. Thus, if you want an alert to pop up when the viewer moves the mouse over a link, you could code something like the following:

This time the visitor doesn’t even get to click the link before being greeted with an alert. Keep in mind that a script like this could annoy your visitors if it is overused. Figure 10-6 shows the result of this script in a browser. The alert pops up as soon as the mouse cursor moves over the link.

Figure 10-6 This alert pops up when the mouse cursor moves over the link.
Since there is no need to click the link for something to happen, the browser won’t try to follow the link afterward. In fact, with this script in place, it is impossible to click the link at all because the alert keeps popping up when you move your mouse over to click it!
The Keyboard Events
Keyboard events occur when the user interacts with a Web page using the keyboard. These allow you to react to each phase of a key being pressed and released by the viewer. The keyboard events are listed here:
• keydown Occurs when the viewer presses down a key on the keyboard.
• keypress Occurs when a viewer presses down a key on the keyboard and the corresponding character is typed. This occurs between the keydown and the keyup events.
• keyup Occurs when the viewer lets go of a key on the keyboard, releasing the key.
For example, if you wanted to send an alert each time a character was typed into a text box, you could use the following code:
This would remind the viewer each time a character is typed into the text box. This can get quite annoying after a couple of characters are typed, but once you learn about the event object later in this chapter, you will learn how to find out what key was pressed, which will give you more flexibility with the keyboard events.
| Try This 10-1 | Focus and Blur |
In this project, you will use your knowledge of the focus and blur events and innerHTML (from Chapter 9) to create a script that will remind a user what to type into a text box. |
Step by Step
1. Create an HTML page and save it as pr10_1.html. Add the necessary script tags to point to an external JavaScript file named prjs10_1.js. Add code so that there is a text box for a phone number with an id of “pn” and a text area for an address. Beside the phone number text box, there will be an empty span tag with an id of “reminder”. The body section of the HTML file should look like this when complete:

2. Create an external JavaScript file and save it as prjs10_1.js. Use this for step 3 and step 5.
3. Get the “pn” and “reminder” elements by their ids and assign them to the variables pn and rm, respectively.
4. When pn receives focus, change the innerHTML of rm to the text “Format: 123-456-7890”. When pn is blurred, change the innerHTML of rm to an empty string (“”).
5. The JavaScript file should look like this when complete:
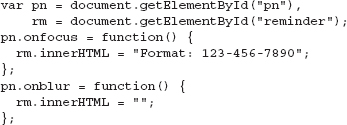
6. Save the HTML and JavaScript files, and load the HTML page in your browser. Click inside the text box and a reminder message should appear next to it. Click the text area afterward to blur the text box and make the message disappear.
Try This Summary
In this project, you used your new skills, the focus and blur events, to create a script that could help a user fill out a form.
Ask the Expert
Q: Why are there so many events?
A: There are so many things that a viewer (or the browser itself) can do while on a Web page that you end up with a bunch of possible events.
Q: Do I need to memorize all of these events?
A: You probably only need to memorize them if you are taking a test, or you are doing this for a job and need to know things quickly, or if you just like knowing the events off the top of your head; otherwise, you can just refer to Table 10-1 in this chapter if you are not sure which event needs to be used.
Q: Will I be using every single event in this book while doing the projects in this book?
A: Since this book is a beginner’s guide, you will not get to the point where you use every single event.
Other Ways to Register Events
Up to this point, you have been using what are called DOM Level 0 event handlers (onclick, onmouseover, and so on). There are two other methods for registering events in addition to the method you have used: addEventListener() and attachEvent(). These are called DOM Level 2 event handlers, and they offer the ability to attach multiple events to elements, whereas the DOM 0 method only allows one event to be registered on any given element. For example, suppose you had the following JavaScript code:
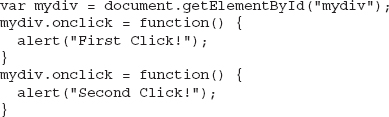
In this case, the second instance of assigning the onclick event handler to the mydiv element will overwrite the first one, so only the “Second Click!” alert will be displayed when a click occurs. DOM Level 2 event handlers allow you to avoid this issue.
The addEventListener() Method
The addEventListener() method is the standard from W3C, and is currently supported in all the most recent browsers (Internet Explorer needs to be version 9+). It allows you to specify an event, a function to execute for the event, and a value of true or false depending on how you want the event handler function to be executed in the capturing (true) or bubbling (false) phase. The general format looks like this:
Thus, if you want to create a linked input button as you did earlier in this chapter, you could adjust the JavaScript code to look like this:
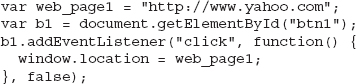
Notice that rather than using the event handler, this method uses the name of the event (instead of onclick, you simply use click). Also, this method will accept a function name or a function expression to handle the event (as shown previously).
Removing an Event
To remove an event, you would use the removeEventListener() method:
Note that if a function expression is used in the addEventListener() method, the event registration cannot be removed (the function expressions will be seen as two different arguments, even if they use exactly the same code). If there is a chance you will need to remove the event later, it is best to use a separate function and use the function name as the second argument in both method calls. An example of this is shown here:

Since this is the standard method for registering events in modern browsers, you will use this method of event registration for the remainder of this book.
Capturing and Bubbling Phases
When you have elements inside other elements that both have the same event type registered to them, which event occurs first will depend on whether the capturing or bubbling phase is used to register the events. If capturing is used, then the outermost element’s event occurs first and the innermost element’s event will occur last. If bubbling is used, the opposite is the case. It is most common to use the bubble phase, since it has the greatest browser compatibility.
The attachEvent() Method
The attachEvent() method works in a similar way to addEventListener(). However, it only works with event bubbling and does not currently (as of the time of this writing) have a way to use event capturing. It is used like this:
Thus, if you want to use the same script you have been using, you could write it like this:
Notice that this method does use the name of the event handler (onclick). Also, it does not have the third option; it just uses event bubbling.
To remove an event, you would use the detachEvent() method:
Browser Support
The attachEvent() method of event registration is the one that is used in Internet Explorer versions prior to version 9 (addEventListener() is unavailable, but DOM Level 0 registration is available). If you need to support prior versions of Internet Explorer, you will want to use a function that allows you to handle events using the method that is available to each browser. If needed, you can find one at http://dean.edwards.name/weblog/2005/10/add-event2/ or you can use a JavaScript library such as jQuery (discussed later in this book) to assist with event registration.
The Event Object
When an event occurs, an object named event is created, which stores information about the event. This information can be used by your script to help it perform the required actions. For example, a keyboard event will have information about the key that was pressed stored in the event object. This allows you to program different responses when different keys are pressed.
The event object works a little differently in Internet Explorer (prior to version 9), so you will first take a look at how to use the event object with all browsers that support it.
DOM and Internet Explorer: DOM Level 0 Registration
In most browsers, the event object is accessed by using the name event. It can be passed as the lone argument to a function that handles the event, as in the following DOM Level 0 code:

Notice that the argument event is passed to the event listener. The type property of the event object (which returns the type of event) is then used to display an alert to the viewer, which will let it be known that the click event is what caused the function to run.
Internet Explorer, however, uses window.event to access the event object, which means the DOM Level 0 event handler would use the following code:

With DOM Level 0 functions, the event object can be implemented cross-browser by assigning the needed value, based on what the browser supports, to a variable, as in the following code:

Notice that the variable is assigned the event object if it is available, or the window.event object if not. The use of the logical OR (||) allows you to provide a preferred value if it is available, or to set another (default) value if not. Now that the variable e will hold the proper value cross-browser, it can be used to alert the event type.
Using event with Modern Event Registration
When using addEventListener() or attachEvent(), the event object is accessible via event. This allows you to use the event object as expected. For addEventListener(), you could use the following code:

For attachEvent(), you could use the following code:

Support for older browsers, if needed, can be achieved using the DOM Level 0 method. Again, you can refer to the resources mentioned in the “The attachEvent() Method” section earlier in the chapter, as they have been coded to handle the various event registration models.
Properties and Methods
You have already seen the type property, but the event object also has other properties and methods that are useful, which are listed in Table 10-2.
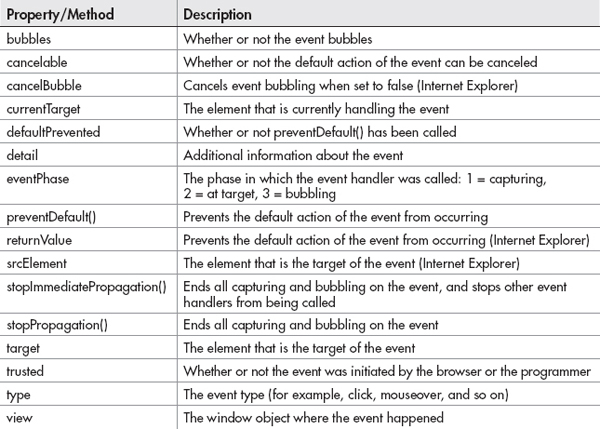
Table 10-2 The Properties and Methods of the event Object
As you will notice, some of the listed properties work with Internet Explorer (prior to version 9), while the others will work with other modern browsers. Since most modern browsers (including Internet Explorer 9 and above) support the standard DOM Level 2 event registration model, you will use this method through the remainder of this book. Notes will be added for cases where you may need to know how to perform a task in Internet Explorer prior to version 9.
Preventing the Default Action
You will recall that when using the DOM Level 0 registration, preventing the default action on a link was achieved using a return statement (return false). However, you can do this without the need to return immediately by using the preventDefault() method of the event object.
For example, the following code can now be used to prevent a link click from loading the specified page:
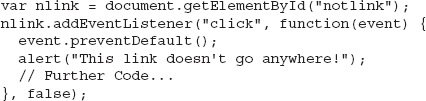
As you can see, you can continue handling the event, rather than using a return statement to leave the function.
NOTE
When using Internet Explorer prior to version 9, you can use the returnValue property. Setting its value to false (for example, window.event.returnValue = false;) will do the same thing as preventDefault().
Event Information
Some events, such as keyboard events, have additional properties that are not shown in the table (which are available to all events).
For example, when a keyboard event occurs, the key code of the key that was pressed is stored in event.keyCode, which allows you to determine which key was pressed. This can be used by your script to react only when a particular key is pressed. For example, you could use this code:
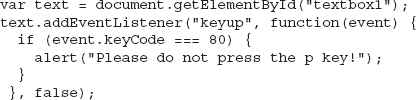
This will alert the viewer that you do not want the p key to be pressed, since 80 is the key code for the “p” key on the keyboard. You can see more on key codes at: http://protocolsofmatrix.blogspot.com/2007/09/javascript-keycode-reference-table-for.html
| Try This 10-2 | Using addEventListener() |
In this project, you will use addEventListener to register a mouseover and mouseout event on a piece of text. |
Step by Step
1. Create an HTML page and save it as pr10_2.html. Add code so that it links to an external JavaScript file named prjs10_2.js. The body section of the HTML code should look like this:
2. Create a JavaScript file and save it as prjs10_2.js. Use it for step 3.
3. When the mouse is moved over the “int” span, change the color to #FF0000. When the mouse moves away, change the color to #000000. When complete, the JavaScript file should look like this:
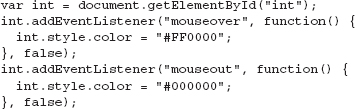
4. Save the JavaScript file and open the HTML file in your browser. Move the mouse over the text and off the text to change colors.
Try This Summary
In this project, you used your skills with event handlers and addEventListener() to change the color of text when the mouse moves over or away from it.
Creating Scripts Using Event Handlers
Now that you have tackled the long list of event handlers and the event object, it’s time to have a little fun. In this section, you are going to learn how to do things other than sending alerts.
Show Hidden Content
For this script, create an HTML file with the following code inside the body section and save it as news.html.
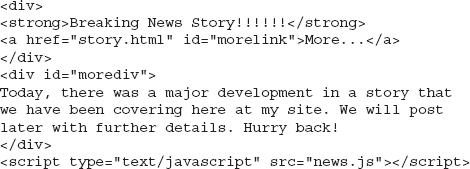
Here, you have a “breaking news story” headline. A link (with an id of morelink) is placed so that when clicked, it will display the content of the story. Below this, you have a div (with an id of morediv) that contains the content of the story. At the moment, it is perfectly visible, since no CSS or JavaScript has been applied to change it. Your goal is to hide this content initially, and then display it when the user activates the link.
Next, create a JavaScript file and save it as news.js. The first thing you will want to do is to define some variables that will grab the two needed elements: the morelink and morediv elements.
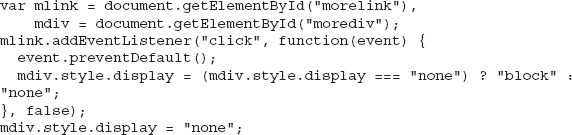
These are now assigned as objects to the mlink and mdiv variables. Next, you will need to add an event listener that will allow you to show or hide the mdiv element when the mlink element is clicked, as in the following code:

Notice that the event object is passed as an argument, allowing preventDefault to be used. The display property of the mdiv element is changed to “block” if it is “none”, or to “none” if it is anything other than “none” (for example, when it has been set to “block” from a previous change).
Now everything is set for the click event, except that you need to hide the mdiv element for the initial page display. This could be done in CSS, but here you will use JavaScript to simply set its display style to “none”:
The full code for the JavaScript file now looks like this:
Save the JavaScript file and open the HTML file in a Web browser. You should see the headline and the link, with no additional content. Figure 10-7 shows what the initial page should look like.
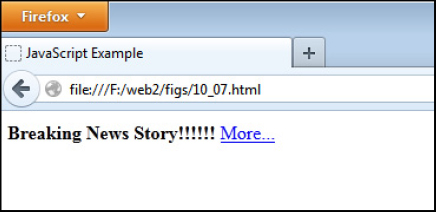
Figure 10-7 The initial view of the page, with only the headline and link displayed
Click the link. The story content should now display below the headline and link. Clicking again should hide the story, which you probably will want to do after reading a teaser headline that simply leads to another teaser telling you to check back soon! Figure 10-8 shows the result of clicking the link to display the content.

Figure 10-8 Once the link is clicked, the content is displayed.
Change Content
Instead of showing and hiding one piece of content, you may want to give the viewer several options and display the chosen content when a particular link is clicked. To do this, you will first need an HTML document. In this case, you will use the following HTML and save the file as technews.html.
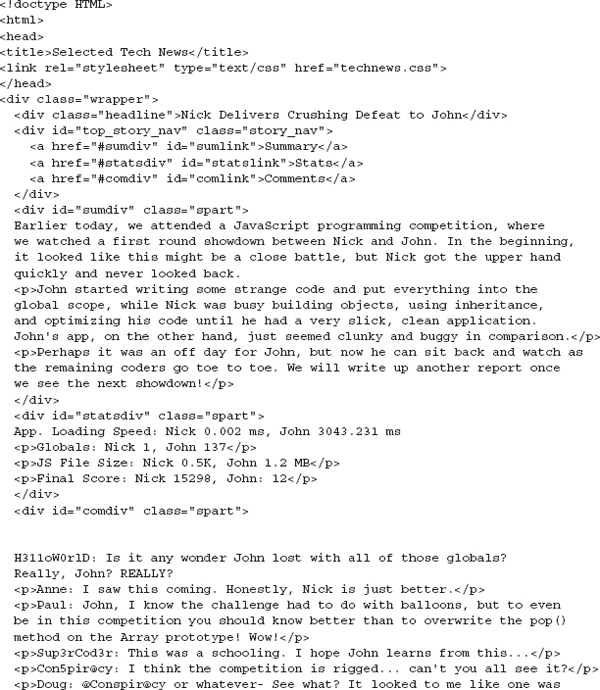
Notice that there is a wrapper div, which you will use to contain all of the content. Within it, you have the headline div, the top_story_nav div, and the three content divs (sumdiv, statsdiv, and comdiv). The script will allow each link to display one of the content divs while hiding the other two. This way, the user can view one section at a time rather than scrolling to the desired section.
The next thing you will do is add a little style to the page by creating a CSS file. Include the following code and save the file as technews.css.

This defines the size of the wrapper div, which will be 600×400 pixels when the padding is included. It allows content that is longer to be scrolled by the user within the wrapper. The other styles provide some color, margins, padding, and spacing for the other elements. You can of course adjust these to fit your preferences.
Finally, you will need to create the JavaScript file. Include the following code and save the file as technews.js.
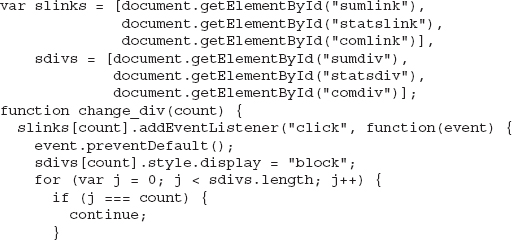
The three links correspond to the three content divs, and so the elements from both sets are placed into arrays (slinks and sdivs). The change_link() function will be explained shortly, but first notice the for loop after the function. This cycles through the slinks array and calls the change_div() function for each link, passing the value of i along as an argument. This argument will be used to register the click event for each element and to change the appropriate content when each link is clicked.
The change_div() function takes in the passed count variable from the for loop as an argument. The first time through the loop, change_div will be sent a value of 0, the second time a value of 1, and so on. Since the links and content divs are in arrays, this allows you to use the count value to access the desired elements. The function begins by using addEventListener(). The listener is added to the link element found in the slinks array at index count. In other words, slinks[0] will be accessed when count is 0. This accesses the first link element, since the value of slinks[0] is document.getElementById(“sumlink”). Since this loop is run three times, the event listener will be added with the count values of 0, 1, and 2.
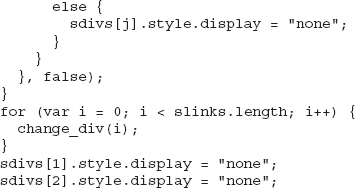
The event listener function first prevents the default action. Then, depending on the link that was clicked, the corresponding div element in the sdivs array is displayed by setting its style display to “block”. A loop is used to hide the remaining two div elements. Notice that if the value of j is equal to the count value (the element being shown), then it is skipped so that the element currently being shown remains visible.
Finally, at the end of the script, you will see that the statsdiv and comdiv elements are hidden. This initializes the page with the sumdiv element still visible by default while the other two content divs are hidden. Figure 10-9 shows the initial display of the page when viewed in a browser.
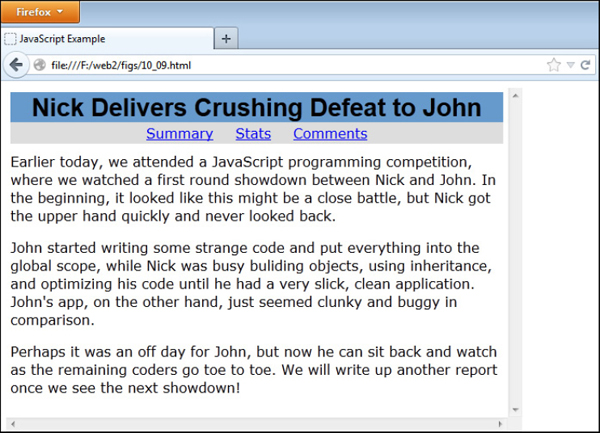
Figure 10-9 The initial display. Notice the links available for the user to click.
Clicking on the “Stats” link will show the statistics (makes statsdiv visible and the others hidden). Figure 10-10 shows the result of clicking the “Stats” link.
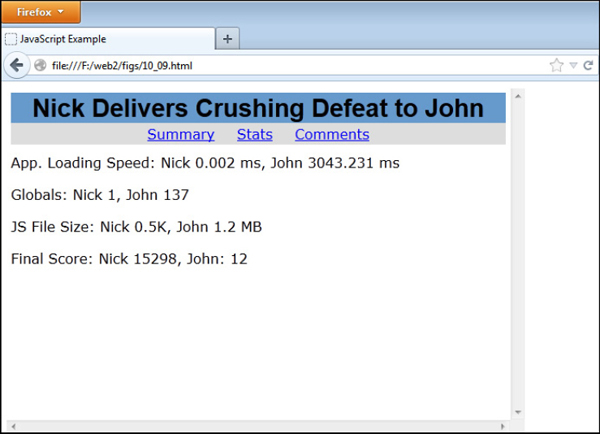
Figure 10-10 The result of clicking on the “Stats” link
Finally, clicking the “Comments” link will display all of the comments that were directed at me for my embarrassing showing at that programming competition! Figure 10-11 shows the comments being displayed.

Figure 10-11 The comments display when the “Comments” link is clicked.
This script combines many of the techniques you have learned (events, loops, arrays, and more). The arrays and loops were particularly helpful here as they kept you from typing three versions of addEventListener() with each value hard-coded into the event registration and function. When working with events, it is often helpful to have these handy ways of typing less code.
Chapter 10 Self Test
1. An event handler is a predefined JavaScript property of an object that is used to handle an event on a Web page.
A. True
B. False
2. Event handlers are useful because they enable you to gain __________ to the __________ that may occur on the page.
3. To use an event handler, you place it in the __________ or the __________ code.
4. Which of the following correctly codes an alert on the click event?
A. <input type=“button” onclick=“window.alert(“Hey there!”);”>
B. <input type=“button” onClick=“window.alert(‘Hey there!”);”>
C. <input type=“button” onclick=“window.alert(‘Hey there!’);”>
D. <input type=“button” onChange=“window.alert(“Hey there!”);”>
5. The __________ event occurs when a Web page has finished loading.
6. A mouseover event occurs when:
A. The viewer clicks the mouse while the cursor is over a button.
B. The viewer moves the mouse cursor away from a link.
C. The viewer clicks a link, linked image, or linked area of an image map.
D. The viewer moves the mouse cursor over an element on the page.
7. A mouseout event occurs when a viewer clicks an element on the page.
A. True
B. False
8. The __________ event occurs when the viewer leaves the current Web page.
9. The blur event is the opposite of the __________ event.
10. The __________ object contains properties and methods for an event.
11. The __________ property of an event contains the type of event that occurred.
12. The submit event occurs when the viewer __________ a __________ on a Web page.
13. The keydown event occurs when a viewer presses down a key on the keyboard.
A. True
B. False
14. In Internet Explorer prior to version 9, the event object can be accessed by using __________.
15. The __________ method and the __________ method are two new ways to register events.
..................Content has been hidden....................
You can't read the all page of ebook, please click here login for view all page.