
Chapter 6
Conditional Statements and Loops
Key Skills & Concepts
• Defining Conditional Statements
• Using Conditional Statements
• Defining Loops
• Using Loops
Now that you have seen how the various operators work in JavaScript, this chapter will instruct you in how to put them to good use. This chapter begins by introducing you to conditional statements and why they are useful to you in scripts. Then, you will learn about all the conditional statement blocks and how to use them. After that, you will learn what loops are and learn how to use the various types of loops within your scripts.
Defining Conditional Statements
In order to use conditional statements, you need to know what they are and why they are useful to you in your scripts.
What Is a Conditional Statement?
A conditional statement is a statement that you can use to execute a bit of code based on a condition or to do something else if that condition is not met. You can think of a conditional statement as being a little like cause and effect. Perhaps a good way to parallel it would be to use something a parent might say, as in the following text:
The first cause would be a clean room, which would have the effect of getting dessert. The second cause would be an unclean room, which would have the effect of an early bedtime.
In your scripts, you may want to create a similar statement. Perhaps something more like the following line:
In this case, the first cause would be a variable having a value greater than 1000, which would have the effect of an alert that says things are OK. The second cause is the variable being 1000 or less. If this happens, you get an alert saying you need more money.
As you can see, if you can create statements like these in your scripts, you will be able to do quite a bit more than you have with your scripts in the past.
Why Conditional Statements Are Useful
As you saw in the previous section, a conditional statement can be quite useful to you. Rather than executing every single line of code in the script as is, you could have certain sections of the script only be executed when a particular condition is met. You could even expand that single condition into a combination of conditions that need to be met for parts of the code to run.
With conditionals, you can tell JavaScript to do things like the following:
• If a variable named yourname is equal to John, then write a line to the page that says hello to John. Otherwise, write a line to the page that says hello to Unknown Surfer and have it be in bold type.
• If a variable named mycar is equal to Corvette or Mustang, then send an alert saying “Cool Car” to the browser. If a variable named mycar is equal to Corvette, then if a variable named yourname is equal to Marty, send an alert that says “Marty is cool and drives a cool car” to the browser. Otherwise, send an alert that says “Unknown Surfer drives a car of some sort” to the viewer.
I don’t really drive a Corvette or a Mustang, so that leaves me out of the cool crowd here; however, these examples do show how you can make your scripts more useful by adding a way to check for certain conditions before an action takes place in the script. These types of statements provide what is known as “flow control” to your scripts.
Using Conditional Statements
Now that you know what conditional statements are, it’s time to look at them in more detail and learn how to code them. You will be looking at the two types of conditional statement blocks used in JavaScript: the if/else statement and the switch statement. You will also learn about the use of the conditional operator.
Using if/else Statements
While using conditional statements, you will see that they have a familiar syntax. Most notable are the curly brackets ({}) that surround the sections of code that will be executed based on a given condition.
The if/else Statement Block Structure
The first thing you must deal with in an if/else statement is the first line, which tells the browser to continue or move along. You begin an if/else statement with the JavaScript keyword if, followed by a comparison in parentheses. The following line shows a sample of the format of the if statement:
You replace the comparison here text with an actual comparison. To do this, you need to remember the comparison operators from the previous chapter. Suppose you want to see if a variable named boats is equal to 3 and to send an alert “Yes, there are 3 boats” if the condition is true. You could use the following code:
Remember that a comparison will return a value of true or false. This is where the return value becomes useful. If the comparison of boats === 3 returns true, the code within the curly brackets will be executed. If it returns false, the code inside the brackets is ignored and the line of code after the closing curly bracket is executed.
If you wish to use an else block to execute a different set of statements when the comparison returns false, you place the else keyword on the next line and then follow it with its own set of curly brackets, as in the following code:
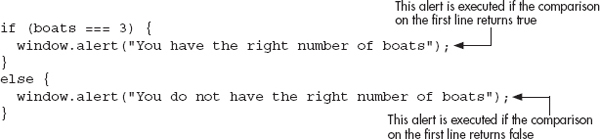
This code will send an alert that says “You have the right number of boats” if the variable boats is equal to 3. If it is not, it will send an alert that says “You do not have the right number of boats” instead.
Now that you have the statements set up, you need to know whether or not the comparison returns true so that you can determine which block of code is executed. To do so, you need to declare the boats variable and assign it a value before the comparison takes place. This will give you the value to determine what happens in the script. See if you can guess which block of code is executed (first or second) if you use the following code:
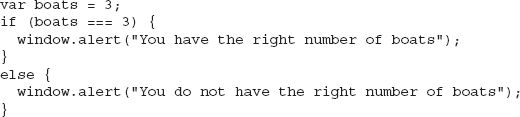
If you guessed the first code block would be executed, you got it! Since the variable boats is equal to 3, the comparison boats === 3 returns true. Since it returns true, the first code block is executed and the code block after the else keyword is ignored. You get the alert that says “You have the right number of boats” and nothing else.
CAUTION
Be careful when typing variable assignments (=), is-equal-to comparisons (==), and is strictly equal to comparisons (===), as they can be easily mistyped by accident and cause problems or unexpected results in your scripts.
Now take a look at how to set up the statement so that you have the opposite result. The following code will cause the comparison to return false:
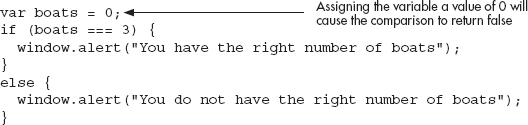
With the value of the variable boats at 0, the comparison boats === 3 will return false; thus, the first code block is ignored and the code block after the else statement is executed instead. This time you get the alert that says “You do not have the right number of boats,” while the alert in the first block is ignored.
Now that you know the basic structure of the if/else statement block, you are ready to look at the technique of nesting one block within another.
Block Nesting
If you nest something, you are basically putting one structure inside another structure of the same or a similar nature. With the if/else statement blocks, you are able to nest other if/else statements within the first block after the comparison (the “if block”) or within the second block after the else keyword (the “else block”).
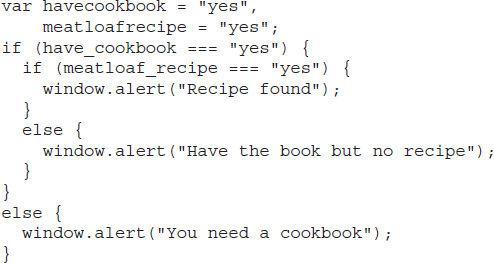
For example, maybe you would like the browser to execute a statement such as the following: “If a variable named havecookbook is equal to yes, and if a variable named meatloafrecipe is equal to yes, send an alert that says ‘Recipe found’ to the browser. If havecookbook is equal to yes, but meatloafrecipe is not equal to yes, then send an alert ‘Have the book but no recipe’ to the viewer; otherwise, send an alert that says ‘You need a cookbook’ to the browser.”
This is a somewhat long and complex statement, but you can accomplish what you are after by nesting an if/else statement within the if block of another if/else statement.
To see how this works, consider the following example, which puts the previous statement into JavaScript form:

Oh no, nesting an if block requires curly brackets all over the place! To help you figure out what is going on with this piece of code, I will break it down into its individual parts.
The first thing you get is the main (first, or outermost) if block. You use it to find out whether the variable havecookbook is equal to yes or not. If this comparison returns true, you move along into the if block; however, the next thing you find is another if block! This is the nested if block, which means it is inside the outside if block. In the nested block, you check whether the variable meatloafrecipe is equal to yes or not. If this returns true, you finally are able to do something, which is to send the “Recipe found” alert.
When the nested if block is finished, you see that it has an else block to go with it in case the comparison meatloafrecipe === “yes” returned false. If it had returned false, the browser would have gone to this else block and executed the code within it. In the preceding code example, the comparison on the outside block (havecookbook === “yes”) returned true, but the comparison on the nested block (meatloafrecipe === “yes”) returned false. So, the nested else block is executed, sending the “Have the book but no recipe” alert.
After this nested else block, you see what looks like an extra closing curly bracket; however, this closing bracket is actually used to close the outside if block that contains all of this nested code. Looking at how the code is indented will help you see which brackets are closing which blocks. This is where using indentions or tabs can be helpful in your code, because—as opposed to the code being all in a straight line up and down—indentions can make the code easier to read.
TIP
When it comes indenting your code, some will recommend using four spaces, some two spaces, and others recommend using the tab key. The most important thing to do is to choose an indention method and to use it consistently in your code. This will help you if you need to read through the script or debug it later. See the following page: en.wikipedia.org/wiki/Indent_style for more information on spaces versus tabs in programming.
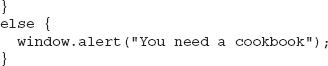
Finally, you get to the outside else block. This is the block that is executed only if the first comparison (havecookbook === “yes”) returns false. If that comparison returns false, all the code within that outside if block is ignored (you never get to the nested if/else block) and the browser moves on to this outside else block. In this case, you get the “You need a cookbook” alert sent to the viewer.
The following example uses the same if/else code used in the preceding code example, but this time the variables are defined differently: both variables are given a value of yes. See if you can follow the code and name the alert that will show up on the screen when it is executed.
The alert you should have chosen is the “Recipe found” alert. When the first comparison returns true, you are sent to the nested if block. Since the comparison for the nested if block also returns true, you execute the code within that block, which sends the “Recipe found” alert to the browser.
The last thing you should know about nesting is that you can nest as many blocks as you want inside other blocks. Rather than just nesting one if/else statement inside another, you could have a second nesting inside that statement, a third, or as many as you can track without going insane. For example, consider the following code:
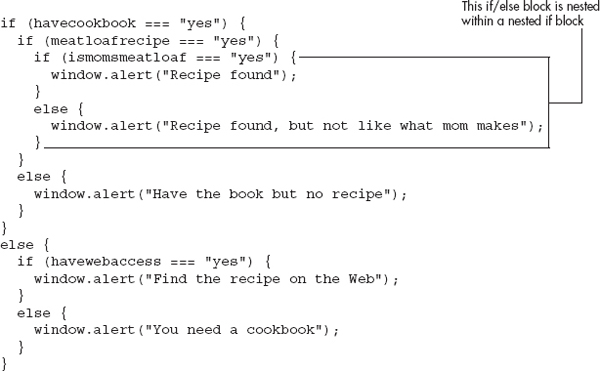
Now there is an if/else block within an if block within an if block. As you can see, yet another variable, ismomsmeatloaf, was added to check for an even more specific recipe. You could keep going on and on like this, until you cannot take it any more; however, this should be enough to allow you to build on it later if you need to do so.
Complex Comparisons
In addition to making a simple comparison such as x === 2 or y < 3, you can also build more complex comparisons using the logical operators discussed in Chapter 5. As you may recall, that chapter presented some of these comparisons in a form similar to the following example:
In Chapter 5, the only concern was whether the comparison would return true or false, and not with how to add it to an if/else statement. Notice the parentheses around each comparison. They are there mainly for organization; but given the order of operations, you could write the comparison as
The problem here is that this is harder to read, so it would be difficult to determine whether there is a problem with the code if you need to debug it later.
Recall that the first line of the if/else statement uses parentheses to enclose the comparison. If you write your complex comparisons without the organizational parentheses, as in the previous example, you could have the first line look like the line of code shown here:
Although this is easy to type, it’s pretty difficult to read because you are not sure if it should be read as “if 2 is equal to 2 or 3 and is less than 5” or as “if (2 is equal to 2) or (3 is less than 5).” The first thing you can do is add spacing, which can help the readability of the comparison:
If you add the parentheses for organization, it becomes even easier to read; but you must be careful that you nest them correctly. The following example code shows the addition of parentheses for organization:
Which form you use will come down to personal preference. For now, this chapter uses the method with the extra parentheses for organization. It should make reading the code from the book easier for you.
Now you can create scripts that allow for more values to be included or allow a specific range of values that will return true. Suppose you want to show an alert when a variable named num1 is greater than 2 but less than 11, and another alert when num1 is not in that range. You could use the following code:

Your comparison is saying, “If num1 is greater than 2 and num1 is less than 11.” If that comparison returns true, then you see the “Cool number” alert. If it returns false, you get the “Not a cool number” alert instead.
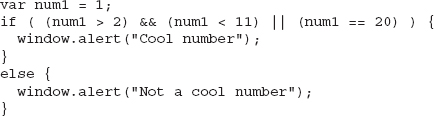
Of course, you can make the comparison line as complex as you want it to be. You can add and and or logical operators in one long line until you get what you need… or have a nervous breakdown. The following example adds an extra stipulation to the comparison to see if num1 is equal to 20:

Now, the comparison allows the numbers greater than 2, the numbers less than 11, and the number 20 to give the “Cool number” alert. The comparison now reads, “If num1 is greater than 2 and num1 is less than 11 or num1 is equal to 20.” You could keep adding information to create more numbers that will return true, or even additional number ranges that will return true.
Of course, to see the preceding code in action, you would need to declare the num1 variable and assign it a value. See if you can figure out which alert will show up if the following code is used:
Yes, you are stuck with the “Not a cool number” alert because the number 1 just doesn’t cut it here (1 is not within the accepted range of numbers for the condition to return true). Of course, you can change it to something that fits to get the “Cool number” alert instead.
CAUTION
Complex expressions using && and | | can cause unintended results in your script if not grouped correctly. For instance, the comparison ((u===v && w===x) | | y===z) is going to be different than if it were grouped as (u===v && (w===x | | y===z)). The first one will return true if u is equal to v and w is equal to x, or if y is equal to z. The second one will return true if u is equal to v and if either w is equal to x or y is equal to z.
Curly Brackets Shortcut
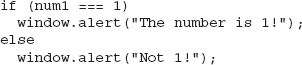
The if statement allows for a shortcut where curly brackets are not required if only one statement will be executed within an if or an else block. For example, consider the following code:
Since the if and else blocks each contain only one statement, JavaScript allows them to be written without the curly brackets, as in the following code:
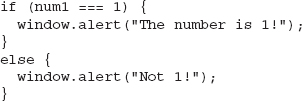
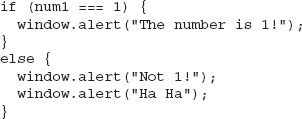
While this does shorten the code in a situation like this, this technique is not recommended since it can cause confusion about what code is being executed for a condition. It is also best for forward compatibility to keep the curly brackets, since it makes it simpler to add a statement to one of the blocks at a later time. Consider this code:

Given the formatting of the code, it appears that the “Ha Ha” alert is meant to display only when num1 is not equal to 1. However, the alert displays regardless of whether the condition is true or false. Since the brackets have been left off, the “Ha Ha” alert is not part of the else block, but is simply the first statement that follows the if/else statement and is always executed.
To fix this, you simply add the curly brackets to clarify what the code should do. The following code will work as intended:
With the brackets in place, the “Ha Ha” alert will only display if num1 is not equal to 1.
Chaining if/else Statements
In some cases, you will want to set up an “elseif” type of statement. While JavaScript doesn’t have an “elseif” keyword, it does allow you to create this type of statement by chaining if/else statements together, as in the following code:
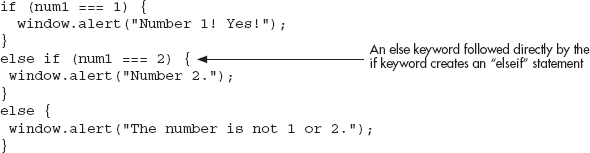
This allows you to perform any number of tests before having to execute the final else statement as a final option. This can often be shortened further by using the switch statement, which is discussed in the next section.
Using the switch Statement
The switch statement allows you to take an expression and execute a different block of code based on whether a case is equal to the value of the expression. If you wish to check for a number of different values, this can be an easier method than using of a set of chained if/else statements.
The first line of a switch statement would have the following syntax:
You can replace expression with a value, a variable, or some other sort of expression (for example, the addition of numeric values or the concatenation of string values). For the first example, you will just use a variable that has been assigned a value before the switch statement begins.
Now, you need to see the general syntax for a full switch statement. The following code is an example of how a switch statement looks:
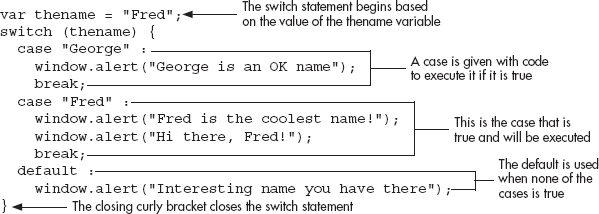
First, this example declares and assigns a variable named thename; it is given a value of Fred. Next, the switch statement begins, using the variable thename as the basis for comparison. Then, the block is opened with a curly bracket, followed by the first case statement. Written like this, it is saying, “If thename is equal to George, then execute the commands after the colon.” If thename were equal to George, you would get an alert.
Next you see the break statement, which tells the browser to exit the code block and move on to the next line of code after the block. You use the break statement in the switch block to be sure only one of the case sections is executed; otherwise, you run the risk of having all the cases executed following the one that returned true, because, by default, the browser would continue to the next statement (called fall through) rather than exit the block entirely, even though it finds one of the cases to be true. To be sure that the browser exits the block, you add the break statement.
If you get back to the script, you see that thename is not equal to George, so this case is skipped; however, the next comparison returns true because thename is equal to Fred in the script. Thus, the set of statements in this case block will be executed. Note that two lines of JavaScript code appear before the break statement here. This shows that you could have any number of lines within a case.
Finally, you see the keyword default. This is used in the event that none of the case statements returns true. If this happens, the default section of code will be executed. Notice that you don’t need the break statement after the default section of code, because it is at the end of the switch block anyway, so the browser will exit the block afterward, eliminating the need for the break statement.
Falling Through
Sometimes you want to execute the following case. This is called falling through, which will allow you to proceed to the next case statement. One use of this technique is when multiple cases would be suitable for a particular section of code. You could allow these cases to fall through until you get to the code to be executed:
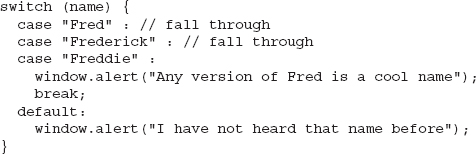
This allows all cases where the name is some variation of “Fred” to be handled by the statements placed in the last case, rather than repeating them in each case with a break. When using a fall through, it is a good idea to note it using a comment, as shown in the example code.
You can still execute code on any case before falling through. The following code shows an example of this:
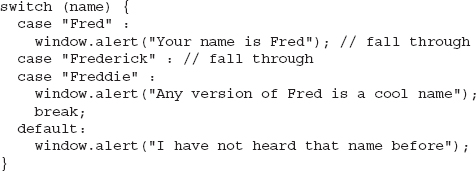
This time, if name is equal to “Fred”, then the “Your name is Fred” alert will display. The case will then fall through and also display the “Any version of Fred is a cool name” alert. If name is equal to “Frederick” or “Freddie”, then only the “Any version of Fred is a cool name” alert will display.
Using Expressions
Up to this point, you have used a variable value as the expression in the opening line of the switch statement. JavaScript allows you to use any type of expression, and this can be very useful when you use a Boolean value for the expression. Doing so allows you to write conditions that return a Boolean value, allowing you to test for more than a single value at a time. For example, consider the following code:
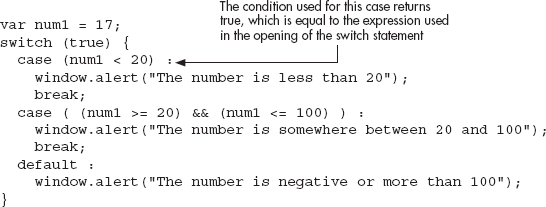
By using the Boolean value of true as the expression, each case can in turn be a condition. If a case condition returns true, then it is a match and that case will be executed. In the previous code, the first case will be executed because the condition num1 < 20 will return true, creating a match with the initial expression.
Using the Conditional Operator
The conditional operator (also called the ternary operator) is one that can be used as a short way to assign a value based on a condition. For instance, you might decide you want to assign a value to a variable based on the result of a conditional statement. You could do it using the following code:
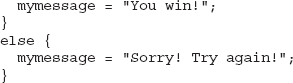
This works, and gives mymessage a value of “You win!” since mynum is equal to 1. However, the conditional operator allows you to shorten the amount of code required for this type of test. It allows you to place a condition before the question mark (?) and place a possible value on each side of the colon (:), like this:
JavaScript evaluates the conditional statement and if the statement returns true, the value on the left side of the colon (value1 here) is assigned to the variable. If the statement returns false, the value on the right side of the colon (value2 here) is assigned to the variable. As you can see, this operator takes three operands (the condition and the two values), which is why it is also sometimes called the ternary operator.
To apply this to our previous example, we could rewrite the entire piece of code as follows:
This works the same way as the previous if/else block, but allows you to write the code with a lot less typing (lessening the size of the script).
The conditional statements you have learned in this chapter will allow you to do much more with your code now that you know how to use them. You will be using these extensively in later chapters to create more complex scripts.
User Input from a Prompt
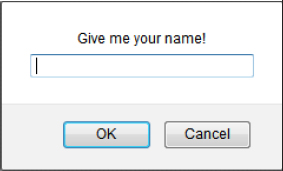
One way to obtain input from a viewer is to use the window.prompt() method. This method takes two arguments: the prompt text to be displayed and the default value for the text box that grabs the viewer’s reply. For example, you could use the following code.
In this case, the prompt text will be “Give me your name!” and the default value of the text box will be empty. The following illustration shows how the prompt dialog would look when this is run in Mozilla Firefox.
The window.prompt() method returns the contents of the text box if the user clicks OK or presses the ENTER key. If the Cancel button is clicked or the prompt is otherwise closed, then the value returned will be null. The returned value is stored in the variable the window.prompt() method is assigned to, if a variable is used. In this case, the returned value will be stored in the username variable.
To make use of this, suppose you want to display the viewer’s name on the page to personalize it a bit. You want to display the viewer’s name if it is entered, or display a default message if nothing is entered or the user cancels/closes the prompt in some way. The following code shows how this can be done:
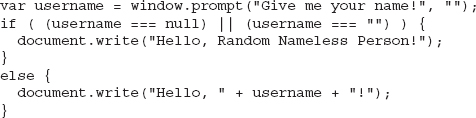
The value returned by the prompt is stored in the username variable. The value of this variable is checked using the if statement. If the value of username is null or an empty string, then the page displays the “Hello, Random Nameless Person!” message. Otherwise, the viewer is greeted with his/her typed name. Figure 6-1 shows the result of entering “Brent” in the prompt text box.
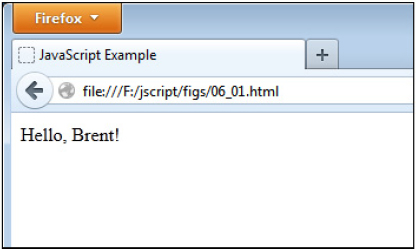
Figure 6-1 A greeting is displayed to the viewer.
As you can see, the if/else conditional statement allowed you to perform some basic testing on the user input. This kept you from displaying a message with null or an empty string as the viewer’s name. Technically, the user could still enter blank spaces, but you can prevent this by using regular expressions with your conditional statements. Regular expressions will be covered in more detail in Chapter 13.
Ask the Expert
Q: Do I need to use curly brackets on every if/else block? I have seen them used in code on the Web without the brackets. Why?
A: There is a shortcut that allows you to omit the curly brackets if you are only going to execute a single JavaScript statement in the if block and the else block (see the “Curly Brackets Shortcut” section of this chapter), and this may be used in free scripts on the Web. As explained earlier, this technique is not recommended as it can cause confusion when you are looking over or debugging the code.
Q: Why I am bothering with conditional statements if all I can do is assign the variable a value and then test it? If I already know what the value of the variable is, why use a conditional?
A: In the next section, you will get to the point where you are getting information from the viewer. This information can vary depending on the viewer (for example, if the viewer needs to enter his/her name into a text box or a prompt), thus making the conditional blocks more useful since you will be able to perform one action for one viewer, and another task for a different user. With user input, you won’t know the value of the variable beforehand, and you will need to handle the possibilities using conditional blocks. Also, you will recall that functions can be passed different values as arguments, which you may need to test with conditionals before executing certain sections of code.
Q: Do I need to use the switch statement or the conditional operator?
A: While it is not absolutely necessary to use them (you could use if/else statements instead), it is a good idea to learn them since they can help you save time and optimize your code. It is also helpful to know them when you are reading through other scripts to see what the code is doing.
Q: I tried entering a number into a prompt and adding it to another number, but it ran the two numbers together instead of adding them. Why?
A: Data entered into the prompt text box is returned as a string, regardless of what type of data was entered. You can use the unary plus operator (refer to Chapter 5) to coerce the string into a numeric value:
If the value can be coerced, it will become numeric and the addition will take place as expected. You will learn more about validating input in Chapter 13.
| Try This 6-1 | Work with User Input |
This project will help you work with the window.prompt() method, if/else statements with nesting, and the switch statement. Suppose you just started an online store that offers a product for sale. Unfortunately, you are on a tight budget and only able to deliver products to certain cities. You want to prompt the customer for a city name and display a message stating whether or not delivery is available to the customer. |
Step by Step
1. Create an HTML page and save it as pr6_1.html. Add script tags to point to an external JavaScript file named prjs6_1.js.
2. Create an external JavaScript file and save it as prjs6_1.js. Use this file for steps 3–6.
3. Create a variable named msg with an initial value of an empty string (“”). This will be used to hold the message that will be displayed to the customer.
4. Create a variable named city and assign it the return value of a prompt that asks “What is the name of your city?”
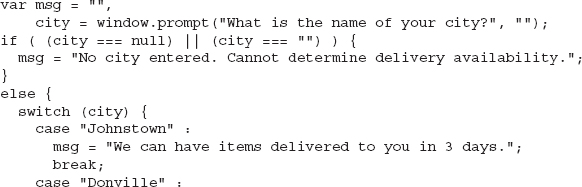
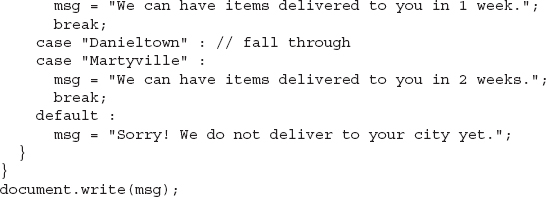
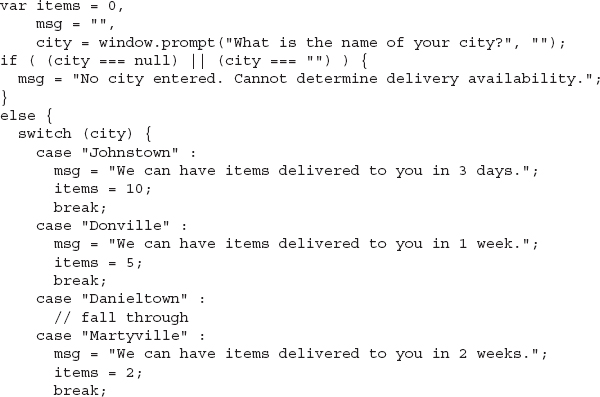
5. If the value of city is null or an empty string (“”), then assign the value “No city entered. Cannot determine delivery availability.” to the msg variable. Otherwise (else), create a switch statement (this will be nested within the else block).
6. In the switch statement, assign the following values to the msg variable, depending on the name of the city:
“We can have items delivered to you in 3 days.” if the city is Johnstown.
“We can have items delivered to you in 1 week.” if the city is Donville.
“We can have items delivered to you in 2 weeks.” if the city is Danieltown or Martyville.
“Sorry! We do not deliver to your city yet.” for any other city name that is entered.
“We can have items delivered to you in 1 week.” if the city is Donville.
“We can have items delivered to you in 2 weeks.” if the city is Danieltown or Martyville.
“Sorry! We do not deliver to your city yet.” for any other city name that is entered.
7. Write the value of the msg variable on the page.
8. When you are done, your JavaScript file should have the following code (other solutions are possible as well):
9. Save the JavaScript file and the HTML file and view the HTML page in your browser.
10. Try entering one of the named cities. You should get the appropriate message written on the page. You can reload the page to try out different city names.
Try This Summary
In this project, you used your new skills with the window.prompt() method, if/else statements, and switch statements to create a script that allows the user to enter a city name and then see whether delivery is available to that city.
Defining Loops
To begin using loops, you will want to know what loops are, what they can do, and why they can be useful to you in your scripts.
What Is a Loop?
A loop is a block of code that allows you to repeat a section of code a certain number of times, perhaps changing certain variable values each time the code is executed. By doing this, you can often shorten certain tasks into a few lines of code, rather than writing the same line over and over again within the script and tiring your fingers.
Why Loops Are Useful
Loops are useful because they allow you to repeat lines of code without retyping them or using cut and paste in your text editor. This not only saves you the time and trouble of repeatedly typing the same lines of code, but also avoids typing errors in the repeated lines. You can also change one or more variable values each time the browser passes through the loop, which again saves you the time and trouble of typing a line that is only slightly different than the previous line.
As a simple example, suppose you wanted to write a sentence onto a Web page ten times in a row using JavaScript. To do this normally, you might have to write something like the following:
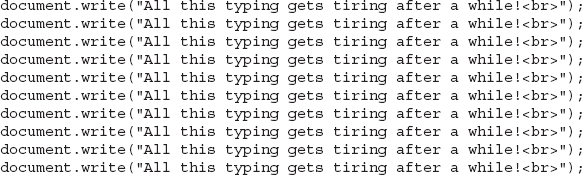
Ouch! Cut and paste can make the task easier, but it would still be a bit tedious, especially if you decide to write the sentence 50 times instead. With a loop, you could write that document.write() statement just one time and then adjust the number of times you want it to be written. It would be something like the following example. This is not actual code, but you will see the actual code needed to repeat a statement multiple times when you look at the loop structures in more detail in the next section, “Using Loops.”

Of course, you will replace the “Do this block 10 times” text with an actual statement that JavaScript will understand. You will see what statements you can use to form loops in the following section.
Using Loops
In order to see how loops can really be helpful to you, you need to take a look at the different loop structures that you can use in JavaScript. The loop structures covered in this section are the for, while, and do while loops.
for
To use a for loop in JavaScript, you need to know how to code the basic structure of the loop and how to nest a for loop within another for loop. To begin, take a look at the basic structure of a for loop.
Structure of a for Loop
The structure of a for loop is very similar to that of the conditional blocks. The only major differences are that a loop serves a different purpose and, as a result, the first line is different. After that, you use the familiar curly brackets to enclose the contents of the loop.
The first line of a for loop would look similar to the following line:
The first thing you see is the for keyword. This is followed by a set of parentheses with three statements inside. These three statements tell the loop how many times it should repeat by giving it special information.
The first statement (var count = 1) creates a variable named count and assigns it an initial value of 1. This initial value can be any number. This number is used as a starting point for the number of times the loop will repeat. Using the number 1 will help you see more easily the number of times the loop will repeat. The preceding code begins the loop with count having a value of 1. Note that if the count variable had been initialized earlier in the script, the var keyword would not be needed here.
The next statement (count < 11) tells the loop when to stop running. The loop will stop running based on this conditional statement. The condition here is to stop only when the variable count is no longer less than 11. This means that if you add 1 to the value of count each time through the loop, the loop’s last run-through will be when count is equal to 10. When 1 is added to 10, it becomes 11; and that doesn’t pass the conditional test, so the loop stops running.
The last statement in the set (count ++) determines the rate at which the variable is changed and whether it gets larger or smaller each time. In the preceding code, you add 1 to the variable each time you go back through the loop. Remember, the first time through, the variable has been set to 1. Since you add 1 each time, the variable will have a value of 2 the second time through, 3 the third time through, and so on, until the variable is no longer less than 11.
To finish the structure, you insert the curly brackets to enclose the code that you wish to use within the loop. An example of the full structure of a for loop is shown in the following code:

Now, you just need to add a real variable and some JavaScript code to be executed, and you will have a full for loop put together. To do this, you’ll begin with a script to write a sentence to the page ten times. Now that you can use a loop, you need to write the sentence itself only once, rather than ten times in a row. The following example code shows how this can be done using a for loop:

The count variable is going to begin counting at 1, since it is assigned an initial value of 1. You are adding 1 to it each time through the loop. When the count variable has a value that is no longer less than 11, the loop will stop. In this case, the count will run from 1 to 10, thus running the loop ten times.
When 1 is added the next time the for statement is hit, the value of the count variable is 11, which is no longer less than 11; thus, the browser will skip over the loop and continue to the next line of code after the closing curly bracket for the loop. The <br> tag is used in the document.write command to be sure that each sentence will have a line break after it and will not write the next sentence on the same line.
To see this work on a page, you can add the script tags and insert an external JavaScript file into the body section of an HTML page. Create a JavaScript file named loops01.js, add the following code, and save the file. Add the necessary script tags to an HTML document and save it as loops01.html.

Here, a slight change was made to increment the count variable. Rather than typing count += 1, the increment operator (++) was used. When you are simply adding one to the variable, the increment operator can be a handy way to shorten the code. However, if you wanted to increment the variable by 2 or more, the add-and-assign operator would still need to be used (that is, count += 2).
The page represented by the preceding code has a short line of text that is followed by your repeating line of text. The page ends with a note, “Now we are back to the plain text.” Figure 6-2 shows how this will appear in the browser window when viewed. Notice that the sentence “I am part of a loop!” is repeated ten times.
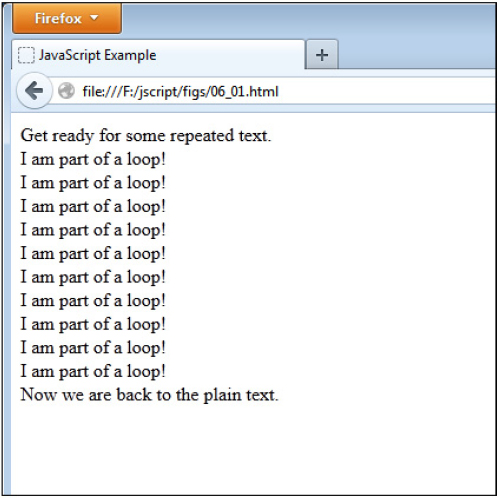
Figure 6-2 The loop displays the line of text ten times.
Now that you can do a basic loop, you are ready to add something to it that will make the loop even more useful. Within the loop, you can use the value of the count variable (or whatever variable is used) to do various things.
One thing you can do (this will become more apparent when you get to arrays later) is to make use of the fact that the variable is changing each time. With the variable going up by 1 each time through, you could use a loop to number the sentences from 1 to 10 and make the lines more readable. The following code does this:

In the preceding code, you just added the value of the count variable to your string at the beginning. The period before the sentence will make the line of text appear with a period after the number, a space, and your sentence on each line. Figure 6-3 shows how the script would look in the browser with this addition.

Figure 6-3 Now the repeated lines are numbered from 1 to 10.
The Comparison
When making the comparison, you are not limited to only the < operator. For example, you have been looping through ten times thus far. There are a number of ways to make a loop execute ten times, though some will change what values the count variable uses (which can be handy when you do not want 1–10 as the count numbers). Some examples are shown here:
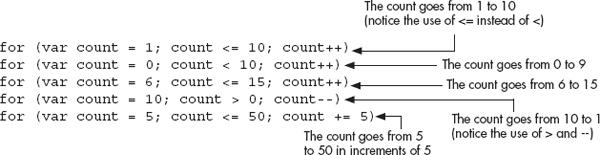
Keep this in mind, as this type of flexibility can help to save you time or additional calculations based on the count variable. The second method shown in the example, for instance, is used often with arrays. You will learn more about this in Chapter 7.
Block Nesting
Yes, you now have to deal with nested loops. As with if/else blocks, you can nest as many levels deep as you can handle. For now, you will just nest one loop within another. The following example shows a for loop within a for loop:

CAUTION
Be careful when you nest loops to be sure that each nested loop has its own counter on its first line, such as for (count = 1; count < 11; count ++). A counter will need to be unique to its own loop in most cases. Also, errors may occur if the curly brackets are not included or paired correctly.
Now you get a loop that interrupts your outer loop text with text of its own. Each time you go through the outer loop, you write out the “I am part of a loop!” line. Then, you encounter another loop that writes out “I keep interrupting in pairs!” to the screen.
The inner loop is set up to repeat twice; so each time you have one sentence from the outside loop, it is immediately followed by two sentences from the inside loop. In order to see this more clearly, consider the following example, which updates the code you used earlier in the loops01.js file:

Figure 6-4 illustrates how this nested loop affects the appearance of the page in the browser. You can now see how nested loops are useful to add even more information along the way if you need to do so.

Figure 6-4 The nested loop inserts text within the outside loop’s text.
To further complicate matters, you can also nest different types of blocks inside one another. For example, you can put an if/else statement block inside a loop, or a loop inside the if block or the else block of an if/else statement. The following example creates an if/else block within a for loop:
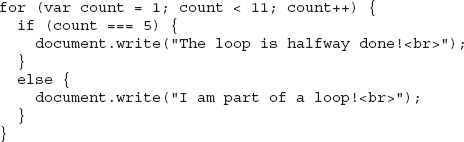
In this case, the browser will check whether or not the count variable has a value of 5. If it does, the browser will print a different message to the screen than the browser would otherwise. You can best see the effects of this by adjusting your JavaScript file to have the following code:
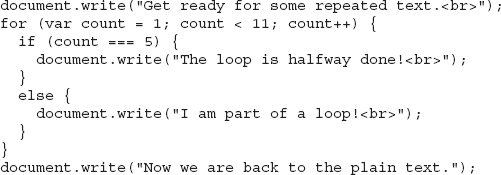
Figure 6-5 shows the result of this code when run in the browser. Notice how the fifth line is different based on the conditional statement within the loop.
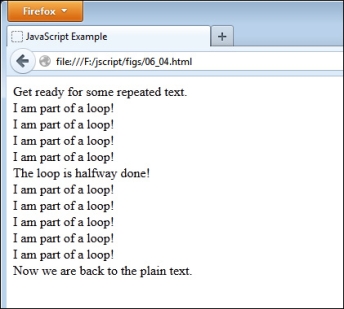
Figure 6-5 The nested if/else block causes the fifth line to be different from the other lines.
As you can see, you can do quite a bit with nesting. Using the same techniques you just learned, you can nest all the other statement blocks covered in this book; therefore, I won’t be as detailed about the nesting techniques with the rest of the statements that are covered.
Infinite Loops
When writing any type of loop, it is possible to create what is known as an infinite loop, which is a loop that never completes. Such a loop can potentially continue to run until it crashes the user’s computer. Though most modern browsers can detect this after a time and prompt the user to stop the execution of the script, it is not guaranteed and could cause issues for those running the script.
To avoid programming an infinite loop, you will need to be sure that the condition you set will at some point return false. For example, the following for loop creates a condition that never returns false when the loop runs, creating an infinite loop:

As you can see here, the variable i is assigned an initial value of 25 and is incremented by one each time through the loop. This means that i will always be greater than 10 and the condition i > 10 will never return false, creating an infinite loop.
To fix this, be sure to make an adjustment in the loop so that the condition will eventually return false. Here are two examples of how this loop can be fixed:

Here, i is decremented rather than incremented, which will eventually bring the value of i down to 10 to make the condition false.

In this case, the condition is altered to i < 50 while keeping the increment in place. When i reaches 50, the condition will return false and end the loop.
Multiple Statements
A for loop can also contain multiple statements when it is initialized. This gives you the ability to have more than one variable for counting that can be altered through the loop. For example, if you want to count by tens, you could use the following code to go from 10 to 100.

Here, both i and j variables are initialized (i is 0 and j is 10) and incremented. The value of i is incremented by one, while j is incremented by 10. The condition i < 11 will stop the loop after it runs ten times. The end result is that the numbers 10, 20, 30, 40, 50, 60, 70, 80, 90, and 100 will be displayed on the page.
while
A while loop tests a comparison and repeats until the comparison is no longer true. The following code shows the general structure of a while loop:

First, notice that the value of 1 is assigned to the variable count before the loop begins. This is important to do, since you cannot declare the variable when initializing a while loop as you can with a for loop. This loop is set up to repeat five times, given the initial value of the variable and the increase in the value of the variable by 1 each time through (count++).
In a while loop, you must also remember to change the value of the variable you use so that you do not get stuck in a permanent loop. If the previous sample loop had not included the count++ code, the loop would have repeated indefinitely, and you do not want that to happen. So, the main things you must remember with a while loop are to give a counting variable an initial value before the loop and to adjust the value of the variable within the loop itself.
For an example of the while loop in action, you can recode your sentence-repeat script to work with a while loop:

The preceding code will produce the same result as your for loop did, just with a different look, as shown in Figure 6-6. In many cases, you can choose to use a for loop or a while loop based on personal preference, since they can perform many of the same tasks.
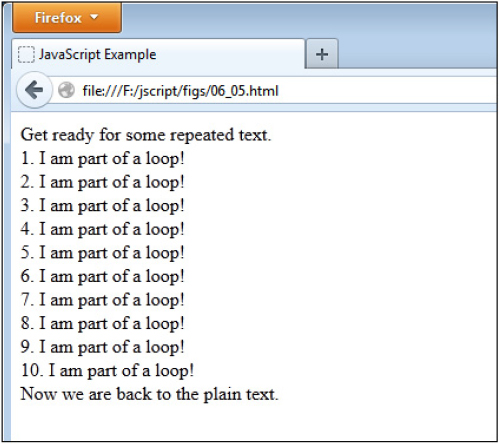
Figure 6-6 A line of text is repeated ten times using a while loop.
As far as nesting with while loops, it works the same as with the for loops. You can insert another while loop, a for loop, or an if/else block within a while loop. You can also insert a while loop within the other statement blocks if you wish.
do while
The do while loop is a special case because the code within the loop is performed at least once, even if the comparison used would return false the first time. A comparison that returns false in other loops on the first attempt would cause them never to be executed. In the case of a do while loop, the loop is executed once, and then the comparison is checked each time afterward to determine whether or not it should repeat.
The following is an example of a do while loop that will run five times:

Notice that the keyword do and the opening curly bracket are the only things on the first line of the block in the preceding code. Then, when the block is complete, you see the while statement and comparison. The do keyword is how you ensure the code block is executed at least once.
After that, the browser checks to see that the comparison returns true before repeating. In this case, the loop repeats five times since the variable count starts at 1 and is increased by 1 each time through. When the value of count reaches 6, the loop is skipped and no longer executed. Also notice that there is a semicolon at the end of the loop to end the statement, unlike with other types of loops.
To see an example of a do while loop that gets executed at least once even though the initial comparison would return false, look at the following example code:

The loop in the preceding code will only run the first time. When the comparison is checked (count will be 12 by this time, since 1 is added to it in the execution of the loop), it returns false and the loop is no longer run.
A do while loop is most useful when you have some code that you need to have executed at least once but need repeated only if certain conditions are met; otherwise, one of the other two loops would be sufficient for the task.
for in and for each in
The for in loop allows you to loop over all the names of the properties of an object, while the for each in loop allows you to loop over the value of each of the properties. These loops will be covered in more detail in Chapter 8.
Using break and continue
The break and continue statements allow you to stop what a loop is currently doing, but they work in different ways. As you will recall from the use of a break statement within a switch block earlier in the chapter, the break statement stops the loop at that point and completely exits the loop, moving on to the next JavaScript statement after the loop. For instance, break could be used in this manner:
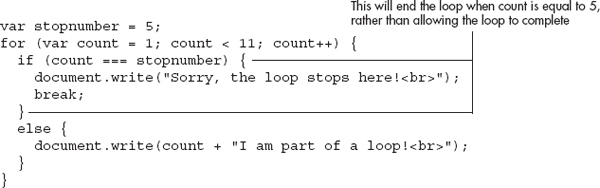
This loop will go through normally until count is equal to the value of stopnumber (in this case, 5). When this happens, a special message is written to the page and the break statement is used to end the loop entirely. Thus, rather than going through the loop ten times, the loop will only be executed five times.
If you decided that you did not want to completely leave the loop when that condition occurs, you could modify the loop to use the continue statement. The continue statement will stop the loop from executing any statements after it during the current trip through the loop. However, it will go back to the beginning of the loop and pick up where it left off, rather than exiting the loop entirely. For example, you could use the following code:

This time, nothing is written to the page when count is equal to the value of skipnumber (in this case, 5). Instead, the loop is told to go back to the beginning and continue from there. The result is that the “I am part of a loop!” message will be written to the page only nine times (effectively skipping the fifth time the text would be written and going on to the sixth). Figure 6-7 shows how this would look when run in a browser.
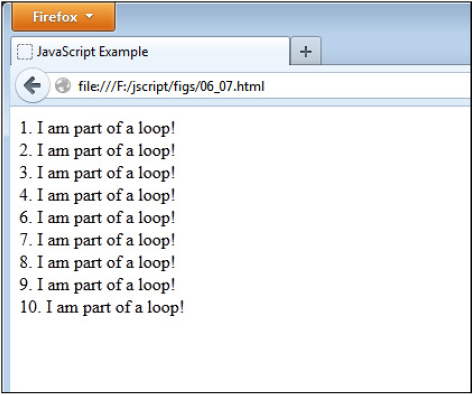
Figure 6-7 The fifth iteration is skipped, so only 1–4 and 6–10 are displayed.
Ask the Expert
Q: Are loops useful for anything other than writing a line of text to the page repeatedly?
A: Yes, you will see their usefulness more as you progress through the chapters. You will see in Chapter 7 that they can be especially useful when dealing with arrays.
Q: Is it really okay to use the variable I have counting the loop inside the loop? Couldn’t that lead to problems?
A: It is okay to use that variable within the loop, as long as you do not somehow assign it a new value when using it. If you are worried that you might do this, assign its value to another variable and use that one in the code instead. For example, take a look at the following code:

Here, you assign the value of the count variable to a variable named thenum. You then use the thenum variable in the code instead of the count variable.
Note, however, that it is okay to assign a new value to a count variable if that is what you intend to do. The preceding idea is only a method you can use if you do not intend to change the count variable and want to be sure you don’t accidentally do so.
Note, however, that it is okay to assign a new value to a count variable if that is what you intend to do. The preceding idea is only a method you can use if you do not intend to change the count variable and want to be sure you don’t accidentally do so.
Q: Should I use a for loop or a while loop when I want to use a loop? Which one is better?
A: Use the type of loop you personally prefer. Often, the type of loop used depends upon the situation at hand. One type of loop might seem to make more sense than the other type under different circumstances.
Q: Will the do while loop ever be useful to me?
A: Although the do while loop does have its usefulness, it is unlikely that you will use it often unless you use scripts that need to have a loop run at least once before it is checked. However, the knowledge you gained about the do while loop in this chapter will help you if you should encounter a script that uses it on the Web or elsewhere.
The break and continue statements will prove helpful to you when special situations come up that require you to stop the loop entirely or to stop the loop and restart it at the beginning.
| Try This 6-2 | Work with for Loops and while Loops |
In this project, you will make use of a for loop to add another feature to the script from Try This 6-1. Suppose your online store also could only deliver a certain number of items to each of the available cities. Unfortunately, you are still on a tight budget and do not have online ordering in place yet. The customer must print out a form, fill in each item number, and snail mail it to you. You want to display a printable form for the customer with enough lines that the customer can order up to the maximum amount of items for the city entered. |
Step by Step
1. Create an HTML page and save it as pr6_2.html. Add the script tags to point to a script named prjs6_2.js.
2. Create an external JavaScript file and save it as prjs6_2.js. Use it to complete steps 3–5.
3. Copy and paste your JavaScript code from prjs6_1.js into your prjs6_2.js file.
4. Add a new variable named items to the script and assign it a value of 0.
5. In the switch statement, add code to assign the following values to the items variable, depending on the name of the city:
10 if the city is Johnstown.
5 if the city is Donville.
2 if the city is Danieltown or Martyville.
0 for any other city name that is entered.
5 if the city is Donville.
2 if the city is Danieltown or Martyville.
0 for any other city name that is entered.
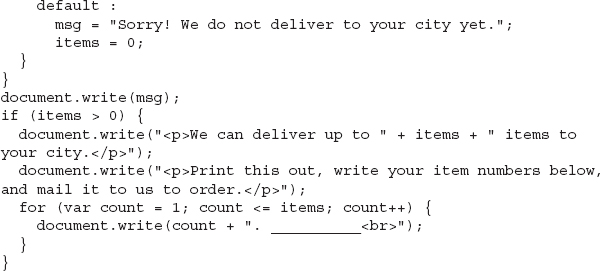
6. After the document.write(msg) statement, add additional code so that if the value of the items variable is greater than 0 (an if statement), then the following document.write() statements are executed.

7. Right after these statements (still inside the if statement), create a for loop that will display a number followed by a series of underscores (_) to create a place to fill in an item number. The loop will run enough times to allow the maximum number of items to be ordered for the city that was entered.
8. When you are done, your JavaScript file should have the following code (other solutions are possible as well):
9. Save the JavaScript file again and view the HTML page in the browser. Enter a city and view the results. You can reload the page to try different city names.
Try This Summary
In this project, you used your knowledge of loops and if statements to enhance your previous project by adding a customized “snail mail” order form for customers in different cities.
Chapter 6 Self Test
1. A conditional statement is a statement that you can use to execute a bit of code based on a __________, or do something else if that __________ is not met.
2. You can think of a conditional statement as being a little like __________ and __________.
3. Rather than executing every single line of code within the script, a conditional statement allows certain sections of the script to be executed only when a particular condition is met.
A. True
B. False
4. Which of the following would be valid as the first line of an if/else statement?
A. if (x=2)
B. if (y<7)
C. else
D. if ((x==2 &&)
5. What do you use to enclose the blocks of code in conditionals and loops?
A. Parentheses
B. Square brackets
C. Curly brackets
D. Less-than and greater-than characters
6. The __________ statement allows you to take a single variable value and execute a different line of code based on the value of the variable.
7. A __________ is a block of code that allows you to repeat a section of code a certain number of times.
8. A loop is useful because it forces you to type lines of code repeatedly.
A. True
B. False
9. Which of these would be valid as the first line of a for loop?
A. for (var x = 1; x < 6; x += 1)
B. for (x==1;x<6;x+=1)
C. for (int x=1;x=6;x+=1)
D. for (var x+=1;x<6;x=1)
10. A __________ loop looks at a comparison and repeats until the comparison is no longer true.
11. Which of these would not be valid as the first line of a while loop?
A. while (x<=7)
B. while (x=7)
C. while (x<7)
D. while (x!=7)
12. A do while loop is special because the code within the loop is performed at least once, even if the comparison used would return false the first time.
A. True
B. False
13. The first line of a do while block contains the keyword do and a comparison.
A. True
B. False
14. The last line of a do while block contains only a curly bracket.
A. True
B. False
15. How many times can you nest a code block within another?
A. None
B. Once
C. Three times, but no more
D. As many times as you like (though enough nesting could make the browser run out of memory)
..................Content has been hidden....................
You can't read the all page of ebook, please click here login for view all page.