
Chapter 9
The Document Object
Key Skills & Concepts
• Defining the Document Object
• Using the Document Object Model
• Using the Properties of the Document Object
• Using the Methods of the Document Object
• Using DOM Nodes
• Creating Dynamic Scripts
Now that you know how objects work and how to use predefined JavaScript objects, it is time to look at some of the major predefined objects in JavaScript.
This chapter covers the document object, which helps you to gather information about the page that is being viewed in the browser. As you will find out in this chapter, some of the document object’s properties and methods can be used to get information about the document or to change information about the document. You will also be introduced to the Document Object Model, and see how this can be used with style sheets to create dynamic scripts.
Defining the Document Object
The document object is an object that is created by the browser for each new HTML page (document) that is viewed. By doing this, JavaScript gives you access to a number of properties and methods that can affect the document in various ways.
You have been using the write() method of the document object for quite some time in this book. This method allows you to write a string of text into an HTML document.
To begin your journey through the document object, you will take a look at the Document Object Model (DOM) and the various properties you can access with this object. Many of these properties will turn out to be quite useful when writing scripts.
Using the Document Object Model
The Document Object Model (DOM) allows JavaScript (and other scripting languages) to access the structure of the document in the browser. Each document is made up of structured nodes (for example, the body tag would be a node, and any elements within the body element would be child nodes of the body element). With this structure in place, a scripting language can access the elements within the document in a number of ways, allowing for the modification of the elements within the document.
If you had the following HTML code, you could use JavaScript to access its structure:

Figure 9-1 shows how the body element is a node, and how it can have child nodes and attribute nodes.
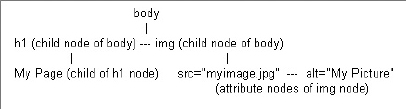
Figure 9-1 An example of part of a document’s structure
The h1 and img elements are both child nodes of the body element. Each element also has its own nodes. The h1 element contains a text node as its child node (the text “My Page”), while the img element contains two attribute nodes (src=“myimage.jpg” and alt=“My Picture”). This type of structure is available throughout the document, so while this is a simple example, much more complex document structure trees could be drawn for most HTML pages.
You can write scripts to add, remove, or change nodes in the DOM. You can use the document.getElementById() method to access elements by their id attribute values, and even get groups of elements using methods like document.getElementsByTagName() or document .getElementsByClassName().
First, you will look at the properties and methods of the document object.
Using the Properties of the Document Object
Table 9-1 lists the properties of the document object with a short description of each. Following the table, some specific properties are discussed in more detail.
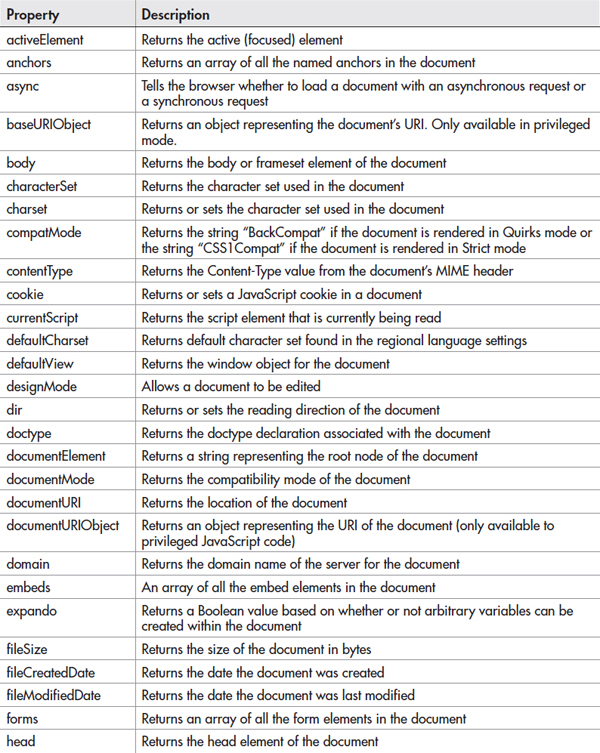
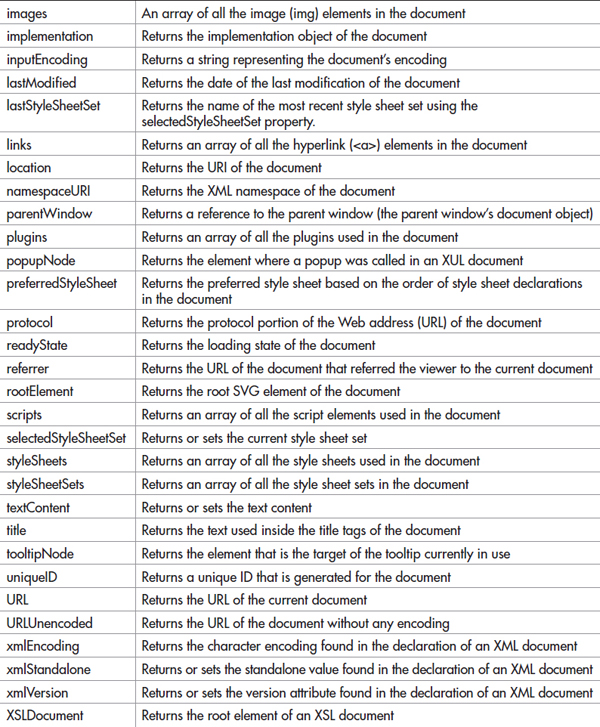
Table 9-1 The Properties of the Document Object
NOTE
Not all of these properties work cross-browser. You can see more information on each of these properties by visiting http://developer.mozilla.org/en/DOM/document#Properties and http://msdn.microsoft.com/en-us/library/ms531073(VS.85).aspx.
Collections
A number of the properties (anchors, embeds, forms, images, links, plugins, scripts, styleSheets, and styleSheetSets) return an array that holds a collection of elements or values found in the document. These can be accessed like any array using indexes. The element or value at index zero will be the first, index one the second, and so on.
For example, the links property can be used to access all of the links in the document. If you need to find the first link in the document, you could use document.links[0] to access that element as an object. You can then use DOM node properties or methods (discussed later in this chapter) to get or set information, or to perform certain tasks on the element.
The cookie Property
The cookie property is used to set a JavaScript cookie to store information for the viewer. A cookie is a small text file saved to the viewer’s computer for a particular amount of time (a set date or a browser session). Cookies can be helpful in allowing a site to remember and retrieve information for a viewer (such as the contents of a shopping cart, special settings, or session information).
To set a cookie, you set the value of the document.cookie property to a string that contains the information you want to store for the viewer. The following is the syntax:
You would replace string with a text string that contains the information you want to use. Usually, this is in a format like the one shown in the following example of setting a cookie:
You can see that there is one thing set by the cookie: the site is homepage. In between the two the equal sign is used to help separate the site and homepage when the cookie is read. Note that setting the cookie does not replace the whole cookie; it just adds the new string to it.
You will see how to use advanced string-handling techniques and how to set and read cookies in more detail in later chapters.
The dir Property
The dir property returns a string value that represents the reading direction of the document. This value can be either ltr (left to right) or rtl (right to left). This property is useful for displaying Web pages in languages that are read from right to left rather than left to right, by setting the value to rtl. For fun, you can change the way your page looks on-the-fly with this property, as in the following example code:
Figure 9-2 shows an example of how a page would look with the dir property set to “rtl”.

Figure 9-2 A Web page with the direction switched to rtl
The lastModified Property
The lastModified property holds the value of the date and time the current document was last modified. This is used mostly for informational purposes, such as displaying the date the document was last modified so the viewer knows when you last updated your page. The value of this property depends on your browser, as different browsers have different results if you write the last modified date on the page.
Consider the following code, which writes the value of the document.lastModified property into a Web page to display the last modified date and time:

Figure 9-3 shows the result of this when viewed in Mozilla Firefox.

Figure 9-3 The last modified date when viewed in Mozilla Firefox
When writing the date of the last modification on the page, the differences only matter in terms of space on the page. Some layouts may need to have extra space arranged for the longer version of the property.
The referrer Property
The referrer property is used for informational purposes and holds the value of the URL of the page that the viewer was on before arriving at your page (the referring page). While this can be useful, the viewer doesn’t always come in with a referring URL (such as when using a bookmark or typing in the address), so the value could be nothing. Also, the value of this property isn’t always correct, because different browsers may consider different types of things as referring the viewer to the new page, rather than just links, and it is possible for the user to hide or change the referrer.
Placing the code in the following example into the document would send an alert to the viewers of a page telling them where they were before they got to your page:
So, if the referring page were http://www.scripttheweb.com/js/, an alert saying “You came from http://www.scripttheweb.com/js/!” would be sent to the viewer.
The title Property
The title property holds the string value of the title of the HTML document. The title is set inside the <title> and </title> tags of a page.
One way you can use the title property is to display the title of the page to the viewer someplace other than in the top bar of the window. The following code would allow you to do this:
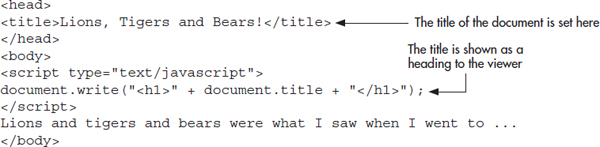
This displays your title as a heading on the page. Figure 9-4 shows the result of this when viewed in a browser.
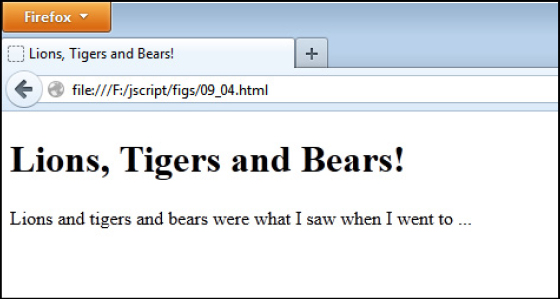
Figure 9-4 The title of the document is shown as a heading on the page.
The URL Property
The URL property holds the value of the full URL of the current document. This information can be useful if you print it at the bottom of your HTML page, because it will show the page URL for anyone who prints out your page.
While you could just type the URL at the bottom on your own, this could become tedious when it needs to be done on numerous pages. This is where this property can be handy, because you can cut and paste a little script to each page rather than type the various URL addresses each time. An example of writing the URL address on the page is shown in the following code:
Figure 9-5 shows the result of the preceding code in a browser. The last line of the page tells the viewer the current location. The figure shows a local file address, but it would show a regular URL if the page were online.
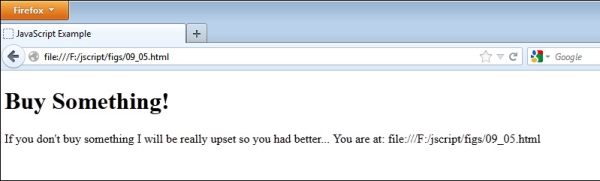
Figure 9-5 The URL of the document is shown at the end of the page contents.
The URLUnencoded Property
The URLUnencoded property returns the URL of the document without any encoding. For instance, if there is a filename with a space in it, the property will return the space rather than a %20 in its place. For the URL http://www.scripttheweb.com/myscript.html, the document .URL property would return http://www.scripttheweb.com/my%20script.html. The document .URLUnencoded property returns http://www.scripttheweb.com/myscript.html, the URL without the encoding for the space. Note that at the time of this writing this property was only available in Microsoft Internet Explorer.
Ask the Expert
Q: Will learning about the document object and the DOM be helpful to me?
A: Yes, because they provide a foundation for working not only with Web pages, but other types of documents as well. For example, other types of documents use a similar structure of nodes, so learning how it works for an HTML document is helpful when you need to make use of JavaScript on another platform, such as Adobe Acrobat for PDF files.
Q: The referrer property is cool! Is there any way I can write that information to a file each time a visitor drops in so that I know where my visitors are coming from?
A: Client-side JavaScript cannot save information in a file on its own, but can send information to a server-side program where it can then be stored in a file or database. You will learn more about this (using JSON and/or AJAX) in later chapters.
Q: Other than the arrays that contain element collections, are there any other ways to access elements in the document?
A: Methods of the document object, such as getElementById(), allow you to be even more specific about the elements you select. You will learn how to use these methods in the next section.
Using the Methods of the Document Object
The methods of the document object allow you to do some new things that you haven’t been able to do yet. Table 9-2 lists the methods with a short description of each. Because a number of these methods are browser-specific (as with the properties), only some specific methods are described in more detail following the table.

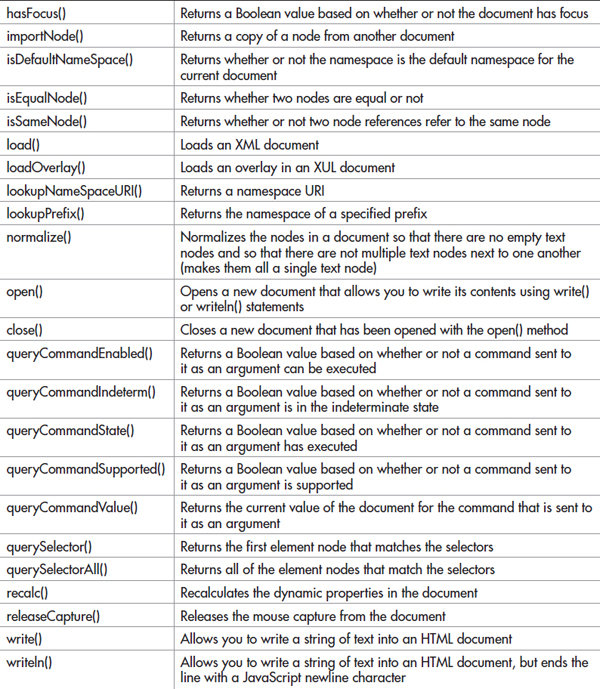
Table 9-2 The Methods of the Document Object
NOTE
Not all of these properties work cross-browser. You can see more information on these properties by visiting http://developer.mozilla.org/en/DOM/document#Methods and http://msdn.microsoft.com/en-us/library/ms531073(VS.85).aspx.
The get Methods for Elements
There are a number of methods that allow you to get one or more elements in the document for use in your scripts. Each of these provides you a unique way to gain access to any elements you may need.
The getElementById() Method
The getElementById() method allows you access to an element by the value of its id attribute. For example, if you have the following HTML code, you can access the div element with the getElementById() method:
Since the id attribute of the div element has the value of some_text, the document .getElementById() method can access the div element using that value as an argument:
As you go through this chapter, you will see that you can use this and the other selection methods to retrieve information from elements, alter elements, add elements, or delete elements.
The getElementsByClassName() Method
This method allows you to get an array filled with all the elements in the document that have the specified class name (from a CSS class). For example, to obtain all of the elements with a class name of number_one, you could use the following code:
The getElementsByName() Method
This method allows you to get an array filled with all the elements in the document that have the specified value for the name attribute. In many cases, this value is unique to one element. However, radio buttons that are part of the same group all need to have the same name value (so that only one selection can be made). This is a case where being able to retrieve all of those elements could be handy:
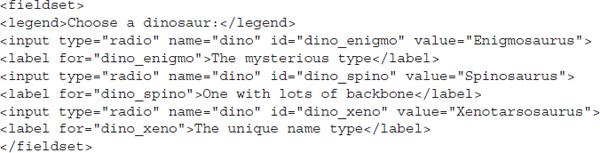
This HTML code has a set of radio buttons, all named dino. If you want to get all of these elements, you could use the following code:
This will retrieve all of the radio button elements with the name dino in an array, which you could then loop through to perform any necessary tasks:

As you can see, you could now work with all of the elements in a loop, rather than gathering each one by its id to perform the same task.
The getElementsByTagName() Method
This method allows you to get an array filled with all the elements in the document that have the specified tag name. For example, to obtain all of the image elements in the document, you could use the following code:
Getting More Specific
The get methods can be used with more specific objects once you have them. For instance, suppose you had the following HTML code:
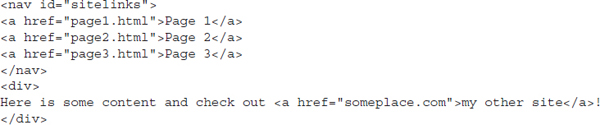
If you wanted to get only the links within the nav element, using document .getElementsByTagName(“links”) wouldn’t work, because you would also get the link that is within the div tag (still part of the document). To do this, you can first get the nav element and then use the getElementsByTagName() method on the object created for the nav element, as in the following code:
Here, you get the nav element by its id, creating the nav_element object. This object is used to get all of the link elements within it and place them into an array named nav_links. This array can now be used to cycle through each link within the nav element or to find out how many links are contained within the nav element. In this case, the number of links is alerted using the length of the nav_links array (3).
The open() and close() Methods
The open() method allows you to open a new document and create its contents entirely with document.write() or document.writeln() statements. When the open() method is called, the browser looks for these statements so that it can write the new page. Once the write() and/or writeln() statements are completed, you need to use document.close() to finish the new page.
NOTE
The open() and close() methods are not necessary (or desirable) when you are writing to the current loading page.
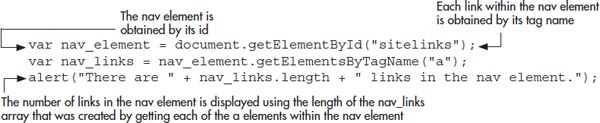
To get an example of the use of the open() method, suppose you want to write a new page based on the name of the viewer. To do this, you not only need to use the open() and close() methods, but also need to create a formName property to use so that you can grab the name entered by the viewer in a text box.
Start with the code for the body section of the initial page. You need a form with a text box and a way to invoke a function that will create the new document. The following code shows a way that you can do this (save the file as document_open.html):
This sets up your script, giving you a form with an id of newp and a text box with an id of yourname. It also has a submit button to submit the form. When the user clicks the submit button, the onsubmit event handler will be triggered, which executes the newpage() function (you will learn more about event handlers later in this chapter and in Chapter 10). You now need to create the newpage() function in your external JavaScript file so that this form will work.
The newpage() function needs to grab the contents of the text box and assign it to a variable. It then needs to open your new customized page in the browser window. The following code shows how this can be done (save the file as document_open.js):
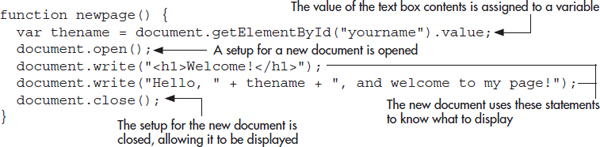
The first thing the function does is to grab the contents of the text box. To get the contents of the text box, you need to use the value property that is available for form elements, which in this case is accessed using document.getElementById(“yourname”).value. This value is then assigned to the thename variable for easy use within your document.write() commands.
Once you have that value, you are ready to open the new page. To do this, you use the document.open() command, which allows you to use a series of document.write() statements until the document.close() command is used. You use the document.write() statements to write a greeting to the viewer on the page.
You can now try this out by opening the HTML page in your browser. Figure 9-6 shows the initial page with the form (the page before the form button is clicked). This is where the viewer can enter a name and click the button.
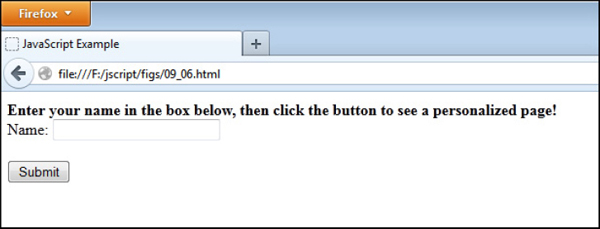
Figure 9-6 This is the page that allows the viewer to enter information.
Figure 9-7 shows the result of entering the name “John” in the text box and clicking the button. The new page appears with a greeting!
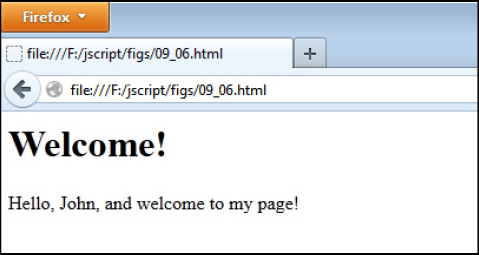
Figure 9-7 Once the button is clicked, the viewer will get a new page similar to this one.
The write() and writeln() Methods
You started using the write() method early in the book, so you know how it works already. The document.write() method is used to display a string value on the page where it is called. The writeln() method works the same way, but adds a newline character (
) at the end of the statement. Recall that Chapter 3 discussed how the JavaScript newline character works—it only places a new line in the page source code and not in the final appearance of the HTML page.
TIP
While the newline character only affects the appearance of the source code when using document.write(), it can be used to create new lines in display elements created by JavaScript such as alert, prompt, and confirm boxes.
The appearance of the page itself is not affected by the JavaScript newline character. Recall the example from Chapter 3 that split the code into two different lines with the newline character:

Since the document.writeln() method adds a newline character at the end of the statement, you could rewrite the preceding code using the following document.writeln() statements:
This would put the lines of code on two different lines in the page source, but would not affect the appearance of the page in the browser.
Using DOM Nodes
There are methods of the document object (such as createElement(), createAttribute(), and createTextNode()) that allow you to create various elements or nodes on the page using JavaScript. To make use of them, though, the new content must be appended as a child of an existing node in the DOM. This is where DOM node properties and methods are needed.
DOM Node Properties
Each DOM node is an object with properties and methods that can be accessed. The DOM node properties are listed in Table 9-3.
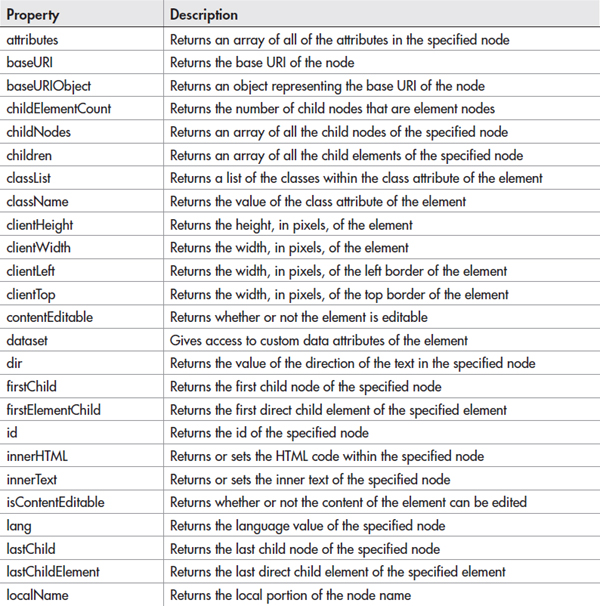
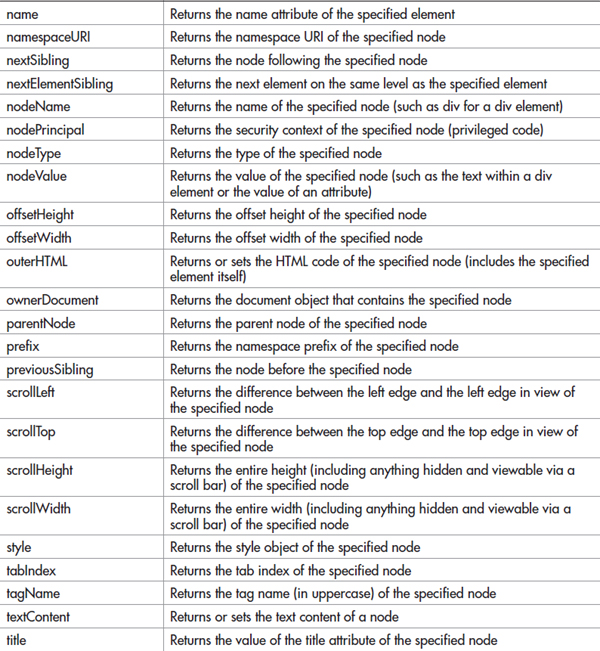
Table 9-3 The DOM Node Properties
When Table 9-3 mentions the specified node, a node works in much the same way as you worked with elements in previous chapters. For instance, you might have the following HTML code:
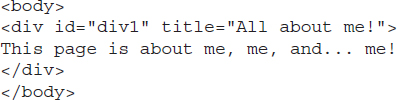
If you wanted to obtain the value of the title attribute of the div element, you could use document.getElementById() to grab the div element by its id of div1. This would be the specified node for the DOM node title property. Then, you could access the title property of the element node, as in the following code:

This works just like object properties, as you learned in the previous chapter. The me_div.title property returns the string value “All about me!”, which is the value of the div element node’s title attribute.
Knowing this, you can use the DOM node methods in the same way.
DOM Node Methods
Table 9-4 lists the DOM node methods.
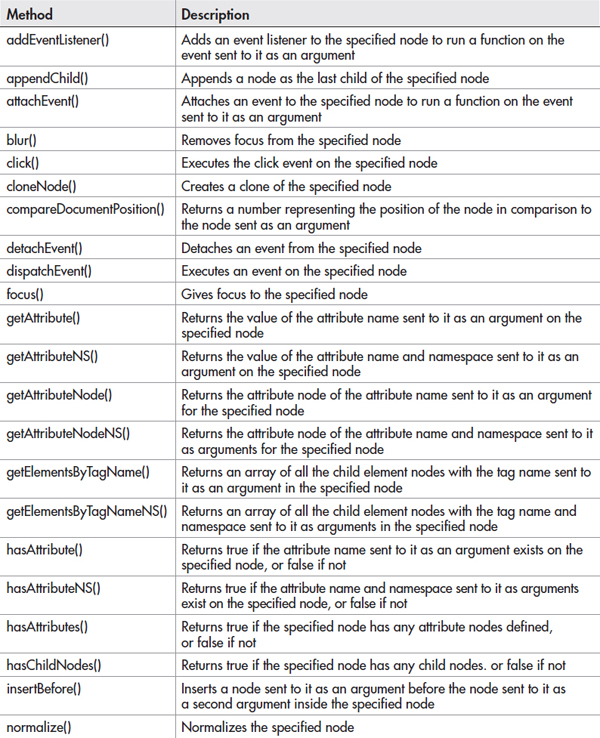
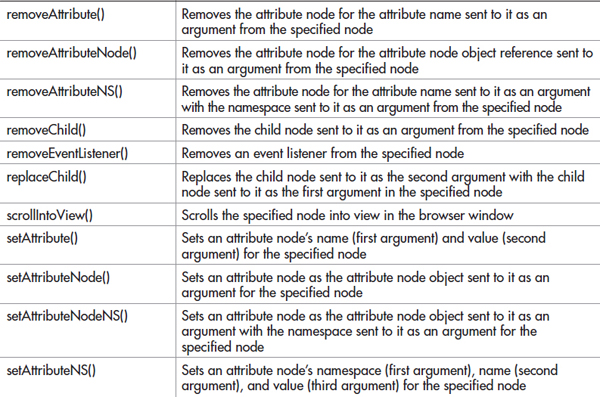
Table 9-4 The DOM Node Methods
As mentioned earlier, to make the creation methods of the document object useful by adding the created node to the document, a DOM node method, such as appendChild() or insertBefore(), is needed to add the new node to the document.
For instance, you might have the HTML code used earlier, as follows:

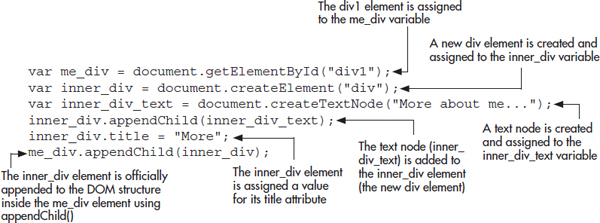
This code has a div element node with a child text node (and attribute nodes). If you want to create another div element as the last child node of the div1 element node, you could use a combination of document.createElement(), document.createTextNode(), and the DOM node method appendChild().
Each node is an object that can use all of the node properties and methods. Since you have a div node available, you can use getElementById() to access it as an object, which will allow you to add an element within it using the appendChild() method.
First, go into the JavaScript code and grab the div1 element by its id and assign it to a variable:
Next, create the new element node using document.createElement():
After that, create the text node for the inner_div node by using the document.createTextNode() method:
Next, use the DOM node method appendChild() to add the text node as a child of the new inner_div node:
To give the inner_div node a title attribute, you can assign a value to its title property:
Finally, use the DOM node method appendChild() to add the inner_div node to the document structure as the last (and in this case, only) child element of the me_div node:
The complete JavaScript code looks like this:
This adds your new div node at the end of the original div element (but before the original element is closed, since it will be a child node). Thus, the document structure for the HTML code would now be like this (though it won’t show up when you use the browser’s “View Source” command):
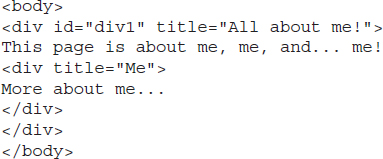
As you can see, the div is added with the text “More about me…” and a title attribute with a value of “Me”.
NOTE
Another way to add or alter content is to use the innerHTML property, which is discussed in the next section, “Creating Dynamic Scripts.”
If you decide you want to delete a node from the DOM structure, you can use the removeChild() DOM node method. For example, if you want to remove the inner_div node added in the previous example, you can use the following code:
This will remove the inner_div child node from the me_div parent node.
Each node has one or more relationships with other nodes in the DOM structure. Figure 9-8 shows how the relationships are tied together.
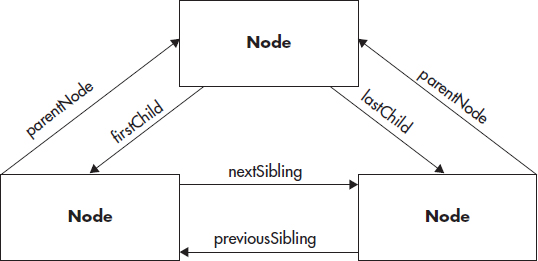
Figure 9-8 DOM node relationships
As you can see, there are properties and methods that can be used with each of these relationships (for example, previousSibling, parentNode, firstChild, and so on). You can use these to access or alter any element within the DOM structure as needed. For example, you might have an HTML document like this:

Each div element could be accessed in different ways, depending on where you begin. For example, you could access the outer “company” div using any of the following paths:
Likewise, the “employee1” div can be accessed a number of ways:
The same, again, goes for the “employee2” div:
While it may seem easiest to simply use the direct route all the time, there may be situations where you do not know the id of the node you are seeking beforehand. Suppose one of the nodes had been added by another script? If you always wanted to find the last “employee” div, for example, it might be better to use lastChild from its parent node, so that if other employees are added (for example, “employee3”, “employee4”), you will always be accessing the last employee:
This will ensure that last_hired will always point to the last “employee” div that is a child of the “company” div.
| Try This 9-1 | Add a DOM Node to the Document |
 |
This project allows you to practice using the new document and DOM node properties and methods you have learned in this chapter. |
Step by Step
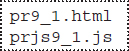
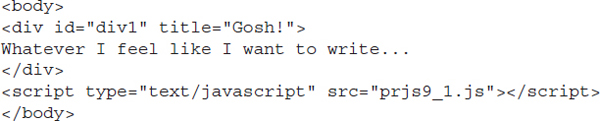
1. Create an HTML page with the following code for the body section and save it as pr9_1.html:
2. Create an external JavaScript file and save it as prjs9_1.js. Use it for steps 3–5.
3. Get the value of the title attribute of the element with the id of “div1” and send that value as an alert to the viewer.
4. Create a new div element with the text “See you!” and a title attribute with the value “Lucky!”. Add it to the document structure as a child of the div element with the id of “div1”.
5. Save the JavaScript file and open the HTML file in your browser to view the results.
Try This Summary
In this project, you used your knowledge of the properties and methods of the document object and the DOM nodes to alert a DOM node property and to create a new div element in the document’s structure.
Creating Dynamic Scripts
As you have seen, JavaScript gives you access to all of the elements in the document with the various methods such as document.getElementById() and document .getElementsByTagName().
This allows you to get information, add nodes, alter nodes, and remove nodes, as you have seen. In addition, you can access the style attributes of elements (typically initially set by a style sheet) to make changes to such things as their positions, colors, borders, sizes, or just about any other part of the styles, using the style DOM node property.
Styles in JavaScript
When setting styles using Cascading Style Sheets (CSS), you may set up something like the following in your CSS code (save it as dyn_01.css):
This gives you style attributes for two ids, div1 and div2. Thus, if you had the following HTML code (save as dyn_01.html), the div elements would use the preceding styles in their presentation on the Web page:
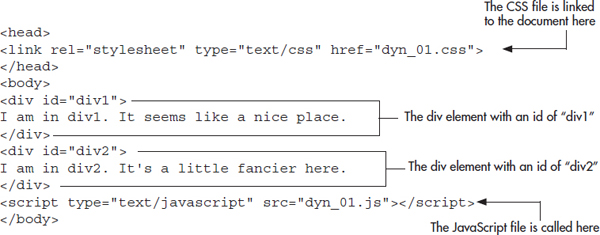
The HTML code is linked to the CSS code via the link tag. Thus, the div1 element is going to display as simple black text on a white background and the div2 element is going to have a plain, solid-black border around it.
As you can see, this page is using ids for each div element—so not only can you access those elements’ ids with the CSS code, but you can also access the elements via their ids in the JavaScript code. So, you can start out your JavaScript file (called in the preceding HTML code—saved as dyn_01.js) with some code to grab both div elements by their ids by using the document.getElementById() method:
Now you have variables for both elements.
If you want to alter the styles that were set up in the CSS code via JavaScript, you’ll need to make use of the style property that is a part of each element node. Then, JavaScript uses the same name as the CSS selector to access that particular property. For instance, if you wanted to change the color of the text in the div1 element to a light gray color, you would use the following code:

In the CSS code, the selector color is used to alter the element’s foreground color. In JavaScript, it is also the name of the property used to alter it after accessing the element’s style property.
What if the CSS selector is not all one single word? For example, the background-color selector would not work in JavaScript if you used it the same way as in the CSS code. The following code attempts to change the background color to green:

This won’t work, because JavaScript doesn’t allow the hyphen (-) character as part of a property name. Instead, JavaScript puts both words together and capitalizes the first letter of any additional words after the first word. Thus, the CSS selector background-color becomes backgroundColor in JavaScript. Other selectors would follow the same pattern (for example, border-right-color would become borderRightColor).
The JavaScript code could be rewritten as follows to make the change effective:

This will change the background color of the div1 element to green. The only issue now is that this will happen as soon as the script runs, which in this case is probably before the viewer ever notices there was another background color on the div1 element in the first place. To make this more useful, you need a way to run portions of your script at a time other than the loading or reloading of the document.
CAUTION
Reading a style isn’t as easy as setting it, as there are browser differences and other issues that occur. For further information and techniques on how to get styles, see www.quirksmode.org/dom/getstyles.html.
Simple Event Handling
So far, your scripts have simply run during the loading (or reloading) of the Web page. This is good for a number of tasks, but many, such as node and style changes, would be more useful if they were executed in response to an action taken by the user. For instance, changing the background color of an element while the page is loading may not even be noticed by the viewer, but changing the color in response to a mouse click would allow the viewer to see the change and provide the choice of leaving the original color or changing to the new color via a click.
The click Event
The click event is available for most elements within the DOM. This event is triggered when the user clicks the primary mouse button while the mouse pointer is over a specific element. One way to gain control of the click event is through onclick, as shown in the following code (other methods will be covered in the next chapter):

Here, the d1 element’s onclick property is assigned a function expression (refer to Chapter 4 if you need to review function expressions), which can then execute code. Thus, when the d1 element is clicked by the user, any code within the function will be executed.
So, you can now take the code you were using to change styles and perform the task when the user clicks the element rather than while the page is loading. The following code shows an example of this:

Figure 9-9 shows what the page looks like after the user clicks on the first div element. The background color has changed from white to a light gray.
Figure 9-9 The background color of the first div element is changed and is now light gray.
NOTE
Event handling will be covered more thoroughly in Chapter 10. For the time being, only the click event will be covered using simple DOM0 event handling.
Coding a Dynamic Script
Now that you know how to alter an element’s style properties, you can alter them in reaction to user events to create dynamic scripts. In addition, you can alter the entirety of the HTML code within a given element using the innerHTML property.
The innerHTML Property
The innerHTML DOM node property allows you to change the HTML code that is inside a specified element. For instance, you could start out with the following HTML code:
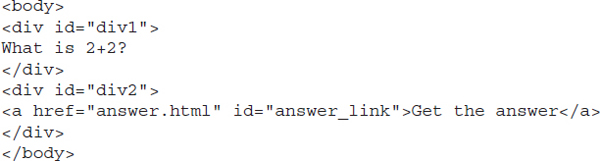
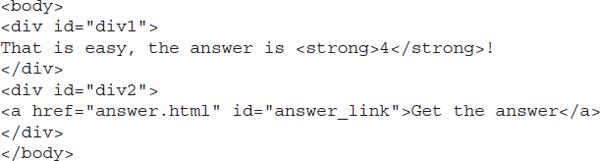
This code sets up a div element node with an id of div1, another div element node with an id of div2, and the link with an id of answer_link. Now, if you want to change the HTML code in the div1 element so that it displays the answer for the viewer when the link is clicked, you can use the click event on the link to start the script in motion and then change the innerHTML property on the div1 element node to change the contents of that element from the question to the answer:

Note that in order to keep this link from being followed when clicked, you add the return false statement after performing the desired actions. This will be discussed in more detail in the next chapter.
When run, this script changes the content inside the div1 element on the page, so that the HTML code would now be the following (though it will not be seen using the browser’s “View Source” command):
TIP
To make the script accessible to those without JavaScript, a default link destination (answer.html) is used. Including the answer text on the linked page allows users without JavaScript to still click the link and obtain the answer to the question.
As you can see, this can be a handy way to make dynamic changes to the content of a Web page. The innerHTML() and appendChild() methods allow you to change information displayed on the page dynamically and without reloading the page. This provides a definite improvement over document.write(), which you have been using up to this point, since document.write() can only change content when the page is loaded or reloaded.
Now that you know the newer methods, you will make use of these methods rather than document.write() as you continue through this book.
Using what you have learned in this chapter to access the DOM and use the properties and methods of the document object and the DOM nodes, you can build scripts to make any number of alterations to the document’s appearance or content.
| Try This 9-2 | Try Out Property Changes |
 |
This project allows you to practice using the new style and innerHTML properties you have learned in this chapter. |
Step by Step
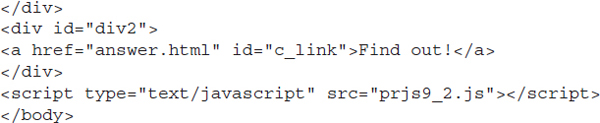
1. Create an HTML page with the following code for the body section and save it as pr9_2.html:

2. Create an external JavaScript file and save it as prjs9_1.js. Use it for steps 3–5.
3. Write some code so that when the link is clicked, the background color of the div element with the id of div1 changes to #CCCCCC and the content of the same element changes to the following:
4. When complete, the JavaScript file should look like this:

5. Save the JavaScript file and open the HTML file in your browser to view the results.
Try This Summary
In this project, you used your knowledge of the style and innerHTML properties of DOM nodes to make style and content changes to the Web page.
Chapter 9 Self Test
1. The __________ object is an object that is created by the browser for each new HTML page that is viewed.
2. The __________ property of the document object returns the URL of the document that referred the viewer to the current document.
3. You can use the DOM node property style to alter the style sheet attributes of an element.
A. True
B. False
4. The __________ method of the document object allows you to get an element by the value of its id attribute.
A. getElementsByClassName()
B. createElement()
C. getSelection()
D. getElementById()
5. The appendChild() DOM node method allows you to add a child node as the first child node of a specified node.
A. True
B. False
6. You cannot remove nodes from the document once they have been added.
A. True
B. False
7. The __________ property of the document object is an array that contains all of the anchor (<a>) tags on the page.
8. The __________ DOM node property allows you to change the HTML content of an element node.
9. The __________ property holds the value of the date and time the current document was last modified.
10. The Document Object Model (DOM) allows JavaScript (and other scripting languages) to access the structure of the document in the browser.
A. True
B. False
11. You can use the title property to display the title of a Web page someplace other than in the top bar of the browser window.
A. True
B. False
12. Which property returns the complete URL of the current document?
A. domain
B. referrer
C. URL
D. title
13. How does the writeln() method differ from the write() method?
A. It adds the equivalent of an HTML <br /> tag at the end of the line.
B. It adds the equivalent of an HTML <p> tag at the end of the line.
C. It adds a JavaScript newline character at the end of the line.
D. It is exactly the same as the write() method.
14. What is the getElementsByName() method commonly used to obtain?
A. All the elements that you know by name.
B. All the elements that are named but do not have an id attribute.
C. All the elements that have the same value for the name attribute (most commonly radio buttons).
D. All of the elements that have property values that are equal to a specified name.
15. What statements are most common between a document.open() and a document.close() statement?
A. HTML commands
B. document.write() and document.writeln() statements
C. Only document.writeln() statements
D. Only window.alert() statements
..................Content has been hidden....................
You can't read the all page of ebook, please click here login for view all page.