
Chapter 11
Window Object
Key Skills & Concepts
• Window: The Global Object
• Using the Properties of the Window Object
• Using the Methods of the Window Object
• Opening New Windows
The JavaScript window object gives you access to more properties and methods you can use in your scripts, and serves as the global JavaScript object in Web browsers. In this chapter, you will see how it works as the global object, and learn to use a number of its properties and methods.
Window: The Global Object
The window object is created for each window that appears in the browser. A window can be the main window, a frame set or individual frame, a tab, or even a new window created with JavaScript. It differs from the document object in that the window object contains the document object (as well as many other objects, such as history, navigator, and so on). It serves as the global object for JavaScript in Web browsers.
Because it is the global object, any global variables or functions that are defined are also properties and methods of the window object. For example, consider the following code:
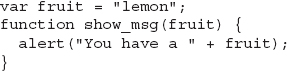
Here, there is a global variable named fruit and a global function named show_msg(). Both of these can now be called as part of the window object, as in the following code:
Because window is the global object, it is not necessary to use window.fruit or window.show_ msg(). The window is assumed, so these can simply be shortened to fruit and show_msg(), which is the way you have already been using them.
For this same reason, objects, properties, and methods within the window object do not need to reference the fact that they are within the window object. As you recall, you have used window.alert(), which can be called by simply using alert(). This also works for objects such as the history object, which are within the window object. Instead of typing window.history.back(), you can type history.back() to access the back() method of the history object.
Using the Properties of the Window Object
To begin your study of the window object, take a look at its properties that you can use, which are listed and described in Table 11-1. Some of the properties are discussed in more detail following Table 11-1.
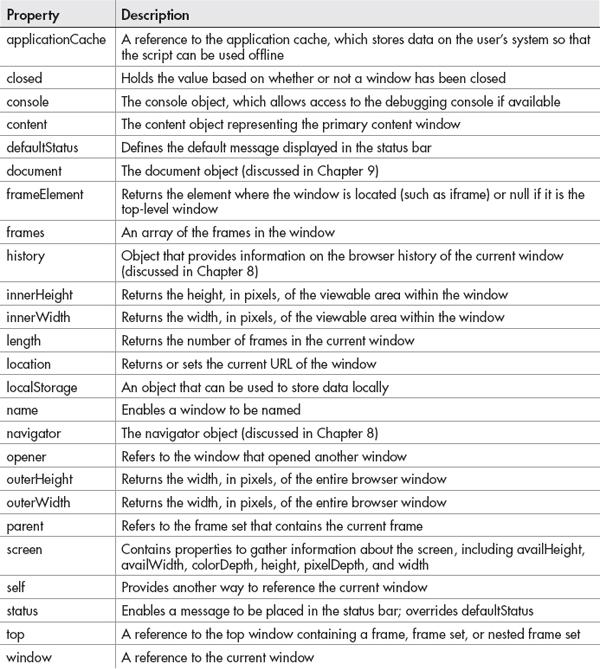
Table 11-1 Properties of the Window Object
NOTE
As in previous chapters, some of the properties and methods listed in this chapter are not cross-browser or only work in modern browsers. For more information and more complete listings, see: https://developer.mozilla.org/en/DOM/window and http://msdn.microsoft.com/en-us/library/ms535873(VS.85).aspx.
The closed Property
The closed property is used to check whether or not a window has been closed by the viewer. The way it is normally used is with the name of a window, followed by the closed property, such as in the following example:
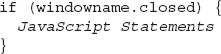
You would replace the windowname part with the name of the window that you wish to check. This is often a new window that you opened with JavaScript; you will see how to name a new window later in the chapter in the section “The open() Method.”
You can also use the closed property inside a new window to check whether the window that opened it has been closed. To do that, you would use closed after the opener property (discussed in “The opener Property” section), as in the following example:
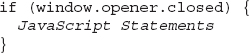
This use of the closed property is really handy if you choose to create a new window that enables the viewer to navigate the main window through links in the new window.
The frames Property
The frames property is an array containing each frame within a frame set. It is often used to gain access to the properties of the various frames on a page. You can find the number of frames in a window by using the frames.length property.
The innerWidth and innerHeight Properties
The innerWidth and innerHeight properties hold values for width and height of the area of the window in view (the browser window minus scroll bars, menu bars, toolbars, and so on). These properties work in modern browsers, but not in Internet Explorer prior to version 9 (document.body.clientWidth and document.body.clientHeight can be used for older versions of Internet Explorer).
So, if you wanted to obtain the width of the content area you have available to your script, you could use the following code:
Of course, if you want to use different HTML code for the browser depending on the available innerWidth of the window, you could use the following code:
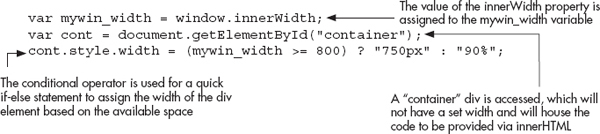
This will determine whether the viewer has 800 pixels of viewable width. If so, the width of the div element will be set to 750 pixels. Otherwise, the div element will have a safer width of 90 percent so that it can display more easily for smaller screens.
The length Property
The length property tells you how many frames are in a window, just like the window.frames .length property. This just shortens it to window.length (which is often more convenient when you are writing code).
The location Property
The location property holds the current URL of the window. You can use the location property to cause instant redirection of the browser to a new page (if your page has moved to a new location, for instance). However, make sure that you don’t use this technique on a page that is listed with search engines that do not allow quick redirection, because they may drop the page from their listings.
If a page has been moved and you want to redirect the viewer without any delay, you could just give the location property a new value, as shown in the following code:

This would just take the viewer to the local URL newpage.html. A standard link was included for browsers without JavaScript. Otherwise, the preceding code would load a blank page for those viewers and nothing would happen.
NOTE
Instant redirection is best suited for testing purposes on pages that are not indexed by a search engine, since the rules on redirection vary from one search engine to the next.
The name Property
The name property holds the name of the current window and also enables you to give a window a name. If you want to give the main window a name, you could assign the name you want to use to this property. The following code shows an example of this:
The script gives the window a name, and then alerts the name to the viewer. Figure 11-1 shows the result of this script in a browser.
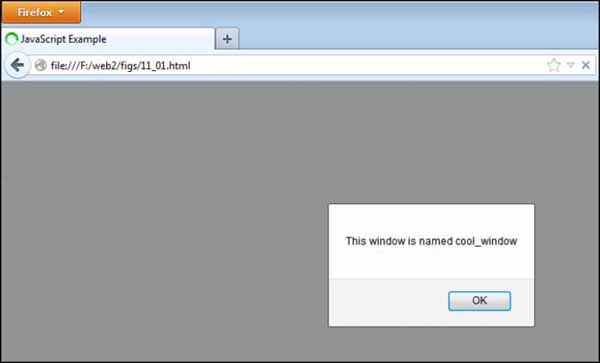
Figure 11-1 The name of the window is alerted to the viewer.
The opener Property
The opener property is used to reference the window that opened the current window. This is often used in new windows opened using the open() method, which you will see later in the chapter in the section “The open() Method.” By using the opener property in a new window, you could detect whether the main window has been closed using the closed property you learned about earlier. The following example shows how you could perform this test:
This adds the closed property after the opener property to check whether the window that opened the current window has been closed. This is helpful if you want to perform an action in the main window through the new one, because you could check to see that it still exists before doing anything.
The parent, self, and top Properties
The parent property is only used when there are frames on a page. It enables you to access the parent frame set of the current frame. This is helpful when you wish to change a property in one frame from another frame.
The self property is another way of saying “the current window” in JavaScript. It is used like the window object and can access the properties of the current window just like the window object. The self property is useful if you have a lot of windows with names and want to be sure you are using a property of the current window and not one in another named window.
The top property is used to access the top window out of all the frame sets (which could be nested). This is a little different from the parent property, which only goes to the top of the current frame set. The top property instead goes all the way to the top window, even if the window contains nested frame sets.
The status and defaultStatus Properties
The status property contains the value of the text set in the status bar of the window. Changing this property overrides the content of the status bar set with the defaultStatus property.
CAUTION
Modern browsers, by default, do not display status bar text altered by JavaScript, in order to keep unscrupulous Web sites from deceiving users with false link destinations in the status bar. Thus, the status and defaultStatus properties will not work unless browser settings are altered by the viewer. Since it is a security risk for the user to change browser settings to allow this, use of these properties is not recommended.
The defaultStatus property sets the text string that is displayed by default in the status bar when nothing has been assigned to the window.status property. A change of the window.status property overrides this setting, because it is only shown as the default. This property is often set in the load event to display a custom message when the viewer is not performing an action that would change the text in the status bar.
| Try This 11-1 | Use the location and innerWidth Properties |
This project enables you to practice using the location and innerWidth properties of the window object. |
Step by Step
1. Create an HTML page, leaving the body section blank other than including a set of script tags to reference a JavaScript file named prjs11_1.js just before the closing </body> tag. Save the file as pr11_1.html.
2. Create a JavaScript file and save it as prjs11_1.js. Use this file for steps 3–6.
3. Set a default value for a variable named mywin_width.
4. Assign the value of the window.innerWidth to mywin_width.
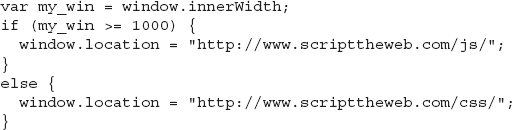
5. If the value of mywin_width is greater than or equal to 1000, send the viewer to the URL http://www.scripttheweb.com/js/. Otherwise, send the viewer to the URL http://www.scripttheweb.com/css/ (use the window.location property).
6. When complete, the JavaScript file should have the following code:
7. Save the JavaScript file and open the HTML file in your Web browser. Try changing the width and then reopening the page with the new width to see which Web page it gives you.
Try This Summary
In this project, you were able to use your knowledge of the location and innerWidth properties of the window object to create a script that will redirect a viewer based on the available width of the viewing area in the viewer’s browser.
Using the Methods of the Window Object
Now that you know how to use the properties of the window object, you can move on to using window methods. Table 11-2 lists a number of the methods of the window object with a description of each, and particular methods are described in more detail next.

Table 11-2 Methods of the Window Object
The alert(), prompt(), and confirm() Methods
The alert(), prompt(), and confirm() methods all bring up system dialogs that require the user to take an action. For example, the user may click OK to close an alert, or enter information into a text box when prompt() is used.
The alert() Method
You have used the alert() method extensively in earlier chapters in example scripts. This pops up a message to the viewer, and the viewer has to click an OK button to continue.
The prompt() Method
The prompt() method is used to prompt the viewer to enter information. You used this method in Chapter 6 to allow the user to enter data into the prompt dialog.
The confirm() Method
The confirm() method can be used to give the viewer a chance to confirm or cancel an action. This method returns a Boolean value of true or false, so its result is often assigned to a variable when it is used. So, if you wanted to assign the result to a variable named is_sure and ask the question “Are you sure?”, you could use the following code:
Figure 11-2 shows a sample confirm dialog box that is displayed by the preceding code. Notice the two buttons the viewer can choose to click: OK and Cancel. If the viewer clicks OK, the method returns true. If the user clicks Cancel, the method returns false. Note that as with alert() and prompt(), you cannot change the value of the text in the buttons, since this is determined by the user’s browser and operating system.

Figure 11-2 An example of a confirm dialog box
As a real example of this method, suppose that you want to create a link to another page, but you want to be sure the viewer wants to leave before being sent away. You could use the confirm dialog box to find out whether or not the viewer wishes to leave the page. The following code shows how you can get a confirmation from the viewer and react appropriately. First, the HTML code:
Next, use JavaScript to confirm whether the user really wants to leave when the link is clicked:

Notice that if OK is clicked and the confirm() method returns true, the viewer is taken to the linked Web site. If cancel is clicked and the confirm() method returns false, an alert is sent to the viewer and the function returns false so that the link won’t be followed by the browser (you can also simply omit the alert and just have nothing happen after Cancel is clicked, by using only the return false statement).
Figure 11-3 shows the browser window after the link is clicked on the page. The confirm dialog box with your “Are you sure you want to leave?” message pops up on the screen.
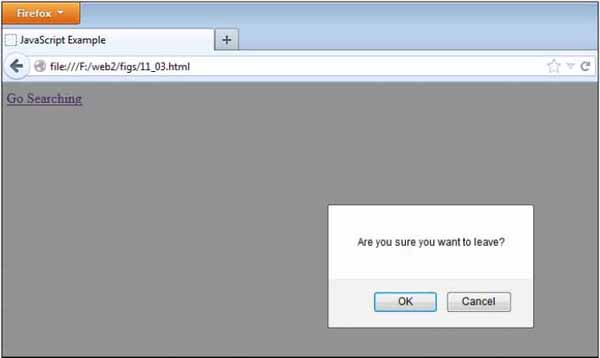
Figure 11-3 A confirm dialog box pops up when the button is clicked.
The find() Method
You can use the find() method to let the viewer find a certain bit of text on your page. It tells the browser to use its built-in Find utility and enables the viewer to type in the text to look for on the page.
For example, if you wanted to create a button for viewers to click when they want to find something on your page, you could use the following code:

This pops up the Find dialog box in the browser and enables the viewer to search for text within the page. Figure 11-4 shows the result of this script when it is added to an HTML document.
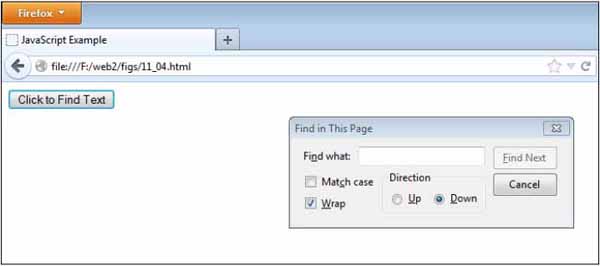
Figure 11-4 A Find dialog box pops up, enabling the viewer to search for text on the page.
This functionality is useful if you have a really long page and want the viewer to be able to find things more quickly by searching the page.
The home() Method
The home() method is used to send the viewer to the home page the viewer has set in the Web browser settings. For instance, you could use it to offer viewers a button that will take them to their selected home page when clicked, as in the following code (at the time of this writing this method worked in Mozilla Firefox and Opera but did not work in Microsoft Internet Explorer):

The print() Method
The print() method enables the viewer to print the current window. When this method is called, it should open the viewer’s Print dialog box so that the viewer can set the printer settings to print the document.
To use it, you could create a button that enables the viewer to print the page they are viewing:
This code should open the user’s Print dialog box when the user clicks the Click to Print Page button. Figure 11-5 shows the result of running this script in a browser. This dialog box may appear differently for different viewers, depending on the browser and printer being used.
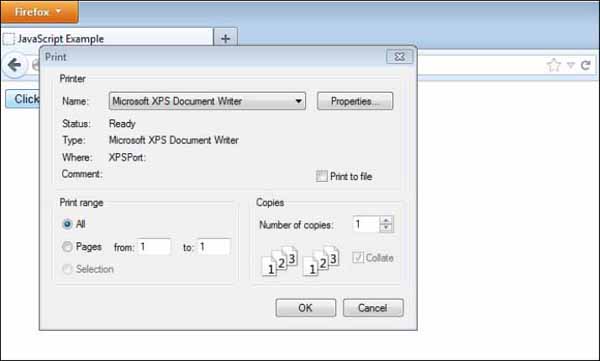
Figure 11-5 The viewer’s print options pop up when the print button is clicked.
The setInterval() and clearInterval() Methods
The setInterval() method is used to execute a JavaScript function repeatedly at a set interval. The following is the general syntax for using this method:
You replace function content with the code you wish to repeat. You then replace time with the time (in milliseconds) you want to wait before each repetition of the function.
So, if you really wanted to annoy your viewers, you could use this method to pop up an alert every 10 seconds (10,000 milliseconds) once the page is viewed. You could do this by placing the following script inside the HTML of a document:
This, of course, could become quite annoying. The less time set in the interval, the more annoying it would become. Luckily, the ten-second interval gives you enough time to leave the page before another alert pops up.
CAUTION
You may come across scripts that provide a string value in place of the function as the first argument to setInterval() or setTimeout(). This requires JavaScript to evaluate the string as JavaScript code using the eval() function, the use of which is discouraged in most cases.
To end the barrage of alerts from the previous script, you could use the clearInterval() method. The following is the general syntax for using this method:
You must replace name with a variable name that has been assigned to the setInterval() method call you want to clear. The problem is, you didn’t assign your setInterval() call to a variable name in the previous example.
In order to clear it, you need to adjust your code. The following code is updated and assigns the setInterval() call to a variable name:

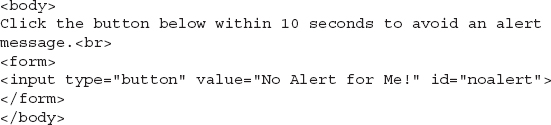
You now have a way to use the clearInterval() method, by calling it with the madness variable as the parameter. So, offer the visitor a button that enables them to stop the madness. As long as it is clicked between intervals, it will stop the interval from running any further. The following code gives you an HTML page with the button for the viewer to click as well as the updated JavaScript code:

The updated JavaScript code:
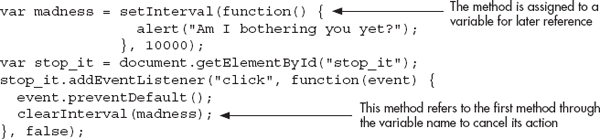
Now the viewer can stop the alerts by clicking the Stop the Madness button.
You will see in later chapters that this method can be handy for clocks and other things that need to be updated at regular intervals on the page.
The setTimeout() and clearTimeout() Methods
The setTimeout() method enables you to execute a JavaScript function after a certain amount of time has passed. It differs from the setInterval() method because it is only executed once (unless it is put inside a loop of some sort). The general syntax is the same as that of the setInterval() method.
If you want to have only a single alert pop up after ten seconds and not repeat, you could use the following code:
This would send the viewer an alert after ten seconds, demanding that the guest book be signed immediately.
The clearTimeout() method enables you to cancel a setTimeout() call if you call the clearTimeout() method before the time expires from the setTimeout() call. The general syntax is the same as that of the clearInterval() method: you use a variable name as a parameter so that it knows which setTimeout() call to cancel.
So, if you want to give viewers a chance to avoid getting an alert, you could add a button for them to click within ten seconds. If the button is clicked in time, the setTimeout() call is canceled and no alert pops up. The following is the example code:
The JavaScript code:
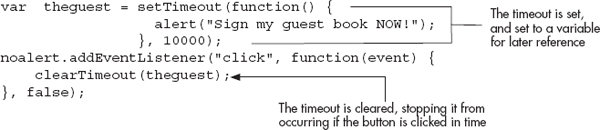
If the button is clicked in time, the viewer avoids receiving an alert about signing the guest book.
Ask the Expert
Q: There are way too many properties and methods here! How am I ever going to remember all of these?
A: As you begin using them with more frequency, they will be easier to remember. I remember the ones I use more often better than those I don’t use much. If you do a lot of coding, it is good to keep a reference handy, such as this book, in case you need to check the details of a property or method now and then. I keep a bunch of books and bookmarks to reference Web sites on hand.
Q: Will I be making window remote controls any time soon?
A: A new window that changes properties (like the location property) in the main window is a “remote control.” Though remote controls are not discussed in this book, there are scripts for these at free script sites on the Web. For now, you want to be sure to master the coding that you need to create and manipulate a regular new window. Note that working between two windows could cause security concerns.
Q: Will I be using the timed methods like setTimeout() and setInterval() often?
A: You will have a use for them when you need to build time-dependent scripts such as clocks, slide shows, or Dynamic HTML (DHTML) animations.
| Try This 11-2 | Use the setTimeout() and confirm() Methods |
This project enables you to practice using some of the window methods. You will have the browser wait a certain number of seconds and then ask the viewer to confirm whether to stay at the page or move on to an Internet search site. |
Step by Step
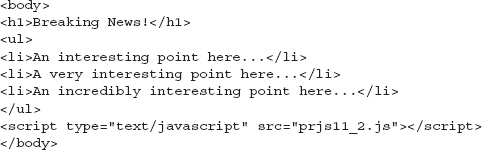
1. Create an HTML page, with the following code in the body section, and save it as pr11_2.html:
2. Create a JavaScript file and save it as prjs11_2.js. Use it for steps 3–4.
3. After 20 seconds, have a confirm box display to the viewer asking them if they want to continue using this Web page. If so, do nothing. If not, send them to the URL http://www.google.com to search for more news.
4. When complete, the JavaScript file should have the following code:

5. Save the JavaScript file and open the HTML file in a Web browser. After 20 seconds, you should see a confirm box.
Try This Summary
In this project, you were able to use your knowledge of the properties and methods of the window object to create a timed, interactive script. This allowed you to give the viewer a choice as to whether to stay at the current Web page or move on to an Internet search site.
The Main Window and New Windows
The main browser window is often protected from being moved, resized, closed, or otherwise manipulated for security reasons (for example, to keep a new window from being opened to a bad site while closing the main window, or to keep microscopic pop-up windows from being opened). Thus, many of the methods mentioned in the previous section, such as resizeTo() or close(), don’t do anything when called in the main window or display a warning to the viewer.
In a number of cases, browsers will allow you more control of a pop-up window. The following sections will discuss how to open new windows and how to customize their look and placement on the screen.
CAUTION
Even when using new windows, some browsers will not allow some methods such as resizeTo() or moveTo() to be used. In addition, browsers may simply open the new window content in a new tab or in the main browser window rather than a pop-up window. It is not recommended that pop-up windows be used on Web sites (though they can have uses for local applications or in other JavaScript environments).
The Tale of Pop-up Windows
At one time, pop-up windows were used quite often on Web sites. While there were legitimate advertisements that used pop-up windows, there were also a number of deceptive advertisements that were designed to “trick” the user into clicking them by appearing to be an alert or some other type of system message. Also, the fact that numerous new windows could be opened, could be hidden from the user’s view, or could be otherwise manipulated caused many security concerns.
These concerns were addressed in a number of ways:
• Pop-up windows can only be opened in modern browsers when the user performs a click or a key press.
• Pop-up windows may only be opened in the main window or as a tab in the main browser window in some browsers.
• In most cases, the status bar and/or location bar will be displayed regardless of the information provided to design the pop-up window.
• A pop-up window may not be permitted to be resized or moved in some browsers.
• Certain code may be effective working locally, but will not work when the page is online.
For these reasons, it is typically not a good idea to use pop-up windows on Web sites. With that said, the following information is provided should you need to work with new windows in a local environment or a more secure platform.
NOTE
Instead of using new windows, you may wish to use a dialog that overlays the current window, but is not a pop-up window. For more information on this, see jqueryui.com/dialog.
Opening New Windows
The open() method enables you to open a new window with JavaScript. This method is typically used with three arguments, as shown in the following example:
The first argument, “URL”, is replaced with the URL of the HTML document that is to be opened in the new window. The “name” parameter is replaced with the name you wish to give to the window. The third parameter enables you to add attributes for the new window. These attributes are set by using “yes”, “no”, or a numeric value on the right side of the equal sign. Notice that each time an attribute is set with a value, there is a comma before the next one and no spaces in between.
If you want to open a window with the features of the current window, you could do so by leaving off the third argument with the attributes. The following example would open a new window with a local URL of newpage.html and a name of my_window; it will have the same features as the window that opened it:
Attributes
If you want to include window features, you need to learn some of the attributes that you can use with the windows. Table 11-3 lists attributes that you can use as part of the third argument in the open() method.
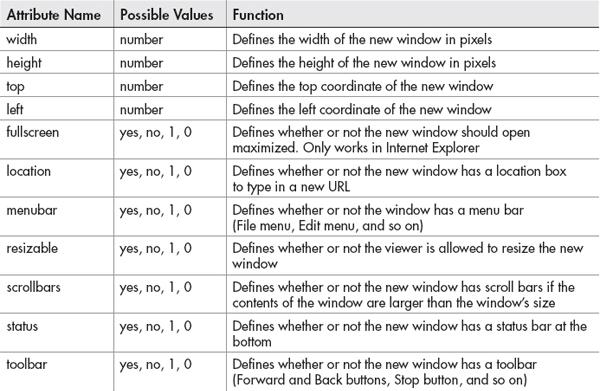
Table 11-3 Standard Attributes for a New Window
Any “yes or no” attribute not defined will default to “no” if it is not overridden by the browser. For example, the location, menubar, and status attributes will likely default to “yes” in most modern browsers and will be unchangeable. Any numeric values not defined will use the settings of the browser being used. These also may be unchangeable or may only allow certain values. For instance, the new window may be required to have left and top coordinates that place it in a viewable area on the screen, and the width and height may have minimum values that you cannot go under in order to keep a window from being too small to be noticed by the user.
To open a basic new window with a width of 400 pixels and a height of 300 pixels, you can use the following code:
Aside from the width and height, this window will open with the default values for the other attributes, which will depend on the browser being used by the viewer.
To set the other attributes, you can assign them a value of “yes” or “no” depending on whether or not you want each feature. You may also use 1 for yes and 0 for no if you prefer, as they will have the same effect. So, if you want to have a 300×200 pixel window with a menu bar added (this adds the Forward, Back, Stop, and other similar buttons), you could use the following code:
This gives you a new window with the contents of newpage.html, a name of “cool,” dimensions of 300×200 pixels, and a menu bar.
You can add as many of the attributes as you want inside the quote marks of the third parameter by separating each one with a comma.
NOTE
Due to space limitations, a new window command may occasionally be on more than one line in the code in this book. Be sure that when you use the code, you put everything from window.open to the ending semicolon (;) on one line to avoid JavaScript errors.
The following example opens a window with most of the features mentioned in Table 11-3 (again, this takes up more than one line here, but when you enter it in your text editor, the code should go on a single line):
If you want a viewable example, you need to make a page named newpage.html and create the code for the main page to include a window.open() command, as described next.
First, create the code for newpage.html (this is just a short page that has some text in it):

Now, create the main page (save as mainpage.html):
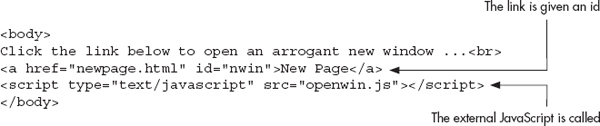
Finally, create the JavaScript code (save as openwin.js):

When the link is clicked, it launches the new window with the contents of your newpage.html document. This window is 400×300 pixels and has a status bar at the bottom. Note that the event.preventDefault() method is added so that the newpage.html file will not also be opened in the main browser window when the link is clicked (if the viewer does not have JavaScript enabled, the link will work normally and open the newpage.html file in the same window).
Figure 11-6 shows the result of opening the main page in the browser and clicking the link to open the new window.
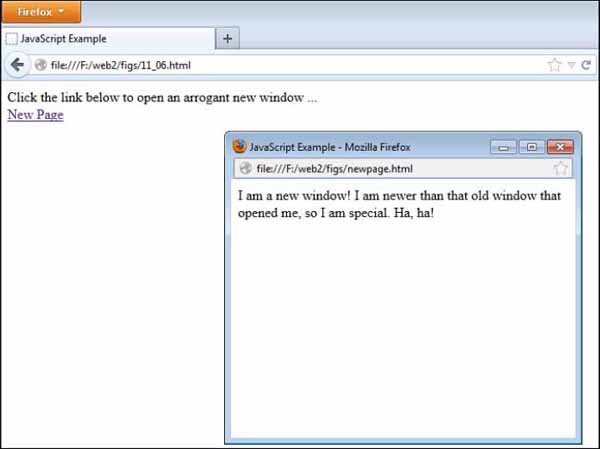
Figure 11-6 A new window is opened when a link is clicked.
Closing New Windows
The close() method is used to close a window; however, unless your script has certain security rights, this method can only be used to close a window that you have opened using JavaScript. It cannot close the main window (though some browsers will offer the user the option to do so via a confirmation dialog).
To use the close() method, you could modify your newpage.html code to provide a button at the end of the text that enables the viewer to close the window by clicking it. So, you could change the code of newpage.html to look like the following code:

When the button is clicked now, the window.close() method is invoked and closes the window just like the standard Close button at the top right of a window. If you want to try it out, use the main page you used in the previous section and click the button to open the new window. It should offer the new button with the option to close the window, and it should close the window if you click the button.
If you prefer to close the new window from the main window, you can do so by assigning the open() method to a variable, which will provide a reference to the new window. You can then add another link that provides the option to close the window. You can modify mainpage.html to use the following code:

Next, you will need to alter the openwin.js file to use the following code:
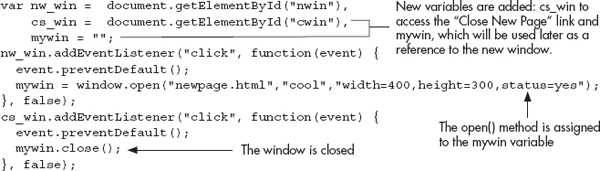
This allows the window to be both opened and closed via the main window.
Moving, Resizing, and Scrolling New Windows
The moveBy(), moveTo(), resizeBy(), resizeTo(), scrollBy(), and scrollTo() methods allow you to alter the window position, window size, or the beginning viewing position within the window. As with the close() method, browsers typically do not allow these methods to be used on the main window. However, they can often be used on windows created via JavaScript.
The moveBy() and moveTo() Methods
The moveBy() method can be used to move a new window to a new location on the screen. This moves a window by the number of pixels given as arguments in the method call. The following is the syntax for using this method:
You replace x-pixels with the number of pixels you want to move the window from left to right. So, if you want the window to move to the right, you enter a positive number. If you want it to move to the left, you enter a negative number.
You replace y-pixels with the number of pixels you want to move the window from top to bottom, with positive numbers pushing the window down and negative numbers pulling the window up.
For example, if you want to give the viewer the option to move the window by the number of pixels of your choice, you could again alter your code to handle this. For mainpage.html, use the following code:

Next, use the following code for openwin.js:
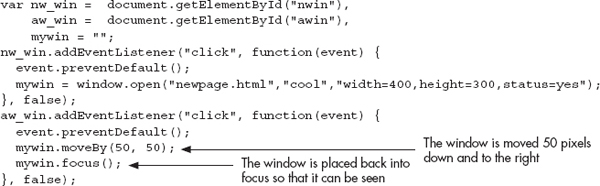
This moves the window 50 pixels to the right and 50 pixels down when the button is clicked. Notice that the focus() method is called after the move. When you click the link in the main window to move the new window, the new window goes out of focus (a blur event). The move still works, but you may not be able to see this if the main window is covering it (since it regains focus when the link is clicked). Placing the focus back on the new window will allow it to be seen in front of any other open windows. Likewise, the blur() method can be used to take a window out of focus, but browsers may disable this as a security feature to ensure that windows are not hidden via scripting. Figure 11-7 shows the initial position of the new window when it is opened from a button on the main page.

Figure 11-7 The new window in its initial position when it is opened
Figure 11-8 shows the window after the “Alter New Page” link is clicked. Notice that it has moved to the right and down by 50 pixels in each direction.
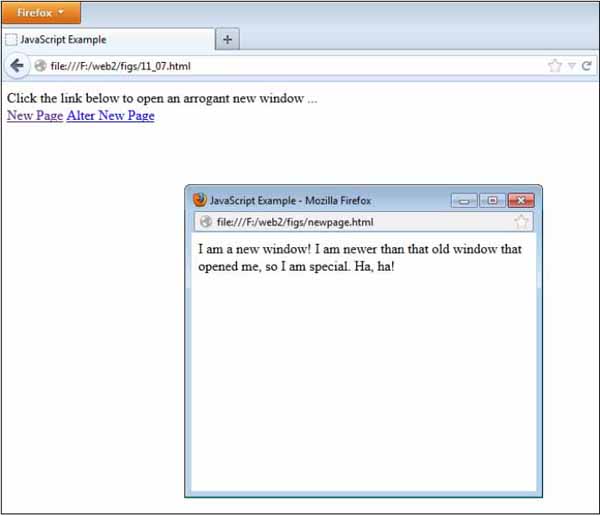
Figure 11-8 The window in its new position after being moved
The way this works, the viewer could continue clicking the link and moving the window by another 50 pixels in both directions. The window just continues to move by the number of pixels it has been set to move by in the script. Most modern browsers will stop moving the window when the move would take part of the window out of the viewable area of the screen.
The moveTo() method is used to move a window to a specific destination on the screen based on the arguments given in the method call. The following is the general syntax for using this method:
Here, you replace x-value with the number of pixels from the left of the screen where you want the window to be moved. For example, if you input 300, the window is moved 300 pixels from the left of the screen. You then replace y-value with the number of pixels from the top of the screen that you want the window to be moved.
As an example, alter your openwin.js code to use moveTo() instead of moveBy(), as in the following code:
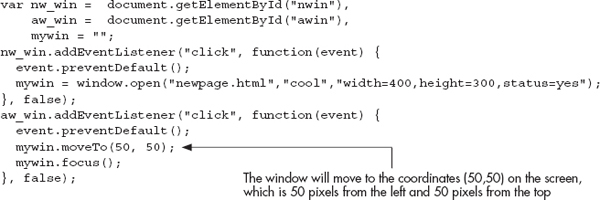
This time the window will be moved to the coordinates (50,50) on the screen when the link is clicked.
To see that this works differently than the moveBy() method, try clicking the link again. Rather than making another move, it stays in the same place because it has already made it to its destination. If you manually move the new window, however, clicking the link again will move it back to its moveTo() coordinates.
Most modern browsers will not allow any part of the window to be moved off the screen. For example, a window moved to (–10, –10) will likely be moved to (0, 0) by the browser instead.
The resizeBy() and resizeTo() Methods
The resizeBy() method is used to resize a window by the number of pixels given in the arguments sent in the method call. To make the window larger, use positive numbers. To make it smaller, use negative numbers. For example, you could alter your openwin.js code to make the new window smaller when clicked, as in the following code:
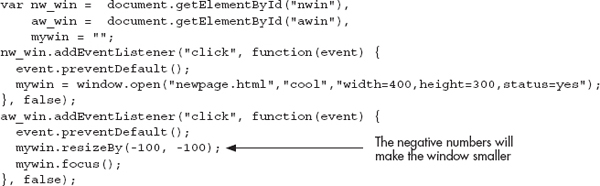
This code will make the window smaller by 100 pixels in width and height. Figure 11-9 shows how the new window looks when it is first opened, and Figure 11-10 shows how the new window looks after it has been resized.
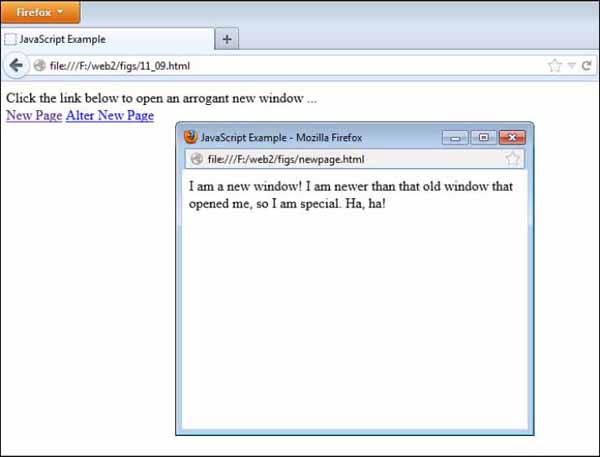
Figure 11-9 The new window when it is originally opened
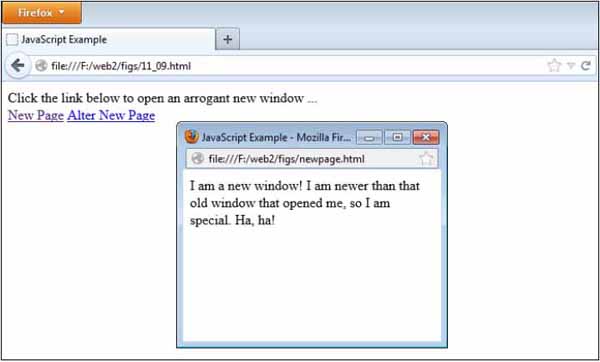
Figure 11-10 The new window after it is resized: it shrinks by 100 pixels in height and width.
As with moveTo(), clicking the link again will continue to resize it. Most modern browsers will stop resizing the window once it gets to a minimum allowable size for security reasons, and will stop once the window size reaches the maximum viewable area on the screen.
The resizeTo() method is used to resize a window to a specific dimension in pixels based on the arguments sent in the method call. As an example, you can again alter your openwin.js file. Use the following code:
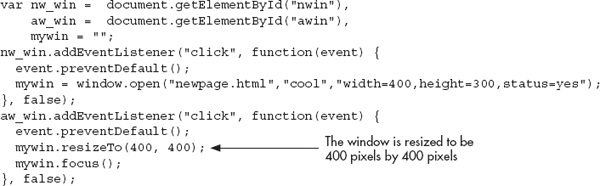
Clicking the “Alter New Page” link in the main window will now resize the new window to 400 × 400 pixels. If the new dimensions will cause the window size to be greater than the viewable area of the screen, then most modern browsers will limit the size of the window to that viewable area rather than using the provided dimensions for security reasons.
The scrollBy() and ScrollTo() Methods
The scrollBy() method is used to scroll a window by the number of pixels given in the arguments sent in the method call. The scrollTo() method is used to scroll a window to a specific destination. The syntax and usage are the same as the other methods mentioned here, and will scroll the new window based on the numbers provided as arguments.
Chapter 11 Self Test
1. A(n) __________ object is created for each browser window.
2. The closed property is used to check whether or not a window has been closed.
A. True
B. False
3. The __________ property returns the number of frames within a window.
4. The location property can cause instant redirection of the browser to a new page.
A. True
B. False
5. The __________ property holds the name of the current window and also allows you to give the window a name.
6. The calls to properties and methods of the window object can often be shortened because
A. The window object is the global object for JavaScript in Web browsers.
B. The window properties and methods are assumed to be part of the navigator object.
C. There really is no window object.
D. The browser assumes the window object is part of the document object.
7. The __________ property is another way of saying “the current window” in JavaScript.
8. Why would this code not work:
A. It should work without a problem.
B. The quote marks are not set correctly.
C. Newer browsers do not allow the window status to be changed by default, so the user would need to change security settings in order for it to work.
D. A change in the status property in a mouseover event must return false afterward.
9. What is the difference between the parent and top properties?
A. The parent property goes to the top of the current frame set, while the top property goes to the top window of all frame sets on the page.
B. The top property goes to the top of the current frame set, while the parent property goes to the top window of all frame sets on the page.
C. The parent property goes to the top of the current frame set, while the top property goes to the top of the current frame.
D. The parent property goes to the top of the outermost frame set, while the top property goes to the top window of all frame sets on the page.
10. The __________ method pops up a message to the viewer, and the viewer has to click an OK button to continue.
11. What value is returned by the confirm() method if the viewer clicks the OK button?
A. true
B. false
C. “OK”
D. 25
12. The __________ method enables the viewer to print the current window.
13. The prompt() method is used to __________ the viewer to enter information.
14. When setting the toolbar attribute as part of the third parameter in the open() method, what values may the attribute have?
A. yes and no only
B. 1 and 0 only
C. yes, no, true, and untrue
D. yes, no, 1, and 0
15. What is the difference between the setInterval() method and the setTimeout() method?
A. The setTimeout() method is used when the viewer needs to take a break from reading, while setInterval() is used when the viewer needs no breaks.
B. The setInterval() method is used to repeat a function at a set time interval, while setTimeout() executes a function only once after a set time delay.
C. The setInterval() method flashes an advertisement across the screen at a set interval by default, while setTimeout() is ad-free.
D. They both perform the same function.
..................Content has been hidden....................
You can't read the all page of ebook, please click here login for view all page.