Chapter 16
JavaScript Libraries, HTML5, and Harmony
Key Skills & Concepts
• Using jQuery
• Other JavaScript Libraries
• JavaScript and HTML5
• ECMAScript Harmony
• Further Reading
This chapter introduces a number of advanced techniques that you may wish to pursue further once you have finished this book. First, you will be introduced to jQuery, which is a good JavaScript library for creating DOM-related scripts that work cross-browser. You will also learn a little about other JavaScript libraries that are available, such as php.js and MooTools. After covering these libraries, you will look at how JavaScript is incorporated into HTML5, and then learn about things that are on the horizon for the future of JavaScript in ECMAScript Harmony.
Using jQuery
One of the reasons to learn JavaScript is so that you can more easily work with jQuery. The jQuery library has become a very popular tool for easily creating dynamic effects that work cross-browser, which avoids many of the issues you may face trying to do so, such as the differences in how to handle events in each browser. At the time of this writing, jQuery had support for Internet Explorer 6.0+, Firefox 10+, Safari 5.0+, Opera, and Chrome.
Obtaining jQuery
The first thing you will need to do is to grab a copy of jQuery or to use a remote copy. If you wish to use a local copy, you can download the latest version from jquery.com. Once you have it, you call it using a <script> tag as you would any other external JavaScript file, as in this code:
If you decide to use a remote copy, such as one from Google (which can be helpful as the user may already have the file cached, which will speed up load time), you can grab the latest code from https://developers.google.com/speed/libraries/devguide#jquery. Here is an example of using a copy from Google:
You can choose the method that works best for you. Once you have the code included in your HTML, you are ready to make use of what jQuery has to offer.
NOTE
When including JavaScript from external sites, there can be security concerns. For more on this, see www.securitee.org/files/jsinclusions_ccs2012.pdf.
Getting Started: document.ready()
The first thing jQuery needs is to be sure that all DOM elements are available for scripting. The document.ready() method determines when the DOM structure is loaded, and then will run the code within, usually a function, as in this code:

This is placed in your regular JavaScript code (for example, your .js file). Notice the $ at the beginning of the code. This is the jQuery selector, and is used when you invoke jQuery in your JavaScript code.
Using Selectors
In jQuery, you can select elements via CSS syntax, rather than using the typical JavaScript methods such as document.getElementById() or document.getElementsByClassName(). For example, suppose you had the following code:

This simply changes a couple of CSS style properties, though it does take several lines of code to do so. In jQuery, this can be shortened like this:

First, you will notice that the “story” div is selected using CSS syntax (“#story”) rather than document.getElementById(“story”). This makes the selection of the element a little shorter. Also, you will see that event handling simply attached the event name (“click” in this case) followed by the function to execute when the event occurs. This keeps you from needing to write cross-browser event-handling code. Next, you are able to alter the CSS of the element by using the css() method on the story element. The css() method accepts an object as a parameter, and it contains each property to change along with its new value (all quoted much like JSON syntax). In this way, you do not need to code a separate statement for each CSS property change you want to make.
To see this example in action, you will need to create an HTML page with a “story” div, as in the following code:

If you are using a local copy of jQuery, you can call that in place of the Google copy here. You can save this HTML page as jqexample.html. Next, you will want to create a JavaScript file, which you will save as jqexample.js. Here is the code:

Once you have the code in place, open jqexample.html in your browser and click on the div element. The text should become larger and turn blue. Figure 16-1 shows the page before the changes, while Figure 16-2 shows the page after the changes:

Figure 16-1 The original page

Figure 16-2 The page after the div element is clicked
There are a number of selectors available in jQuery to help you select the element(s) you need in your scripts. Some of the most common are
• (*) Selects all of the elements in the document
• (.class_name) Selects all elements with the provided class name
• (#id) Selects the element with the provided id
• (element_name) Selects all element_name elements
• (element_name.class_name) Selects all element_name elements with the class_name class
• (element_name[attribute=“value”]) Selects all element_name elements that have the provided attribute with the provided value
Further selection options are available if needed at api.jquery.com/category/selectors.
Altering Classes
The addClass() and removeClass() functions make it very easy to change the style of elements in jQuery. If you already have classes coded in your CSS, then you can use these methods to add or remove them at any time. For example, suppose you had the same HTML page (jqexample.html), and altered it to include a CSS file named jqexample.css. You could then write CSS classes that could be added or removed from the “story” div. Here is the updated HTML code:

The next step is to create jqexample.css and include some CSS declarations:

This gives three possible styles. Each can now be easily applied to an element or taken away as needed. To add a class, simply call addClass() with the class name as the argument, as in the following code:
If you later decide to remove it, you can do the same thing with removeClass():
You can also add more than one class to an element at a time by separating each class name with a space, as in the following code:
This will not only make the text larger and blue, but will also make it italic. You can make use of this along with the existing code in order to add or remove classes on a click.
If you decide you want to toggle one or more classes, you can use the toggleClass() method. This will add a class if the element does not have it and will remove a class if the element already has it. Here, you will update your jqexample.js code to toggle the style2 and style3 classes when the div is clicked. The updated script is shown in the following code:

With this code, each click will add or remove both the style2 and style3 classes, depending on the current style of the element.
If you want to check whether or not an element has a class before adding or removing it, you can use the hasClass() method. The method returns true if the element has the class applied to it, and false if not. For example, the following code would make sure the “story” div does not already have the style3 class before adding it:

As you can see here, the JavaScript if statement and the logical NOT operator (!) are used here along with the jQuery code. jQuery is a JavaScript library, so all of the code is still JavaScript code. Since this is the case, you can use any JavaScript code you need as well—operators, statements, arrays, functions, and more. Figure 16-3 shows what the initial page looks like, while Figure 16-4 shows how the page looks after the link is clicked.

Figure 16-3 The initial page

Figure 16-4 After the link is clicked, the class is added.
Methods for Effects
The jQuery library has a number of methods that make creating specific dynamic effects easier. Table 16-1 lists some of the most commonly used jQuery effects.

Table 16-1 Common Methods Used for Effects in jQuery
Each of these methods can take two arguments: the amount of time to take to perform the effect and an optional callback function (discussed later in this section). For example, calling the show() method will reveal an element immediately if no arguments are used, as in the following code:
If you want to show the element over time, you can send the number of milliseconds to the show method as an argument:
When this argument is provided, the element will fade in while increasing in width and height during the specified span of time. Here, the “story” element would fade in and increase in size over a period of 1000 milliseconds (1 second). Alternatively, there are some preset values you can use in place of a specific time: “fast” and “slow”, as in the following code:
The other methods work the same way, but perform different animations: slideDown() shows an element by sliding it down into position, slideUp() hides an element by sliding it up and out of sight, fadeIn() shows an element by gradually fading it in, while fadeOut() hides an element by gradually fading it out.
If desired, you can provide a second argument to any of these methods, which is a callback function that will be executed as soon as the effect completes execution. This can be useful to string two or more effects together, executing each one after the previous one has been completed. For instance, the following code will show the “story” element over 500 milliseconds, then fade it out over 2000 milliseconds:

You could continue the process by using a callback function as the second argument of the fadeOut() method, and continue adding callback functions as needed until your desired effects have all been completed.
Finally, if you need to prevent the default action when an event occurs on an element (such as when you need a link to not be followed), you can use the jQuery event registration while still passing in the event object. This allows you to call event.preventDefault(), as in the following code:

The jQuery library can prove to be a very useful tool if you need to get scripts working across a larger number of browsers (for example, older versions of Internet Explorer). Since it helps with element selection, event handling, and display/animation methods, it allows you to do less work when you need cross-browser code. The next section will give you some resources to look at if you wish to delve further into the jQuery library.
Further Reading
You can read more about jQuery and how to use it at the following Web sites:
| Try This 16-1 | Using jQuery to Create Effects |
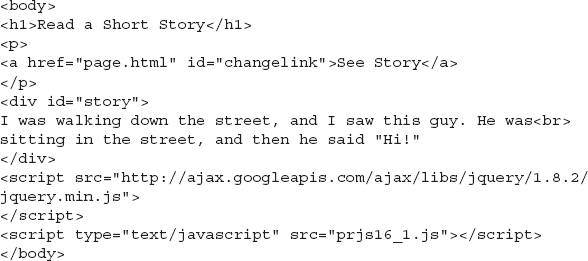
You have a link and a div element with some text that you would like to have initially hidden, but to display when the link is clicked. Once it displays, you want the div element to slowly fade out. You want to use jQuery to accomplish the task. |
Step by Step
1. Create an HTML document named pr16_1.html and use the following HTML code for the body section:
2. Create a JavaScript file named prjs16_1.js. In this file, you need to wait until the document is ready, then immediately hide the “story” element. Next, register the click event for the “changelink” link, prevent its default action, and then show the “story” element using a “slide down” animation over 3000 milliseconds. The “story” element should then fade out over 10,000 milliseconds. When complete, your JavaScript code should look like this:
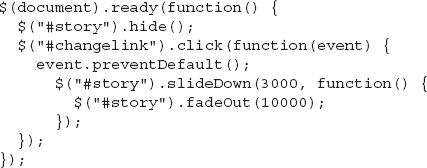
3. Save the HTML and JavaScript files and open the HTML file in your browser. Click the link to view the story. It should slide down, then fade out over time.
Try This Summary
In this project, you used your knowledge of JavaScript and jQuery to create animations in response to a user event. The jQuery made it easier to write the code and have it work cross-browser at the same time.
Other JavaScript Libraries
There are a number of JavaScript libraries available that can help you write higher-level scripts with less effort than it would take to write all of the code from scratch. Some of these are listed here in case you would like to look into them further:
jQuery Mobile
The jQuery mobile library is part of the jQuery Mobile framework. It is an HTML5-based framework that uses progressive enhancement so that you can write applications or Web sites that work in the most popular handheld devices or in the browser. More information on jQuery Mobile can be found at jquerymobile.com.
php.js
The php.js library is a useful one if you have been programming in PHP and would like to use functions you are familiar with from PHP, for example, in_array(), array_key_exists(), and others. These functions are set up to work like their PHP counterparts, taking the same arguments and returning the same results. You can find out more about php.js at phpjs.org.
node.js
While node.js isn’t actually a library, but a software system that allows you to build server-side applications in JavaScript, it is a popular system worth a mention here. The applications run asynchronously and are event-based. More information on node.js and how it is implemented can be found at nodejs.org.
MooTools
The MooTools library is an object-oriented framework designed to make writing object-oriented code easier and cross-browser. More information on MooTools can be found at mootools.net.
Three.js
The Three.js library allows you to create 3D graphics in the browser using your choice of methods: HTML5 <canvas>, WebGL, or SVG. You can find out more about Three.js at mrdoob.github.com/three.js/.
Ask the Expert
Q: There are a lot of libraries! How do I know which one to use?
A: What you decide to use will depend on your needs and your coding style. For example, if you want to make event registration and handling work across a larger number of browsers using a shorter syntax, jQuery is a good choice. On the other hand, if you want to use object-oriented programming and want to make it easier to write, MooTools would be a good choice. If you have other needs that aren’t met by one of these libraries, searching the Web should provide additional options that may be helpful.
Q: Do I need to learn jQuery? Couldn’t I just write the JavaScript code?
A: This will also depend on your needs. If your boss wants you to use it or you need to code for maximum cross-browser compatibility, then you probably will want to learn it. If your script is designed to work only with the latest browsers (and does not need to be functional in older ones), then you may not need to learn it. It all depends on your needs at any given time.
Q: Does jQuery do more than what I saw here?
A: Yes, it can do quite a bit. There are more advanced selectors, additional effects, and numerous plugins to fill any additional needs that are not met with the library itself. You can find out more and read more advanced information at docs.jquery.com/Main_Page.
Q: Are there any libraries for developing JavaScript games?
A: Yes! If you would like to delve into game development, you can check out some of the following links to see some of the available libraries and how to use them.
• Crafty craftyjs.com
• Impact impactjs.com
• GameQuery gamequeryjs.com
• Jaws jawsjs.com
JavaScript and HTML5
HTML5 provides an API (application programming interface) for a number of elements and markup that allow you to create more dynamic Web pages or application. Some of these include dynamic drawing via the <canvas> element, local storage, and the dragging and dropping of elements. These are possible in browsers that support HTML5 and the corresponding JavaScript interfaces. To begin, you will look at the HTML5 <canvas> element.
The <canvas> Element
The <canvas> element allows you to create graphics with JavaScript as the page is rendered. When a <canvas> element is placed on the page, it creates a rectangular area (based on its width and height attributes) where graphics can be drawn. For example, the following code will create a drawing area of 400×400 pixels:
Anything inside the opening and closing tags will be displayed in browsers that do not support the <canvas> element, as in the following code:
To begin working with the <canvas> element in JavaScript, you will need to get the element by its id, and then use the getContext() method to create a drawing context. The getContext() method takes one argument, which is the type of context being created. Most modern browsers support a 2D context. A 3D (three-dimensional) context is in the works. Here is an example that opens a 2D context for the <canvas> element you have been using:
Once you have the context, you can begin using it to draw lines, shapes, text, and more.
Rectangles
Rectangles can be drawn in a context by using the fillRect() or strokeRect() methods. The fillRect() method will create a rectangle that is filled in with color, while strokeRect() will create a rectangle that is outlined but has no fill color. Both methods take four arguments: the x-coordinate of the top-left corner, the y-coordinate of the top-left corner, the width, and the height. For example, the following code will draw a filled rectangle beginning at (70, 70) that is 50 pixels wide and 30 pixels tall:

Figure 16-5 shows how this would look in a browser. Notice that the canvas is not outlined. If you want to outline it, you can use CSS to add a visible border.
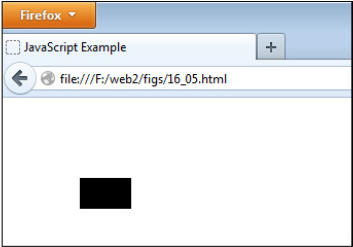
Figure 16-5 A canvas with a filled rectangle
The origin on a canvas is the top-left corner, so a higher x-coordinate will move the point further to the right, while a higher y-coordinate will move the point further down. Figure 16-6 shows how the canvas grid is laid out when the example rectangle is drawn.
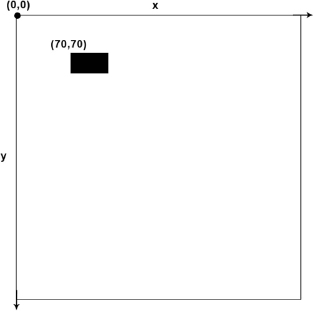
Figure 16-6 The example showing the canvas layout
If you decide you would rather have an outlined rectangle that is not filled with color, you can use strokeRect() instead, as in the following code:

If you need to clear a rectangular area on the canvas, you can use the clearRect() method. It uses the same four arguments as fillRect(), but clears (makes transparent) the area that it affects. For example, you could clear out a rectangle within a filled rectangle using the following code:

Figure 16-7 shows the result of this code. Notice how the filled rectangle now has an area cleared inside of it.
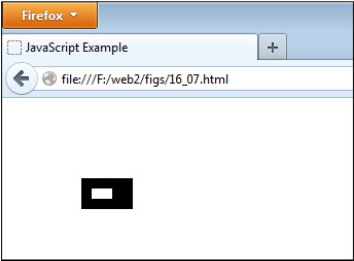
Figure 16-7 The rectangle now has an empty rectangular area within it.
Using fillStyle and strokeStyle
The default color of a shape or outline is black (#000000). To use different colors, you can set these using the fillStyle property for fill color and strokeStyle property for the color of a stroke (outline or line). For example, consider this code:

Here, fillStyle is set to #FF0000 (red), and any shapes after this assignment will use red for the fill color. This can always be changed as you go to use shapes with different colors, as in the following code:

If you have particular settings such as fillStyle and strokeStyle that you want to save for later, you can use the save() method. You can then restore those settings using the restore() method, as in the following code:

You can use strokeStyle in the same way as fillStyle to set the color of a shape outline or a drawn line (path). For example, the following code will create a rectangle with a red outline:

Using Paths
The canvas context also allows you to draw lines and curves (paths), which gives you the opportunity to create more complex drawings. You begin a path by calling the beginPath() method, and then end a path by calling one of several methods. In between, you can use a number of methods to draw lines, curves, and more. Table 16-2 lists the methods that can be used within a path:
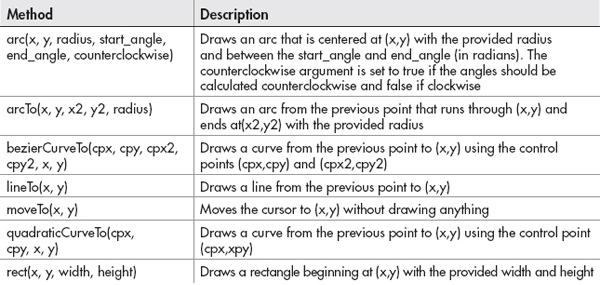
Table 16-2 Methods for Drawing Paths
Once you have completed drawing a path, you can end the path in several ways. Table 16-3 lists the available methods.

Table 16-3 Methods to End a Path
As an example, suppose you decided to draw a path using lines and arcs, and then stroke the path. You could use the following code:

Figure 16-8 shows the result of this code. It draws a half-oval on the canvas.
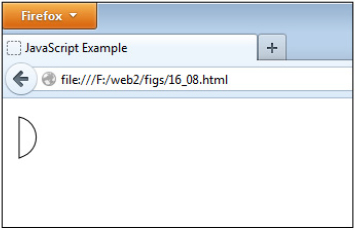
Figure 16-8 A stroked path on the canvas
Adding Text
The canvas API provides two methods for adding text to the context: fillText() and strokeText(). Both take the same arguments: the text string, x, y, and an optional argument to set a maximum width (which will attempt to condense the text string if it is longer than the set width). For example, the following code will draw the text string “I am some text on a canvas” beginning at (10,10) with a maximum width of 200 pixels:

There are also three properties that you can use to style text:
• font Sets the font properties using CSS format, for example, “bold 1em Verdana”
• textBaseLine Sets the text baseline. Possible values are “alphabetic”, “bottom”, “hanging”, “ideographic”, “middle”, and “top”.
• textAlign Sets the alignment of the text. Possible values are “center”, “end”, “left”, “right”, and “start”.
Thus, if you wanted to change the font and align the text, you could set font and fontAlign, as in the following code:

The text will now be a bold Verdana font with “end” alignment. Figure 16-9 shows the result of this code when run in a browser.
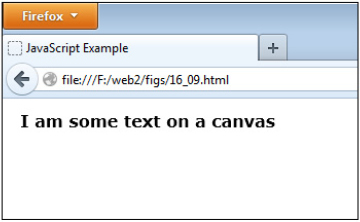
Figure 16-9 The font is now a bold Verdana with “end” alignment.
Further Reading
The basics of using canvas have been covered, but there are even more things you can do. You can learn more about using canvas at the following sites:
Drag and Drop
HTML5 provides native drag-and-drop capabilities to the browser with the help of JavaScript. Some elements, such as links, images, and selected text, are draggable by default. If you want to make another element draggable, or if you want to ensure an element is not draggable, you can use the draggable attribute in its HTML tag, as in the following examples:

The next thing you will need is a valid drop target. To set this, you will need to get the element in JavaScript and ensure that its dragover, dragenter, and drop events prevent the default action, which is to not allow dropping. To do this, you can simply add event listeners to each event for the element, as in the following code:
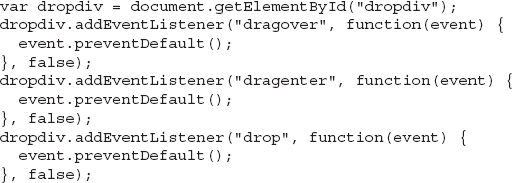
Doing this will allow items to be dropped into the dropdiv element.
The Drag-and-Drop Events
There are seven events involved in the drag-and-drop process, and each is described in Table 16-4.
Each of these can have event listeners added in order to perform further scripting. Depending on what you need to do, you may use any number of these events when creating a drag-and-drop script.
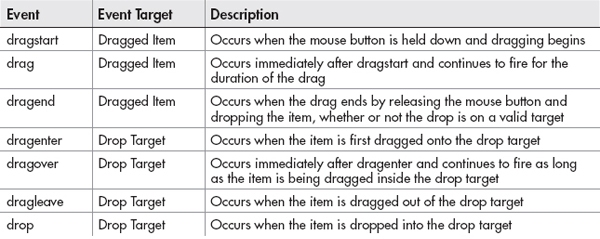
Table 16-4 The Drag-and-Drop Events
The dataTransfer Object
While you can currently drag an item and drop it with what you have so far, you will probably want to be able to access data stored within the item being dragged, so that it can be used when it is dropped. This is where the dataTransfer object can be used.
The dataTransfer object is part of the event object, and has two methods for setting and retrieving data from the dragged item: setData() and getData().
The setData() method can be used to set custom data, but is also called by default when selected text, and image, or a link is dragged. For selected text, it will store the dragged text; for an image, it will store the image URL; and for a link, it will store the link URL. If you need to store custom data rather than using these defaults (or if you are dragging a different type of element), you can store either text or a URL using the following code:
Note that you can store both “text” and “URL” types in a single dataTransfer object, but cannot have more than one of either type. HTML5 extends this to allow for any MIME type to be passed (“text” and “URL” are still valid and are the same as using the “text/plain” and “text/uri-list” MIME types, respectively). Just remember that only one piece of data from each MIME type can be stored in a dataTransfer object.
The getData() method is used to retrieve any data stored in a dataTransfer object. Due to browser compatibility issues, it is best to use the following example code when retrieving text or URL information from the dataTransfer object:

Notice the capital “T” when retrieving text, which allows older versions of Firefox to get the text value while still working for other browsers. Also, note the method for getting the URL tests first for the “URL” and then for the MIME type “text/uri-list”, in order to help with older versions of Internet Explorer.
A Quick Drag-and-Drop Script
As an example to put all of this together, you will create a script to drag a link into a div element in order to display the link URL. First, begin with the following HTML code:

Since links are draggable by default, the draggable=“true” attribute is not necessary here. The div element is given a border so that the user can see where to drag the link. Next, you will need the JavaScript code:
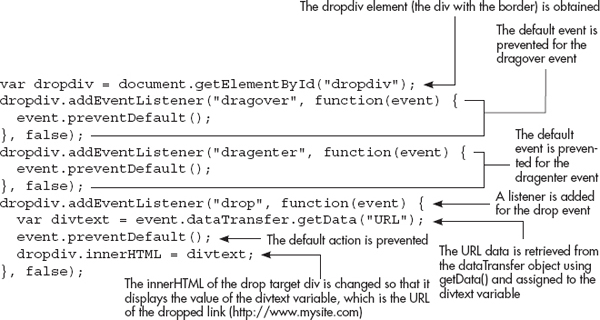
You will notice that since you are dragging a link, you do not need to call setData() to store the URL in the dataTransfer object (if you needed to do this, for example, to store text, you would also need to get the link element by its id, then add an event listener for the dragstart event and use setData() within that function). The action here occurs on the drop event for the target div element. When the link is dropped inside the target div, then the URL that was stored in the dataTransfer object is displayed in that div using innerHTML. Figure 16-10 shows the page before the item is dragged and dropped, and Figure 16-11 shows the page afterward.

Figure 16-10 The original page

Figure 16-11 The page after the item has been dragged and dropped
Further Reading
While this book introduces the drag and drop, you may decide to delve deeper into the topic to create more advanced drag-and-drop scripts. The following resources will provide you with more information on using the drag-and-drop capabilities of HTML5.
| Try This 16-2 | Drag and Drop |
This project will update the drag-and-drop example script so that it stores descriptive text about the link. This will be displayed when the link is dropped in the target div rather than the link URL. |
Step by Step
1. Create an HTML document named pr16_2.html and use the following HTML code for the body section:

2. Create a JavaScript file named prjs16_2.js and begin with the code from the drag-and-drop example from this chapter. Alter the code so that the text “This links goes to my Web Site!” is stored in the dataTransfer object when the link is dragged and then is displayed in the drop target div when the link is dropped inside it. When complete, the code should look like this:
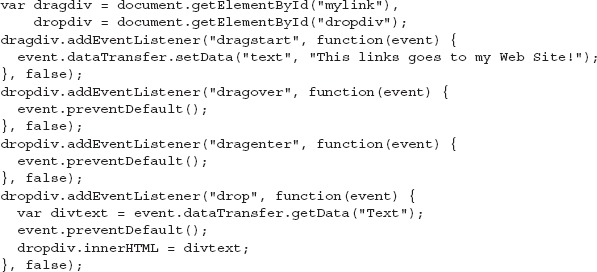
3. Save the JavaScript file and then open the HTML file in a browser that supports HTML5 drag and drop (the latest Firefox or Chrome browsers should work). Drag the link into the div to display the link’s description.
Try This Summary
In this project, you updated your drag-and-drop script so that it stores and retrieves text from the dataTransfer object. This text is then displayed when the link is dragged and dropped into the target div element.
ECMAScript Harmony
ECMAScript Harmony will be the next update to the JavaScript language, and it will add some new features to the language, as well as updating some existing features. Some of the highlights are covered in this section so that you can get a preview of the future of JavaScript.
The const and let Keywords
Currently, JavaScript does not have a formal way to define constants and does not use block-level scope (only function scope). The const and let keywords will provide a means to use both of these features.
Using const
A constant is a variable that cannot have its value changed once it has been defined. The typical standard for naming a constant is to use all capital letters, for example, TEXT, MAGIC_NUMBER, MONEY. For example, to define a constant named MAGIC_NUMBER with a value of 7, you could use the following code:
With this in place, the value of MAGIC_NUMBER cannot be changed afterward; it will remain constant even if code attempts to change it. The following code shows an example of this:

Figure 16-12 shows the first alert, and Figure 16-13 shows the second alert. Notice that the value remains 7, even though the code attempted to change it to 42.
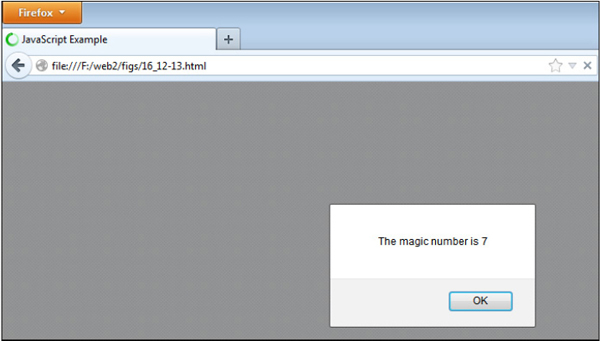
Figure 16-12 The value is 7.
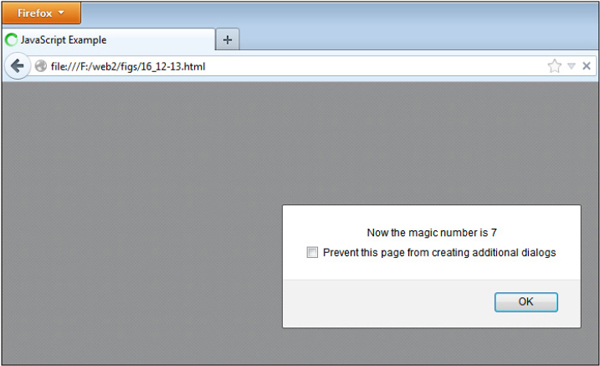
Figure 16-13 The value is still 7.
Using let
The let keyword allows you to define a variable that exists only within the block-level scope in which it is defined. Using this, you can localize a variable to a block rather than only to a function. For example, the following code defines a variable that is only available within the while loop by using let:
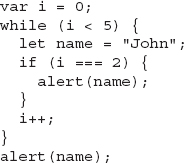
In this code, the name variable is only available for use within the while loop. Trying to alert the value outside the loop results in name being undefined. Figure 16-14 shows the alert that occurs within the loop, and Figure 16-15 shows the alert that occurs outside the loop.
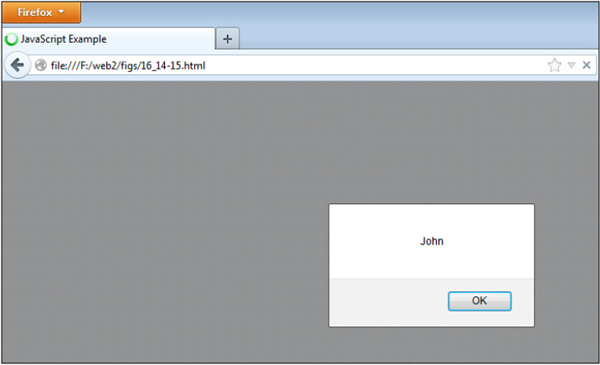
Figure 16-14 The name variable has a value inside the loop block.
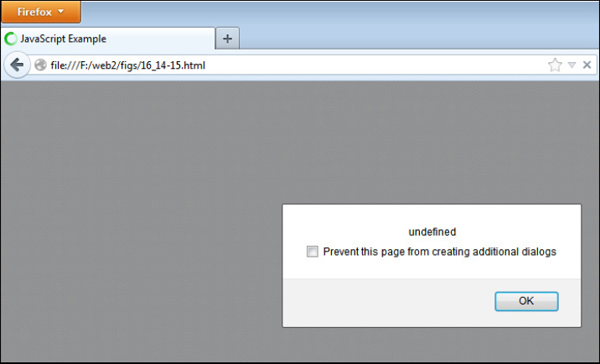
Figure 16-15 The name variable is undefined outside of the block.
You can also use the let keyword to create a block-level statement where one or more variables are defined only within that block. For example, consider the following code:

Here, a let statement block is created, and any variables defined within the parentheses will have block-level scope within this block. The name variable will have a value of “John” in the first alert, but will be undefined in the second alert, which is outside the block. As you can see, this can be useful when you need to create a block-level scope without defining a new function.
Default Argument Values
Since arguments passed to functions are optional, it sometimes helps to be able to set a default value for particular arguments when those values are not passed to the function. In Harmony, this can be done by adding an equal sign and the default value to the argument, as in the following code:

Here, the variable my_num will have a value of 15 (3*5). Since the value of 3 is passed to the function, the default value of 0 for num is not used. The default_num variable will have a value of 0 (0*5), since no argument was passed to the function, requiring it to use the default value of 0 for num. In this way, you can avoid using additional code to check whether a value was passed to the num variable.
Classes
Harmony will add the ability to use the class keyword to define objects using a format similar to Java. Note that this simply provides a format for defining classes—the object is still technically created by JavaScript using the constructor/prototype combination you learned in Chapter 8. For example, suppose you had the following code to define an object named Car:
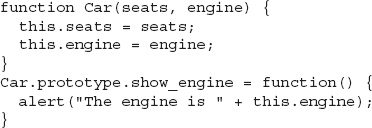
This creates a constructor for the properties and places the method on the Car prototype. The following code would create a class that is equivalent to the code shown previously:

As you can see, the class keyword is used, followed by the name of the class, which is defined within the block. A class can contain any number of functions that are used as methods. When inside a class, a method named constructor will always operate as the constructor function for the class. Any other methods will be added to the object’s prototype, allowing for maximum reuse of their code. Being able to define a class allows all of the object’s code to be in one place (the code block for the class) while still utilizing the advantages of the constructor/prototype pattern.
You will also notice that the constructor defined the properties using the public keyword. This allows the properties to be accessed publicly (for example, using Car.seats outside of the class will work). You can also use the private keyword if you want a private property—one that cannot be accessed from outside of the class. The syntax for using private members is still in the process of being finalized. The links in the next section may prove helpful in finding out when this has been completed.
More on Harmony
There are other new and/or changed features coming in Harmony, and some of the listed features could have a change in syntax before implementation. To find the latest updates or read more on the ECMAScript Harmony update, you can browse the following Web sites:
Further Reading
If you wish to delve into JavaScript further, some recommendations for more advanced JavaScript books are listed here:
• JavaScript: The Complete Reference by Thomas Powell and Fritz Schneider
• Professional JavaScript for Web Developers by Nicholas C. Zakas
• JavaScript: The Good Parts by Douglas Crockford
• JavaScript Patterns by Stoyan Stefanov
Need Help?
If you find that you are stuck and need help, feel free to get online and visit the JavaScript discussion forums on the Web Xpertz Web site at www.webxpertz.net/forums. Either I or another fellow coder may be able to help you with your questions.
If you would like to contact me, you can send me a message on my Web site (www.scripttheweb.com/about/contact.html) or you can find me on Twitter (@ScripttheWeb).
Ask the Expert
Q: Where can I find free cut-and-paste JavaScript code on the Web?
Q: Where can I learn more about JavaScript?
Q: Where can I learn more about Cascading Style Sheets?
Q: Where can I learn more about HTML5?
Chapter 16 Self Test
1. Which of the following is used to see if a document is ready in jQuery?
A. docReadyState()
B. $documentReady()
C. $(document).ready()
D. $(document).done()
2. Which of the following lines would hide an element with an id of “story” using jQuery?
A. $(getElementById(“story”)).hide();
B. $(“#story”).hide();
C. $#story.hide();
D. $(“story”.hide)();
3. __________ syntax is used to select elements in jQuery.
4. The jQuery library makes it easier to write code that is __________.
5. The __________ element allows you to use JavaScript to draw on a defined area of the page.
6. When drawing on a canvas, you can use the fillCircle() method to draw a circle.
A. True
B. False
7. The __________ attribute of an element defines whether or not the element can be dragged.
8. JavaScript __________ may make some advanced coding tasks easier by making the code easier to write.
9. By default, all elements are draggable.
A. True
B. False
10. The __________ event occurs when an element begins being dragged.
11. Which object can be used to store or retrieve data during the drag and drop process?
A. event.dataStorage
B. event.dataTransfer
C. event.data
D. event.dataMove
12. Which method is used to get data stored during a drag and drop?
A. retrieveData()
B. getInfo()
C. getItems()
D. getData()
13. What keyword can be used in Harmony to declare a constant?
A. constant
B. const
C. let
D. var
14. What keyword can be used in Harmony to give a variable block-level scope?
A. block
B. blockScope
C. let
D. secret
15. Is JavaScript fun?
A. Yes!
B. Maybe for you!
C. I was forced to learn this by my boss, so it can never be fun!
D. I’m curious to know if that coding contest back in Chapter 10 was real, and if so, why John got crushed so badly? That doesn’t sound like much fun!
..................Content has been hidden....................
You can't read the all page of ebook, please click here login for view all page.
