
Chapter 15
An Introduction to Advanced Techniques
Key Skills & Concepts
• Working with Images
• JavaScript and Frames
• Debugging Scripts
• JavaScript and Accessibility
• JavaScript Security
• AJAX and JSON
Working with Images
JavaScript uses the image object to preload images, create rollover effects, and even create slide shows or animations. The image object’s properties will help when you want to create such scripts. Table 15-1 lists and describes the image object’s properties.
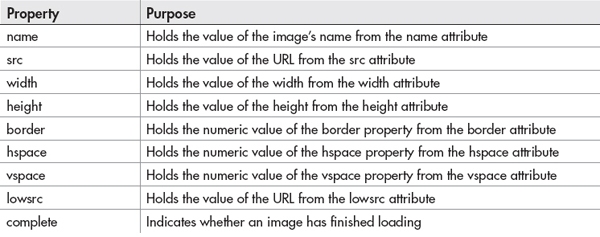
Table 15-1 Properties of the Image Object
Rollovers
Image rollovers (also known as hover buttons, image flips, and other similar names) can add some zest to your navigational images. With the recent advances in browsers and CSS, rollovers are commonly implemented via CSS rather than JavaScript now. You can see an example of this at www.netmagazine.com/tutorials/create-progressively-enhanced-3d-css-rollovers.
A Simple JavaScript Rollover
A simple rollover just changes one image to another when the mouse moves over the initial image. First, you create two images and make the second image different in some way. For example, examine the two images shown here:
NOTE
For each JavaScript rollover effect you create, you need two separate images.
Once you have two images, you can begin working on the code for the image rollover. You can code your initial image into your HTML document, giving it an id:
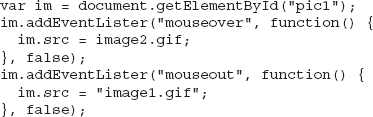
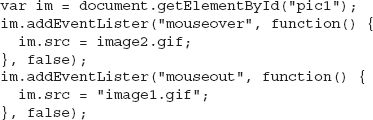
In your JavaScript code, you will just need to get the image element by its id and assign it a new value for the src property on a mouseover event. Then you will simply change it back on a mouseout event. The following is the JavaScript code:
The closest you can get to seeing the results here is to see a before and after set of images. Figure 15-1 shows the initial image, while Figure 15-2 shows the result when the mouse is moved over the image.
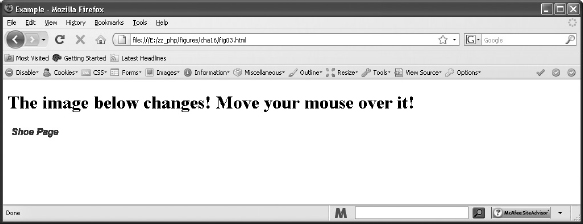
Figure 15-1 The initial image
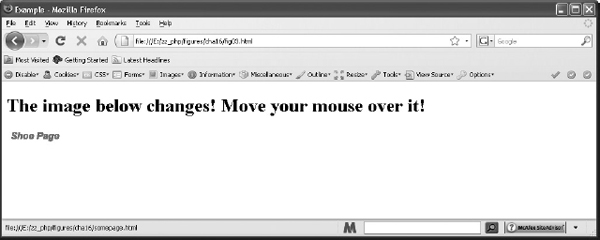
Figure 15-2 The new image appears when the mouseover event occurs.
NOTE
To make this more accessible to users without a mouse, you can use the code to perform the change on the focus and blur events of the <a> element. You will do this in your first project in this chapter.
| Try This 15-1 | A More Accessible Rollover |
To make a JavaScript rollover more accessible, you will use the same set of images and will write code that will change the image on the focus and blur events of <a> elements in addition to the mouseover and mouseout events on the <img> element. |
Step by Step
1. Create an HTML document named pr15_1.html and use the following HTML code for the body section:

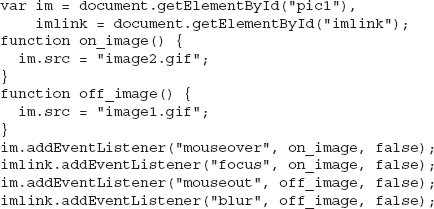
2. Create a JavaScript file named prjs15_1.js. In this file, start with the following code:
3. Make changes to the code so that the image will also change when the focus and blur events occur on the <a> element. You can do this either by moving some of the code to a separate function or by simply pasting the code from the appropriate event listener to its companion event listener (i.e., mouseover and focus will use the same code). If you move the event listener code to a separate function, it will look like this:
4. Save the HTML and JavaScript files and open the HTML file in your browser. The image should now change when the focus and blur events occur on the <a> element.
Try This Summary
In this project, you used your knowledge of JavaScript, images, and events to create an image rollover that works with the mouseover, focus, mouseout, and blur events.
JavaScript and Frames
The decision of whether or not to use frames on your Web site is up to you. However, it should be noted that frames do have accessibility/usability issues. In fact, <frameset> and <frame> are no longer valid in HTML5. The <iframe> element (an inline frame) is still available.
Purpose of Frames
Frames divide a window into two or more separate areas (a frame set), each containing different content. This differs from tables in that the divisions in a frame set each contain a separate Hypertext Markup Language (HTML) document, and you can change one of the sections without affecting the other sections.
NOTE
Each frame shown on a Web page is actually a separate HTML document.
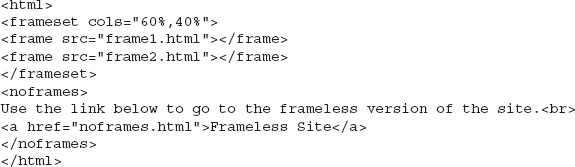
For example, Figure 15-3 shows a Web page with two frames. Each frame is actually a separate HTML document. The HTML document that creates the frames uses a set of <frameset> and </frameset> tags to create a frame set.

Figure 15-3 A frame set containing two frames
Accessing Frames
How do you access a frame in JavaScript? You can either use the frames array or name the frame and use the frame name instead. To begin, take a look at how to access a frame using the frames array.
The frames Array
You use the frames array to access frames based on their order in the source code. You will access one frame from within another frame, so you must be able to find the frame you want to access.
Recall that the frames array comes from the window object. Frames carry most of the same properties and methods as regular windows, but you access them differently. For instance, take a look at this code, which creates a frame set with two frames. Name it frameset1.html.
If you’re coding some script inside the first frame (frame1.html) and want to know the value of the location property in the second frame (frame2.html) to display it for the viewer, you must figure out how to access the second frame. To access the other frame, you need to find a way to get back to the main window and reference the frame. Recall that the window object’s top property allows you to access the topmost window in a frame set (the main window).
You can now use the frames array because you have access to that main window, which contains the code for the frame set. The frames array contains an item for each frame tag in the code. The count starts at 0, so to access the first frame in a frame set, you could use the following syntax:
Using the top property allows you to access the main window and the frameset code. Then, frames[0] is used to access the first frame in the source code. So, if you’re coding within the second frame and want to access the first frame, you would use this syntax:
Now, you can make the code in the second frame access the needed information in the first frame for the viewer. The following code is for the first frame (frame1.html):
To complete this script, you could use the following code for frame2.html:

Now you can see the result by opening the main window (frameset1.html). The right frame should tell you the location of the document used for the left frame. Figure 15-4 shows how this may appear in a browser. (Your location value will probably be different from the filename.)

Figure 15-4 The second frame shows information taken from the first frame.
Using a Frame Name
Another way to access one frame from another is to use the name of the frame (much like the way you used form names in the previous chapter). For example, this code gives each frame a name by adding the name attribute to the frame tag (call this frameset3.html):
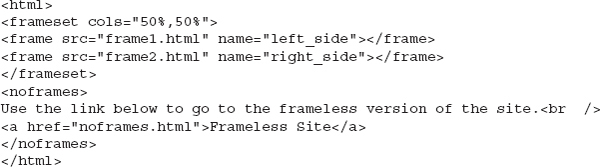
You can now access one of the frames from the other using the frame name rather than the frames array. Thus, if you want to access the second frame (right_side) from the first one, you could use this syntax:
In the same way, you could access the first frame from within the second frame with this syntax:
Now you can make each frame tell the viewer the location of the other frame by coding the frames with a short document.write() statement in each. The document for the first frame (frame1.html) could be coded like this:

After that, frame2.html could be coded as follows:

Each frame now gives out information about the other one.
NOTE
Frames and iframes have potential security risks when they are used. For more on these risks, see appliedlife.blogspot.com/2011/02/html-frames-and-security.html.
Breaking Out of Frames
Sometimes another Web site will code links that don’t break the user out of the site’s frames before arriving at your site. Your site is then left in a smaller portion of the viewer’s window with the navigation from the other site still showing in other frames. When this happens, you may want to offer your viewers a way to break out of the other site’s frames.
You can place a link on your page for viewers to click to break out of frames. You need to add a special target in the <a> tag, as shown here:
The target of _top tells the browser to use the full window when opening the URL in the link, rather than opening the link inside a frame. You just need to replace the URL in the tag with your own.
Debugging Scripts
Even though JavaScript is fun, sometimes it can also be quite frustrating. One error in the code can cause an entire script to run incorrectly or not run at all. Debugging a script can be a time-consuming and arduous process, but there are a few techniques you can use that may help save some time while looking over the code. The first step in debugging a script is to figure out what type of error is likely to be causing the problem.
Types of Errors
The two main types of errors are syntax errors and logical errors. A syntax error occurs when the coder forgets to add a semicolon, forgets a quotation mark, misspells a word, and so on. A logical error occurs when the code is implemented incorrectly.
For example, a while loop could go on infinitely if the condition for executing the loop never becomes false. While it may be coded with the correct syntax, the results won’t be what the programmer expected.
Find the Syntax Errors
A syntax error could be as simple as leaving out a necessary semicolon. For example, the following code is missing a semicolon between statements:
In this case, the semicolon is very important because the two statements are on the same line. To fix this, you just need to add the needed semicolon, as shown here:
Syntax errors often cause the browser to display an error message so that you can debug the script. For example, you might see a message like the one in Figure 15-5.

Figure 15-5 A JavaScript error message
NOTE
Most modern browsers hide these error messages by default, but you can enable them if you wish to view them.
These messages can help you figure out what’s causing the problem. The line number shown in the error message often tells you where the error is. For instance, if the message says the error is on line 15, you would start at the 15th line from the top of your document and see what’s there. The rest of the message might tell you what’s missing or what has been placed improperly.
However, sometimes the line stated in the message is not the line where the actual problem is located. It could be on the preceding line, a few lines away, or even somewhere else entirely. You may need to do a little searching to figure out where the problem started.
Scanning the Script
If the error message doesn’t help you locate the problem, you can try scanning the script for errors on your own. This solution can be more tedious, but it may help you find the problem if the error message isn’t helpful. Table 15-2 shows some items you should try to find.
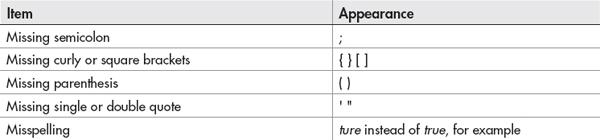
Table 15-2 Items to Look for When Scanning a Script for Errors
The following code is riddled with errors; see how many of them you can find.
The code is missing a number of necessary items. Following is the list of items you should have found:
• Between lines 3 and 4: The function is missing its opening curly bracket
• Line 4: The word alert is misspelled as alery; the double quote mark is missing after the word like; the mycar variable is misspelled as mynar
• Line 5: The alert method is missing a closing parenthesis
• Line 7: The word new is misspelled as neq
• Line 9: The array index number is missing its opening square bracket
• Line 10: The opening parenthesis for the loop is missing
• Line 11: The index number for somearray[0] is missing its closing square bracket
• Between lines 11 and 12: The closing curly bracket to end the loop is missing
You probably won’t make that many errors, but the example provides a nice way to see how to catch them while scanning a script. After you become more experienced with locating these small errors, you’ll be able to find them quickly when you have a problem in a script.
Find the Logical Errors
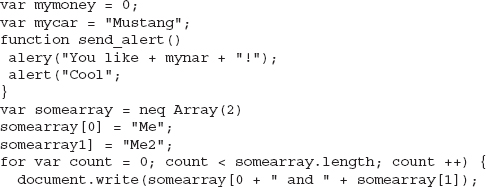
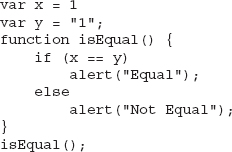
Logical errors are often tougher to find because the syntax of the code is correct. You will be trying to find a mistake in how the code was implemented. For example, look at the following code (but do not run it!):
The code has no syntax errors. All the semicolons and quote marks are where they should be. The problem here is that the variable x is never greater than the variable y. This situation would cause an infinite loop, possibly crashing the browser.
You can fix the code by adding a line inside the loop to increase the value of x, decrease the value of y, or both increase x and decrease y. The important point is that something must be done to make the condition false. The following code shows a possible fix for this problem:

Alerts and Using the Console
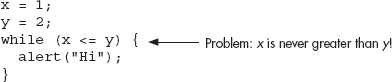
If there are values that don’t seem to be correct, they can be quickly checked at any point in the script by using an alert or sending the value to the console. For example, suppose you have the following code:
When run, the alert will display “Infinity”, which probably is not the intended result. With additional code between the initial variable definitions and the assignment of the calculation (x/y) to the z variable, it may be difficult to see that a division by zero is taking place while scanning the code. To find out where the error is, you could place an alert in the code prior to the calculation of the z variable to see if it can help you see what is happening, as in the following example:

When the alert shows that the calculation will be “2/0”, you can see that the y variable having a value of zero is causing the issue. Knowing that, you can now look for any lines of code that assign a value to the y variable to see if it results in y being given a value of zero. In this case, it happens on the second line of the code, and can be corrected by assigning a different value to y.
If you decide to add several checks, or simply do not want to have alert messages popping up with the values as the script runs, you may opt to use the console.log() method. This allows you to place a message in the console, which many modern browsers use to track errors, warnings, or other messages that occur when the HTML, CSS, and JavaScript code is read by the browser.
NOTE
It is best to remove your testing code when you are finished debugging, as it could cause errors or other issues with the script when run by the user.
The console can typically be displayed in a browser by looking in the “Tools” menu and looking for a menu option such as “Web Developer” or “Developer Tools”. For example, you can display the console in Firefox by opening the “Tools” menu, going to “Web Developer”, and selecting “Web Console”.
The script used previously can now be changed to display the message in the console, as in the following code:

The script will now log the message in the console, and will not bring up an alert. When you need to place multiple messages to check for values at various points in the script, this is a good way to obtain the necessary information without being overrun with pop-up alert messages.
Using a Lint Tool
Thanks to some expert Web developers, there are tools available that can assist you in finding JavaScript errors, while also encouraging the use of best practices in your JavaScript code. A lint tool (a tool that looks at the code for anything that might not be correct) can be very useful in tracking down any problems (or potential problems) in your code.
Two popular lint tools for JavaScript are listed here:
• JSLint (www.jslint.com)
• JSHint (www.jshint.com)
Both tools allow you to paste your JavaScript code into a text area and have it checked. The tools will check for various issues such as:
• Variables defined without the var statement (making them global)
• Missing semicolons
• Use of eval()
• == vs. ===
• Other issues
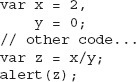
For example, suppose you had the following code:
There are some problems with this code that will give you unexpected results when the code is run. Running the code through JSLint, for example, will give you a number of errors. Included in the list are some important notes that will assist you in fixing the code:
• Line 1: Expected ';' and instead saw 'var'.
The end of Line 1 is missing a semicolon to complete the first var statement. Since these could be combined, the best practice would be to use a comma between the two variable definitions and remove the second var keyword, as in this code:
The end of Line 1 is missing a semicolon to complete the first var statement. Since these could be combined, the best practice would be to use a comma between the two variable definitions and remove the second var keyword, as in this code:
• Line 4: Expected '===' and instead saw '=='.
The comparison (x == y) could give an unexpected result here due to type coercion being performed. With x = 1 and y = “1”, JavaScript will evaluate x ==y to be true. If you intended to ensure both values were in fact the numeric value of 1, you would not want this to be the case. Using === is safer and avoids any potentially odd results:
The comparison (x == y) could give an unexpected result here due to type coercion being performed. With x = 1 and y = “1”, JavaScript will evaluate x ==y to be true. If you intended to ensure both values were in fact the numeric value of 1, you would not want this to be the case. Using === is safer and avoids any potentially odd results:
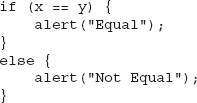
• Line 5: Expected '{' and instead saw 'alert'.
To avoid any potential pitfalls and make the purpose of the code easier to read, it is best to place brackets around if and else statements, even if they only contain one line of code (allowing the shortcut of not adding the brackets). This error is picked up for both the if and else statements, and can be fixed by adding the brackets to both:
To avoid any potential pitfalls and make the purpose of the code easier to read, it is best to place brackets around if and else statements, even if they only contain one line of code (allowing the shortcut of not adding the brackets). This error is picked up for both the if and else statements, and can be fixed by adding the brackets to both:
As you can see, a lint tool can pick up on potential problems before you run your code, keeping any remaining debugging tasks to a minimum. By following the suggestions of the tool for this code, you can avoid the number 1 being equal to the string 1, and you also allow the if and else statements to have additional lines of code added within each block without causing problems later (forcing you to figure out what happened and then add the brackets at that time).
Browser Developer Tools
Most of the major modern browsers have a set of developer tools that are available either natively or via an add-on. These tools can prove helpful in debugging JavaScript as well. Some links to tutorials on how to access/acquire and use some of these are provided here:
• Chrome Debugger www.nsbasic.com/app/tutorials/TT10.htm
• Firebug for Firefox https://getfirebug.com/javascript
• Internet Explorer Debugger blogs.msdn.com/b/cbowen/archive/2011/06/24/internet-explorer-9-developer-tools-deep-dive-part-3-debugging-javascript.aspx
Ask the Expert
Q: The error message I get says something I don’t understand. What should I do?
A: Error messages don’t always make sense and don’t always point to the right line in the code. You may need to trace any variables or functions you have called on the line that the message gave you or check the lines near it for errors. Once you’ve seen an error message a few times, its meaning becomes easier to figure out.
Q: Something in my code crashed the browser when I tried to run it, and I can’t try adding alerts to help find the problem because it crashes every time! What should I do?
A: If the script crashes the browser, look closely at your variables, loops, objects, and functions. You might also try a browser add-on, such as Firebug, which will allow you to set break points in the script as needed. As a last resort, write some new code from scratch.
Q: An error in my code crashed not only the browser, but also the computer! What do I do?
A: Restart the computer but do not run the code again. Check it very carefully to see if you can find the problem.
Q: Can any other strategies help me debug my scripts?
A: Some text editors use color coding to mark HTML tags, JavaScript code, or other types of code. Color coding helps you see the code more clearly and makes it easier to detect an error. (Try the Vim or NoteTab text editor.)
JavaScript and Accessibility
One topic you have seen many times in this book is how a script or HTML code for the script relates to accessibility. In some cases, such as Web sites of government agencies, a state or federal law (such as the Americans with Disabilities Act) might require that the Web site be accessible to viewers with disabilities. Even if it is not a legal issue for your Web site, it is still a usability issue: you will want as many visitors as possible to be able to use your site and access the information you have for them.
The general theme for accessibility is that content needs to be made accessible to all browsers and other software that may access a Web site. This means that your content should be readable not only by various Web browsers, but also by assistive technologies like screen reading software (for example, JAWS from Freedom Scientific), or Web browsing software on portable devices like cellular phones.
Separate Content from Presentation
Typically, the first step in making your Web site content accessible is to build the accessibility into your HTML/XHTML code, but you’ll also need to tweak your JavaScript code. As you may already know, when coding your HTML you can use Cascading Style Sheets (CSS) for presentation of the content (how many columns are displayed, the font style, the width of various divisions, and so forth) while using HTML to simply mark up the content itself (such as dividing it into sections with <div></div> tags or inserting objects like images). This takes care of issues dealing with plain HTML content because the use of a style sheet rather than HTML markup for presentation ensures that you can offer different CSS styles for different types of browsers, or that those not using browsers with CSS capabilities will still get the structural markup of the plain text (for example, there won’t be columns or font colors, and so on), which allows them to still view the content of the page.
With JavaScript, making the content accessible often means making sure that the content you use in your script is already displayed on the page or is available through a link or other means. One thing that may help is to move all JavaScript code (or as much as possible) into external JavaScript files while leaving as little JavaScript code in the HTML code as possible.
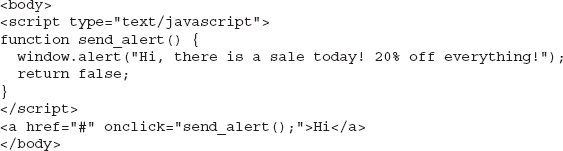
For example, you might have a Web page that uses the following code:
This code will function just fine for those with JavaScript. However, having the script in the HTML code makes for a lot of extra scrolling through the file when you need to update the HTML code (especially if you have a long script). Thus, the first move you may want to make is to move the script to an external file, as shown in the following code samples. First the new HTML code:

Next, the myscript.js JavaScript file:

This makes the HTML file shorter and easier to read because the JavaScript functionality is placed in its own file and out of the way of the HTML code.
The next move you may want to make is to change the use of the onclick event handler in the HTML tag. Though valid, it becomes troublesome if you decide to use a function with a different name or decide to make it a normal link without JavaScript, because you will need to update each HTML file to accommodate the change cleanly (you can simply change the script to have the new function use this function name or just do nothing when called, but this could be confusing for those who may need to update the code later). To get this onclick event handler out of the HTML code, you could rewrite the JavaScript slightly and give the anchor tag an id (much like what you have done earlier in this book). First, the updated HTML code:

Next, the myscript.js JavaScript file:

Now the HTML code has no JavaScript commands sprinkled in with it, just a call at the end to the external script. The anchor tag is given an id of sale, which can be used by the JavaScript code to capture the click event on that element. The JavaScript code now uses document.getElementById() to grab the anchor element and then assigns it a function to run when clicked.
The final note here is that the link simply does nothing for those without JavaScript. Since the content of the alert is something you need the visitor to know (so that they will know there is a sale), you will want to be sure that even those visitors without JavaScript can get this message. You can either display it elsewhere on the page, use a set of <noscript></noscript> tags to display the message inline, or code the link so that it leads to an HTML page with the message, as in the following code:

Then, you can place your message in a file named sale_alert.html:
This ensures that all users can access the message with or without JavaScript.
Enhancing Content
One technique for ensuring wide accessibility that has become widely used is one that provides the content for the viewer first, then uses JavaScript to make the experience more appealing for those who can run it. This is typically called “progressive enhancement” and allows all viewers to use the site while providing a richer experience for those with modern browsers.
This is what you did (on a small scale) with the script in the previous section. By offering the “sale” message when the link is clicked, you made it accessible to all viewers. However, those with JavaScript were able to view the alert without leaving the page and needing to go back, enhancing their experience somewhat.
This process can be simple, as in the previous example, or it can be as complex as adding a lot of JavaScript code to work with various browsers and/or adding server-side scripting to aid those without JavaScript. You can learn more about progressive enhancement at http://developer.yahoo.com/yui/articles/gbs/#progressive-enhancement. Yahoo! has a very detailed and organized system of progressive enhancement that allows the JavaScript code to work with as many browsers as possible, but also provides server-side scripts or HTML content for those without JavaScript.
TIP
For information on accessibility with JavaScript and forms, refer to Chapter 14, which discusses this topic and the use of forms with JavaScript.
| Try This 15-2 | Make This Code Accessible |
 |
To practice making JavaScript more accessible, you will take an HTML page and work with it to separate the JavaScript and HTML code as much as possible. You’ll also use code that ensures that those without JavaScript can also obtain any additional content. |
Step by Step
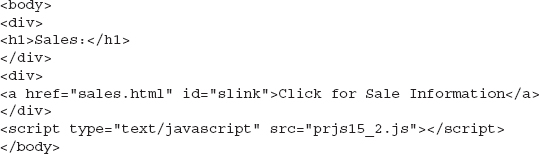
1. Create an HTML document named pr15_2.html and use the following HTML code for the body section:
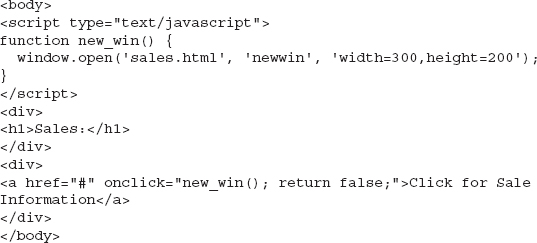
2. Create an HTML document named sales.html and use the following HTML code for the body section:

3. Make the code accessible and usable for those without JavaScript by making any necessary adjustments and moving as much JavaScript code as possible to a JavaScript file named prjs15_2.js.
4. One possible solution is shown in the following HTML code (for pr15_2.html) and the JavaScript code (for prjs15_2.js).
HTML Code:
JavaScript Code:

5. Save the HTML and JavaScript files and open the HTML file in your browser. The content should now be accessible in any browser with which you choose to open the page.
Try This Summary
In this project, you used your knowledge of accessibility to make a document and script more accessible for the viewer.
JavaScript Security
You may have noticed that when you try to use the window.close() method on the main browser window, a confirmation box appears asking if you really want to allow the window to be closed. This situation is one of the issues of JavaScript security. The browser does not want a site to close a window that the viewer opened without permission from the viewer. If that were allowed, the programmer would have some control of the viewer’s computer, which could be a problem.
Another aspect of security is the mistaken belief that you can “protect” Web pages with passwords or keep the source code of the page from being viewed by a user.
Yet another aspect of security is protecting against cross-site scripting, the use of JavaScript to grab information from a server-side application that didn’t properly filter user input.
Security and Signed Scripts
To get viewer permission to close the main browser window or to use certain properties or methods in JavaScript, you must use signed scripts. Signed scripts will open up some more JavaScript features, but you must do some additional work.
Basically, you digitally sign the script using a special tool. The viewer then gets a message when entering the page that asks whether to allow the signed script, with some information about the signed script. If the viewer accepts, then you will be able to use the additional features. If not, you’ll need to have alternative code ready to avoid JavaScript errors.
For further information about this subject, go to the Web site www.mozilla.org/projects/security/components/signed-scripts.html.
Page Protection
Many scripts attempt to keep viewers out in some way, such as by using password protection or by using a “no-right-click” script to keep the source code of the page from being viewed.
However, these security strategies are largely ineffective because these “password” and “no-right-click” scripts can often be bypassed by turning off JavaScript or by doing a little extra work.
Passwords
Some password systems are better than others, but none really seems to offer true Web page security. If you don’t want someone to view a page, much better methods exist than using a JavaScript system, such as using server-side languages or using certain setups on your Web server.
If you are on a free Web-hosting service, the better methods may or may not be available. However, keep in mind that a JavaScript password system is not foolproof and that you should not protect anything important with such a system.
Hiding Web Page Source Code
Many people would love to hide the source code of a Web page. However, JavaScript isn’t going to do the trick. A number of scripts try various means of disabling the right-click. Basically, these strategies don’t work because they can be bypassed in a couple of ways:
• If the right-click is disabled, you can always try selecting View | View Source.
• If the preceding method does not work, you can always turn off JavaScript or look in your cache folder on your computer. The browser must have the code to display the page, so a copy of it goes into the browser’s cache.
In the long run, these scripts just make viewing the source code more difficult (and they can be annoying). For more information about this topic, go to http://webhome.idirect.com/~bowers/copy/copy1.htm.
Cross-Site Scripting
Cross-site scripting (often shortened to XSS) uses JavaScript code (or other types of code) in a malicious way to obtain information from users of various Web sites with vulnerable applications. With this information, a person can use someone else’s cookie or session information and access the Web site as though they were the user from whom they obtained the information. This, of course, can lead to big trouble, especially if that user is an administrator in that application or if the application deals with money (such as a banking or shopping application).
While JavaScript is one of the ways used to perform such an attack, the vulnerable application is usually one that is server-side and displays user input on the page. If the user input is not sanitized (validated) in the server-side application, then any number of possible malicious scripts could be entered instead of the expected input.
For example, you might have a form that uses a server-side script to allow people to send comments. The script displays the comment the user submitted back to the user as a confirmation. If the input is not sanitized, it is possible to enter something like this into the comments field: <script>alert(“You’ve been had!”);</script>. If someone submits this and sees an alert on the response page, the person will know there is a potential vulnerability and could simply direct a subsequent user to a malicious URL where the user’s cookie or session information can be taken. Figure 15-6 shows how a vulnerable application would display such an alert (this one also included some comment text to help disguise the intent of the person submitting the form).
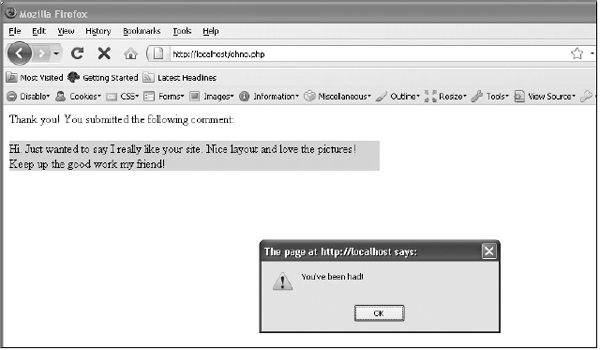
Figure 15-6 Oh no! This would not be good for users of this Web site!
Cross-site scripting has evolved over the years. In the beginning, it was that a bad Web site could load a good Web site in a frame (or in a pop-up browser window) and then access the text boxes, cookies, and other data (user id and password) using JavaScript—thus the name “cross site.” It should be noted that modern browsers, within the past four or five years, don’t allow this type of cross-site scripting. One domain cannot access the contents of a different domain. Most of the modern cross-site scripting attacks are injection attacks like the example here (though often much more complex).
This introduction just scratches the surface of this type of security issue. The main thing to remember is that when you are using server-side applications, you must sanitize any user input to be sure that you receive the type of input you expect. For more information on this topic, go to www.owasp.org/index.php/Cross_site_scripting.
AJAX and JSON
AJAX provides a method of obtaining data from a server-side script using the XMLHttpRequest object. The data obtained can be returned as a usable JavaScript value such as an array or object by using JSON. Both of these are explained in more detail in the following sections.
AJAX
AJAX stands for Asynchronous JavaScript and XML, which is a way JavaScript can obtain data from a server-side file or application without the need to reload a page. For example, a synchronous request to the Web server requires that the current page be reloaded to use the new information. An asynchronous request allows the information to be obtained and used without the need to wait for the entire page to reload.
The data obtained from the server can be any number of things (for example, a text file, an XML file, the result of running a server-side script). The value returned does not actually need to be in XML format, in spite of the AJAX terminology. This gives you a lot of flexibility as to how you can retrieve the data you need.
This type of scripting is useful in progressive enhancement, as it allows applications to enhance the user experience for those with JavaScript enabled in modern browsers. Instead of waiting for a page to load again, the information can be obtained and used on-the-fly.
The XMLHttpRequest Object
In JavaScript, an XMLHttpRequest object is created, which can then be used to make HTTP requests to the server in the background and allow the user to continue using the application without interruption. This object is often referred to as XHR in text as a shorthand for the full object name (XMLHttpRequest).
To create an XHR object, you simply use its constructor, as shown in the following code:
This object is available in most modern browsers. In Internet Explorer versions before version 7, you would need to create an ActiveX object. Workarounds for earlier versions of Internet Explorer can be found on the Web, such as the one at github.com/ilinsky/xmlhttprequest. If you do not need the functionality in older browsers, you can use the standard constructor.
The open() and send() Methods
The open() method allows you to prepare a request to be sent to the server. It takes three arguments: the request method (for example, “get” or “post”), the URL to open, and a Boolean value (true if the request is to be asynchronous and false if the request is to be synchronous). So, to use the “get” method to open a PHP script named get_info.php as an asynchronous request, you could use the following code:
Now that the request is prepared, you can send it using the send() method. The send() method takes one argument, which is data to be sent as part of the request. If you are using a “get” request, you can simply use null as the argument, as in the following code:
This will send the request to the server. Once the request has been sent, you will need to wait for a status to be returned and for the data to be received to complete transmission.
The status Property, the readystatechange Event, and the responseText Property
The first thing you will need to know when trying to retrieve data from the server is whether or not the request received a valid response from the server. This can be determined using the status property. Basically, any status code in the 200 range is a successful response. Also, a status code of 304 is successful, since data will be available from the browser cache.
To see what data is returned, you can use the responseText property (or, if using a response MIME type of “text/xml” or “application/xml”, the responseXML property can be used). If the get_info.php PHP script is expected to return a string of data, then that data will be available in the responseText property.
Finally, for an asynchronous request, you will want to be able to determine when the data you are trying to retrieve is available for use. This is done using the readystatechange event. This event is fired whenever an update occurs to the readyState property of your XHR object. The readyState property can have the following values:
• 0 – Uninitialized. The open() method has not been called.
• 1 – Open. The open() method has been called.
• 2 – Sent. The send() method has been called.
• 3 – Receiving. Data has been received, but is still not complete.
• 4 – Complete. All of the data has been received and can be used.
For most applications, you only need to worry about whether the response code is 4, since you won’t do anything until you have all of the data.
To send a request and receive data, you need to put all of this together. The request needs to be open and sent, a good response status is needed, and you need to know when the value of readyState is equal to 4 by using the onreadystatechange event. This can be accomplished using the following code:
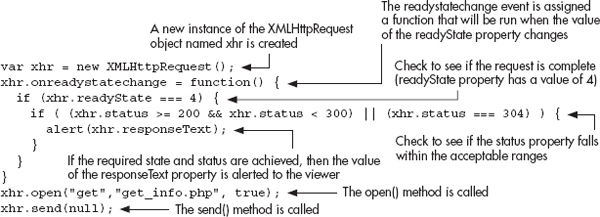
A couple of notes on this code: due to browser compatibility issues, the DOM 0 method of handling the readystatechange event is used, and the open() and send() methods are called after the function that handles the readystatechange event. These two things help to minimize the risk of unexpected errors occurring in various browsers. If the response passes all of the tests, then the user receives an alert with the text received from the PHP script.
The text received in the responseText property can be anything from a simple value to a complex string of data. Whether the script returns “John” or “x=34&y=25&z=50”, that value will be placed in the responseText property.
Note that since this is a beginner’s guide, you will use “get” requests to retrieve data and won’t change the HTTP headers. For additional details on these features of AJAX, see the “Further Reading” section later in this chapter.
An Example AJAX Script
The best way to show how the response data is created is to apply an example. Suppose you had the following HTML to create a simple poll:
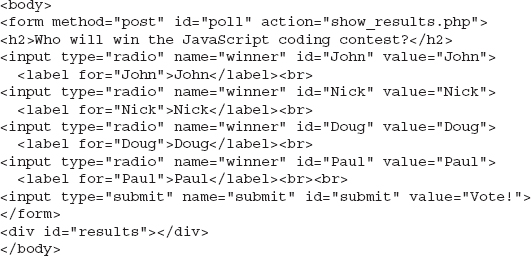
In this case, the form action will be a separate PHP script that will run if JavaScript is not available. If JavaScript is available, you will call a script named get_winner.php in your AJAX code.
The get_winner.php will be a server-side application that returns data. This could be results from a database query, a calculation, or any other task a server-side application can perform. In this case, the script is going to add your vote to a database and query the database for the person who has the most votes, declaring that person the current winner of the poll. Since server-side programming is beyond the scope of this book, the get_winner.php script will be shortened to describe its purpose. Here is the script:

Here, a function is run to determine the value of the $winner variable from the database. The echo command sends a string of text as a response. If this were run as a standalone script, the string would simply be written in the browser window. When responding to an XHR request, however, this string is returned to the JavaScript application as the value of the responseText property. You can now make use of this data returned from the server-side application in JavaScript!
NOTE
When you’re using a server-side application to return data, it does not need to be written in PHP. Any server-side language (for example, Perl, ASP, Python, Java) can be used based on your background and server setup.
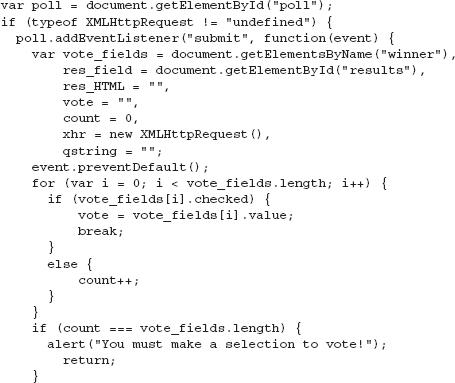
With this in mind, the bulk of the remaining work is performed in your JavaScript code. Since you want to display the current winner, the value returned for the responseText property will give you the data you need. Here is the JavaScript code to retrieve and use the information from the get_winner.php script:

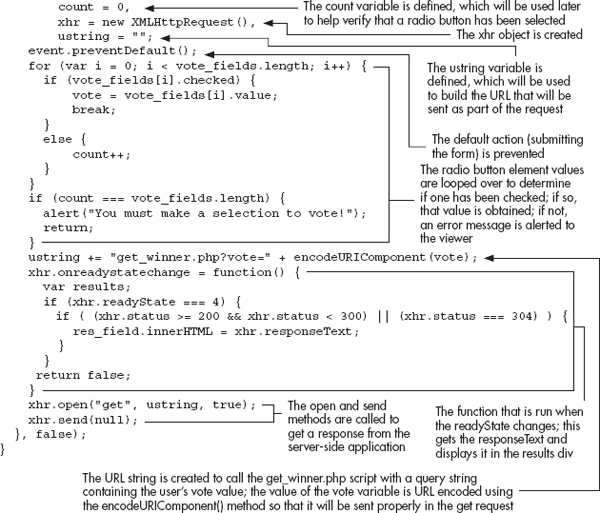
This looks like quite a long process, but most of it is preparing the user’s vote to be sent (checking that a selection was made before submitting, and so on). This obtains the user’s vote, which is stored in the vote variable. This variable is then used as part of a query string that will be added to the URL when get_winner.php is called. For example, if the user voted for “Paul”, then the URL sent to the server in this case would be “get_winner.php?vote=Paul”. Notice that the encodeURIComponent() method is used on the vote variable, which ensures that the value can be part of a valid URL. This will give the PHP script the data it needs to add that vote to the database. The remainder of the script uses what you learned in this chapter to obtain the data (the current winner of the poll). Since the data is already in the desired format, the results div innerHTML is updated to show the current poll winner. Figure 15-7 shows how the HTML page appears initially, while Figure 15-8 shows how the page appears when the result is displayed.
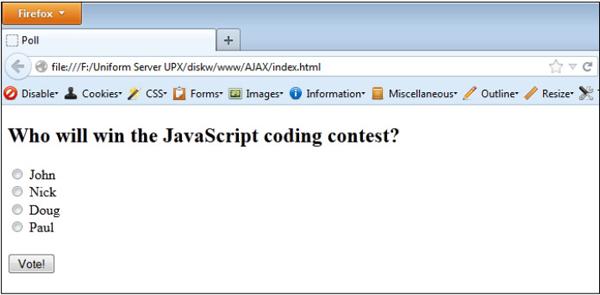
Figure 15-7 The initial HTML page
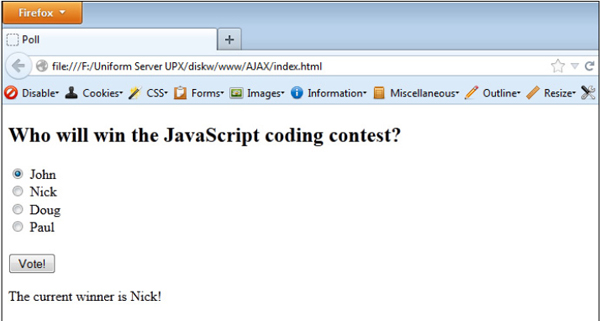
Figure 15-8 The page after retrieving the data
This script conveniently returned a simple text string, but you may wish to have more data returned that you could use to display more detailed results. Returning this data could result in a string that you have to break apart to get the values (for example, “John=2&Nick=34&Doug=32&Paul=25”). This can be used, but it would be even better if this data could be returned in a format that JavaScript could use more easily. JSON makes this possible, and is discussed in more detail shortly.
Further Reading
More information on AJAX and how to use it in your applications can be found at the following Web sites:
JSON
JSON stands for JavaScript Object Notation. It is a data format that can be used in numerous programming languages, which makes it a perfect companion when making use of AJAX. If you send JSON data to a server-side application, most of these languages have JSON parsers that can take the information and place it in a usable form in that language—be it a value, array, object, and so on. When sending JSON data back to JavaScript, it can easily be used either via the JSON object (newer browsers) or with a JavaScript JSON parser (older browsers).
JSON Object or JSON Parser?
Most modern browsers support the JSON object: Firefox 3.5+, Internet Explorer 8+, Chrome, and others. If you need to use JSON data in JavaScript in older browsers, you can get a parser written by Douglas Crockford at github.com/douglascrockford/JSON-js.
JSON Formatting
Often, you will send or receive an array or object containing data. JSON formatting simply takes the array literal and object literal notation from JavaScript. For example, an array in JSON format could look like this:
Notice that this is not assigned to a variable; it is simply the data itself that is passed along in JSON format. The JSON object or JSON parser will convert the data to the desired format for the language that makes use of the information.
For objects, JSON also requires quotes around all strings, including property names. For example, a JavaScript object could look like this:
In JSON format, the property names would also need to be quoted, as in the following code:
Notice that the property names are also quoted in this case. So, if you need to write or parse JSON data, keep these rules in mind to avoid errors sending or receiving the data.
Using the JSON Object
The JSON object has two methods: stringify() to send JSON data to another application and parse() to turn JSON data into JavaScript values. For example, if you were going to send data from JavaScript to another application, you could convert it into JSON format easily using JSON.stringify(), as in the following code:
The j_data variable could then be sent via the send() method once you have an XHR object.
When receiving JSON data, you would use the JSON.parse() method to convert the data from JSON format into usable JavaScript values. For example, suppose you are receiving the following JSON data in JavaScript:
If this JSON data were read into the responseText of an XHR object named xhr, you could convert this data into a usable JavaScript object, as in the following code:
The info object would now be created, which would be the same as if you had written this code:
With this ability to quickly convert data into a usable JavaScript value, JSON can make data collection and use much easier for your AJAX scripts.
AJAX and JSON Example
Suppose you wanted to change your AJAX script from earlier in the chapter, which displayed the current winner of the poll. Instead of just displaying the current winner, you would like to show all of the current results. Recall that without JSON, you would need to send back and parse a string of names/values or an XML document from the server-side application. With JSON, you could simply send back the data in JSON format, where you could then quickly use the parse() method to make it usable JavaScript.
Here, you will use the same HTML code, a PHP script named get_results.php, and will alter your JavaScript code to make use of JSON data.
First, the PHP script: It will add your vote to the database, then retrieve the current results from the database, then send those results back to JavaScript in JSON format. Here is the example:

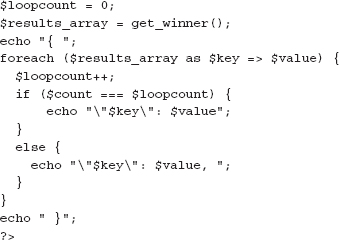
In summary, this will send back a string of JSON data to your JavaScript application (here the JSON string is built, but PHP has methods for converting PHP objects to JSON as well), which could look like the following:
You can now alter your JavaScript code to show the names and vote totals for each of the people in the poll. Here is the updated JavaScript code:
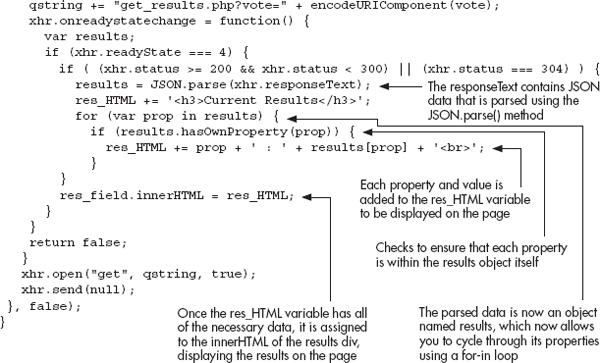
Here, you are able to simply parse the responseText to obtain a usable JavaScript object named results. A for-in loop cycles through each of the object’s properties, which are the names of each person in the poll. The property names and values are then added to a variable named res_HTML, which is then displayed as the innerHTML of the results div on the HTML page.
With the ability to easily use data obtained from a server-side application, you can enhance your scripts to provide your users more options without the need to reload the entire page to get results.
Further Reading
More information on JSON is available from the following Web sites:
Chapter 15 Self Test
1. __________ divide a window into two or more separate areas, each containing different content.
2. Frames differ from tables because the divisions in a frame set contain separate _________ documents.
3. The __________ tags are used to create a frame set.
4. A single frame is created with the __________ tags.
5. The __________ attribute divides a frame set into columns.
6. The __________ property of an <img> element allows you to change an image.
7. What are two methods that can be used to access frames?
A. The frames array or a frame name
B. The frame array or a frame name
C. The frames array or a special code
D. There is only one way to do it
8. Using JavaScript, you can get information from the server.
A. True
B. False
9. Which of the following is a valid Lint tool for JavaScript?
A. jsChecker
B. JavaScript Linter
C. jsLint
D. <Script> the Web
10. What two methods can be used to test JavaScript values when debugging?
A. test() and show()
B. alert() and console.log()
C. print() and show()
D. None of the above.
11. What is used to access the main window so that you can access another frame?
A. top
B. self
C. window
D. this
12. What object allows you to get data from the server in JavaScript?
A. XMLServerRequest
B. XMLHttpRequest
C. JSONRequest
D. XMLFileGet
13. _________ stands for Asynchronous JavaScript and XML.
14. JavaScript can retrieve data from the server other than an XML document.
A. True
B. False
15. The acronym for JavaScript Object notation is __________.
..................Content has been hidden....................
You can't read the all page of ebook, please click here login for view all page.