
In the previous chapter, you had a powerful introduction to Apache Cordova. In this chapter, you will develop, build, and deploy your first Apache Cordova application from scratch. The application you will develop is a Sound Recorder utility that you can use to record your voice or any sound and play it back. In this chapter, you will learn about the following topics:
- Generating your initial Apache Cordova project artifacts by utilizing the Apache Cordova Command-line Interface (CLI)
- Developing and building your mobile application from the initial Cordova generated code
- Deploying your developed mobile application to a real Android mobile device to see your application in action
In order to create, develop, build, and test a Cordova application, you first need to use the Cordova CLI. Using this, you can create new Apache Cordova project(s), build them on mobile platforms such as iOS, Android, Windows Phone, and so on, and run them on real devices or within emulators. Note that in this chapter, we will focus on deploying our Sound Recorder application in Android devices only.
Before installing Apache Cordova CLI, you need to make sure that you install the following software:
- Target platform SDK: For Android, you can download its SDK from http://developer.android.com/sdk/index.html (for other platforms, you need to download and install their corresponding SDKs)
- Node.js: This is accessible at http://nodejs.org and can be downloaded and installed from http://nodejs.org/download/
Tip
If you want to know more about the details of configuring Android, iOS, and Windows Phone environments in your development machine, refer to Chapter 3, Apache Cordova Development Tools.
After installing Node.js, you should be able to run Node.js or node package manager (npm) from the command line. In order to install Apache Cordova using npm, run the following command (you can omit sudo if you are working in a Windows environment):
> sudo npm install -g cordova
It's worth mentioning that npm is the official package manager for Node.js and it is written completely in JavaScript. npm is a tool that allows users to install Node.js modules, which are available in the npm registry.
Tip
The sudo command allows a privileged Unix user to execute a command as the super user, or as any other user, according to the sudoers file. The sudo command, by default, requires you to authenticate with a password. Once you are authenticated, you can use the command without a password, by default, for 5 minutes.
After successfully installing Apache Cordova (Version 3.4.0), you should be able to execute Apache Cordova commands from the command line, for example, the following command will show you the current installed version of Apache Cordova:
> cordova -version
In order to execute the Cordova commands without any problem, you also need to have Apache Ant installed and configured in your operating system.
You can download Apache Ant from http://ant.apache.org. The complete instructions on how to install Ant are mentioned at https://ant.apache.org/manual/install.html.
After installing Apache Cordova, we can start creating our Sound Recorder project by executing the following command:
> cordova create soundRecorder com.jsmobile.soundrecorder SoundRecorder
After successfully executing this command, you will find a message similar to the following one (note that the location path will be different on your machine):
Creating a new cordova project with name "SoundRecorder" and id "com.jsmobile.soundrecorder" at location "/Users/xyz/projects/soundRecorder"
If we analyze the cordova create command, we will find that its first parameter represents the path of your project. In this command, a soundRecorder directory will be generated for your project under the directory from which the cordova create command is executed. The second and third parameters are optional. The second parameter, com.jsmobile.soundrecorder, provides your project's namespace (it should be noted that in Android projects, this namespace will be translated to a Java package with this name), and the last parameter, SoundRecorder, provides the application's display text. You can edit both these values in the config.xml configuration file later, which will be illustrated soon.
The following screenshot shows our SoundRecorder project's generated artifacts:
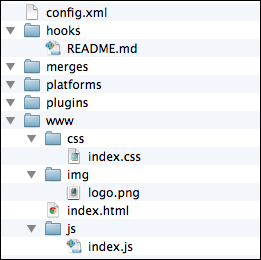
As shown in the preceding screenshot, the generated Apache Cordova project contains the following main directories and files:
www: This directory includes your application's HTML, JavaScript, and CSS code. You will also find the application's starting page (index.html), along with various subdirectories, which are as follows:config.xml: This file contains the application configuration. The following code snippet shows the initial code of theconfig.xmlfile:<?xml version='1.0' encoding='utf-8'?> <widget id="com.jsmobile.soundrecorder" version="0.0.1" xmlns="http://www.w3.org/ns/widgets" xmlns:cdv="http://cordova.apache.org/ns/1.0"> <name>SoundRecorder</name> <description> A sample Apache Cordova application that responds to the deviceready event. </description> <author email="[email protected]" href="http://cordova.io"> Apache Cordova Team </author> <content src="index.html" /> <access origin="*" /> </widget>As shown in the preceding
config.xmlfile,config.xmlcontains the following elements that are available on all the supported Apache Cordova platforms:- The
<widget>element'sidattribute represents the application's namespace identifier as specified in ourcordova createcommand, and the<widget>element'sversionattribute represents its full version number in the form ofmajor.minor.patch. - The
<name>element specifies the application's name. - The
<description>and<author>elements specify the application's description and author, respectively. - The
<content>element (which is optional) specifies the application's starting page that is placed directly under thewwwdirectory. The default value isindex.html. - The
<access>element(s) defines the set of external domains that the application is allowed to access. The default value is*, which means that the application is allowed to access any external server(s).Tip
Specifying the
<access>element's origin to*is fine during application development, but it is considered a bad practice in production due to security concerns. Note that before moving your application to production, you should review its whitelist and declare its access to specific network domains and subdomains.
There is another element that is not included in the default
config.xml, and this is the<preference>element. The<preference>element(s) can be used to set the different preferences of the Cordova application and can work on all or a subset of the Apache Cordova-supported platforms. Take the example of the following code:<preference name="Fullscreen" value="true" /> <preference name="HideKeyboardFormAccessoryBar" value="true"/>
If the
Fullscreenpreference is set totrue, it means that the application will be in fullscreen mode on all Cordova-supported platforms (by default, this option is set tofalse). It is important to note that not all preferences work on all Cordova-supported platforms. Consider the following example:If the
HideKeyboardFormAccessoryBarpreference is set totrue, then the additional helper toolbar, which appears above the device keyboard, will be hidden. This preference works only on iOS and BlackBerry platforms.- The
platforms: This directory includes the application's supported platforms. After adding a new platform using Apache Cordova CLI, you will find a newly created directory that contains the platform-specific generated code under theplatformsdirectory. Theplatformsdirectory is initially empty because we have not added any platforms yet. We will add support to the Android platform in the next step.plugins: This directory includes your application's used plugins. If you aren't already aware, a plugin is the mechanism to access the device's native functions in Apache Cordova. After adding a plugin (such as theMediaplugin) to the project, you will find a newly created directory under thepluginsdirectory, which contains the plugin code. Note that we will add three plugins in our Sound Recorder application example.merges: This directory can be used to override the common resources under thewwwdirectory. The files placed under themerges/[platform]directory will override the matching files (or add new files) under thewwwdirectory for the specified platform (the[platform]value can be iOS, Android, or any other valid supported platform).hooks: This directory contains scripts that can be used to customize Apache Cordova commands. A hook is a piece of code that executes before and/or after the Apache Cordova command runs.
If we look in the
www directory, we will find that it contains the following three files:
index.html: This file is placed under the application'swwwdirectory, and it contains the HTML content of the application pageindex.js: This file is placed under thewww/jsdirectory, and it contains a simple JavaScript logic that we will illustrate soonindex.css: This file is placed under thewww/cssdirectory, and it contains the style classes of the HTML elements
The following code snippet includes the most important part of the index.html page:
<div class="app">
    <h1>Apache Cordova</h1>
    <div id="deviceready" class="blink">
        <p class="event listening">Connecting to Device</p>
        <p class="event received">Device is Ready</p>
    </div>
</div>
<script type="text/javascript" src="cordova.js"></script>
<script type="text/javascript" src="js/index.js"></script>
<script type="text/javascript">
    app.initialize();
</script>
The index.html page has a single div "app", which contains a child div "deviceready". The "deviceready" div has two paragraph elements, the "event listening" and "event received" paragraphs. The "event received" paragraph is initially hidden as indicated by index.css:
.event.received {
    background-color:#4B946A;
    display:none;
}
In the index.html page, there are two main JavaScript-included files, as follows:
cordova.js: This file contains Apache Cordova JavaScript APIsindex.js: This file contains the application's simple logic
Finally, the index.html page calls the initialize() method of the app object. Let's see the details of the app object in index.js:
var app = {
    initialize: function() {
        this.bindEvents();
    },
    bindEvents: function() {
        document.addEventListener('deviceready', this.onDeviceReady, false);
    },
    onDeviceReady: function() {
        app.receivedEvent('deviceready'),
    },
    receivedEvent: function(id) {
        var parentElement = document.getElementById(id);
        var listeningElement = parentElement.querySelector('.listening'),
        var receivedElement = parentElement.querySelector('.received'),

        listeningElement.setAttribute('style', 'display:none;'),
        receivedElement.setAttribute('style', 'display:block;'),

        console.log('Received Event: ' + id);
    }
};
The initialize() method calls the
bindEvents() method, which adds an event listener for the 'deviceready' event. When the device is ready, the onDeviceReady() method is called, and this in turn calls the receivedEvent() method of the app object.
In the
receivedEvent() method, the "event listening" paragraph is hidden and the "event received" paragraph is shown to the user. This is to display the Device is Ready message to the user once Apache Cordova is fully loaded.
Now you have an Apache Cordova project that has common cross-platform code, so we need to generate a platform-specific code in order to deploy our code on a real device. To generate Android platform code, you need to add the Android platform as follows:
> cd soundRecorder
> cordova platform add android
In order to add any platform, you need to execute the cordova platform command from the application directory. Note that in order to execute the cordova platform command without problems, you need to perform the following instructions:
- Have Apache Ant installed and configured in your operating system as described in the Installing Apache Cordova section
- Make sure that the path to your Android SDK platform tools and the tools directory are added to your operating system's
PATHenvironment variable
After executing the cordova platform add command, you will find a new subdirectory Android added under the soundRecorder/platforms directory. In order to build the project, use the following command:
> cordova build
Finally, you can run and test the generated Android project in the emulator by executing the following command:
> cordova emulate android
You might see the ERROR: No emulator images (avds) found message flash if no Android AVDs are available in your operating system. So, make sure you create one!
Tip
Refer to the Creating an Android virtual device section in Chapter 3, Apache Cordova Development Tools, to know how to create an Android AVD.
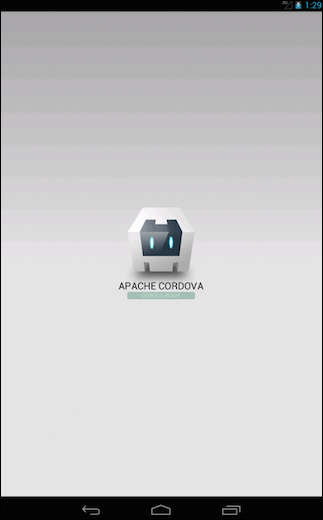
The following screenshot shows our Sound Recorder application's initial screen:
It is recommended that you make your code changes in the root www directory, and not in the platforms/android/assets/www directory (especially if you are targeting multiple platforms) as the platforms directory will be overridden every time you execute the cordova build command, unless you are willing to use Apache Cordova CLI to initialize the project for a single platform only.