
Now, let's see Jasmine in action. In the following sections, we will illustrate a Cordova mobile app (weather application), which we will develop its tests using Jasmine. We will see how to test both the synchronous and asynchronous JavaScript code of the app, automate running our developed Jasmine tests using Karma, run our tests on the mobile device browser, generate test and code coverage reports, and finally, fully automate our tests by integrating our developed tests with CI tools.
The main purpose of the weather application is to allow its users to know the current weather information of a specified place. It has two main views; the first view represents First Time login, which appears to the users for their first login time, as shown in the following screenshot:
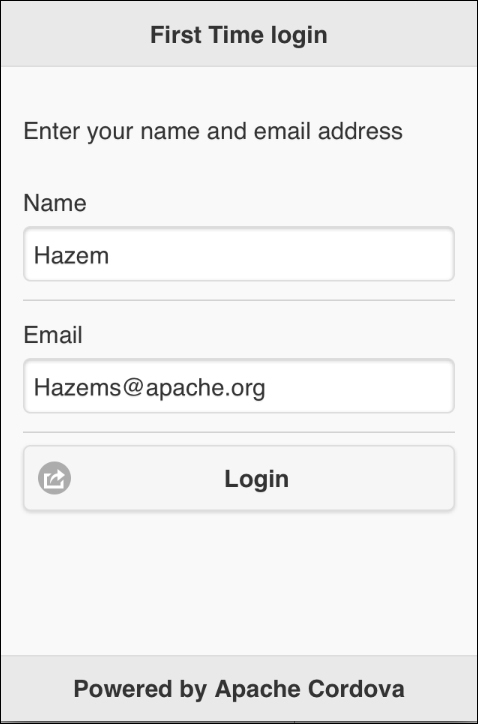
Weather application's first time login
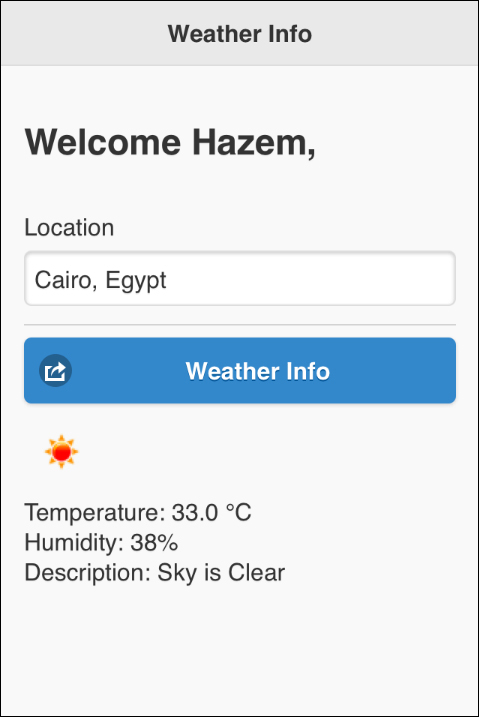
After entering the valid information and clicking on the Login button, the user will be forwarded to the weather information page. On the weather information page, the user can enter the place information and then click on the Weather Info button to get the current weather information, as shown in the following screenshot:
Again, pretty obvious
After entering valid information on the First Time login page and clicking on the Login button, if the user exits the app and opens it again, the user will automatically be forwarded to the weather information page with his/her name displayed in the welcome message.
In order to create weather application from CLI, we run the following cordova create command:
> cordova create weather com.jsmobile.weather Weather
We run the usual cordova platform add commands from the app directory to add the platforms we want to support as follows:
> cd weather
> cordova platform add ios
Finally, we can build our app using the cordova build command as follows:
> cordova build
Now, let's examine the structure of our weather application code. The following screenshot shows our weather application hierarchy:
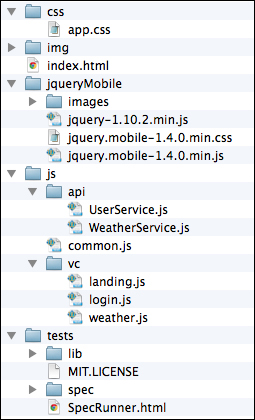
The www directory contains the following files and subdirectories:
css: This directory contains the custom application's Cascading Style Sheet (CSS).jqueryMobile: This directory contains the jQuery Mobile framework files.js: This directory contains all the application JavaScript code. It has two subdirectories:api: This directory contains the app services.vc: This directory contains the app view controllers, which register and implement the event handlers of every page and its user interface components. An event handler usually calls one or more app services in order to perform an action and optionally display the returned results on an app page.
tests: This directory contains the tests of app services, which are implemented using Jasmine.
The
js directory also includes common.js file, which includes the common app utilities. Under the www directory, the index.html file contains all of the app pages, and finally, the img directory can contain any app's custom images.
The index.html file contains the following pages:
"landing": This page displays a loading message to the user in the app startup and forwards the user to either the First Time login page if the user has not logged in to the app before or to the weather information page if the user is already registered."login": This page displays a form that includes the username and e-mail input fields and a Login button. The"login"page allows the users to enter their information while they are accessing the app for the first time. If the users enter valid information on the"login"page and clicks on the Login button, the users will not be introduced to this page during their next visit."weather": This page allows the user to enter information about a place and then click on the Weather Info button to find out the current weather information of the place entered.
The following code snippet shows the "login" page:
<div data-role="page" id="login">
    <div data-role="header" data-position="fixed">
        <h1>First Time login</h1>
    </div>
    <div data-role="content">
        <p>Enter your name and email address</p>
        <form id="loginForm">
            <div class="ui-field-contain">
                <label for="userName">Name</label>
                <input type="text" id="userName"></input>
            </div>
            <div class="ui-field-contain">
                <label for="userEmail">Email</label>
                <input type="text" id="userEmail"></input>
            </div>

            <input type="button" id="loginUser" data-icon="action" value="Login"/>

            <div id="loginFormMessages" class="error"></div>
        </form>
    </div>
    <div data-role="footer" data-position="fixed">
        <h1>Powered by Apache Cordova</h1>
    </div>
</div>
As shown in the preceding "login" page, it contains the following:
- A page header and page footer
- Page content that includes the following main elements:
"userName": This input field is used to enter the username"userEmail": This input field is used to enter the user's e-mail"loginUser": This button is used to save the user information and then go to the weather information page"loginFormMessages": This div is used to display the error messages on the login page
The following code snippet shows the "login" page view controller JavaScript object that includes the event handlers of the page (login.js):
(function() {
    var userService = UserService.getInstance();

    $(document).on("pageinit", "#login", function(e) {
        e.preventDefault();

        $("#loginUser").on("tap", function(e) {
            e.preventDefault();

            try {
                userService.saveUser({
                    'name': $("#userName").val(),
                    'email': $("#userEmail").val(),
                });

                $.mobile.changePage("#weather");
            } catch (exception) {
                $("#loginFormMessages").html(exception.message);
            }
        });
    });
})();
The "pageinit" event handler that is called once in the initialization of the page registers the "loginUser" tap event handler, which:
- Saves the entered user information by calling the
saveUser()method of theuserServiceobject, specifying the user object with thenameandemailattributes. Thenameandemailattributes are populated with the"userName"and"userEmail"input field values, respectively. - Forwards the user to the
"weather"page.
If an exception occurs while saving the user information, the "loginFormMessages" div is populated with the exception message.
The following code snippet shows the UserService JavaScript object, which interacts with the Web Storage API to save and retrieve the user information (UserService.js):
var UserValidationException = function(code, message) {
    this.code = code;
    this.message = message;
}

var UserService = (function () {
    var instance;
    var USER_KEY = "WEATHER_USER";

    function isValidEmail(email) {
        var regex = /^([a-zA-Z0-9_.+-])+@(([a-zA-Z0-9-])+.)+([a-zA-Z0-9]{2,4})+$/;

        return regex.test(email);
    }

    function createObject() {
        return {
            saveUser: function (user) {
                if (!user.name || !user.email || user.name.trim().length == 0 || user.email.trim().length == 0) {
                    console.log("You need to specify both user name and email!");

                    throw new UserValidationException("EMPTY_FIELDS", "You need to specify both user name and email!");
                }

                if (user.name.trim().length > 6) {
                    console.log("User name must not exceed 6 characters!");

                    throw new UserValidationException("MAX_LENGTH_EXCEEDED", "User name must not exceed 6 characters!");
                }

                if (! isValidEmail(user.email)) {
                    console.log("Email is invalid!");

                    throw new UserValidationException("INVALID_FORMAT", "Email is invalid!");
                }

                window.localStorage.setItem(USER_KEY, JSON.stringify(user));
            },
            getUser:function() {
                var user = window.localStorage.getItem(USER_KEY);

                if (user) {
                    user = JSON.parse(user);
                }

                return user;
            }
        };
    };

    return {
        getInstance: function () {
            if (!instance) {
                instance = createObject();
            }
            return instance;
        }
    };
})();
As you can see, UserService is a singleton object that has two methods, as highlighted in the preceding code:
saveUser(user): This uses thewindow.localStorage.setItem()method to save the user information in the Local Storage:window.localStorage.setItem(USER_KEY, JSON.stringify(user)): This has the two parameters in order:USER_KEY, which is a string that represents the Local Storage item name, andJSON.stringify(user), which returns the user object JSON string. This parameter represents the Local Storage item value.- If any of the user object information is invalid, then an exception of the
UserValidationExceptiontype is thrown.
getUser():This uses thewindow.localStorage.getItem()method to get the user information string from the Local Storage and then parses it as a JSON object usingJSON.parse().
We are now done with the "login" page; let's check out the "weather" page. The following code snippet shows the "weather" page:
<div data-role="page" id="weather">
    <div data-role="header" data-position="fixed">
        <h1>Weather Info</h1>
    </div>
    <div data-role="content">
        <h2>Welcome <span id="user"></span>,</h2>
        <form id="weatherForm">
            <div class="ui-field-contain">
                <label for="location">Location</label>
                <input type="text" id="location"></input>
            </div>
            <input type="button" id="getWeatherInfo" data-icon="action" value="Weather Info"/>

            <div id="weatherResult">
            </div>
        </form>
    </div>
</div>
As shown in the preceding "weather" page, it contains the following:
- A page header
- Page content that includes the following main elements:
"user": This span is used to display the username"location": This input field is used to enter the location information"getWeatherInfo": This button is used to get the current weather information of the location entered in the"location"input field"weatherResult": This div is used to display the current weather information
The following code snippet shows the page view controller JavaScript object, which includes the event handlers of the page (weather.js):
(function() {
    var weatherService = WeatherService.getInstance();
    var userService = UserService.getInstance();

    $(document).on("pageinit", "#weather", function(e) {
        e.preventDefault();

        $("#getWeatherInfo").on("tap", function(e) {
            e.preventDefault();

            $("#location").blur(); //Hide keyboard

            $.mobile.loading('show'),

            var successCallback = function(result) {
                $.mobile.loading('hide'),
                $("#weatherResult").removeClass("error");

                var result = "<img class='center' src='" + result.icon + "'><br/>"
                           + "Temperature: " + result.temperature + "<br/>"
                           + "Humidity: " + result.humidity + "<br/>"
                           + "Description: " + result.description + "<br/>";

                $("#weatherResult").html(result);
            };
            var errorCallback = function(errorMessage) {
                $.mobile.loading('hide'),
                $("#weatherResult").addClass("error");
                $("#weatherResult").html(errorMessage);
            };

            weatherService.getWeatherInfo($("#location").val(), successCallback, errorCallback);
        });
    });

    $(document).on("pageshow", "#weather", function(e) {
        $("#user").html(userService.getUser().name || "");
    });

})();
The "pageinit" event handler registers the "getWeatherInfo" tap event handler. The "getWeatherInfo" tap event handler gets the current weather information by calling the
getWeatherInfo() method of the weatherService object with the following parameters in order:
$("#location").val(): This is the user's location entered in the"location"input textsuccessCallback: This is the successful callback that will be called if the weather information query operation succeedserrorCallback: This is the error callback that will be called if the weather information query operation fails
In successCallback, the result object, which holds the current weather information, is received as a parameter, and its main information is displayed in the "weatherResult" div.
In errorCallback, errorMessage is displayed in the "weatherResult" div.
The "pageshow" event handler displays the username (which is retrieved using userService.getUser().name) in the "user" span.
The following code snippet shows the WeatherService JavaScript object, which interacts with the weather API provided by OpenWeatherMap (http://openweathermap.org) to get the current weather information for a specified location (WeatherService.js):
var WeatherService = (function () {
    var instance;
    var BASE_ICON_URL = "http://openweathermap.org/img/w/";

    function createObject() {
        return {
            getWeatherInfo: function (locationText, successCallback, errorCallback) {
                if (!location || locationText.trim().length == 0) {
                    errorCallback("You have to specify a location!");
                }

                $.ajax({
                    url: "http://api.openweathermap.org/data/2.5/weather?q=" + escape(locationText),
                    success: function(response) {
                        console.log(response);

                        // If response code != 200 then this is an error
                        if (response.cod != 200) {
                            errorCallback(response.message);
                            return;
                        }

                        successCallback({
                            'temperature': (response.main.temp - 273.15).toFixed(1) + " °C",
                            'pressure': response.main.pressure,
                            'humidity': response.main.humidity + "%",
                            'description': (response.weather[0]) ? (response.weather[0].description) : "NA",
                            'icon': (response.weather[0]) ? BASE_ICON_URL+ (response.weather[0].icon) + ".png" : ""
                        });
                    }
                });
            }
        };
    };

    return {
        getInstance: function () {
            if (!instance) {
                instance = createObject();
            }

            return instance;
        }
    };
})();
As you can see, WeatherService is a singleton object that has a single method, as highlighted in the preceding code. The getWeatherInfo(locationText, successCallback, errorCallback) method which makes an Ajax call using $.ajax to http://api.openweathermap.org/data/2.5/weather, specifying q (the query parameter) with locationText. If the operation response code (response.cod) is not equal to 200 (this means that the operation was not performed successfully), then errorCallback is called with the response message specified by response.message. If the operation response code (response.cod) is equal to 200 (this means that the operation was performed successfully), then successCallback is called with a resulting JSON object that contains temperature, pressure, humidity, description, and icon information.
Finally, let's check the code of the "landing" page, which is used to decide the weather application initial page. The following code snippet shows the "landing" page HTML content:
<div id="landing" data-role="page">
    <div class="center-screen">Please wait ...</div>
</div>
The following code snippet shows the page view controller JavaScript object of the "landing" page, which is located in landing.js:
(function() {
    var userService = UserService.getInstance();

    $(document).on("pageinit", "#landing", function(e) {
        e.preventDefault();

        function onDeviceReady () {
            console.log("Apache Cordova is loaded");

            var home = '#login';

            if (userService.getUser()) {
                home = '#weather';
            }

            $.mobile.changePage(home);
        }

        document.addEventListener("deviceready", onDeviceReady, false);
    });
})();
The "pageinit" event handler of the landing page tries to get the user information using the getUser() method of userService once Cordova is loaded. If there is an object that is not returned as null from the getUser() method, then the initial page is chosen to be the "weather" page; else, the initial page is chosen to be the "login" page.
After exploring the weather application code, let's see how we can develop Jasmine tests for weather app services.
It is the time to develop Jasmine tests for the synchronous JavaScript code (UserService) in our weather app services. First of all, in order to test the UserService object, let's basically consider the following four test scenarios:
- Test that
UserServicewill not save a user with an empty user name - Test that
UserServicewill not save a user with an invalid e-mail - Test that
UserServicewill not save a user with a username of more than six characters - Test that
UserServicewill save a user with a valid username and e-mail, and load the saved user properly when requested
The following code snippet shows UserServiceSpec.js, which includes the test scenarios mentioned earlier:
describe("UserService", function() {
    var userService;

    beforeEach(function() {
        userService = UserService.getInstance();
    });

    it("should NOT be able to save a user with an empty user name", function() {
        var user = {
            'name': ' ',
            'email': '[email protected]'
        };

        expect(function() {
            userService.saveUser(user);
        }).toThrow();
    });

    it("should NOT be able to save a user with invalid email", function() {
        var user = {
            'name': 'Hazem',
            'email': 'Invalid_Email'
        };

        expect(function() {
            userService.saveUser(user);
        }).toThrow();
    });

    it("should NOT be able to save a user with a user name more than 6 characters", function() {
        var user = {
            'name': 'LengthyUserName',
            'email': '[email protected]'
        };

        expect(function() {
            userService.saveUser(user);
        }).toThrow();
    });

    it("should be able to save and load a valid user", function() {
        var originalUser = {
            'name': 'Hazem',
            'email': '[email protected]'
        };

        userService.saveUser(originalUser);

        var user = userService.getUser();

        expect(user).toEqual(originalUser);
    });
});
We have a test suite called "UserService", which has fours specs. In beforeEach, the userService object is created using UserService.getInstance().
In the first test scenario of the "UserService" test suite, the spec title is "should NOT be able to save a user with an empty user name". The spec creates a user object with an empty username and then passes the created user object to userService.saveUser(). Finally, the spec expects userService.saveUser() to throw an exception using the toThrow matcher.
In the second test scenario of the "UserService" test suite, the spec title is "should NOT be able to save a user with invalid email". The spec creates a user object specifying an invalid e-mail ('Invalid_Email') and then passes the created user object to userService.saveUser(). Finally, the spec expects userService.saveUser() to throw an exception using the toThrow matcher.
In the third test scenario of the "UserService" test suite, the spec title is "should NOT be able to save a user with a user name more than 6 characters". The spec creates a user object specifying a username whose length is more than six characters ('LengthyUserName') and then passes the created user object to userService.saveUser(). Finally, the spec expects userService.saveUser() to throw an exception using the toThrow matcher.
In the final test scenario of the "UserService" test suite, the spec title is "should be able to save and load a valid user". The spec creates a user object (originalUser) with a valid username and e-mail. The spec then passes the originalUser object to userService.saveUser() to save the user. After saving originalUser, the spec then retrieves the saved user object by calling userService.getUser(). Finally, the spec makes sure that the retrieved user object is identical to originalUser using the toEqual matcher.
Before developing Jasmine tests for the asynchronous JavaScript code in our weather app services, you need to understand how we can test asynchronous operations in Jasmine.
Since Jasmine 2.0, testing asynchronous JavaScript code in Jasmine is a very simple task. In order to develop asynchronous operation Jasmine tests, you need to know that:
- Jasmine provides an optional single parameter (usually named
done) for specs (and also forbeforeEachandafterEach). - A spec will not complete until
doneis called. This means that ifdoneis included as a parameter of a spec, thendonehas to be called when the asynchronous operation completes in all cases (whether the operation succeeds or fails). Note that ifdoneis included as a parameter inbeforeEach, then the spec afterbeforeEachwill not start untildoneis called inbeforeEach. - If
doneis not called for5seconds by default, then the test will fail; however, you can change this default timeout interval by setting thejasmine.DEFAULT_TIMEOUT_INTERVALvariable.
Now, let's develop Jasmine tests for the asynchronous JavaScript code (WeatherService) in our weather application services to see how to develop Jasmine tests for asynchronous JavaScript code in action. In order to test the WeatherService object, let's basically consider the following two test scenarios:
- Test that
WeatherServicewill be able to get the weather information for a valid place - Test that
WeatherServicewill not be able to get the weather information for an invalid place
The following code snippet shows WeatherServiceSpec.js, which covers the test scenarios mentioned earlier:
describe("WeatherService", function() {
    var weatherService;
    var originalTimeout;

    beforeEach(function() {
        weatherService = WeatherService.getInstance();
        originalTimeout = jasmine.DEFAULT_TIMEOUT_INTERVAL;
        jasmine.DEFAULT_TIMEOUT_INTERVAL = 8000;
    });

    it("should be able to get weather information for a valid place", function(done) {
        var successCallback = function(result) {
            expect(result.temperature).not.toBeNull();
            done();
        };
        var errorCallback = function() {
            expect(true).toBe(false); // force failing test manually
            done();
        };

        weatherService.getWeatherInfo("Paris, France", successCallback, errorCallback);
    });

    it("should NOT be able to get weather information for an invalid place", function(done) {
        var successCallback = function(result) {
            expect(true).toBe(false); // force failing test manually
            done();
        };

        var errorCallback = function(message) {
            expect(message).not.toBeNull();
            done();
        };

        weatherService.getWeatherInfo("Invalid Place", successCallback, errorCallback);
    });

    afterEach(function() {
        jasmine.DEFAULT_TIMEOUT_INTERVAL = originalTimeout;
    });
});
We have a test suite called "WeatherService", which has two specs. In beforeEach, the weatherService object is created using WeatherService.getInstance(), and jasmine.DEFAULT_TIMEOUT_INTERVAL is set to 8000 to change the default timeout interval to 8 seconds instead of 5 seconds. In afterEach, the jasmine.DEFAULT_TIMEOUT_INTERVAL is set to its default timeout value again.
As shown in the preceding highlighted code, in the first test scenario of the "WeatherService" test suite, the spec title is "should be able to get weather information for a valid place". The spec calls the weatherService.getWeatherInfo(locationText, successCallback, errorCallback) method, specifying the following parameters in order:
locationText: This is set to a valid place, that is,"Paris, France".successCallback: This is set to a successful callback function that takesresultas a parameter. InsuccessCallback(result), theresultreturned is validated to have a valid temperature value, and finally, thedoneparameter is called.errorCallback: This is set to an error callback function. InerrorCallback(), the test is forced to fail as this callback should never be called ifweatherService.getWeatherInfoexecutes successfully. Finally, thedoneparameter is called.
In the second test scenario of the "WeatherService" test suite, the spec title is "should NOT be able to get weather information for an invalid place". The spec calls the weatherService.getWeatherInfo(locationText, successCallback, errorCallback) method, specifying the following parameters in order:
locationText: This is set to an invalid place, that is,"Invalid Place".successCallback: This is set to a successful callback function that takesresultas a parameter. InsuccessCallback(result), the test is forced to fail. This is because this successful callback should never be called ifweatherService.getWeatherInfobehaves correctly, as it does not make sense to get the weather information successfully for an invalid place. Finally, thedoneparameter is called.errorCallback: This is set to an error callback function that takesmessageas a parameter. InerrorCallback(message), the returned message is validated to be a non-null value, which means thatweatherService.getWeatherInfobehaves correctly, as it produces an error message when asked to get the weather information for an invalid place. Finally, the (done) parameter is called.
Tip
It is important to note that JavaScript unit testing can be implemented using many frameworks and has many details that cannot be covered completely by a single small chapter. To get more information about Jasmine (such as mocking asynchronous operations using Spies and loading HTML fixtures using jasmine-jquery) and other popular JavaScript Unit testing frameworks such as YUI Test and QUnit, we recommend that you read JavaScript Unit Testing, Hazem Saleh, Packt Publishing.
After developing Jasmine tests for both the weather application's synchronous and asynchronous JavaScript code, it is the time to run the developed Jasmine tests from the SpecRunner.html file. The following code snippet shows the important contents of the SpecRunner.html file:
<!DOCTYPE HTML>
<html>
    <head>
        <meta http-equiv="Content-Type" content="text/html; charset=UTF-8">
        <title>Jasmine Spec Runner v2.0.0</title>

        <script src="../jqueryMobile/jquery-1.10.2.min.js"></script>

        <!-- ... Jasmine files are included here .. -->

        <!-- include source files here... -->
        <script type="text/javascript" src="../js/api/UserService.js"></script>
        <script type="text/javascript" src="../js/api/WeatherService.js"></script>

        <!-- include spec files here... -->
        <script type="text/javascript" src="spec/UserServiceSpec.js"></script>
        <script type="text/javascript" src="spec/WeatherServiceSpec.js"></script>
    </head>

    <body>
    </body>
</html>
As shown in the preceding highlighted code, besides the Jasmine framework files, SpecRunner.html also includes the following files:
jquery-1.10.2.min.js, as it is required byWeatherService- JavaScript source files (
UserService.jsandWeatherService.js) - JavaScript test files (
UserServiceSpec.jsandWeatherServiceSpec.js)
We can check the results of our developed tests by clicking on the SpecRunner.html file, and then we will see the tests passing.