
In this chapter, we will continue our journey in the Apache Cordova API by exploring the remaining main features of the Cordova Exhibition app. You will learn how to work with Cordova's media, file, capture, notification, and storage APIs. You will also learn how to utilize the Apache Cordova events in your Cordova mobile app.
The media plugin provides the ability to record and play back audio files on a device.
In order to use the media plugin in our Apache Cordova project, we need to use the following cordova plugin add command:
> cordova plugin add https://git-wip-us.apache.org/repos/asf/cordova-plugin-media.git
The capture plugin provides access to the device's audio, image, and video capture capabilities. In order to use the capture plugin in our Apache Cordova project, we need to use the following cordova plugin add command:
> cordova plugin add https://git-wip-us.apache.org/repos/asf/cordova-plugin-media-capture.git
The file plugin provides access to the device's filesystem. In order to use the file plugin in our Apache Cordova project, we need to use the following cordova plugin add command:
> cordova plugin add https://git-wip-us.apache.org/repos/asf/cordova-plugin-file.git
In order to access the media, file, and capture demo, you can click on the Media, File, and Capture list item, respectively. You will then be introduced to the Media / File / Capture page. You can click on the Record Sound button in order to start recording. Once you complete recording, you can click on the Stop Recording button, as shown in the following screenshot, and you will be able to play back your recorded sound by clicking on the Playback button:
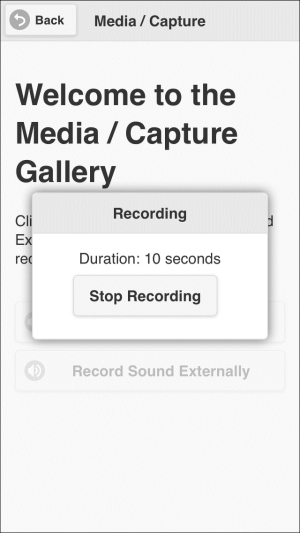
Record your voice
You also have the option to click on Record Sound Externally, which will open your device's default recording application in order to perform recording. Once you are done, you will return to the page, and then, you can use the Playback button to play back your recorded sound again.
The following code snippet shows the media page ("mediaFC"):
<div data-role="page" id="mediaFC">
    <div data-role="header">
        <h1>Media / Capture</h1>
        <a href="#" data-role="button" data-rel="back" data-icon="back">Back</a>
    </div>
    <div data-role="content">
        <h1>Welcome to the Media / Capture Gallery</h1>
        <p>Click 'Record Sound' or 'Record Sound Externally' button below to start recording your voice.</p>
        <input type="hidden" id="location"/>
        <div class="center-wrapper">
            <input type="button" id="recordSound" data-icon="audio" value="Record Sound"/>
            <input type="button" id="recordSoundExt" data-icon="audio" value="Record Sound Externally"/>
            <input type="button" id="playSound" data-icon="refresh" value="Playback"/><br/>
        </div>

        <div data-role="popup" id="recordSoundDialog" data-dismissible="false" style="width:250px">
            <div data-role="header">
                <h1>Recording</h1>
            </div>

            <div data-role="content">
                <div class="center-wrapper">
                    <div id="soundDuration"></div>
                    <input type="button" id="stopRecordingSound" value="Stop Recording"
                           class="center-button" data-inline="true"/>
                </div>
            </div>
        </div>
    </div>
</div>
As shown in the preceding "mediaFC" page, it contains the following:
- A page header that includes a back button
- Page content that includes the following elements:
"recordSound": This button is used to record sound using our app interface. Clicking on this button will show the"recordSoundDialog"pop up to allow the user to stop the recording when the operation is finished."recordSoundExt": This button is used to record sound externally using the device's default recording app."playSound": This button is used to play the recorded sound."recordSoundDialog": This is a custom pop up that will be shown when the user clicks on the"recordSound"button. It contains the"stopRecordingSound"button, which is used to stop recording sound when the recording is finished.
The following code snippet shows the first main part of the "mediaFC" page view controller JavaScript object:
(function() {
    var mediaManager = MediaManager.getInstance(), recInterval;

    $(document).on("pageinit", "#mediaFC", function(e) {
        e.preventDefault();

        $("#recordSound").on("tap", function(e) {
            e.preventDefault();

            disableActionButtons();

            var callback = {};

            callback.onSuccess = handleRecordSuccess;
            callback.onError = handleRecordError;

            mediaManager.startRecording(callback);

            var recTime = 0;

            $("#soundDuration").html("Duration: " + recTime + " seconds");

            $("#recordSoundDialog").popup("open");

            recInterval = setInterval(function() {
                              recTime = recTime + 1;
                              $("#soundDuration").html("Duration: " + recTime + " seconds");
                          }, 1000);
        });

        $("#recordSoundExt").on("tap", function(e) {
            e.preventDefault();

            disableActionButtons();

            var callback = {};

            callback.onSuccess = handleRecordSuccess;
            callback.onError = handleRecordError;

            mediaManager.recordVoiceExternally(callback);
        });

        $("#recordSoundDialog").on("popupafterclose", function(e, ui) {
            e.preventDefault();

            clearInterval(recInterval);
            mediaManager.stopRecording();
        });

        $("#stopRecordingSound").on("tap", function(e) {
            e.preventDefault();

            $("#recordSoundDialog").popup("close");
        });

        $("#playSound").on("tap", function(e) {
            e.preventDefault();

            disableActionButtons();

            var callback = {};

            callback.onSuccess = handlePlaySuccess;
            callback.onError = handlePlayError;

            mediaManager.playVoice($("#location").val(), callback);
        });

        initPage();
    });

    $(document).on("pagebeforehide", "#mediaFC", function(e) {
        mediaManager.cleanUpResources();
        enableActionButtons();
    });

    // code is omitted for simplicity ...
})();
The "pageinit" event handler registers the "tap" event handler on the "recordSound", "recordSoundExt", "playSound", and "stopRecordingSound" buttons.
In the "tap" event handler of the "recordSound" button:
- Sound recording and playing buttons are disabled by calling the
disableActionButtons()method - In order to start recording sound:
- A call to
mediaManager.startRecording(callback)is performed specifying a callback parameter with the success and error callbacks - The
"recordSoundDialog"pop up is shown, and its"soundDuration"div is updated every second with the current recording duration using thewindow'ssetInterval()method
- A call to
In the "tap" event handler of the "recordSoundExt" button:
- Sound recording and playing buttons are disabled by calling the
disableActionButtons()method - In order to start recording sound externally, a call to
mediaManager.recordVoiceExternally(callback)is performed specifying a callback parameter with the success and error callbacks
In the "tap" event handler of the "stopRecordingSound" button, it closes the "recordSoundDialog" pop up in order to trigger the "popupafterclose" event of the "recordSoundDialog" pop up in the "popupafterclose" event handler of the "recordSoundDialog" pop up:
- The recording timer is stopped using the
window'sclearInterval()method - In order to stop recording sound, a call to
mediaManager.stopRecording()is performed
In the "tap" event handler of the "playSound" button:
- Sound recording and playing buttons are disabled by calling the
disableActionButtons()method - In order to start playing the recorded sound, a call to
mediaManager.playVoice(filePath, callback)is performed specifying afilePathparameter with the media file location to play (media file location is stored in the"location"hidden field when the recording operation succeeds) and a callback parameter with the success and error callbacks
The "pageinit" event handler also calls initPage(), whose code will be shown in the following code snippet. Finally, in the "pagebeforehide" event handler, which will be called every time, we are transitioning away from the page. A call to mediaManager.cleanUpResources() is performed in order to stop any playing sounds and clean up any used media resources when the media page is left.
The following code snippet shows the second main part of the "mediaFC" page view controller, which mainly includes the callback handlers and the initPage() method:
(function() {
    // code is omitted here for simplicity

    function initPage() {
        $("#playSound").closest('.ui-btn').hide();
    }

    function handleRecordSuccess(filePath) {
        $("#location").val(filePath);
        enableActionButtons();
        $("#playSound").closest('.ui-btn').show();
    }

    function handleRecordError(error) {
        console.log("An error occurs during recording: " + error.code);
        enableActionButtons();
    }

    function handlePlaySuccess() {
        console.log("Sound file is played successfully ...");
        enableActionButtons();
    }

    function handlePlayError(error) {
        if (error.code) {
            console.log("An error happens when playing sound file ...");
            enableActionButtons();
        }
    }

    // Code is omitted here for simplicity ...
})();
As shown in the preceding code, we have the following methods:
initPage(): This is called in the"pageinit"event. It initially hides the"playSound"button.handleRecordSuccess(filePath): This represents the success callback ofmediaManager.startRecording(callback)andmediaManager.recordVoiceExternally(callback). It does the following:- It receives
filePathof the recorded file as a parameter and saves it in the"location"hidden field in order to be used by the playback operation - It enables the sound recording (
"recordSound"and"recordSoundExt") and playback ("playsound") buttons - It shows the
"playSound"button
- It receives
handleRecordError(error): This represents the error callback ofmediaManager.startRecording(callback)andmediaManager.recordVoiceExternally(callback). It does the following:- It receives an
errorobject as a parameter and the error code is logged in the console - It enables the sound recording and playback buttons
- It receives an
handlePlaySuccess(): This represents the success callback ofmediaManager.playVoice(filePath, callback). It does the following:- It logs a successful message in the console
- It enables the sound recording and playing buttons
handlePlayError(error): This represents the error callback ofmediaManager.playVoice(filePath, callback). It does the following:- It logs an error message in the console
- It enables the sound recording and playing buttons
The following code snippet shows the first part of MediaManager.js that interacts with the Cordova media and capture APIs:
var MediaManager = (function () {
    var instance;

    function createObject() {
        var fileManager = FileManager.getInstance();
        var recordingMedia;
        var audioMedia;

        return {
            startRecording : function (callback) {
                var recordVoice = function(dirEntry) {
                    var basePath = "";

                    if (dirEntry) {
                        basePath = dirEntry.toURL() + "/";
                    }

                    var mediaFilePath = basePath + (new Date()).getTime() + ".wav";

                    var recordingSuccess = function() {
                        callback.onSuccess(mediaFilePath);
                    };

                    recordingMedia = new Media(mediaFilePath, recordingSuccess, callback.onError);

                    // Record audio
                    recordingMedia.startRecord();
                };

                if (device.platform === "Android") {
                    var cb = {};

                    cb.requestSuccess = recordVoice;
                    cb.requestError = callback.onError;

                    fileManager.requestApplicationDirectory(cb);
                } else {
                    recordVoice();
                }
            },
            stopRecording : function () {
                if (recordingMedia) {
                    recordingMedia.stopRecord();
                    recordingMedia.release();

                    recordingMedia = null;
                }
            },
            playVoice : function (filePath, callback) {
                if (filePath) {
                    this.cleanUpResources();

                    audioMedia = new Media(filePath, callback.onSuccess, callback.onError);

                    // Play audio
                    audioMedia.play();
                }
            },
            recordVoiceExternally: function (callback) {
                // code is omitted for simplicity ...
            },
            cleanUpResources : function () {
                // code is omitted for simplicity ...
            }
        };
    };

    return {
        getInstance: function () {
            if (!instance) {
                instance = createObject();
            }

            return instance;
        }
    };
})();
As you can see in the preceding highlighted code, MediaManager is a singleton object that has five methods. In order to record audio files using Apache Cordova, we can create a Media object as follows:
recordingMedia = new Media(src, [mediaSuccess], [mediaError], [mediaStatus]);
The Media object constructor has the following parameters in order:
src: This refers to the URI of the media filemediaSuccess: This is an optional parameter that refers to the callback, which will be called if the media operation (play/record or stop function) succeedsmediaError: This is an optional parameter that refers to the callback, which will be called if the media operation (play/record or stop function) failsmediaStatus: This is an optional parameter that executes to indicate status changes
In order to start recording an audio file, a call to the startRecord() method of the Media object must be performed. When the recording is finished, a call to the stopRecord() method of the Media object must be performed. Now, let's check out the details of the MediaManager methods:
startRecording(callback): This starts the audio recording by doing the following:- Getting the current device platform by calling
device.platform. - If the current platform is Android, then a call to
fileManager.requestApplicationDirectory(cb)is performed in order to create an application directory (if it hasn't already been created) under the device SD card's root directory using thefileManagerobject. If the directory creation operation succeeds, thencb.requestSuccesswill be called, in this case, and the application directory path will be passed as a parameter. TherecordVoice()method starts recording the sound and saves the result audio file under the application directory. Note that if there is no SD card in your Android device, then the application directory will be created under the app's private data directory (/data/data/[app_directory]), and the audio file will be saved under it. - In the
elseblock, which refers to the other supported platforms (Windows Phone 8 and iOS),recordVoice()is called without creating an application-specific directory. As you know from Chapter 2, Developing Your First Cordova Application, in iOS and Windows Phone 8, every application has a private directory, and applications cannot store their files in any place other than this directory using Apache Cordova APIs. In the case of iOS, the application audio files will be stored under thetmpdirectory of the applicationsandboxdirectory (the application private directory). In the case of Windows Phone 8, the audio files will be stored under the application's local directory. As you know from Chapter 2, Developing Your First Cordova Application, using the Windows Phone 8 native API (Window.Storage), you can read and write files in an SD card with some restrictions; however, until this moment, you cannot do this using the Apache Cordova API. - In
recordVoice(),startRecording(callback)starts creating a media file using theMediaobject's (recordingMedia)startRecord()method. After calling therecordingMediaobject'sstopRecord()method and if the recording operation succeeds, thencallback.onSuccesswill be called and the audio file's full path,mediaFilePathwill be passed as a parameter. If the recording operation fails, thencallback.onErrorwill be called.
- Getting the current device platform by calling
stopRecording(): This stops the audio recording by doing the following:- Calling
stopRecord()ofrecordingMediain order to stop recording - Calling
release()ofrecordingMediain order to release the underlying operating system's audio resources
- Calling
playVoice(filePath, callback): This plays an audio file by doing the following:- Cleaning up resources before playing the audio file by calling the
cleanUpResources()method, which will be shown in the following code snippet - Creating a
Mediaobject (audioMedia) specifyingfilePathas the media source,callback.onSuccessas the media success callback, andcallback.onErroras the media error callback - Calling the
play()method of theaudioMediaobject
- Cleaning up resources before playing the audio file by calling the
The following code snippet shows the second part of MediaManager.js:
var MediaManager = (function () {
    var instance;

    function createObject() {
        // ...
        return {
            // ...
            recordVoiceExternally: function (callback) {
                var onSuccess = function (mediaFiles) {
                    if (mediaFiles && mediaFiles[0]) {
                        var currentFilePath = mediaFiles[0].fullPath;

                        if (device.platform === "Android") {
                            var fileCopyCallback = {};

                            fileCopyCallback.copySuccess = function(filePath) {
                                callback.onSuccess(filePath);
                            };

                            fileCopyCallback.copyError = callback.onError;

                            fileManager.copyFileToAppDirectory(currentFilePath, fileCopyCallback);
                        } else {
                            callback.onSuccess(currentFilePath);
                        }
                    }
                };
                navigator.device.capture.captureAudio(onSuccess, callback.onError, {limit: 1});
            },
            cleanUpResources : function () {
                if (audioMedia) {
                    audioMedia.stop();
                    audioMedia.release();
                    audioMedia = null;
                }

                if (recordingMedia) {
                    recordingMedia.stop();
                    recordingMedia.release();
                    recordingMedia = null;
                }
            }
        };
    };
    // ...
})();
In order to record the audio files using the device's default audio recording app, we can use the captureAudio method of Cordova's capture object as follows:
navigator.device.capture.captureAudio(captureSuccess, captureError, [options])
The captureAudio() method has the following parameters:
captureSuccess: This will be called when the audio capture operation is performed successfully. It receives an array ofMediaFileas a parameter. As shown in the following table, these are the attributes ofMediaFile:captureError: This will be called when the audio capture operation fails. It receives aCaptureErrorobject as a parameter. TheCaptureErrorobject has acodeattribute, which represents the error code.options: This represents the options of capture configuration. The following table shows theoptionsattributes:
The preceding code snippet shows the other methods of the MediaManager object as follows:
recordVoiceExternally(callback): This starts audio recording using the device's default recording app by doing the following:- In order to start audio recording using the device's default recording app,
navigator.device.capture.captureAudio(onSuccess, callback.onError, {limit: 1})is called. This means thatonSuccessis set as the success callback,callback.onErroris set as the error callback, and finally,optionsis set to{limit: 1}in order to limit the maximum number of audio clips that the device user can record in a single capture to1. - In the
onSuccesscallback, if the current platform is Android, then a call tofileManager.copyFileToAppDirectory(currentFilePath, fileCopyCallback)is performed in order to copy the recorded file to theappdirectory using thefileManagerobject. If the copy operation succeeds, then the originalrecordVoiceExternally()method'scallback.onSuccess(filePath)will be called in this case and the new copied file path under theappdirectory (filePath) will be passed as a parameter. - If the current platform is not Android (in our case, Windows Phone 8 and iOS),
callback.onSuccess(currentFilePath)will be called and the current filepath (currentFilePath) will be passed as a parameter.
- In order to start audio recording using the device's default recording app,
cleanUpResources(): This makes sure that all resources are cleaned up by callingstop()andrelease()methods of all theMediaobjects.
Before going into the details of the FileManager.js file, note that the Media object has more methods that you can check out in the Apache Cordova Documentation at https://github.com/apache/cordova-plugin-media/blob/master/doc/index.md.
Cordova Capture also has more objects and methods that you can look at in the Apache Cordova Documentation at https://github.com/apache/cordova-plugin-media-capture/blob/master/doc/index.md.
The following code snippet shows the first part of FileManager.js, which is used by MediaManager.js:
var FileManager = (function () {
    var instance;

    function createObject() {
        var BASE_DIRECTORY = "CExhibition";
        var FILE_BASE = "file:///";

        return {
            copyFileToAppDirectory: function (filePath, cb) {
                var callback = {};

                callback.requestSuccess = function (dirEntry) {
                    if (filePath.indexOf(FILE_BASE) != 0) {
                        filePath = filePath.replace("file:/", FILE_BASE);
                    }

                    window.resolveLocalFileSystemURL(filePath, function(file) {
                        var filename = filePath.replace(/^.*[\/]/, ''),

                        var copyToSuccess = function (fileEntry) {
                            console.log("file is copied to: " + fileEntry.toURL());
                            cb.copySuccess(fileEntry.toURL());
                        };
                        file.copyTo(dirEntry, filename, copyToSuccess, cb.copyError);
                    }, cb.copyError);
                };

                callback.requestError = function (error) {
                    console.log(error);
                };

                this.requestApplicationDirectory(callback);
            },
            requestApplicationDirectory: function (callback) {
                var fileSystemReady = function(fileSystem) {
                    fileSystem.root.getDirectory(BASE_DIRECTORY, {create: true}, callback.requestSuccess);
                };

                window.requestFileSystem(LocalFileSystem.PERSISTENT, 0, fileSystemReady, callback.requestError);
            }
        };
    };

    return {
        getInstance: function () {
            if (!instance) {
                instance = createObject();
            }

            return instance;
        }
    };
})();
As you can see in the preceding highlighted code, FileManager is a singleton object that has two methods. In order to work with directories or files using Apache Cordova, we first need to request a filesystem using the requestFileSystem() method as window.requestFileSystem(type, size, successCallback, errorCallback).
The window.requestFileSystem method has the following parameters in order:
type: This refers to the local filesystem typeSize: This indicates how much storage space, in bytes, the application expects to needsuccessCallback: This will be called if the operation succeeds, and it will receive aFileSystemobject as a parametererrorCallback: This will be called if an operation error occurs
In order to create a directory after getting the FileSystem object, we can use the getDirectory() method of the DirectoryEntry object as fileSystem.root.getDirectory(path, options, successCallback, errorCallback).
The directoryEntry.getDirectory method takes the following parameters:
path: This is either a relative or absolute path of the directory in which we can look up or create a directoryoptions: This refers to anoptionsJSON object that specifies thecreatedirectory using{create: true}or exclusively creates the directory using{create: true, exclusive: true}successCallback: This will be called if the operation succeeds, and it receives the new or existingDirectoryEntryas a parametererrorCallback: This will be called if an operation error occurs
If you look at the first method requestApplicationDirectory(callback) of the FileManager object, you will find that it creates a directory called "CExhibition" if it has not already been created (in the case of an Android device with an SD card, "CExhibition" will be created under the SD card root).
In order to get an Entry object of a specific URI to perform a file or directory operation, we need to use resolveLocalFileSystemURL() as window.resolveLocalFileSystemURL(uri, successCallback, errorCallback).
The window.resolveLocalFileSystemURL method takes the following parameters:
uri: This is a URI that refers to a local file or directorysuccessCallback: This will be called if the operation succeeds, and it will receive anEntryobject that corresponds to the specified URI (it can beDirectoryEntryorFileEntry) as a parametererrorCallback: This will be called if an operation error occurs
In order to copy a file, we need to use the copyTo() method of the Entry object as fileEntry.copyTo(parent, newName, successCallback, errorCallback) the Entry object.
The fileEntry.copyTo method takes the following parameters:
parent: This represents the directory to which the entry will be copiednewName: This represents the new name of the copied file, and it defaults to the current namesuccessCallback: This will be called if the operation succeeds, and it will receive the new entry object as a parametererrorCallback: This will be called if an operation error occurs
If you look at the second method copyFileToAppDirectory (filePath, cb) of the FileManager object, you will find that it creates an app directory called "CExhibition" if it has not already been created. Then, it copies the file specified in filePath under the app directory using the copyTo() method of the fileEntry object. Finally, if the copy operation succeeds, then the cb.copySuccess() callback will be called and the new copied file path will be passed as a parameter.
Tip
The Cordova file has more objects and methods that you can have a look at in the Apache Cordova Documentation at https://github.com/apache/cordova-plugin-file/blob/master/doc/index.md.
Now, we are done with the media, file, and capture functionalities in the Cordova Exhibition app.