
2
Your Arduino
Now that you’ve got your Arduino and a number of parts and tools, let’s look at them in more depth. The Arduino is just the thing to solve your everyday interactive needs. In this chapter, you’ll learn about the parts of the Arduino and how to attach it to a computer and to a power supply. We will also look at unboxing our electronic parts, sorting them out, and learning more about them on both websites and data sheets.
Parts of an Arduino
First let’s take a look at the labeled parts of the board, as shown in Figure 2-1.
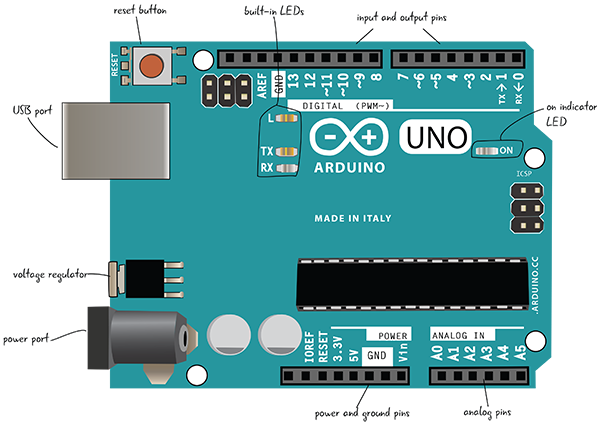
Figure 2-1: The Arduino Uno
We are going to break down each side of the board in more detail so you can see where everything important is located on the Arduino.
Arduino in Detail
Let’s learn a bit more about what is on the Arduino board. Remember that there are different styles of boards, so yours may look slightly different. These figures are based on Arduino Uno revision 3. We’ll look first at the left side of the board, with the reset button, USB port, voltage regulator, and power port, as shown in Figure 2-2.
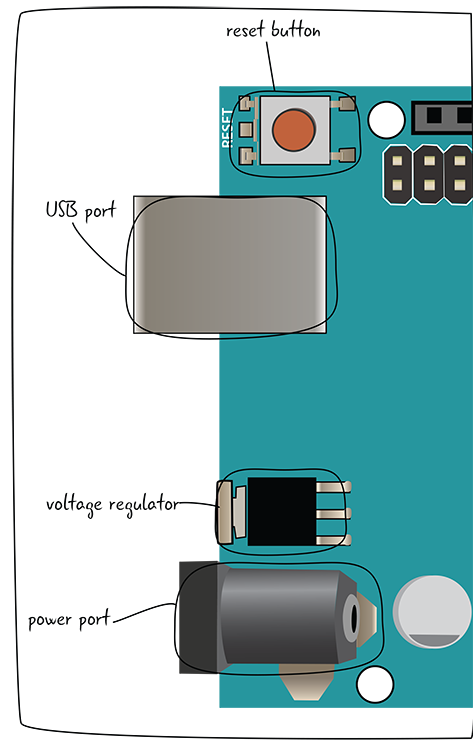
Figure 2-2: The left side of the Arduino Uno board
Reset Button
- Much like turning your computer off and on again, some problems with the Arduino can be solved by pushing the reset button. This button will restart the code currently uploaded on your Arduino. The reset button may be in a different location on your board than in Figure 2-2, but it is the only button.
USB Port
- The USB port takes a standard A-to-B USB cable, often seen on printers or other computer peripherals. The USB port serves two purposes: First, it is the cable connection to a computer that allows you to program the board. Second, the USB cord will provide power for the Arduino if you’re not using the power port.
Voltage Regulator
- The voltage regulator converts power plugged into the power port into the 5 volts and 1 amp standard used by the Arduino. Be careful! This component gets very hot.
Power Port
- The power port includes a barrel-style connector that connects to power straight from a wall source (often called a wall-wart) or from a battery. This power is used instead of the USB cable. The Arduino can take a wide range of voltages (5V–0V DC) but will be damaged if power higher than that is connected.
We’ll take a closer look at the other side of the board now (Figure 2-3), which includes the digital, analog, and power pins as well as the actual chip for the board.
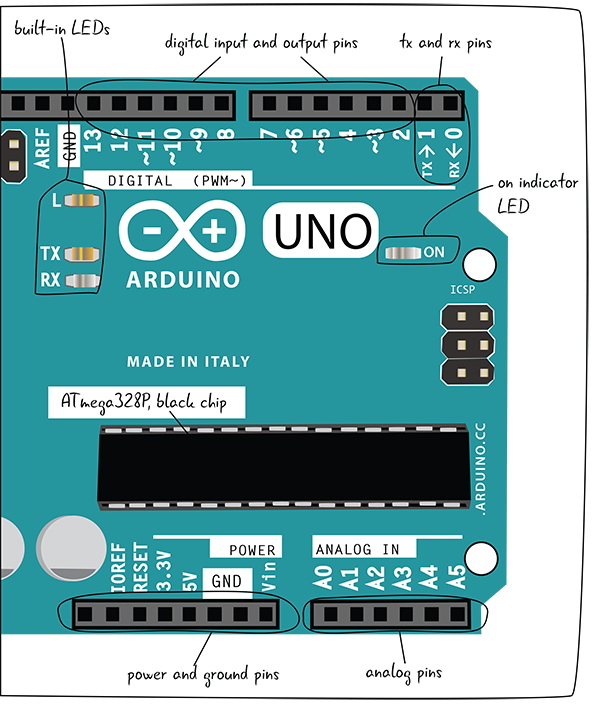
Figure 2-3: The right side of the Arduino Uno
Built-In LEDs
- The LEDS marked TX and RX show whether your Arduino is sending or receiving data. The one marked L is connected to Pin 13.
ON Indicator LED
- This LED indicates that the Arduino is getting power when you turn it on.
Digital I/O Pins
- The holes on this side of the board are called the digital input/output pins. They are used to either sense the outside world (input) or control lights, sounds, or motors (output).
TX/RX Pins
- Pin 0 and Pin 1 are special pins labeled TX and RX. We will cover this in more detail later, but it is good practice to leave these pins empty. Any changes you make to your program won’t load if something is plugged into Pin 0.
ATmega328P, Black Chip
- The black chip in the middle of the board is an ATmega328P. This is the “brains” of the Arduino: it interprets both the inputs/outputs and the programming code uploaded onto your Arduino. The other components on the board enable you to communicate with this chip when creating projects.
Power and Ground Pins
- Pins related to power are located here. You can use these pins to run power from your Arduino to your breadboard circuit.
Analog Pins
- These pins take sensor readings in a range of values (analog), rather than just sending whether something is just on or off (digital).
Now let’s connect the Arduino to your computer. We’re not going to program it just yet, but it will help to see how to attach it to the computer via the USB cable.
Plug Your Arduino into Your Computer
You’ll need a USB A-B cable, your computer, and an Arduino Uno. If you have a newer MacBook model, you may also need a USB-C-to-USB adapter.
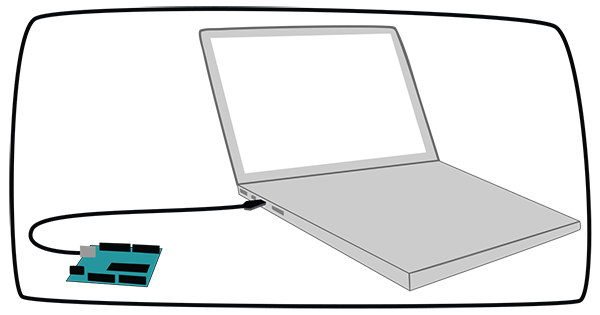
Figure 2-4: Connect your Arduino to your computer.
First, plug the USB cable into one of your computer’s USB ports as shown in Figure 2-4. Any port that is available, as shown in Figure 2-5, should work fine.

Figure 2-5: Close-up USB port
Now that you are attached to the computer, plug the USB cable into the USB port on the Arduino. The USB port is labeled in Figure 2-6.

Figure 2-6: USB port on the Arduino
You can see the top view of the USB port on the Arduino with the USB A-B cable in Figure 2-7.

Figure 2-7: Top view of plugging USB cable into Arduino
Plugging In the Arduino
What happens when you plug in the Arduino? The power LED labeled ON should light up. And if this is the first time you’ve plugged it in, the LED on the Arduino near Pin 13 should blink on and off, as shown in Figure 2-8.
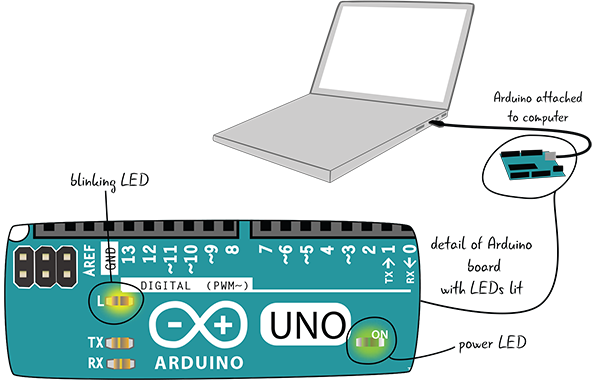
Figure 2-8: The LEDs turn on when the Arduino gets power from your computer.
You’ve Powered Up Your Arduino for the First Time!
You can always use a USB cable and a port on your computer to power the Arduino. The Arduino can also be powered by attaching it to a power supply that’s plugged into a wall outlet.
Powering the Arduino from a Power Supply
You will need a 9–12V DC power supply and an Arduino. The first step is to unplug the USB cable, which will completely power down the Arduino. Figure 2-9 shows the power port on the Arduino.

Figure 2-9: Power port on the Arduino
Attach the power supply to the power port on the Arduino (Figure 2-10).
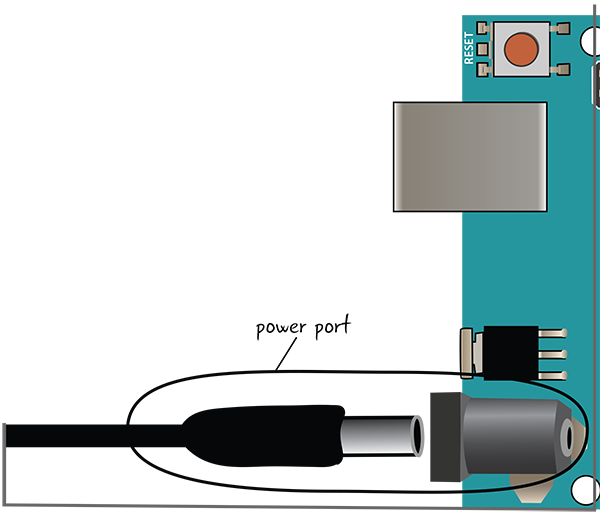
Figure 2-10: Top view of the power port on the Arduino
Next, plug your power supply into a surge protector, and then into a wall outlet, as shown in Figure 2-11.
What happens now? It should be just the same as when you attached the Arduino to your computer with the USB cable: the LED labeled ON indicates that the Arduino has power. And if your Arduino is straight out of the box, the LED near Pin 13 will start blinking, as seen in Figure 2-12.
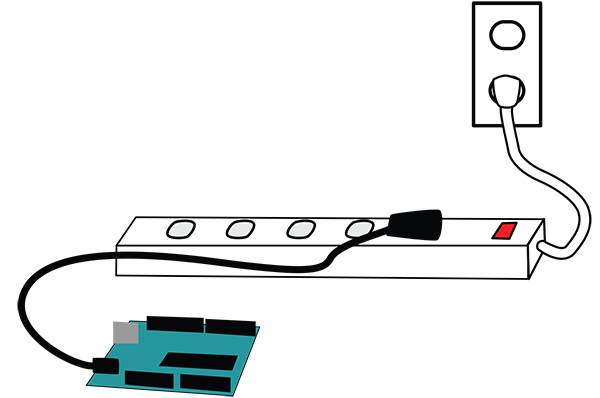
Figure 2-11: Plug your power supply into a surge protector.
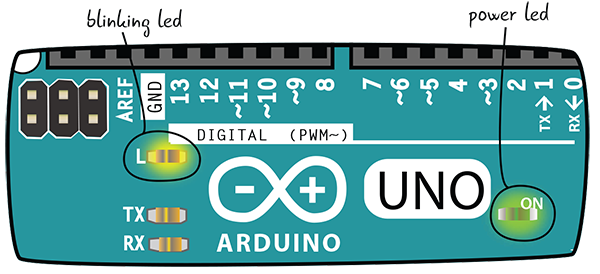
Figure 2-12: LEDs blinking on the Arduino
Now you know the two methods of powering an Arduino. You can switch your power source as your project evolves—you’re not stuck using one or the other.
Components and Tools
Now that you have purchased the components in the parts list (Figure 2-13), you may wish to learn more about the individual pieces. Several different types of resources are available that can help you figure out which parts to use and where to put them.

Figure 2-13: Where do I find information about my components?
Sorting Your Parts
The best thing to do when unboxing all your parts is to separate them by type. It’s nice to have all of your resistors in a separate place from your LEDs, or even to have separate places for different LED colors and for resistors of different values. Most hardware or craft supply stores sell plastic boxes that will make it easy to sort out the parts and find them when you need them later on. We recommend something that looks like the box shown in Figure 2-14.
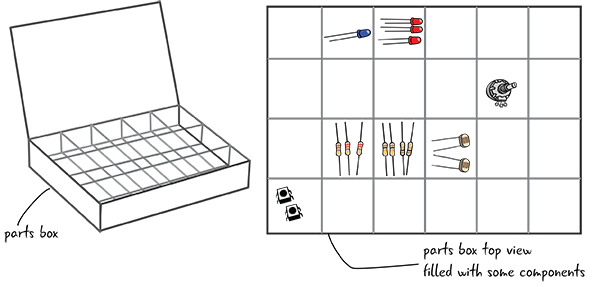
Figure 2-14: Sorting all of your components will also help you get familiar with them.
Part Numbers and Store Guides
Now that you have your parts separated out and can identify what they are, where should you look to find out information about them? The very first place to check for information about components is the components themselves. Resistors, LEDs, and most other components look different enough that you will quickly learn how to identify them. Often, components will have a part number listed on them somewhere, which can help you find a supplier’s or manufacturer’s website. When you order components or a kit, the store will also send along documentation or point you to a page on their website. Always check a part supplier’s website first and save yourself a headache.
Finding More Info: Data Sheets
If you can’t find the information you are looking for either on the component or on the website, the next thing to look for is your component’s data sheet. You can find it by entering the part number, followed by “data sheet,” in your favorite search engine online. Do not search for just the part name, since chances are there are many different versions of your part online with different information. For example, there are a lot of different LEDs!
Electronic data sheets document the behavior, function, and limitations of electronic components. They have a tremendous amount of information, from operating temperature and behavior and suggested wiring diagrams, to material makeup and industrial application.
For example, here’s how to find a data sheet online for one of your LEDs.
- Find the number that identifies the LED on your invoice from the supplier you purchased your parts from. If you can’t find one, use this one for red superbright LEDs: WP7113SRD.
- Open a browser and type the number of your part into your favorite search engine, as well as the words “data sheet.” If you use our example part number, your search terms will be “WP7113SRD data sheet.”
- Your search results will include data sheets about your part, often in the form of PDFs. Choose a couple of the links and click on them. Take a look at the results and make sure they approximately match the part number you searched for.
It can often be overwhelming to sift through the data sheet to find the one bit of information that you need, but data sheets come in handy, particularly when you are not sure what components you are handling. Let’s start by looking at a sample sheet, as shown in Figure 2-15.

Figure 2-15: Data sheet for LED found on a shelf
Your data sheet contains a lot of parts, and not all of the technical information will matter for your project—but it can help you if you get stuck.
Summary
You should now feel comfortable with the layout of your Arduino. You know how to power up the Arduino from the USB and the power ports. If you are ever unsure about your components, you know you can look them up online from the website where you purchased them or search for their data sheet. In the next chapter, we are going to take a look at using a few components to build our first circuit.