
A
Appendix: Reading Resistor Codes
If you have just purchased a resistor, it will generally come with some sort of label, but that doesn’t help if you find your resistor sitting unaccompanied on a table or in your parts box. Fortunately, every resistor has a set of color bands printed on its casing that tells you the value of the resistor. While there are resistors with six, three, or even one band, the most commonly found resistors by far have four bands, and we are looking at that type in this appendix.
Identifying Resistors by Color Bands
Let’s take a close look at a resistor in Figure A-1. A resistor has two wire leads and a body with color bands on it.

Figure A-1: A resistor
Orienting the Resistor
Not only do the colors of the bands matter, but also the order in which the colors appear. How do you know what each color means? The first step is to orient your resistor in the correct direction, as shown in Figure A-2. On one side of the resistor, the band color will be either silver or gold. This band should be placed on the right-hand side of the resistor. Look for the silver or gold band on the resistor body and place it on the right-hand side.

Figure A-2: Orient your resistor.
Now that your resistor is oriented correctly, you can identify the other color bands on the resistor body. We have labeled the bands in Figure A-3 in order. The colors on each band have a particular significance.

Figure A-3: Numbering the bands on the resistor
Resistor Color Chart
Figure A-4 is a standard color chart that all resistors follow. You can find similar charts online. We’ll go over what each band means in detail. The colors mean the same thing for all resistors.

Figure A-4: Resistor band color chart
Decoding the Resistor
Now that you’ve seen the color chart, we’ll show you how to apply it to a resistor.
The first band represents the most significant digit, or the first digit in the number. For example, on our resistor in Figure A-5, the first band is red. Looking at the color chart, you see that red on the first band equates to the number 2.
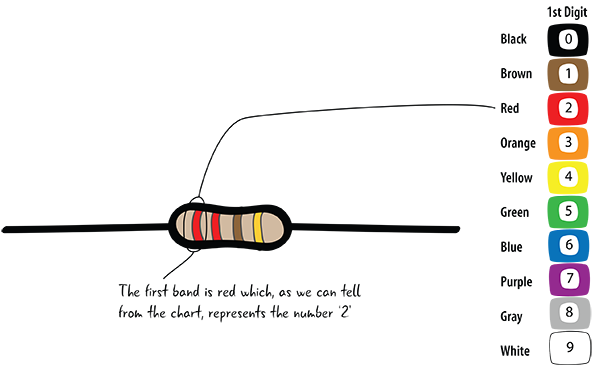
Figure A-5: The first band
The second band signifies the second most significant digit. On this resistor, the second band is also red. As you see in Figure A-6, the chart indicates again that the number 2 is represented by the red color of your second band.

Figure A-6: The second band
The first two bands taken together give us the number 22. The first two bands on a resistor will always represent a number between 10 and 99. (We’ll explain what these numbers mean shortly.) The third digit is a little bit different.
The third band, shown in Figure A-7, has another meaning. Rather than representing a number like the first two bands, the third band represents a multiplier. This band multiplies the values on the first two bands by a power of 10. We can see this in the third row of the chart in Figure A-4. For this resistor, the band is brown, which the chart tells us means a multiplier of 10, or 10 to the first power. Now that we know these three values, we can calculate the resistor’s total resistance using the simple formula shown in Figure A-8: the first two digits times the multiplier equals the resistance (in ohms).

Figure A-7: The third band

Figure A-8: Calculating the value of a resistor
This means that our red-red-brown resistor is a 220-ohm resistor. In fact, all red-red-brown resistors have a value of 220 ohms.
The fourth band of our resistor, Figure A-9, represents the resistor’s tolerance or possible range of accuracy. With a gold band, the accuracy is plus or minus 5 percent, which means that our resistor could be as high as 231 ohms (220×1.05) or as low as 209 (220×0.95). (This variation is caused by imperfections in the resistor’s manufacturing process.)

Figure A-9: The fourth band
Since the fourth band is always going to be gold or silver, and these are not colors any of the other bands use, we can always use the fourth band to orient our resistor correctly.
Analyzing the Color Bands on Another Resistor
Let’s look at another resistor and evaluate its color bands to figure out its total resistance value. The resistor in Figure A-10 has the color bands brown, black, orange, and gold.

Figure A-10: A resistor with the bands labeled
The first step is to orient the resistor correctly. To do that, make sure that the gold band is on the right-hand side (Figure A-11).

Figure A-11: Orienting the resistor
Looking at the Color Chart Again
Refer back to Figure A-4 to reference the color values. You can always look up the chart whenever you need to calculate a resistance value.
Reading the Bands
The first band is brown, so we can look at the color chart and know that the first digit is a 1 (Figure A-12).

Figure A-12: First band
The next color band on the resistor is black, which makes the second digit a 0 (Figure A-13).

Figure A-13: Second band
The third band is orange, which means that the value of the multiplier is 1000 (Figure A-14).

Figure A-14: Third band
This means that our resistor value is 10 times 1000. That means our resistor is 10,000 ohms, or more commonly seen as 10 kΩ (Figure A-15).

Figure A-15: Calculating the resistance in our 10 kΩ resistor using the color bands