
In this chapter, we will take on the role of the bad guy. We want to create a program that can beat CAPTCHAs, allowing our comment spam program to advertise on someone's website. It should be noted that our CAPTCHAs will be a little easier that those used on the web today and that spamming isn't a very nice thing to do.
Our CAPTCHAs will be individual English words of four letters only, as shown in the following image:
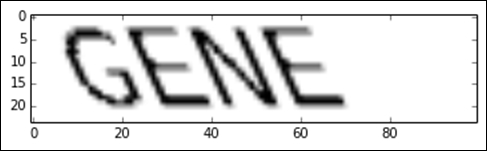
Our goal will be to create a program that can recover the word from images like this. To do this, we will use four steps:
- Break the image into individual letters.
- Classify each individual letter.
- Recombine the letters to form a word.
- Rank words with a dictionary to try to fix errors.
Our CAPTCHA-busting algorithm will make the following assumptions. First, the word will be a whole and valid four-character English word (in fact, we use the same dictionary for creating and busting CAPTCHAs). Second, the word will only contain uppercase letters. No symbols, numbers, or spaces will be used. We are going to make the problem slightly harder: we are going to perform a shear transform to the text, along with varying rates of shearing.
Next, we develop our function for creating our CAPTCHA. Our goal here is to draw an image with a word on it, along with a shear transform. We are going to use the PIL library to draw our CAPTCHAs and the scikit-image library to perform the shear transform. The scikit-image library can read images in a NumPy array format that PIL can export to, allowing us to use both libraries.
First, we import the necessary libraries and modules. We import NumPy and the Image drawing functions as follows:
import numpy as np
from PIL import Image, ImageDraw, ImageFont
from skimage import transform as tf
Then we create our base function for generating CAPTCHAs. This function takes a word and a shear value (which is normally between 0 and 0.5) to return an image in a NumPy array format. We allow the user to set the size of the resulting image, as we will use this function for single-letter training samples as well. The code is as follows:
def create_captcha(text, shear=0, size=(100, 24)):
We create a new image using L for the format, which means black-and-white pixels only, and create an instance of the ImageDraw class. This allows us to draw on this image using PIL. The code is as follows:
    im = Image.new("L", size, "black")
    draw = ImageDraw.Draw(im)
Next we set the font of the CAPTCHA we will use. You will need a font file and the filename in the following code (Coval.otf) should point to it (I just placed the file in the Notebook's directory.
    font = ImageFont.truetype(r"Coval.otf", 22)
    draw.text((2, 2), text, fill=1, font=font)
Note
You can get the Coval font I used from the Open Font Library at http://openfontlibrary.org/en/font/bretan.
We convert the PIL image to a NumPy array, which allows us to use scikit-image to perform a shear on it. The scikit-image library tends to use NumPy arrays for most of its computation. The code is as follows:
image = np.array(im)
We then apply the shear transform and return the image:
    affine_tf = tf.AffineTransform(shear=shear)
    image = tf.warp(image, affine_tf)
    return image / image.max()
In the last line, we normalize by dividing by the maximum value, ensuring our feature values are in the range 0 to 1. This normalization can happen in the data preprocessing stage, the classification stage, or somewhere else.
From here, we can now generate images quite easily and use pyplot to display them. First, we use our inline display for the matplotlib graphs and import pyplot. The code is as follows:
%matplotlib inline
from matplotlib import pyplot as plt
Then we create our first CAPTCHA and show it:
image = create_captcha("GENE", shear=0.5)
plt.imshow(image, cmap='Greys')
The result is the image shown at the start of this section: our CAPTCHA.
Our CAPTCHAs are words. Instead of building a classifier that can identify the thousands and thousands of possible words, we will break the problem down into a smaller problem: predicting letters.
The next step in our algorithm for beating these CAPTCHAs involves segmenting the word to discover each of the letters within it. To do this, we are going to create a function that finds contiguous sections of black pixels on the image and extract them as sub-images. These are (or at least should be) our letters.
First we import the label and regionprops functions, which we will use in this function:
from skimage.measure import label, regionprops
Our function will take an image, and return a list of subimages, where each sub-image is a letter from the original word in the image:
def segment_image(image):
The first thing we need to do is to detect where each letter is. To do this, we will use the label function in scikit-image, which finds connected sets of pixels that have the same value. This has analogies to our connected component discovery in Chapter 7, Discovering Accounts to Follow Using Graph Mining.
The label function takes an image and returns an array of the same shape as the original. However, each connected region has a different number in the array and pixels that are not in a connected region have the value 0. The code is as follows:
labeled_image = label(image > 0)
We will extract each of these sub-images and place them into a list:
subimages = []
The scikit-image library also contains a function for extracting information about these regions: regionprops. We can iterate over these regions and work on each individually:
for region in regionprops(labeled_image):
From here, we can query the region object for information about the current region. For our algorithm, we need to obtain the starting and ending coordinates of the current region:
start_x, start_y, end_x, end_y = region.bbox
We can then extract the sub-images by indexing the image (remember it is represented as a simple NumPy array, so we can easily index it) using the starting and ending positions of the sub-image, and adding the selected sub-image to our list. The code is as follows:
subimages.append(image[start_x:end_x,start_y:end_y])
Finally (and outside the loop) we return the discovered sub-images, each (hopefully) containing the section of the image with an individual letter in it. However, if we didn't find any sub-images, we just return the original image as our only sub-image. The code is as follows:
    if len(subimages) == 0:
        return [image,]
    return subimages
We can then get the sub-images from the example CAPTCHA using this function:
subimages = segment_image(image)
We can also view each of these sub-images:
f, axes = plt.subplots(1, len(subimages), figsize=(10, 3))
for i in range(len(subimages)):
    axes[i].imshow(subimages[i], cmap="gray")
The result will look something like this:
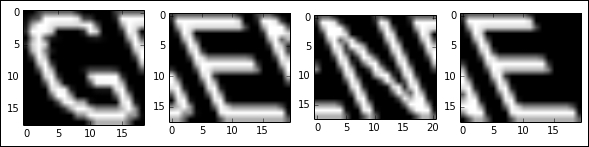
As you can see, our image segmentation does a reasonable job, but the results are still quite messy, with bits of previous letters showing.
Using this function, we can now create a dataset of letters, each with different shear values. From this, we will train a neural network to recognize each letter from the image.
We first set up our random state and an array that holds the options for letters and shear values that we will randomly select from. There isn't much surprise here, but if you haven't used NumPy's arange function before, it is similar to Python's range function—except this one works with NumPy arrays and allows the step to be a float. The code is as follows:
from sklearn.utils import check_random_state
random_state = check_random_state(14)
letters = list("ABCDEFGHIJKLMNOPQRSTUVWXYZ")
shear_values = np.arange(0, 0.5, 0.05)
We then create a function (for generating a single sample in our training dataset) that randomly selects a letter and a shear value from the available options. The code is as follows:
def generate_sample(random_state=None):
    random_state = check_random_state(random_state)
    letter = random_state.choice(letters)
    shear = random_state.choice(shear_values)
We then return the image of the letter, along with the target value representing the letter in the image. Our classes will be 0 for A, 1 for B, 2 for C, and so on. The code is as follows:
return create_captcha(letter, shear=shear, size=(20, 20)), letters.index(letter)
Outside the function block, we can now call this code to generate a new sample and then show it using pyplot:
image, target = generate_sample(random_state)
plt.imshow(image, cmap="Greys")
print("The target for this image is: {0}".format(target))
We can now generate all of our dataset by calling this several thousand times. We then put the data into NumPy arrays, as they are easier to work with than lists. The code is as follows:
dataset, targets = zip(*(generate_sample(random_state) for i in range(3000)))
dataset = np.array(dataset, dtype='float')
targets =  np.array(targets)
Our targets are integer values between 0 and 26, with each representing a letter of the alphabet. Neural networks don't usually support multiple values from a single neuron, instead preferring to have multiple outputs, each with values 0 or 1. We therefore perform one hot-encoding of the targets, giving us a target array that has 26 outputs per sample, using values near 1 if that letter is likely and near 0 otherwise. The code is as follows:
from sklearn.preprocessing import OneHotEncoder
onehot = OneHotEncoder()
y = onehot.fit_transform(targets.reshape(targets.shape[0],1))
The library we are going to use doesn't support sparse arrays, so we need to turn our sparse matrix into a dense NumPy array. The code is as follows:
y = y.todense()
Our training dataset differs from our final methodology quite significantly. Our dataset here is nicely created individual letters, fitting the 20-pixel by 20-pixel image. The methodology involves extracting the letters from words, which may squash them, move them away from the center, or create other problems.
Ideally, the data you train your classifier on should mimic the environment it will be used in. In practice, we make concessions, but aim to minimize the differences as much as possible.
For this experiment, we would ideally extract letters from actual CAPTCHAs and label those. In the interests of speeding up the process a bit, we will just run our segmentation function on the training dataset and return those letters instead.
We will need the resize function from scikit-image, as our sub-images won't always be 20 pixels by 20 pixels. The code is as follows:
from skimage.transform import resize
From here, we can run our segment_image function on each sample and then resize them to 20 pixels by 20 pixels. The code is as follows:
dataset = np.array([resize(segment_image(sample)[0], (20, 20)) for sample in dataset])
Finally, we will create our dataset. This dataset array is three-dimensional, as it is an array of two-dimensional images. Our classifier will need a two-dimensional array, so we simply flatten the last two dimensions:
X = dataset.reshape((dataset.shape[0], dataset.shape[1] * dataset.shape[2]))
Finally, using the train_test_split function of scikit-learn, we create a set of data for training and one for testing. The code is as follows:
from sklearn.cross_validation import train_test_split
X_train, X_test, y_train, y_test =
    train_test_split(X, y, train_size=0.9)