
One of the most important parts of the whole Android architecture is the Recovery partition. A recovery partition is very common in embedded systems, and we saw an overview of it in previous chapters. As we know, the so-called Recovery is a minimal runtime system, completely decoupled from the main Android system and totally self-sufficient. Its main goal is to guarantee system integrity and provide the necessary tools to fix common minor issues and restore a properly working system.
With an Android vanilla Recovery, we can:
- Update the Android system
- Wipe the data partition and the cache partition
Wiping the data and cache partition is a common practice if we want to restore our device to the factory defaults, for instance, in order to have a clean system to start experimenting on something specific, or if we just want to sell it.
The Android Recovery system is completely standalone. This means that whatever might happen to the main Android system, recovery will be always able to restore a working system.
To achieve this level of resilience, recovery contains its own Linux kernel and its own rootfs. The following screenshot shows how recovery actually lives near the Android system, but is completely separate:
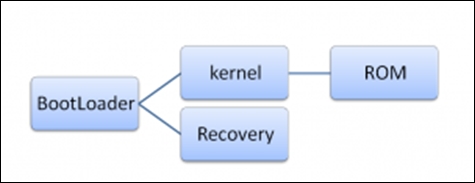
The previous screenshot shows how access to the recovery is bound to the BootLoader. The BootLoader is unable to decide if the current boot sequence is going to end with a running recovery or a running Android system.
Recovery mode can be accessed with a button combination when the device is turned off. For our reference device, Google Nexus 6, you can take the following steps:
- Press and hold Volume Down, Volume Up and Power buttons simultaneously.
- Release all buttons when the
Fastboot Modemenu appears. - Use the Volume buttons until the upper part of the screen displays the
Recovery Modetext. - Press Power to select
Recovery Mode—after that you will see an Android icon laid on its back. - Press and hold the Power button, then press the Volume Up button once.
Once you have landed on the recovery main screen, you can navigate using the Volume buttons and confirm your choice using the Power button.
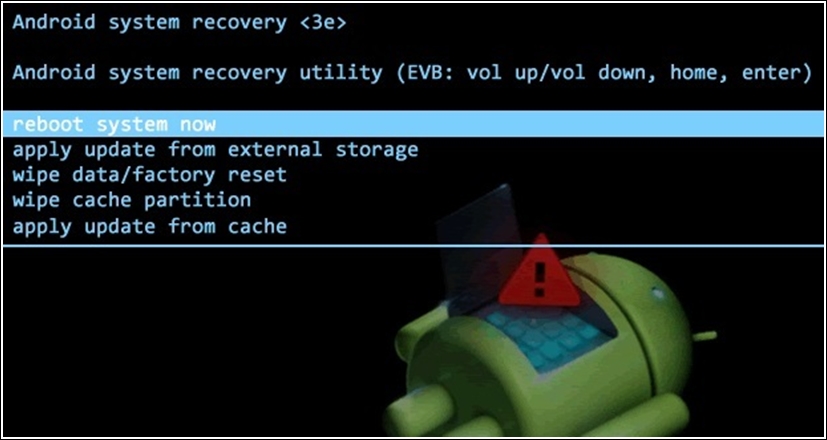
The options you will find in the recovery menu could vary, but an Android vanilla recovery will definitely provide these options:
- Reboot system now: This option will restart the system.
- Apply update from ADB: Android Debug Bridge can be used from a host computer to upload an official Google system update. Only certified updates can be uploaded and applied this way due to security measures enforced by the recovery to guarantee system integrity.
- Wipe cache partition: This option will erase the cache partition. This partition usually contains the system's temporary data and app cache data. Deleting this file will free quite an amount of disk space, without losing user data or apps.
- Wipe data/factory reset: This option will erase the volatile memory and restore the original factory system. Everything that is not strictly system-related will be deleted: videos, music, documents, user apps, and so on. The cache partition will be erased as well.
The following screenshot show a stock Android recovery:
As with the whole Android system, even the recovery source code is available for study and modifications and, over the years, the Android community has developed alternatives that can be used in place of the Android stock recovery.
All these alternatives aim to improve and add more features to the stock recovery. The most common features are:
- Ability to save and restore system backups: NANDroid is extremely useful for experimenting with custom systems and adventurous configurations
- Ability to install custom ROMs: Probably the most important among the added features, from a custom ROM developer's point of view
- Enhanced UI and UXD: Some of these custom recoveries provide support for the touchscreen, instead of the default Volume/Power button navigation
The most popular recovery alternatives are:
- Clockworkmod
- 4EXT
- Amon Ra Recovery
- Team Win Recovery Project (TWRP)
Every one of them is different in some way—look and feel, advanced features, and so on, but all of them provide a clear way to allow the advanced user to install custom ROMs.
This is definitely one of the most popular custom recoveries in the game. It's often called CWM, and has been developed by Koushik "Koush" Dutta. He started with the ancient Android 2.1 recovery source code and, since then, he has kept on adding features.
One of the main features is the NANDroid backup, which allows the user to safely save and restore the whole system structure. Another interesting feature is the ability to connect to the recovery shell from a computer, via ADB. A critically important feature is the ability to update the system using unofficial update packages. Unlike the stock recovery, Clockworkmod ignores all signature certificates, knowing that only an advanced user would try to flash a custom-made update package.
Clockworkmod recovery can be easily installed using the specific app distributed via Google Play Store, or manually, as we will see.
To install it manually on your trusted Nexus device, you can use fastboot. Follow these steps to install Clockworkmod recovery:
- First thing to do—download it. The Clockworkmod website has a complete list of supported devices and specific download files: https://www.clockworkmod.com/rommanager.
- Once you have the file, decompress it and you will have a
.imgfile. - Now, put your device in
fastbootmode, as we saw in previous chapters, fire up a terminal, and use the following command to flash the.imgfile to the recovery partition:$~: sudo fastboot flash recovery recovery.img - Once the brand new recovery has been installed, you can reboot the device straight to recovery mode with the following command:
$~: sudo fastboot reboot recovery
From this moment on, we can install custom ROMs or perform a total system backup.
It's also possible to recompile the Clockworkmod source code from scratch, since the project is open source. You can also find a custom recovery source code in the custom Cyanogenmod ROM that we have discussed in previous paragraphs. Building Cyanogenmod from the source code follows the same steps you already followed to build official Android: the build system and the build setup are the same. Applying the same know-how as for vanilla Android, you can easily create a Cyanogenmod system image and a Clockworkmod custom recovery.
Here's a screenshot of the Clockworkmod UI:

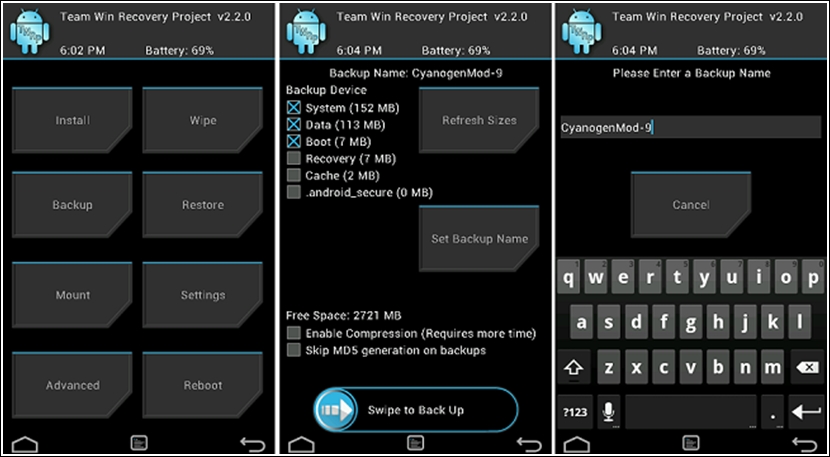
One alternative to the famous Clockworkmod recovery is TWRP, which stands for Team Win Recovery Project. One of the most important features of this recovery mod is support for touchscreens.
In this way, you can interact with the recovery mod directly using the screen, like you normally do using Android, which is very convenient, especially if we compare it to the volume keys used in all the other recovery mods. The graphical interface is pretty usable, with big buttons that show all the various options (they are very similar to the ones in the Clockwork mod). Using TWRP, you can install unofficial ROMs and also perform a complete system backup.
The project was born on 30th July 2011 and is an open source project— also, here you can either download a binary for your device or recompile from source code.
You can find more information on the official website at http://teamw.in/.
Here are some screenshots of TWRP:
Custom recovery can be operated using their standard UI, as we saw, and using an ADB connection. This feature is not available in the stock recovery and will be very useful during our experiments.
Once the custom recovery is installed, fire up a terminal and run the following command:
~$: adb devices
ADB will list all the available devices, as shown in the following screenshot:

Knowing that there is just a single device, we can simply use the following command to connect to the recovery shell:
~$: adb shell
You will be prompted with a # symbol, which lets you know that you have administrator powers as a root user. Being a root user gives you the opportunity to do advanced tasks, such as mount the system/ in read/write mode and add or remove any file you want, without starting the whole Android system.