
When you think about customizing the core of an Android system, you immediately think about customizing the Linux kernel. It manages CPU, sensors, radio, and display, and it's the starting point of every great system customization. As we already saw, modifying the kernel is no easy job, but with the right mindset, knowledge, and toolset, it can be a satisfying experience.
Every embedded system has its own customization possibilities and, when it comes to Android, most of the effort is focused on customizing the following:
- Governors
- I/O schedulers
- CPU overclocking/underclocking
In Chapter 5, Customizing Kernel and Boot Sequence, we had an overview about governors, how they work, and how you can pick a different one for different scenarios. In this section, you will learn how to customize existing governors and how to add new ones to your systems.
A typical general purpose governor would decrease the number of active cores and their working frequency when the system load is low and push the CPU to full power and full speed when the system is in need of high performance.
A standard Linux kernel provides the following governors:
- On-demand: This is the default governor on most of the kernels on the market. It's considered a balanced governor because it can guarantee the system to be reactive, quickly increasing the CPU frequency when needed. The truth is that, being so eager to increase the CPU frequency, this governor makes no real evaluation about the CPU power that is actually needed. The on-demand governor does not consider the actual system load; instead it just increases the CPU frequency to the max when it is triggered and then slowly decreases it if not needed. As you can see, this does not work well in a "battery saving" scenario: it is pushing to top speed every time the system thinks it is going to need more power, without a deeper analysis. This approach will surely guarantee a reactive device, but will definitely drain the battery very quickly.
- Powersave: This is definitely the most effective way to save battery life, in a way. This governor sets the maximum CPU frequency to the lowest possible value. The battery will surely last "an eternity", but the device will be unusable: a 2 GHz Quad-core CPU can easily go down to 200 MHz, and if it stays there all the time, that's just nonsense.
- Performance: This governor behaves as the exact opposite of the Powersave one: it sets the minimum CPU frequency to the maximum possible value to achieve maximum performance. Battery-wise, this will drain the battery in no time: a 2 GHz Quad-core running all the time at full power is surely performing well, but the smartphone won't last long.
- Interactive: This is a smarter version of the On-demand governor. Its goal is to provide a reactive CPU scaling without falling into on-demand pitfalls. The On-demand governor changes the CPU frequency according to preset values, without any specific analysis. The interactive governor, instead, continuously evaluates the system load and adjusts the CPU frequency accordingly, with a more linear CPU scaling curve: definitely a big pro. The whole CPU scaling analysis is not based on raw workload, but is performed according to the requested time. This approach guarantees system fluidity and better performance in a multimedia scenario, because the CPU won't jump up and down in frequency, but will be steady during the whole necessary time, providing a constant framerate when required.
- Conservative: This governor is a smoother version of the On-demand governor. Unlike On-demand, the Conservative governor won't push the CPU to the top frequency every single time, but will proceed through a series of CPU frequency steps, according to the CPU load.
- Userspace: This is the most customizable and least "automatic" governor. It provides the user with the possibility to manually pick the desired frequency.
If you need a specific CPU behavior, or you simply want to dig deeper into kernel customization, you can create your own CPU governor.
For this task, you will need the kernel source code and to navigate to:
<root-source>/drivers/cpufreq
This folder contains every governor we saw in the previous section and every possible custom governor you are going to add or that your device manufacturer already added.
Let's create a new governor, creating a .c file in this folder, for example:
<root-source>/drivers/cpufreq/cpufreq_mygovernor.c
Once you have the file in place, you need to add it to the file mentioned here:
<root-source>/drivers/cpufreq/Kconfig
We make changes as shown in the following snippet:
config CPU_FREQ_GOV_MYGOVERNOR
 tristate "'mygovernor' cpufreq governor"
 depends on CPU_FREQ
 help
 'mygovernor' - my optimized governor!

config CPU_FREQ_DEFAULT_GOV_ MYGOVERNOR
 bool "mygovernor"
 select CPU_FREQ_GOV_MYGOVERNOR
 help
 Use the CPUFreq governor 'mygovernor' as default.
Once you are done with the Kconfig, edit the Makefile and add the following line:
obj-$(CONFIG_CPU_FREQ_GOV_ MYGOVERNOR) += cpufreq_mygovernor.o
As a last step, edit the following file:
<root-source>/include/linux/cpufreq.h
Around line 400, there is a list of currently available governors, as shown in the following image:
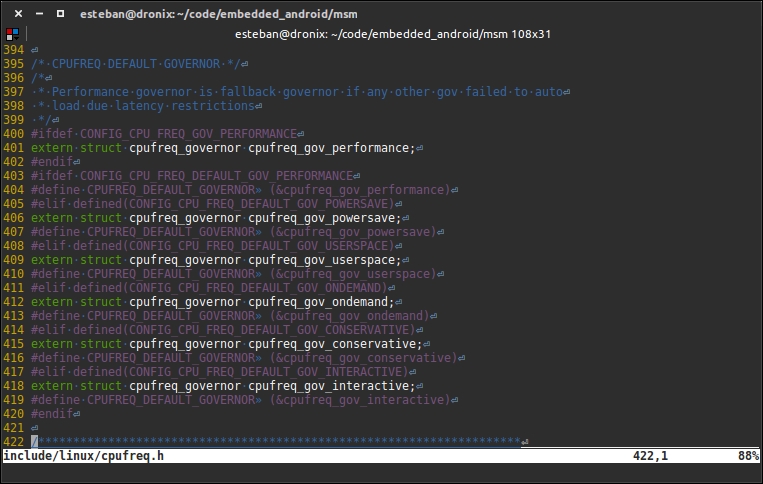
Following the same pattern, let's add your new governor reference, using the following snippet:
#elif defined(CONFIG_CPU_FREQ_DEFAULT_GOV_MYGOVERNOR)
extern struct cpufreq_governor cpufreq_gov_mygovernor;
#define CPUFREQ_DEFAULT_GOVERNOR (&cpufreq_gov_mygovernor)
Mission completed: your new governor is now available and ready to be integrated in your next kernel build. Try to run menuconfig and navigate to the governor screen; you will be able to enable it and set it as the default governor.
I/O schedulers specify how I/O-bound operations must be performed and balanced among CPU cores. Android comes with a default set of I/O schedulers:
- Noop: This can be barely considered a scheduler. Practically speaking, it has no effect on the tasks list: it just queues them as they come in.
- SIO: This is the first real scheduler. Even if it does no task reordering, it guarantees the smallest possible latency from the moment the task is enqueued and the moment it is performed.
- CFQ: This scheduler orders tasks in separated queues, according to specific categories, and assigns an execution time window to every queue. The window size depends on the priority assigned to the tasks involved.
- BFQ: This scheduler is similar to the CFQ scheduler, but it uses disk bandwidth windows instead of time windows to group and schedule tasks.
- Anticipatory: This scheduler uses prediction techniques to group and schedule tasks, pausing executions for a short time period and waiting for a possible new task to be added to a specific queue.
- ROW: This scheduler is based on the "read over write" rule: every reading task has priority over writing tasks.
- Deadline: This scheduler guarantees termination for the enqueued tasks, trying to avoid "starvation" scenarios. Starvation is a well-known concept in computer science and applies to resource management. Imagine that N processes want to use the same shared resource. The shared resource can be used by one process at a time, and processes alternate according to their priority. What is going to happen if a low-priority process is asking for the resource, but the resource never becomes available due to other high-priority processes using it? The low-priority process will wait forever for the resource and never get to enjoy it. In computer science terminology, it will starve.
Every available scheduler is stored in the following folder:
<root-source>/block
Creating an I/O scheduler can be challenging and it's beyond the purpose of this book. What we can do is point you in the right direction and get you curious about the topic.