
In Chapter 7, Tailoring Your Personal Android System, you learned how to add the final personal touch to your custom Android system. You customized both the application layer and the system layer: new menus, new apps, and new daemons.
In this chapter, we are going even further: we are going outside the smartphone, connecting to external microcontrollers, sensors, and different devices. We will see how our whole world could be connected and interactive with Android.
You will learn about Android ADK and Arduino, and how Google is filling our lives with Android-oriented devices: from Chromecast devices to Android Auto, from smart watches to Internet of Things.
More than ten years ago, in a bar in a small Italian town, a group of students and researchers created a low-cost microcontroller that would revolutionize the world of DIY (Do It Yourself)—Arduino, shown in the next image:

The latest version of Ardunio (or Genuino, for the non-USA market) is called Arduino UNO. Uno means one in Italian and this codename celebrates the first stable version of the IDE (Integrated Development Environment) that comes with the board itself. This board is based on ATmega328P by Atmel and provides a set of controllable input/output pins. It can work as a standalone microcontroller, once it has been properly programmed, and can be used via its USB connection.
The greatest feature of Arduino is its open nature: everything, from the hardware schematics to the development IDE, has been open source since day one. This openness, and the extensible design of the board, allowed manufactures and advanced users to create an infinite number of so-called shields:

An Arduino shield is a separate component that can be attached to Arduino to enhance it and to add new features. The previous image shows how Arduino shields can be stacked to create a totally new and customized device. Common examples of Arduino shields are:
- The Ethernet Shield, which gives Arduino the ability to communicate with the outside world via an Internet connection.
- The Proto Shield, which can be used to make a permanent version of a prototype that you created with a breadboard.
- The Relay Shield, which enables Arduino to pilot high-voltage circuits. This is crucial for home automation when you need to turn lights or appliances on and off.
- The Display Shield, which gives Arduino a visual way to communicate with the outside world.
Since Arduino came out, it has gained more and more fans and passionate developers, thanks to its easy interface and the extremely flat learning curve. Today, software developers without hardware or electronics knowledge can create projects that live outside their computers and can interact with the external world. To take advantage of these possibilities, in 2012 Google created the Android ADK.
Android Accessory Development Kit is the reference implementation for the Android Open Accessory device. At Google I/O, in 2012 Google provided Android Accessory Development Kits to developers and provided manufacturers with clear specifications for creating their own kit, external accessory devices for Android. One of these certified devices is the Arduino itself, but thanks to the open nature of the whole project, you could build a compatible device yourself.
Unfortunately, Android ADK never really boomed among developers. Of course, you can find lots of interesting projects on the web about connecting an Android smartphone to an Arduino, like the one by TCRobotics at http://blog.bricogeek.com/noticias/arduino/el-adk-de-google-en-un-arduino-uno. This is surely one of our favorites; it shows the great potential, but also the big sacrifice, of keeping an Android smartphone wired to a cable the whole time:

Luckily for us, there are much cooler ways to use Android ADK to play around with sensors and electronics.
As you already know, UDOO can run Android. What you probably don't know is that it comes with an Arduino on it. Yes, both Android and Arduino are on the same board! When you think that you can connect a touchscreen, or even a mouse and keyboard to UDOO, you soon start fantasizing about all those geeky projects of yours becoming reality.
To start playing with Arduino, you just need to set up UDOO and connect the Android part to the SAM3X (Arduino-compatible) part. The following images show an UDOO, as seen from above. On the left, jumper 18 is highlighted. This jumper must be unplugged to enable the SAM3X. On the right, the USB port you are going to connect to is highlighted as well:

Once the board is ready, you can move to the software part.
For this quick example, we are going to command an LED connected to the UDOO. The LED will be connected to input 13 of the UDOO board. Every LED has two pins; the longer one is the anode and has to be connected to input 13, and the shorter one is the cathode and has to be connected to ground, the unnumbered input on the left of input 13:

The electronics setup is in place. Let's download the Arduino IDE from http://www.udoo.org/other-resources/.
The first time you run the Arduino IDE, you will be presented with an empty project file:

This empty Arduino sketch gives you a skeleton structure for our Arduino program:
- A
setupmethod that runs once and gets everything in place for the second method - A
loopmethod that keeps on running over and over until the board is turned off
To properly connect and program our Arduino, we need to select the board type and port. From the Arduino IDE Tools menu, select Board | Arduino Due (Programming Port):
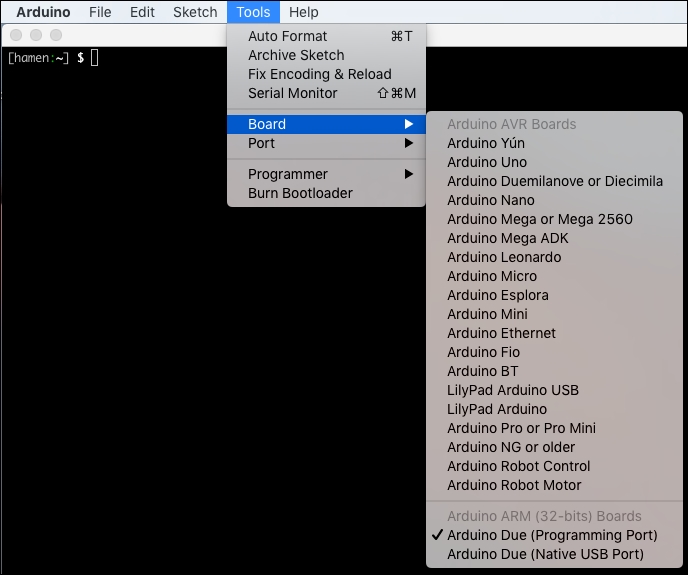
The previous image shows the amount of different Arduino boards that are available on the market nowadays. UDOO is compatible with the Arduino Due, so we are choosing that board model. Once we have selected the proper board, we need to select the Port to use to connect to the UDOO:

As you can see in the image, the port name could be slightly different on different computers. The previous image shows a common configuration for an Apple MacBook Pro.
Once the IDE has been properly configured, we can start with the source code, as follows:
#include "variant.h"
#include <stdio.h>
#include <adk.h>

#define  LED_PIN  13

// Accessory descriptor. It's how Arduino identifies itself to Android.
char descriptionName[] = "ArduinoADK";
char modelName[] = "UDOO_ADK";           // Arduino Accessory name (Need to be the same defined in the Android App)
char manufacturerName[] = "Packt";     // Manufacturer (Need to be the same defined in the Android App)

char versionNumber[] = "1.0";            // version (Need to be the same defined in the Android App)
char serialNumber[] = "1";
char url[] = "http://www.packtpub.com";      // If there isn't any compatible app installed, Android suggest to visit this url

USBHost Usb;
ADK adk(&Usb, manufacturerName, modelName, descriptionName, versionNumber, url, serialNumber);

#define RCVSIZE 128
uint8_t buf[RCVSIZE];
uint32_t bytesRead = 0;

void setup() {
    Serial.begin(115200);
    pinMode(LED_PIN, OUTPUT);
    delay(500);
    Serial.println("Starting...");
}

void loop() {
    Usb.Task();

    if (adk.isReady()) {
      adk.read(&bytesRead, RCVSIZE, buf);// read data into buf variable
      if (bytesRead > 0) {
        if (parseCommand(buf[0]) == 1) {// compare received data
          // Received "1" - turn on LED
          digitalWrite(LED_PIN, HIGH);
        } else if (parseCommand(buf[0]) == 0) {
          // Received "0" - turn off LED
          digitalWrite(LED_PIN, LOW);
        }
      }
    } else {
      digitalWrite(LED_PIN , LOW); // turn off light
    }

    delay(10);
}

// the characters sent to Arduino are interpreted as ASCII, we decrease 48 to return to ASCII range.
uint8_t parseCommand(uint8_t received) {
  return received - 48;
}
We can quickly analyze the source code and can find out that:
- We are specifying PIN number 13
- We are specifying the model name, manufacturer name, and version number that will identify our board once we connect it to Android
- We are configuring the serial connection
- We are listening for incoming data on the serial connection and reacting accordingly:
- turn on the LED if we received 1
- turn off the LED if we received 0
Once the source code is in place, you can flash it to the Arduino using the IDE File | Upload menu.
The Android app will be super simple: a toggle button to turn the LED ON and OFF. You can create the initial app using the Android Studio wizard, creating an empty Activity to get things started. Once the skeleton is in place, you need to add a new dependency to your build.gradle:
dependencies {
    compile 'me.palazzetti:adktoolkit:0.3.0'
}
Emanuele Palazzetti, author of Getting started with UDOO by Packt Publishing, released a handy Android library, ADK Toolkit (https://github.com/palazzem/adk-toolkit), for easier communication between your Android apps and your Android ADK device, and we are going to take full advantage of this library.
You need to add some specific configurations in your Android Manifest. In your <activity> tag, add the following lines:
<intent-filter>
  <action android:name="android.hardware.usb.action.USB_ACCESSORY_ATTACHED"/>
</intent-filter>
<meta-data
  android:name="android.hardware.usb.action.USB_ACCESSORY_ATTACHED"
  android:resource="@xml/accessory_filter"/>
As you will have noted, the <meta-data> tag refers to an XML resource, named accessory_filter. Right now, it's missing. Let's create a accessory_filter.xml in the src/res/xml/ folder:
<?xml version="1.0" encoding="utf-8"?>
<resources>
  <usb-accessory
    manufacturer="Packt"
    model="UDOO_ADK"
    version="1.0"/>
</resources>
This is the exact information we added to the Arduino sketch and will allow Android to properly identify our board.
Setup is over. Let's move on to the UI of our app. Having followed the wizard, you now have a single Activity with its own layout; chances are that its name is main.xml and it's located in src/res/layout. Once you have located the layout, we can add our button:
<ToggleButton
 android:id="@+id/toggleButtonLED"
 android:textOn="Turn OFF"
 android:textOff="Turn ON"
 android:layout_width="500dp"
 android:layout_height="200dp"
 android:layout_centerVertical="true"
 android:layout_centerHorizontal="true"
 android:textSize="50sp"
 android:onClick="blinkLED"/>
It's pretty straightforward: an ID, a couple of labels, and an onClick method to trigger when the button is tapped.
The method referred by the onClick will be placed into our Activity:
public void blinkLED(View v) {
    if (buttonLED.isChecked()) {
        adkManager.write("1");
    } else {
        adkManager.write("0");
    }
}
When the button is clicked, we send 1 if it's ON, or 0 if it's OFF. Fair enough, but where do we send this data? What's that adkManager?
The adkManager module comes with the ADK Toolkit. We create it and set it up in our Activity. This is the final result:
public class UDOOBlinkLEDActivity extends Activity {

    private ToggleButton buttonLED;

    private AdkManager adkManager;

    @Override
    public void onCreate(Bundle savedInstanceState) {
        super.onCreate(savedInstanceState);
        setContentView(R.layout.main);
        buttonLED = (ToggleButton) findViewById(R.id.toggleButtonLED);

        adkManager = new AdkManager(this);
        registerReceiver(adkManager.getUsbReceiver(), adkManager.getDetachedFilter());
    }

    @Override
    public void onResume() {
        super.onResume();
        adkManager.open();
    }

    @Override
    public void onPause() {
        super.onPause();
        adkManager.close();
    }

    public void blinkLED(View v) {
        if (buttonLED.isChecked()) {
            adkManager.write("1");
        } else {
            adkManager.write("0");
        }
    }
}
Finally, our app is completed. Just upload it to our UDOO and you will have a huge button to turn your LED ON and OFF:
