
Hierarchical data is something that most developers are intimately familiar with. The root-branch-leaf structure is the underlying feature for many user interfaces, from the file and folder representations in Windows Explorer to the classic family tree showing children, parents, and grandparents. The Ext.tree package enables developers to bring these data structures to the user with only a few lines of code, and provides for a range of advanced cases with a number of simple configuration options.
Although the default Ext JS icon set shows tree nodes as files and folders, it is not restricted to the file system concept. The icons and text of the items, or nodes in your tree, can be changed based on the dynamic or static data used to populate it—and without requiring custom code. How about a security screen showing permission groups containing a number of users, with icons showing a photo of each user, or a gallery showing groups of photos, or image previews in the icons? Ext JS's tree classes puts all of these scenarios within your grasp.
Ultimately, the Ext JS tree doesn't care about the data you're displaying, because it's flexible enough to deal with any scenario that you can come up with. Data can be instructed to load up-front, or in logical bursts, which can become a critical feature when you've got a lot of information to load. You can edit data directly in the tree, changing labels and item positions, or you can modify the appearance of the overall tree or of each individual node, all of which will contribute to a customized end-user experience.
The Ext JS tree is built on top of the Component model, which underlies the whole Ext JS framework. This means that developers receive the benefits of working with the familiar Component system, that users get a consistent and integrated interface experience, and that you can be sure your tree will work seamlessly with the rest of your application.
In this chapter, we'll see how you can build a tree from first principles with a minimal of code. We'll also discuss the unique data structure that is used to populate the tree, and the way in which clever use of that data can let you harness important configuration options. The Ext JS tree natively supports advanced features such as sorting, and drag-and-drop, so we'll be discussing those as well. But if you need a truly bespoke tree, we'll also explore the way in which configuration options, methods, and events can be overridden or augmented to provide it.
The tree itself is created via the Ext.tree.TreePanel class, which in turn contains many Ext.tree.TreeNodes classes. These two classes are the core of the Ext JS tree support, and as such will be the main topics of discussion throughout this chapter. However there are a number of other relevant classes that we'll also cover. Here's the full list from the Ext.tree package:
|
|
Allows |
|
|
Standard single-select for the |
|
|
Provides support for multiple node selection |
|
|
Specialized |
|
|
Provides support for |
|
|
Provides support for |
|
|
Allows node labels to be edited |
|
|
Filter support for |
|
|
Populates a |
|
|
The main class representing a node within a |
|
|
Provides the underlying interface for the |
|
|
A tree-like representation of data—the main tree class |
|
|
Supports sorting of nodes within a |
Ouch! Fortunately, you don't have to use all of them all at once. TreeNode and TreePanel provide the basics, and the rest of the classes are bolted on to provide extra functionality. We'll cover each of them in turn, discussing how they're used, and showing a few practical examples along the way.
By now, you're probably thinking of the various possibilities for the Ext JS tree, and want to get your hands dirty. Despite the fact that the Ext.tree classes are some of the most feature-rich available in the framework, you can still get everything up and running with only a few lines of code.
In the examples that follow, we'll assume that you have a blank-slate HTML page ready and waiting, with all of the Ext JS dependencies included. Most of the code we will use builds on what came before, to make sure that we're only working with bite-sized pieces. Bear this in mind when you look at them in isolation.
It is best practice to put the JavaScript in a separate file and wrap it in an Ext.onReady call. However, you can also do it according to your individual coding style.
First, we need to create a containing<div> element on our HTML page. We will be rendering our TreePanel into this container. So we have to set it to the size we want our tree to be:
<div id="treecontainer" style="height:300px; width:200px;"></div>
The JavaScript for the tree can be broken down into three parts. Firstly, we need to specify the manner in which it's going to be populated. The Ext.tree.TreeLoader class provides this functionality, and here we're going to use it in the simplest manner:
var treeLoader = new Ext.tree.TreeLoader({
dataUrl:'http://localhost/samplejson.php'
});
The dataUrl configuration parameter specifies the location of the script that is going to supply the JavaScript Object Notation (JSON) used to populate our tree. I'm not going to go into the details of the structure of JSON now; let's save that for later.
Each tree requires a root node, which acts as a great-granddaddy for all of its descendants. To create that root node, we use the Ext.tree.AsyncTreeNode class:
var rootNode = new Ext.tree.AsyncTreeNode({
text: 'Root'
});
The reason we're using AsyncTreeNode, rather than the basic TreeNode that is also available, is because we're fetching our nodes from the server and are expecting child nodes to be populated branch-by-branch rather than all at once. This is the most typical scenario for a tree.
Note
AsyncTreeNode uses AJAX on-the-fly to ensure your users aren't waiting too long for your data to load and for the first nodes to be rendered.
Finally, we create the tree itself, using the Ext.tree.TreePanel class:
var tree = new Ext.tree.TreePanel({
renderTo:'treecontainer',
loader: treeLoader,
root: rootNode
});
This is just a matter of passing the root node and the TreeLoader in as configuration options, as well as using the renderTo config to specify that we'd like the TreePanel rendered into our treeContainer element.
Again, you should remember that you need to wrap all of this code in a call to Ext.onReady, to make sure that the DOM is available when our code runs.
We've seen that it only takes eleven lines of code to create a tree interface using Ext JS. You can see an example of the finished product here:
I guess it doesn't look like much, but we've got quite a bit of functionality for our eleven lines of code. We've got a consistent and attractive look and feel, with asynchronous remote loading of child nodes. To be fair, it's not as simple as that, because we skimmed over a crucial part of building an Ext JS tree—the data.
The standard TreeLoader supports JSON in a specific format—an array of node definitions. Here's a cut-down example:
[
{ id: '1', text: 'No Children', leaf: true },
{ id: '2', text: 'Has Children',
children: [{
id: '3',
text: 'Youngster',
leaf: true
}]
}
]
The text property is the label of the node as it appears in the tree. The id property is used to uniquely identify each node, and will be used to determine which nodes are selected or expanded. Using the id property can make your life a whole lot easier if you're using some of the advanced features of the TreePanel, which we'll see later. The children property is optional. The leaf property can be thought of as marking a node as either a folder or a file. As a leaf, the file is contained within the folder. In the tree, leaf nodes will not be expandable and won't have the plus icon which identifies folders.
By default, TreeNodes are assigned an automatically-generated ID, meaning that the ID configuration property is actually optional. The generated ID is a text string in the form ynode-xx, with xx being replaced by a number. IDs can be useful for retrieving a node you have previously referenced. However, it is quite likely that you'd want to assign the ID value yourself. Whenever you expand a node with children to trigger an asynchronous load of data from the server, your server script needs to know exactly which node was clicked in order to send its children back. By explicitly setting the ID, you'll find it a lot easier to match nodes with their actions when you're working with the server.
Although the id, text, and leaf properties are the most commonly-used properties, the way in which they are populated by JSON isn't exclusive to them. In fact, any configuration property of a TreeNode can be initialised by JSON, which will prove to be a useful trick when we begin to explore the other features of the tree. You're also able to include application-specific data; perhaps your nodes are products and you want to hold the price of them. Any property that isn't recognized as a TreeNode config option will still be included on the TreeNode.attributes property for later access.
XML is not natively supported by the tree. However, it is possible to use Ext JS's data support to make this happen. Generally, using JSON will ease your pain, although some applications may use XML as their data transport. So it's worth discussing some general approaches.
We can use Ext.data.HttpProxy to pull in the data, but we need to transform the XML as it is being read:
var xmltree = new Ext.tree.TreePanel({el: 'treeContainer'});
var proxy = new Ext.data.HttpProxy({url: 'http://localhost:81/ext/treexml.php'});
proxy.load(null, {
read: function(xmlDocument) {
parseXmlAndCreateNodes(xmlDocument);
}
}, function(){ xmltree.render(); });
We create a new TreePanel and HttpProxy, and specify that when the proxy loads we want an Ext.data.Reader to handle the incoming XML data. We then tell the reader to pass the XML to parseXmlAndCreateNodes. In this function, you would create a root TreeNode and children based on the XML data, which is pretty straightforward given that HttpProxy is XML-aware and passes you a true XML document rather than a plain string.
JavaScript is fully capable of handling XML data, although you may be more comfortable approaching it as you would approach traversing the DOM of an XHTML document. By navigating and reading the XML document you can build up a TreeNode hierarchy, incorporating XML attributes as extra data for each node, and using textnodes as the text label. Because you have access to the raw XML nodes in this manner, you have full control over the resultant tree structure and the TreeNodes that comprise it.
We're now going to discuss the main features that you can bolt on to your tree to make it a little bit more useful. Drag-and-drop, sorting, and node editing, are the kinds of things that lift the TreePanel from being a clever way of displaying data, to being a great way of manipulating it.
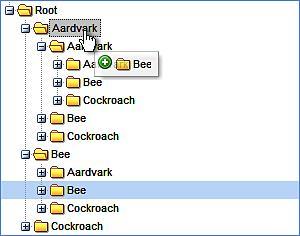
Ext JS takes care of all of the drag-and-drop UI for you when you're using a TreePanel. Just add enableDD: true to your configuration, and you'll be able to rearrange nodes with a drop target graphic, and add them to folders, with a green plus icon to indicate what you're about to do.
Note
The TreePanel doesn't care about just its own nodes. If you've got more than one TreePanel on the page, then you can happily drag-and-drop branches or leaves between them.
But that's only half the story. When you refresh your page, all of your rearranged nodes will be back to their starting positions. That's because the TreePanel doesn't automatically know how you want to persist your changes, and in order to educate it, we've got to hook into some events.
The TreePanel's beforemovenode event fires at just the right time for us—after the mouse button is released to signify we want to do a drop, but before the TreePanel UI is updated to reflect that. We are most likely to add code such as the following to tell the server about node move events:
tree.on('beforemovenode', function(tree, node, oldParent, newParent, index) {
Ext.Ajax.request({
url: 'http://localhost/node-move.php',
params: {
nodeid: node.id,
newparentid: newParent.id,
oldparentid: oldParent.id,
dropindex: index
}
});
});
Augmenting our previous code, we're adding a new event handler for the beforemovenode event. The handler function is called with a few useful arguments:
tree:TheTreePanelthat raised the eventnode:TheTreeNodebeing movedoldParent:The previous parent of the node being movednewParent:The new parent of the node being movedindex:The numerical index where the node was dropped
We use these arguments to form the parameters of an AJAX call to the server. As you can pull out pretty much any information you need about the current state of the tree, your server-side script can perform any action that it needs to.
In some cases, that could include canceling the move action. If the logic you place within the beforemovenode handler fails, you need to roll back your changes. If you're not doing an AJAX call, this is pretty straightforward—just return false at the end of the handler and the action will be canceled. For AJAX though, it's more difficult, because the XMLHttpRequest happens asynchronously, and the event handler will proceed with its default action, which is to allow the move.
In these circumstances, you need to make sure that you provide a failure handler for your AJAX request, and pass enough information back to that failure handler to allow it to manually return the tree to its previous state. Because beforemovenode provides a lot of information through its arguments, you can pass the necessary data to take care of these error events.
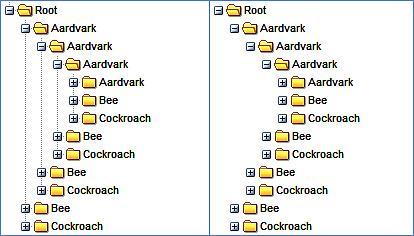
We can sort nodes in a TreePanel in a very flexible manner by using the TreeSorter. Again, building on our previous code, we can create a TreeSorter such as this:
new Ext.tree.TreeSorter(tree, {
folderSort: true,
dir: "asc"
});
Because TreeSorter assumes a couple of defaults—specifically, that your leaf nodes are marked with a property called leaf and that your labels are in a property called text—we can perform an alphabetical sort very easily. The dir parameter tells the TreeSorter to sort in either ascending (with the asc value) or descending (desc) order, and the folderSort parameter indicates that it should sort leaf nodes that are within folders—in other words, the whole tree hierarchy.
If you've got data that isn't simple text, you can specify a custom method of sorting with the sortType configuration option. sortType takes a function as its value, and that function will be called with one argument: a TreeNode.
The purpose of the sortType function is to allow you to cast a custom property of the TreeNode—presumably something you've passed from the server and that is specific to your business needs—and convert it to a format that Ext JS can sort, in other words, one of the standard JavaScript types such as integer, string, or date.
This feature can be useful in cases where data passed to the tree is in a format that isn't conducive to normal searching. Data generated by the server might serve multiple purposes, and hence may not always be right for a particular purpose. For example, we may need to convert dates into a standard format—from US style MM/DD/YY to YYYYMMDD format that is suitable for sorting—or maybe we need to strip extraneous characters from a monetary value so that it can be parsed as a decimal.
sortType: function(node) {
return node.attributes.creationDate
}
In the above example, we return some custom data from our node, and because this value is a valid JavaScript date, Ext JS will be able to sort against it. This is a simple demonstration of how the sortType option can be used to allow the TreeSorter to work with any kind of server data.
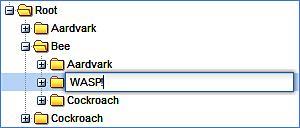
There are many scenarios in which editing the value of your nodes could be useful. When viewing a hierarchy of categorized products, you may wish to rename either the categories or the products in-line, without navigating to another screen. We can enable this simple feature by using the Ext.tree.TreeEditor class:
var editor = new Ext.tree.TreeEditor(tree);
The defaults of the TreeEditor mean that this will now give your tree nodes a TextField editor when you double-click on their label. However, as with basic drag-and-drop functionality, enabling this feature doesn't automatically mean that your changes will be persisted to the server. We need to handle the event that fires when you've finished editing the node:
editor.on('beforecomplete', function(editor, newValue, originalValue) {
// Possible Ajax call?
});
The beforecomplete event handler gets called with three arguments:
editor:The editor field used to edit the nodenewValue:The value that was enteredoriginalValue:The value before you changed it
However, it is important to note that the editor parameter is no ordinary Ext.form.Field. It is augmented with extra properties, the most useful of which is editNode, a reference to the node that was edited. This allows you to get information such as the node ID, which would be essential in making a server-side call to synchronize the edited value in the database.
As with the TreePanel's beforemovenode event, beforecomplete allows cancellation of the edit action by returning False at the end of its handler processing; AJAX requests will need to provide a failure handler to manually restore the edited value.
This has been a quick overview of how to create a very simple in-line editor. There are also means of using this class to create more complicated features. The TreeEditor constructor can take up to two optional parameters on top of the single mandatory parameter shown in the example above. These are a field configuration object and a configuration object for the TreeEditor. The field config can be one of two things: a field config object to be applied to the standard TextField editor, or an already-created instance of a different form field. If it is the latter, it will be used instead of the default, which means that you can add NumberField, DateField or another Ext.form.Field in a similar manner.
The second parameter allows you to configure the TreeEditor, and is more for fine-tuning rather than introducing any exciting functionality. For example, we can use cancelOnEsc to allow the user to cancel any editing by pressing the Escape key, or use ignoreNoChange to avoid firing completion events if a value has not changed after an edit.
There a few other tricks that the TreePanel supports, which assist in the creation of rich applications. Varying selection models, node filtering, and context menus are commonly-used features in many solutions. So let's take a look at these now.
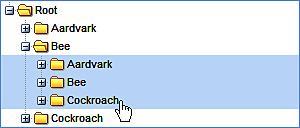
In our previous example code, we dragged and edited TreeNodes to alter them immediately. But nodes can also be selected for further processing. The TreePanel uses a single-selection model by default. In our previous code, we've already done everything we need to enable node selection. As with many aspects of the tree, simply selecting the node doesn't do anything; instead we need to hook in to some of the features provided to manipulate the selection.
A great example of this would be to select a node and have an information panel automatically populated with further details of that node. Perhaps you have a tree of named products, and clicking a node will display the price and stock level of the selected product. We can use the selectionchange event to make this happen. Again, using our previous code as a starting point, we could add the following:
tree.selModel.on('selectionchange', function(selModel, node) {
var price = node.attributes.price;
});
The second node argument that is passed to the selectionchange event makes it very easy to grab any custom attributes in your node data.
What if we want to allow multiple nodes to be selected? How can we do that, and how can we handle the selectionchange event in that configuration? We can use Ext.tree.MultiSelectionModel when creating our TreePanel:
var tree = new Ext.tree.TreePanel({
renderTo:'treeContainer',
loader: treeLoader,
root: rootNode,
selModel: new Ext.tree.MultiSelectionModel()
});
Configuration is as simple as that. Although handling the selectionchange event is very similar to the default selection model, there is an important difference. The second argument to the event handler will be an array of nodes rather than a single node.
Selection models don't just expose the means of retrieving selection information. They also allow manipulation of the current selection. For example, the MultiSelectionModel.clearSelections() method is useful for wiping the slate clean after you have finished handling an event involving multiple nodes. DefaultSelectionModel has methods (selectNext and selectPrevious) for navigating the tree, moving up or down the node hierarchy as required.
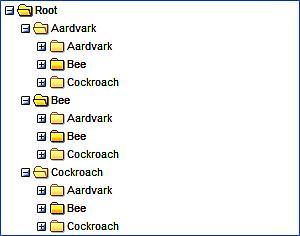
We've already covered a lot of the functionality that the TreePanel can provide, so let's consolidate a little bit with a practical example. Adding a context menu that appears when you right-click a TreeNode is a trivial task with Ext JS. However, it can be an extremely useful means of adding shortcuts to your interface. We'll be building on the code that has been used in the previous sections. First, let's create the menu, and then we'll hook it up to the TreePanel:
var contextMenu = new Ext.menu.Menu({
items: [
{ text: 'Delete', handler: deleteHandler },
{ text: 'Sort', handler: sortHandler }
]
});
tree.on('contextmenu', treeContextHandler);
The TreePanel provides a contextmenu event which fires when the user right-clicks on a node. Note that our listeners are not anonymous functions as they have been in the previous examples—instead they have been split off for easy reading.
First, the treeContextHandler that handles the contextmenu event:
function treeContextHandler(node) {
node.select();
contextMenu.show(node.ui.getAnchor());
}
The handler gets called with a node argument, so we need to select the node to allow us to act upon it later. We then pop up the context menu by calling the show method with a single parameter that tells the pop-up menu where to align itself—in this case it's the text of the TreeNode we've clicked on.

We've got two context menu entries—Delete and Sort. Let's first take a look at the handler for Delete:
function deleteHandler() {
tree.getSelectionModel().getSelectedNode().remove();
}
Using our previous knowledge of selection models, we get the node that we selected in the treeContextHandler, and simply call its remove method. This will delete the node and all of its children from the TreePanel. Note that we're not dealing with persisting this change to the server, but if this was something that you needed to do, TreePanel has a remove event that you could use a handler for to provide that functionality.
The handler for our Sort menu entry is given here:
function sortHandler() {
tree.getSelectionModel().getSelectedNode().sort(
function (leftNode, rightNode) {
return (leftNode.text.toUpperCase() < rightNode.text.toUpperCase() ? 1 : -1);
}
);
}
Again, we use the selection model to get the selected node. Ext JS provides a sort method on the TreeNode that takes a function as its first parameter. This function gets called with two arguments: the two nodes to compare. In this example, we are sorting by the node's text property in descending order, but you can sort by any custom node attribute you like.
Note
You can use this sorting method in conjunction with a TreeSorter without issues. That's because TreeSorter only monitors the beforechildrenrendered, append, insert, and textchange events on the TreePanel. Any other changes will be unaffected.
The Delete context menu action will completely remove the selected node from the TreePanel, while the Sort action will order its children according to their text label.
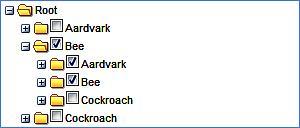
The Ext.tree.TreeFilter class is marked as "experimental" in Ext JS 2.2, so I'm going to touch upon it only briefly. It's designed for scenarios where the user needs to search for nodes based on a particular attribute. This attribute could be the text, the ID, or any custom data that was passed when the node was created. Let's take the context menu that we just built and use it to demonstrate filtering. First, we have to create the TreeFilter:
var filter = new Ext.tree.TreeFilter(tree);
You need to go back to the configuration for the context menu and add a new entry to the items configuration property:
{ text: 'Filter', handler: filterHandler }
We now need to create a filterHandler function that performs the filter action:
function filterHandler() {
var node = tree.getSelectionModel().getSelectedNode();
filter.filter('Bee', 'text', node);
}
As with our other handler functions, we start by getting the currently-selected node in the tree, and then call the filter function. This function takes three arguments:
The value to filter by
The attribute to filter on; this is optional and defaults to
textThe starting node for the filter
We pass the selected node as the starting node for the filter, which means that the node we right-clicked on in order to to pop up the menu will have its children filtered by the specified value.
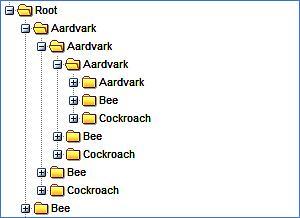
Our aardvark, bee, and cockroach examples don't really require this level of filtering, but there are other situations in which this could prove to be a useful user feature. Online software documentation, with multiple levels of detail, could be represented in a tree and a TreeFilter could be used to search by topic. In a more advanced scenario, you could use checkboxes or pop-up dialogs to get the user's input for the filter, providing a much more flexible experience.
Although we've demonstrated a number of powerful techniques using the Ext tree support, its real strength lies in the wealth of settings, methods, and hook points that the various classes expose. We've already reviewed a number of ways of configuring the TreePanel and TreeNode classes, which give access to a number of powerful features. However, there are more configuration options that can be used to tweak and enhance your tree, and we're going to review some of the more interesting ones now.
By default, there are a number of graphical enhancements enabled for the TreePanel which, depending on your application requirements, may not be desirable. For example, setting animate to false will prevent the smooth animated effect being used for the expansion and contraction of nodes. This can be particularly useful in situations where nodes will be repeatedly expanded and collapsed by a user and slower animated transitions can be frustrating.
Because TreePanel extends from Ext.Panel, it supports all of the standard Panel features. This is easy to remember, because it means that support for toolbars at the top and the bottom (via the tbar and bbar config options), separate header and footer elements, and expand/collapse functionality for the Panel are all supported. The TreePanel can also be included in any Ext.ViewPort or Ext.layout.
In terms of purely cosmetic options, TreePanel provides the lines option, which, when set to false, will disable the guide-lines that show the hierarchy of the TreeNodes within the panel. This can be useful if you're creating a very simple tree for which lines would just clutter the interface.
hlColor is applicable for drag-and-drop enabled trees, and controls the start color for the fading highlight (supplied as a hex string, such as 990000) which is triggered when a node is dropped. This can be completely disabled by setting dlDrop to false. Setting trackMouseOver to false will disable the highlight that appears when you hover over a node.
In many cases, you won't be manually creating TreeNodes, other than your root node, so you might think that the configuration options aren't of much use to you. Not so, because it's not just the id and text properties from your JSON that are used when generating nodes—any property in your JSON that matches with a config option on the TreeNode will be used to create the node. If you have a JSON that like this:
[
{ text: 'My Node', disabled: true, href: 'http://extjs.com'}
]
You'll get a node that starts off as disabled, but when enabled will act as a link to the Ext JS website.
This feature is extremely useful for passing application-specific information to your TreeNodes. For example, your server logic may dictate that particular nodes cannot have children. Setting allowChildren:false means that the node can't be used as a drop target for a node that is being dragged. Similarly , you can set individual nodes to be disallowed for dragging by using the draggable: false option. We can set the status of a checkbox on the node by using checked: true. In fact, simply specifying the checked option—whether true or false—will cause the checkbox to appear next to the node. These configuration options allow you to set the behavior of your nodes based on some server logic, but do not require any manual handling in order to see your preferences enacted.
There are a few other useful configuration options available for TreeNode. You can provide custom icons by using the icon option, or provide a CSS styling hook by using the cls option. The qtip option lets you provide a pop-up tooltip, perhaps providing a description of the node, while the text label shows its name.
Once the TreePanel is configured, we can begin to work with its nodes. The panel mostly allows for navigation of the hierarchy, starting at a selected node and moving to a parent or child, or up and down the current branch. We can also select nodes or expand them by their path, which could be used to search for specific nodes.
The expandAll and collapseAll methods are pretty self-explanatory, and can be useful for resetting the tree to a default state. Each method takes a single Boolean parameter to state whether the change should be animated or not.
The expandPath method's first parameter is the "path" of a node. The path uniquely identifies the node within the hierarchy, and takes the form of a string which fully qualifies the location of a node in the tree. For example, a path could look like this:
/n-15/n-56/n-101
Here, we have a representation of the location of the node with the ID n-101. n-15 is the root node, with a child n-56; and n-101 is in turn a child of n-56. If you're familiar with XPath, then this notation will be well-known to you. If you're not familiar with XPath then you can think of it as a postal address or a web IP address—a unique way of referring to this node.
By passing this value to expandPath, the tree will drill down to the specified node, expanding branches as necessary. Imagine the following code:
Ext.Msg.prompt('Node', 'Please enter a product name', function(btn, text){
if (btn == 'ok'){
var path = GetNodePathFromName(text);
tree.expandPath(path);
}
});
The GetNodePathFromName function could perform a server lookup and return the node ID, enabling quick navigation of the tree based on the user's input. Alternatively, TreePanel.getNodeById could be used in a similar way. Rather than expand to the node, further manipulation could occur.
In some circumstances, you may need to perform the reverse action, that is, you have a node but you need to get the path for it. TreeNode.getPath is provided for just this purpose, and can be used as a means of storing the location of a node.
The TreeNode has a number of other useful methods as well. We've already covered sort and remove, but now we can add some basic utility methods such as collapse and expand, enable and disable, as well as some handy extras such as expandChildNodes and collapseChildNodes, which can traverse all child nodes of an arbitrary root, and change their expansion states. The findChild and findChildBy methods allow both simple and custom searching of child nodes, as shown in the following example where we search for the first node with a price attribute of 300:
var node = root.findChild('price', 300);
In some cases you may need to mass-manipulate the attributes of your node hierarchy. You can do this by using the TreeNode.eachChild method:
root.eachChild(function(currentNode) {
currentNode.attributes.price += 30;
});
Because the first parameter to eachChild is a function, we can perform any logic that is required of our application.
We've already demonstrated a couple of methods of watching for user interaction with the tree, but there are many events available as hooks for your custom code. Earlier, we discussed the use of the checked configuration option on a TreeNode. When the node checkbox is toggled, the checkchange event is fired. This could be useful for visually highlighting the check status:
tree.on('checkchange', function(node, checked) {
node.eachChild(function(currentNode) {
currentNode.ui.toggleCheck();
});
}
We're propagating the check down through the children of the TreeNode. We could also highlight the nodes in question to clearly show that their check status has changed, or perform some other logic, such as adding information about the newly-checked nodes to an informational display elsewhere on the page.
A more common use of the TreePanel events is to verify changes or persist them to a server-side store. For example, a tree of categorized products may have some logical restrictions—certain bargain categories may specify the maximum price of a product. We could use the beforeappend event to check for this:
tree.on('beforeappend', function(tree, parent, node) {
return node.attributes.price < parent.attributes.maximumPrice;
});
This example demonstrates a pattern that you have seen throughout Ext JS—returning false from an event handler will cancel the action. In this case, if the price of the node being added is greater than the maximumPrice assigned to its parent, the function will return false, and the node will not be added.
In many applications, TreePanels are used as navigation aids, showing a hierarchical structure, with its nodes being HTML links to node detail pages. In this scenario, if a user wishes to view multiple node detail pages, one after the other, the default behavior of the TreePanel can lead to frustration. This is because the tree doesn't save its state between page refreshes, so any expanded node will be rendered as collapsed when the user navigates back to the page. If the user needs to drill down to the branch they are interested in every time they navigate back to the tree, they are quickly going to lose patience with the interface.
Now that we have a good grasp of the way we can manipulate the TreePanel, working out how we can save and restore its state should be fairly straightforward. Essentially, what we need to do is record each expansion of a TreeNode, and when the page reloads, "playback" those expansions. We can use Ext.state.Manager with a CookieProvider to store our expansion. We can initialize this with:
Ext.state.Manager.setProvider(new Ext.state.CookieProvider());
This is standard fare for setting up a state provider. We now need to establish exactly what we're going to store, and the logical choice would be the path of the last expanded node. This means that we can simply expand out that path and present the user with the last part of the hierarchy they were interested in. Here's a naive implementation of that idea:
tree.on('expandnode', function (node){ Ext.state.Manager.set("treestate", node.getPath()); });
In this code, we simply handle the TreePanel's expandnode event to record the path, using TreeNode.getPath, of any node that is expanded. Because we overwrite that value on each expansion, the treestate should hold the path of the last node that was expanded. We can then check for that value when the page is loaded:
var treeState = Ext.state.Manager.get("treestate");
if (treeState)
tree.expandPath(treeState);
If treestate has previously been recorded, we use that to expand the tree out to the last-expanded node.
As mentioned, this is a naive implementation. It doesn't handle cases where the user expands and, then collapses a node, and then navigates away and back. In such cases, the collapse of the node wouldn't be saved. So when we restore the state, the user will see it expanded again. By handling the collapsenode event, we could take this issue into account. We also have a problem with the expansion of multiple nodes. If more than one branch is expanded our code will only expand the one the user clicked most recently. Storing an array of expanded nodes is one approach that could address this shortcoming.
Getting a feature-rich tree interface such as Ext.tree.TreePanel up and running in eleven lines of code is pretty impressive, and we've shown that it is possible. Over and above that, this chapter has demonstrated that the TreePanel's strength is not simply in its ease of use, but in the way we can use its wealth of configuration options to deliver application-specific functionality.
The use of asynchronous loading is an important feature of the TreePanel, because it provides a way of consuming large amounts of dynamic data in a scalable fashion. It's also handled transparently by Ext.tree, which means that the implementation is as beneficial for the developer as it is for the end user.
Despite all of their power, the Ext.tree classes still manage to feel pretty lightweight in use. It's easy to tame that power by using the configuration options, the methods, and the events that the TreePanel and TreeNode provide, but it's not just about these classes. TreeSorter and TreeNodeUI are key parts of the puzzle, adding functionality and allowing customization for a standardized look and feel.
Because the Ext.TreePanel extends the Panel, which in turn extends BoxComponent, we get all of the strong component and layout support that comes from a fully-fledged Ext JS component. BoxComponent support will be particularly interesting as we move forward, because it means that trees can easily be included in various configurations within an Ext.Window. Which just happens to be our next topic.