
In this chapter, we'll discuss how we can create our own custom components by extending the Ext JS library. We'll talk about how we can create our own namespaces, differentiating our custom components from others. We'll also discuss some other core object-oriented concepts (just enough to understand what we need here) and the concept of Event-Driven application architecture.
Over the last several years, we've seen a drastic shift with regards to client-side scripting in browser-based web applications. JavaScript has become the defacto standard in client-side scripting, with support for it built into every major browser available.
The issue has always been in each browser's implementation of the Document Object Model. Microsoft's Internet Explorer, having taken the majority share of the browser marketplace, helped to gather support for a modern Document Object Model, to which all other browsers had to adapt. However, after the release of Internet Explorer 6, Microsoft halted new development of their browser for several years, other than to provide security fixes. Added to this was Microsoft's play to try and create new standards. Rather than implement JavaScript, Internet Explorer actually implemented JScript, which ran JavaScript files, but had a slightly different implementation that never garnered momentum (other than in Internet Explorer), possibly because it did not adhere to the ECMAScript standard. This created several issues. The World Wide Web Consortium (W3C) had created a standard for the Document Object Model, which companies like Mozilla and Opera adhered to and furthered. Yet Internet Explorer (the dominant browser) was stagnant.
These events led to very hard times for client-side developers, as a great deal of time and effort went into creating client-side code that was cross-browser compliant. Netscape and Internet Explorer had been waging the browser war over several versions, slowly growing more divergent in their standards acceptance, with cross-browser development consistently becoming more of a challenge. The landscape had changed, in that a large degree of client-side development had become relegated to basic form validation and image rollovers, because few developers were interested in investing the time and effort necessary to write large, cross-browser compliant, client-side applications.
Enter Web 2.0. The buzzword of the day was AJAX, or Asynchronous JavaScript And XML. AJAX wasn't a new technology, but its use had been fairly minimal and obscure. Developers with a deep knowledge of JavaScript, looking to create greater and more dynamic web sites, had begun to implement the technology as a way of reinvigorating the client-side movement, creating richer and more interactive user experiences.
With this renewed interest in client-side scripted applications, but the same issues existing around cross-browser compatibility, several cross-browser JavaScript libraries (Dojo, Prototype, Yahoo UI, and so on) had begun life, in response to minimizing the previous woes involved in cross-browser, client-side development. The developers of these libraries, with their knowledge of JavaScript, had kept pace with the changes in this language as well. JavaScript had travelled well beyond the confines of a solely procedural scripting language, with full support for object-oriented development. In developing their libraries, these developers took full advantage of an object-oriented style of development that JavaScript's prototype-based model allowed, creating small objects of functionality that could build upon one another to provide extensive resources of re-usable code.
Ext JS is a perfect example of this shift. The Ext JS library is an extremely extensive collection of packages of classes of re-usable code: small pieces of functionality that can be taken on their own, or combined to create some truly fantastic client-side magic. An additional part of its beauty is the ability to extend the library further, creating our own custom components as extensions of those already there. This gives us the ability to create our own re-usable pieces of code. We can write our own objects, as extensions of the library. This means that we don't have to write all of our functionality on our own, as much of this work has already been done for us. We expand upon the foundation, providing our own custom functionality.
To gain a full understanding of what we need to do, we have to understand one of the key concepts of object-oriented programming—inheritance.
As we write our own components, these components will usually inherit some other component of Ext JS, extending that component's functionality by providing our own properties and overriding the component's existing methods. We are creating new classes from an existing Ext JS class to determine whether the method that has been called is that of our new class, the method of the extended (parent) class, or a combination of the two.
Confused yet? It's a lot to take in. Let's break this down into a basic example that may clarify a few things. Say we are writing a Customer Resource Management application for a company. This company has salespeople, who have clients (and client contacts), and the company also has vendors that they utilize, who also have contacts. Here we've identified three similar objects within our application. if we take these objects down to the base level, we notice that each one of these objects is a Person (the Clients and Vendors would more clearly be Companies):
Salesperson
Client Contact
Vendor Contact
Each one of these Person objects will share some basic attributes and methods, because each person has a name, an email address, a phone number, and an address. We'll create a quick class diagram to visually represent the Person object:
Note
Author's note
Class diagrams, and UML diagramming in general, are a great way to visually represent different programming constructs. A full explanation is outside the purview of this text, but I highly recommend that you become familiar with them. Our diagrams here show the class name, the attributes, and methods of the class.
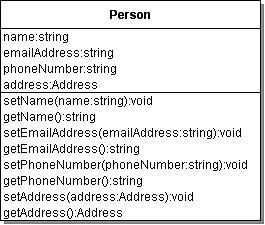
Note that the Person object has four attributes: name, emailAddress, phoneNumber, and address. Also note that the address attribute is, in itself, another object. We've included some simple methods for the object as well, to get and set our attributes.
Each one of these objects also has its own object-specific properties such as a salesPersonID, a clientContactID, or a vendorContactID.

Note that in our diagram of the SalesPerson object, you do not see any of the Person-specific properties and methods. Because SalesPerson extends (inherits) the Person object, all of the properties and methods of the Person object become a part of the SalesPerson object as well. We can now create a SalesPerson.
var sp = new SalesPerson();
This creates a new instance of the SalesPerson object, with all of the attributes and methods of the SalesPerson object, including those of the parent Person object, by extension.
By default, the SalesPerson object, being an extension of Person, allows you to set that SalesPerson's name as:
SalesPerson.setName('Zig Ziggler')
You don't have to reference the methods, or the attributes, by calling on the object's (SalesPerson) parent object (Person) directly because, through inheritance, SalesPerson is a Person.
Through inheritance, all of the methods and attributes of a parent object become the child's as well. However, there will be times when you may want the child object's method to be different from that of its parent. Case in point: let's say our Person object had its own validate() method, which has validated all of the attributes and returned its own error array, but your SalesPerson object has some additional attributes to validate as well. By defining a validate() method within the SalesPerson object, you are overriding the validate() method of its Person parent object.
validate: function() {
// Some validation code here
}
But, in this case, you would want total attribute validation; both the internal object-specific properties, as well as those of the parent object. So here, you would also need to call the validate() method of the parent object:
validate: function() {
var errorArr = ourObjects.salesperson.superclass.validate.call(this);
// The salesperson specific validate stuff, appending the errorArr
return errorArr;
}
These are the basic pieces of OO that we need to understand so that we can begin to create our own custom classes with Ext JS. Well, almost…
There are a few final pieces that of the object-oriented puzzle we need, in order to keep a solid grasp of our goals. We've talked about how Ext JS is a large collection of objects extending other objects, but it's also important to understand a few other pieces of basic OO terminology, and how they help in keeping things organized.
A package is a collection of classes that share something in common. For instance, the Ext.data package is a collection of classes for dealing with data, such as the different types of data Stores, Readers, and Records. The Ext.grid package is a collection of classes for the various grid objects, including all of the different grid types and selection models. Likewise, the Ext.form package contains classes for building forms, to include all of the classes of the different field types.
A class is what we call a specific JavaScript object, defining that object's attributes and methods. Going back to our previous examples, Person and SalesPerson would both be written as class objects, and both would probably be part of the same package.
Classes are a part of packages, and packages generally have their own namespace. Namespaces are containers of logically grouped packages and class objects. As an example, the Ext JS library falls into the Ext namespace. Forms within Ext JS fall into the Ext.forms namespace, where forms is a package of the various classes used to make up forms. It's a hierarchal relationship, using dot notation to separate the namespace from the package from the class. Variables from one namespace must be passed into another namespace, so applying a namespace helps to encapsulate information within itself. Ext.grid, Ext.form, and Ext.data are all custom namespaces.
Typically, we'll be writing an application and will see ourselves writing the same basic piece over and over again. Or, we may be lucky enough to identify it early enough that we can just choose the best piece and move forward right away. It usually comes down to deciding which Ext JS component is the best one to extend.
Let's revisit our previous scenario, a Customer Resource Management system. We know that we have several Person objects within our application. From a display perspective, we will probably need something to display a person's contact details.
There are several different components for the display of information, and we must choose the right one. A grid object would work, but a tabular display across so many different values might clutter our application, and in this scenario, we probably only need to see the details of one person at a time. A PropertyGrid is a little different from a standard grid, but we're just going to output a name and an address. We really don't need the user to see the field names so much as the data itself. We can pretty much eliminate the DataView as well, for the same reasons as rejecting the grid. We really need only one record at a time.
This brings us to a form or a Panel. Forms imply editing of information, so for a display-only application you really come back to a Panel. Panel objects are extremely versatile objects, being the core of many other objects within Ext JS. The body of a Window object is a Panel. The different pieces of an Accordian are Panel objects. The bodies of the tabs in a TabPanel are Panel objects. Creating a custom component that extends the Panel object opens the doors to a variety of different display areas within an Ext JS application.
We want to create our custom components within their own custom namespace for encapsulation, quick reference, and to help us organize our code. It may be that our packages or class may be named the same as other packages and classes already within Ext JS. A custom namespace prevents conflicts from occurring between classes of the same name, as long as each is defined within its own separate namespace. A common naming convention for user-defined objects is to use the Ext.ux namespace.
Ext.namespace('Ext.ux'),
Because we're going to be creating a collection of display Panels for our CRM application, we'll really set our namespace apart from the rest.
Ext.namespace('CRM.panels'),
We need to place this line at the top of each class definition template.
First, let's take a look at a fairly simple script that takes a single record of information and lays it out in a Panel on the screen.
Example 1:ch13ex1.js
var userData = [
{ID:1,FIRSTNAME:'John',LASTNAME:'Lennon',EMAIL:'[email protected]', PASSWORD:'apple1',ADDRESSTYPE:'Home (Mailing)',STREET1:'117 Abbey Road',STREET2:'',STREET3:'',CITY:'New York',STATE:'NY',ZIP:'12345',PHONETYPE:'Cell',PHONE:'123-456-7890'},
{ID:2,FIRSTNAME:'Paul',LASTNAME:'McCartney', EMAIL:'[email protected]',PASSWORD:'linda',ADDRESSTYPE:'Work (Mailing)',STREET1:'108 Penny Lane',STREET2:'',STREET3:'', CITY:'Los Angeles',STATE:'CA',ZIP:'67890',PHONETYPE:'Home', PHONE:'456-789-0123'},
{ID:3,FIRSTNAME:'George',LASTNAME:'Harrison', EMAIL:'[email protected]',PASSWORD:'timebandit', ADDRESSTYPE:'Home (Shipping)',STREET1:'302 Space Way',STREET2:'',STREET3:'',CITY:'Billings',STATE:'MT', ZIP:'98765',PHONETYPE:'Office',PHONE:'890-123-4567'},
{ID:4,FIRSTNAME:'Ringo',LASTNAME:'Starr', EMAIL:'[email protected]',PASSWORD:'barbie', ADDRESSTYPE:'Home (Mailing)',STREET1:'789 Zildizhan Pl', STREET2:'',STREET3:'',CITY:'Malibu', STATE:'CA',ZIP:'43210',PHONETYPE:'Home',PHONE:'567-890-1234'}
];
var userDetail = new Ext.Panel({
applyTo: 'chap13_ex01',
width: 350,
height: 250,
title: 'Chapter 13 Example 1',
data: userData[0],
tpl: new Ext.XTemplate([
'<img src="/resources/images/s.gif" width="21" height="16" /><b>{FIRSTNAME} {LASTNAME}</b><br />',
'<img src="/resources/images/icons/silk/database_edit.gif" width="16" height="16" id="emailEdit_{ID}" class="iconLnk" align="Edit Email Address" border="0" />{EMAIL}<br />',
'<img src="/resources/images/icons/silk/database_edit.gif" width="16" height="16" id="phoneEdit_{ID}" class="iconLnk" align="Edit Phone" border="0" />{PHONE} ({PHONETYPE})<br />',
'<b>{ADDRESSTYPE} Address</b><br />',
'<img src="/resources/images/icons/silk/database_edit.gif" width="16" height="16" id="addrEdit_{ID}" class="iconLnk" align="Edit Address" border="0" />{STREET1}<br />',
'<tpl if="STREET2.length > 0">',
'<img src="/resources/images/s.gif" width="21" height="16" />{STREET2}<br />',
'</tpl>',
'<tpl if="STREET3.length > 0">',
'<img src="/resources/images/s.gif" width="21" height="16" />{STREET3}<br />',
'</tpl>',
'<img src="/resources/images/s.gif" width="21" height="16" />{CITY}, {STATE} {ZIP}'
]),
listeners:{
render:{
fn: function(el){
this.tpl.overwrite(this.body,this.data);
}
}
}
});
What we have here is a simple array of data objects, and a Panel definition. We're passing a single data item into the Panel's configuration, defining an XTemplate for the record's display, and applying a listener which will apply the data to the XTemplate when the Panel is rendered.

Turning this into a reusable component is very easy, as the majority of our code will just be moved into our custom class definition. First, we'll create a new class template, ContactDetails.js, and define its initial class declaration as extending the Ext.Panel class. Ext JS actually provides custom methods for extending components.
Example 2:ContactDetails.js
Ext.namespace('CRM.panels'),
CRM.panels.ContactDetails = Ext.extend(Ext.Panel,{
// The panel definition goes here
});
Our next step is to begin defining the custom properties and methods of our component. We begin with the default properties that are specific to our component. Some of these properties may be overridden in our object configuration, but these defaults allow us to only pass in what we might need to change for our individual application.
width: 350,
height: 250,
data: {
ID: 0,
FIRSTNAME: '',
LASTNAME: '',
EMAIL: '',
ADDRESSTYPE: 'Home (mailing)',
STREET1: '',
STREET2: '',
STREET3: '',
CITY: '',
STATE: '',
ZIP: '',
PHONETYPE: 'Home',
PHONE: ''
},
tpl: new Ext.XTemplate([
'<img src="/resources/images/s.gif" width="21" height="16" /><b>{FIRSTNAME} {LASTNAME}</b><br />',
'<img src="/resources/images/icons/silk/database_edit.gif" width="16" height="16" id="emailEdit_{ID}" class="iconLnk" align="Edit Email Address" border="0" />{EMAIL}<br />',
'<img src="/resources/images/icons/silk/database_edit.gif" width="16" height="16" id="phoneEdit_{ID}" class="iconLnk" align="Edit Phone" border="0" />{PHONE} ({PHONETYPE})<br />',
'<b>{ADDRESSTYPE} Address</b><br />',
'<img src="/resources/images/icons/silk/database_edit.gif" width="16" height="16" id="addrEdit_{ID}" class="iconLnk" align="Edit Address" border="0" />{STREET1}<br />',
'<tpl if="STREET2.length > 0">',
'<img src="/resources/images/s.gif" width="21" height="16" />{STREET2}<br />',
'</tpl>',
'<tpl if="STREET3.length > 0">',
'<img src="/resources/images/s.gif" width="21" height="16" />{STREET3}<br />',
'</tpl>',
'<img src="/resources/images/s.gif" width="21" height="16" />{CITY}, {STATE} {ZIP}'
]),
Note
Pit stop!
Does anything look familiar here? Yes, it should, especially after looking at the 'records' within userData. A class is an object, just like each 'record' in the userData array is an object. At its most base level, an object is a collection of name/value pairs. The only true difference is that a class will also have functions as the value of an attribute name of the object, and the object can be referenced by its class (the name of the class). Each of these name/value pairs forms the constructor of the ContactDetails class.
Continuing to build our first custom class, we get into overriding methods. As we have previously mentioned, we can override a method of our parent class by defining a method of the same name in the child class. A key component of the Panel class is the initComponent() method, which (as the name suggests) initializes the Panel component. Most methods will never need to be overridden, but sometimes, we'll need to override a specific method to add to, or change, the default behavior of a component.
initComponent: function(){
CRM.panels.ContactDetails.superclass.initComponent.call(this);
if (typeof this.tpl === 'string') {
this.tpl = new Ext.XTemplate(this.tpl);
}
},
Note
Author's note
Ext JS uses superclass as the programmatic reference to the object's parent class object, as CRM.panels.ContactDetails is a subclass of it's parent (superclass) Ext.Panel.
With our component, we needed a way to apply a new XTemplate to our component, should one be passed into our ContactDetails class. Because a developer can pass in the template configuration via the tpl argument, instead of an actual XTemplate object, it is important to validate that input and adjust accordingly. Our first action is to call the initComponent() method of our parent Panel class, and then adjust the value of the tpl argument as needed.
In our previous example (Example 1), we used the render event to apply our XTemplate to our Panel object. In our custom component, we take the same tack, by writing an overriding method for the onRender() method.
onRender: function(ct, position) {
CRM.panels.ContactDetails.superclass.onRender.call (this, ct, position);
if (this.data) {
this.update(this.data);
}
},
Here, we've called the onRender() method of our parent Panel (super) class. After that, we verify that we have a value for our data attribute, before calling the custom update() method of our component.
update: function(data) {
this.data = data;
this.tpl.overwrite(this.body, this.data);
}
The update() method takes an argument of data (a record object from our array), applies that argument to the component's data attribute, and then applies the component's XTemplate to the 'body' of the component. This is a custom method of the component, not an overridden method of the parent Panel class. What's important to our discussion is the need for this method.
Our XTemplate does not get immediately applied to our component, as it isn't able to overwrite the Panel body until the Panel body has actually been rendered. This is what we mean by 'order of events', and can initially be very confusing, until you put a little thought into it. For instance, say we had dynamically tried to apply a custom ID argument as part of our constructor:
id: 'ContactDetails_' + this.data.ID,
This would have broken our component. Why? Because this.data is also an item within our constructor, and doesn't actually exist until the component is instantiated into memory. The same thing would have happened, if we had tried to apply our XTemplate within the initComponent() method:
initComponent: function(){
CRM.panels.ContactDetails.superclass.initComponent.call(this);
this.tpl.overwrite(this.body, this.data);
},
This would have failed when initComponent() begins the process of creating the component. The component, at this stage, still isn't part of the browser's Document Object Model, so there isn't any 'body' for the XTemplate to be applied to yet. Getting a handle on the 'order of events' is one of the biggest challenges in learning Ext JS, if you don't know about it, and the order of events may be different with different Ext JS classes as well.
Now we get down to the real juice. One huge barrier to cross, when transitioning from a procedural programming style into object-oriented development, is understanding the event-driven application model. Not all OO programs are event-driven, but the paradigm is definitely shifting in that direction, and Ext JS is no exception. Basically, the flow of an application is determined by sensing some change of state or user interaction, called an event. When the event occurs, the application broadcasts that the event has taken place. Another piece of the application (a listener, also known as an observer) is listening for the event broadcast. When it sees that the event has been broadcast, it then performs some other action.
Our ContactDetails class is no different. As an extension of the Panel class, it automatically contains all of the events and event listeners that are a part of the Panel class. An event, render, was previously defined. The process of building the display of the Panel fires off a 'broadcast' of the render event.
this.fireEvent('render'),
The Ext.Panel object has already defined an event listener for the render event. Once the render event has been handled, it calls the onRender() method.
this.addListener('render',this.onRender,this, {ct:this.ct,position:this.position});
An event has been reached, which is then broadcast. An event listener is listening for that broadcast. Upon hearing the broadcast, it executes additional pre-configured actions that have been defined for that event. Understanding this process plays a key part in how we develop event-driven applications, and our own applications with Ext JS.

We may just as easily apply our own custom events within our Ext JS applications. We can either register new events, that an end developer can then add listeners to, or we can add our own listeners to kick off other methods within our custom component.
By way of example, let's create a new update event within our custom component. We'll adjust our initComponent() method to register our new event:
initComponent: function(){
CRM.panels.ContactDetails.superclass.initComponent.call(this);
if (typeof this.tpl === 'string') {
this.tpl = new Ext.XTemplate(this.tpl);
}
this.addEvents('update'),
},
This new code is all it takes to register our new event. We'll also go ahead and register a new, internal, event listener, which we'll use to call a new method that we'll write in a moment:
initComponent: function(){
CRM.panels.ContactDetails.superclass.initComponent.call(this);
if (typeof this.tpl === 'string') {
this.tpl = new Ext.XTemplate(this.tpl);
}
this.addEvents('update'),
this.addListener({
update:{
fn: this.onUpdate,
scope: this
}
});
},
What this states is that whenever the update event is broadcast, our application will turn around and call the onUpdate() method of our ContactDetails component.
onUpdate: function(data){
console.log('in onUpdate'),
}
The onUpdate() method, in this case, only outputs a short message to the debugging console, which you can see if you are debugging your application in Firefox with the Firebug plugin (console is not supported in Internet Explorer). The final step is having the update event broadcast. We already have an update() method, so it would make sense for us to broadcast the update once it's completed:
update: function(data) {
this.data = data;
this.tpl.overwrite(this.body, this.data);
this.fireEvent('update', this.data);
},
Here we broadcast our update event by calling the Ext JS's fireEvent() method, and passing along our data as the argument to any method listening for the update event. We can have any number of event listeners configured for a particular event, either internal to the component, or externally within a script referencing our custom component.
Here's the final component we've been constructing. At this point in time, we don't really need the custom update event. We'll leave it in, as it may be useful later, and we'll just remove the onUpdate() method for now.
Example 2:ContactDetails.js
Ext.namespace('CRM.panels'),
CRM.panels.ContactDetails = Ext.extend(Ext.Panel,{
width: 350,
height: 250,
data: {
ID: 0,
FIRSTNAME: '',
LASTNAME: '',
EMAIL: '',
ADDRESSTYPE: 'Home (mailing)',
STREET1: '',
STREET2: '',
STREET3: '',
CITY: '',
STATE: '',
ZIP: '',
PHONETYPE: 'Home',
PHONE: ''
},
tpl: new Ext.XTemplate([
'<img src="/resources/images/s.gif" width="21" height="16" /><b>{FIRSTNAME} {LASTNAME}</b><br />',
'<img src="/resources/images/icons/silk/database_edit.gif" width="16" height="16" id="emailEdit_{ID}" class="iconLnk" align="Edit Email Address" border="0" />{EMAIL}<br />',
'<img src="/resources/images/icons/silk/database_edit.gif" width="16" height="16" id="phoneEdit_{ID}" class="iconLnk" align="Edit Phone" border="0" />{PHONE} ({PHONETYPE})<br />',
'<b>{ADDRESSTYPE} Address</b><br />',
'<img src="/resources/images/icons/silk/database_edit.gif" width="16" height="16" id="addrEdit_{ID}" class="iconLnk" align="Edit Address" border="0" />{STREET1}<br />',
'<tpl if="STREET2.length > 0">',
'<img src="/resources/images/s.gif" width="21" height="16" />{STREET2}<br />',
'</tpl>',
'<tpl if="STREET3.length > 0">',
'<img src="/resources/images/s.gif" width="21" height="16" />{STREET3}<br />',
'</tpl>',
'<img src="/resources/images/s.gif" width="21" height="16" />{CITY}, {STATE} {ZIP}'
]),
initComponent: function(){
CRM.panels.ContactDetails.superclass.initComponent.call(this);
if (typeof this.tpl === 'string') {
this.tpl = new Ext.XTemplate(this.tpl);
}
this.addEvents('update'),
},
onRender: function(ct, position) {
CRM.panels.ContactDetails.superclass.onRender.call (this, ct, position);
if (this.data) {
this.update(this.data);
}
},
update: function(data) {
this.data = data;
this.tpl.overwrite(this.body, this.data);
this.fireEvent('update', this.data);
}
});
With our new custom component, we now have a new way of calling it into our applications as well.
Example 2:ch13ex2.js
var userData = [
{ID:1,FIRSTNAME:'John',LASTNAME:'Lennon', EMAIL:'[email protected]',PASSWORD:'apple1', ADDRESSTYPE:'Home (Mailing)', STREET1:'117 Abbey Road',STREET2:'',STREET3:'',
CITY:'New York',STATE:'NY',ZIP:'12345',PHONETYPE:'Cell', PHONE:'123-456-7890'},
{ID:2,FIRSTNAME:'Paul',LASTNAME:'McCartney', EMAIL:'[email protected]',PASSWORD:'linda', ADDRESSTYPE:'Work (Mailing)', STREET1:'108 Penny Lane',STREET2:'', STREET3:'',CITY:'Los Angeles',STATE:'CA',ZIP:'67890', PHONETYPE:'Home',PHONE:'456-789-0123'},
{ID:3,FIRSTNAME:'George',LASTNAME:'Harrison', EMAIL:'[email protected]',PASSWORD:'timebandit', ADDRESSTYPE:'Home (Shipping)',STREET1:'302 Space Way',STREET2:'',STREET3:'',CITY:'Billings',STATE:'MT',ZIP:'98765', PHONETYPE:'Office',PHONE:'890-123-4567'},
{ID:4,FIRSTNAME:'Ringo',LASTNAME:'Starr', EMAIL:'[email protected]',PASSWORD:'barbie', ADDRESSTYPE:'Home (Mailing)',STREET1:'789 Zildizhan Pl', STREET2:'',STREET3:'',CITY:'Malibu',STATE:'CA',ZIP:'43210',PHONETYPE:'Home',PHONE:'567-890-1234'}
];
var userDetail = new CRM.panels.ContactDetails({
applyTo: 'chap13_ex01',
title: 'Chapter 13 Example 1',
data: userData[0]
});
updateContact = function(event,el,data){
userDetail.update(data.data);
}
xt.get('actionLink').on('click',updateContact,this, {data:userData[1]});
We've taken an anchor element, with an id of actionLink, from our calling page, and given it an onclick event that updates the data of our ContactDetails object, userDetail. Clicking on the Update Data link on the page changes the contact details from John over to Paul.

Ok, we've now created our first custom component. That was fairly painless. But, looking back at what we've done, it looks as if we've pushed ourselves into a small corner again. As it stands, every aspect of our application that requires contact information would have to display the name, email address, phone number, and address of our contact, every time. What happens if we required only the address? Or just the name, or email, or the phone number?
Well, this is where we refactor, creating even more custom components. For our purposes, we'll quickly break this down into two components: one for UserDetail, and one for AddressDetail.
Ext.namespace('CRM.panels'),
CRM.panels.UserDetail = Ext.extend(Ext.Panel,{
width: 350,
height: 125,
data: {
ID: 0,
FIRSTNAME: '',
LASTNAME: '',
EMAIL: '',
ADDRESSTYPE: 'Home (mailing)',
STREET1: '',
STREET2: '',
STREET3: '',
CITY: '',
STATE: '',
ZIP: '',
PHONETYPE: 'Home',
PHONE: ''
},
split: false,
tpl: new Ext.Template([
'<img src="/resources/images/s.gif" width="21" height="16" /><b>{FIRSTNAME} {LASTNAME}</b><br />',
'<img src="/resources/images/icons/silk/database_edit.gif" width="16" height="16" id="emailEdit_{ID}" class="iconLnk" align="Edit Email Address" border="0" />{EMAIL}<br />',
'<img src="/resources/images/icons/silk/database_edit.gif" width="16" height="16" id="phoneEdit_{ID}" class="iconLnk" align="Edit Phone" border="0" />{PHONE} ({PHONETYPE})<br />'
]),
initComponent: function(){
CRM.panels.UserDetail.superclass.initComponent.call(this);
if (typeof this.tpl === 'string') {
this.tpl = new Ext.XTemplate(this.tpl);
}
},
onRender: function(ct, position) {
CRM.panels.UserDetail.superclass.onRender.call (this, ct, position);
if (this.data) {
this.update(this.data);
}
},
update: function(data) {
this.data = data;
this.tpl.overwrite(this.body, this.data);
}
});
Ext.reg('userdetail',CRM.panels.UserDetail);
Example 3:AddressDetail.js
Ext.namespace('CRM.panels'),
CRM.panels.AddressDetail = Ext.extend(Ext.Panel,{
width:350,
height:125,
data: {
ID: 0,
FIRSTNAME: '',
LASTNAME: '',
EMAIL: '',
ADDRESSTYPE: 'Home (mailing)',
STREET1: '',
STREET2: '',
STREET3: '',
CITY: '',
STATE: '',
ZIP: '',
PHONETYPE: 'Home',
PHONE: ''
},
split: false,
tpl: new Ext.XTemplate([
'<b>{ADDRESSTYPE} Address</b><br />',
'<img src="/resources/images/icons/silk/database_edit.gif" width="16" height="16" id="addrEdit_{ID}" class="iconLnk" align="Edit Address" border="0" />{STREET1}<br />',
'<tpl if="STREET2.length > 0">',
'<img src="/resources/images/s.gif" width="21" height="16" />{STREET2}<br />',
'</tpl>',
'<tpl if="STREET3.length > 0">',
'<img src="/resources/images/s.gif" width="21" height="16" />{STREET3}<br />',
'</tpl>',
'<img src="/resources/images/s.gif" width="21" height="16" />{CITY}, {STATE} {ZIP}'
]),
initComponent: function(){
CRM.panels.AddressDetail.superclass.initComponent.call(this);
if (typeof this.tpl === 'string') {
this.tpl = new Ext.XTemplate(this.tpl);
}
},
onRender: function(ct, position) {
CRM.panels.UserDetail.superclass.onRender.call (this, ct, position);
if (this.data) {
this.update(this.data);
}
},
update: function(data) {
this.data = data;
this.tpl.overwrite(this.body, this.data);
}
});
Ext.reg('addrdetail',CRM.panels.AddressDetail);
By breaking these into two separate components, we can now use either piece in any area of our application, independently.
Example 3:ch13ex3.js
var userData = [
{ID:1,FIRSTNAME:'John',LASTNAME:'Lennon',EMAIL:'[email protected]' ,PASSWORD:'apple1',ADDRESSTYPE:'Home (Mailing)',STREET1:'117 Abbey Road',STREET2:'',STREET3:'',CITY:'New York', STATE:'NY',ZIP:'12345',PHONETYPE:'Cell',PHONE:'123-456-7890'},
{ID:2,FIRSTNAME:'Paul',LASTNAME:'McCartney', EMAIL:'[email protected]',PASSWORD:'linda', ADDRESSTYPE:'Work (Mailing)',STREET1:'108 Penny Lane',STREET2:'',STREET3:'',CITY:'Los Angeles',STATE:'CA', ZIP:'67890',PHONETYPE:'Home',PHONE:'456-789-0123'},
{ID:3,FIRSTNAME:'George',LASTNAME:'Harrison', EMAIL:'[email protected]',PASSWORD:'timebandit', ADDRESSTYPE:'Home (Shipping)',STREET1:'302 Space Way', STREET2:'',STREET3:'',CITY:'Billings',STATE:'MT',ZIP:'98765', PHONETYPE:'Office',PHONE:'890-123-4567'},
{ID:4,FIRSTNAME:'Ringo',LASTNAME:'Starr', EMAIL:'[email protected]',PASSWORD:'barbie', ADDRESSTYPE:'Home (Mailing)',STREET1:'789 Zildizhan Pl', STREET2:'',STREET3:'',CITY:'Malibu',STATE:'CA',ZIP:'43210', PHONETYPE:'Home',PHONE:'567-890-1234'}
];
var userDetail = new CRM.panels.UserDetail({
applyTo: 'chap13_ex03a',
title: 'User Detail',
data: userData[0]
});
var addrDetail = new CRM.panels.AddressDetail({
applyTo: 'chap13_ex03b',
title: 'Address Detail',
data: userData[0]
})
updateContact = function(event,el,data){
userDetail.update(data.data);
addrDetail.update(data.data);
}
Ext.get('actionLink').on('click',updateContact,this, {data:userData[1]});
Note
Best Practice
Ok, looking at our two custom components, it's fairly obvious that they are essentially the same object with different XTemplates applied, and it would probably be best for them to have their own parent class of overloaded, template-applying methods, and just be repositories of the XTemplate defaults and our xtypes. But, for our examples, we're going to try and keep it simple for now.
In our previous example, a new line was added to the bottom of each class file:
Ext.reg('userdetail',CRM.panels.UserDetail);
What we've done here is register our new custom component as an xtype. Well, what does that mean exactly? An xtype is a component container element, registered with the Ext JS library, for lazy object instantiation. What this means is that we can use the xtype as a quick object identifier, when laying out our applications, and that these types of objects are only loaded into browser memory when they are actually used. This can greatly improve the overall performance of our application, especially when a view may contain many objects. We'll use xtype wherever possible while writing object configuration, so that objects that might not immediately be displayed won't take up valuable memory resources. Next, we'll look at this in practice.
Now that we've created our custom components, we can add them to any other container object within Ext JS. We can now use our xtype to refer to the component type, for lazy instantiation, and we can get all of the benefits of modular design. Let's apply our two new components with a border layout, for side-by-side viewing.
Example 4:ch14ex4.js
var ContactDetail = new Ext.Panel({
title: 'Contact Details',
applyTo: 'chap13_ex04',
width: 400,
height: 125,
layout: 'border',
frame: true,
items:[{
region: 'west',
xtype: 'userdetail',
width: 200,
data: userData[0]
},{
region: 'center',
xtype: 'addrdetail',
width: 200,
data: userData[0]
}]
});
We have identified the West and center regions of our BorderLayout as belonging to the UserDetail and AddressDetail class types respectively. If this layout were part of a window object, these two classes wouldn't even be loaded into memory until the window was shown, helping to reduce browser memory usage.
Extending the various classes of the Ext JS library is one way to place ourselves on a fast track to Rapid Application Development, by allowing us to easily create modular, re-usable components. Within this chapter, we've discovered some of the most powerful aspects of the Ext JS library.
We had a brief overview of object-oriented development with JavaScript, and then covered how object-oriented program design applies to the Ext JS library. We spent a little time covering some of the basics of object-oriented programming such as inheritance, method overriding, and some basic terminology.
We then began applying some of these concepts within Ext JS such as defining custom namespaces, creating custom components, and overriding methods of our object's parent (super) class.
We followed up by giving a small explanation of event-driven application architecture, and applied that by writing a custom event and listener for our custom component.
Finally, we covered xtypes and the importance of lazy instantiation on application performance, and then modified our code to use xtypes for our new custom components to add them into other Ext JS object containers.