
In this chapter, we will start to use and interact with Ext widgets for the first time, by creating a series of dialogs that interact with each other, the user, and the web page. We will be using the onReady, MessageBox, and get functions to learn how to create different types of dialogs and modify HTML and styles on our page. Furthermore, in this chapter, we will be:
Finding out how to configure Ext widgets easily
Waiting for the DOM (Document Object Model) to be made available for interaction
Using dialogs to figure out what the user wants to do
Dynamically changing the HTML and CSS on our page in response to the user's inputs
We will start by covering some of the core functions of Ext. We will take a look at how the example given in the first chapter worked, and will expand upon it. The following core functions of Ext will be used on every project that we work on during the course of this book:
Ext.onReady:This function makes sure that our document is ready to be thrashed outExt.Msg:This function creates application-style message boxes for usconfiguration objects:This function defines how Ext widgets will actExt.get:This function accesses and manipulates elements in the DOM
In this section, we'll look at the onReady event—the first thing that you need to deal with when you are working with Ext. We will also see how to display some different types of dialogs, and how to respond to the users' interaction with those dialogs. Before we get to that, we need to cover some ground rules about working with Ext.
Before we proceed any further, we should provide Ext with something it needs—a spacer image. Ext needs a 1 pixel by 1 pixel, transparent, GIF image to stretch in different ways, giving a fixed width to its widgets. We need to set the location of this spacer image using the following line:
Ext.onReady(function(){
Ext.BLANK_IMAGE_URL = 'images/s.gif';
});
You're probably wondering why we need a spacer image at all. The user interface of Ext is created using CSS, but the CSS needs underlying HTML elements to style so that it can create the look and feel of Ext components. The one HTML element that is an exact, predictable size across all browsers is an image. So an image is used to define how an Ext component is drawn. This is a part of how Ext maintains its cross-browser compatibility.
Ext has many "widgets". These include components such as a message box, grid, window, and pretty much everything else that serves a particular user interface function. I prefer to view components like onReady more as core functions, and only refer to components that provide a specific user interface role as a "widget"—like the grid that is used to present tabular data to the user.
Let's create a new page (or just modify the 'getting started' example page) and add the code to display a dialog when the page is ready:
Ext.onReady(function(){
Ext.BLANK_IMAGE_URL = 'images/s.gif';
Ext.Msg.show({
title: 'Milton',
msg: 'Have you seen my stapler?',
buttons: {
yes: true,
no: true,
cancel: true
}
});
});
As we did in the previous chapter, we have placed our code inside an onReady function. We can then start to code our dialog and configure it using a config object. The config object used for this dialog has three elements, the last of which is a nested object for the three buttons.
Here is how our code now looks in a browser:

This displays what appears to be a very minimal dialog, but if we start clicking on things, the built-in functionality of Ext becomes apparent. The dialog can be dragged around the screen by grabbing the title bar, just like the dialog in a typical desktop application. There is a close button built in, and pressing the Escape key when the dialog has focus, or clicking on the Cancel button will close the dialog.
Let's take a closer look at the two core Ext functions we have just used:
Ext.onReady:This function provides a way to make our code wait until the DOM is available, before doing anything. This is needed because JavaScript starts executing as soon as it is encountered in the document, at which point, our DOM elements might not exist.Ext.Msg.show:This is the core function used for the creation of a dialog. It takes care of everything needed to have a working dialog. There are some shortcuts that can be used for common dialog types, which will help you save time. We will cover these in just a minute.
It's time to examine the code we just used to display our dialog.
Ext.onReady(function(){
Ext.Msg.show({
title: 'Milton',
msg: 'Have you seen my stapler?',
buttons: {
yes: true,
no: true,
cancel: true
}
});
});
The onReady function is what we use to make our code wait until the document is ready. The argument passed to onReady is a function, which can be passed in as a function name, or created in-line, as we have done in the example code. This method of creating a function in-line is referred to as an anonymous function, which is used when you plan on calling a particular function only once.
If we were executing a function that will be used again, then we could define and call it like this:
Function stapler(){
Ext.Msg.show({
title: 'Milton',
msg: 'Have you seen my stapler?',
buttons: {
yes: true,
no: true,
cancel: true
}
});
}
Ext.onReady(stapler());
When we start to make our application bigger, we are not likely to use many anonymous functions, and will probably opt for creating re-usable functions.
Let's get back to making our little application as annoying as possible by adding an icon and buttons! This can be done by adding a style for the icon, and modifying the config to have an icon record along with a buttons record.
First, let's discuss the CSS we need. Add the following code into the head of the document, within a style tag:
.milton-icon {
background: url(milton-head-icon.png) no-repeat;
}
Also, we will make some changes to our widgets configuration. The icon record just needs our style name as the value, milton-icon. We have also included a function to be executed when a user clicks on any of the buttons in the dialog. This function is created as an anonymous function, and in this case, it is merely used to pass variables:
Ext.Msg.show({
title: 'Milton',
msg: 'Have you seen my stapler?',
buttons: {
yes: true,
no: true,
cancel: true
},
icon: 'milton-icon',
fn: function(btn) {
Ext.Msg.alert('You Clicked', btn);
}
});

In our case, the function has only one argument, which is the name of the button that was clicked. So if our user was to click the Yes button, the btn variable would contain a value of yes. Using the example code, we are taking the name of the button clicked, and passing it to alert, as the message.
In our example, we are utilizing what's called a config object, which is the primary way to get Ext to do what you want. This is what provides the configuration of the different options that are available for the function that is being used.
We used to call functions with a pre-determined set of arguments. This means that we had to remember the order of the arguments every time the function was used.
var test = new TestFuntion(
'three',
'fixed',
'arguments'
);
This old way of using functions can create many problems:
It requires us to remember the order of the arguments
It does not describe about what the arguments represent
It provides less flexibility in dealing with optional arguments
Using a config object, we are able to have a larger level of flexibility, and can tell what our variables are in descriptive plain text. The order of our arguments no longer matters—firstWord could be the last item, and thirdWord could be the first, or they could be in any random order. With the config object method of passing arguments to your functions, the arguments no longer needs to be tied down to a specific place.
var test = new TestFunction({
firstWord: 'three',
secondWord: 'fixed',
thirdWord: 'arguments'
});
This method also allows for unlimited expansion of our function's arguments. Using fewer arguments or adding new arguments is simple. Another great result that comes by using a config object is that the prior usage of your functions will not be harmed by the addition or subtraction of arguments at a later point.
var test = new TestFunction({
secondWord: 'three'
});
var test = new TestFunction({
secondWord: 'three',
fourthWord: 'wow'
});
If you are familiar with CSS or JSON, you'll notice that a config object looks similar to these, mostly because they are all the same. Config objects are just ways of structuring data so that it can easily be read by programming languages—in our case, JavaScript.
For an example, let's take a look at the config portion of our example code:
{
title: 'Milton',
msg: 'Have you seen my stapler?',
buttons: {
yes: true,
no: true,
cancel: true
},
icon: 'milton-icon',
fn: function(btn) {
Ext.Msg.alert('You Clicked', btn);
}
}
The particular config that we are using here may appear complex at first, but once we get to know it, it becomes an extremely fast way of configuring widgets. Just about every Ext widget uses a configuration object, so this is something that we will want to become very familiar with. The config object will become our new best friend.
Here are some key things to remember when working with a config object:
Curly brackets wrap around your whole record set, which symbolizes the records inside the brackets as being part of an object—
{records}.Each record consists of a set of name/value pair, with the name and value separated by a colon, and pairs separated by commas—
{name0: value0, name1: value1}.The records' values can contain any type of data, including boolean, array, function, or even another object—
{ name0: true, name1: { name2: value2 } }.Square brackets identify an array—
{name: [ 'one', 'two', 'three' ] }. An array can also contain objects with records, values, or any number of other things.
The best thing about using JSON to configure our widgets is that if we want more options, we just start typing them out. Presto! Unlike a typical function call, the order of your config options has become irrelevant, and there can be as few or as many as necessary.
Ok! So now we've seen how to get our Ext JS party started and ask the user a question. Now let's see what we can do with their answers. Let's add to our dialog's function so that we can decide what to do in response to each of the button-clicks. A switch statement can take care of deciding what to do in each case:
fn: function(btn) {
switch(btn){
case 'yes':
Ext.Msg.prompt('Milton', 'Where is it?'),
break;
case 'no':
Ext.Msg.alert('Milton', 'Im going to burn the building down!'),
break;
case 'cancel':
Ext.Msg.wait('Saving tables to disk...','File Copy'),
break;
}
}
Remember those built in dialog types I mentioned earlier? Well we just used some of them. They let us accomplish some common tasks without spending time writing the config needed for each standard scenario.
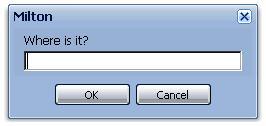
Click OK and you get a prompt. A prompt is the common name for a small window that allows you to enter a single value, and is a standard element in almost every user interface.
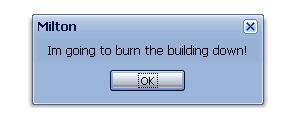
Click No and you get an alert. I'm sure you are familiar with the standard alert dialog in JavaScript. I remember the first time I used an alert dialog in JavaScript. I was so excited to have an alert message on my home page that I made it pop up and say "Click OK if you are a moron".
Click the Cancel button(or click the close button or press the Escape key) and you will get a wait message that's using a progress dialog.
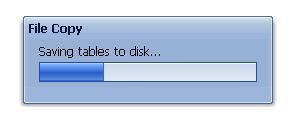
The progress dialog we are using can be controlled by Ext and be notified when it should disappear. But for the sake of simplicity, in this example, we are letting it run forever.
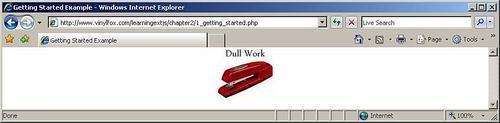
Now, we can start causing some reactions in our page, based on the users' responses to the dialogs. We are going to add to our switch statement, which takes care of a Yes button click. The prompt function can handle a third argument, which is the function to be executed after the Yes button has been clicked. We are defining this so that the function will check to see if the value entered into our prompt dialog is equal to the office and then write this text to a DIV in our page if it is, and a default text of Dull Work if it does not. The code also applies a style to the same DIV, which uses a "Swingline" stapler background image.
case 'yes':
Ext.Msg.prompt('Milton', 'Where is it?', function(btn,txt) {
if (txt.toLowerCase() == 'the office') {
Ext.get('my_id').dom.innerHTML = 'Dull Work';
}else{
Ext.get('my_id').dom.innerHTML = txt;
}
Ext.DomHelper.applyStyles('my_id',{
background: 'transparent
url(images/stapler.png) 50% 50% no-repeat'
});
});
break;
The no case will display an alert message, which also styles the document when the No button is clicked.
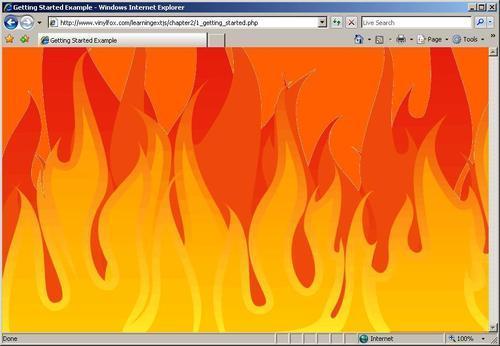
case 'no':
Ext.Msg.alert('Milton',
'Im going to burn the building down!',
function() {
Ext.DomHelper.applyStyles('my_id',{
'background': 'transparent
url(images/fire.png) 0 100% repeat-x'
});
Ext.DomHelper.applyStyles(Ext.getBody(),{
'background-color': '#FF0000'
});
Ext.getBody().highlight('FFCC00',{
endColor:'FF0000',
duration: 6
});
});
break;
Ext is able to work so well, because it has a foundation that provides access to the DOM, and to many functions that allow manipulation of the DOM. Of these functions, get is one of the most used.
Ext.get('my_id'),
This gives us access to an element in the document with the ID, my_id. If we take a look at the first example, it is using getBody , which retrieves the body element and applies our effect to that. Let's switch that around to use my_id instead. But first, we will need to create a my_id element in our document:
<div id='my_id' style='width:200px;height:200px;'>test</div>
If we add this to the body section of our document, and change our effect to reference this instead of the body, then our effect will happen only to the my_id div we created:
Ext.get('my_id').highlight('FF0000',{
endColor:'0000FF', duration: 3
});
If we now looked at our document in a browser, we would see a 200-pixel square box changing color, instead of the entire body of the document changing color.
Bear in mind that IDs are unique. So once we have used my_id, we cannot use this ID again in our document. If duplicate IDs exist in your document, then the last one found will be used. But this should be considered as a bug, and not a design practice. For the most part, Ext creates and tracks its own IDs, and most of the time, we will default to Ext's tracking of the document elements and not create them on our own.
This isn't exactly a speed tip, but is more about conserving memory by using something called a "flyweight" to perform simple tasks, which results in higher speed by not clogging up the browser's memory.
The same highlight effect we just used, could be written using a flyweight instead:
Ext.fly('my_id').highlight('FF0000',{
endColor:'0000FF', duration: 3
});
This is used when we want to perform an action on an element in a single line of code, and we do not need to reference that element again. The flyweight re-uses the same memory over and over each time it is called.
Here is an example of using a flyweight incorrectly:
var my_id = Ext.fly('my_id'),
Ext.fly('another_id'),
my_id.highlight('FF0000',{
endColor:'0000FF', duration: 3
});
Because the flyweight re-uses the same memory each time it is called, by the time we run the highlight function on our my_id reference, the memory has changed to actually contain a reference to another_id.
Using only a few lines of code, we have created a fun program that will keep you entertained for hours! Well, maybe not for hours, but for at least a few minutes. Nonetheless, we have the beginnings of the basic functionality and user interface of a typical desktop application.
We have learned the basics of using configuration objects, and I'm sure this will make even more sense after we have had the chance to play with some more Ext widgets. But the real point here is that the configuration object is something that is very fundamental when using Ext. So the quicker you can wrap your head around it, the better off you will be.
Don't worry if you are not entirely comfortable with the configuration object yet. We have plenty of time to figure it out. For now, let's move on to one of my favorite things—forms.