
Although many designers and developers like to capitalize heavily on Flash’s vector-based features, the application has a lot to offer from the world of pixels. Perhaps the most useful way in which vectors and pixels coexist in Flash is through the use of bitmap compositing features. In this context, compositing pertains to combining visual elements to give those elements a new appearance. This includes the use of transparency, blending (combining the pixel color values of two bitmaps), and filters (such as blur or drop shadow). Whether your asset is a bitmap or vector, Flash can use traditional bitmap compositing techniques to combine elements during authoring or at runtime.
Flash can act upon vectors as if they were bitmaps by using a feature called bitmap caching. Bitmap caching is a process by which Flash Player temporarily takes a bitmap snapshot of your asset and uses that snapshot, rather than the original asset, for bitmap compositing. There are two important ideas going on here. First is the concept that you can apply an effect typically reserved for bitmaps, such as blurring, to vectors. Second is the fact that the effect is applied to a cached snapshot of the original asset, which means the asset remains in its original format. For example, if the original asset is a vector, it remains crisp at any resolution.
Bitmap caching not only makes certain features possible, it can also improve performance. This is because it’s easier for your computer to manipulate bitmaps than to recalculate all of the math needed to display the points, lines, curves, fills, and so on that comprise a vector asset. In short, Flash takes a picture of your asset after every visual change, ensuring that its appearance will remain at maximum quality, and uses the bitmap for the heavy lifting.
How often you change the asset can have a big impact on performance. For example, if you just intend to move a movie clip around on the stage, a bitmap only needs to be cached once. However, if you materially change the movie clip through scaling, rotating, or changing its opacity (alpha), Flash will need to cache the bitmap version of the asset after every such change. If bitmap caching is used injudiciously, it can actually affect performance adversely. Limit the use of the feature when doing a lot of these kinds of transformations, and test your work with caching disabled, if your feature set permits. This will let you know if caching is helping or hurting performance.
Sometimes bitmap caching is applied automatically by Flash Player, as when using a filter effect on text elements. You’ll learn how to use filters in just a moment. However, you can manually apply bitmap caching to buttons or movie clips. Because this step is used in later sections of this chapter, it’s helpful to learn how to enable bitmap caching using both the interface and ActionScript. Enabling the feature without doing anything else won’t show any change, but it’s necessary groundwork for upcoming discussions.
Note
This chapter provides examples of bitmap compositing features created in the Flash interface (the primary focus) and with ActionScript to help you practice and expand the ActionScript skills you learned in Chapter 6. You’ll find more such opportunities in subsequent chapters as space allows.
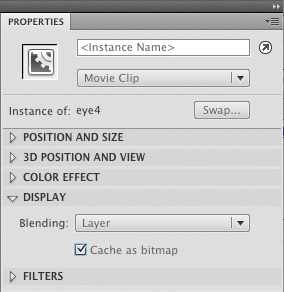
The Cache as bitmap option appears in the Display section of the Properties panel (Figure 7-1) when you select a button or movie clip. To get a feel for the feature, try this short activity:
Create a new file. Use the Rectangle tool to draw a rectangle anywhere on the stage.
Use the Selection tool to select the shape and convert it to a movie clip (Modify→Convert to Symbol). The name and registration point of the symbol are unimportant in this case, but make sure it’s a movie clip.
In the Properties panel, look under Display and enable the Cache as bitmap option. Bitmap caching is now enabled. This file is not required for the final project.
An alternative to using the Flash interface to enable bitmap caching is to use ActionScript to do so at runtime.
To rely solely on ActionScript, select your movie clip on the Stage with the Selection tool and disable Cache as bitmap in the Properties panel. The ActionScript property will work regardless of the Properties panel values, but resetting them makes the tutorial clearer.
Using the Properties panel, give the movie clip an instance name of
myMovieClip.Create a new layer in the Timeline, name it
actions, and lock it.Select the frame in the new layer and open the Actions panel (Window→Actions). Enter the following script:
myMovieClip.cacheAsBitmap = true;
After following the Properties panel or ActionScript steps described, you can apply compositing features that require bitmap caching to myMovieClip.
Flash features seven filter effects that are akin to Adobe Photoshop’s layer styles. You can apply one or more filters and one or more copies of each filter to compatible display objects (shapes and graphic symbols are not supported, for example). You can copy and paste, hide, reset, and delete them. You can also save a library of custom presets for later use.
Figure 7-2 shows a quick example of each basic filter configuration in use, with a control (unaffected object) in the lower-right corner of the figure. The source file filters.fla demonstrates each filter.
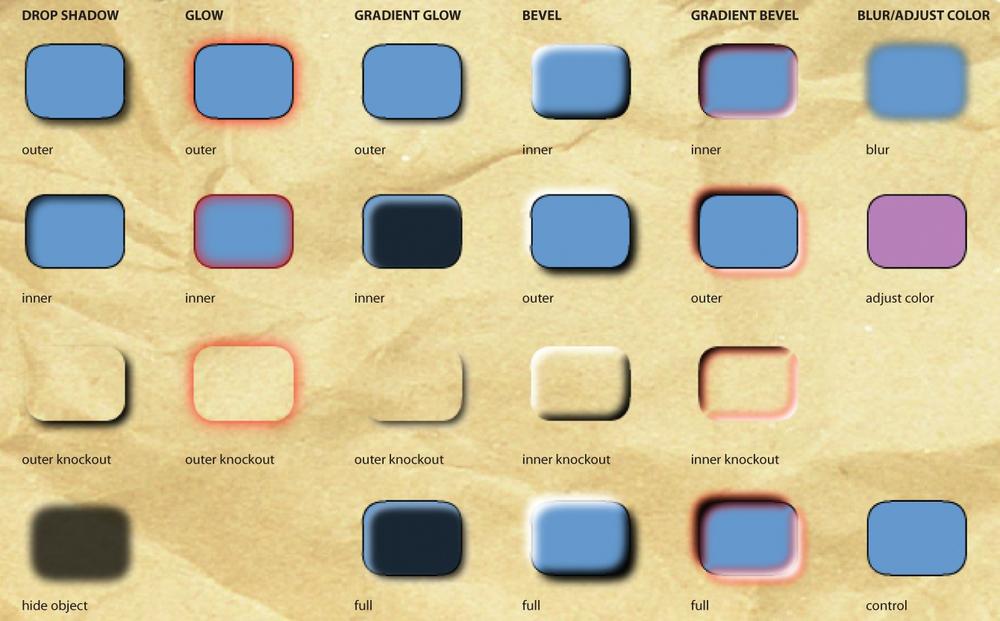
- Drop shadow
Creates a drop shadow with the following configurable properties: BlurX (width), BlurY (height), Strength (darkness/opacity), Quality (degree of blurriness of the shadow), Angle (of virtual light source), Distance (from the object casting the shadow), Knockout (removes the area of the object from the shadow and shows only the remaining shadow), Inner Shadow (applies a shadow within object boundaries), Hide Object (hides the object and shows only the complete shadow), and Color.
- Blur
Blurs the object with the following configurable properties: BlurX (width), BlurY (height), and Quality (degree of blurriness).
- Glow
Creates a glow with the following configurable properties: BlurX (width), BlurY (height), Strength (sharpness of glow edge), Quality (degree of blurriness of glow), Color, Knockout (removes the area of the object from the glow and shows only the remaining glow), and Inner Glow (applies a glow within the object boundaries).
- Bevel
Bevels, or edges, the object with the following configurable properties: BlurX (horizontal softness), BlurY (vertical softness), Strength (opacity), Quality (degree of blurriness of the bevel), Shadow (color of the shadow portions of the bevel), Highlight (color of the highlight portions of the bevel), Angle (of virtual light source), Distance (depth of the bevel), Knockout (removes the object and shows only the bevel), and Type (applies a bevel to the inner portion of the object, outer portion of the object, or the full object—inside and outside).
- Gradient glow
Applies a glow to the object, functioning the same way as the Glow filter, but uses a gradient instead of a solid color. Adds the following configurable properties to those found in Glow: Angle (of gradient), Distance (of glow from the object), and Type (applies a bevel to the inner portion of the object, the outer portion of the object, or the full object—inside and outside). The Glow filter’s Color property is replaced with Gradient (features a gradient editor similar to Color panel, but the first end color must be 100% transparent).
- Gradient bevel
Applies a bevel to the object, functioning the same way as the Bevel filter, but uses a gradient instead of highlight and shadow colors. The Bevel filter’s Shadow and Highlight properties are replaced with Gradient (features a gradient editor similar to Color panel, but the first end color must be 100% transparent).
- Adjust color
Adjusts the color of the object with Contrast, Brightness, Saturation (how vibrant the color is), and Hue (color range) sliders.
Where applicable, high quality approximates a Gaussian blur on the effect, while low quality is better for performance.
Configuring a filter in the Properties panel is almost as straightforward as manipulating any other property. You just need to use a few added interface elements, which are found in a row in the lower-left corner of the Filters section of the panel (Figure 7-3).
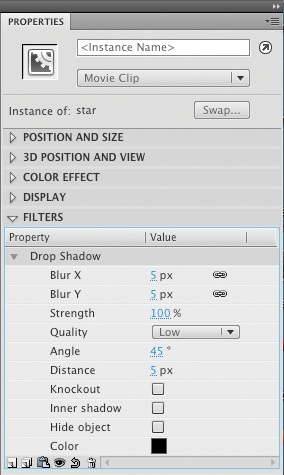
The first button in the row (single document icon) adds a filter from a pop-up menu of filters that ship with Flash. Using this menu, you can also remove, enable, or disable all filters. The second button (multiple document icon) allows you to manage your own custom presets. You can name and save presets, and rename and delete them. The third button (clipboard icon) copies all or selected filters, and pastes filters from the clipboard. The fourth button (eye icon) enables or disables the filter. The fifth button (arrow) resets the filter to the preset values. The last button (trashcan icon) deletes a filter.
Note
The companion website includes information about sharing your custom filter presets with others.
Applying a filter in ActionScript adds flexibility and requires two steps. First create the filter, and then you must apply it to your display object.
It is possible to configure a filter when it is created, like the drop shadow created here:
var ds:DropShadowFilter = new DropShadowFilter
(5, 45, 0x000000, 0.5, 5, 5, 0.5, 1, false, false, false);
Because you must remember the order of all the properties to do this, however, it’s not recommended. Applying the properties as separate lines of script is easier to read:
var ds:DropShadowFilter = new DropShadowFilter();
ds.distance = 5;
ds.angle = 45;
ds.color = 0x000000;
ds.alpha = 0.5;
ds.blurX = 5;
ds.blurY = 5;
ds.strength = 1;
ds.quality = 1;
ds.inner = false;
ds.knockout = false;
ds.hideObject = false;
All properties in these filters have default values, so you can create a filter with preset values with a single line of code. If you want to alter any of the preset values, you can adjust only those parameters, as shown with this bevel:
var bvl:BevelFilter = new BevelFilter();
bvl.distance = 10;
Applying a filter to a movie clip instance is as simple as adding the variable you used to create that filter to an array of all such filters applied to the object. The array is added to the aptly named filters property of the movie clip. For example, you can apply the drop shadow and bevel filters to a movie clip with an instance name of myMovieClip using the following ActionScript:
myMovieClip.filters = [ds, bvl];
You can apply a single filter in exactly the same way:
myMovieClip.filters = [ds];
It may seem strange at first to place a single value into an array, but it must be done this way to accommodate more than one filter. That is, without the array structure, you might only be able to apply a single filter to a movie clip. That would be too limiting.
If, after applying a filter, you make a change to a filter property, you must reapply the filter to the display object. The following simplified example alters a filter property after application and then reapplies the filter to update the change:
myMovieClip.filters = [ds];
ds.distance = 0;
myMovieClip.filters = [ds];
Note
On the companion website, you’ll find ActionScript techniques that replicate the functionality of the filter interface buttons in the Properties panel. Among these techniques are how to create, enable/disable, and reset your filters, as well as how to maintain a library of presets.
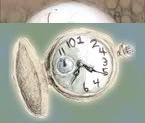
This exercise demonstrates how to take advantage of the hide object feature of the Drop Shadow filter. Figure 7-4 shows the portfolio protagonist, Scaly, minding his own business. On the left is the original movie clip, selected to show that the transform point has been dragged down to near the bottom center of the clip.
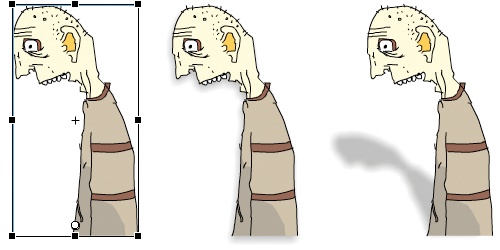
Figure 7-4. Unaffected movie clip (left), normal drop shadow filter applied (middle), and filter applied to transformed duplicate movie clip with hide object enabled
The middle image in Figure 7-4 is the same movie clip with a drop shadow filter applied in a typical manner. Think of the shadow using an imaginary light source somewhere behind you above your right shoulder. This gives Scaley some depth, but it’s not very realistic.
On the right, the same movie clip is used, but a second copy of the movie clip has been added to a layer underneath. That copy has the same filter applied, but the hide object feature has been enabled, and the second movie clip has been scaled and skewed to add perspective.
To try this exercise yourself, open the shadow_hide_object_01.fla from the companion source files. If you want to use your own assets and adapt the instructions as you go, please pay careful attention to the transform point of the movie clips. You will need to adjust your transform point and apply scale, skew, and possibly x- and y-coordinate values that work with your assets.
In the provided source file, you will see the setup depicted in Figure 7-4, but without the filters applied. The visible characters on the left and right are in locked layers. The character in the middle is in the normalFilter layer, and a duplicate of the character on the right is in the perspectiveFilter layer, both of which are unlocked.
Select the middle character and use the Properties panel to add a Drop Shadow filter. Change the BlurX and BlurY to
10, the Strength to30, and the Angle to110. This completes the normal filter, which should resemble the shadow in the center of Figure 7-4.Select the filter name in the Properties panel and copy it using the clipboard icon button in the lower left of the panel.
Select the duplicate character on the right (because the topmost layer is locked, clicking on the character selects the duplicate underneath). Using the same clipboard icon button, paste the filter onto the selected character. Both the middle and right characters should look the same now because you haven’t begun to transform the shadow.
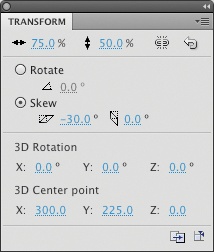
With the right duplicate movie clip selected, open the Transform panel (Figure 7-5). Click the link icon in the top row until you unlink the horizontal and vertical scale settings. Set the horizontal scale to
75and the vertical scale to50.In the panel’s second row, select the Skew radio button and enter
−30in the first value for horizontal skew. The duplicate movie clip should now be scaled and skewed the way the shadow appears in Figure 7-4.All that remains is to hide the object. Select the duplicate movie clip and, in the Filters section of the Properties panel, click the Hide object option. Finit.
Your file should now look like Figure 7-4. The best part is that the shadow is really a duplicate movie clip instance, so if the movie clip is animated, the shadow will animate, too!
Flash includes a dozen blend modes that function similarly to their namesakes in Adobe Photoshop and Adobe Fireworks. Blend modes are used to blend one compatible display object (such as a movie clip or button) with another, based on the colors of both.
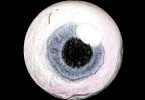
Figure 7-6 shows an example of each visual blend mode, and the source file blend_modes.fla demonstrates them in use. The list that follows explains each blend mode and uses target to refer to the underlying art, or the art to which the blending artwork is applied. For the most part, the underlying art is the crumpled paper background from the portfolio project, and the blending art is the eyeball vignette seen in large part in the lower-right corner of the figure. The only visual change to this eye is the removal of the small star shape applied by the Erase blend mode.

The three exceptions to this are Invert, Alpha, and Erase. Overlaying the eyeball with a black rectangle movie clip and applying the Invert blend mode to the rectangle produces a clearer demonstration of the effect. As for Alpha and Erase, these blend modes use alpha data and work only when the two assets being composited are in a container display object. This arrangement will be explained in detail, but the visual difference in Figure 7-6 between these two modes exists because a second movie clip containing a PNG of a star on a transparent background is placed atop the eye.
The most important thing to remember when looking over these blend modes is that trial and error with your own artwork is probably more helpful than trying to understand how each blend mode works in detail. Some are easy to understand, such as Darken, in which only blending pixels with colors that are darker than the underlying pixels will be visible, but others are a bit more complicated. You will likely become familiar with the blend modes you use most often, and you can always try a variety of modes to see how they look.
- Darken
Darken applies only color from the blending object that is darker than the color in the target object.
- Multiply
The Multiply blend mode multiplies the target color by the blending color, resulting in a more uniform application of darker colors.
- Lighten
The opposite of Darken, this blend mode applies only blending color that is lighter than the target color.
- Screen
For all intents and purposes, Screen is the opposite of Multiply. Screen multiplies the target color by the inverse of the blending color, resulting in a more uniform application of lighter colors.
- Overlay
Using Overlay, blending colors darker than 50% gray are applied to the target color using the Multiply effect. Blending colors lighter than 50% are applied to the target color using the Screen effect.
- Hard Light
Similar to Overlay, color application is determined by a mid-gray threshold. Blending colors darker than 50% gray are applied to the target color using the Darken effect, while blending colors darker than 50% gray are applied to the target color using the Lighten effect.
- Add
Add sums the blending color values and target color values, resulting in a higher-contrast, bleaching effect.
- Subtract
The opposite of Add, Subtract reduces the target color values by the values of the blending colors. This results in a higher-contrast, darkening effect.
- Difference
Using Difference, blending colors darker than 50% gray are applied to the target color using the Add effect. Blending colors darker than 50% gray are applied to the target color using the Subtract effect, resulting in a look similar to a color negative.
- Invert
The Invert blend mode doesn’t rely on the color values of the blending object. Instead, target colors are inverted by any blending color. The degree to which the effect is applied is based on the transparency value of each pixel. For example, the effect shown in Figure 7-6 is achieved using an opaque black rectangle movie clip blended onto the eye movie clip. However, the same effect would occur if the rectangle were white.
- Alpha
Using Alpha, transparent and semitransparent alpha values in the blending object remove all colors from both the blending object and target. In Figure 7-6, this blend mode uses the transparency around a star to knock out the color. Alpha requires a catalyst to work. The blending and target display objects must be in a parent container (such as another movie clip) and the Layer blend mode must be applied to the parent. Alpha will not work when applied only to a display object in the main Timeline.
- Erase
Erase works like Alpha, including the need for a parent container and use of the Layer blend mode, but opaque and semiopaque alpha values in the blending object remove the colors from the blending object and target. Figure 7-6 shows that the opaque star knocks out the color, not the surrounding alpha data.
- Layer
Layer is an important facilitator blend mode that precomposes the contents of a display object container to which the blend mode is applied. That is, the Layer blend mode composites the contents of the container first, and then treats the container as a single object. It does not have any visual effect on its own. Layer is required for the Alpha and Erase blend modes to work, but also improves the appearances of opacity changes to parent movie clips. See the Blend Modes in Practice section, later in this chapter, for more information.
- Normal
This blend mode applies no change whatsoever. Use Normal to remove blend mode effects.
Applying a blend mode using the Properties panel is very simple. All you need to do is select a movie clip or button, look in the Display section of the Properties panel (Figure 7-1), and choose the desired blend mode from the Blending menu.
Using ActionScript is also straightforward. References to all blend modes are stored in a single BlendMode class. They are stored by name in public static constants. This means that their names don’t change, and they are available to all scripts without requiring you to first create an instance of the class. For more information about instantiating classes, see Chapter 6.
Constants are also usually easy to remember and often eliminate case-sensitivity mistakes because they are comprised of all uppercase letters. To use a blend mode, use the following syntax:
myMovieClip.blendMode = BlendMode.DARKEN;
This example assumes that you are applying the blend mode to a movie clip with an instance name of myMovieClip. In the case of blend modes, all the constants are one word, so the hard light effect is applied this way:
myMovieClip.blendMode = BlendMode.HARDLIGHT;
This section shows you how to use the Flash-specific Layer blend mode to solve a common problem. A sample source file, layer_blend_mode.fla, demonstrates the problem and solution.
Figure 7-7 shows a movie clip that contains two assets: an image of a pocket watch overlapping much of an image of an eyeball. If you set the Alpha value of that movie clip to 50%, the expected result is a movie clip with the same overall appearance, but faded to 50%.
Unfortunately, that’s not what Flash will give you. Instead, Flash will apply the opacity change to each of the items inside the movie clip, meaning that both the eyeball and pocket watch will be independently faded to 50%. The result is shown in Figure 7-8.

If, however, you first apply the Layer blend mode to the movie clip, the blend mode will precompose the movie clip so it can be affected as a whole by the Alpha setting. Figure 7-9 shows the final result, after both the Layer blend mode and 50% Alpha setting have been applied.
Building the sound control in Chapter 3 demonstrated that Timeline layer masks are good for showing only portions of a layer at runtime. Essentially, they are adept at cropping underlying content. However, as you’ll soon see, Timeline layer masks can have a sharp edge only. Even if you use a gradient with alpha data in a mask layer, all nontransparent pixels are considered opaque in a mask layer and, therefore, soft-edge masks are impossible using this technique.
Figure 7-10 shows the parts used for creating all the masks in this chapter. The unmasked movie clip contains a familiar orb, and the Mask movie clip is filled with a radial gradient that spans from opaque black to transparent black. The sample source files masking_techniques_01.fla and masking_techniques_02.fla, as well as the images that follow, use a black stage to make the masked eyeball easier to see.
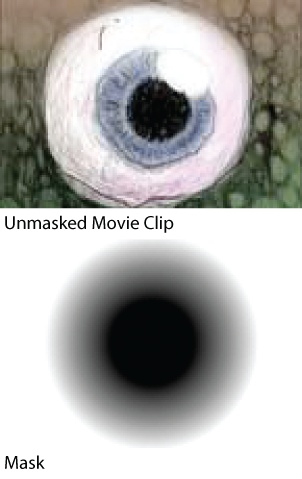
In a Timeline mask layer, any nontransparent color will be included in the mask, so even gradients that contain Alpha values of less than 100% can’t create soft edges. Figure 7-11 shows the result of a Timeline mask using the parts in Figure 7-10.
Using the Alpha blend mode, you can create the look of a soft-edge mask, shown in Figure 7-12. To follow along, open masking_techniques_01.fla:
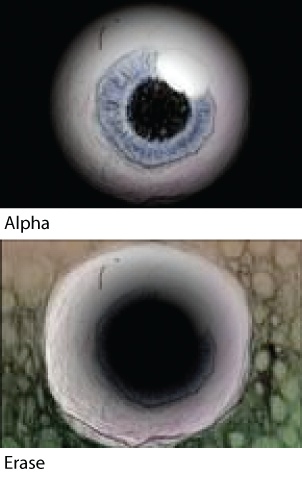
Figure 7-12. Using the Alpha and Erase blend modes, in a container to which the Layer blend mode is applied
Place the mask on top of the eyeball. The mask should partially cover the eyeball with black from the radial gradient.
Select only the mask and give it a blend mode of Alpha. The mask will disappear without affecting the eyeball, but that is expected behavior and is only temporary.
Select both movie clips and create a new movie clip (Modify→Convert to Bitmap). The mask will still be invisible and the eyeball will still appear unaffected.
Select the new movie clip and apply the Layer blend mode. The Alpha blend mode within the movie clip will take effect, and you should see the same thing shown at the top of Figure 7-12.
You can easily reverse the area of the eyeball movie clip that is masked by following the same process, but switching the internal blend mode in step 2 with Erase. Using the Erase blend mode gives the effect seen at the bottom of Figure 7-12.
Finally, you can create a soft-edge mask with ActionScript using just a few lines of code. Both the content display object (the eyeball movie clip, in this case) and the mask display object (the radial gradient movie clip) must have bitmap caching enabled. From there, the only thing that remains is to assign the mask movie clip as the value of the content movie clip’s mask property.
eyeballMC.cacheAsBitmap = true;
maskMC.cacheAsBitmap = true;
eyeballMC.mask = maskMC;
To see the result, test your movie (Control→Test Movie). It should resemble Figure 7-13. Compare your work with the final version of the source file, masking_techniques_02.fla.


In this chapter, you will examine blend modes and add filter effects to the portfolio, including creating the Up, Over, and Down states of the navigation buttons.
In Chapter 4, you imported the user interface shell from Adobe Illustrator. One of the features that remains editable after its move from Illustrator to Flash is support for blend modes. Happily, an Overlay blend mode is now applied to your project without you having to do much at all.
Figure 7-14 shows what your logo might have looked like without the blend mode applied (top) and what it looks like with the blend mode applied (bottom). In this section of Project Progress, you will confirm that the blend mode is correctly applied or apply it manually if a problem exists.
Open your project file. Based on previous chapters, it is likely called portfolio.fla.
Scroll your Timeline panel to frame 63 in the logo layer. This shows the interface after fading and zooming in, and is a likely place to find the logo.
Look in the upper-right corner of the Stage to locate the logo movie clip. If its colors are blending with the wheel below it, you can skip to the next Project Progress section. If the logo appears white, or if you want to see that the blend mode is still editable, continue.
Double-click the movie clip. You should switch into editing mode, editing the logo in place.
If necessary, lock the black and red layers, and unlock the white layer. This prevents you from selecting the wrong asset.
Click the logo to select the white layer and look in the Display section of the Properties panel. You should see that the Overlay blend mode has been applied during the AI import process. If it hasn’t been applied, apply it now. If you made a change, save your work.
Next, apply Glow filters to the logo, sound control, and wheel. You’ll also apply drop shadows to the navigation buttons to create visual changes in their Up, Down, and Over states. Along the way, you’ll learn a little bit more about blend modes.
Adding a black Glow filter to the logo, sound control, and wheel will contribute to the illusion that they are free-floating. Figure 7-15 shows the logo and sound control elements before and after the Glow filter was applied. Figure 7-16 shows a detail of the same transformation to the wheel.
Return to editing the logo movie clip and lock all layers but white.
Select the white logo element and add a Glow filter. Use all the default values except for BlurX and BlurY. Change these values to
15.Leave editing mode (double-click a faded stage element or use the Edit→Edit Document menu command) and look at the shadow. Look closely and notice that the strength of the glow isn’t very impressive and, what’s more, it seems to vary. This is because a blend mode is applied to every part of an element, including any filters applied. This means that the filter is subject to the Overlay blend mode, too, and is blending into the underlying artwork. That’s not what you want.
Double-click the movie clip again to edit it. In the Timeline, select the FOLIO layer and add a new layer. This creates a new layer above FOLIO and below white. Name this layer glow.
Select the white logo element and copy it. Then select the new glow layer and paste the element in place (Edit→Paste in Place). This pastes the copy in the same location as the original.
You now have two blend modes and two filter effects. You want one of each. Lock the glow layer so you can easily work with the white layer. Select the logo element and, in the Properties panel, select the Glow filter. Delete it using the trashcan icon button near the lower-left corner of the panel.
Next, lock the white layer and unlock the glow layer. Select this logo element and, in the Display section of the Properties panel, change the blend mode to
Normal. Immediately, the glow around the logo becomes stronger. You now have one blend mode and one filter, but you’re not done with the logo yet.In the Filters section of the Properties panel, enable the Knockout feature. This leaves the glow but hides the duplicate logo element in the glow layer so the Overlay blend mode from the white layer will still work. Now all that’s left is the text.
While still in the Filters section of the Properties panel, select the Glow filter and copy it using the clipboard icon button near the lower-left corner of the panel.
Lock the glow layer and unlock the FOLIO layer. Select the text element in this layer and, in the Properties panel, use the clipboard icon button again to paste the filter effect. The same glow from the previous steps is applied to the text.
Now that you’re finished with the logo, it’s time to move on to the sound control. You still have a Glow filter in the clipboard, so put it to work.
Leave editing mode and select the sound control. In the Filters section of the Properties panel, paste the Glow filter again. This adds the effect you used in the logo to the sound control. Both the logo and sound control should now look like the after stage of Figure 7-15.
Note
Remember, these filters are rendered live, not composited. So, as the sound control animates under ActionScript control (which you’ll tackle in Chapter 9), the filter will update dynamically, too.
The final exercise in this chapter is to add drop shadows to the navigation buttons to create button states. Start by creating the states for one button and then repeat the process carefully for the other three buttons. Figure 7-16 shows the Up, Over, and Down states, from top to bottom, of the Lab button.

You’re using drop shadows rather than glows for a few reasons. First, it gives you experience with additional buttons. Second, the movement of the drop shadow when the button changes states is a little more obvious than adjustments to a glow filter would be, making the buttons seem a bit more responsive. Finally, the close proximity of the buttons to the background paper on which they rest makes a drop shadow more appropriate. A drop shadow was added to the button background in Photoshop and a shadow element was created during the PSD import.
Warning
Unlike blend modes, Photoshop layer styles do not remain editable after a PSD import. The styles are faithfully reproduced and, depending on your import settings, you can create them as separate elements that you can later transform. However, you cannot edit them in the Properties panel.
Double-click the navigation movie clip to get access to the button art.
Select the blue movie clip and create a new button symbol (Edit→Convert to Symbol). Choose a center registration point again and name the button
labButton.Double-click the new button to edit it and select the movie clip in the Up state.
In the Filters section of the Properties panel, add a Drop Shadow filter. Use all the default values except for Strength (change to
50).In the Timeline, click in the layer under the Over state and add a keyframe (Modify→Timeline→Convert to Keyframe, or F6).
Select the blue movie clip in this frame and change its filter values. Change the BlurX, BlurY, and Distance to
8. This makes the button appear to pop up when the mouse is placed over it.Repeat the process described in step 5 to add a Down state to the button. Repeat the process described in step 6 and change the Down state filter values of BlurX, BlurY, and Distance to
5,5, and1, respectively. This makes the button appear to be pushed down to the background paper when clicked.Save your work and test your movie (Control→Test Movie). The Lab button should have a slightly raised default state, the button should jump up a bit during mouse over, and the button should flatten to its background when clicked.
If the Lab button functions to your satisfaction, repeat this exercise with the three remaining buttons. If not, retrace your steps to see what went wrong or pick up with the provided source file, portfolio_07_final.fla.