
Welcome! It’s the final chapter of the book, and you’re almost home. You worked hard, you know your way around Flash, and you created a portfolio that ties together everything you’ve learned. All that remains now is getting it out into the world.
In this chapter, you’ll publish a SWF and a host HTML file that will run in your friendly neighborhood web browser. As an added bonus, you’ll also create an AIR (Adobe Integrated Runtime) desktop application that will wrap the portfolio into one neat little package. You can download the AIR application and run it locally or even leave a copy behind at job interviews.
First, however, you’ll create a preloader to keep your viewers aware of any loading delays caused by slow Internet connections. When the preloader is finished and you’ve deployed to both HTML and AIR, your mission will be complete. In this chapter, you’ll work on the project in three separate segments so you can focus on each topic individually.
When a viewer to your site is struggling with a slow Internet connection, waiting a long time for assets to load can be disconcerting. At best, the experience is frustrating. At worst, your visitor may think there is a problem with your site and move on.
In time, you will be able to optimize your online applications to keep SWF sizes small, load more assets from external sources, and reduce embedded assets by accomplishing more with code. Until you’re comfortable and experienced enough to do these things, you’ll have to work around large assets.
The portfolio project that wound its way through this book was designed to show you how. The user interface’s large viewing wheel contributes significantly to the size of your SWF. By displaying a progress bar during the initial load time, you can indicate to visitors that your content is coming and also indicate how long they will have to wait.
To do this, you will create a preloader that sits as the only asset in the first frame of any FLA. When the file begins to load, the preloader will stop in frame 1 and begin monitoring the percentage of your SWF that has loaded. When that value reaches 100%, the SWF will be fully loaded and the code will continue playing the file.
The only asset essential to this task is a movie clip that will act as a progress bar. To provide the viewer with some context as to how much of the loading process remains, however, you need to create the progress bar in a specific manner:
Create a new file (without using the book template) and give it a black Stage color.
Select the Rectangle tool in the Tools panel.
Make sure Object Drawing mode is off.
Using the Tool panel’s color chips, select a gray stroke color (#999999) and white fill (#FFFFFF).
Draw a rectangle anywhere on the Stage.
Switch to the Selection tool and double-click the fill of the rectangle, or click outside the rectangle and drag over the entire rectangle with the Selection tool to select both the fill and stroke.
Using the Properties panel, give the rectangle a width of
150pixels and height of10pixels. To control these values independently, click the adjacent link icon to unlock the aspect-ratio lock.Convert the shape to a movie clip, name it
preloader, and give it an upper-left registration point. Click OK to create the symbol.This movie clip is a symbol you can drop into any project to use as a preloader. You will create your progress bar and add your code inside this movie clip.
Double-click the movie clip to edit its contents. In the Timeline panel, name the existing layer
progBar.Using the Selection tool, carefully double-click the stroke of the shape you created. Be sure the fill remains unselected. Zoom in if selecting only the stroke is difficult.
Cut the stroke (Edit→Cut), create a new layer in the Timeline panel called
outline, and paste the stroke in place (Edit→Paste in Place) in that layer. Be sure the stroke ends up at the same x and y position so it appears to surround the fill. Lock this layer. By separating the stroke and fill, you will create not only a progress bar, but also a rectangular frame that the progress bar will fill up, providing context to the viewer.Select the fill and convert it to a movie clip, name it
bar, and choose a center-left registration point. This is important because you will incrementally scale this bar to the right with ActionScript to show loading progress. If the registration point is not on the left side, it may not appear to grow correctly. For example, if you use a center registration point, it will expand in both the left and right directions. Click OK to create the symbol.Select the instance of the
barmovie clip on the Stage and give it an instance name ofprogBar. Double-click anywhere on the black background of the Stage to return to the main timeline. You’re now done with the assets and are ready to move on to coding. Compare your file to preloader_01.fla of the companion source files.
When writing ActionScript within your FLA, you’ll usually write code in the main timeline. This consolidates code and reduces the need to hunt for scripts elsewhere. In this case, however, you’re designing a generic preloader that you can reuse often simply by dropping it into the first frame of each file. For this reason, you’re going to place the ActionScript inside the preloader, making it self-contained like a component.
When writing code inside a movie clip that refers to the main timeline, you need to adjust your point of reference. The main timeline is the parent of a movie clip inside it. If you use the identifier this, you will be referring to the movie clip in which you wrote the script. If, instead, you use this.parent, you can refer to the main timeline.
Double-click the preloader movie clip you created to edit its contents.
At the top of the Timeline panel, create a new layer called
actions, type the following script into this layer, and save your work:1 var main:MovieClip = MovieClip(this.parent); 2 var mainInfo:LoaderInfo = main.loaderInfo; 3 var loadPercent:Number = 0; 4 5 main.stop(); 6 progBar.scaleX = 0; 7 8 this.addEventListener(Event.ENTER_FRAME, onCheckLoaded); 9 function onCheckLoaded(evt:Event):void { 10 loadPercent = mainInfo.bytesLoaded / mainInfo.bytesTotal; 11 progBar.scaleX = loadPercent; 12 if (progBar.scaleX == 1) { 13 removeEventListener(Event.ENTER_FRAME, onCheckLoaded); 14 main.play(); 15 } 16 }
So, what does this new ActionScript do? Line 1 stores a reference to the main timeline—the parent of the preloader movie clip you are creating. To prevent errors from the compiler, this line casts the main timeline as a MovieClip data type. This lets the compiler know that the main timeline is, in fact, a movie clip, so using movie clip properties and methods is legal.
Line 2 stores a reference to the main timeline’s loaderInfo property. As its name implies, this property contains information pertaining to the loading of a display object. In most cases, you will query this property when checking on an instance of the Loader class that you create to load an external asset. However, this also works when checking on the loading progress of the main timeline.
The loadPercent variable in line 3 is initialized to a value of 0 and will contain the percentage of the main timeline that has loaded throughout the preloading process.
Line 5 stops the main timeline from playing so the preloader can do its work. The progBar instance name in line 6 refers to the progress bar movie clip that you created earlier. This line initializes the horizontal scale of the progress bar to 0 before the loading begins.
Lines 8 and 9 create an event listener that listens for the enter frame event, thereby updating the progress bar many times per second. Line 10 divides the current number of bytes loaded by the total available bytes to calculate the percentage loaded each time the listener function is called. Line 11 sets the horizontal scale of the progress bar to this percentage. Thus, when 50% of the SWF is loaded, the progress bar will be scaled to 50% of its total width.
Finally, the conditional statement in lines 12 through 15 checks to see if the amount loaded has reached 100%. If so, the listener is removed and the main timeline is played. This makes the preloader disappear and the portfolio’s user interface begins to animate in.
With the assets and code in place, the preloader is complete and you can now test it using Flash’s download simulator. The preloader_02.fla companion source file has been provided for this purpose. It contains a second frame with a large asset in it. You can copy and paste the preloader from your file into frame 1 of preloader_02.fla for testing, or simply use preloader_03.fla, which has a finished preloader included.
Test your movie. The movie will load instantly because everything is local.
When you test a movie in Flash, you run a copy of Flash Player launched from within the Flash application interface. The application menus have changed so that you can use player features designed to simulate online connections. Access the View→Download Settings menu command to see a variety of connection speeds and select 56k (modem speed).
Test the movie again, while still in player mode, by using the View→Simulate Download menu command (do not close the SWF and return to Flash to retest). This will test the SWF again, but this time, throttle the speed to simulate a 56k Internet connection. You should see the progress bar increase in horizontal scale until it reaches full width and then advance to the next frame to show the content.
Because you added the necessary ActionScript to the preloader movie clip itself, all you need to do for the prelaoder to work is add it to frame 1 of your main portfolio FLA:
Open your main portfolio FLA and add a layer to the timeline beneath the labels layer. The placement of the layer isn’t critical; it just helps keep things tidy by keeping frame labels and ActionScript at the top of your timeline. Name it
preloader.Create a keyframe (F6) in frame 2, isolating frame 1 from the rest of the layer’s frames.
If your preloader FLA is still open, make sure you’re in the main timeline. Otherwise, open your preloader FLA, or preloader_03.fla if you prefer to use the furnished source file.
Copy the preloader movie clip from your preloader FLA and paste it into the first frame of the preloader layer in your portfolio FLA.
Save your work and test the preloader using the same process outlined previously in this chapter, in the Testing Your Preloader section.
Your project is now complete! Now it’s time to deploy it to the world.
When a SWF is compiled and readied for deployment, your distribution doesn’t have to include any of the assets that were imported into the FLA. For example, you don’t need to include your portfolio’s interface PSD when you upload your files to a server. However, you must include all external assets that will be loaded at runtime.
Whenever any of the Project Progress exercises throughout the book have needed to load external assets, you’ve consolidated the external files in the assets folder in your main project directory. When uploading your HTML deployment package, and when preparing your AIR application, you will need to include this directory and the assets within.
Because the preparation for deployment via web browsers and AIR is different, the external assets will be mentioned in both exercises.
Most of the time, Flash designers and developers create Flash projects that are uploaded to a server and accessible via the World Wide Web. This typically requires not only the creation of the SWF that is compiled every time you test your movie (Control→Test Movie), but also a host HTML file. For your convenience, both of these files are created when you publish your FLA (File→Publish). To configure properties of both files, use the Publish Settings dialog (File→Publish Settings).
The Publish Settings dialog is a file-specific set of properties divided into segments based on which assets you want to publish. By default, the Flash and HTML options are enabled (Figure 14-1), and as you select additional publish options, additional sections become active.

The GIF, JPG, and PNG options publish the first frame of the movie in their respective formats, with GIF supporting the added option of publishing animations as animated GIFs. The Windows and Macintosh Projector options publish an operating system-specific executable, which adds the player code to your SWF so the application is self-sufficient.
Note
Although you can publish both Windows and Macintosh executables on either platform, the resulting application will only run on the targeted operating system.
To deliver your project across the Web, however, you typically need to enable the Flash and HTML options. Exceptions to this rule include situations where only the SWF file is required, such as when integrating your SWF into an existing HTML page or uploading to an online content management system (CMS) that is already responsible for generating the HTML host files. The next two sections cover both SWF and HTML generation, and you can apply what is needed to your work on a project-by-project basis.
Regardless of which formats you choose to publish, you can use default names when creating the files (which use the name of the FLA as base file names) or create custom names for any format. In both cases, you can also specify a path for the asset by clicking the folder icon to the right of the name field.
The Flash section of the Publish Settings dialog (Figure 14-2) provides instructions to the Flash compiler that are used when creating SWFs. It’s in this section that you target the minimum version of Flash Player required to run your SWF, set file-wide image and sound compression values, manipulate security settings, and more.
In general, you can use the default settings for SWF export. When changes are needed, the most common areas of interest include image and sound compression and local playback security. These and other options are explained in the following list.
- Player
The Player setting specifies the minimum player version required to display your content. If no CS4-specific features are used, for example, you may be able to target Flash Player 9. If ActionScript 3.0 is not required, you may be able to target Flash Player 8, and so on. This is also where you target AIR as a platform to create AIR files.
- Script
The Script setting specifies the version of ActionScript used in your FLA. Flash Player versions prior to 6 can parse ActionScript 1.0 only. Player versions 6 and later can parse ActionScript 2.0, and versions 9 and later can process ActionScript 3.0. AIR can use only ActionScript 3.0.
The Settings button for this option lets you configure ActionScript settings, which can include how strictly the compiler validates your code, whether or not to show warnings in addition to errors when testing, whether or not instance names added in the Properties inspector are automatically declared in your scripts, and more.
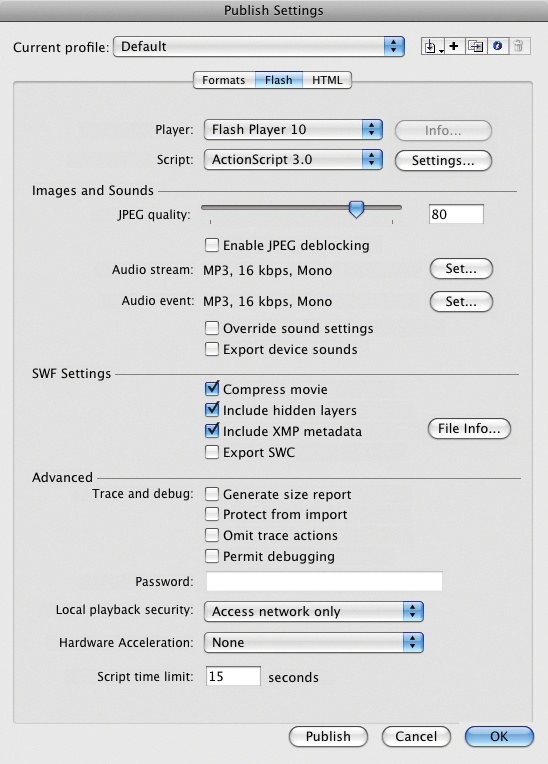
- JPEG quality
The JPEG quality setting applies a global compression setting applicable to all bitmaps that do not have a custom compression defined on a per-bitmap basis in the Library Bitmap Properties options. See Chapter 4 for more information.
- Audio stream/event
These settings allow you to dictate the compression settings for stream and event sounds. If you use the Override sound settings option, you can override the per-sound compression values applied in the Library’s sound properties options. See Chapter 11 for more information.
- Compress movie
The Compress movie option applies additional compression to your SWF file during compiling and should be used for all player versions 6 and later. It has the greatest impact on text- and script-heavy files.
- Include hidden layers
The Include hidden layers feature, by default, includes layers hidden in the Timeline panel when compiling a SWF. However, with this feature disabled, you can selectively, even temporarily, prevent layers from being included in the SWF. For example, you could temporarily prevent sound layers from being compiled, saving time during development.
- Include XMP metadata
The Include XMP metadata option can include an extensive amount of metadata in the SWF, readable by Adobe Bridge and other XMP-aware applications. The File Info button lets you add descriptive information about the file as a whole (title, author, rating, and so on), video and sound information, mobile playback data, and lots, lots more.
- Export SWC
The Export SWC option lets you compile a protected file that is typically used for distributing components or script libraries.
- Generate size report
The Generate size report option exports a comprehensive text file detailing the size of the data contained in your SWF. It is broken down by frame number, scene, symbol, asset type, external file, data type, and more. Reading this text file can help you identify unnecessarily large assets ripe for optimization.
- Protect from import
Enabling the Protect from import option prevents unauthorized users from importing graphic assets from your SWF. Use this feature carefully because it will also prevent you from importing your SWF. See “Password,” later in this list.
- Omit trace actions
A helpful ActionScript debugging technique is to trace text into the Output panel during authoring. Common uses include tracing the values of variables and references to objects so you can determine if your scripts are functioning properly. As a last step before distribution, you can use the Omit trace actions option to prevent others from discovering your traces in the wild.
- Permit debugging
Enabling the Permit debugging feature allows the Flash Debugger to debug SWF files from a remote location like a server. This is an intermediate to advanced skill that is reserved for ActionScript debugging and requires use of the debug version of the Flash Player. See the next entry, “Password,” for more information.
- Password
To prevent unauthorized use of the debugger or unauthorized SWF import, you can add a password to your file. In this case, a valid password must be entered when attempting to debug or import a protected SWF; otherwise the process will fail.
- Local playback security
As a security safeguard, your Flash file cannot access both local files from your hard drive and files or locations on the Internet. The Local playback security option lets you pick which of these realms will contain your file. In general, Access network only is the option of choice when uploading your files to a server.
- Hardware acceleration
For processor-intensive projects you can take advantage of Hardware acceleration. Two options are available. Direct lets Flash Player draw directly to the screen instead of letting the browser handle the display. GPU uses the graphics card to handle video playback and compositing.
- Script time limit
As a preventive measure, Flash Player will allow viewers of your SWF to abort scripts that take too long to run. This prevents crashes due to programming problems like circular logic and endless loops.
The HTML section of the Publish Settings dialog (Figure 14-3) creates an HTML host file that will contain your SWF and display it when users visit your site with a web browser. This is where you add Flash Player version detection, set the size of the SWF display, and more.
In general, you can use the default settings for HTML export. When changes are needed, the most common adjustments are to scale your SWF when resizing the browser and enable full-screen mode. These and other options are explained in the following list.
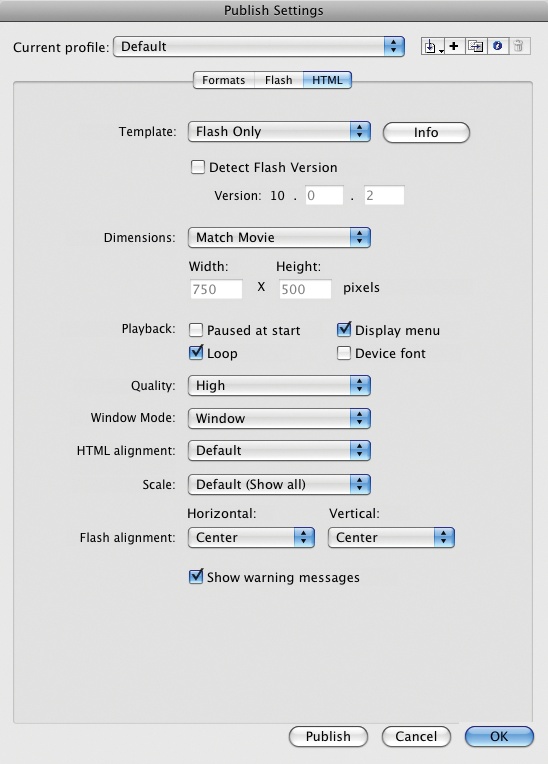
- Template
Template lets you choose from precreated HTML templates that enable or support Flash Player options. Some templates include JavaScript support features like player version detection and communication between the SWF and learning management systems (LMSs), among other things. By and large the Flash Only option will serve you well. Another notable option is Flash Only – Allow Full Screen, which enables full-screen mode for SWF and video content.
When player version detection is needed, the major version, or the leading digit (such as Flash Player 10, or Flash Player 9) is dictated by the version you specified in the Flash segment of the dialog. The minor version, or the dot release that follows the main player version (such as Flash Player 10.0.2), can then be typed into the field.
- Dimensions
The Dimensions menu and the accompanying Width and Height fields allow you to specify the size of the Flash file and what happens when the browser is scaled. Options include Match Movie (which disables the Width and Height fields and matches the Stage size of your SWF), Pixels (which enables the fields and lets you enter a desired size in pixels) and Percent (which enables the fields and lets you enter a size in percent form). The first two options will not scale the image, but specifying a percentage bases the size of the SWF on the size of the browser window and scales your SWF accordingly.
- Playback
Playback options include pausing the movie at startup, looping playback, displaying a context-sensitive menu of Flash Player control options (like zoom, rewind, play, and so on) when you Control+click (Mac) or right-click (Windows) on the SWF, and the Windows-only feature of substituting device fonts (default serif and sans-serif fonts installed on your operating system).
- Quality
Quality controls display features that improve quality at a cost to performance (such as antialiasing). Settings include Low (no antialiasing), Medium (some antialiasing, but no bitmap smoothing), High (always antialiased, but bitmap smoothing is dropped during animation), and Best (antialiasing and bitmap smoothing always on). Two other settings are also included. Auto Low starts in low quality, but changes to higher quality if the computer can accommodate the associated performance hit. Auto High starts in high quality, but changes to lower quality if the computer can’t handle the features.
- Window Mode
Window Mode controls how the Flash file can visually interact with the surrounding HTML. The default value, Window, renders an opaque background in the SWF and sets the HTML background color to that of the Stage. HTML content can’t flow over or beneath the Flash content. Opaque Windowless sets the background of the SWF to opaque, but lets HTML content stack on top of or be eclipsed by the SWF. Transparent Windowless renders the SWF background as transparent, letting HTML appear in front of and behind the SWF.
Warning
Window Mode has long been one of the most error- or conflict-prone settings in Flash because it must coexist with a flurry of browser versions and features and the rendering quirks that come with them. If you are experiencing display problems within a browser, first set the Window Mode to Window and see if that improves or solves your problem.
- HTML alignment
HTML alignment controls how the SWF display window is positioned within the HTML page, relative to other HTML elements on the page, such as text, images, and so on. The values include Default, Left, Right, Top, or Bottom. Default centers the content in the browser window and crops all four sides of content if the browser window is smaller than the SWF dimensions. The remaining options align the SWF along the specified edge of the browser window and crop the other three sides if the browser window becomes smaller than the SWF dimensions. See “Flash alignment,” later in this list.
Note
The HTML alignment setting does not change the position of a SWF if it is the sole element on the HTML page. Like the
alignattribute of the HTMLimgtag, for example, it controls the relative positioning of the SWF in conjunction with other HTML assets. Consequently, this setting will not appear to have any effect until additional content is added to the HTML page or the generated SWF tags are integrated into another HTML document.- Scale
Scale controls how the SWF is scaled, if percentage is specified in the Dimensions setting. When the user changes the browser window size, the following settings apply. Default (Show All) shows the entire stage while maintaining aspect ratio. Borders may appear above and below, or at left and right, of your stage boundaries if the dimensions of the browser window do not match the aspect ratio of your stage. No Border also scales your SWF while maintaining aspect ratio, but doesn’t allow borders to appear. As a result, the SWF display area in the HTML page may crop the SWF. Exact Fit matches the exact size of the SWF display area without preserving aspect ratio. Distortion will result if the browser window size doesn’t match the aspect ratio of the SWF stage. Finally, No Scale prevents the SWF from scaling.
- Flash alignment
In contrast to HTML alignment, which aligns the SWF display area within the HTML page, Flash alignment aligns the content within the SWF display area, cropping as needed. Horizontal options include Left, Center, and Right, and vertical options include Top, Center, and Bottom.
- Show warning messages
This setting, which should remain enabled whenever possible, will turn on a message system that will warn you if there is a conflict in any settings you choose. For example, if you specify an HTML template that displays an alternate image upon failure to detect Flash, but you don’t specify the creation of that file in the Formats section of the settings dialog, a warning will be displayed.
Once you configure your Flash and HTML settings, you can publish your file using the button in the Publish Settings dialog or the File→Publish menu option. Flash CS4 Professional will compile your SWF and create a corresponding host HTML page. These two files, along with any local external assets designed to load at runtime, must be collected for upload. After uploading the HTML, SWF, and external files to a server, you can point your browser to the address of the HTML file and view your finished work.
To prepare your portfolio project for deployment, you must configure the Flash and HTML publish settings and collect the assets folder containing your external files for runtime loading:
Check to make sure your main portfolio FLA and the assets folder are in your main project directory.
Open your main portfolio FLA.
In the Flash publish settings, set the following options (omitted options are inconsequential):
Player:
Flash Player 10Script:
ActionScript 3.0JPEG quality:
80Compress movie:
onInclude hidden layers:
on(unless you specifically used this feature to your advantage to enable/disable features during testing—this was not a planned part of the project progress, so if you are unsure of your actions, enable this feature).Protect from import:
onOmit trace actions:
onLocal playback security:
Access network onlyHardware Acceleration:
None(feel free to experiment with this feature, but a setting of None is most compatible with all possible systems that may view your portfolio).
In the HTML publish settings, set the following options:
Template:
Flash OnlyDetect Flash Version:
on,testing for version 10.0.2Dimensions:
Match MoviePlayback:
Loop and Display menuQuality:
HighWindow Mode:
WindowHTML alignment:
DefaultScale:
Default (Show All)Flash alignment:
Horizontal CenterandVertical Center
Click Publish to create the SWF and HTML files.
Inside your main project directory, you should now find the following three items: the HTML and SWF files created in the publish process (most likely titled portfolio.html and portfolio.swf), and the assets directory, which contains the external files you plan to load at runtime.
Upload these three items to your server. Do not upload the FLA file or any external files that were used during authoring (such as files that were imported into the FLA or compiled into the SWF).
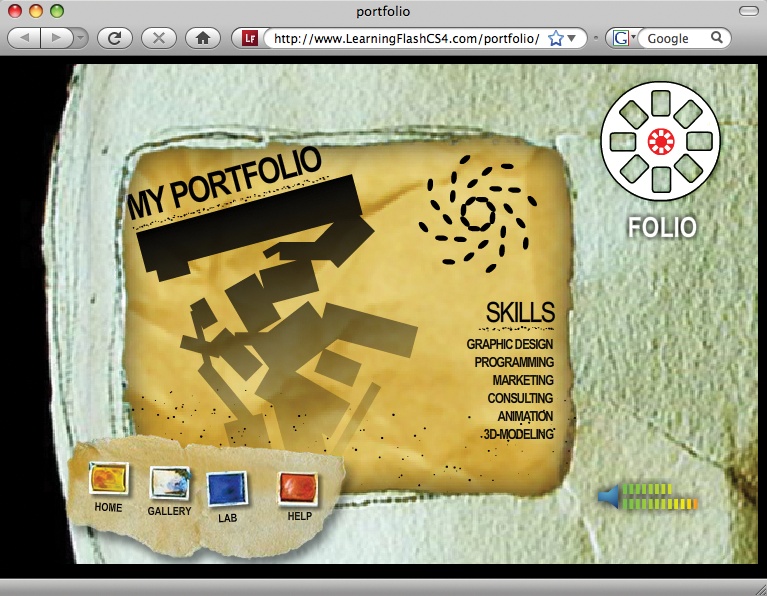
Compare your site with the online version found at the companion website (Figure 14-4).
AIR is an application designed to expand the realm of rich Internet applications to include the desktop. For example, AIR is capable of delivering Flash SWFs, HTML, and JavaScript—technologies typically used for web development—in a desktop environment.
AIR applications consist primarily of two separate parts: a standalone player and a data file. AIR, itself, is a player that is installed on a user’s computer just like any other program. It contains all the runtime code needed to play your project, but includes no file-specific data. Your project file is the opposite side of the equation. It contains all the file-specific information, but no runtime code. Your AIR application, as it is most often called, is essentially a mini-installer that installs the data portion of your project onto a user’s hard drive. The installation process makes it appear, for simplicity and ease of use, as though your project is a standalone application. In reality, when you double-click your project file, the AIR player launches automatically and loads the data file.
Note
Users who don’t have AIR installed, or who want the latest and greatest version, can find it at http://get.adobe.com/air/.
It’s important to note that Adobe did not conceive AIR as a replacement for Flash projectors or as competition for third-party projector enhancers. As described, AIR doesn’t create self-contained executable files complete with runtime code. Therefore, it can’t practically serve as the primary executable on a disc-based project (CD-ROM or DVD-ROM) because users must have AIR installed on their computers for your application to operate.
AIR doesn’t have as broad a feature set as some projector enhancers, such as Screentime’s cross-platform mProjector. However, AIR does make it possible to deliver your Flash projects outside the confines of a web browser and with a level of professionalism previously unavailable directly from Flash. Best of all, it’s free and integrated right into Flash.
Note
Another advantage of using AIR to deliver your project is that it is not subject to as many security restrictions as a SWF running in a browser. For example, AIR grants limited access to the local filesystem that is forbidden to browser-bound SWFs.
The first step in preparing a file for desktop delivery is to set the file’s targeted player to AIR rather than Flash Player. As discussed previously in the Deploying for Web Browsers section, the player version is set in the Flash section of the file’s Publish Settings dialog (File→Publish Settings), shown in Figure 14-5. In this case, however, instead of choosing a version of Flash Player (such as Flash Player 10, the default for a new FLA created in Flash CS4 Professional), choose Adobe AIR as your target player.
Note
Flash CS4 Professional ships with a publishing profile for Adobe AIR 1.1. However, at the time of this writing, an update that supports publishing to Adobe AIR 1.5 was available. To update your AIR publishing capabilities, visit http://www.adobe.com/support/flash/downloads.html and look for “Adobe AIR 1.5 Update for Flash CS4 Professional.” Alternatively, consult the update options in Flash’s Help menu or use Adobe Updater to check for any available updates.
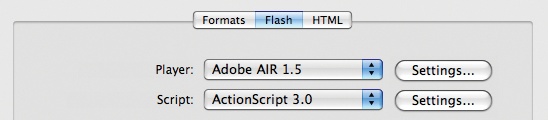
When you set the player to Adobe AIR, a Settings button will become visible adjacent to the Player drop-down list. Click this button to compile your SWF and open the AIR Application and Installer Settings dialog shown in Figure 14-6. As its name implies, the dialog is divided into two main sections featuring settings pertinent to your application and to the AIR installation process.
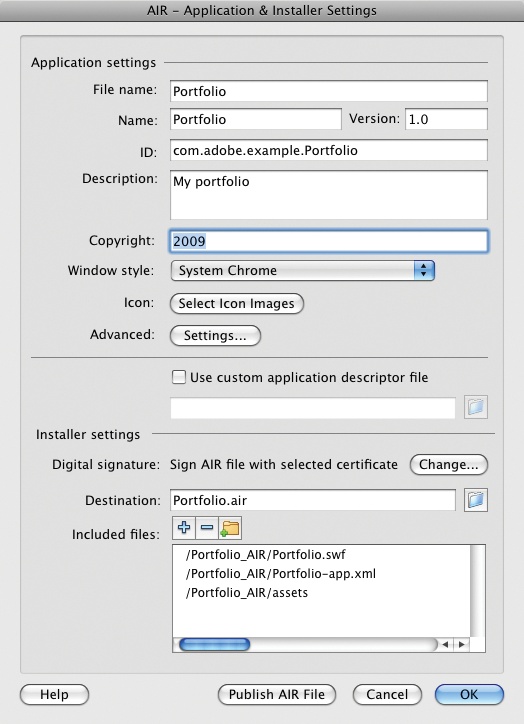
The application settings contain information about your project, as well as about how your file will be displayed.
- File name
The File name is, literally, the name of the AIR file that users will see.
- Name
The Name of your project will be displayed in the application menu, system Dock (Mac) or Start menu (Windows), and window title bar.
- Version
You can optionally assign a Version number to an application to keep track of updates.
- ID
The ID identifies your application to the AIR engine by a unique value. The default is
com.adobe.example.<application name>, but you can change it if desired. The value must be 212 characters or fewer and contain only a–z, A–Z, 0–9, dot (.), and dash (–).- Description
The optional Description is a string describing your project. Users will see this in an installer window during the installation process.
- Copyright
The optional Copyright allows you to specify a copyright string for your project.
- Window style
The Window style setting dictates how the window will be rendered. None renders the window with no interface elements at all. System Chrome will render a standard rectangular operating system window with controls such as name bar, close, minimize, and so on. Custom Chrome (opaque) allows you to create your own window interface in the FLA. Custom Chrome (transparent) allows you to create your own window interface in the FLA, but makes the Stage transparent.
Note
If you choose not to use the System Chrome setting for the AIR window style, you will need to create your own custom controls for features such as dragging, minimizing, and similar functionality provided by the operating system.
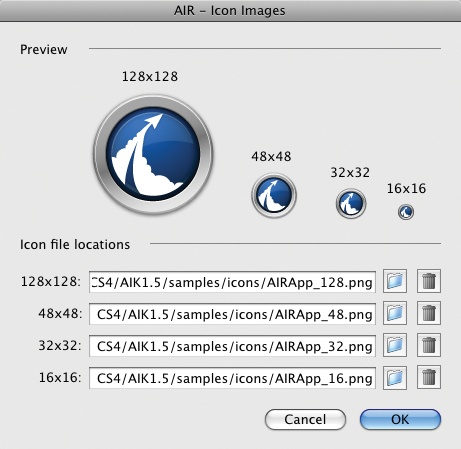
- Icon
The optional Icon feature lets you specify custom application icons as external files in four standard sizes (Figure 14-7).
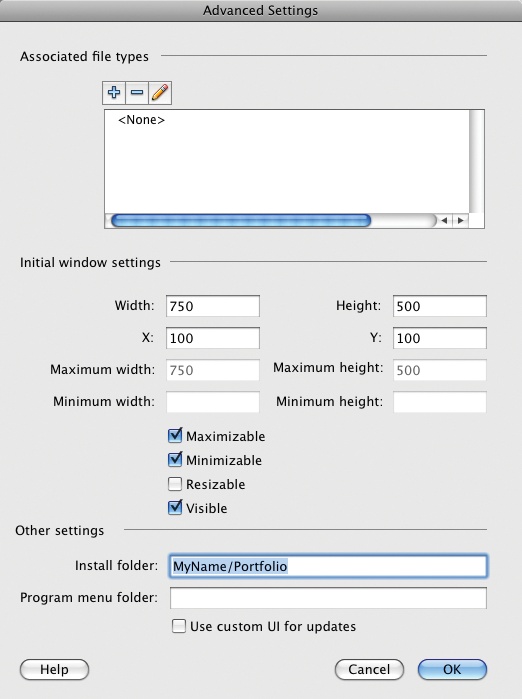
- Advanced
When you click the Advanced button, an additional dialog will open (Figure 14-8). This dialog lets you specify advanced features, such as the initial size and position of the application window and where the application is installed.
- Associated file types
The Associated file types feature allows you to specify which file types your AIR application handles. For example, FLA files are associated with the Flash application. You must specify the name and file extension of the file type, but you can also add a MIME type, description, and even file icons.
- Initial window settings
You can use Initial window settings to specify the width, height, x location and y location of the window. You can also specify whether the window is initially visible, and if it’s minimizable, maximizable, or resizeable along with its minimum and maximum width and height values.
- Other settings
Other settings include the folder or directory into which your application should be installed (the folder will be created if it doesn’t already exist), and into which Program menu (Windows only) your file should be added.
You can also dictate the use of a custom interface for handling updates. By default, AIR will display a standardized dialog that asks the user what to do when a new version of the application is launched. You can prevent this from happening and show your own custom interface to retain control over how an application handles updates.
Note
Creating custom update user interfaces is an intermediate to advanced skill. The companion website can point you to additional Help resources if this becomes a point of interest.
In the middle of the Application and Installer Settings dialog is the Use custom application descriptor file option. This allows you to replace the manual completion of user interface elements in the AIR publish settings process with a preconfigured XML file. For more information about the structure of this file, see this book’s companion website.
Installer settings specify how your application is bundled. These settings include the capability to add a digital signature to your application that, ideally, instills confidence in users during the installation process, and specifying which external assets are bundled with your application.
- Digital signature
A Digital signature is a security certificate that you can purchase from a digital signing company that allows you to “sign” your applications with your identity. This identifies you or your firm as the publisher of the work during the installation process. This may give your users confidence that they are installing an application from a trusted source. See the upcoming Digital certificates section for instructions for creating your own digital signature.
Note
The companion website has more information about digital signing options, including links to VeriSign, Thawte, GlobalSign, and ChosenSecurity, all of which sell digital signature certificates for Adobe AIR.
- Destination
The Destination setting specifies where the AIR installer file will be saved when it is built.
- Included files
The Included files feature lets you add external assets to an AIR bundle. This allows you to distribute one AIR file to your audience. For example, you will use this feature later in the Project Progress AIR section of this chapter to add your portfolio’s external assets to your AIR application.
To sign your AIR application, you need to use or create a digital certificate. You must specify a digital certificate to build an AIR application.
In the Installer settings section of the Application and Installer settings dialog, click the Set button (which is named Change if the certificate has already been chosen) to the right of Digital signature. Doing so will open the dialog shown in Figure 14-9. You have the option of either using or creating a certificate, or creating an interim file to which you will later apply a certificate.
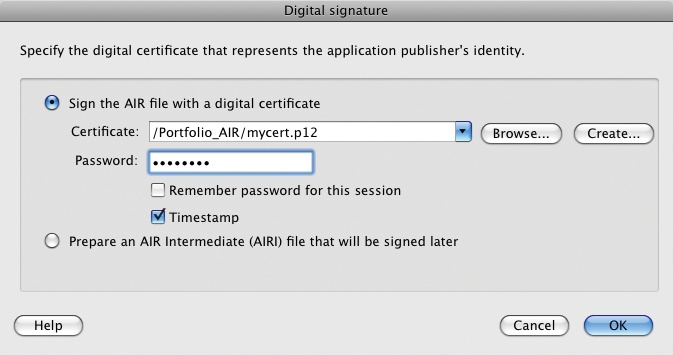
- Sign the AIR file with a digital certificate
If you’ve already acquired a digital signature or want to create your own, you can choose to Sign the AIR file with a digital certificate. Click Browse to locate an existing certificate or click Create to use your own digital signature. If you want to do the latter, see the next section, Creating a self-signed digital certificate.
Either way, you must enter the password you used when acquiring or creating the signing certificate to authenticate its use. You can optionally remember the password for the current authoring session to prevent the need to enter the password each time you make a change.
The Timestamp option is also very important, and you should enable it whenever you have Internet access available. When you create an AIR application, the packaging tool checks to see if the signing certificate is valid when the installer is built. That timestamp is then embedded into the installer.
When a user attempts to install the application, the installer looks for the timestamp. If found, as long as the certificate was valid at that time—even if the certificate has since expired—the installation can continue. On the other hand, if no timestamp is found, the installer will only work as long as the certificate is valid.
While it sounds like you would never proceed without a timestamp, the feature was made accessible to developers because it relies on an authentication server. Because you can disable the feature, you can still create an installer if the server is inaccessible.
Note
While creating your own certificate is quick, free, and easy, be aware that the publisher of the work will be identified as unknown during the installation process. Though this is more common than you think, it still may give your users pause when installing your application.
- Prepare an AIR Intermediate (AIRI) file that will be signed later
If you haven’t yet acquired or don’t wish to create a signing certificate during the development process, you can set up your publish settings to create an interim file. This will allow you to test your application in the authortime AIR preview application (called adl, for AIR Debug Launcher), but you will not be able to build an installer that users can run to install your application.
At any point, you can return to this setting and either load a signing certificate or create your own, after which you can build an installer.
Creating your own digital certificate is as easy as filling out a few simple form elements, shown in Figure 14-10. Fill out the Publisher name, Organization unit, Organiztion name, and Country, then enter and confirm a password. You can choose from four types and strengths of encryption when creating the certificate and specify where it will be saved.
When you create the certificate, the Publisher name appears in the installer as the developer of the application, and the password is used when selecting the certificate, as described earlier in the Digital certificates section.
After setting up the Adobe AIR publish settings in your document, each time you test your file, it will launch and run in the AIR Debug Launcher (adl). If you completed the digital signature process rather than choosing to create an AIR intermediate file, it will also build an AIR application.
The application is the lone file that you need to distribute to your audience. When users download and double-click this file, it will look for the AIR engine on the user’s computer. If the AIR engine is found, it will run the application’s built-in installer and prompt the user to install the file.
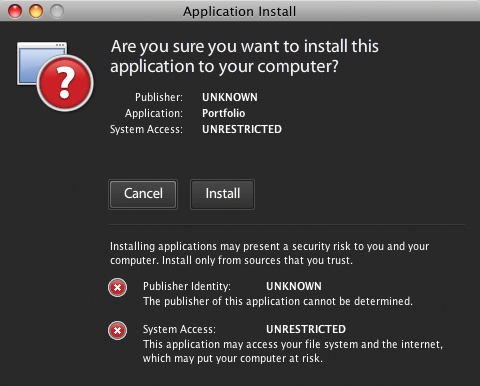
The first step in this process is to show the user the digital signature so he can determine if the file is trustworthy (Figure 14-11). The user can choose to abort or continue with the installation process.
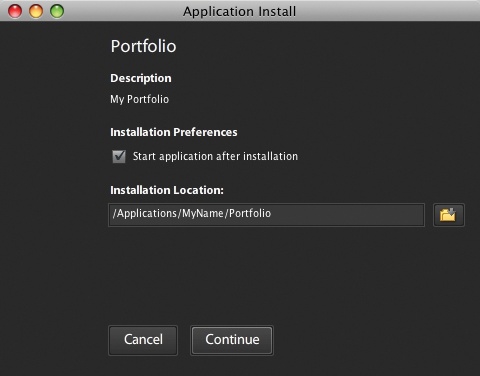
If the user decides to continue, the installer will display a final dialog (Figure 14-12) that shows the name and description of the application and the preset installation location (which the user can change, if desired), and then offers to start the application after installation.
After the installation, the user can launch the application any time with the installed file, just like most desktop programs. Unless your project requires online access, the AIR application can function without relying on an Internet connection.
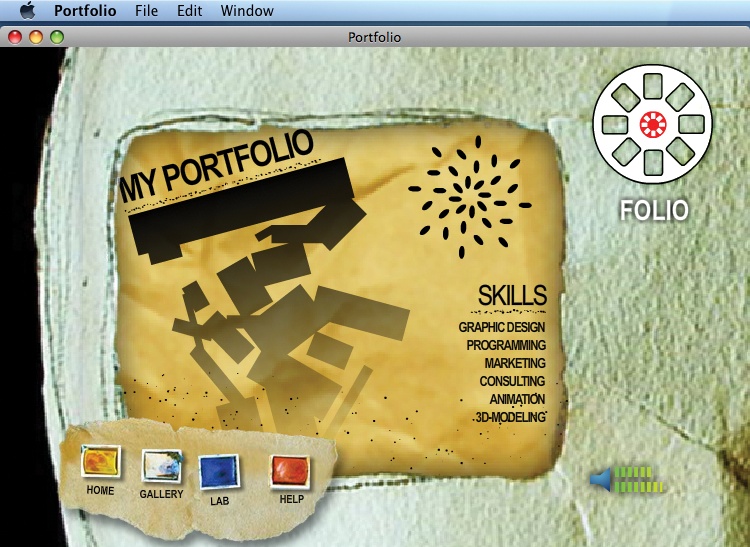
Now it’s time to apply what you’ve learned to the final Project Progress session of this book. To whet your appetite, you can see what you’ll be creating in Figure 14-13. Additionally, all the screenshots in the AIR section of this chapter were taken from the project files, so you can reference them any time you like.
Open your final portfolio FLA and access the publish settings (File→Publish Settings). In the Flash section, choose Adobe AIR from the Player menu and click the Settings button. Your file will compile and the Application and Installer Settings dialog will appear.
Note
If you are using Flash CS4 Professional without any updates, your player version will likely be Adobe AIR 1.1. If you installed the AIR update mentioned earlier in this chapter, the version will probably be Adobe AIR 1.5 or later.
Under Application settings, enter
Porfoliofor File name and Name, enter1.0for Version, and entercom.adobe.example.Portfoliofor ID. Continue by enteringMy Portfoliofor Description, and enter the current year, company name, or other copyright notice for Copyright. Finally, select System Chrome for Window style. Verify your settings using Figure 14-6.Click the Settings button next to the Advanced option. In the Advanced Settings dialog, under Initial window settings, enter
750for Width,500for Height, and100for X and Y. Enable Maximizable, Minimizable, and Visible, but not Resizable (this would allow the user to change the size and shape of the stage, revealing more of the viewing wheel and possibly other behind-the-scenes material).Continue by entering
MyName/Portfoliofor the Install folder and, if using Windows, you may optionally enter a Program menu folder. Feel free to substitute your own name in the Install folder path, but know that you’ll need to allow for this change when comparing to screenshots and searching for your installed application. Compare your results with Figure 14-8 and close the Advanced Settings dialog.Back in the Application and Installer Settings dialog, under Installer settings, click the Set (or Change) button found next to the Digital signature option.
In the Digital Signature dialog that opens, select the Sign the AIR file with a digital certificate option and click the Create button.
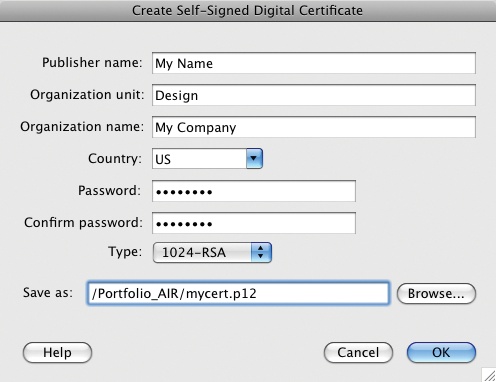
In the Create Self-Signed Digital Certificate dialog that opens, match the chapter figures by entering
My Namefor Publisher name,Designfor Organizational unit,My Companyfor Organization name, andUSfor Country. Feel free to substitute your own values, as long as you remember that the screenshots will differ.Continue by entering and confirming a password, and choose
1024-RSAfor the encryption Type.In the Save as option, choose a location to save the certificate. Compare your settings with Figure 14-10. Finish with the Create Self-Signed Digital Certificate dialog by clicking OK.
Returning to the Digital Signature dialog, enter the password you chose in step 8, and enable Timestamp. Compare your settings with Figure 14-9 and click OK to close the dialog.
Finally, back in the Application and Installer Settings dialog, choose a Destination for your AIR file.
Continue by clicking the Add Folder icon in the Included files section. Add the assets folder in which you’ve been storing all your external assets. This will add the directory in the same relative location, allowing your portfolio project to find the external graphics, sound, video, and SWF used in the project. Compare your settings with Figure 14-6.
You are now finished with the AIR settings. Click the Publish AIR File to create your AIR application and then dismiss the Application and Installation Settings dialog by clicking OK. Click OK again to close the main Publish Settings dialog.
Note
After configuring a FLA to publish as an AIR application, a shortcut to the AIR-specific settings will be visible in the File menu. Thereafter, you can use the File→AIR Settings menu command to alter any AIR settings.
In the directory you specified in step 11, double-click the Portfolio.air file. Click through and compare the Application Install screens to Figure 14-11 and Figure 14-12. After clicking Continue on the final screen, your application will launch.
As the very last steps in the development of this project, check the install location you specified in step 4 (which is, by default, found in the Applications folder on the Mac and Program Files folder on Windows) to find the application launcher your AIR installer created. Hereafter, you can bypass the installer and simply double-click the launcher like any other application. The only time you’ll likely need to reinstall is if you update your file and create a new version of the application.
All that remains now is to distribute your files. Conveniently, you bundled everything up into your single Portfolio.air file, so all you need to do is zip it up and put it online for your legions of fans, clients, and supporters to download!
Note
AIR applications can also be installed directly from within a browser if you don’t want to require your audience to be responsible for the installation. For more information, see the companion website.
Congratulations! Your project is complete. You’ve worked your way through a detailed, powerful application with great breadth and depth. You’ve touched an all the major features Flash CS4 Professional has to offer and developed a feature-rich portfolio application. What’s next?
If you want to expand your knowledge and skill set beyond using Flash as a linear, timeline-based animation tool, your next step is to master ActionScript. ActionScript will add an entirely new dimension to your projects. Even some of the simplest uses of ActionScript—like runtime changes based on date and time, processing user input, and randomization—can add a degree of expressiveness and life to your projects that will never be matched by use of the Timeline.
With these features, however, comes a steeper learning curve. ActionScript 3.0 is a powerful, object-oriented programming (OOP) language that takes practice to master. Fortunately, Flash doesn’t force you to use object-oriented techniques to benefit from ActionScript. Unlike Flex, or even many ActionScript editors that can be used in conjunction with Flash, Flash CS4 Professional lets you program with simple procedural techniques right in the timeline.
This book’s companion text, Learning ActionScript 3.0: A Beginner’s Guide (O’Reilly), has been written with this in mind. It introduces syntax and programming concepts in the timeline and slowly introduces OOP practices over the course of the book. Chapter 6 of this book (which was excerpted in part from Learning ActionScript 3.0) introduced you to the basics of events and the display list. Now it’s time to jump in and learn the rest of the language.
Even if you decide not to pursue learning ActionScript at this time, the skills you learned in timeline animation, component use, sound and video, 3D, inverse kinematics, text, and more will get you started down a road to Flash design and development. Just keep working and improving, and experiment every day!