
For many users, animation is the cornerstone of Flash. Sure, there are large groups of users who choose Flash over other tools because of its video capabilities, or for use as an application development tool, or even to learn programming in a fun, visual way. A big part of the Flash user base, however, employs the application as the main tool, if not the exclusive tool, for animation.
For years, animators have used Flash to further web-based storytelling, produce content for animated television shows, and even contribute to feature films. In some ways, it’s easy to see why Flash is a boon for animators. Using Flash, artists no longer have to draw every single frame of an animation by hand. Instead, animators can draw a few key poses by hand or build characters from many smaller posable parts, and then let the computer fill in the frames between poses. This process is called tweening because the computer calculates the frames between each pose.
Of course, Flash is not a wholesale substitute for hand-drawn animations. Highly expressive poses or sequences with rapidly changing poses still require a lot of manual illustrations. Even in these situations, however, Flash can lend a hand with backgrounds, transitions, and other elements that aren’t the primary focus of attention. Deciding when to use Flash in your animations will usually be a matter of choosing the best tool for the job.
In this chapter, you’ll learn how to create animations using a variety of techniques ranging from the Flash equivalent of traditional cel animation to the simple motion of symbols, and to morphing between shapes. Along the way you’ll learn more about the Timeline and frame types, how to animate gradient and bitmap fills, how to use Flash CS4 Professional’s new Motion Editor, and much more. This chapter will focus exclusively on interface-driven animations, and the next chapter will introduce some ActionScript basics for controlling animation with code. By the time you have finished reading these two chapters, you will probably recognize which kinds of animations Flash is most suited to create. Ideally, your animation tasks will be conquered more often than not with a big computer assist, leaving you more quality time to spend on fewer hand-drawn sequences.
The single most important step in conquering noncoded animation in Flash is gaining an understanding of the Flash Timeline panel (Figure 5-1). Prior to Flash CS4 Professional, the Timeline panel was the primary interface element for all things animated. You’ll learn later in this chapter that Flash CS4 Professional introduces a new tool for manipulating animations, the Motion Editor, but even when you’re using this new tool, animations must originate in the Timeline panel.

Figure 5-1 shows an example file viewed in the Timeline panel. This example uses many of the animation tools that will be explained in this chapter. As described in Chapter 1, there are two primary ways to organize assets in a Timeline: by vertical stacking order (layers) and by time (frames).
Horizontal spatial arrangement in a single frame is determined simply by where you place your assets on the Stage. You can set vertical stacking of overlapping assets by arranging them in a single frame and by bringing an asset forward or sending it backward (using Modify→Arrange) when they overlap. However, to animate objects in the Timeline panel, you place assets into discrete layers so that only the desired asset is included in the animation. This visual stacking arrangement will be familiar to users of Adobe Illustrator and Adobe Photoshop.
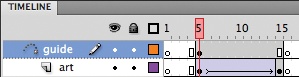
There are several layer types, not the least of which are the normal layer and guide layer discussed in Chapter 1. Normal layers have no unique functionality, and guide layers display content only during authoring (guide layers are excluded when SWFs are compiled). You can also organize layers into layer folders. This is handy when files have a large number of layers, because you can collapse the folder using the arrow to the left of the folder icon and hide all the layers therein.
While they are not specifically reserved layer types, two kinds of tweens reside in their own layers. Shape tweens are typically used to morph shapes, and classic tweens (formerly called motion tweens) are legacy animation types used to animate symbols, such as movie clips. The Flash CS4 Professional upgrade for the classic tween retains the name motion tween and has become a dedicated layer type. You will learn how to create both kinds of motion tweens in this chapter and even use both techniques in your ongoing portfolio project.
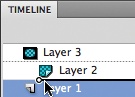
You can use a special kind of guide layer, called a classic motion guide, with classic tweens. Classic motion guide layers allow you to draw a path for an associated classic tween for the animated asset to follow. At the top of Figure 5-1, you can see the name and icon of the classic tween layer icon indented below the name and icon of the classic motion guide layer. This indicates a relationship between the two layers, and the guide is partially controlling the location of the asset in the classic tween.
For now, the final unique layer types you’ll learn about are the mask and masked layers. A mask layer can be used to show only select content from an underlying masked layer. At the bottom of Figure 5-1, you will notice another pair of associated layers. This time the name and icon of a masked layer—in this case, a shape tween—are indented below a mask layer.
Note
In Chapter 10, you’ll learn about a brand-new layer type, called an armature layer, which contains inverse kinematics (IK) armatures. IK is an animation tool that lets you join objects together with bones and joints like a skeleton or robotic arm.
There are three buttons beneath the layer icons and names in Figure 5-1. From left to right, these buttons let you create a new layer, create a layer folder, or delete a selected layer. To the right of the layer icons and names are three columns. Clicking in these columns in a layer of interest will, from left to right, show or hide the layer’s contents, lock layers to prevent further edits, and display all layer contents as colored outlines. For example, the red x indicates that the sections layer is hidden, the locks show that the mask and shape tween layers are locked, and the purple outline box indicates that the classic tween layer is displaying its contents in purple outlines.
Note
You can use the show/hide option to control the parts that are compiled into a SWF. If you disable Include hidden layers in the Flash section of the File→Publish Settings dialog, hidden layers will be excluded from your SWF. Use this feature to hide assets, prevent scripts from executing, or speed up compiling by excluding sounds.
The right half of Figure 5-1 is composed of the frames that make up the FLA’s Timeline, much like the frames of a film, with each showing only the content of a single frame of the total animation to the viewer at a time. Chapter 1 outlines the principle differences between keyframes and computer interpolated frames, but, as animation techniques add complexity, a broader overview is in order.
An ordinary frame is a frame in which no change occurs. Such frames might be empty or they may contain static, or unchanging, content. Within the Timeline panel, ordinary frames have no visual appearance other than a gray tint if the frame contains content. In Figure 5-1, for example, frame 18 of the sections layer (directly under the red playhead) is an empty frame, and frame 5 of the sections layer is an ordinary frame with static content.
A keyframe is a frame that contains animator-defined change. By definition, the first frame of every frame span is a keyframe, whether it contains content or not, because the animator has chosen to isolate that frame from its previous frame.
Note
When a frame contains content, creating a new keyframe is usually based on the need to change a property of the frame’s content (such as its location) or even replace the content altogether. However, it’s also sometimes useful to add empty keyframes to a layer. For example, an empty keyframe can remove content from a layer only after a specific frame, or even serve as a visual cue to divide a Timeline into easily noticeable segments.
Traditional keyframes are marked with a circle. An empty circle represents an empty keyframe (frame 15 of the sections layer in Figure 5-1), while a filled black circle marks a keyframe that contains content (frame 1 of the same layer). A filled black diamond marks the new property keyframe, which is part of the new motion tween format. You’ll learn more about property keyframes when you read about motion tweens, but you can see property keyframe icons in frames 10 and 20 of the motion tween layer.
An interpolated frame is a frame in which content properties have been altered by the computer. Varying color tints indicate interpolated frames, depending on which kind of tween is at work. For example, frame 5 of the shape tween layer is tinted green to indicate that a shape is likely morphing from its original appearance in frame 1 to its final appearance in frame 23. Frame 5 of the motion tween layer is tinted light blue to show that it is part of the new Flash CS4 Professional motion tween. A movie clip in this layer may be moving between three positions set in frames 1, 10, and 20. Finally, frame 5 of the classic tween layer is tinted a purplish blue to show its inclusion in a legacy style motion tween. This layer may be tweening another property, such as scale, for example, between sizes set in frames 1, 10, and 23.
Note
You cannot edit content in interpolated frames of shape tweens and classic tweens. You must create a keyframe to make any changes. Properties of content in new motion tweens, however, can be changed without first creating a keyframe. A property keyframe will automatically be created for you.
Finally, although not a keyframe, the end of a frame span is marked by a vertical rectangle. This serves no other purpose than as a visual indicator that an ordinary frame span has ended. Frames 14 and 23 of the sections layer mark the end of content-filled and empty frame spans, respectively.
Prior to adding frames, the Timeline panel is restricted to working only with frame 1. You can’t even move the playhead through the Timeline panel beyond the last frame. Although you can draw static illustrations in a single frame or control animations with ActionScript, Timeline-based animations require a minimum of two frames.
To add frames to a single layer, click in the layer where you want to insert the frame and press F5 (Insert→Timeline→Frame), shown in Figure 5-2a. If you click in an existing frame, a frame will be added at that point. If you click beyond all existing frames, additional frames will be added up to that point. For example, if you start with a new empty file containing only frame 1, and want the Timeline to contain 20 frames, click in frame 20 and press F5.
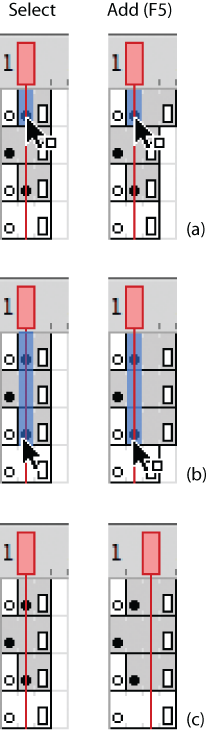
The process is similar for adding frames to more than one layer of the Timeline at once. Instead of clicking once in a single frame, drag through all the layers in which you will insert frames (Figure 5-2b). To insert new frames between existing frames in all layers, click in the number span atop the Timeline to position the playhead. By not clicking in a specific layer, frames will be added to all layers at the position of the playhead (Figure 5-2c). This technique will only work within existing frame spans, however, because the playhead can’t move past the last frame in the Timeline.
Finally, to remove frames, select the frames you want to remove (by dragging your mouse over them or Shift-+clicking the first and last frames) and press Shift-+F5 (Edit→Timeline→Remove Frames).
Warning
Removing frames will literally remove the frames, not the contents of the frames, and will shorten the entire frame span. If you only want to remove the contents of a frame, click once to select the frame span in question and delete. If you want to remove the contents from a segment of a frame span, insert keyframes at the start and end of the segment so you can then delete only that portion of the content.
Creating and clearing keyframes is similar to adding and removing frames. Select the frame that you want to convert to a keyframe and press F6 (Insert→Timeline→Keyframe). To end a frame span by inserting a keyframe and deleting its contents, there’s a more direct process: create an empty keyframe by using F7 (Insert→Timeline→Blank Keyframe) instead of F6.
To convert a keyframe back to a normal frame, select the keyframe and press Shift+F6 (Modify→Timeline→Clear Keyframe).
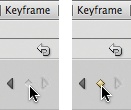
Below the frames, in the bottom of the Timeline panel shown in Figure 5-1, is a series of frame editing controls. The first button will scroll the Timeline panel to center the frame in which the playhead currently resides.
The next two buttons will turn on onion skin preview and show the onion skin frames in outline view. Onion skin preview allows you to display frames to the left and/or right of the current frame in a muted image or outline, depending on your setting (Figure 5-3). The additional frames are rendered right on the Stage, showing the current frame in the context of its surrounding frames.
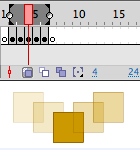
Figure 5-3. Onion skinning enabled, showing two frames behind and two frames ahead of the current frame
This feature gets its name from the translucency of onion skin. The more layers of onion skin you must look through, the harder it is to see the content. Therefore, the frames farthest from the playhead are the least opaque. The onion skin feature is discussed further in Chapter 10 when working with inverse kinematics armatures.
The next control allows you to edit multiple frames at once and will be explained in greater detail later in this chapter.
The final button offers a quick setting to modify the onion and edit multiple markers that appear on top of the frame numbers. These markers change the number of frames that appear to the left and right of the playhead when using the onion skin or edit multiple frames features. You can manually drag the markers to show any number of frames, but this quick menu will show two, five, or all the frames surrounding the playhead. It also allows you to anchor the visible frames (even when you move the playhead) and show the markers all the time, even when the features are not in use.
The three editable values that conclude the array of controls are the current playhead position measured in frames, the frame rate (the speed at which the playhead moves through frames) measured in seconds, and the current playhead position measured in seconds. The playhead in Figure 5-1 is in frame 18 and the frame rate of the file is 24 frames per second, so the playhead is resting at 0.7 seconds of elapsed playback time.
Warning
Animation speed is often affected by many factors of the end user’s computer setup. These include processor speed, available RAM, other running applications, and even which tasks are being performed in Flash at any given moment. As such, don’t rely too heavily on a frame-to-time correlation, especially when trying to synchronize animations to other events.
If you plan to create very stylistic animations with many unique art elements, it’s likely that you won’t be able to rely too heavily on tweening for assistance. In this scenario, you’ll have to start from the beginning and use the time-tested technique of frame-by-frame animation.
There’s nothing very special or difficult about frame-by-frame animation beyond the care and attention it requires. The method literally entails creating a keyframe in every frame and drawing or manipulating each frame’s artwork manually. Figure 5-4 shows a layer with keyframes in every frame.
While this is the most straightforward of all animation techniques, there are a few tips and features that can make the process easier. For example, you should create keyframes as you go, rather than all at once at the outset of your effort. That is, avoid selecting a long span of frames and pressing F6 to create individual keyframes from the span. True, this is a quick process. However, if you add one keyframe at a time, each new frame will duplicate the previous frame. This allows you to adjust each new frame based on the prior frame’s appearance, rather than starting from scratch.
Additional features can provide big animation assists. Editing multiple frames, copying and pasting frames, swapping symbols, and the aforementioned onion skin option not only improve frame-by-frame animations, but can be used with other animation techniques as well.
In some cases, particularly when working with a sequence of several keyframes, you face the prospect of having to edit many frames. For example, assume you are working on a frame-by-frame animation and later decide that you want to move the art in every other frame down a bit on the stage. This would ordinarily require you to move the playhead to every other frame and repeatedly select the frame’s contents and make the adjustments. What’s more, you would have little context from the surrounding frames during the editing process.
Fortunately, the Edit Multiple Frames feature allows you to work in as many keyframes as you like, not only making it possible to edit the frames’ content, but also to see each frame on the Stage at the same time. To do this, click the Edit Multiple Frames button at the bottom of the Timeline. Brackets will appear to the left and right of the playhead. You can drag these brackets to set the number of editable frames to the left and right of the playhead. Thereafter, you can work in any of the included frames.
The top of Figure 5-5 shows the feature enabled at the bottom of the Timeline panel detail (the button just to the right of the playhead, under frame 8, is pushed in, meaning the feature is active). The editable frames are set to two to the left and two to the right of the playhead. The selected movie clips on the Stage at the bottom of the figure, as well as the highlighted frames in the Timeline, show that content in frames 5, 7, and 9 are selected. They have been moved down 10 pixels, creating the desired effect.
In addition to copying and pasting content from a single frame, it is also possible to cut, copy, and paste the frames in their entirety. Doing so will preserve the frames’ contents, but also keyframes, tweens, layer properties, and more.
For example, if you selected five frames and used the standard Copy feature, you would only copy the content from the current frame—the frame in which the playhead resides. However, if you selected those same five frames and used the Copy Frames feature, you could then paste five frames with all their content and attributes intact.
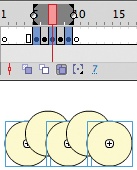
You can access the Copy Frames command through the application menu (Edit→Timeline→Copy Frames) or by right-clicking (Windows) or Control-clicking (Mac) the selection (Figure 5-6). You can then paste frames using the Paste Frames option found in the same menus.
This is really handy when you realize, after a lot of hard work, that you want all the animations you finished in the main Timeline to be in a movie clip instead. In that case, you can copy (or cut, if you prefer) all the frames, create a movie clip, double-click to edit that movie clip, and then paste all the frames into the movie clip. All of the layers, frames, and contents will be recreated inside the movie clip. Copying and pasting frames is also convenient when you want to create an animation of repeating frames.
The only tricky part of the process is when you want to replace frames with a paste. In the aforementioned examples, you are likely creating frames where none previously existed, such as when adding content to an empty movie clip. However, if you need to overwrite existing frames, you must first select the frames you want to replace. If you fail to do this, you will be adding to the existing frames, rather than replacing them, and your frame span will grow, possibly affecting frame synchronization later on.
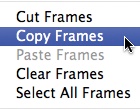
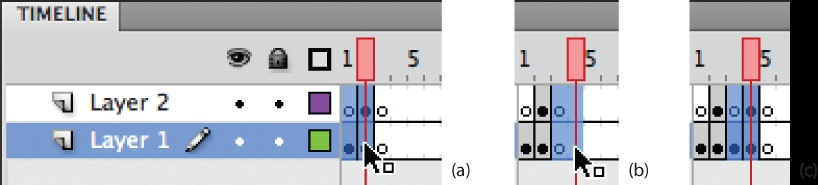
Figure 5-7 shows the steps required to replace frames with a paste. The first step, (a), is to select the desired frames by dragging over them with your mouse and copying them. The next step, (b), is to select the frames you wish to overwrite using the same selection procedure. The final step, (c), is to paste the frames into the selection.
When using symbols in animations, it can be very convenient to automatically replace a symbol without otherwise affecting animation properties. For example, if you had to replace a symbol by deleting it and adding a new symbol in its place, you would then have to reapply any properties such as location, rotation, scale, and so on, that defined the animation’s characteristics. This is not only tedious, but you run the risk of not accurately reproducing all the original symbol’s properties. Alternately, if you edited the symbol, any unrelated instance of the symbol would also be changed.
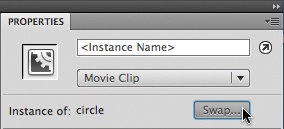
Enter the Swap Symbols feature to protect the integrity of your symbols and save you time and frustration. This feature does exactly what its name implies. After selecting a symbol on the Stage, click the Swap button at the top of the Properties panel (Figure 5-8) to swap the original symbol with a replacement from the Library.
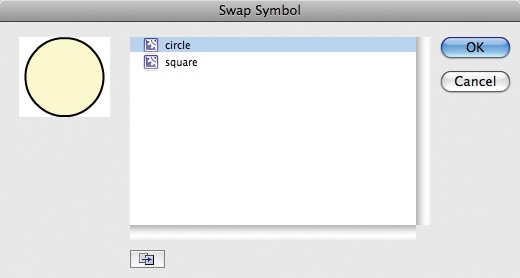
The Swap Symbol dialog that appears (Figure 5-9) has a list and preview thumbnail of all symbols that you can swap for the original. The Duplicate Symbol button (at the bottom of the dialog) allows you to duplicate the original and swap the copy for the prior symbol instance, all in one step. This is useful when you want to edit the original symbol in one or more uses, but can’t change it throughout the entire file.
Now that you have some experience with a few workflows that will help you create frame-by-frame animations, it’s time to get the computer more involved. Using one of Flash’s tweening processes will allow you to set a few keyframes and turn the rest of the work over to the computer. Specifically, Flash will create the interpolated, or in-between, frames by calculating all the property values to further the animation from one keyframe to the next.
A shape tween is a tween that uses shapes (rather than symbols) as its assets, and is typically used to morph one shape into another. In this section, you will morph a square into a circle. To create a shape tween, you need two keyframes, each containing a shape. To try this in Flash, use the following steps:
Create a new file using File→New. This file will not be a part of the ongoing portfolio project.
Practice creating a keyframe by clicking in frame 5 and pressing F7 to create an empty keyframe.
Using the Rectangle tool, draw a rectangle in frame 5 at the left edge of the Stage.
Create an empty keyframe (F7) in Frame 15. This will create a gray frame span from frame 5 to 14 and an empty keyframe in frame 15.
Switch to the Oval tool and draw a circle in frame 15 at the right side of the Stage.
Click anywhere in the first frame span and use the Insert→Shape Tween menu command. Alternately, you can right-click (Windows) or Control-click (Mac) on the first keyframe (or even the shape on the Stage in the first keyframe), and select Create Shape Tween from the pop-up menu (Figure 5-10).

Because you created the tween in the first group of frames, the tween will span from the first keyframe to the next. The frame span will turn green and an arrow will appear between frames 5 and 15 (Figure 5-11).
Using the Timeline panel, scrub through frames 5 and 15, and you will see the square morph into a circle. Flash has calculated and drawn all of the interim shapes of the artwork required to change its appearance. Figure 5-12 shows a representation of the tween. If your tween doesn’t look similar to this figure, compare your file to shape_tween_01.fla from the provided source files.

Figure 5-12. A visual representation of a shape tween on the stage; dark shapes are in keyframes, faded shapes are in interpolated frames
Although the ultimate effect is the same (changing one shape into another), shape tweens are not only useful for what clearly look like morphs. For example, you can also use them for transitions, as when covering up content with a shape that matches the Stage color, or for animating the look of drawing lines.
If you look carefully at the shape tween in Figure 5-12, the square appears to rotate as it changes into a circle. However, the shape is not really rotating, it is simply distorting in an unexpected way during the morph. This is because the main control points for the square are at its corners, while the main control points for the circle are at the top, bottom, left, and right of the circle. As such, when the shape tween process attempts to change the square into the circle, it tries to move the control points about 45 degrees counterclockwise to meet up with the similar points on the circle.
This is a simple, easy-to-demonstrate example of distortions that occur during morphs, but the effects can actually be much worse. Flash often needs a little help—a few instructions to assist the morphing process—so the algorithm knows what kind of morph you had in mind. Shape hints are markers that you place on the original and final shapes to match up control points during the morph. For example, you can place a hint at the upper-left corner of the square and in the same approximate northwest position on the edge of the circle, and Flash will try to synchronize the position of the two points during the morph.
Figure 5-13 shows four shape hints applied to the square-to-circle example discussed previously. A single hint can be referenced in both keyframes by noting the letter of the hint. In this case, the hints are marked a, b, c, and d in both frames.

When you place hints, they turn yellow in the first keyframe and green in the second keyframe. In Figure 5-13, the fourth hint has yet to be positioned, and remains red in both keyframes.
After successfully placing shape hints in both frames, Flash tries to match up each pair during the shape tween, resulting in a morph between square and circle that no longer appears to rotate (Figure 5-14). If desired, you can compare your work to shape_tween_02.fla.

Figure 5-14. The shape tween, after using shape hints, with the apparent rotation distortion corrected
You can use up to 26 shape hints, remove shape hints by dragging them off the stage in either keyframe, and remove all shape hints by using the Modify→Shape→Remove All Hints menu command. You can also display shape hints that are no longer visible using the View→Show Shape Hints menu command. For these hints to be visible, you must unlock the shape tween layer and the frame in one of the keyframes using the hints.
Warning
Even when using shape hints, Flash still sometimes has to make guesses when it morphs one shape into another. Sometimes only one or two shape hints are required, and sometimes too many shape hints can make a morph worse than when you started. When relying on shape hints to improve a shape tween, be prepared to test the tween often and start fresh if things go awry.
Like visual compositing applications such as Adobe Photoshop and Adobe After Effects, Flash supports the use of masks. Masks behave like holes through which you can see the content in underlying layers.
To create a mask effect, you need a minimum of two layers: one layer will serve as the mask, and the other will contain the content seen through the mask. Figure 5-15 shows detail views of the Timeline and Stage of the layer_mask.fla source file. The top of the figure shows two layers prior to being converted to mask and masked layers. Layer 1 contains a bitmap and layer 2 contains a shape.
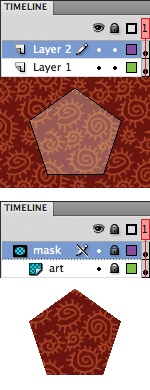
To convert these layers to a mask/masked pair, right-click (Windows) or Control-click (Mac) the top layer and select Mask from the pop-up menu. The top layer will be converted to a mask layer, the mask will affect the bottom layer, and both layers will lock to display the visual result of the masking process. The bottom of Figure 5-15 shows the end result, and the layers have been renamed to clearly indicate which purpose each layer is serving.
You can unlock either layer at any time, but when doing so, both the mask and the underlying content will become visible. To return to viewing the masked state, simply lock both layers again.
Unlike Photoshop, Flash does not allow you to choose whether dark or light colors serve as the mask. Furthermore, Flash layer masks do not support alpha values. Any nontransparent pixel will be understood as opaque and will become part of the mask. As a result, all edges in layer masks are hard edges, so feathered masks are not possible when using layers. To achieve a soft-edge mask, you will require ActionScript and bitmap compositing effects (this technique is discussed in Chapter 7).
A mask can affect multiple adjacent layers, if desired. For any normal layer that sits immediately below a masked layer, you can double-click its icon and select masked from its layer properties. You can also drag layers into a mask setup either by dragging them between the mask and masked layers (which may adversely affect layering and require further adjustment) or by dragging them below and to the right of a masked layer until the mouse is under the layer name (Figure 5-16). Visual feedback below the layer icons will give the appearance that the layer has been indented to match the left margin of the other masked layers.
Multiple mask layers, however, cannot apply to the same masked content. To achieve this effect, simply duplicate the mask/masked pair for as many masks as you wish to apply. If you are using symbols in both layers, this will not noticeably affect your file size. However, if you are using shapes, creating multiple layers will increase file size. In this scenario, you may want to consider ActionScript masks, discussed in Chapter 7.
Where shape tweens morph from one shape to another, motion tweens animate symbols. Although the phrase “motion tween” has been part of the Flash vernacular for a long time, this is not your father’s motion tween. Instead, this is a brand-new way of animating in Flash. The new tweens are easier to create and edit, provide better visual feedback to the animator during authoring, and are even supported by a new panel called the Motion Editor for exerting more granular control. You’ll learn more about the Motion Editor panel later, but for now, see how easy it is to create and edit a tween right on the Stage:
Create a new file using File→New. This file will not be a part of the ongoing portfolio project.
Click in frame 5 and press F7 to create an empty keyframe.
Using the Oval tool, draw a circle in frame 5 at the left edge of the Stage. Select the shape and convert it to a movie clip (Modify→Convert to Symbol). Symbols are required for motion tweens.
Note
If you try to create a motion tween without first creating a symbol, Flash will not only warn you about the problem, it will also offer to automatically convert the shape to a symbol for you!
Create an empty keyframe (F7) in Frame 15. This will create a gray frame span from frames 5 to 14 and an empty keyframe in frame 15.
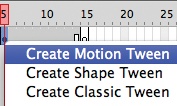
Click once in the first keyframe and use the Insert→Motion Tween menu command. Alternately, you can right-click (Windows) or Control-click (Mac) the first keyframe (or even the shape on the Stage in the first keyframe) and select Create Motion Tween from the pop-up menu (Figure 5-17).
Notice that, unlike when working with shape tweens, you don’t need a second keyframe to create a motion tween. The keyframe in frame 15 serves only as a terminus for the tween. Because you created the tween in the first group of frames, the tween will span from the first keyframe to the next and turn blue (Figure 5-18).
Scrubbing through the Timeline, however, you’ll notice that the symbol doesn’t move. In Flash CS4 Professional’s new motion tween format, you create keyframes after creating the tween.
Move the playhead to frame 14 by clicking in the frame number bar above the Timeline.
Using the Selection tool, drag the circle to the right side of the stage.
This creates a property keyframe in frame 14, represented by the diamond icon (Figure 5-19). Using the new motion tween format, you can add property keyframes on the fly in the Timeline, just by changing a property value. In this case you changed the x and (possibly) y properties by moving the movie clip to the right side of the stage.
When you click any motion tween in the Timeline, the entire tween will be selected. To select a portion of the tween, such as single property keyframe or the first half of an animation, hold down the Ctrl (Windows) or Command (Mac) key while selecting. To clear a property keyframe, select only the keyframe and press F6. You can also right-click (Windows) or Control-click (Mac) a single selected keyframe and remove only certain properties using the Clear Keyframe menu.
If you grab the very end or beginning of a tween, the mouse pointer will turn into a horizontal pair of arrows, and you can slide it left or right to change the length of the tween (Figure 5-20). When doing so, the tween will expand or contract the time between keyframes. As you resize, the keyframes will move to retain their same relative positions within the tween. If you only want to add more frames to a tween, and don’t wish the keyframe locations to change, hold down the Shift key before dragging to resize the tween.
Now if you scrub through the Timeline, you will see the circle move from left to right. Flash determined the distance between the first and second locations and calculated how far the circle would have to move to reach that distance. You’ll also notice a line depicting the path the circle travels, and dots along that line. The large dots at the ends of the path depict keyframes, and the smaller dots along the path depict interpolated frames. Figure 5-21 shows a representation of the tween. If your tween doesn’t look similar to this figure, compare your file to motion_tween.fla from the provided source files.
One of the nicest things about the new motion tween format is the degree to which you can dynamically alter the tween just by tinkering on the Stage. Previously, you inserted a property keyframe just by dragging the symbol in the last frame. You can edit the tween’s motion path just as easily. In many respects, the tween’s motion path behaves just like a regular stroke.
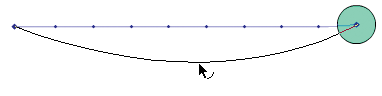
Figure 5-22 shows a motion path being dragged into an arc using the Selection tool and Flash’s natural drawing techniques. You can grab a motion path anywhere along its length and distort it just as you would any other line.
The Subselection tool is being used in Figure 5-23 to edit the motion path as if it were a Bézier curve created with the Pen tool. You can move each keyframe independently or drag its control handles to distort the shape of the curve. (In Figure 5-23, a third keyframe was added to the center of the tween to show additional control handles for demonstration purposes.)

As when working with regular strokes, if you click and release to select the path (rather than immediately dragging the path to reshape it), you can then drag the entire animation around on the Stage without creating or changing a property keyframe or further editing the path. Finally, you can draw motion paths from scratch, but not while editing the tween; you must create the path first, as described in the next section.
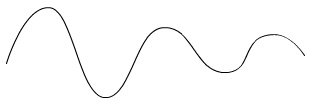
When working with a motion tween, you can use the Selection tool to drag the motion path and use the Subselection tools to manipulate the path’s control handles. However, you can’t actually draw in the motion tween layer. To apply a hand-drawn motion path, you must first draw a stroke in another layer as you ordinarily would, using any preferred drawing method. Figure 5-24 shows just such a stroke.
Once the path is complete, you can simply copy the stroke and paste it into the motion tween layer. Flash may ask you if you want to replace the existing motion path, which you can decide on a case-by-case basis. If you proceed with the paste, the motion guide will take on the shape of the stroke you drew, and the frames will be distributed across its length (Figure 5-25).
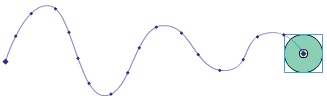
Figure 5-25. The stroke from the previous figure pasted into a motion guide to become a custom motion path
If the stroke you drew is too complex to be recreated with the number of frames allotted to the tween, Flash will prompt you to simplify the curve by optimizing it or resampling it across the available frames. Optimizing the path is recommended as a first step, but experimentation with both options may yield different results.
When editing motion paths, watch out for signs of stuttering motion. This can be caused when the distances the object must travel between keyframes are not proportional to the number of frames allotted. Figure 5-26, for example, shows a tween in which half its distance must be covered in approximately one-third of the frames. This causes the first half of the tween to move quicker than the last half of the tween, with an abrupt change at frame 4.

Figure 5-26. Irregular motion caused by the same amount of distance traveled in differing numbers of frames
A new Flash CS4 feature called roving keyframes solves this problem. Roving keyframes are specific to motion paths and are not linked to frames in the Timeline. Flash will disassociate roving keyframes from the Timeline and automatically adjust their positions to create more uniform motion throughout the tween.
Figure 5-27 shows the same tween depicted in Figure 5-26, but using roving keyframes. The motion has become much more consistent.

Roving keyframes only work with x and y properties, as well as the z property you will learn about in Chapter 8. To enable roving keyframes, right-click (Windows) or Control-click (Mac) a motion tween and choose Motion Path→Switch keyframes to roving from the pop-up menu (Figure 5-28). You can disable roving keyframes by selecting the Switch keyframes to non-roving option.

Another option in the Motion Path context-sensitive menu is the ability to reverse a motion tween. If, for example, your tween moves a movie clip across the Stage from left to right, you can automatically reverse this animation by using the Motion Path→Reverse Path menu option. The resulting animation will move across the stage from right to left.
In addition to obvious properties such as x and y location, scale, and rotation, you can apply simple color effects to symbols and animate them using motion tweens. When you select a symbol, you can access color effects through the Properties panel (Figure 5-29). The Style menu in the Color Effect section of the panel contains four color effects:

- Brightness
Brightness adds white or black to the color of a symbol instance. Values range from −100% (solid black) through 0 (no change) to 100% (solid white).
- Tint
Tint sets the color of a symbol instance, ranging from 0% (no tint) to 100% (solid tint), regardless of the original symbol color.
- Alpha
Alpha sets the transparency of a symbol, ranging from 0% (transparent) to 100% (opaque).
- Advanced
Advanced separately adjusts the red, green, blue, and alpha values of a symbol instance. There are two controls for each channel. A percentage of the total value allows you to reduce the amount of any channel. This value is based on how much of any color or alpha channel originally appears in the symbol instance. If, for example, a color starts off with only 50% red, a setting of 100% for the first control allows you to use all of that available red, while a setting of 0% removes red. An offset value also exists for each channel, allowing you to offset the amount of color or opacity in a symbol instance from −255 to 255. This allows you to add more of the chosen color to the symbol instance, effectively changing the hue of each channel.
Note
Brightness and tint essentially cover a symbol instance with a white, black, or tinted overlay until the symbol disappears under that color at full value. The Advanced setting applies subtle changes to the actual color in the symbol instance, rather than covering it up. As such, Advanced is a better choice for altering the color bitmaps and for preserving, as much as possible, the impact of separate stroke and fill colors.
Just as you saw earlier when changing the x property in your first motion tween, changing a color effect during a motion tween will automatically create a property keyframe. Here, for example, is a simple process for fading in a movie clip, which also demonstrates a nice feature of motion tweens: automatic frame spans. If you need to review any of these steps, refer back to the beginning of this section.
Create a new file using File→New. This file will not be a part of the ongoing portfolio project.
Create a movie clip in frame 1.
Click frame 1 in the Timeline panel and create a motion tween.
Notice that frames were automatically added for you! When a frame span doesn’t already exist to convert to a motion tween, Flash will add one second’s worth of frames for the motion tween to occupy. So, if your frame rate is the default 24 frames per second, you will end up with 24 frames.
Move the playhead to frame 1 and select the movie clip. Choose Alpha from the Color Effect Style menu in the Properties inspector and give it a value of
0.Move the playhead to the last frame of the tween and select the movie clip. Choose Alpha from the Color Effect Style menu in the Properties inspector and give it a value of
100.
Scrub through the Timeline, and you will see the movie clip fade in from transparent to opaque over the course of the animation. Compare your file to alpha_tween.fla from the companion source files.
A fun, easy way to get started with motion tweens is to use motion presets. Motion presets are a collection of property tweens bundled into a single preset that you can apply to a tween to recreate a desired animation. Because motion tween values, and therefore motion presets, can be applied to any symbol, that symbol will take on the animated attributes defined by the tween.
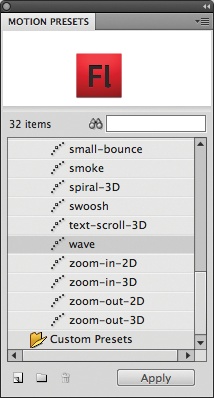
Presets are stored in the Motion Presets panel (Figure 5-30). To apply a preset, simply select a motion tween, choose a preset from the panel, and click the Apply button. Flash will automatically insert the required frames in the Timeline layer and apply all the property value changes needed to create the desired animation.
Because using a motion preset is just an automated way of creating a motion tween, Flash will also help you apply motion presets even if the focus of your attention is not a movie clip. For example, you can create a new file, draw a shape on the Stage, select that shape, and apply a motion preset. Flash will do all the rest and, a second later, your former shape will be bouncing along or going up in smoke.
If you’re thinking that canned effects like these have limited long-term value (a common sentiment), reserve judgment until you’ve used the feature a few times. Some of the effects, such as variants of fly in and out, zoom in and out, and spiral-3D, are useful for common tasks like presentations and intros.
Best of all, you can easily create your own presets and build a library of animations to reuse at any time. To create your own preset, right-click (Windows) or Control-click (Mac) the motion tween you want to archive and choose Save as Motion Preset from the pop-up menu. You can then name the preset and it will appear in the Custom Presets folder of the Motion Presets panel.
At the bottom left of the Motion Presets panel are three additional buttons to help you manage your own presets. From left to right, you can create a preset from your tween using the Save selection as a preset button instead of the mouse context menu, create folders within the Custom Presets folder to organize your presets, and delete a custom preset.
If you want to reuse a motion tween on a whim or in a single case, you may not want to clutter up your custom Motion Presets menu. In this situation, you can quickly copy the motion from one tween and paste it into another.
To see this process in action, create a file with two layers, with a unique movie clip in each layer. Create a motion tween in one layer and leave the other layer untouched. When you’re finished, click the existing motion tween and use the Edit→Timeline→Copy Motion menu command, or right-click (Windows) or Control-click (Mac) a motion tween and choose Copy Motion from the pop-up menu (Figure 5-31).
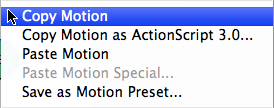
This copies all the pertinent information from the tween, which can then be recreated with a paste. Click the movie clip in the second layer and revisit one of the same menus to invoke the Paste Motion command. The initial motion tween will be recreated and will feature another movie clip as its star player.
Flash CS4 Professional introduces the Motion Editor panel (Figure 5-32), a new tool to help manage its new motion tween format. You can create and edit many basic tweens without using this panel, but some tasks, such as applying easing and editing property values by manipulating curves—both of which you’ll learn how to do in a moment—require the Motion Editor panel.
Think of the Motion Editor panel as a combination of the Timeline and Properties panels with a little Pen tool thrown in for good measure. If you have seen timeline-based video editing applications, particularly Adobe After Effects, the Motion Editor panel will feel familiar.
The most important thing to understand when using the Motion Editor for the first time is that it’s not a replacement for the Timeline panel. Instead, you use the Motion Editor to edit property values for one tween at a time. For example, if no tween is selected in the Timeline panel, the Motion Editor panel will be empty. If the Timeline panel contains three tweens, you will need to select each tween in turn if you want to use the Motion Editor to change their values.
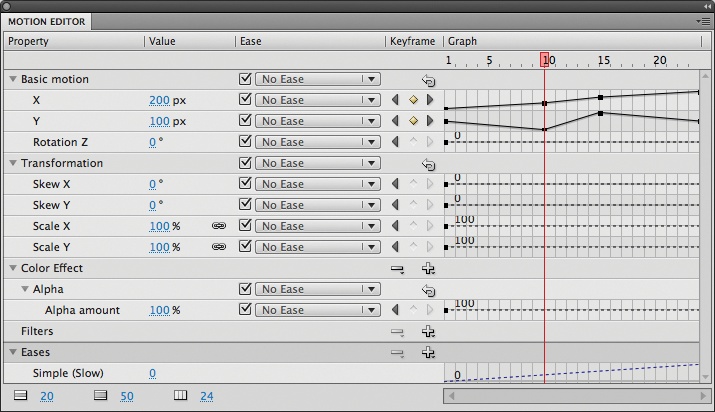
After selecting a tween and opening the Motion Editor, you will find that properties appear by name in the first column and their corresponding values appear in the second column. Basic Motion and Transformation properties appear by default. The rotation property applied with the Transform tool, and edited numerically in the Properties and Transform panels, has been moved to the Basic Motion section and listed as Rotation Z.
Note
Standard rotation and rotation z are essentially the same. Rotation z bests standard rotation in one respect because it’s more compatible with text fields. You’ll learn more about that in Chapter 11, which discusses text.
The x, y, and rotation z properties are grouped together in the Motion Editor mainly because the panel can include 3D properties, which you’ll learn about in Chapter 8. Using rotation z as the rotation of choice improves clarity and reduces redundancy when 3D properties like rotation x and rotation y appear.
For all intents and purposes, the Color Effects, Filters, and Eases sections start out empty (the Eases section does have a default ease setting available, but its value amounts to no easing). To add properties in these categories, click the plus (+) icon in the desired section and select the desired property from the pop-up list that appears. To remove effects, click the adjacent minus (−) icon.
Property keyframes are added using the Keyframe column and, in addition to the Value column, you can alter their values using graphs that appear in the Graph column. This process is covered in the next section.
Finally, at the bottom of the panel are three settings that control the row height and the width of the Graph column. Use these three settings to customize the view of the panel to improve your workflow. The first setting controls the height of a property row when not in use. Reducing this number allows you to see more rows without scrolling, while increasing the setting’s value makes the graphs more legible.
The second setting controls the height of a row when in use. Splitting the height values into two settings makes it possible to maintain a panel as compact as you like, but then instantly increase the height of any row with a single click. Each time you work in a new row, that row expands and the others return to their inactive height.
The last setting controls how many frames are visible in the Graph column. This effectively allows you to zoom in on a portion of the graph or see as much of the graph as your panel size will allow. The wider your panel, the more frames can fit in the column.
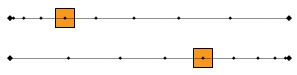
Any keyframe created in the Timeline panel will appear in the Motion Editor panel, and adding property keyframes in the Motion Editor is just as easy. The playhead at the top of the Graph column in Figure 5-33 corresponds to the playhead in the Timeline panel. You can use the playhead to scrub through the animation and stop at any frame.
At any point, you can add a keyframe by clicking the diamond shape in the center of the Keyframe column. The left image in Figure 5-33 indicates that there is a property keyframe only to the left of the playhead (see arrows), and that the current frame is not a property keyframe (no diamond icon is visible). After clicking the diamond icon (in the right image), the current frame becomes a property keyframe.
Another way to add property keyframes is to hold down the Ctrl key (Windows) or Command key (Mac) and click anywhere on the property curve. Similar to the Pen tool, you can add a keyframe where none existed before or delete a keyframe that already exists. Additional curve editing options are discussed in the next section.
The Graph column of the Motion Editor panel contains, well, a graph. The horizontal axis represents time, in frames. The vertical axis represents the value of the property, with higher values at the top of the axis, just like a normal graph. A straight dashed line and the value of the property represent an unedited property.
Consider, however, a one-second animation that lasts 24 frames with a frame rate of 24 frames per second, and changes only the x property to move a movie clip across the Stage from 1 to 500. The graph of this animation (Figure 5-34) starts at the lower-left corner (a time of 1 frame, or 0 seconds, and an x value of 0) and ends at the upper-right corner of the graph (a time of 24 frames, or 1 second, and an x value of 500).
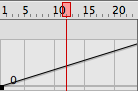
Figure 5-34. A Motion Editor property graph showing the x coordinate move from 0 to 300 in 24 frames
Using the property curve, you can control the value of the property in any frame. Figure 5-35 shows more examples of x property curves, including one that shows the x position offstage to the left in negative territory.
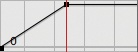
Figure 5-35. More Motion Editor graphs of x property change over 24 frames, with a property keyframe at frame 12; 0 to 300 to 300 (top), 0 to 300 to 0 (middle), 300 to −300 to 300 (bottom)


In addition to working directly with keyframes, you can edit the curve to edit the animation as a whole, including interpolated frames. To do so, edit the curve in the same way that you would use the Pen tool to edit strokes on the Stage (for more information, see Chapter 2). Each property keyframe is similar to a point on the curve, and the interpolated frames run along the rest of the curve.
Figure 5-36, for example, shows the default keyframe at the start of every frame span in frame 1, and a single property keyframe at frame 11. All frames between 1 and 11 and from 12 to 24 are interpolated frames. The curve in Figure 5-36 was created by holding down the Ctrl key (Windows) or Command key (Mac), clicking near the middle of the line, and dragging down and to the right forming the curve.

Cursor feedback and modifier-key use for editing property curves is pretty consistent with stroke editing on the Stage. Because you must select a motion tween for the Motion Editor to remain active, you will typically be using the Selection tool when you begin working with a property curve. However, the Motion Editor will handle the behavior of your mouse machinations, based on context.
When the cursor resembles the Subselection tool cursor (a hollow arrow), you can drag the entire curve or individual keyframes around. Hold the Shift key when dragging keyframes to constrain their movement in left-right or up-down directions. If you hold down the Ctrl (Windows) or Command (Mac) key, the cursor will resemble the Pen tool, allowing you to add new points and remove existing points. Dragging with this mouse/key configuration lets you create curves, as discussed previously and shown in Figure 5-36. Finally, you can hold down the Alt (Windows) or Option (Mac) key while clicking to change a keyframe marker to a corner point, straightening the curve surrounding the point, just as you would alter a point on a stroke with the Pen tool.
Right-clicking (Windows) or Control-clicking (Mac) on a point allows you to remove a keyframe or switch between roving keyframes (indicated on the graph by a circle) or the default nonroving keyframes (indicated on the graph by a square). You can also set the curve segment to the left or right of a point to a straight line.
If you right-click or Control-click in the area behind the graph, you can easily reset the property, reverse the keyframes, or copy and paste the curve from one property to another.
When you’re just starting out with animation, one great way to add life to your work is to use easing. As the name implies, this is when an object eases into motion (like when you ease into traffic from a slowed or stopped state), or eases out of motion (like slowing gradually to a stop).
Typically, these movements are not perfectly consistent. If a character isn’t the Road Runner of Warner Brothers cartoon fame, it doesn’t run to a location and instantly stop. Nor does a character typically slow to a stop at a perfectly fixed rate. By applying easing, you can make your animations more expressive as they slow into or out of keyframes.
Figure 5-37 shows a movie clip easing into (top) and out of (bottom) a 10-frame animation. In both cases, the movie clip is at frame 5 of the animation. The clustered interpolated frame markers on the motion path convey the speed at which the movie clip is traveling.
When the movie clip eases in, it initially moves slowly, traveling a shorter distance over more frames, and then speeds up to cover a greater distance over the remaining frames. Note that halfway through the animation, the movie clip is farther to the left of the path. When the movie clip eases out, it initially moves faster, traveling a longer distance over fewer frames, and then slows down, covering a shorter distance over the remaining frames. In contrast to the prior example, halfway through the animation, the movie clip is further to the right.
You can add easing to all tweens—shape, motion, and classic motion—through the Properties panel, and to motion tweens in the Motion Editor panel. Shape and classic motion tweens can have multiple easing settings on a per-keyframe basis, but motion tweens can only accept a single easing setting for the entire tween.
In simple terms, easing is a slow acceleration or deceleration that lends realism to motion animation.
In this chapter, you’ll look at two ways to apply easing: through the Motion Editor and Properties panels. Adding easing in the Motion Editor can be a bit of a challenge the first time. It will help you if you remember a few things:
You can only apply one easing setting per property, and it applies to the entire animation. You will therefore repeat this action several times out of necessity, rather than redundancy.
You can’t edit the easing curve along with the property curve.
You must edit the easing curve independently, and you can apply that setting to as many properties as desired through the pop-up menus in the Ease column.
Figure 5-38 shows an example of this workflow, and the sections that follow discuss how to apply easing curves in greater detail. Figure 5-38 shows the Motion Editor after applying the wave motion preset to a movie clip. Near the bottom of the panel you can see that the preset has added a new layer called Sine Wave in the Eases section.
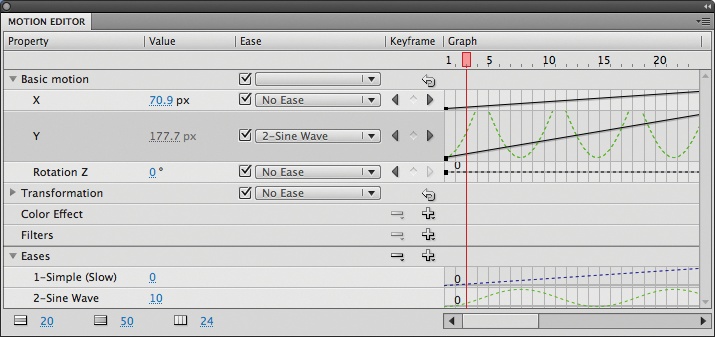
Figure 5-38. The Motion Editor after applying the Wave Motion Preset to a tween; note the Sine Wave easing preset at the bottom of the figure and its application to the y property of the tween
In the Ease column in Figure 5-38, the pop-up lists for each property show that no easing is used except with the y property, where the pop-up list shows the Sine Wave easing curve, and you can see a dotted line that runs behind the y property curve in the Graph column. The dotted line differentiates the easing curve from the property curve and further emphasizes the fact that you cannot edit the easing curve where it has been applied.
The easiest way to learn how easing curves work is to create your own, so that process is discussed in the next section. However, this is not required. You can always add any of the 16 existing easing presets to the Motion Editor menus and apply them to properties as described in the upcoming exercise. For now, familiarize yourself with creating your own curves, whether you intend to use them frequently or not.
Preparing an easing preset, whether it’s custom or not, involves two steps: creating or using a curve, and determining the strength of the ease. In all cases, begin the process by adding a preset using the plus (+) menu in the Ease section of the Motion Editor. For a preset to be accessible to all properties, choose it from the menu by name. To create a custom preset, select Custom from the menu. In both cases, the curve will be added to the Ease section.
Editing your own custom easing curve requires the same process as editing a Bézier curve on the Stage and has been discussed in the Editing Property Curves in the Motion Editor section. Figure 5-39 shows a custom curve with two control handles.

In addition to being comfortable with Bézier curve editing techniques, you need to understand a small difference between easing and property graphs. The x-axis of the easing graph is measured in frames, just like the property graphs. However, the y-axis represents the degree to which the tween is complete, measured in percent, rather than the changing value of a particular property.
For example, the lower-left corner of the graph is 0% complete at the first frame of the tween. The upper-right corner of the graph is 100% complete at the final frame of the tween. The ease curve depicted in Figure 5-39 is based on the same 24-frame example used throughout the discussions on the Motion Editor. It will slowly ease into the animation, reaching approximately 20% complete at frame 10, move relatively quickly through the animation, reaching approximately 80% complete by frame 15, and then slowly ease out of the animation over the last 9 frames, reaching 100% complete at frame 24.
Once you’re satisfied with your easing curve, you need to set the strength of the easing that will be applied to a property. As with properties, this value is set in the numeric entry field in the Values column of the panel.
For simple preset ease settings, this is a value between −100 and 100. Negative values ease into an animation, resulting in slower change at the beginning of the curve. Positive values ease out of an animation, increasing the easing applied to the end of a curve. For wave presets, such as Sine Wave and Sawtooth Wave, the value determines the number of half-cycles the wave makes during the duration of the tween. Finally, for custom ease settings, the value is the percent complete at any point throughout the curve.
Because you must create an easing preset and add it to a list of available settings for use in any property, and because you must set the strength value of the ease at its time of creation, it’s not possible to vary the strength from use to use. The only way to accomplish this is to create multiple copies of the ease curve, each with different values. Unfortunately, it’s not currently possible to rename any ease setting, even the custom settings you create, so you’re stuck with remembering which setting is which by number.
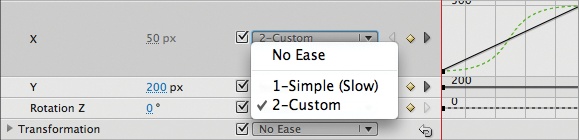
After you have created the curve and set its strength, you can apply the setting to a property. Figure 5-40 shows the custom ease curve created in Figure 5-39 being applied to the x property. In the Ease column, access the custom setting from the pop-up menu; the dotted line showing the ease appears behind the property curve. In this example, the x value changes from 0 to 300, but does so at a pace based on the easing curve applied.
One of the really cool things about this implementation of custom easing curves is that the easing curve doesn’t have to end at 100%. This was a limitation of the prior custom easing editor, which you’ll learn about later on, but is not a factor in the new easing model. By creating an easing curve that does not finish at 100%, you can end your tween and leave properties at any desired values.
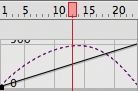
For example, Figure 5-41 shows an x property curve from 0 to 300. Without easing applied, the movie clip from this example will move from an x of 0 to an x of 300 in 24 frames. However, when the easing is applied, the movie clip will move from 0 at frame 1 to approximately 300 at frame 12 (because the easing curve reaches approximately 100% at that point) and then back to 0 at frame 24 (because the easing curve returns to 0% at the end of the tween).
Combining different properties with different easing curves can result in some interesting effects. A quick way to glance over sample settings is to apply the motion presets to a temporary file and look at the Motion Editor every time you try a new preset. After a handful of peeks at the inner workings of the presets, you’ll be able to read the Motion Editor pretty easily.
Although it’s possible to draw elaborate easing curves that factor in the locations and values of every property keyframe, this can be quite involved for complex animations. In some cases, when per-keyframe easing is required, the limitations of one ease per property tween in the Motion Editor will be a major annoyance. In those circumstances, it may be easier to use the classic motion tween format. The portfolio project demonstrates this scenario. Most animations will use the new motion tween format, but the rotating viewing wheel will use classic motion tweens so keyframe-specific easing can be employed.
The classic tween format is the motion tween version used in prior Flash releases. Its creation and manipulation is similar to that of the shape tween discussed earlier in this chapter. However, just like the new motion tween, it animates symbols instead of morphing shapes.
Create a new file using File→New. This file will not be a part of the ongoing portfolio project.
Create a keyframe in frame 5 (F6).
Draw a small shape in frame 5, near the left edge of the Stage, and convert it to a movie clip (F8).
Create a keyframe (F6) in Frame 15 and drag the movie clip to the right edge of the Stage.
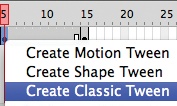
Click anywhere in the first frame span and use the Insert→Classic Tween menu command, or right-click (Windows) or Control-click (Mac) the span or movie clip and select Create Classic Tween from the pop-up menu (Figure 5-42).
The Timeline will look very similar to the shape tween Timeline, but the span will be purplish-blue instead of green (Figure 5-43). If you scrub through the Timeline, you’ll see the movie clip move across the Stage. Compare your file to classic_tween.fla from the companion source files, then experiment further by changing other properties in each keyframe. For example, apply an alpha effect from the Color Effects Style menu in the Properties panel. Most importantly, however, apply easing to the tween.
Adding a stock easing effect to a classic motion tween is very much like adjusting the very properties you tweened. Click in the first keyframe of the tween and, in the Properties panel, adjust the Ease value in the Tweening section (Figure 5-44). The value ranges from −100 (maximum ease in), to 0 (no easing), to 100 (maximum ease out). For more information about the difference between easing in and out, including sample motion paths, see the Easing section, earlier in this chapter. Sample files called classic_tween_ease_in.fla and classic_tween_ease_out.fla have been provided for you to compare against your own efforts.
Once you’ve had some experience with the differences between easing in and out, try to add another classic motion tween sequence, perhaps by practicing the Copy and Paste Frames processes discussed earlier in this chapter. Save a copy of your basic classic tween file first, as you’ll want to work with the simple version when learning about motion paths near the end of this chapter. After saving a copy, apply different easing effects to each keyframe, and you’ll be prepared for your work on the portfolio project later on. Compare your tests to the classic_tween_ease_in_out.fla source file for an example of multiple keyframe easing.
Although applying stock easing effects to classic motion tweens is as straightforward as changing property values, sometimes a simple ease isn’t enough. To achieve other easing effects, such as an effect that simulates bouncing, you need to draw a custom easing curve.
Although not as powerful as the new custom easing curves, you may prefer to use classic easing because of its per-keyframe application benefit. To create a custom easing curve, click the pencil icon to the right of the easing value, shown in Figure 5-44. This will open the Custom Ease In / Ease Out editor shown in Figure 5-45.
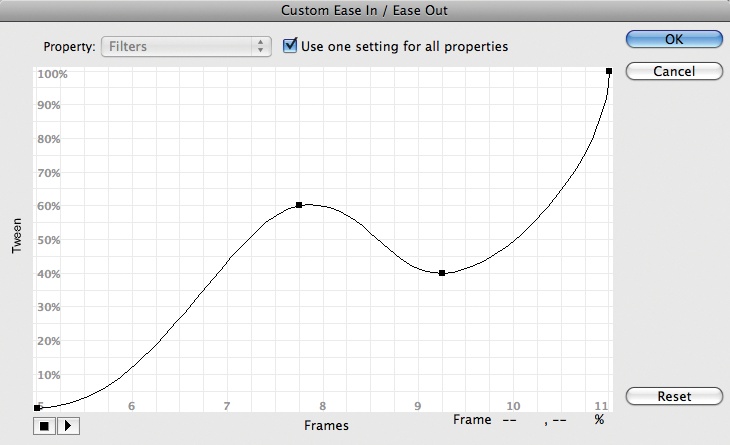
Editing the custom classic easing curve is similar to creating an easing preset in the Motion Editor panel, including the values on the x- and y-axes of the graph, and the Bézier curve editing features. However, there is one limitation with the legacy format. Classic easing curves must end at 100% complete. That is, just like the Motion Editor easing curves, the first keyframe is in the lower-left corner of the graph at 0% complete and frame 1. You can add additional property keyframes, but the last keyframe must be anchored to the upper-right corner of the graph, at the end of the tween and 100% complete.
Another point worthy of discussion is that you can apply different easing curves to each property in the classic easing editor, just as you can in the Motion Editor. If you disable the Use one setting for all properties feature at the top of the editor, the adjacent menu offers the chance to create a unique curve for position, rotation, scale, color, and filters. Switching among these properties in the menu will also switch among any associated custom curves created.
The final significant difference between classic tweens and motion tweens applies to the use of a motion guide. It is not possible to simply paste a motion guide into a classic tween. Instead, you must paste it into a dedicated motion guide layer type, shown in Figure 5-46.
Open the first classic tween exercise you created or, if you’ve edited that file further, open the classic_tween.fla source file.
Right-click (Windows) or Control-click (Mac) the classic tween layer and choose Add Classic Motion Guide from the pop-up menu.
Create keyframes (F6) in frames 5 and 16 to confine the motion guide to the span of the entire tween, keyframe to keyframe.
Draw a stroke with the Pencil tool in that guide layer to serve as a path for the animation to follow.
Click the first keyframe of the classic tween and, in the Properties panel, make sure Snap is enabled in the Tweening section.
Drag the movie clip instance on the Stage to the start of the path you drew, until it snaps into place.
Select the last keyframe and drag the movie clip in that frame until it snaps to the end of the motion guide to complete the process.
If you scrub through your Timeline, you’ll see that the movie clip now follows the path you drew. Compare your work to the classic_tween_motion_guide.fla source file.
As the final experiment of the chapter, before working on the portfolio project, set up your tween so the animated object orients itself along the direction of the motion guide. This is ideal for elements that need to appear to be pointing in the direction in which they are traveling.
For example, think of a plane flying across the Stage and performing a 360-degree loop as it moves from left to right. Without orienting the object to the path, it would begin to fly right, appear to float upward parallel to the ground as it entered the loop, then fly backward at the top of the loop, and finally fall out of the loop and continue to fly to the right. On the other hand, if you oriented the plane to your path, the plane would appear more correctly to fly straight up, point left as it flew upside down, dive downward, and then swoop out of the loop and on its way.
To achieve the best results when trying this feature, edit your movie clip so it has a clear, correct orientation. For example, draw an arrow that will appear to point in a specific direction. If you prefer, continue with the classic_tween_motion_guide.fla source file. Then click in the first keyframe of the tween and, in the Tweening section of the Properties panel, enable the Orient to path option. Your movie clip should now follow your path with the correct orientation throughout.
You can also apply the Orient to path option to the Flash CS4 Professional version of motion tweens. After the motion tween is complete, select it in the Timeline and enable the feature in the Rotation section of the Properties panel.

In this chapter, you’ll build the project’s skeletal structure and animate its interface. Before jumping into the step-by-step file construction, it’s helpful to have a big-picture understanding of how the portfolio works. As you probably remember from the previous chapter, the design and navigation metaphor for the portfolio is a paper craft viewing wheel. A wheel rotates around its center spindle and eventually stops to reveal the contents of a specific screen.
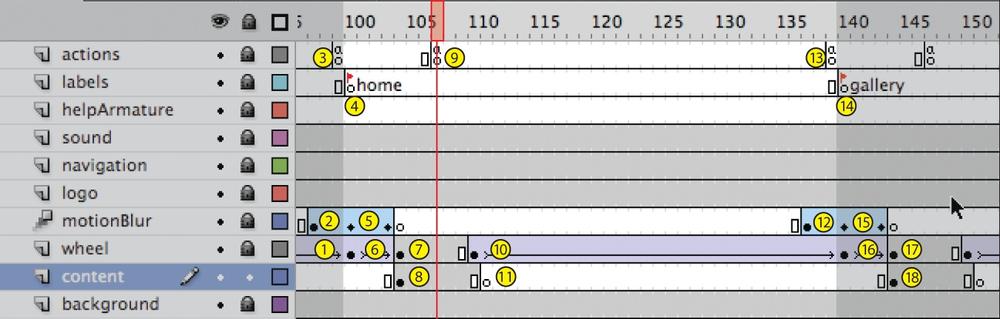
Figure 5-47 shows a preview of part of the Timeline you’ll build, focusing on a sample section screen of the portfolio. You will insert numbers into the text that follows, showing where each event occurs in the Timeline. By visualizing the navigation this way before you build it, the descriptions and the steps may be more obvious. It may also help to see the portfolio in action at the companion website, http://www.LearningFlashCS4.com, before proceeding.
At first launch, the viewing wheel fades in over a black background and scales to full size. A paper background and logo then fade in, the wheel begins to spin, and the navigation and sound controls appear.
When the viewing wheel reaches full speed (1), a still image created from a motion blur of the wheel rotating fades in on top of the wheel for a partial second (2). The first section visited (Home) is stored into a variable by a frame script (3), and the playhead is sent to that frame label (4). The motion blur fades away (5), and the wheel slows down as it rotates into final position (6). Finally, the wheel stops rotating (7), the section content is revealed (8), and a frame script stops the playhead in the section screen (9).
This process is repeated each time the user switches portfolio sections. The user clicks a navigation bar button and stores the desired destination in the variable and starts the playhead moving. The wheel rotates (10), the previous section content disappears (11), and the motion blur fades in (12). When the playhead reaches the last frame in the section (13), the motion blur fades up enough to cover the navigation jump, and a script sends the playhead to the new desired section frame.
After the playhead jumps to the new section (14), the motion blur fades out (15), the wheel slows and stops spinning (16 and 17), and the new section’s contents appear (18). By splitting the motion blur—fading up over the last few frames of the prior section, and down over the first few frames of the next section—you can hide any sudden change in the wheel’s rotation during the transition between sections.
With the portfolio navigation fresh in your mind, it’s a good idea to start building your main file with the repeating structure for each portfolio section.
The first task is to add a few new layers and divide the Timeline into sections:
Open your running portfolio project file or portfolio_03.fla.
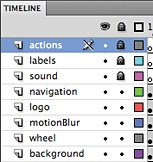
Select the top layer in the Timeline panel and add three layers to the top using the New Layer button at the bottom-left of the panel (or by using Insert→Timeline→Layer). Name the new layers, from top to bottom,
actions,labels, andsound, and lock them. Your Timeline layers should now resemble Figure 5-48.Select the background layer, add a new layer above it, and name it
content.Scroll the Timeline panel until frame 260 is visible. With one process, click in frame 260 of the top layer and drag down to frame 260 of the bottom layer. This will select frame 260 in all layers. If you have any trouble doing this, look back over Figure 5-7. After selecting frame 260 in all layers, press F5 to add frames. Your file should span from frame 1 to frame 260 in all layers.
In the labels layer, click frame 100 and add a keyframe (F6). With the frame still selected, give it the label name
homein the Properties panel. Repeat this process in frames 140, 180, and 220, applying label namesgallery,lab, andhelp, respectively.
With the new layers added and the sections marked off with keyframes and frame labels, you’ll insert the frame scripts required for navigation. You’ll write the button scripts for the navigation bar later on.
In the actions layer, add keyframes that will stop the playhead in each portfolio section. These frames will stop the playhead 7 frames after every frame label, allowing enough time for the motion blur to fade out and the content to fade in. The frame numbers are 107, 147, 187, and 227. In each frame, add the following ActionScript:
stop();
In the actions layer, add keyframes that will serve as the end of each animated transition. When the playhead reaches these frames, a script will take the playhead to the frame label stored in a variable, providing a seamless navigation between sections. The end of each animated transition appears before every label (99, 139, 179, and 219) and before the end of the timeline (259). Add the following ActionScript to each of these frames except frame 99 (you will write a special script for frame 99 later in this chapter).
gotoAndPlay(nextSection);
The next task is to create the motion blur overlays for each section. You’ll create the first fade in/fadeout sequence, then copy those frames for use in other sections.
If it’s hidden (because of work you did in Chapter 4), show the motionBlur layer. In this layer, click in frame 97 and press F6 to create a keyframe. Repeat this process in frame 104. Click frame 1 of the layer to select its content and delete it, emptying the first section of the layer. Repeat this process in frame 104, deleting the content in frame 104 after the keyframe is created. Scroll through the Timeline and confirm that the only content in the motionBlur layer is between frames 97 and 103.
Right-click (Windows) or Control-click (Mac) the motionBlur between frames 97 and 103 and select Create Motion Tween from the pop-up menu. The layer frame span will turn blue, indicating that it has become a motion tween, and the first frame will automatically become the span’s first keyframe.
Next, you need to create two property keyframes. Move the playhead to frame 100 and click the motionBlur movie clip on the Stage. In the Properties panel, in the Color Effect section, choose the Alpha Style and set its value to
100. Repeat this process in frames 97 and 103, setting the Alpha of the movie clip to0in both frames. If you scrub through these frames, you should see the movie clip start with an alpha of 0, fade up to 100, and then fade back down again to 0.
Now that you have a completed motion blur tween, you need to copy these frames and paste them into the other sections. To prepare for this change, you’ll need to create the 7-frame span required for the blur effect in the three other sections of the Timeline.
Add keyframe pairs to the motionBlur layer in frames 137 and 144 (for the Gallery screen), 177 and 184 (for the Lab screen), and 217 and 224 (for the Help screen). This will create the 7-frame span required for the motion blur effect in each section.
To copy the necessary frames, right-click (Windows) or Control-click (Mac) on the first motion blur tween, anywhere in the motionBlur layer between frames 97 and 103, and choose Copy Frames from the pop-up menu. This is the first of three important points of this task. Do not choose Copy out of habit. The latter option will only copy the contents of the current frame while the former will copy the selected frames in the Timeline.
To paste the tween, you must select all the frames between the keyframes you created to hold the corresponding blur effect in each of the other sections. This is the second important point in this task. If you simply click once in the frame span, additional unwanted frames will be added to the layer when you paste. If you select the frames first, they will be replaced by the copied tween.
To select all the frames, click in the first frame of the span and, without releasing the mouse, drag to the last frame of the span. In the motionBlur layer, click in frame 137 and drag to frame 143, selecting all seven frames (Figure 5-49). Next, right-click or Control-click in the span and choose Paste Frames from the pop-up menu. This is the final important point in this task. Be sure to select Paste Frames instead of Paste. The result is that the motion blur tween will be copied from the Home section and pasted into the Gallery section.
Having duplicated the motion blur tween once, do so again two more times. Click and drag to select frames 177 through 183, right-click or Control-click the span and select Paste Frames, and then repeat the process for frames 217 through 223.
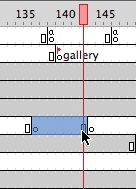
Finally, you need to create half of the motion blur effect that fades up the blurred overlay at the end of the Help section. Remember, during navigation, the script at the end of the section will send the playback head to the second half of the fade in another section.
You will use the same Copy Frames and Paste Frames technique you used previously, but you need to select only the first half of another section’s fade. You will need to hold a modifier key down and drag to select only the first half of the tween, but a helpful feature can make this tricky: you may remember from earlier in the chapter that you can grab the first or last frame of a tween span in the Timeline panel and drag it left or right to change the length of the span. This convenience can get in the way when you try to hold the Ctrl (Windows) or Command (Mac) key down to select only a portion of the frames in a span. When making your selection, if you start dragging the first frame in the span from left to right, Flash will think you are trying to shorten the span. So, you need to start the selection process from the middle property keyframe and drag left until you reach the first frame. You will be selecting the same four frames, but you’ll be dragging from right to left instead of left to right.
Create a keyframe in frame 257 in the motionBlur layer. Similar to the process described in step 11, select the first half of the motion blur tween in the Help section by holding down the Ctrl key (Windows) or Command key (Mac), clicking in frame 220, and dragging to frame 217 (Figure 5-50). Right-click (Windows) or Control-click (Mac) the selection and choose Copy Frames from the pop-up menu. As described in step 12, select frames 257 through 260, right-click or Control-click the selection, and choose Paste Frames.
Save your work. When you’re done, scrub through the Timeline panel and make sure the motion blur fades up and down near each frame label, and up at the end of the Timeline.
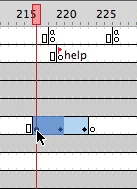
The last major task in building the Timeline structure that is specific to each section is to create frame spans in a new layer that will hold portfolio content. You will also add content created in prior chapters to two sections, and add the sound controller you created in Chapter 3 to the main interface.
Select the content layer in the Timeline panel by right-clicking (Windows) or Control-clicking (Mac) the layer’s name and choosing Insert Layer from the pop-up menu.
Create keyframe pairs in the layer at frames 104 and 111 (Home), 144 and 151 (Gallery), 184 and 191 (Lab), and 224 and 231 (Help). This creates the necessary 7-frame spans for each section that will hold content.
Open the home_page.fla you created in Chapter 2. On the stage, select the instance of the HomePage movie clip (the only asset in that FLA’s content layer) and copy it.
Switch back to your portfolio FLA and use Paste in Place (Shift+Ctrl+V in Windows or Shift-Command-V on Mac) to paste the movie clip into frame 104 of the content layer.
Repeat steps 18 and 19 for the Lab page content. Open the lab_page.fla created in Chapter 4, copy the LabPage movie clip from the Stage, and use Paste in Place to paste the movie clip into frame 184 of the portfolio FLA’s content layer.
Finally, add the sound controller you created in Chapter 3. Open sound_control.fla and copy the soundControl movie clip. Switch back to your portfolio FLA and paste the movie clip into the sound layer. Using the Properties panel, set the movie clip’s x and y locations to
590and420, respectively.
You have completed the changes to the main portfolio document that are specific to each section. You can compare your file to portfolio_06_01.fla and continue on with that file, if you prefer. Next, you’ll animate the layers that apply to all of the sections. Now is probably a good time to save your work and take a break!
Beyond screen-specific assets, the project includes interface elements used throughout the portfolio. In this Project Progress segment, you’ll define frame spans for these elements and animate them with two kinds of tweens.
Upon a user’s first visit to the portfolio, the project assembles its interface one element at a time, introducing the viewer to functionality as it builds. To facilitate this, the content will not all appear in the same frame.
In the sound layer, add a keyframe (F6) in frame 90. Click in frame 1 of the layer and delete the content. This should remove the assets in the layer between frames 1 and 89.
In the navigation layer, add a keyframe (F6) in frame 90 and delete the content in frame 1.
In the logo layer, add a keyframe in frame 55 and delete the content in frame 1.
In the wheel layer, practice moving a keyframe. Click in frame 1 to select only the keyframe. Click and drag it to frame 2 to move the keyframe, leaving frame 1 empty.
In the background layer, add a keyframe in frame 50 and delete the content in frame 1.
With the frame spans defined, you can now create new motion tweens for the sound, navigation, logo, and background layers. You’ll address the wheel layer later on.
The interface elements will reveal themselves one by one, either by fading in or by moving into view from offstage. Because you imported many of the interface elements using the PSD File Importer, they are already in place. So, you can simplify the tween creation process by first adding property keyframes to the frames in which you want each tween to finish. You can then manipulate the starting position or opacity in the tween’s first frame to accomplish the reveal.
Convert the sound, navigation, logo, and background layers into motion tweens. Right-click (Windows) or Control-click (Mac) in frame 120 of each layer (to be sure there is content in the frame) and select Create Motion Tween from the pop-up menu each time.
In the sound layer, click in frame 95. Open the Motion Editor panel and, in the Keyframe column of the Basic Motion section, click the diamond to add a keyframe for the x and y properties.
Repeat step 6 for the navigation layer, adding property keyframes for x and y in frame 95.
In the logo layer, click in frame 63. In the Motion Editor panel’s Color Effects section, add Alpha from the plus (+) menu (Figure 5-51) so it appears as an editable property in the section. Set the value to 100%, (if it is not already).
Repeat step 9 for the background layer, adding a property keyframe for Alpha in frame 58.
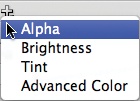
Now all you have to do is change the initial states of each of these tweens to assemble the interface.
In the sound layer, click in frame 90. Select the sound controller on the Stage with the Selection tool and, using the Properties panel, set its x and y properties (in the Position and Size section of the panel) to
790and420, respectively.Repeat step 11 for the navigation layer. In frame 90, click the navigation button bar and set its x and y properties to
207and575, respectively.In the logo layer, click in frame 55. Select the logo on the Stage and, using the Properties panel’s Color Effects section, set the Style to Alpha and its value to
0.Repeat step 13 for the background layer. In frame 50, select the background image and set its Alpha property to
0.
If you scrub the Timeline between frames 45 and 95, you should see the background fade in, followed by the logo fading in. Next, the navigation button bar should animate into view from below the stage and the sound controller should animate in from the right of the stage. After you’ve previewed your work, save your file.
Note
Because you staggered the animated effects, such as the alpha and motion tweens used to build the portfolio interface, the animations won’t all occur in the same frames. This can lighten the load on your computer’s processor and reduce the number of times the animations perform sluggishly.
The animating viewer wheel is a particularly good candidate for classic motion tweens because it’s easier to add easing effects on a per-keyframe basis to classic tweens. As discussed previously, you can only apply easing settings in the new motion tween model to an entire tween span. This makes creating complex, frame-specific easing graphs more difficult and less attractive than using Flash’s traditional tweening approach. This is especially true if the custom easing settings are not easily reused, as reuse is one of the compelling reasons for creating easing presets in the Motion Editor panel.
All of the steps in this section apply to the wheel layer. In Chapter 4, you finished the Project Progress section with the wheel in place at its final size. Therefore, to set up the intro animation, it will be easiest to work backward—staring at its end frame and working back to frame 2. Once that is complete, you can go on to create the similar animations required for each section.
Create keyframes (F6) at frames 45 and 21. Frame 45 is the last state of the intro animation and doesn’t need to be changed. In frame 21, select the wheel on the stage and, using the Properties panel, set the x and y properties to
350and250, respectively. Using the Transform panel, set both the x and y scales (at the top of the panel) to20percent. This will reduce and center the wheel on stage.Right-click (Windows) or Control-click (Mac) in frame 21 and chose Create Classic Tween from the pop-up menu. The tween will turn blue, but will have a slight purple tinge and an arrow running through the span. If you scrub the Timeline panel through these frames, you’ll see the wheel enlarge from 20% to 140% at its final size.
While still in frame 21, select the wheel on stage and copy it. In frame 2, select the large final size and position and delete it. Then paste the smaller wheel in place, using Edit→Paste in Place. Right-click (Windows) or Control-click (Mac) in frame 2 and choose Create Classic Tween from the pop-up menu. This first tween in the layer will fade in the wheel at its starting size.
Create a keyframe in frame 20 to serve as the final keyframe of this initial tween, which requires no change. In frame 2, select the wheel on the Stage and, using the Properties panel, set the Color Effect style to Alpha and give it a value of
0. Scrubbing the Timeline panel among frames 2 through 20 will show the wheel fading in from 0% to 100%.
With one exception, which we’ll look at in a moment, the wheel section animations are consistent. At the end of each section (including the intro), the wheel makes one full clockwise spin. At the beginning of each section, the wheel spins one more quarter turn as it slows to a stop. You’ll go through the first set of tweens in detail, then use the same process for the remaining three sections.
As in the previous section, all of the following tasks apply to the wheel layer. You will create several classic motion tweens so, for brevity, the instructions for converting a normal frame span into a tween will not be reviewed. In all cases, you can click on the first frame of the span and use the Insert→Classic Tween menu command, or right-click (Windows) or Control-click (Mac) the first frame of the span and choose Create Classic Tween from the pop-up menu.
Add keyframes to frames 65, 100, and 104. This span includes the spin up from the intro and the spin down at the start of the Home section.
At frame 65, create a classic tween. In the Tweening section of the Properties inspector, select CW (clockwise) from the Rotate menu and enter
1to the right of the Rotate menu for one rotation.At frame 100, create another classic tween. This time, however, you want to rotate the wheel manually. Select the keyframe in frame 104 and click the wheel on the Stage. In the Transform panel, enter
90degrees in the Rotate value. The classic tween will use this transformation in the second keyframe and rotate the wheel one more quarter turn until it stops.All that remains for this initial set of tweens is to add easing to the first half. Click in frame 65 and enter
−100for the Ease value.
This last step adds a maximum Ease In to the first segment of the two-part tween, so the wheel slowly spins up to speed. The second part of the tween consists of only three frames so the wheel stops quickly. This span length is usually too short for easing to be noticeable, but, more importantly, the wheel slowdown occurs while the motion blur is fading out, further obscuring any visible easing. So, no easing is applied to the second part of the tween.
Now you’ll repeat this process for the three remaining sections. If any of these steps seem abbreviated, simply review steps 19 through 22 to see how you should apply the values.
Add keyframes to frames 110, 140, and 144 to spin up leaving Home and spin down entering Gallery. Create classic tweens at frames 110 and 140. Select the tween at 110 and set Rotate to
1clockwise rotation, with an Ease of−100. At frame 144, click the wheel on the Stage and enter a rotation value of180in the Transform panel. Note that this value has changed from 90 in the previous section. This is because the wheel needs to rotate another quarter turn.Add keyframes to frames 150, 180, and 184 to spin up leaving Gallery and spin down entering Lab. Create classic tweens at frames 150 and 180. Select the tween at 150 and set Rotate to
1clockwise rotation, with an Ease of−100. In frame 184, set the rotation of the wheel to−90in the Transform panel.
If you’re wondering why the value is −90, you’re not alone. In the previous two similar efforts, the addition of a quarter turn each time resulted in values of 90 and 180. Why does another quarter turn result in a value of −90 instead of 270? This is a side effect of Flash optimizing the way it handles angles. Flash will always take the shortest approach to rotation by converting large angles to their negative equivalents. For example, instead of rotating clockwise three quarters of a circle to 270 degrees, it’s more efficient to rotate one quarter counter clockwise to −90 degrees and end up at the same location.
Add keyframes to frames 190, 220, and 224 to spin up leaving Lab and spin down entering Help. Create classic tweens at frames 190 and 220. Select the tween at 190 and set Rotate to
1clockwise rotation, with an Ease of−100. In frame 224, set the rotation of the wheel to0in the Transform panel. Here, again, the negative angles are at work. The prior value of −90, plus one more quarter turn, yields 0.The last tween covers only leaving the Help section, so there is only one segment. Add keyframes to frames 230 and 260. Create a classic tween at frames 230. Select the tween at 230 and set Rotate to
1clockwise rotation, with an Ease of−100.
You’re now done with the Timeline tweens. Save your work and scrub through each section in the Timeline. If the rotation of the wheel doesn’t appear correct in any of the sections, review your settings. If you’re still having trouble, check the companion website at http://www.LearningFlashCS4.com for additional information and continue on with the provided source file, portfolio_06_02.fla. All that remains is to add a script to activate the navigation buttons, allowing you to test your file.
Earlier, you added a stop action to the content frame of each portfolio section and a script at the end of each section that tells the playhead to jump to a frame specified in the nextSection variable. Now you must add a script that will enable the buttons to populate that destination variable and play through the current section on to the next.
You will learn more about ActionScript, including more detail about this very script, in the next chapter. However, this code is included here because it’s required to successfully test your tweens. Scrubbing through the Timeline is adequate, but it can’t effectively show easing and doesn’t give you an accurate picture of how your tweens look. By testing your file, you can see if any tweaks are required and adjust any tween values as needed.
Rather than just including this script as is, a brief explanation will follow. However, expect to learn and retain more about this code in the next chapter. For now, type this script into frame 99 of the actions layer. It’s fine if you want to wait to look over the script after reading Chapter 6, but even a vague understanding of how this code works may make it easier to grasp when covering more detail later:
1 var nextSection:String;
2
3 navigation.home.addEventListener(MouseEvent.CLICK, onNavigate);
4 navigation.gallery.addEventListener(MouseEvent.CLICK, onNavigate);
5 navigation.lab.addEventListener(MouseEvent.CLICK, onNavigate);
6 navigation.help.addEventListener(MouseEvent.CLICK, onNavigate);
7
8 function onNavigate(evt:MouseEvent):void {
9     nextSection = evt.target.name;
10    play();
11 }
Here’s a cursory look at how this script functions, with a more detailed explanation to follow in Chapter 6. Line 1 creates the variable that will hold the desired portfolio destination each time the user clicks a button.
Lines 3 through 6 assign specific code (lines 8 through 11) to each button. The buttons are named home, gallery, lab, and help, and all reside inside the navigation movie clip. The code is executed when the user clicks on the button. The click event includes both actions of pressing the mouse button down (mouse down) and releasing it (mouse up).
Finally, after each user interaction, the script can tell which button was chosen because it was the target of the user’s mouse click. The name of that button is put into the destination variable and the playhead is set in motion.
When the playhead reaches the end of the section, the frame script you created earlier sends the playhead to the frame label that has the same name as the clicked button.
You’ve put a lot of effort into the project this chapter, so it’s time to test your work. You should now be able to click any of the four navigation buttons and start the wheel rotating. After the motion blur fades in and out, the wheel should stop rotating on the desired frame.
So far, you’ve only created content for the Home and Lab sections, and haven’t yet powered the Lab section with ActionScript. However, if you can successfully revisit the Home and Lab screens, your script is likely working. A further indication of success, when visiting the empty Gallery and Help screens, is that the rotation of the wheel changes with each section. Between the four sections, and including the art visible between frames as the wheel rotates, you should see the entire wheel.
Again, if you want to, compare your work to the online portfolio at the companion website, or to the portfolio_06_02.fla source file.
The next chapter will serve primarily as a primer for the ActionScript language, so no new work will be added to the portfolio project. However, the chapter will not be void of project progress. You will review the ActionScript you’ve learned so far and revisit the button navigation script you just added, as well as the script used in the Home screen assets you created in Chapter 1 and Chapter 2.