
In this chapter, we will redevelop the Controller application that we developed in the previous chapter and call it Controller2. We will, however, develop it as a service to be run on the Clayster Internet of Things platform. In this way, we can compare the work that was required to develop it as a standalone application with the effort that is required to create it as a service running on an IoT platform. We can also compare the results and see what additional benefits we will receive by running our service in an environment where much that is required for a final product already exists.
We will start the download of the Clayster platform by downloading its version meant for private use from http://www.clayster.com/downloads.
Before you are able to download the platform, the page will ask you to fill in a few personal details and a working e-mail address. When the form is filled, an e-mail will be sent to you to confirm the address. Once the e-mail address has been confirmed, a distribution of the platform will be built for you, which will contain your personal information. When this is done, a second e-mail will be sent to you that will contain a link to the distribution along with instructions on how to install it on different operating systems.
Note
In our examples available for download, we have assumed that you will install Clayster platform on a Windows machine in the C:DownloadsClaysterSmall folder. This is not a requirement. If you install it in another folder or on another operating system, you might have to update the references to Clayster Libraries in the source code for the code to compile.
All the information about Clayster, including examples and tutorials, is available in a wiki. You can access this wiki at https://wiki.clayster.com/.
Creating a service project differs a little from how we created projects in the previous chapters. Appendix A, Console Applications outlines the process to create a simple console application. When we create a service for a service platform, the executable EXE file already exists. Therefore, we have to create a library project instead and make sure that the target framework corresponds to the version of the Clayster distribution (.NET 3.5 at the time of writing this book). Such a project will generate a dynamic link library (DLL) file. During startup, the Clayster executable file will load any DLL file it finds marked as a Clayster Module in its installation folder or any of its subfolders.
The Clayster distribution and runtime environment already contains all Clayster libraries. When we add references to these libraries from our project, we must make sure to use the libraries available in the Clayster distribution from the installation folder, instead of using the libraries that we used previously in this book. This will ensure that the project uses the correct libraries. Apart from the libraries used previously, there are a few new libraries available in the Clayster distribution that are new to us, and which we will need:
Clayster.AppServer.Infrastructure: This library contains the application engine available in the platform. Apart from managing applications, it also provides report tools, cluster support, management support for operators and administrators; it manages backups, imports, exports, localization and various data sources used in IoT, and it also provides rendering support for different types of GUIs, among other things.Clayster.Library.Abstract: This library contains a data abstraction layer, and is a crucial tool for the efficient management of objects in the system.Clayster.Library.Installation: This library defines the concept of packages.Clayster.Library.Meters: This library replaces theClayster.Library.IoTlibrary used in previous chapters. It contains an abstraction model for things such as sensors, actuators, controllers, meters, and so on.
Apart from the libraries, we will also add two additional references to the project—this time to two service modules available in the distribution, which are as follows:
Clayster.HomeApp.MomentaryValues: This is a simple service that displays momentary values using gauges. We will use this project to display gauges of our sensor values.Clayster.Metering.Xmpp: This module contains an implementation of XMPP on top of the abstraction model defined in theClayster.Library.Metersznamespace. It does everything we did in the previous chapter and more.
Not all DLLs will be loaded by Clayster. It will only load the DLLs that are marked as Clayster modules. There are three requirements for a DLL to be considered as a Clayster module:
- The module must be CLS-compliant.
- It must be marked as a Clayster module.
- It must contain a public certificate with information about the developer.
Tip
There are a lot of online services that allow you to create simple self-signed certificates. One such service can be found at www.getacert.com.
All these things can be accomplished through the AssemblyInfo.cs file, available in each .NET project. Enforcing CLS compliance is easy. All you need to do is add the CLSCompliant assembly attribute, defined in the System namespace, as follows:
using System;
[assembly: CLSCompliant(true)]
This will make sure that the compiler creates warnings every time it finds a construct that is not CLS-compliant.
The two last items can be obtained by adding a public (possibly self-generated) certificate as an embedded resource to the project and referencing it using the Certificate assembly attribute, defined in the Clayster.Library.Installation library, as follows:
[assembly: Certificate("LearningIoT.cer")]Note
This certificate is not used for identification or security reasons. Since it is embedded into the code, it is simple to extract. It is only used as a means to mark the module as a Clayster module and provide information about the developer, so that module-specific data is stored appropriately and locally in an intuitive folder structure.
There are different ways in which you can execute a service. In a commercial installation, a service can be hosted by different types of hosts such as a web server host, a Windows service host or a standalone executable host. While the first two types are simpler to monitor and maintain in a production environment, the latter is much easier to work with during development. The service can also be hosted in a cluster of servers.
The small Clayster distribution you've downloaded contains a slightly smaller version of the standalone executable host that can be run on Mono. It is executed in a terminal window and displays logged events. It loads any Clayster modules found in its folder or any of its subfolders. If you copy the resulting DLL file to the Clayster installation folder, you can simply execute the service by starting the standalone server from Windows, as follows:
Clayster.AppServer.Mono.Standalone
If you run the application from Linux, you can execute it as follows:
$ sudo mono Clayster.AppServer.Mono.Standalone.exe
Instead of manually copying the service file and any other associated project files, such as content files, the developer can create a package manifest file describing the files included in the package. This makes the package easier to install and distribute. In our example, we only have one application file, and so our manifest file becomes particularly simple to write. We will create a new file and call it Controller2.packagemanifest. We will write the following into this new file and make sure that it is marked as a content file:
<?xml version="1.0" encoding="utf-8" ?>
<ServicePackageManifest
xmlns="http://clayster.com/schema/ServicePackageManifest/v1.xsd">
  <ApplicationFiles>
    <ApplicationFile file="Controller2.dll"/>
  </ApplicationFiles>
</ServicePackageManifest>
Tip
You can find more information on how to write package manifest file can be found at https://wiki.clayster.com/mediawiki/index.php?title=Service_Package_Manifest_File.
Now that we have a package manifest file, we can install the package and execute the standalone server from the command line in one go. For a Windows system we can use the following command:
Clayster.AppServer.Mono.Standalone –i Controller2.packagemanifest
On a Linux system the standalone server can be executed using the following command:
$ sudo mono Clayster.AppServer.Mono.Standalone.exe –i Controller2.packagemanifest
Before loading the server and executing the particular service, the executable file analyzes the package manifest file and copies all the files to the location where they belong.
If you are working with the professional version of Visual Studio, you can execute the service directly from the IDE. This will allow you to debug the code directly from the IDE. To do this, you need to open the properties by right-clicking on the project in the Solution Explorer and go to the Debug tab. As a Start Action, choose the Start external program option. There you need to search for the Clayster.AppServer.Mono.Standalone.exe file and enter -i Controller2.packagemanifest on the command line arguments box. Now you can execute and debug the service directly from the IDE.
The Clayster system does many things automatically for us that we have manually done earlier. For instance, it maintains a local object database, configures a web server, configures mail settings, connects to an XMPP server, creates an account, registers with a Thing Registry and provisioning server, and so on. However, we need to provide some details manually for this to work. We will do this by editing the Clayster.AppServer.Infrastructure.Settings.xml file.
In Raspberry Pi, we will do this with the following command:
$ sudo nano Clayster.AppServer.Infrastructure.Settings.xml
The file structure is already defined. All we need to do is provide values for the SmtpSettings element so that the system can send e-mails. We can also take this opportunity to validate our choice of XMPP server in the XmppServerSettings element, which by default is set to thingk.me, and our HTTP server settings, which are stored in the HttpServerSettings and HttpCacheSettings elements.
Tip
You can find more detailed information about how to set up the system at https://wiki.clayster.com/mediawiki/index.php?title=Clayster_Setting_Up_Index.
Clayster comes with a management tool that helps you to manage the server. This Clayster Management Tool (CMT), can also be downloaded from http://www.clayster.com/downloads.
Apart from the settings file described in the previous section, all other settings are available from the CMT. This includes data sources, objects in the object database, current activities, statistics and reports, and data in readable event logs.
When the CMT starts, it will prompt you for connection details. Enter a name for your connection and provide the IP address of your Raspberry Pi (or localhost if it is running on your local machine). The default user name is Admin, and the default password is the blank password. Default port numbers will also be provided.
A typical login window that appears when CMT starts will looks like the following screenshot:
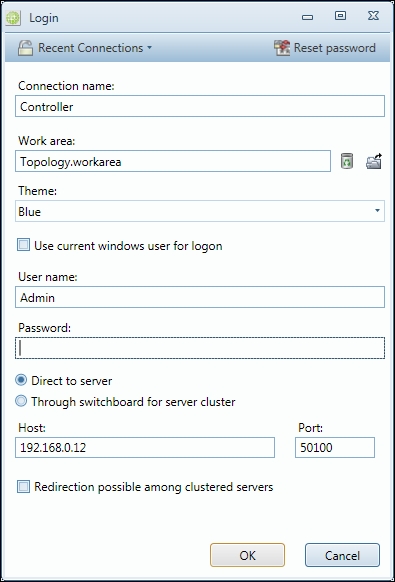
Login window in CMT
Most of the configurable data in Clayster is ordered into data sources. These can be either tree-structured, flat or singular data sources. Singular data sources contain only one object. Flat data sources contain a list (ordered or unordered) of objects. Tree structured data sources contain a tree structure of objects, where each object in the structure represents a node. The tree-structured data sources are the most common, and they are also often stored as XML files. Objects in such data sources can be edited directly in the corresponding XML file, or indirectly through the CMT, other applications or any of the other available APIs.
When you open the CMT for the first time, make sure that you open the Topology data source. It is a tree-structured data source whose nodes represent IoT devices. The tree structure shows how they are connected to the system. The Root represents the server itself.
In the following example, we can see the system (Root) connected to an XMPP Server (via an account). Through this account, five entities can be accessed (as "friends"). Our sensor, actuator, and camera are available and online (marked in green). Our thing registrar app is a connection, but is not currently online. We are also connected to a Thing Registry and provisioning service. Each node adds its functionality to the system.
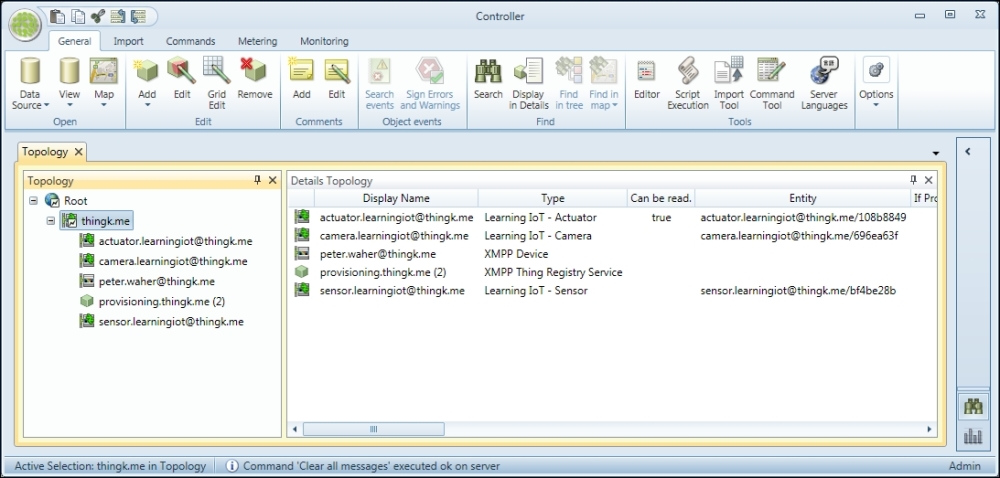
Displaying the Topology data source in CMT
In the CMT, you can view, modify, delete, import, and export all objects in these data sources. Apart from the Topology data source, there are a lot of other available data sources. Make sure that you familiarize yourself with them.