
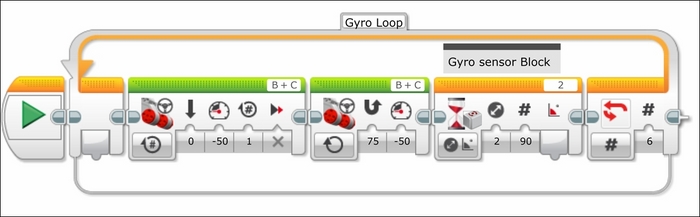
Now we will repeat this exercise using the Gyro Sensor that comes with the Educational Version of the EV3 kit. If you have the Home version, you might consider buying the LEGO Gyro Sensor or the Gyro or Compass sensor from HiTechnic or other third-party vendors. You can buy the LEGO EV3 Gyro Sensor directly from LEGO, part number 45505, for about $30. In the following screenshot, you can see that the loop is the same except we will use a move to turn while steering until the Wait block is triggered by a change in state of the Gyro Sensor by 90 degrees:
Before you run the program, you need to make sure the robot is absolutely still. It is critical to calibrate the Gyro Sensor. You can do this either by unplugging it and plugging it back in while the robot is stationary, or by changing the mode of the Gyro Sensor. You can change the mode using Port View or by writing this into your program. We can now run this program. If you notice that your Gyro values keep changing even though the robot is not moving, this means the gyro needs to be calibrated.
The Gyro Sensor detects rotational speed. You can use the EV3 software to calculate the angle or measure the angular speed. Using the Gyro Sensor will allow you to quickly make accurate turns. The Gyro will drift over time, so it is a good idea to reset the Gyro when using it in your programs. Including a Reset Gyro block and calibrating the Gyro Sensor are both good ideas when using the Gyro Sensor.
With both dead reckoning and the Gyro Sensor, you will notice that, using this simple code, the robot does not make a perfect square. This is because you are asking the robot to stop exactly at a discrete signal, by which time it is too late because of the inertia of the robot. In the remaining sections, we will optimize the motion of the robot and program the robot to steer around obstacles.
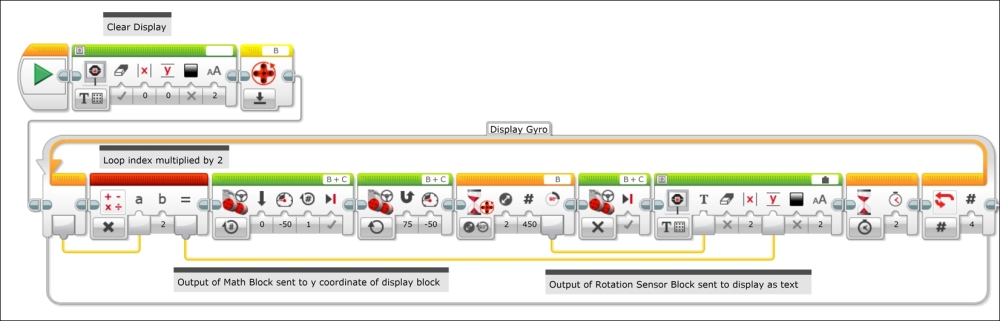
We want to diagnose why the robot is not turning in a perfect square. We will alter our program from the previous section by having the robot display on the screen what angle the sensor is currently reading, as you can see in the following screenshot:

In the following steps, we will write a program to troubleshoot why the robot is not turning in a perfect square.
- Before the Loop, clear the EV3 display screen with a Display block.
- Set the Display block to Text and replace the word Mindstorms with an empty space.
- Follow the Display block with a reset Gyro block to nullify the Gyro Sensor.
- Reduce the number of iterations of the Loop block to
4iterations. - Inside the Loop, add a Move block set to stop after the Wait for the Gyro block.
- Place a Display block set to Text Grid mode with the erase input unchecked.
- Add a Wait block (for 2 seconds) to allow you time to read the angle.
- Draw a wire from the angle output plug of the Wait Gyro block to the text input plug of the Display block. Although the Wait block executes upon changes in 90 degrees, the output plug will send the value of the angle measurement after it has stopped. If you were to execute the program now, you would find that the displayed text would overlap. We can control the placement of text on the screen using the index counter of our loop.
- Create a Math block at the beginning of the loop that will multiply numbers by 2.
- Run a wire from the Loop index to the Math block.
- Run a wire from the output of the Math block to the Y coordinate input of the Display block.
As the loop runs through subsequent iterations, the index increases and so will the placement of text on the display screen.
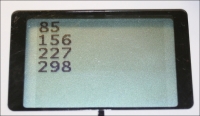
When you look at the numbers on the brick display, you will find that on each turn, the robot may be overshooting the turn. This is because the robot does not begin stopping until it reaches 90 degrees. And as it overshoots each turn, these errors build on each other to create a path that is anything but a perfect square.
One challenge in using dead reckoning is to figure out the relationship between the change to rotation of the wheels and the change in rotation of the robot itself. Now, let's examine a similar program using the Motor Rotation sensor of one of the drive motors. It is better to measure the quantity of rotations for the motor on the outside of the turn since this motor undergoes a larger number of rotations. The Motor Rotation sensor has been reset at the beginning of the program. The Wait for sensor block uses the Motor Rotation sensor instead of the Gyro Sensor. The Move block does not have an output plug from the rotation sensor, so we had to use the output plug of Wait for the sensor block.
Of course, if your robot is connected to your computer via Bluetooth or Wi-Fi, you could read the value of the rotation sensor on the Port View of your computer. It is also a useful technique in using dead reckoning to have the robot move forward in a straight line to determine the change in the rotation sensor reading.