
In the EV3 tutorials (embedded in the EV3 LEGO MINDSTORMS software), they present an example of messaging where feedback from the shaft encoders of a motor on the master robot will make the slave robot move. However, the feedback in the tutorial programs takes position readings from the motor on the master robot. This is very similar to a knob on a remote control being used to make your robot move. I will instead use power values so that we can emulate the speed of the master robot.
In the following example, I used two similar robots. The robots do not need to be identical, but will need to have the right motor plugged into port B and the left motor into port C. I used two of the caster-bots from our earlier chapters. In this program, when you push the master robot along a surface, the slave1 robot will emulate the motions.
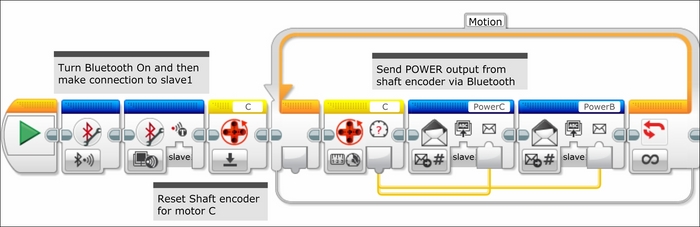
In the following screenshot is the program to be downloaded onto the master robot. The program begins by turning on the brick's Bluetooth with the Bluetooth Communication On block. Next, the program prepares a line of communication between the master robot and the slave1 robot with the Bluetooth Communication Initiate block. Note that this allows the master robot to send messages to the slave1 robot, but does not prepare the master robot to receive messages. You need to type the correct name of the receiving robot in this block. After resetting the shaft encoder on motor C with the Motor Rotation block, we enter the infinite Loop block called Motion. The current power values are sent from the Motor Rotation block to the Message Send Numeric blocks. I have chosen to have one signal for each motor. Although I am just making the robot move backwards and forwards in this chapter, having separate motor messages sets up the option for you to modify the code for giving navigation instructions.
The program for the slave robot is quite simple as you can see in the following screenshot. We start out by turning on the brick's Bluetooth. Inside the Loop block, we can see the program repeatedly accepts power current value messages from the Messaging Receive Numeric block and sends them to the Move Tank On block.

Because these are the actual current power values measured by the shaft encoder on the master robot, the slave robot does an efficient job of emulating the motion of the other robot.
A lot of the current robotics research is geared towards developing autonomous vehicles. A large part of that research is in collision avoidance and making sure the cars do not come into contact with each other. In the following program, we will try to maintain a fixed distance between the two robots using a proportional algorithm. If you remember, in Chapter 8, Advanced Programming and Control, when we first introduced the use of the proportional controller with the Ultrasonic Sensor, it was relative to a fixed target. This is analogous to the problem of stopping at a dark line on the ground using the Color Sensor. The problem of maintaining a fixed distance to a moving target is more akin to line tracking.
We will use the same slave program as we used in the Follow the leader section. All of the magic will happen in the program on the master robot. You will need to mount an Ultrasonic Sensor pointing backwards on your master robot. You can plug the motion sensor into port 4 on the master robot. This will be used to detect how far away the slave robot is. There will be two parallel sequences, one sequence for communication with the slave, and the other sequence to control the motion of the master robot.
We begin the control sequence as follows:
- Define the Variable blocks with values for the gain and setpoint distance in our proportional controller.
- Next the Bluetooth Connection blocks initiate a connection to the slave robot.
- Then our Distance Sensing Loop block will send messages to the slave robot so that a constant distance between the robots can be maintained.
- Inside the Loop block, the Advanced Math block computes the difference between the Ultrasonic Sensor block value and the value for the setpoint distance, and multiplies this difference by the gain.
- This power level is sent to the slave robot by the Messaging blocks.
A simple challenge would be to add in another variable for the speed of the master robot into this algorithm, so the robot is not always playing catch up.
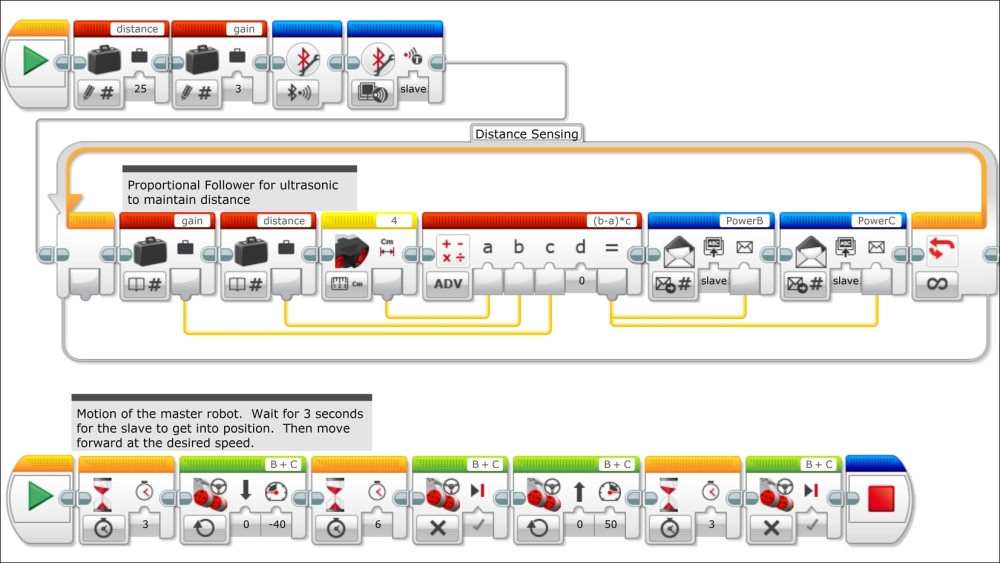
The second sequence controls the motion of the master robot. We begin with a Wait Time block in order to allow the slave robot a few seconds to catch up with the master robot. Then we have the master robot move forward for several seconds, stop, and then move backwards. Again, you should start the program on the slave robot first. When you run the programs, you can play around with the value for the gain and distance variables. You can try to create new situations to simulate traffic on a highway. As an added challenge, you could add in a proportional line tracker to both robots and have them track a line while maintaining a fixed distance.
In the following program, we will use two robots to try and find a target. Without knowing where the target is, each robot will travel outwards and look for a target. When the target is found, the other robot will join the robot that found the target. If neither one finds the target, both robots return to their starting positions.
If you extend this model to multiple robots, we have a branch of robotics called swarming. How can you use multiple autonomous robots to find an unknown target in two-dimensional (or three-dimensional) space? The uses start from basic vacuum cleaner robots up to flying autonomous quad-copters finding lost hikers and forest fires.
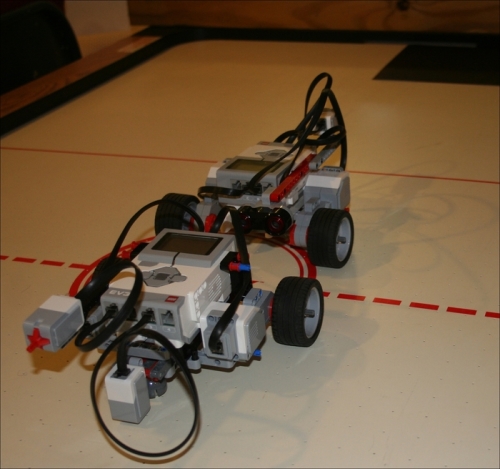
In this particular example, you should place two identical robots back to back, as you can see in the preceding image. Mount each robot with a Color Sensor pointed downwards to look for the target. In the preceding image, most of the terrain was a white surface. But as you can see in the following image, the target is a black sheet of paper. At the front of each robot, place a Touch Sensor. When the Touch Sensor hits a barrier, it will trigger the Color Sensor to measure the color on the surface below it. Place a colored target before the barrier in only one direction.

On both robots, the Touch Sensor is plugged into port 1, and the Color Sensor is plugged into port 3. The Ultrasonic Sensor is not needed for this program, but is left over from the Maintain a distance section's program.
Let's start out by examining the program for the slave robot. There are two parallel sequences in this program, as you can see in the following screenshot. The first sequence receives movement instructions from the master robot. This is similar to the Slave Loop block from the earlier programs, except now I am using a Move Steering block to simplify the programming.
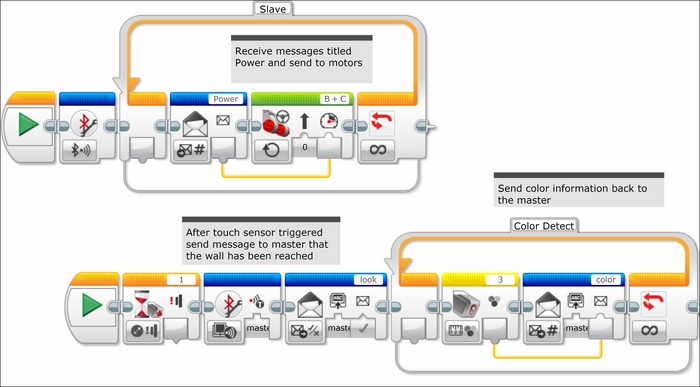
The second sequence sends information back to the master robot in the following manner:
- This sequence begins only once the Touch Sensor on the slave robot has been triggered by the Wait Touch Sensor Change block.
- What is different is that now the Bluetooth Communication Initiate block prepares the master robot to receive messages back from slave1.
- Next, a Messaging Send Logic block sends back a Boolean true statement called
lookto the master. This allows the master to know that the slave robot has reached the wall and is now sending color information. - The Color Detect Loop block will constantly send readings from the value of the Color Sensor Measuring block back to the master via the Messaging Send Numeric block.
To simplify the program on the master robot, I have used several My Blocks on the third of three parallel sequences, as you can see in the following screenshot:
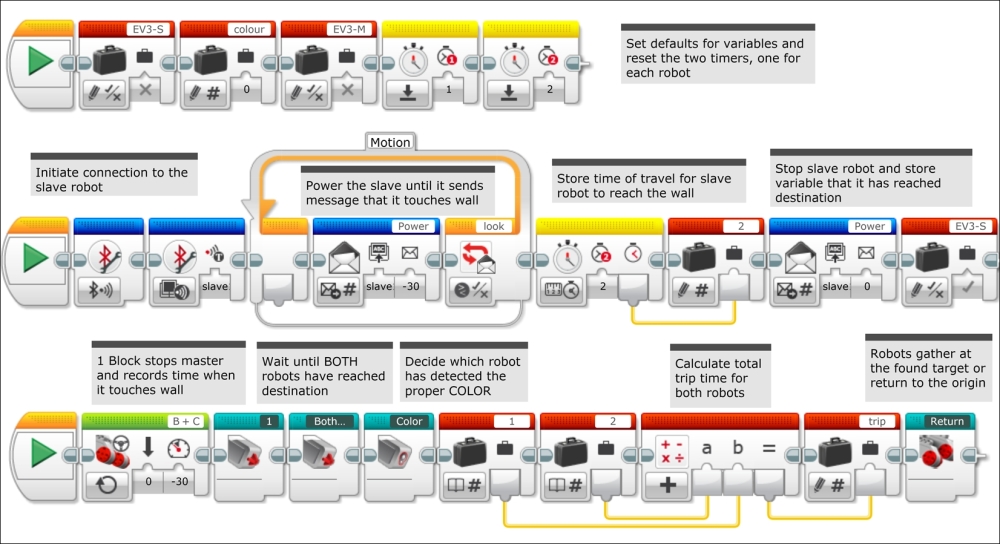
The first sequence defines default values for several variables and resets some sensor values. We begin by setting the Boolean Logic Variable blocks EV3-M and EV3-S to false (M for master and S for slave). These variables keep track of when the Touch Sensor on each robot has been triggered, and will change to true after their respective Touch Sensors have been depressed. The Numeric Variable block color keeps track of which robot has detected the target. The default value of 0 indicates that neither robot has detected the target. A value of 1 will indicate the master has detected the target, and a value of 2 will indicate that slave1 has detected the target. A new sensor we have not discussed before is the Timer Sensor block. You can actually have up to eight individual Timer Sensors all running independently. We are going to use two different Timer Sensors. We will use one Timer Sensor to measure the travel time it takes to reach the wall for each robot. We use the Reset Timer block to zero these timers at the beginning of the program.
The second sequence will send motion control commands to the slave robot in addition to keeping track of the travel time for the slave robot. We begin the thread by initiating communication with the slave robot. Notice that we have a Loop Messaging Compare block. Inside the block is the command for the slave robot to move forward. The trigger to break this loop is given when the Boolean true statement is received from the messaging send logic block called look on the slave robot. Next, the travel time of the slave robot is recorded by sending the value of the Timer Measure block 2 to the Numeric Variable block called 2. Finally, a Messaging Send Numeric block commands the slave to stop, and the Boolean Variable EV3-S is changed to true to indicate that the slave has reached the barrier.
The third sequence stops the master robot at the wall and makes a color measurement. It then decides which robot has found the target and where the robots should rendezvous. I have simplified the third sequence using several My Blocks as follows:
- After the master robot has been set in motion, the first
1My Block stops the master robot once it has reached the barrier and records the travel time. - The Both Touch My Block checks to see whether both robots have reached their respective barriers.
- The Color My Block decides which robot has found the target, if either of them has found the target.
- Next, a Math block calculates the sum of the individual trip times of each individual robot.
- Finally, the Return My Block decides on the rendezvous point.
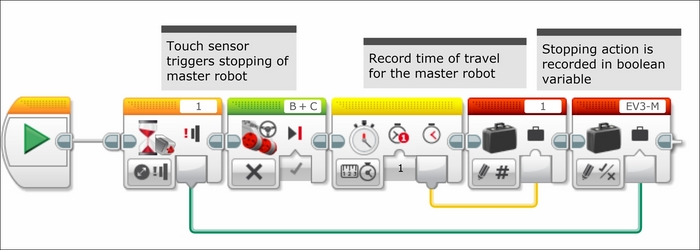
In the following screenshot, if we look inside of the 1 My Block, we can see that the master robot waits for a change of state of the Touch Sensor and then stops the robot. At this point, the Timer Measure Time 1 block sends its value to the Numeric Variable block 1 to record the duration of the travel time for the master robot. Additionally, a true statement is sent to the Boolean Logic Variable block EV3-M to record that the master robot has reached the barrier.
In the following screenshot, we can see inside of the Both Touch My Block. This is a Boolean Logic Loop that continues to loop until it receives a true statement from the Logic Operations And block. This only becomes true once both the Logic Variable block EV3-M and the Logic Variable Block EV3-S are turned to true. As the Logic Variable block EV3-S is changed in a parallel sequence, this pauses the third sequence until the slave robot has reached the barrier.

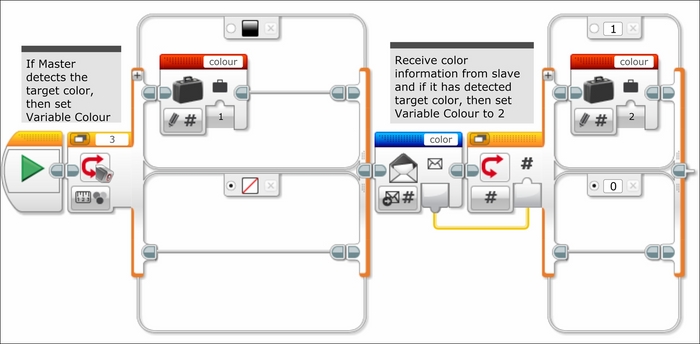
In the following screenshot, we can see inside of the Color My Block. This My Block will decide whether the target has been detected and adjust the Numeric Variable block colour appropriately. Remember, the default value for the Numeric Variable block colour is 0, which indicates that the target has not been found. The Switch Color Sensor block will measure the color type from the Color Sensor on the master. If the measured color is the color of the target, then the Numeric Variable block colour will be set to 1 to indicate that the master has found the target. We are not used to seeing a Messaging Receive block on the master, but this block receives the value of the slave's Color Sensor and sends it to the Switch Numeric block. Each color has a coded number, and if that number matches (in this case 1 for black), then the Numeric Variable block colour will be set to 2 to indicate that the slave has found the target.
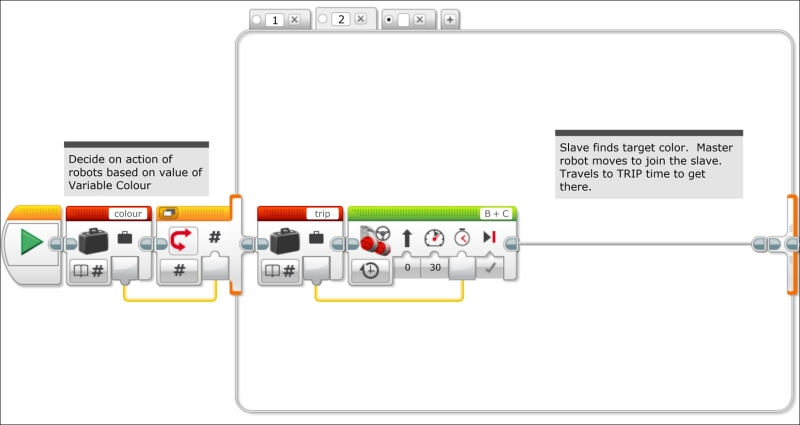
Now that we have decided whether the target has been found, we can choose a course of action for our robots. In the following three screenshots, we can see inside of the Return My Block. The value of the Numeric Variable block Colour will be sent to a Switch Numeric block, which we are viewing in the tabbed view. In the following screenshot, the choice for tab 1 is displayed:
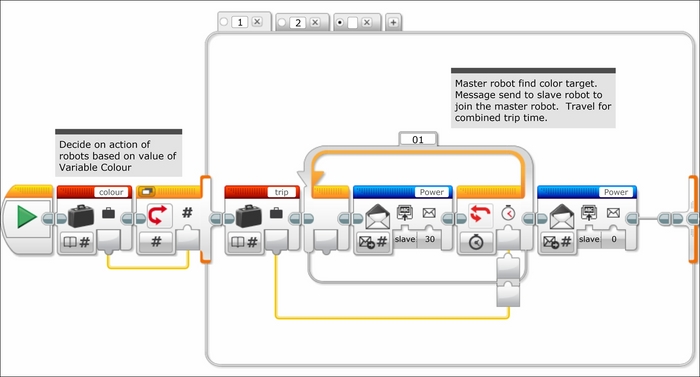
We will now examine each of the three choices in our switch block. Each case in the switch block will execute a series of commands based on which robot has discovered the target.
Choice 1 indicates that the master has found the robot. Thus, a command is sent to the slave to join the master robot. The motor commands are sent to the slave robot for an amount of time that is the value of the Numeric Variable trip. The value of the trip is the sum of the amount of time it takes for both robots to reach their respective targets. In this way, we can approximate the amount of time it will take for one robot to return.
In the following screenshot, we can see tab 2, which is the case for when the slave finds the target. Similarly, the travel time is again dictated by the Numeric Variable trip.
The default case is when neither robot finds the target. In this case, both robots will return back to where they started. In the following screenshot, you can see the separate motion commands for each robot, but the duration of each respective return trip mirrors how much time it took to reach their destination.

Once the robots have returned to the origin, you could send the robots out again to try and acquire the target. You could extend this idea to multiple robots, which is the concept of the swarm.